1
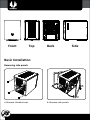
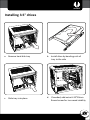
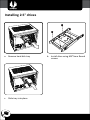
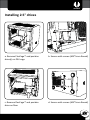
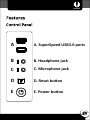
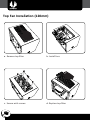
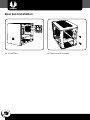
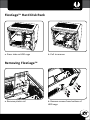
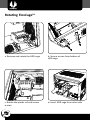
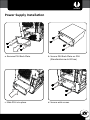
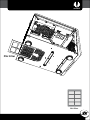
Quick Installation Guide
Box Contents
•
Phenom Mini-ITX Case
•
Phenom Mini-ITX Quick Installation Guide
o Accessories:
5.25" drive bay adapter: x 1
Cable Clip: x 1
o Screws:
Thumbscrews M3: x 4 (For 5.25" drive bay adapter)
Standard Screw 6-32 Hex: x 4 (For PSU)
Standard Screw 6-32*6mm Flat: x 7 (For MB)
Standard Screw 6-32*10mm Round: x 5 (For securing HDD trays)
Standard Screw M3*5mm Round: x 12 (For 2.5" SSD)
* Contents and specifications subject to change without notice.
01
Front
Top
Back
Side
Basic Installation
Removing side panels
a
b
a. Remove thumbscrews
02
b. Remove side panels
Installing 3.5" drives
a. Remove hard disk tray
b. Install drive by bending rails of
tray to the side
c. Slide tray into place
d. If needed, add extra 6-32*10mm
Round screw for increased stability
03
Installing 2.5" drives
a. Remove hard disk tray
c. Slide tray into place
04
b. Install drive using M3*5mm Round
screws
Installing 2.5" drives
a. Remove FlexCage™ and position
drive(s) on PSU cage
b. Secure with screws (M3*5mm Round)
c. Remove FlexCage™ and position
drive on floor
d. Secure with screws (M3*5mm Round)
05
Installing 2.5" drives
a. Slide drives into place
06
b. Secure with screws (M3*5mm Round)
A
A. SuperSpeed USB3.0 ports
B
B. Headphone jack
C
C. Microphone jack
D
D. Reset button
E
E. Power button
07
Top Fan Installation (120mm)
a. Remove top filter
b. Install fans
c. Secure with screws
d. Replace top filter
08
Front Fan Installation
a. Remove front panel by pushing
tabs from inside chassis
b. Install fans (If necessary, remove
FlexCage™)
c. Secure with screws
09
Rear Fan Installation
a. Install fan
10
b. Secure with screws
FlexCage™ Hard Disk Rack
a. Press tabs on HDD cage
b. Pull to remove
Removing FlexCage™
a. Remove plastic rail
b. Remove screws from bottom of
HDD cage
11
Rotating FlexCage™
a. Remove and rotate the HDD cage
b. Secure screws from bottom of
HDD cage
a
b
c. Rotate the plastic rail and secure
screws
12
d. Insert HDD cage from other side
Power Supply Installation
a. Remove PSU Back Plate
b. Secure PSU Back Plate on PSU
(Standardscrew 6-32 hex)
c. Slide PSU into place
d. Secure with screws
13
Installing 5.25" drive bay adapter
A
B
a. Install device using M3*5mm Round
screws
b. Use A or B depending on device
c. Slide tray into place
d. Secure with screws
(Thumbscrews M3)
14
PSU Filter
PSU Filter
15
Bitfenix Co., Ltd.
3F, No.79, Sec. 1, Xintai 5th Rd.,
Xi Zhi District, New Taipei City, Taiwan, R.O.C.
For the most updated information, please visit our official website: http://www.bitfenix.com
© 2013 BITFENIX Co., Ltd. All Rights Reserved. All trademarks are registered to their respective owners.
Ver 1.0 : 2013/09
16