1
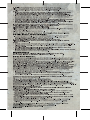
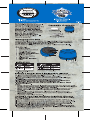
Register
Your Product At:
www.hmdxaudio.com
Your valuable input regarding this
product will help us create
the products you will WIRELESS
want in the future. SPEAKER
Instruction Manual
| year and Warranty
limited warranty Information
Por manual de instrucciones e il У | | i И | A
información de garantía en español i За ДЕ |
visitenos en wwwhmaxaudio. com Package Contents a
Thank you forspreading the я
Jam and purchasing the fA
HMDX Jam Plus Wireless . 7
Speaker. Be sure to check = user Manual 4
out the entire JAM product —
line on our website: Gels ms
www.hmdxaudio.com — «=
Where there's a Jam a
there's a party! Charging Cord
TTT Charging the Unit Z
Approximately 3 hours required for full charge. Can be charged : de
by using the USB to Micro USB cord (included) through computer =“
or AC adapter with USB jack (not included).
Note: Battery will last up to 4 hours win connected ИНОЕ
a
Controls
Power Button
Speaker Mode Switch
Charging Port
Line-In Audio Jack
Battery Status Indicator
Volume Down
Play/Pause Button
Volume Up
Bluetooth® Indicator
Jam?
WOW o AU NU IB бо ко —
—
>
Indicators i A
Battery Bluetooth
Status Status
Indicator Indicator
Solid Red Charging Quickly Flashes BLUE | Pairing Mode
Slow Blinking | Low Battery Slowly Flashes BLUE | Paired
Red RED Line-In Mode
Note: When unit is fully charged
Redlight will be off,
Pairing a Single Jam Plus Speaker (Mono)
To listen to your music over Bluetooth® wireless connection, you need
to pair your device with Jam Plus:
1. Make sure your device has Bluetooth? capability.
2. es and hold power button for 5 seconds; indicator will begin
to flash.
3. Follow the instructions of your device to pair ‘the unit.
- 4. Pair your device with the unit by selecting JAM PLUS from your
‘Bluetooth® listings on your device or selecting YES.
5. Press play on your device and use controls on the unit to adjust
desired volume.
NOTE:
* Once you have successfully paired your device, you may not need
to repeat the above steps. Please ensure the AUX cable is unplugged
and your device has been Bluetooth? enabled.
DU * When using only one Jam Plus, make sure that the switch is set to = -т-ттот
+ Mono. You will not be able to pair with the speaker if it is set to y
sE or a
* When pairing with a computer, please consult your computer
manufacturer for Bluetooth? pairing instructions and/or the latest
Bluetooth? Drivers.
* A pairing code is not required.
Pairing 2 Jam Plus speakers together (Stereo)
To pair 2 Jam Plus speakers together for stereo sound please follow
the below steps:
Turn 1 speaker over and move the speaker mode switch to L.
Tum the other speaker over and move the speaker mode switch fo R.
Press and hold power button for 5 seconds on one speaker.
Press and hold power button for 5 seconds on other speaker.
Speakers will begin to pair together automatically.
. Paring process can take up to 30 seconds — once you hear the
steel drum tone and the Jam? indicator light begins to slowly flash,
you may pair to your device.
OHR ON
7. Follow the instructions of your device to pair the unit.
8. Pair your device with the unit by selecting Jam? from your
Bluetooth? listings on your device or selecting YES.
NOTE:
If you do not see Jam? as an option on your device, you may have
only paired 1 speaker. Turn off both units and repeat steps 1-8.
You cannot pair more than one set of Jam Plus speakers together.
If you are using two Jam Plus speakers in Stereo (Jam? Mode), in order
fo use them in Mono mode, turn off the unit and move the switch on
the bottom to the center Mono position.
When 2 Jam Plus speakers are paired in Stereo (Jam? Mode), and you
turn off 1 speaker, the 2nd speaker will turn off automatically.
For balancing the volume level on the speakers, maximize volume
on both units and control volume through device.
If you experience connection issues or distortion when pairing 2
Jam Plus speakers please follow the below steps:
1. Tum power “OFF” on both Jam Plus units.
2. Turn power “ON” on both Jam Plus units.
3. Speakers will begin to pair together automatically. Wait for pairing
to complete.
4. Pair the units again to your device.
Listening to your device through the Auxiliary
Line-In Audio Jack (MONO)
1. Connect Aux cable to the headphone or Line-Out Jack of an
audio device and plug the other end of the cable into the
Line-In Audio Jack on the back of the unit.
2. Press and hold the power buttons to turn on the unit.
3. Press PLAY on the device and use controls on the unit to adjust
desired volume.
NOTE:
* When connected through an AUX cable only one speaker will play.
* Play/pause controls on Jam Plus will not work when using Line-In
Audio Jack.
To clear the pairing history, press the play/pause button and the
power button simultaneously for 5 seconds.
In the event the speaker controls are not operable, press reset on the
bottom of the unit to reset the speaker.
Maintenance
Only use a soft dry cloth to clean the enclosure of the unit.
NEVER use liquids or abrasive cleaner to clean.
FCC Disclaimer:
Note: This device complies with part 15 of the FCC Rules. Operation is subject to the
following two conditions: (1) This device may not cause harmful interference, and
(2) this device must accept any interference received, including interference that
may cause undesired operation.
Note: This equipment has been tested and found to comply with the limits for a Class
B digital device, pursuant to part 15 of the FCC Rules. These limits are designed to
provide reasonable protection against hdrmful interference in a residential
installation. This equipment generates, uses and can radiate radio frequency energy
and, if not installed and used in accordance with the instructions, may cause
harmful interference to radio communications. However, there is no guarantee that
interference will not occur in a particular installation. If this equipment does cause
harmful interference to radio or television reception, which can be determined by
turning the equipment off and on, the user is encouraged to try to correct the
interference by one or more of the following measures:
Reorient or relocate the receiving antenna.
Increase the separation between the equipment and receiver.
Connect the equipment into an outlet on a circuit different from that to which the
receiver is connected.
Consult the dealer or an experienced radio/TV technician for help.
Changes or modifications not expressly approved by HMDX could void the user's
authority to operate the equipment.
One Year Limited Warranty:
For detailed Warranty Instructions and Information visit:
hitp://www.hmdxaudio.com/prod /jam-wireles bl ker.html
To obtain warranty service on your HMDX product, contact a Consumer Relations
Representative by telephone at 1-800-753-3000 or email cservi com
for assistance. Please make sure to have the model number of the product available.
Representatives are available 8:30am - 7:00pm EST Monday-Friday.
IMPORTANT SAFEGUARDS:
When using an electrical product, basic precautions should always be followed,
including the following:
READ ALL INSTRUCTIONS BEFORE USING
* WARNING: Do not place speakers too close to ears. May cause damage fo ear
drums, especially in young children.
* Use this product only for its intended use as described in this manual. Do not
use attachments not recommended by HMDX.
* HMDX is not liable for any damage caused fo Smartphones, iPod/MP3 player or any
other device.
* Do not place or store this product where it can fall or be dropped into a tub or sink.
* Do not place or drop into water or any other liquid.
* Not for use by children. THIS IS NOT A TOY.
* Never operate this product if it has a damaged cord, plug, cable or housing.
* Keep away from heated surfaces.
* Only set on dry surfaces. Do not place on surface wet from water or cleaning
solvents.
Por manual de instrucciones e Información de garantia en espanol visitenos
en www.hmdxaudio.com
HMDX Jam and HMDX are trademarks of HMDX.
©2013 HMDX. All Rights Reserved.
IB-HXP240