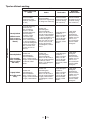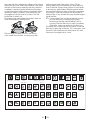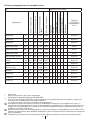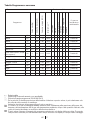
1
Washing Machine
Waschmaschine
Πλυντήριο Ρούχων
Lavatrice
WNF 7301 WE20
WNF 7321 AE20
WNF 7341 AE20
WNF 7361 AE20
User‘s Manual
Bedienungsanleitung
Εγχειρίδιο Χρήστη
Manuale utente
1 Important safety instructions
•
This section contains safety instructions that will
help protect from risk of personal injury or property
damage. Failure to follow these instructions shall void
any warranty.
•
General safety
•
•
•
•
•
•
•
•
•
•
•
•
•
•
•
This product should not be used by persons
with physical, sensory or mental disorders or
unlearned or inexperienced people (including
children) unless they are attended by a person
who will be responsible for their safety or who
will instruct them accordingly for use of the
product.
Never place the product on a carpet-covered
floor; otherwise, lack of airflow beneath the
machine will cause electrical parts to overheat.
This will cause problems with your product.
Do not operate the product if the power cable
/ plug is damaged. Call the Authorized Service
Agent.
Have a qualified electrician connect a
16-Ampere fuse to the installation location of
the product.
If the product has a failure, it should not be
operated unless it is repaired by the Authorized
Service Agent. There is the risk of electric shock!
This product is designed to resume operating
in the event of powering on after a power
interruption. If you wish to cancel the
programme, see "Cancelling the programme"
section.
Connect the product to a grounded outlet
protected by a fuse complying with the values
in the "Technical specifications" table. Do not
neglect to have the grounding installation made
by a qualified electrician. Our company shall
not be liable for any damages that will arise
when the product is used without grounding in
accordance with the local regulations.
The water supply and draining hoses must be
securely fastened and remain undamaged.
Otherwise, there is the risk of water leakage.
Never open the loading door or remove the filter
while there is still water in the drum. Otherwise,
risk of flooding and injury from hot water will
occur.
Do not force open the locked loading door. The
loading door will be ready to open just a few
minutes after the washing cycle comes to an
end. In case of forcing the loading door to open,
the door and the lock mechanism may get
damaged.
Unplug the product when not in use.
Never wash the product by spreading or
pouring water onto it! There is the risk of electric
shock!
Never touch the plug with wet hands! Never
unplug by pulling on the cable, always pull out
by grabbing the plug.
Use detergents, softeners and supplements
suitable for automatic washing machines only.
Follow the instructions on the textile tags and on
the detergent package.
2
The product must be unplugged during
installation, maintenance, cleaning and repairing
procedures.
Always have the installation and repairing
procedures carried out by the Authorized
Service Agent. Manufacturer shall not be
held liable for damages that may arise from
procedures carried out by unauthorized
persons.
Intended use
•
•
•
This product has been designed for domestic
use. It is not suitable for commercial use and it
must not be used out of its intended use.
The product must only be used for washing and
rinsing of laundry that are marked accordingly.
The manufacturer waives any responsibility
arisen from incorrect usage or transportation.
Children's safety
•
•
•
Electrical products are dangerous for the
children. Keep children away from the product
when it is in use. Do not let them to tamper with
the product. Use child lock to prevent children
from intervening with the product.
Do not forget to close the loading door when
leaving the room where the product is located.
Store all detergents and additives in a safe place
away from the reach of the children.
2 Installation
Refer to the nearest Authorised Service Agent for
installation of the product. To make the product ready
for use, review the information in the user manual
and make sure that the electricity, tap water supply
and water drainage systems are appropriate before
calling the Authorized Service Agent. If they are not,
call a qualified technician and plumber to have any
necessary arrangements carried out.
of the location and electrical, tap
C Preparation
water and waste water installations at the place
of installation is under customer's responsibility.
Installation and electrical connections of the
B product
must be carried out by the Authorized
Service Agent. Manufacturer shall not be
held liable for damages that may arise from
procedures carried out by unauthorized
persons.
Prior to installation, visually check if the product
A has
any defects on it. If so, do not have it
installed. Damaged products cause risks for
your safety.
sure that the water inlet and discharge
C Make
hoses as well as the power cable are not
folded, pinched or crushed while pushing the
product into its place after installation or cleaning
procedures.
Appropriate installation location
•
•
EN
Place the machine on a rigid floor. Do not place
it on a long pile rug or similar surfaces.
Total weight of the washing machine and the
dryer -with full load- when they are placed
on top of each other reaches to approx. 180
kilograms. Place the product on a solid and flat
floor that has sufficient load carrying capacity!
•
•
•
Do not place the product on the power cable.
Do not install the product at places where
temperature may fall below 0ºC.
Place the product at least 1 cm away from the
edges of other furniture.
Removing packaging reinforcement
Tilt the machine backwards to remove the packaging
reinforcement. Remove the packaging reinforcement
by pulling the ribbon.
Removing the transportation locks
Do not remove the transportation locks before
A taking
out the packaging reinforcement.
Remove the transportation safety bolts before
A operating
the washing machine, otherwise, the
Ensure that the cold and hot water connections
A are
made correctly when installing the product.
product will be damaged.
1. Loosen all the bolts with a spanner until they
rotate freely (C).
2. Remove transportation safety bolts by turning
them gently.
3. Attach the plastic covers supplied in the User
Manual bag into the holes on the rear panel. (P)
the transportation safety bolts in a safe
C Keep
place to reuse when the washing machine
needs to be moved again in the future.
move the product without the
C Never
transportation safety bolts properly fixed in
place!
Connecting water supply
water supply pressure required to run the
C The
product is between 1 to 10 bars (0.1 – 10 MPa).
It is necessary to have 10 – 80 liters of water
flowing from the fully open tap in one minute
to have your machine run smoothly. Attach a
pressure reducing valve if water pressure is
higher.
you are going to use the double water-inlet
C Ifproduct
as a single (cold) water-inlet unit, you
must install the supplied stopper to the hot
water valve before operating the product.
(Applies for the products supplied with a blind
stopper group.)
you want to use both water inlets of the
C Ifproduct,
connect the hot water hose after
removing the stopper and gasket group from
the hot water valve. (Applies for the products
supplied with a blind stopper group.)
Models with a single water inlet should not be
A connected
to the hot water tap. In such a case
the laundry will get damaged or the product will
switch to protection mode and will not operate.
Do not use old or used water inlet hoses on
A the
new product. It may cause stains on your
laundry.
1. Connect the special hoses supplied with the
product to the water inlets on the product. Red
hose (left) (max. 90 ºC) is for hot water inlet, blue
hose (right) (max. 25 ºC) is for cold water inlet.
3
Otherwise, your laundry will come out hot at the
end of the washing process and wear out.
2. Tighten all hose nuts by hand. Never use a
wrench when tightening the nuts.
3. Open the taps completely after making the
hose connection to check for water leaks at
the connection points. If any leaks occur, turn
off the tap and remove the nut. Retighten the
nut carefully after checking the seal. To prevent
water leakages and damages caused by them,
keep the taps closed when the machine is not
in use.
Connecting to the drain
•
The end of the drain hose must be directly
connected to the wastewater drain or to the
washbasin.
Your house will be flooded if the hose comes
A out
of its housing during water discharge.
Moreover, there is risk of scalding due to
high washing temperatures! To prevent such
situations and to ensure smooth water intake
and discharge of the machine, fix the end of the
discharge hose tightly so that it cannot come
out.
• The hose should be attached to a height of at
least 40 cm, and 100 cm at most.
• In case the hose is elevated after laying it on
the floor level or close to the ground (less than
40 cm above the ground), water discharge
becomes more difficult and the laundry may
come out excessively wet. Therefore, follow the
heights described in the figure.
EN
Do not use any tools to loosen the lock nuts.
A Otherwise,
they will get damaged.
Electrical connection
•
•
•
To prevent flowing of dirty water back into the
machine and to allow for easy discharge, do
not immerse the hose end into the dirty water or
drive it in the drain more than 15 cm. If it is too
long, cut it short.
The end of the hose should not be bent, it
should not be stepped on and the hose must
not be pinched between the drain and the
machine.
If the length of the hose is too short, use it by
adding an original extension hose. Length of the
hose may not be longer than 3.2 m. To avoid
water leak failures, the connection between
the extension hose and the drain hose of the
product must be fitted well with an appropriate
clamp as not to come off and leak.
Adjusting the feet
In order to ensure that the product operates
A more
silent and vibration-free, it must stand level
and balanced on its feet. Balance the machine
by adjusting the feet. Otherwise, the product
may move from its place and cause crushing
and vibration problems.
Connect the product to a grounded outlet protected
by a fuse complying with the values in the "Technical
specifications" table. Our company shall not be liable
for any damages that will arise when the product is
used without grounding in accordance with the local
regulations.
• Connection must comply with national
regulations.
• Power cable plug must be within easy reach
after installation.
• The voltage and allowed fuse or breaker
protection are specified in the “Technical
specifications” section. If the current value of
the fuse or breaker in the house is less than 16
Amps, have a qualified electrician install a 16
Amp fuse.
• The specified voltage must be equal to your
mains voltage.
• Do not make connections via extension cables
or multi-plugs.
Damaged power cables must be replaced by
B the
Authorized Service Agents.
First use
Before starting to use the product, make sure
that all preparations are made in accordance
with the instructions in sections "Important safety
instructions" and "Installation".
To prepare the product for washing laundry, perform
first operation in Drum Cleaning programme. If
your machine is not featured with Drum Cleaning
programme, use Cottons-90 programme and select
Additional Water or Extra Rinse auxiliary functions
as well. Before starting the programme, put max.
100 g of powder anti-limescale into the main wash
detergent compartment (compartment nr. II). If the
anti-limescale is in tablet form, put only one tablet
into compartment nr. II. Dry the inside of the bellow
with a clean piece of cloth after the programme has
come to an end.
1. Loosen the lock nuts on the feet by hand.
2. Adjust the feet until the product stands level and
balanced.
3. Tighten all lock nuts again by hand.
an anti-limescale suitable for the washing
C Use
machines.
water might have remained in the
C Some
product due to the quality control processes in
4
EN
the production. It is not harmful for the product.
Disposing of packaging material
Packaging materials are dangerous to children. Keep
packaging materials in a safe place away from reach
of the children.
Packaging materials of the product are
manufactured from recyclable materials. Dispose of
them properly and sort in accordance with recycled
waste instructions. Do not dispose of them with
normal domestic waste.
Transportation of the product
Unplug the product before transporting it. Remove
water drain and water supply connections. Drain
the remaining water in the product completely; see,
"Draining remaining water and cleaning the pump
filter". Install transportation safety bolts in the reverse
order of removal procedure; see, "Removing the
transportation locks".
move the product without the
C Never
transportation safety bolts properly fixed in
place!
Disposing of the old product
Dispose of the old product in an environmentally
friendly manner.
Refer to your local dealer or solid waste collection
centre in your area to learn how to dispose of your
product.
For children's safety, cut the power cable and break
the locking mechanism of the loading door so that it
will be nonfunctional before disposing of the product.
3 Preparation
Things to be done for energy saving
Following information will help you use the product in
an ecological and energy-efficient manner.
• Operate the product in the highest capacity
allowed by the programme you have selected,
but do not overload; see, "Programme and
consumption table".
• Always follow the instructions on the detergent
packaging.
• Wash slightly soiled laundry at low temperatures.
• Use faster programmes for small quantities of
lightly soiled laundry.
• Do not use prewash and high temperatures for
laundry that is not heavily soiled or stained.
• If you plan to dry your laundry in a dryer, select
the highest spin speed recommended during
washing process.
• Do not use detergent in excess of the amount
recommended on the detergent package.
Sorting the laundry
•
•
Sort laundry according to type of fabric, colour,
and degree of soiling and allowable water
temperature.
Always obey the instructions given on the
garment tags.
laundry bag or pillow case.
• Take out all substances in the pockets such as
coins, pens and paper clips, and turn pockets
inside out and brush. Such objects may
damage the product or cause noise problem.
• Put small size clothes such as infant's socks
and nylon stockings in a laundry bag or pillow
case.
• Place curtains in without compressing them.
Remove curtain attachment items.
• Fasten zippers, sew loose buttons and mend
rips and tears.
• Wash “machine washable” or “hand washable”
labeled products only with an appropriate
programme.
• Do not wash colours and whites together. New,
dark coloured cottons release a lot of dye. Wash
them separately.
• Tough stains must be treated properly before
washing. If unsure, check with a dry cleaner.
• Use only dyes/colour changers and limescale
removers suitable for machine wash. Always
follow the instructions on the package.
• Wash trousers and delicate laundry turned inside
out.
• Keep laundry items made of Angora wool in the
freezer for a few hours before washing. This will
reduce pilling.
• Laundry that are subjected to materials such as
flour, lime dust, milk powder, etc. intensely must
be shaken off before placing into the machine.
Such dusts and powders on the laundry may
build up on the inner parts of the machine in
time and can cause damage.
Correct load capacity
The maximum load capacity depends on the type
of laundry, the degree of soiling and the washing
programme desired.
The machine automatically adjusts the amount of
water according to the weight of the loaded laundry.
Follow the information in the “Programme
A and
consumption table”. When overloaded,
machine's washing performance will drop.
Moreover, noise and vibration problems may
occur.
Loading the laundry
•
•
•
Open the loading door.
Place laundry items loosely into the machine.
Push the loading door to close until you hear a
locking sound. Ensure that no items are caught
in the door.
loading door is locked while a programme
C The
is running. The door can only be opened a while
after the programme comes to an end.
In case of misplacing the laundry, noise and
A vibration
problems may occur in the machine.
Preparing laundry for washing
•
Laundry items with metal attachments such as,
underwired bras, belt buckles or metal buttons
will damage the machine. Remove the metal
pieces or wash the clothes by putting them in a
5
EN
Using detergent and softener
Detergent Drawer
The detergent drawer is composed of three
compartments:
- (I) for prewash
- (II) for main wash
– (III) for softener
– (*) in addition, there is siphon piece in the softener
compartment.
3 2
1
3
2 1
detergent dispenser may be in two different
CThe
types according to the model of your machine
as seen above.
Detergent, softener and other cleaning agents
• Add detergent and softener before starting the
washing programme.
• Never open the detergent drawer while the
washing programme is running!
• When using a programme without prewash,
do not put any detergent into the prewash
compartment (compartment nr. I).
• In a programme with prewash, do not put
liquid detergent into the prewash compartment
(compartment nr. I).
• Do not select a programme with prewash if you
are using a detergent bag or dispensing ball.
Place the detergent bag or the dispensing ball
directly among the laundry in the machine.
• If you are using liquid detergent, do not forget
to place the liquid detergent cup into the main
wash compartment (compartment nr. II).
Choosing the detergent type
The type of detergent to be used depends on the
type and colour of the fabric.
• Use different detergents for coloured and white
laundry.
• Wash your delicate clothes only with special
detergents (liquid detergent, wool shampoo,
etc.) used solely for delicate clothes.
• When washing dark coloured clothes and quilts,
it is recommended to use liquid detergent.
• Wash woolens with special detergent made
specifically for woolens.
Use only detergents manufactured specifically
A for
washing machines.
Do not use soap powder.
A
Adjusting detergent amount
The amount of washing detergent to be used
depends on the amount of laundry, the degree of
soiling and water hardness. Read the manufacturer's
instructions on the detergent package carefully and
follow the dosage values.
• Do not use amounts exceeding the dosage
quantities recommended on the detergent
package to avoid problems of excessive
6
foam, poor rinsing, financial savings and finally,
environmental protection.
• Use lesser detergent for small amounts or lightly
soiled clothes.
• Use concentrated detergents in the
recommended dosage.
Using softeners
Pour the softener into the softener compartment of
the detergent drawer.
• Use the dosages recommended on the
package.
• Do not exceed the (>max<) level marking in the
softener compartment.
• If the softener has lost its fluidity, dilute it with
water before putting it in the detergent drawer.
Using liquid detergents
If the product contains a liquid detergent cup:
• Make sure that you have placed the liquid
detergent cup in compartment nr. "II".
• Use the detergent manufacturer's measuring
cup and follow the instructions on the package.
• Use the dosages recommended on the
package.
• If the liquid detergent has lost its fluidity, dilute it
with water before putting in the detergent cup.
If the product does not contain a liquid
detergent cup:
• Do not use liquid detergent for the prewash in a
programme with prewash.
• Use the detergent manufacturer's measuring
cup and follow the instructions on the package.
• Liquid detergent stains your clothes when used
with Delayed Start function. If you are going to
use the Delayed Start function, do not use liquid
detergent.
Using gel and tablet detergent
When using tablet, gel, etc. detergents, read the
manufacturer's instructions on the detergent
package carefully and follow the dosage values. If
there is not any instruction on the package, apply the
following.
• If the gel detergent thickness is fluidal and
your machine does not contain a special liquid
detergent cup, put the gel detergent into the
main wash detergent compartment during first
water intake. If your machine contains a liquid
detergent cup, fill the detergent into this cup
before starting the programme.
• If the gel detergent thickness is not fluidal or in
the shape of capsule liquid tablet, put it directly
into the drum before washing.
• Put tablet detergents into the main wash
compartment (compartment nr. II) or directly into
EN
the drum before washing.
detergents may leave residues in the
C Tablet
detergent compartment. If you encounter such
a case, place the tablet detergent between the
laundry, close to the lower part of the drum in
future washings.
the tablet or gel detergent without selecting
C Use
the prewash function.
Using starch
• Add liquid starch, powder starch or the dyestuff
into the softener compartment as instructed on
the package.
• Do not use softener and starch together in a
washing cycle.
• Wipe the inside of the machine with a damp and
clean cloth after using starch.
Using bleaches
• Select a programme with prewash and add
the bleaching agent at the beginning of the
prewash. Do not put detergent in the prewash
compartment. As an alternative application,
select a programme with extra rinse and add
the bleaching agent while the machine is taking
water from the detergent compartment during
first rinsing step.
• Do not use bleaching agent and detergent by
mixing them.
• Use just a little amount (approx. 50 ml) of
bleaching agent and rinse the clothes very
well as it causes skin irritation. Do not pour the
bleaching agent onto the clothes and do not use
it for coloured clothes.
• When using oxygen based bleaches, follow
the instructions on the package and select a
programme that washes at a lower temperature.
• Oxygen based bleaches can be used together
with detergents; however, if its thickness is not
the same with the detergent, put the detergent
first into the compartment nr. "II" in the detergent
drawer and wait until the detergent flows
while the machine is taking in water. Add the
bleaching agent from the same compartment
while the machine is still taking in water.
Using limescale remover
• When required, use limescale removers
manufactured specifically for washing machines
only.
• Always follow instructions on the package.
7
EN
Tips for efficient washing
Clothes
Light colours and
whites
Colors
Dark colors
Delicates/
Woolens/Silks
(Recommended
temperature range based
on soiling level: cold-40C)
(Recommended
temperature range
based on soiling
level: cold-40C)
(Recommended
temperature range
based on soiling
level: cold-30C)
It may be necessary
to pre-treat the
stains of perform
prewash. Powder
and liquid detergents
Heavily Soiled recommended
for whites can be
(difficult stains used at dosages
such as grass, recommended for
coffee, fruits and heavily soiled clothes.
It is recommended to
blood.)
use powder detergents
to clean clay and soil
stains and the stains
that are sensitive to
bleaches.
Powder and
liquid detergents
recommended for
colours can be used at
dosages recommended
for heavily soiled clothes.
It is recommended to use
powder detergents to
clean clay and soil stains
and the stains that are
sensitive to bleaches.
Use detergents without
bleach.
Liquid detergents
suitable for
colours and dark
colours can be
used at dosages
recommended
for heavily soiled
clothes.
Prefer liquid
detergents
produced for
delicate clothes.
Woollen and silk
clothes must
be washed with
special woollen
detergents.
Powder and
liquid detergents
recommended for
(For example,
whites can be used at
stains caused by dosages recommended
body on collars for normally soiled
and cuffs)
clothes.
Powder and
liquid detergents
recommended for
colours can be used at
dosages recommended
for normally soiled
clothes. Use detergents
without bleach.
Liquid detergents
suitable for
colours and dark
colours can be
used at dosages
recommended
for normally soiled
clothes.
Prefer liquid
detergents
produced for
delicate clothes.
Woollen and silk
clothes must
be washed with
special woollen
detergents.
Powder and
liquid detergents
Lightly Soiled
recommended for
(No visible stains whites can be used at
dosages recommended
exist.)
for lightly soiled clothes.
Powder and
liquid detergents
recommended for
colours can be used at
dosages recommended
for lightly soiled clothes.
Use detergents without
bleach.
Liquid detergents
suitable for
colours and dark
colours can be
used at dosages
recommended
for lightly soiled
clothes.
Prefer liquid
detergents
produced for
delicate clothes.
Woollen and silk
clothes must
be washed with
special woollen
detergents.
Soiling Level
(Recommended
temperature range
based on soiling level:
40-90C)
Normally Soiled
8
EN
4 Operating the product
Control panel
1
2
8
1 - Programme Selection knob (Uppermost
position On / Off)
2 - Display
3 - Delayed Start button
4 - Programme Follow-up indicator
Make sure that the hoses are connected tightly. Plug
in your machine. Turn the tap on completely. Place
the laundry in the machine. Add detergent and
fabric softener.
Programme selection
60˚C
Normally soiled, coloured, fade proof
cottons or synthetic clothes (shirt,
nightgown, pajamas, etc.) and lightly
soiled white linens (underwear, etc.)
40˚C30˚CCold
Blended laundry including delicate
textile (veil curtains, etc.), synthetics and
woolens.
5
select the lowest required temperature.
C Always
Higher temperature means higher power
consumption.
further programme details, see "Programme
C For
and consumption table".
Main programmes
1. Select the programme suitable for the type,
quantity and soiling degree of the laundry
in accordance with the "Programme and
consumption table" and the temperature table
below.
Heavily soiled white cottons and linens.
(coffee table covers, tableclothes,
towels, bed sheets, etc.)
6
4
5 - Start / Pause button
6 - Auxiliary Function buttons
7 - Spin Speed Adjustment button
8 - Temperature Adjustment button
Preparing the machine
90˚C
7
3
2. Select the desired programme with the
Programme Selection button.
are limited with the highest spin
C Programmes
speed appropriate for that particular type of
fabric.
selecting a programme, always consider
C When
the type of fabric, colour, degree of soiling and
permissible water temperature.
9
Depending on the type of fabric, use the following
main programmes.
• Cottons
Use this programme for your cotton laundry (such
as bed sheets, duvet and pillowcase sets, towels,
bathrobes, underwear, etc.). Your laundry will be
washed with vigorous washing action for a longer
washing cycle.
• Synthetics
Use this programme to wash your synthetic
clothes (shirts, blouses, synthetic/cotton blends,
etc.). It washes with a gentle action and has a
shorter washing cycle compared to the Cottons
programme.
For curtains and tulle, use the Synthetic 40˚C
programme with prewash and anti-creasing
functions selected. As their meshed texture causes
excessive foaming, wash the veils/tulle by putting
little amount of detergent into the main wash
compartment. Do not put detergent in the prewash
compartment.
• Woollens
Use this programme to wash your woolen clothes.
Select the appropriate temperature complying with
the tags of your clothes. Use appropriate detergents
for woolens.
EN
Additional programmes
For special cases, additional programmes are
available in the machine.
programmes may differ according to
C Additional
the model of the machine.
• Cotton Economic
You may wash your normally soiled durable cotton
and linen laundry in this programme with the highest
energy and water saving compared to all other
wash programmes suitable for cottons. Actual water
temperature may differ from the declared cycle
temperature. Programme duration may automatically
be shortened during later stages of the programme
if you wash less amount (e.g. ½ capacity or less) of
laundry. In this case energy and water consumption
will be further decreased giving you the opportunity
for a more economical wash. This feature is available
for certain models having remaining time display.
• Hand wash
Use this programme to wash your woolen/delicate
clothes that bear “not machine- washable” tags and
for which hand wash is recommended. It washes
laundry with a very gentle washing action to not to
damage clothes.
• Super short express
Use this programme to wash your little amount of
lightly soiled cotton clothes in a short time.
• Dark wash
Use this programme to wash your dark coloured
laundry or the laundry that you do not want it get
faded. Washing is performed with little mechanic
action and at low temperatures. It is recommended
to use liquid detergent or woolen shampoo for dark
coloured laundry.
• Shirts
Use this programme to wash the shirts made of
cotton, synthetic and synthetic blended fabrics
together.
• Sports
Use this programme to wash your garments that
are worn for a short time such as sportswear. It is
suitable to wash little amount of cotton / synthetic
blended garments.
Temperature selection
Whenever a new programme is selected, the
recommended temperature for the selected
programme appears on the temperature indicator.
To decrease the temperature, press the Temperature
Adjustment button. Temperature will decrease
gradually.
the programme has not reached the heating
C Ifstep,
you can change the temperature without
switching the machine to Pause mode.
Spin speed selection
Whenever a new programme is selected, the
recommended spin speed of the selected
programme is displayed on the spin speed indicator.
To decrease the spin speed, press the Spin Speed
Adjustment button. Spin speed decreases gradually.
Then, depending on the model of the product,
"Rinse Hold" and "No Spin" options appear on the
display. See "Auxiliary function selection" section for
explanations of these options.
the programme has not reached the spinning
C Ifstep,
you can change the speed without
switching the machine to Pause mode.
Special programmes
For specific applications, select any of the following
programmes.
• Rinse
Use this programme when you want to rinse or
starch separately.
• Spin + Drain
Use this programme to apply an additional spin cycle
for your laundry or to drain the water in the machine.
Before selecting this programme, select the desired
spin speed and press Start / Pause button. First, the
machine will drain the water inside of it. Then, it will
spin the laundry with the set spin speed and drain the
water coming out of them.
If you wish to drain only the water without spinning
your laundry, select the Pump+Spin programme
and then select the No Spin function with the help of
Spin Speed Adjustment button. Press Start / Pause
button.
C Use a lower spin speed for delicate laundries.
10
EN
Programme and consumption table
EN
Auxiliary functions
Max. Load (kg)
Water Consumption (l)
Energy Consumption (kWh)
Max. Speed***
Prewash
Quick Wash
Rinse Plus
Anti-Creasing
Rinse Hold
Soaking
2
Cottons
90
7
74
2.30
1600
•
•
•
•
•
•
Cold-90
Cottons
60
7
70
1.54
1600
•
•
•
•
•
•
Cold-90
Cottons
40
7
69
0.85
1600
•
•
•
•
•
•
Cold-90
Programme
Selectable
temperature
range °C
Cotton Economic
60**
7
44
1.00
1600
•
40-60
Cotton Economic
60**
3.5
38
0.84
1600
•
40-60
Cotton Economic
40**
3.5
38
0.65
1600
Super short express
30
2
50
0.11
1400
Darkwash
40
3.5
66
0.55
800
Sports
40
4
67
0.58
800
Hand wash
30
1
34
0.20
600
Woollens
40
1.5
47
0.34
600
Shirts
60
3.5
60
1.00
600
•
•
•
*
•
•
Cold-60
Synthetics
60
3
55
1.00
800
•
•
•
•
•
•
Cold-60
Synthetics
40
3
55
0.55
800
•
•
•
•
•
•
Cold-60
•
*
•
•
•
•
40-60
•
Cold-30
•
•
•
Cold-40
•
Cold-40
Cold-30
•
•
*
**
***
•
Cold-40
Selectable
Automatically selected, no canceling.
Energy Label programme (EN 60456 Ed.3)
If maximum spin speed of the machine is lower then this value, you can only select up to the maximum
spin speed.
and power consumption may vary subject to the changes in water pressure, water hardness and
C Water
temperature, ambient temperature, type and amount of laundry, selection of auxiliary functions and spin
speed, and changes in electric voltage.
can see the washing time of the programme you have selected on the display of the machine. It is
C You
normal that small differences may occur between the time shown on the display and the real washing
time.
C The auxiliary functions in the table may vary according to the model of your machine.
11
EN
Auxiliary function selection
Select the desired auxiliary functions before starting
the programme. Furthermore, you may also select
or cancel auxiliary functions that are suitable to
the running programme without pressing the Start
/ Pause button when the machine is operating.
For this, the machine must be in a step before the
auxiliary function you are going to select or cancel.
If the auxiliary function cannot be selected or
canceled, light of the relevant auxiliary function will
blink 3 times to warn the user.
functions cannot be selected together. If a
C Some
second auxiliary function conflicting with the first
one is selected before starting the machine, the
function selected first will be canceled and the
second auxiliary function selection will remain
active. For example, if you want to select Quick
Wash after you have selected the Prewash,
Prewash will be canceled and Quick Wash will
remain active.
auxiliary function that is not compatible
C An
with the programme cannot be selected. (See
"Programme and consumption table")
Function buttons may vary according to
C Auxiliary
the model of the machine.
• Prewash
A Prewash is only worthwhile for heavily soiled
laundry. Not using the Prewash will save energy,
water, detergent and time.
without detergent is recommended for
C Prewash
tulle and curtains.
• Quick Wash
This function can be used in Cottons and Synthetics
programmes. It decreases the washing times and
also the number of rinsing steps for lightly soiled
laundry.
you select this function, load your
C When
machine with half of the maximum laundry
specified in the programme table.
• Rinse Plus
This function enables the machine to make another
rinsing in addition to the one already made after the
main wash. Thus, the risk for sensitive skins (babies,
allergic skins, etc.) to be effected by the minimal
detergent remnants on the laundry can be reduced.
• Anti-Creasing
This function creases the clothes lesser when they
are being washed. Drum movement is reduced and
spinning speed is limited to prevent creasing. In
addition, washing is done with a higher water level.
• Rinse Hold
If you are not going to unload your clothes
immediately after the programme completes, you
may use rinse hold function to keep your laundry
in the final rinsing water in order to prevent them
from getting wrinkled when there is no water in
the machine. Press Start / Pause button after this
process if you want to drain the water without
spinning your laundry. Programme will resume and
complete after draining the water.
If you want to spin the laundry held in water, adjust
the Spin Speed and press Start / Pause button.
12
The programme resumes. Water is drained, laundry
is spun and the programme is completed.
• Soaking
The Soaking auxiliary function ensures better removal
of stains ingrained into the clothes by holding
them in the detergent water prior to startup of the
programme.
Delayed Start
With the Delayed Start function the startup of the
programme may be delayed up to 19 hours. Delayed
start time can be increased by increments of 1 hour.
not use liquid detergents when you set
C Do
Delayed Start! There is the risk of staining of the
clothes.
Open the loading door, place the laundry and put
detergent, etc. Select the washing programme,
temperature, spin speed and, if required, the auxiliary
functions. Set the desired time by pressing the
Delayed Start button. Press Start / Pause button.
The delayed start time you have set is displayed.
Delayed start countdown starts. “_” symbol next to
the delayed start time moves up and down on the
display.
laundry may be loaded during the
C Additional
delayed start period.
At the end of the countdown, duration of the
selected programme will be displayed. “_” symbol will
disappear and the selected programme will start.
Changing the Delayed Start period
If you want to change the time during countdown:
Press Delayed Start button. Time will increase by 1
hour each time you press the button. If you want to
decrease the delayed start time, press Delayed Start
button repeatedly until the desired delayed start time
appears on the display.
Canceling the Delayed Start function
If you want to cancel the delayed start countdown
and start the programme immediately:
Set the Delayed Start period to zero or turn the
Programme Selection knob to any programme.
Thus, Delayed Start function will be canceled. The
End/Cancel light flashes continuously. Then, select
the programme you want to run again. Press Start /
Pause button to start the programme.
Starting the programme
Press Start / Pause button to start the programme.
Programme follow-up light showing the startup of the
programme will turn on.
no programme is started or no key is pressed
C Ifwithin
1 minute during programme selection
process, the machine will switch to Pause mode
and the illumination level of the temperature,
speed and loading door indicator lights will
decrease. Other indicator lights and indicators
will turn off. Once the Programme Selection
knob is rotated or any button is pressed,
indicator lights and indicators will turn on again.
Child Lock
Use Child Lock function to prevent children from
tampering with the machine. Thus you can avoid any
changes in a running programme.
Programme Selection knob is turned when
C IfthetheChild
Lock is active, "Con" appears on the
EN
display. The Child Lock does not allow any
change in the programmes and the selected
temperature, speed and auxiliary functions.
if another programme is selected with the
C Even
Programme Selection knob while the Child Lock
is active, previously selected programme will
continue running.
To activate the Child Lock:
Press and hold 1st and 2nd Auxiliary Function buttons
for 3 seconds. The lights on the 1st and 2nd Auxiliary
Function buttons will flash, and "C03", "C02", "C01"
will appear on the display respectively while you keep
the buttons pressed for 3 seconds. Then, "Con"
will appear on the display indicating that the Child
Lock is activated. If you press any button or turn the
Programme Selection knob when the Child Lock is
active, same phrase will appear on the display. The
lights on the 1st and 2nd auxiliary function buttons
that are used to deactivate the Child Lock will blink
3 times.
To deactivate the Child Lock:
Press and hold 1st and 2nd auxiliary function buttons
for 3 seconds while any programme is running. The
lights on the 1st and 2nd Auxiliary Function buttons
will flash, and "C03", "C02", "C01" will appear on
the display respectively while you keep the buttons
pressed for 3 seconds. Then, "COFF" will appear
on the display indicating that the Child Lock is
deactivated.
to the method above, to deactivate
C Intheaddition
Child Lock, switch the Programme Selection
knob to On / Off position when no programme is
running, and select another programme.
Lock is not deactivated after power failures
C Child
or when the machine is unplugged.
you switch off the machine by pressing the On
C If/ Off
button when the Child Lock is active and
the machine is running, then the child lock will
be deactivated.
Progress of programme
Progress of a running programme can be followed
from the Programme Follow-up indicator. At the
beginning of every programme step, the relevant
indicator light will turn on and light of the completed
step will turn off.
You can change the auxiliary functions, speed
and temperature settings without stopping the
programme flow while the programme is running.
To do this, the change you are going to make must
be in a step after the running programme step. If the
change is not compatible, relevant lights will flash for
3 times.
the machine does not pass to the spinning
C Ifstep,
Rinse Hold function might be active or the
automatic unbalanced load detection system
might be activated due to the unbalanced
distribution of the laundry in the machine.
Loading door lock
There is a locking system on the loading door of the
machine that prevents opening of the door in cases
when the water level is unsuitable.
Loading door light will start flashing when the
machine is switched to Pause mode. Machine
13
checks the level of the water inside. If the level is
suitable, Loading Door light illuminates steadily within
1-2 minutes and the loading door can be opened.
If the level is unsuitable, Loading Door light turns off
and the loading door cannot be opened. If you are
obliged to open the Loading Door while the Loading
Door light is off, you have to cancel the current
programme; see "Canceling the programme".
Changing the selections after
programme has started
Switching the machine to pause mode
Press the Start / Pause button to switch the machine
to pause mode while a programme is running.
The light of the step which the machine is in starts
flashing in the Programme Follow-up indicator to
show that the machine has been switched to the
pause mode.
Also, when the loading door is ready to be opened,
Loading Door light will also illuminate continuously in
addition to the programme step light.
Changing the speed and temperature settings
for auxiliary functions
Depending on the step the programme has reached,
you may cancel or activate the auxiliary functions;
see, "Auxiliary function selection".
You may also change the speed and temperature
settings; see, "Spin speed selection" and
"Temperature selection".
no change is allowed, the relevant light will
C Ifflash
for 3 times.
Adding or taking out laundry
Press the Start / Pause button to switch the machine
to pause mode. The programme follow-up light of
the relevant step during which the machine was
switched into the pause mode will flash. Wait until
the Loading Door can be opened. Open the Loading
Door and add or take out the laundry. Close the
Loading Door. Make changes in auxiliary functions,
temperature and speed settings if necessary. Press
Start / Pause button to start the machine.
loading door will not open if the water
C The
temperature in the machine is high or the water
level is above the door opening.
Canceling the programme
To cancel the programme, turn the Programme
Selection knob to select another programme.
Previous programme will be canceled. End /
Cancel light will flash continuously to notify that the
programme has been canceled.
Pump function is activated for 1-2 minutes regardless
of the programme step, and whether there is water
in the machine or not. After this period, your machine
will be ready to start with the first step of the new
programme.
on the step where the programme
C Depending
was canceled in, you may have to put detergent
and softener again for the programme you have
selected anew.
you want to open the loading door after you
C Ifhave
cancelled the programme but it is not
possible to open the loading door since the
water level in the machine is above the loading
door opening, then turn the Programme
EN
Selection knob to Pump+Spin programme and
discharge the water in the machine.
End of programme
“End” appears on the display at the end of the
programme. Wait until the loading door light
illuminates steadily. Press On / Off button to switch
off the machine. Take out your laundry and close
the loading door. Your machine is ready for the next
washing cycle.
5 Maintenance and cleaning
Service life of the product extends and frequently
faced problems decrease if cleaned at regular
intervals.
Cleaning the detergent drawer
Clean the detergent drawer at regular intervals (every
4-5 washing cycles) as shown below in order to
prevent accumulation of powder detergent in time.
Press the dotted point on the siphon in the softener
compartment and pull towards you until the
compartment is removed from the machine.
more than normal amount of water and
C Ifsoftener
mixture starts to gather in the softener
compartment, the siphon must be cleaned.
Wash the detergent drawer and the siphon with
plenty of lukewarm water in a washbasin. Wear
protective gloves or use an appropriate brush to
avoid touching of the residues in the drawer with your
skin when cleaning. Insert the drawer back into its
place after cleaning and make sure that it is seated
well.
Cleaning the water intake filters
There is a filter at the end of each water intake valve
at the rear of the machine and also at the end of
each water intake hose where they are connected to
the tap. These filters prevent foreign substances and
dirt in the water to enter the washing machine. Filters
should be cleaned as they do get dirty.
Close the taps. Remove the nuts of the water intake
hoses to access the filters on the water intake valves.
Clean them with an appropriate brush. If the filters are
14
too dirty, take them out by means of pliers and clean
them. Take out the filters on the flat ends of the water
intake hoses together with the gaskets and clean
thoroughly under running water. Replace the gaskets
and filters carefully in their places and tighten the
hose nuts by hand.
Draining remaining water and
cleaning the pump filter
The filter system in your machine prevents solid
items such as buttons, coins and fabric fibers
clogging the pump impeller during discharge of
washing water. Thus, the water will be discharged
without any problem and the service life of the pump
will extend.
If the machine fails to drain water, the pump filter
is clogged. Filter must be cleaned whenever it
is clogged or in every 3 months. Water must be
drained off first to clean the pump filter.
In addition, prior to transporting the machine (eg.,
when moving to another house) and in case of
freezing of the water, water may have to be drained
completely.
Foreign substances left in the pump filter may
A damage
your machine or may cause noise
problem.
In order to clean the dirty filter and discharge the
water:
Unplug the machine to cut off the supply power.
Temperature of the water inside the machine
A may
rise up to 90 ºC. To avoid burning risk, filter
must be cleaned after the water in the machine
cools down.
Open the filter cap.
If the filter cap is composed of two pieces,
press the tab on the filter cap downwards and
pull the piece out towards yourself.
If the filter cap is one piece, pull the cap from both
sides at the top to open.
can remove the filter cover by slightly
C You
pushing downwards with a thin plastic tipped
tool, through the gap above the filter cover. Do
not use metal tipped tools to remove the cover.
Some of our products have emergency draining
hose and some does not have. Follow the steps
below to discharge the water.
Discharging the water when the product has an
emergency draining hose:
Pull the emergency draining hose out from its seat
Place a large container at the end of the hose. Drain
EN
the water into the container by pulling out the plug at
the end of the hose. When the container is full, block
the inlet of the hose by replacing the plug. After the
container is emptied, repeat the above procedure
to drain the water in the machine completely. When
draining of water is finished, close the end by the
plug again and fix the hose in its place. Turn the
pump filter to take it out.
Discharging the water when the product does not
have an emergency draining hose:
Place a large container in front of the filter to
catch water from the filter. Loosen pump filter
Refresh
(Freshen Up)
Eco 20
(Eco Clean)
Machine
Care
(Self Clean)
Lingerie
(anticlockwise) until water starts to flow. Fill the
flowing water into the container you have placed in
front of the filter. Always keep a piece of cloth handy
to absorb any spilled water. When the water inside
the machine is finished, take out the filter completely
by turning it. Clean any residues inside the filter as
well as fibers, if any, around the pump impeller region.
Install the filter.
If your product has a water jet feature, be sure
A to
fit the filter into its housing in the pump.
Never force the filter while installing it into its
housing. Seat the filter into its place completely.
Otherwise, water may leak from the filter cap.
If the filter cap is composed of two pieces, close the
filter cap by pressing on the tab. If it is one piece, seat
the tabs in the lower part into their places first, and
then press the upper part to close.
Mini (Daily
Mini 14
express) (Super short
express)
Half Load
Quick wash
Darkwash
(Darkcare)
Mix
Hand wash
&
Silk
On/Off
Start
Pause
Coton
Synthetics
Woollens
Delicate
Intensive
Sport
Shirt
Duvet
Hygiene
Hand wash
Prewash
Main wash
Rinse plus
Soaking
Anti
creasing
Rinse Hold
No Spin
Spin
Cold
Ready
Wash
End
Child Lock
Cancel 3”
Temparature
Time Delay
Drain
Super
Super Eco
Rinse
Cotton Eco
15
EN
Jean
Mini (Daily
express)
WNF 7361 AE20
WNF 7341 AE20
Models (EN)
WNF 7321 AE20
WNF 7301 WE20
6 Technical specifications
Maximum dry laundry capacity (kg)
7
7
7
7
Height (cm)
84
84
84
84
Width (cm)
60
60
60
60
Depth (cm)
55
55
55
55
Net weight (±4 kg.)
72
72
71
76
10
10
Electrical input (V/Hz)
230 V / 50Hz
Total current (A)
Total power (W)
10
10
2200
Spin speed (rpm max.)
1000
1200
1400
1600
Stand-by mode power (W)
1.35
1.35
1.35
1.35
Off-mode power (W)
0.25
0.25
0.25
0.25
specifications may be changed without prior notice to improve the quality of the product.
C Technical
in this manual are schematic and may not match the product exactly.
C Figures
stated on the product labels or in the documentation accompanying it are obtained in laboratory
C Values
conditions in accordance with the relevant standards. Depending on operational and environmental
conditions of the product, these values may vary.
This appliance’s packaging material is recyclable. Help recycle it and protect the environment
by dropping it off in the municipal receptacles provided for this purpose. Your appliance also
contains a great amount of recyclable material. It is marked with this label to indicate the
used appliances that should not be mixed with other waste. This way, the appliance recycling
organised by your manufacturer will be done under the best possible conditions, in compliance
with European Directive 2002/96/EC on Waste Electrical and Electronic Equipment. Contact your
town hall or your retailer for the used appliance collection points closest to your home. We thank
you doing your part to protect the environment.
16
EN
7 Troubleshooting
Programme cannot be started or selected.
• Washing machine has switched to self protection mode due to a supply problem (line voltage, water
pressure, etc.). >>> Press and hold Start / Pause button for 3 seconds to reset the machine to
factory settings. (See "Canceling the programme")
Water in the machine.
• Some water might have remained in the product due to the quality control processes in the
production. >>> This is not a failure; water is not harmful to the machine.
Machine vibrates or makes noise.
• Machine might be standing unbalanced. >>> Adjust the feet to level the machine.
• A hard substance might have entered into the pump filter. >>> Clean the pump filter.
• Transportation safety bolts are not removed. >>> Remove the transportation safety bolts.
• Laundry quantity in the machine might be too little. >>> Add more laundry to the machine.
• Machine might be overloaded with laundry. >>> Take out some of the laundry from the machine or
distribute the load by hand to balance it homogenously in the machine.
• Machine might be leaning on a rigid item. >>> Make sure that the machine is not leaning on
anything.
Machine stopped shortly after the programme started.
• Machine might have stopped temporarily due to low voltage. >>> It will resume running when the
voltage restores to the normal level.
Programme time does not countdown. (On models with display)
• Timer may stop during water intake. >>> Timer indicator will not countdown until the machine takes
in adequate amount of water. The machine will wait until there is sufficient amount of water to avoid
poor washing results due to lack of water. Timer indicator will resume countdown after this.
• Timer may stop during heating step. >>> Timer indicator will not countdown until the machine
reaches the selected temperature.
• Timer may stop during spinning step. >>> Automatic unbalanced load detection system might be
activated due to the unbalanced distribution of the laundry in the drum.
does not switch to spinning step when the laundry is not evenly distributed in the drum
C Machine
to prevent any damage to the machine and to its surrounding environment. Laundry should be
rearranged and re-spun.
Foam is overflowing from the detergent drawer.
• Too much detergent is used. >>> Mix 1 tablespoonful softener and ½ l water and pour into the main
wash compartment of the detergent drawer.
detergent into the machine suitable for the programmes and maximum loads indicated in the
C Put
“Programme and consumption table”. When you use additional chemicals (stain removers, bleachs
and etc), reduce the amount of detergent.
Laundry remains wet at the end of the programme
• Excessive foam might have occurred and automatic foam absorption system might have been
activated due to too much detergent usage. >>> Use recommended amount of detergent.
does not switch to spinning step when the laundry is not evenly distributed in the drum
C Machine
to prevent any damage to the machine and to its surrounding environment. Laundry should be
rearranged and re-spun.
2820522240_EN/190911.1648
If you cannot eliminate the problem although you follow the instructions in this section, consult your
A dealer
or the Authorized Service Agent. Never try to repair a nonfunctional product yourself.
17
EN
1 Wichtige Hinweise zu Ihrer
Sicherheit
•
In diesem Abschnitt finden Sie Hinweise, die für Ihre
und die Sicherheit anderer Personen unerlässlich sind.
Halten Sie sich unbedingt an diese Hinweise, damit
es nicht zu Verletzungen oder Sachschäden kommt.
Bei Nichteinhaltung dieser Anweisungen erlöschen
sämtliche Garantieansprüche.
Allgemeine Sicherheit
•
•
•
•
•
•
•
•
•
•
•
Dieses Produkt sollte nicht von Personen
genutzt werden, die unter körperlichen oder
geistigen Einschränkungen leiden oder die
nicht über die nötige Erfahrung im Umgang mit
solchen Geräten verfügen – dies gilt auch für
Kinder. Eine Ausnahme kann gemacht werden,
wenn solche Personen von einer kompetenten
Aufsichtsperson gründlich in der Bedienung des
Gerätes unterwiesen und beaufsichtigt werden.
Stellen Sie das Gerät niemals auf Teppichen,
Teppichböden oder ähnlichen Unterlagen auf:
Durch mangelnde Luftzirkulation unterhalb des
Gerätes kann es ansonsten zur Überhitzung
elektrischer Komponenten kommen. Dies kann
zu Problemen mit Ihrem Gerät führen.
Benutzen Sie das Gerät nicht, falls Netzkabel
oder Netzstecker beschädigt sind! Wenden Sie
sich an den autorisierten Kundendienst.
Lassen Sie eine 16 A-Sicherung durch einen
qualifizierten Elektriker installieren, sofern der
Stromanschluss am Aufstellungsort des Gerätes
nicht auf diese Weise abgesichert sein sollte.
Bei Fehlfunktionen darf das Gerät erst dann
wieder in Betrieb genommen werden, nachdem
es durch den autorisierten Kundendienst repariert
wurde. Es besteht Stromschlaggefahr!
Nach einem Stromausfall setzt das Gerät den
Betrieb wieder automatisch fort. Wenn Sie ein
Programm abbrechen möchten, schauen Sie sich
bitte den Abschnitt „Programm abbrechen“ an.
Schließen Sie das Gerät an eine
Schutzkontaktsteckdose an, die mit einer
ausreichend dimensionierten Sicherung
abgesichert wurde – schauen Sie sich dazu die
Tabelle „Technische Daten“ an. Die Installation
der Schutzerde muss grundsätzlich von einem
qualifizierten Elektriker ausgeführt werden. Wir
haften nicht für jegliche Schäden, die durch
mangelhafte, nicht den örtlichen Vorschriften
entsprechende, Erdung entstehen.
Wasserzulauf- und Wasserablaufschläuche
müssen fixiert und dürfen nicht beschädigt
werden. Andernfalls kann Wasser auslaufen.
Öffnen Sie niemals die Tür des Gerätes, nehmen
Sie niemals den Filter heraus, wenn sich noch
Wasser in der Trommel befindet. Andernfalls
besteht Überschwemmungsgefahr und
Verletzungsgefahr durch heißes Wasser.
Versuchen Sie niemals, die Waschmaschinentür
mit Gewalt zu öffnen. Die Waschmaschinentür
lässt sich erst ein paar Minuten nach dem Ende
des Waschzyklus öffnen. Falls Sie versuchen,
die Tür gewaltsam zu öffnen, können Tür und
Sperrmechanismus beschädigt werden.
Ziehen Sie den Netzstecker, wenn Sie das Gerät
19
•
•
•
•
•
nicht benutzen.
Gießen Sie niemals Wasser oder andere
Flüssigkeiten direkt auf das Gerät! Es besteht
Stromschlaggefahr!
Berühren Sie den Stecker niemals mit feuchten
oder gar nassen Händen! Ziehen Sie den
Netzstecker niemals, indem Sie am Kabel ziehen:
Fassen Sie grundsätzlich den Stecker selbst.
Verwenden Sie ausschließlich für
Waschmaschinen geeignete Waschmittel,
Weichspüler und Zusatzstoffe.
Halten Sie sich an die Hinweise auf
Pflegeetiketten und auf der Waschmittelpackung.
Vor Aufstellung, Wartung, Reinigung und vor
Reparaturen muss unbedingt der Netzstecker
gezogen werden.
Lassen Sie Installations- und Reparaturarbeiten
grundsätzlich vom autorisierten Kundendienst
ausführen. Der Hersteller haftet nicht bei
Schäden, die durch den Eingriff nicht autorisierter
Personen entstehen.
Bestimmungsgemäßer Gebrauch
•
•
•
Dieses Produkt wurde für den Hausgebrauch
entwickelt. Es darf nicht für kommerzielle
Zwecke und nicht außerhalb seines
bestimmungsgemäßen Einsatzgebietes
eingesetzt werden.
Das Gerät darf nur zum Waschen und Spülen
von Textilien verwendet werden, die entsprechend
gekennzeichnet sind.
Der Hersteller haftet nicht bei Schäden, die
durch falschen Gebrauch oder unsachgemäßen
Transport entstehen.
Sicherheit von Kindern
•
•
•
Elektrogeräte können für Kinder gefährlich sein.
Halten Sie Kinder im Betrieb daher unbedingt
vom Gerät fern. Lassen Sie Kinder nicht mit dem
Gerät spielen. Nutzen Sie die Kindersicherung,
damit Kinder das Gerät nicht manipulieren
können.
Vergessen Sie nicht, die Tür des Gerätes zu
schließen, wenn Sie den Raum verlassen.
Lagern Sie sämtliche Wasch- und Zusatzmittel an
einem sicheren Ort und außerhalb der Reichweite
von Kindern.
2 Installation/Aufstellung
Lassen Sie Ihr Gerät vom autorisierten Kundendienst
in Ihrer Nähe installieren. Wenn Sie Ihre Maschine
betriebsbereit machen, achten Sie darauf, dass
Wasserzulauf und Wasserablauf in einwandfreiem
Zustand sind (schauen Sie dazu auch in die
Bedienungsanleitung), ehe Sie sich an den
Kundendienst wenden. Falls dies nicht der Fall sein
sollte, lassen Sie die nötigen Arbeiten durch einen
qualifizierten Klempner und/oder Techniker ausführen.
Die Vorbereitung des Aufstellungsortes, der
C Wasserzuund -ableitung sowie des elektrischen
Anschlusses sind Sache des Kunden.
und elektrischer Anschluss des
B Installation
Gerätes müssen vom autorisierten Kundendienst
ausgeführt werden. Der Hersteller haftet nicht bei
Schäden, die durch Aktivitäten nicht autorisierter
Personen entstehen.
DE
Sie das Gerät vor der Installation
A Untersuchen
auf eventuelle, sichtbare Defekte. Falls Defekte
vorliegen, darf das Gerät nicht installiert werden.
Beschädigte Geräte können gefährlich sein.
Achten Sie darauf, dass Wasserzulauf- und
C -ablaufschläuche
sowie das Netzkabel nicht
geknickt und nicht anderweitig beschädigt
werden, wenn Sie das Gerät nach dem
Anschluss an Ort und Stelle rücken oder es
reinigen.
Der richtige Aufstellungsort
•
•
•
•
•
Stellen Sie die Maschine auf einem stabilen
Untergrund auf. Stellen Sie das Gerät nicht auf
langflorigen Teppichen oder ähnlichen Unterlagen
auf.
Eine Kombination aus Waschmaschine und
Trockner kann – voll beladen – bis etwa 180 kg
Gewicht erreichen. Stellen Sie das Gerät auf
einem stabilen, ebenen Untergrund auf, der das
Gewicht der Maschine(n) mühelos tragen kann!
Stellen Sie das Gerät nicht auf das Netzkabel.
Stellen Sie das Gerät nicht an Stellen auf, an
denen die Temperatur unter 0 °C abfallen kann.
Sorgen Sie für einen Abstand von mindestens
1 cm zwischen den Seiten des Gerätes und
anderen Möbelstücken.
Transportstabilisatoren entfernen
Zum Entfernen der Transportstabilisatoren neigen Sie
die Maschine etwas nach hinten. Entfernen Sie die
Stabilisatoren durch Ziehen am Band.
Druckreduzierventil.
Wenn Sie ein Gerät mit doppeltem Wasserzulauf
mit nur einem Wasserzulauf (Kaltwasser) nutzen
möchten, muss der mitgelieferte Stopfen am
Warmwasserzulaufventil installiert werden. (Dies
gilt für Geräte, die mit einem Blindstopfen geliefert
werden.)
Sofern Sie beide Wasserzuläufe nutzen möchten,
C schließen
Sie den Warmwasserzulauf erst an,
nachdem Sie die Stopfen/Dichtung-Kombination
aus dem Warmwasserventil entfernt haben. (Dies
gilt für Geräte, die mit einem Blindstopfen geliefert
werden.)
mit einzelnem Wasserzulauf sollten
A Modelle
nicht an den Warmwasserhahn angeschlossen
werden. Falls Sie dies dennoch versuchen,
wird Ihre Wäsche beschädigt – oder das Gerät
wechselt in den Sicherheitsmodus und arbeitet
nicht.
Sie keine alten oder gebrauchten
A Verwenden
Wassereinlaufschläuche mit Ihrem neuen Gerät.
Diese können zu Verschmutzungen Ihrer Wäsche
führen.
1. Schließen Sie die mit der Maschine gelieferten
Spezialschläuche an die Wasserzuläufe des
Gerätes an. Der rote Schlauch (links) dient als
Warmwassereinlass (maximal 90 °C), der blaue
Schlauch (rechts) als Kaltwassereinlass (maximal
25 °C).
C
Transportsicherungen entfernen
Sie die Transportsicherungen erst
A Entfernen
nachdem die Transportstabilisatoren entfernt
wurden.
Transportsicherungen (Bolzen) müssen
A Die
unbedingt entfernt werden, bevor Sie die
Maschine benutzen! Andernfalls wird das Gerät
beschädigt!
1. Lösen Sie sämtliche Bolzen mit einem Schlüssel,
bis sie sich frei drehen lassen (C).
2. Entfernen Sie die Transportsicherungen, indem
Sie diese vorsichtig herausdrehen.
3. Setzen Sie die Kunststoffabdeckungen
(diese finden Sie in der Tüte mit der
Bedienungsanleitung) in die Löcher an der
Rückwand ein. (P)
Bewahren Sie die Transportsicherungen an
einem sicheren Ort auf. Sie brauchen sie, wenn
Sie die Waschmaschine zukünftig transportieren
möchten.
Transportieren Sie das Gerät niemals ohne korrekt
C angebrachte
Transportsicherungen!
Sie bei der Installation Ihres Gerätes
A Achten
darauf, dass Kalt- und Warmwasseranschlüsse
korrekt durchgeführt werden. Andernfalls kommt
Ihre Wäsche am Ende des Waschvorgangs
eventuell heiß aus der Maschine und verschleißt
schneller.
2. Ziehen Sie sämtliche Schlauchmuttern mit der
Hand an. Ziehen Sie die Muttern niemals mit einer
Zange oder ähnlichen Werkzeugen an.
C
Wasseranschluss
C
Die Maschine benötigt zum Arbeiten einen
Wasserdruck zwischen 1 und 10 bar (0,1 bis 10
MPa). (In der Praxis bedeutet dies, dass innerhalb
einer Minute 10 bis 80 Liter Wasser aus dem voll
geöffneten Wasserhahn laufen müssen, damit
Ihre Maschine richtig arbeiten kann.) Falls der
Wasserdruck höher sein sollte, verwenden Sie ein
20
3. Nach dem Anschluss der Schläuche öffnen
Sie die Wasserzuläufe (Hähne) komplett und
überzeugen sich davon, dass kein Wasser
an den Anschlussstellen austritt. Falls Wasser
austreten sollte, drehen Sie den Hahn zu und
lösen anschließend die Mutter. Überprüfen Sie die
Dichtung und ziehen Sie die Mutter anschließend
wieder gut an. Um ein Auslaufen von Wasser
und daraus entstehende Wasserschäden
DE
zu vermeiden, halten Sie die Wasserhähne
geschlossen, wenn Sie die Maschine nicht
benutzen.
vibrieren und gegen andere Gegenstände oder
Möbelstücke stoßen.
Wasserablauf anschließen
•
Das Ende des Wasserablaufschlauches muss
direkt an den Wasserablauf (Abfluss) in der Wand
oder am Waschbecken angeschlossen werden.
kann es zu Überschwemmungen
A Ansonsten
kommen, falls sich der Schlauch beim
Abpumpen des Wassers lösen sollte. Bei hohen
Waschtemperaturen besteht Verbrühungsgefahr!
Damit es nicht zu unangenehmen Situationen
kommt und damit Wasserzu-/-ablauf reibungslos
funktionieren, fixieren Sie das Ende des
Ablaufschlauches so, dass es sich keinesfalls
lösen kann.
• Der Schlauch sollte in einer Höhe von mindestens
40 und maximal 100 cm angeschlossen werden.
• Wenn der Ablaufschlauch zuerst am Boden
(bis etwa 40 cm über dem Boden) und
danach wieder nach oben verläuft, kann es zu
Schwierigkeiten beim Wasserablauf kommen;
es kann vorkommen, dass die Wäsche beim
Herausnehmen noch sehr nass ist. Halten
Sie sich deshalb an die in der Abbildung
angegebenen Höhen.
•
•
•
Damit kein verschmutztes Wasser in die
Maschine zurücklaufen kann und um der
Maschine das Abpumpen zu erleichtern, darf
das Ende des Schlauches nur maximal 15 cm
tief in den Ablauf eingeführt werden. Falls das
Schlauchende zu lang sein sollte, schneiden Sie
ein Stück ab.
Das Schlauchende sollte nicht gebogen werden,
es sollte nicht darauf getreten werden und
es darf nicht zwischen Ablauf und Maschine
eingeklemmt werden.
Falls der Schlauch zu kurz sein sollte, können
Sie einen Original-Verlängerungsschlauch
verwenden. Die Gesamtlänge des Schlauches
ab Austrittspunkt aus der Maschine darf 3,2
m nicht überschreiten. Um ein Auslaufen von
Wasser zu vermeiden, müssen Ablaufschlauch
und Verlängerungsschlauch mit einer
passenden Schelle gesichert werden, damit
sich die Verbindung nicht lösen und kein Wasser
austreten kann.
Füße einstellen
Ihre Maschine leise und vibrationsfrei
A Damit
arbeiten kann, muss sie absolut gerade und
ausbalanciert stehen. Sie balancieren die
Maschine aus, indem Sie die Füße entsprechend
einstellen. Sollte das Gerät nicht fest und gerade
stehen, kann es sich im Betrieb bewegen, stark
21
1. Lösen Sie die Kontermuttern an den Füßen von
Hand.
2. Stellen Sie die Füße so ein, dass das Gerät stabil
und absolut gerade steht.
3. Ziehen Sie die Kontermuttern anschließend mit
der Hand an.
Sie die Kontermuttern grundsätzlich
A Lösen
nur mit den Händen, benutzen Sie keinerlei
Werkzeuge dafür. Andernfalls kann es zu
Beschädigungen kommen.
Elektrischer Anschluss
Schließen Sie das Gerät an eine
Schutzkontaktsteckdose an, die mit einer ausreichend
dimensionierten Sicherung abgesichert wurde –
schauen Sie sich dazu die Tabelle „Technische
Daten“ an. Wir haften nicht für jegliche Schäden, die
durch mangelhafte, nicht den örtlichen Vorschriften
entsprechende, Erdung entstehen.
• Der Anschluss muss gemäß örtlichen Vorschriften
erfolgen.
• Der Netzstecker muss nach der Installation frei
zugänglich bleiben.
• Angaben zu Spannung und erforderlicher
Absicherung durch Sicherung oder Unterbrecher
finden Sie im Abschnitt „Technische Daten“. Falls
Ihre Stromversorgung mit einer geringeren als
einer 16 A-Sicherung ausgestattet ist, lassen Sie
eine 16 A-Sicherung durch einen qualifizierten
Elektriker installieren.
• Die angegebene Spannung muss mit Ihrer
Netzspannung übereinstimmen.
• Schließen Sie das Gerät nicht über
Verlängerungskabel oder Mehrfachsteckdosen
an.
Netzkabel müssen durch den
B Beschädigte
autorisierten Kundendienst ersetzt werden.
DE
Erste Inbetriebnahme
Bevor Sie Ihr neues Gerät zum ersten Mal benutzen,
machen Sie sich unbedingt mit den Abschnitten
„Wichtige Hinweise zu Ihrer Sicherheit“ und
„Installation/Aufstellung“ vertraut.
Bereiten Sie die Maschine entsprechend vor,
indem Sie zuerst das Trommelreinigung-Programm
ausführen. Sofern Ihre Maschine nicht mit einem
Trommelsreinigungsprogramm ausgestattet ist,
wählen Sie das Baumwolle 90-Programm und dazu
die Zusatzfunktionen „Zusätzliches Wasser“ oder
„Extraspülen“. Bevor Sie das Programm starten,
geben Sie maximal 100 g Entkalkungspulver in das
Hauptwaschmittelfach (Fach II). Bei Entkalkungsmitteln
in Tablettenform geben Sie eine einzelne Tablette
in das Fach II. Reinigen Sie die Gummidichtung im
Türbereich mit einem sauberen Lappen, nachdem das
Programm durchgelaufen ist.
schneiden Sie das Netzkabel ab und machen die
Türverriegelung unbrauchbar, bevor Sie das Gerät
entsorgen.
3 Vorbereitung
Tipps zum Energiesparen
Die folgenden Hinweise helfen Ihnen, Ihr neues Gerät
ökologisch sinnvoll und energiesparend einzusetzen.
• Nutzen Sie möglichst die maximale Beladung
des jeweiligen Programms – dabei jedoch nicht
überladen. Schauen Sie sich die „Programm- und
Verbrauchstabelle“ an.
• Beachten Sie grundsätzlich die Hinweise auf den
Waschmittelpackungen.
• Waschen Sie leicht verschmutzte Wäsche bei
niedrigen Temperaturen.
• Nutzen Sie schnelle Programme, wenn Sie nur
geringe Mengen leicht verschmutzter Wäsche
waschen.
• Verzichten Sie bei nur leicht verschmutzter
Wäsche auf Vorwäsche und hohe Temperaturen.
• Wenn Sie Ihre Wäsche in einem Wäschetrockner
trocknen möchten, wählen Sie beim Waschen die
höchstmögliche Schleudergeschwindigkeit.
• Verwenden Sie nicht mehr Waschmittel als auf
der Waschmittelverpackung angegeben.
Wäsche sortieren
C
C
Verwenden Sie nur für Waschmaschinen
geeignete Kalkentferner.
Eventuell befindet sich noch etwas Wasser in der
Trommel. Dies liegt daran, dass das Gerät vor
der Auslieferung noch einmal gründlich geprüft
wurde. Ihrer Maschine schadet dies nicht.
Verpackungsmaterialien entsorgen
Verpackungsmaterialien können eine Gefahr
für Kinder darstellen. Lagern Sie sämtliche
Verpackungsmaterialien an einem sicheren Ort und
außerhalb der Reichweite von Kindern.
Das Verpackungsmaterial Ihres Gerätes wurde aus
recyclingfähigen Rohstoffen hergestellt. Achten Sie
auf eine ordnungsgemäße, getrennte Entsorgung der
Materialien. Entsorgen Sie das Verpackungsmaterial
nicht mit dem normalen Hausmüll.
•
•
Wäsche vorbereiten
•
•
Gerät transportieren
Ziehen Sie grundsätzlich den Netzstecker, bevor Sie
das Gerät transportieren oder verrücken. Trennen
Sie Wasserablauf und Wasserzulauf (Hahn zuvor
schließen). Lassen Sie restliches Wasser komplett aus
dem Gerät ab – siehe„Restliches Wasser ablaufen
lassen und Pumpenfilter reinigen“. Bringen Sie die
Transportsicherungen (Bolzen) wieder an; schauen
Sie sich dazu den Abschnitt „Transportsicherungen
entfernen“ an, gehen Sie in umgekehrter Reihenfolge
vor.
Transportieren Sie das Gerät niemals ohne korrekt
C angebrachte
Transportsicherungen!
Altgeräteentsorgung
Entsorgen Sie Ihre Altgeräte auf umweltfreundliche
Weise.
Ihr Händler und sowie Sammelstellen vor Ort
informieren Sie gerne über die richtige Entsorgung
Ihres Gerätes.
Damit Kinder nicht in Gefahr gebracht werden,
•
•
•
•
•
22
Sortieren Sie die Wäsche nach Textilientyp,
Farbe, Verschmutzungsgrad und zulässiger
Waschtemperatur.
Halten Sie sich grundsätzlich an die Angaben auf
den Pflegeetiketten.
DE
Wäsche mit Metallteilen wie Büstenhalter,
Gürtelschnallen und Metallknöpfe beschädigen
die Maschine. Entfernen Sie die Metallteile oder
waschen Sie die Textilien in einem Wäschebeutel
oder einem Kissenbezug.
Leeren Sie sämtliche Taschen komplett aus
und entfernen Sie Münzen, Kugelschreiber,
Büroklammern, Papiertaschentücher und
ähnliche Dinge, bevor Sie die Wäsche in die
Maschine geben. Drehen Sie Taschen auf
links, entfernen Sie Fusseln. Fremdkörper
können das Gerät beschädigen und zu lauten
Betriebsgeräuschen führen.
Geben Sie sehr kleine Textilien wie Kinder- und
Nylonstrümpfe in einen Wäschebeutel oder
Kissenbezug.
Drücken Sie Vorhänge nicht zusammen, wenn
Sie diese in die Maschine geben. Bei Vorhängen
entfernen Sie zuvor sämtliche Applikationen und
sonstige nicht textile Teile.
Schließen Sie Reißverschlüsse, nähen Sie lose
Knöpfe an und reparieren Sie Risse und sonstige
Defekte.
Waschen Sie Textilien, die mit
„maschinenwaschbar“ oder „Handwäsche“
gekennzeichnet sind, ausschließlich mit dem
passenden Waschprogramm.
Waschen Sie bunte und weiße Textilien
nicht zusammen. Neue, intensiv gefärbte
Baumwollsachen (z. B. schwarze Jeans) können
beim Waschen stark abfärben. Waschen Sie
•
•
•
•
•
solche Wäschestücke grundsätzlich separat.
Hartnäckige Verschmutzungen müssen vor dem
Waschen richtig behandelt werden. Fragen Sie im
Zweifelsfall bei einer chemischen Reinigung nach.
Verwenden Sie ausschließlich Färbemittel oder
Mittel zur Kalkentfernung, die sich ausdrücklich
zur Verwendung in der Waschmaschine eignen.
Beachten Sie dabei immer die Hinweise auf der
Verpackung.
Waschen Sie Hosen und empfindliche
Kleidungsstücke „auf links“, also mit der
Innenseite nach außen.
Legen Sie Wäschestücke aus Angorawolle
vor dem Waschen ein paar Stunden in das
Gefrierfach Ihres Kühlschranks. Dadurch bilden
sich weniger Knötchen im Material.
Wäsche, die mit Substanzen wie Mehl, Kalk,
Milchpulver oder ähnlichen Dingen verunreinigt
ist, muss zuvor gründlich ausgeschüttelt werden,
bevor sie in die Maschine gegeben wird.
Andernfalls können sich staub- oder pulverförmige
Substanzen innerhalb der Maschine ablagern und
im Laufe der Zeit Schäden verursachen.
Die richtige Wäschemenge
Die maximale Ladungskapazität (Wäschemenge) hängt
vom Textilientyp, dem Verschmutzungsgrad und dem
gewünschten Waschprogramm ab.
Die Maschine reguliert die Wassermenge automatisch
je nach Wäschevolumen.
Sie sich an die Hinweise in der „ProgrammA Halten
und Verbrauchstabelle“. Bei Überlastung nimmt
die Waschleistung ab. Zusätzlich kann es zu
starker Geräuschentwicklung und zu Vibrationen
kommen.
Wäsche in die Maschine geben
•
•
Öffnen Sie die Waschmaschinentür.
Legen Sie die Wäschestücke lose in die
Maschine.
• Drücken Sie die Waschmaschinentür zu, bis sie
hörbar einrastet. Vergewissern Sie sich, dass
nichts in der Tür eingeklemmt wurde.
Bei laufender Maschine wird die Gerätetür
C gesperrt.
Die Tür kann erst eine Weile nach dem
Abschluss des Programms geöffnet werden.
die Wäsche falsch (also schlecht verteilt) in
A Falls
die Maschine gegeben wird, kann es zu starken
Betriebsgeräuschen und zu Vibrationen kommen.
Waschmittel und Weichspüler verwenden
Waschmittelschublade
Die Waschmittelschublade besteht aus drei Fächern:
- (I) für Vorwaschmittel
- (II) für Hauptwaschmittel
– (III) für Weichspüler
– (*) im Weichspülerfach befindet sich zusätzlich ein
Siphon.
3 2
1
3
2 1
CJe nach Modell Ihrer Maschine können zwei
23
unterschiedliche Waschmittelschubladen
eingesetzt werden.
Waschmittel, Weichspüler und andere
Reinigungsmittel
• Geben Sie Waschmittel und Weichspüler in
die Maschine, bevor Sie das Waschprogramm
starten.
• Öffnen Sie niemals die Waschmittelschublade,
während ein Waschprogramm läuft!
• Wenn Sie ein Programm ohne Vorwäsche
nutzen, füllen Sie kein Waschmittel in das
Vorwaschmittelfach (Fach I) ein.
• Wenn Sie ein Programm mit Vorwäsche
nutzen, füllen Sie kein Flüssigwaschmittel in das
Vorwaschmittelfach (Fach I) ein.
• Wenn Sie Waschmittel im Säckchen oder in
einer Dosierkugel zur Wäsche geben, sollten Sie
grundsätzlich auf eine Vorwäsche verzichten.
Geben Sie das Waschmittelsäckchen oder die
Dosierkugel direkt zur Wäsche in die Maschine.
• Wenn Sie Flüssigwaschmittel
verwenden, vergessen Sie nicht, den
Flüssigwaschmittelbehälter in das
Hauptwaschmittelfach (Fach II) zu geben.
Der richtige Waschmitteltyp
Die richtige Waschmittelauswahl hängt von Typ und
Farbe der Textilien ab.
• Für Buntwäsche und Weißwäsche sollten Sie
unterschiedliche Waschmittel benutzen.
• Waschen Sie empfindliche Textilien ausschließlich
mit speziellen Waschmitteln (spezielle
Flüssigwaschmittel, Wollshampoo, usw.), die
speziell auf den jeweiligen Textilientyp abgestimmt
sind.
• Für dunkle Wäsche und Bettzeug empfehlen wir
Flüssigwaschmittel.
• Wollsachen waschen Sie mit einem speziellen
Wollwaschmittel.
Sie ausschließlich Waschmittel, die
A Verwenden
speziell für Waschmaschinen hergestellt wurden.
Verzichten Sie auf Seifenpulver.
A
Die richtige Waschmittelmenge
Die richtige Waschmittelmenge hängt von der
Wäschemenge, dem Verschmutzungsgrad
und der Wasserhärte ab. Lesen Sie
die Dosierungsanweisungen auf der
Waschmittelverpackung sorgfältig, halten Sie sich eng
an die Dosierungsempfehlungen.
• Benutzen Sie nicht mehr Waschmittel als auf
der jeweiligen Verpackung angegeben; Sie
verhindern damit übermäßige Schaumbildung und
schlechtes Ausspülen. Außerdem sparen Sie Geld
und leisten einen Beitrag zum Umweltschutz,
wenn Sie nur so viel Waschmittel wie nötig
verwenden.
• Verwenden Sie weniger Waschmittel, wenn Sie
nur geringe Wäschemengen oder nur leicht
verschmutzte Kleidung waschen.
• Halten Sie sich bei Waschmittelkonzentraten
an die jeweiligen Dosierungsempfehlungen des
Herstellers.
Weichspüler
Gießen Sie den Weichspüler in das Weichspülerfach
der Waschmittelschublade.
• Verwenden Sie die auf der Verpackung
DE
empfohlenen Mengen.
Für die Weichspüler nicht über die
Maximalmarkierung (> MAX <) im Weichspülerfach
hinaus ein.
• Falls der Weichspüler fest geworden ist, lösen Sie
den Weichspüler in etwas Wasser auf, bevor Sie
ihn in die Schublade geben.
Flüssigwaschmittel
Bei Flüssigwaschmitteln mit
Flüssigwaschmittelbehälter:
• Geben Sie den Flüssigwaschmittelbehälter in das
Fach II.
• Benutzen Sie den Messbecher des
Waschmittelherstellers und beachten Sie die
Anweisungen auf der Verpackung.
• Verwenden Sie die auf der Verpackung
empfohlenen Mengen.
• Falls das Flüssigwaschmittel fest geworden ist,
lösen Sie das Waschmittel in etwas Wasser auf,
bevor Sie es in die Schublade geben.
•
Flüssigwaschmittel, ohne
Flüssigwaschmittelbehälter:
• Benutzen Sie Flüssigwaschmittel nicht als
Vorwaschmittel.
• Benutzen Sie den Messbecher des
Waschmittelherstellers und beachten Sie die
Anweisungen auf der Verpackung.
• Flüssigwaschmittel können Flecken in der
Kleidung verursachen, wenn Sie solche
Waschmittel in Kombination mit der
Zeitverzögerungsfunktion benutzen. Verzichten
Sie daher grundsätzlich auf Flüssigwaschmittel,
wenn Sie mit der Zeitverzögerung arbeiten.
Gel- und Tab-Waschmittel
Lesen Sie die Gel- und Tab-Waschmitteln
die Dosierungsanweisungen auf der
Waschmittelverpackung sorgfältig, halten Sie sich
eng an die Dosierungsempfehlungen. Falls sich keine
Hinweise auf der Verpackung finden, beachten Sie die
folgenden Hinweise:
• Wenn Sie dünnflüssige Gel-Waschmittel
verwenden und Ihre Maschine nicht über
einen speziellen Flüssigwaschmittelbehälter
verfügt, geben Sie das Flüssigwaschmittel
in das Hauptwaschmittelfach, sobald das
Wasser einläuft. Ist Ihre Maschine mit einem
Flüssigwaschmittelbehälter ausgestattet, geben
Sie das Waschmittel in den Behälter, bevor Sie
das Programm starten.
• Bei dickflüssigem Gel-Waschmittel und bei
Waschmittelkapseln geben Sie das Waschmittel
vor Programmstart direkt zur Wäsche in die
Trommel.
• Waschmittel in Tablettenform geben Sie entweder
in das Hauptwäschefach (Fach II) oder direkt zur
Wäsche in die Trommel.
C Tab-Waschmittel können Rückstände im
24
Waschmittelfach hinterlassen. Falls dies geschieht,
geben Sie das Tab-Waschmittel direkt zur Wäsche
im unteren Bereich der Trommel.
Verzichten Sie grundsätzlich auf die Vorwäsche,
C wenn
Sie Gel- oder Tab-Waschmittel verwenden.
Stärke
• Geben Sie Wäschestärke (auch in Pulverform)
sowie Färbemittel in das Weichspülerfach;
beachten Sie aber in jedem Fall die Anweisungen
auf der Verpackung.
• Verwenden Sie Weichspüler und Stärke niemals
gemeinsam in einem Waschprogramm.
• Wischen Sie das Innere der Trommel mit
einem sauberen, feuchten Tuch ab, wenn Sie
Wäschestärke verwendet haben.
Bleichmittel
• Wählen Sie ein Programm mit Vorwäsche,
geben Sie das Bleichmittel zu Beginn der
Vorwäsche hinzu. Geben Sie kein Waschmittel
in das Vorwäschefach. Alternativ können Sie
ein Programm mit Extraspülen wählen und das
Bleichmittel beim ersten Spülungsschritt in das
Waschmittelfach geben.
• Vermischen Sie niemals Bleichmittel und
Waschmittel miteinander.
• Verwenden Sie lediglich eine geringe Menge
(etwa 50 ml) Bleichmittel, spülen Sie die Wäsche
anschließend sehr gut aus, damit es nicht zu
Hautreizungen kommt. Geben Sie Bleichmittel
niemals direkt auf die Wäsche, behandeln Sie
Buntwäsche nicht mit Bleichmitteln.
• Wenn Sie Bleichmittel auf Sauerstoffbasis
verwenden, halten Sie sich streng an die
Anweisungen auf der Verpackung und wählen ein
Waschprogramm mit niedriger Temperatur.
• Bleichmittel auf Sauerstoffbasis können
gemeinsam mit Waschmitteln verwendet werden.
Falls Bleichmittel und Waschmittel jedoch
eine unterschiedliche Konsistenz aufweisen
(das eine ist flüssiger als das andere), geben
Sie zuerst das Waschmittel in das Fach II der
Waschmittelschublade und warten ab, bis das
Waschmittel aus dem Fach gespült wurde.
Anschließend geben Sie das Bleichmittel in
dasselbe Fach, während die Maschine noch
Wasser aufnimmt.
Kalkentferner
• Bei Bedarf verwenden Sie einen speziell für
Waschmaschinen hergestellten Kalkentferner.
• Beachten Sie dabei immer die Hinweise auf der
Verpackung.
DE
Nützliche Tipps zum Waschen
Kleidung
Helle Farben und
Weißwäsche
Dunkle Farben
Feinwäsche/wolle/
Seide
(Empfohlene
Temperaturen je nach
Verschmutzungsgrad:
40 – 90 °C)
(Empfohlene
Temperaturen je nach
Verschmutzungsgrad:
kalt bis 40 °C)
(Empfohlene
Temperaturen je nach
Verschmutzungsgrad: kalt
bis 40 °C)
(Empfohlene
Temperaturen je nach
Verschmutzungsgrad:
kalt bis 30 °C)
Bei solchen
Verschmutzungen
kann es erforderlich
sein, die Flecken
zuvor zu behandeln
und ein Programm
mit Vorwäsche
auszuwählen.
Für Weißwäsche
geeignete Pulver- und
Flüssigwaschmittel
können bei für
stark verschmutzte
Kleidung empfohlenen
Dosierungen verwendet
werden. Wir empfehlen
Pulverwaschmittel
zum Entfernen von
Verschmutzungen durch
Ton oder Erde sowie
bei Verschmutzungen,
die gut auf Bleichmittel
reagieren.
Für Buntwäsche
geeignete Pulver- und
Flüssigwaschmittel
können bei für
stark verschmutzte
Kleidung empfohlenen
Dosierungen
verwendet werden.
Wir empfehlen
Pulverwaschmittel
zum Entfernen von
Verschmutzungen
durch Ton oder
Erde sowie bei
Verschmutzungen,
die gut auf Bleichmittel
reagieren. Nutzen Sie
Waschmittel ohne
Bleichmittelzusatz.
Für Buntwäsche und
Dunkles geeignete Pulverund Flüssigwaschmittel
können bei für
stark verschmutzte
Kleidung empfohlenen
Dosierungen verwendet
werden.
Bevorzugen Sie
Flüssigwaschmittel für
Feinwäsche. Woll- und
Seidentextilien müssen
mit einem speziellen
Wollwaschmittel
gewaschen werden.
Für Weißwäsche
geeignete Pulver- und
Normal verschmutzt Flüssigwaschmittel
können bei für
(beispielsweise
normal verschmutzte
Kragen- oder
Kleidung empfohlenen
Manschettenschmutz) Dosierungen verwendet
werden.
Für Buntwäsche
geeignete Pulver- und
Flüssigwaschmittel
können bei für
normal verschmutzte
Kleidung empfohlenen
Dosierungen
verwendet werden.
Nutzen Sie
Waschmittel ohne
Bleichmittelzusatz.
Für Buntwäsche und
Dunkles geeignete Pulverund Flüssigwaschmittel
können bei für
normal verschmutzte
Kleidung empfohlenen
Dosierungen verwendet
werden.
Bevorzugen Sie
Flüssigwaschmittel für
Feinwäsche. Woll- und
Seidentextilien müssen
mit einem speziellen
Wollwaschmittel
gewaschen werden.
Für Weißwäsche
geeignete Pulver- und
Flüssigwaschmittel
können bei für
leicht verschmutzte
Kleidung empfohlenen
Dosierungen verwendet
werden.
Für Buntwäsche
geeignete Pulver- und
Flüssigwaschmittel
können bei für
leicht verschmutzte
Kleidung empfohlenen
Dosierungen
verwendet werden.
Nutzen Sie
Waschmittel ohne
Bleichmittelzusatz.
Für Buntwäsche und
Dunkles geeignete Pulverund Flüssigwaschmittel
können bei für
leicht verschmutzte
Kleidung empfohlenen
Dosierungen verwendet
werden.
Bevorzugen Sie
Flüssigwaschmittel für
Feinwäsche. Woll- und
Seidentextilien müssen
mit einem speziellen
Wollwaschmittel
gewaschen werden.
Stark verschmutzt
(hartnäckige Flecken
wie Gras, Kaffee,
Früchte und Blut)
Verschmutzungsgrad
Buntwäsche
Leicht verschmutzt
(keine sichtbaren
Flecken)
25
DE
4 Bedienung
Bedienfeld
1
2
8
1 - Programmauswahlknopf (Oberste Position: Ein/Aus)
2 - Display
3 - Zeitverzögerungstaste
4 - Programmfolgeanzeige
Maschine vorbereiten
Sorgen Sie dafür, dass sämtliche Schläuche fest
und dicht angeschlossen sind. Stecken Sie den
Netzstecker der Maschine ein. Drehen Sie den
Wasserhahn vollständig auf. Geben Sie die Wäsche in
die Maschine. Füllen Sie Waschmittel und Weichspüler
ein.
Programmauswahl
Wählen Sie ein geeignetes Programm aus
der „Programm- und Verbrauchstabelle“
(Temperaturtabelle darunter beachten). Orientieren
Sie sich dabei an Wäschetyp, Wäschemenge und
Verschmutzungsgrad.
7
90 ˚C
60 ˚C
Normal verschmutzte,
ausbleichsichere Baumwoll- oder
Synthetiktextilien (z. B.: Hemden,
Nachthemden, Schlafanzüge und
dergleichen) sowie leicht verschmutzte
weiße Leinenwäsche (Unterwäsche,
usw.).
Mischtextilien einschließlich
40 ˚C
Textilien (z. B. Gardinen),
30 ˚C - Kalt empfindlichen
Synthetik und Wolle.
Wählen Sie das gewünschte Programm mit dem
Programmauswahlknopf.
C Die maximale Schleudergeschwindigkeit dieser
26
4
5
5 - Start/Pausetaste
6 - Zusatzfunktiontasten
7 - Schleudergeschwindigkeit-Einstelltaste
8 - Temperatureinstelltaste
Programme wird durch den jeweiligen Textilientyp
begrenzt.
Beachten Sie bei der Auswahl eines
C Waschprogramms
grundsätzlich Textilientyp,
Farbe, Verschmutzungsgrad und zulässige
Wassertemperatur.
Wählen Sie grundsätzlich die niedrigstmögliche
C Temperatur.
Eine höhere Temperatur führt auch
zu höherem Stromverbrauch.
Weitere Details zu den Programmen finden Sie in
C der
„Programm- und Verbrauchstabelle“.
Hauptprogramme
Stark verschmutzte weiße Baumwolle
und Leinen. (Platzdeckchen,
Tischtücher, Handtücher, Betttücher,
usw.)
6
3
Je nach Textilientyp können Sie unter folgenden
Hauptprogrammen wählen:
• Koch-/Buntwäsche
Dieses Programm empfehlen wir für Ihre
Baumwolltextilien wie Bettlaken, Bettbezüge,
Kissenbezüge, Handtücher, Bademäntel,
Unterwäsche, etc.). Ihre Wäsche wird in einem
längeren Waschprogramm mit intensiveren
Bewegungen gewaschen.
• Pflegeleicht
Mit diesem Programm waschen Sie Ihre
Synthetiktextilien (Hemden, Blusen, Synthetik/
Baumwoll-Mischtextilien, usw.). Dieses Programm
arbeitet mit sanften Waschbewegungen und reinigt
Ihre Textilien schneller als das „Baumwolle“-Programm.
Für Gardinen und Schleier empfehlen wir das
„Synthetik 40 °C“-Programm mit Vorwäsche und
Knitterschutz. Geben Sie etwas weniger Waschmittel
in das Hauptwäschefach, da die Maschenstruktur der
Textilien sonst zu einer übermäßigen Schaumbildung
führt. Geben Sie kein Waschmittel in das
DE
Vorwäschefach.
• Wolle
Mit diesem Programm waschen Sie Ihre Wollsachen.
Die richtige Waschtemperatur entnehmen Sie bitte den
Pflegeetiketten der jeweiligen Textilien. Benutzen Sie für
Wollsachen ein spezielles Wollwaschmittel.
Zusätzliche Programme
Für spezielle Fälle stehen Ihnen zusätzliche Programme
zur Verfügung.
Zusatzprogramme können je nach Modell Ihrer
C Maschine
abweichen.
• Baumwoll-Öko
Mit diesem Programm waschen Sie normal
verschmutzte, strapazierfähige Baumwoll- und
Leinenwäsche. Dabei sparen Sie im Vergleich zu
anderen Baumwollprogrammen eine Menge Wasser
und Energie. Die tatsächliche Wassertemperatur
kann etwas von der regulären Programmtemperatur
abweichen. Die Programmdauer verkürzt sich im
Verlauf des Programms automatisch, wenn Sie weniger
Wäsche (z. B. die Hälfte der maximalen Kapazität
oder weniger) waschen. In diesem Fall sparen Sie
noch mehr Wasser und Energie, waschen also noch
ökonomischer als zuvor. Dieses Merkmal finden Sie bei
bestimmten Modellen mit Restzeitanzeige.
• Handwäsche
Mit diesem Programm können Sie Ihre
Baumwollsachen und empfindlichen Textilien waschen,
die laut Etikett nicht mit der Maschine gewaschen
sollen. Dieses Programm reinigt Ihre Wäsche
besonders schonend und nutzt dabei besonders
sanfte Waschbewegungen.
• Superschnell-Express
Dieses Programm eignet sich zum schnellen
Waschen von kleineren Mengen leicht verschmutzter
Baumwolltextilien.
• Dunkles
Mit diesem Programm waschen Sie dunkle Textilien
oder Wäsche, die leicht zum Ausbleichen neigt. Das
Programm arbeitet mit sanfteren Bewegungen und
geringerer Temperatur. Für dunkle Wäsche empfehlen
wir Flüssig- oder Wollwaschmittel.
• Hemden
Dieses Programm eignet sich zum gemeinsamen
Waschen von Hemden aus Baumwolle, Synthetik und
synthetischen Mischfasern.
• Sportkleidung (Sport)
Mit diesem Programm waschen Sie nur kurzzeitig
getragene Wäsche wie Sportkleidung. Das Programm
eignet sich für geringe Wäschemengen und Bauwoll/
Synthetik-Mischfasern.
Wasser aus der Maschine abgepumpt. Anschließend
wird die Wäsche mit der festgelegten Geschwindigkeit
geschleudert und weitestgehend von Nässe befreit.
Falls Sie lediglich das Wasser abpumpen möchten,
ohne die Wäsche zu schleudern: Wählen Sie das
„Abpumpen + Schleudern“-Programm, stellen
Sie anschließend „Nicht schleudern“ über die
Schleudergeschwindigkeit-Einstelltaste ein. Drücken
Sie die Start-/Pausetaste.
Bei empfindlichen Wäschestücken sollten Sie eine
C geringere
Schleudergeschwindigkeit wählen.
Temperatur auswählen
Sobald Sie ein neues Programm auswählen, wird die
Maximaltemperatur des jeweiligen Programms in der
Temperaturanzeige angezeigt.
Zum Vermindern der Temperatur drücken Sie
die Temperatureinstelltaste. Die Temperatur wird
schrittweise niedriger eingestellt.
Sofern die Maschine noch nicht mit dem
C Aufheizen
des Wassers begonnen hat, können
Sie die Temperatur ändern, ohne die Maschine
zunächst anhalten zu müssen.
Schleudergeschwindigkeit auswählen
Nachdem Sie ein Programm ausgewählt haben,
wird die empfohlene Schleudergeschwindigkeit
des gewählten Programms in der
Schleudergeschwindigkeitsanzeige dargestellt.
Zum Vermindern der Schleudergeschwindigkeit
drücken Sie die SchleudergeschwindigkeitEinstelltaste. Die Schleudergeschwindigkeit wird
Schritt für Schritt vermindert. Anschließend werden
je nach Modell die Optionen „Spülstopp“ und „Nicht
schleudern“ angezeigt. Hinweise zu diesen Optionen
finden Sie im Abschnitt „Zusatzfunktionen auswählen“.
Sofern die Maschine noch nicht mit dem
C Schleudern
begonnen hat, können Sie die
Geschwindigkeit ändern, ohne die Maschine
zunächst anhalten zu müssen.
Spezialprogramme
Für spezielle Zwecke können Sie die folgenden
Programme wählen:
• Spülen
Dieses Programm benutzen Sie, wenn Sie separat
spülen oder stärken möchten.
• Schleudern + Abpumpen
Dieses Programm nutzen Sie, um Ihre Wäsche ein
weiteres Mal zu schleudern oder das Wasser aus der
Maschine abzupumpen.
Dazu wählen Sie zunächst die gewünschte
Schleudergeschwindigkeit und starten das Programm
anschließend mit der Start/Pausetaste. Zuerst wird das
27
DE
Programm- und Verbrauchstabelle
DE
Zusatzfunktion
Max. Beladung (kg)
Wasserverbrauch (Liter)
Stromverbrauch (kWh)
Maximalgeschwindigkeit ***
Vorwäsche
Schnellwäschen
Spülen Plus
Bügelleicht
Spülstopp
Einweichen
4
Koch-/Buntwäsche
90
7
74
2.30
1600
•
•
•
•
•
•
Kalt-90
Koch-/Buntwäsche
60
7
70
1.54
1600
•
•
•
•
•
•
Kalt-90
•
•
•
•
•
•
Kalt-90
Programm
Koch-/Buntwäsche
Wählbarer
Temperaturbereich
(°C)
40
7
69
0.85
1600
Baumwoll-Öko
60**
7
44
1.00
1600
•
40-60
Baumwoll-Öko
60**
3.5
38
0.84
1600
•
40-60
Baumwoll-Öko
40**
3.5
38
0.65
1600
•
40-60
Kalt-30
Superschnell-Express
30
2
50
0.11
1400
•
•
Dunkles
40
3.5
66
0.55
800
*
•
Sportkleidung (Sport)
40
4
67
0.58
800
Handwäsche
30
1
34
0.20
600
Wolle
40
1.5
47
0.34
600
Hemden
60
3.5
60
1.00
600
•
•
•
*
•
•
Kalt-60
Pflegeleicht
60
3
55
1.00
800
•
•
•
•
•
•
Kalt-60
Pflegeleicht
40
3
55
0.55
800
•
•
•
•
•
•
Kalt-60
•
•
•
•
•
Kalt-40
•
Kalt-40
Kalt-30
•
•
Kalt-40
• : Wählbar
* : Automatisch ausgewählt, nicht abwählbar.
** : Energieprogramm (EN 60456 Ed.3)
*** : Falls die maximale Schleudergeschwindigkeit Ihrer Maschine unterhalb dieses Wertes liegt, lässt sich
lediglich die maximal mögliche Schleudergeschwindigkeit auswählen.
- : Entnehmen Sie die maximale Beladung bitte der Programmbeschreibung.
Wasser- und Stromverbrauch können sich abhängig von Wasserdruck, Wasserhärte und
C Wassertemperatur,
Umgebungstemperatur, Wäscheart und Wäschemenge, Einsatz von Zusatzfunktionen,
der Schleudergeschwindigkeit sowie Schwankungen der Versorgungsspannung ändern.
Die Dauer des ausgewählten Programms erscheint im Display der Maschine. Dabei kann es durchaus zu
C kleinen
Abweichungen zwischen der angezeigten und der tatsächlichen Dauer kommen.
C Die Zusatzfunktionen in der Tabelle können je nach Modell Ihrer Maschine abweichen.
28
DE
Zusatzfunktionen auswählen
Wählen Sie die gewünschten Zusatzfunktionen, bevor
Sie das Programm starten. Darüber hinaus können Sie
auch im Betrieb zum laufenden Programm passende
Zusatzfunktionen auswählen oder aufheben, ohne
die Start-/Pausetaste zu drücken. Allerdings darf der
Schritt, in dem die jeweilige Zusatzfunktion eingesetzt
wird, natürlich noch nicht erreicht sein.
Falls sich eine Zusatzfunktion nicht auswählen
oder aufheben lässt, blinkt die entsprechende
Zusatzfunktion zur Information dreimal.
Bestimmte Funktionen lassen sich nicht
C gleichzeitig
auswählen. Wenn Sie eine
Zusatzfunktion wählen, die mit einer zuvor
gewählten Funktion kollidiert (also nicht gleichzeitig
ausgewählt werden kann), wird die zuerst
ausgewählte Funktion aufgehoben, die zuletzt
gewählte Zusatzfunktion bleibt aktiv. Ein Beispiel:
Wenn Sie zunächst „Vorwäsche“ wählen und sich
dann für „Schnellwäsche“ entscheiden, wird die
Vorwäsche aufgehoben, die Schnellwäsche bleibt
aktiv.
Zusatzfunktionen, die nicht mit dem gewählten
C Programm
vereinbar sind, können nicht
ausgewählt werden. (Siehe „Programm- und
Verbrauchstabelle“.)
Je nach Modell Ihrer Maschine können die
C Zusatzfunktionstasten
etwas anders aussehen.
• Vorwäsche
Eine Vorwäsche ist nur bei stark verschmutzter
Wäsche erforderlich. Wenn Sie auf die Vorwäsche
verzichten, sparen Sie Energie, Wasser, Waschmittel
und Zeit.
Für Gardinen, Schleier und ähnliche Materialien
C empfehlen
wir eine Vorwäsche ohne
Waschmittelzugabe.
• Schnellwäschen
Diese Funktion können Sie bei Baumwolle- und
Synthetik-Programmen verwenden. Dies reduziert die
Waschzeit und die Anzahl der Spülgänge bei leicht
verschmutzter Wäsche.
Wenn Sie diese Funktion wählen, beladen
C Sie
Ihre Maschine nur mit der halben in der
Programmtabelle angegebenen maximalen
Wäschemenge.
• Spülen Plus
Bei dieser Funktion führt Ihre Maschine einen
zusätzlichen Spülgang nach der Hauptwäsche aus.
Dadurch verringert sich die Gefahr von Hautreizungen
bei empfindlichen Personen (z. B. Kleinkindern,
Allergikern), weil weniger Waschmittelreste in der
Wäsche verbleiben.
• Bügelleicht
Mit dieser Funktion verknittert Wäsche deutlich weniger
als bei einem normalen Waschgang. Die Textilien
werden mit sanfteren Bewegungen gewaschen
und mit geringerer Geschwindigkeit geschleudert.
Zusätzlich wird Ihre Wäsche mit mehr Wasser
gewaschen.
• Spülstopp
Wenn Sie Ihre Textilien nicht gleich nach dem
Abschluss des Waschprogramms aus der Maschine
nehmen möchten, können Sie die Spülstopp-Funktion
einsetzen, damit Ihre Wäsche nicht durch Antrocknen
29
in der Maschine verknittert. Wenn Sie anschließend
die Start-/Pausetaste drücken, wird das Wasser ohne
Schleudern abgepumpt. Nach dem Abpumpen wird
das Programm fortgesetzt und abgeschlossen.
Wenn Sie die im Wasser einweichende Wäsche
schleudern möchten, wählen Sie die gewünschte
Schleudergeschwindigkeit und drücken anschließend
die Start/Pause-Taste.
Das Programm wird fortgesetzt. Das Wasser wird
abgepumpt, die Wäsche geschleudert, das Programm
abgeschlossen.
• Einweichen
Durch Einweichen lassen sich hartnäckige
Verschmutzungen leichter entfernen: Dazu verbleibt
die Wäsche eine Zeit lang im Waschwasser, bevor das
eigentliche Programm beginnt.
• Tierhaare
Mit dieser Funktion entfernen Sie an der Kleidung
haftende Tierhaare besonders leicht.
Bei der Auswahl dieser Funktion wird das normale
Programm durch Vorwäsche und einen zusätzlichen
Spülschritt ergänzt. Durch 30 % mehr Wasser werden
Tierhaare besonders gründlich entfernt.
dürfen Haustiere niemals in der
A Natürlich
Maschine gewaschen werden.
Zeitverzögerung
Wenn Sie den Waschvorgang erst später beginnen
lassen möchten, können Sie den Programmstart
durch die Zeitverzögerung um bis zu 19 Stunden
hinausschieben. Die Verzögerungszeit kann in
1-Stunden-Schritten eingestellt werden.
Benutzen Sie keine Flüssigwaschmittel, wenn Sie
C die
Zeitverzögerungsfunktion nutzen! Es besteht
die Gefahr, dass sich Flecken auf Ihren Textilien
bilden können.
Öffnen Sie die Waschmaschinentür, treffen Sie die
nötigen Vorbereitungen wie Einfüllen von Wäsche
und Waschmittel, usw. Wählen Sie Waschprogramm,
Temperatur, Schleudergeschwindigkeit und – sofern
gewünscht – Zusatzfunktionen. Wählen Sie die
gewünschte Zeit mit der Zeitverzögerungstaste.
Drücken Sie die Start-/Pausetaste. Die eingestellte
Verzögerungszeit wird angezeigt. Der Countdown bis
zum verzögerten Start beginnt. Neben der Anzeige der
verzögerten Startzeit bewegt sich das Symbol „_“ im
Display nach oben und unten.
Während die Zeitverzögerung läuft, können Sie
C weitere
Wäsche hinzugeben.
5. Zum Abschluss des Countdowns wird die Laufzeit
des Ausgewählten Programms angezeigt. Das
Symbol „_“ verschwindet, das ausgewählte
Programm beginnt.
Verzögerungszeit ändern
Wenn Sie die Zeit bei laufendem Countdown ändern
möchten:
Drücken Sie die Zeitverzögerungstaste. Bei jedem
Tastendruck erhöht sich die Zeit um eine Stunde. Falls
Sie die Zeit bis zum verzögerten Start vermindern
möchten, drücken Sie die Zeitverzögerungstaste
wiederholt, bis die gewünschte Zeit im Display
erscheint.
Zeitverzögerung aufheben
Wenn Sie die Zeitverzögerung aufheben und das
Waschprogramm sofort starten möchten: Stellen Sie
DE
die Zeit bis zum verzögerten Start auf Null ein oder
wählen Sie mit dem Programmauswahlknopf ein
anderes Programm. Dadurch wird die Zeitverzögerung
aufgehoben. Die Ende/Abbrechen-Leuchte blinkt.
Anschließend wählen Sie das gewünschte Programm
aus. Starten Sie das Programm mit der Start/PauseTaste.
Programm starten
Starten Sie das Programm mit der Start/Pause-Taste.
Die Programmfortschrittanzeigen leuchten beim Start
des Programms auf.
Falls kein Programm gestartet oder innerhalb einer
C Minute
nach Auswahl des Waschprogramms
keine Taste betätigt wurde, wechselt die Maschine
in den Bereitschaftsmodus, die Beleuchtung
der Temperatur-, Geschwindigkeits- und
Tür-Anzeigen wird abgedunkelt. Sonstige
Leuchten und Anzeigen schalten sich ab. Die
Anzeigen leuchten wieder auf, sobald Sie den
Programmauswahlknopf drehen oder eine
beliebige Taste drücken.
Kindersicherung
Mit der Kindersicherung können Sie verhindern, dass
Kinder die Einstellungen Ihrer Maschine und des
laufenden Programms manipulieren.
Falls der Programmauswahlknopf bei aktiver
C Kindersicherung
gedreht wird, erscheint „Con“ im
Display. Bei aktiver Kindersicherung können keine
Änderungen am Programm sowie an Temperatur,
Geschwindigkeit und Zusatzfunktionen
vorgenommen werden.
Auch wenn bei aktiver Kindersicherung
C ein
anderes Programm mit dem
Programmauswahlknopf ausgewählt werden
sollte, wird weiterhin das zuvor eingestellte
Programm ausgeführt.
So schalten Sie die Kindersicherung ein:
Halten Sie die 1. und 2. Zusatzfunktionstaste drei
Sekunden lang gedrückt. Beim Gedrückthalten
der 1. und 2. Zusatzfunktionstaste blinken die
entsprechenden Anzeigen, die Meldungen „C03“,
„C02“, „C01“ leuchten im Display auf, während Sie
die Tasten gedrückt halten. Anschließend erscheint
„Con“ im Display – die Kindersicherung ist nun aktiv.
Falls bei aktiver Kindersicherung eine Taste betätigt
oder der Programmauswahlknopf gedreht wird,
erscheint dieselbe Meldung im Display. Die Anzeigen
der ersten und zweiten Zusatzfunktionstaste (die auch
zum Abschalten der Kindersicherung genutzt werden)
blinken dreimal auf.
So schalten Sie die Kindersicherung ab:
Halten Sie die 1. und 2. Zusatzfunktionstaste drei
Sekunden lang gedrückt, während ein beliebiges
Programm läuft. Beim Gedrückthalten der 1. und
2. Zusatzfunktionstaste blinken die entsprechenden
Anzeigen, die Meldungen „C03“, „C02“, „C01“
leuchten im Display auf, während Sie die Tasten
gedrückt halten. Anschließend erscheint „COFF“ im
Display – die Kindersicherung ist nun abgeschaltet.
Alternativ können Sie die Kindersicherung
C auch
abschalten, indem Sie den
Programmauswahlknopf im Leerlauf der
Maschine auf die Ein/Aus-Position drehen und
anschließend ein anderes Programm auswählen.
30
C
Auch bei Stromausfällen (oder wenn der
Netzstecker gezogen wird) bleibt die
Kindersicherung eingeschaltet.
Programmfortschritt
Die Programmfolgeanzeige informiert Sie über den
Fortschritt des laufenden Programms. Zu Beginn eines
jeden Programmschrittes leuchtet die entsprechende
Anzeigeleuchte auf, die Leuchte des gerade
abgeschlossenen Programmschrittes erlischt.
Sie können Zusatzfunktionen sowie Geschwindigkeitsund Temperatureinstellungen ändern, ohne ein
laufendes Programm zuvor stoppen zu müssen. Damit
dies funktioniert, darf der jeweilige Programmschritt
natürlich noch nicht erreicht sein. Falls keine Änderung
möglich ist, blinkt die entsprechende Leuchte dreimal.
Falls die Maschine nicht schleudern sollte, ist die
C Spülstopp-Funktion
eventuell aktiv – oder die
Wäsche ist so ungleichmäßig in der Trommel
verteilt, dass Schleudern nicht ratsam wäre.
Türsperre
Ein spezielles Sicherungssystem verhindert das
Öffnen der Tür, solange der Wasserpegel innerhalb der
Maschine noch nicht als sicher gilt.
Die Tür-Leuchte beginnt zu blinken, wenn die
Maschine angehalten wird. Die Maschine prüft nun den
Wasserstand im Inneren. Bei sicherem Wasserstand
leuchtet die Tür-Leuchte innerhalb von 1 bis 2 Minuten
auf, die Tür kann nun geöffnet werden.
Solange die Tür-Leuchte nicht dauerhaft leuchtet, lässt
sich die Tür aufgrund des unsicheren Wasserstandes
nicht öffnen. Falls Sie die Tür öffnen müssen, die TürLeuchte jedoch nicht dauerhaft leuchtet, müssen Sie
das aktuelle Programm abbrechen. Lesen Sie dazu
bitte unter „Programme abbrechen“ nach.
Änderungen nach Programmstart
Maschine anhalten (Pause)
Zum Anhalten eines laufenden Programms drücken Sie
die Start-/Pausetaste. In der Programmfolgeanzeige
beginnt die Leuchte des entsprechenden
Programmschrittes zu blinken und zeigt an, dass die
Maschine angehalten wurde.
Sofern die Tür geöffnet werden kann, leuchtet
zusätzlich die Tür-Leuchte auf.
Geschwindigkeits- und
Temperatureinstellungen bei Zusatzfunktionen
ändern
Je nach aktuellem Programmschritt lassen sich
Zusatzfunktionen aufheben oder zuschalten – siehe
„Zusatzfunktionen auswählen“.
Darüber hinaus können Sie auch Geschwindigkeitsund Temperatureinstellungen ändern; schauen Sie sich
dazu bitte die Abschnitte „Schleudergeschwindigkeit
auswählen“ und „Temperatur auswählen“ an.
Falls keine Änderung möglich ist, blinkt die
C entsprechende
Leuchte dreimal.
Wäsche hinzugeben oder herausnehmen
1. Halten Sie die Maschine durch Drücken der Start/
Pause-Taste an. In der Programmfolgeanzeige
blinkt der Programmschritt, bei dem das
Programm angehalten wurde.
2. Warten Sie, bis sich die Tür öffnen lässt.
3. Öffnen Sie die Waschmaschinentür, geben Sie
weitere Wäsche hinzu oder nehmen Sie Wäsche
heraus.
DE
4. Schließen Sie die Waschmaschinentür.
5. Ändern Sie bei Bedarf Zusatzfunktionen,
Temperatur und Schleudergeschwindigkeit.
6. Starten Sie das Programm mit der Start/PauseTaste.
Programme abbrechen
Zum Abbrechen eines Programms wählen
Sie einfach ein anderes Programm mit dem
Programmauswahlknopf. Das zuvor aktive Programm
wird abgebrochen. Die Ende/Abbrechen-Leuchte
blinkt und zeigt an, dass das vorherige Programm
abgebrochen wurde.
Die Pumpe läuft 1 – 2 Minuten lang; unabhängig
davon, welcher Programmschritt gerade ausgeführt
wird oder ob sich noch Wasser in der Maschine
befindet. Anschließend kann die Maschine mit dem
ersten Schritt des neuen Programms beginnen.
Je nachdem, bei welchem Schritt ein Programm
C abgebrochen
wurde, müssen Sie eventuell erneut
Waschmittel und Weichspüler einfüllen, nachdem
Sie ein neues Programm ausgewählt haben.
Programmende
Nach Abschluss des Programms wird „End“ im
Display angezeigt. Warten Sie, bis die Tür-Leuchte
dauerhaft leuchtet. Schalten Sie die Maschine mit der
Ein-/Austaste ab. Nehmen Sie die Wäsche heraus,
schließen Sie die Waschmaschinentür. Die Maschine ist
nun zum nächsten Waschen bereit.
5 Reinigung und Wartung
Viele Probleme lassen sich vermeiden, wenn Sie Ihre
Waschmaschine in regelmäßigen Abständen reinigen;
zusätzlich verlängern Sie die Lebensdauer Ihres neuen
Gerätes.
Waschmittelschublade reinigen
Reinigen Sie die Waschmittelschublade regelmäßig
(jeweils nach 4 – 5 Wäschen), damit sich im Laufe der
Zeit keine Waschmittelreste ansammeln. Gehen Sie
dazu wie folgt vor:
Drücken Sie die runde Markierung im Weichspülerfach
hinab und ziehen Sie die Schublade zu sich hin, bis Sie
sie aus der Maschine nehmen können.
Wenn sich eine Mischung aus Wasser und
C Weichspüler
im Weichspülerfach ansammelt, ist
es Zeit, den Siphon zu reinigen.
Waschen Sie die Waschmittelschublade und
den Siphon mit reichlich warmem Wasser im
Waschbecken aus. Tragen Sie beim Reinigen
Schutzhandschuhe oder benutzen Sie eine Bürste,
damit die Rückstände bei der Reinigung nicht
an Ihre Haut gelangen können. Schieben Sie die
Waschmittelschublade nach der Reinigung wieder an
Ort und Stelle; vergewissern Sie sich, dass sie richtig
sitzt.
Wasserzulaufschläuche (dort, wo diese an den
Wasserhahn angeschlossen werden) befindet sich
ein Filter. Diese Filter verhindern, dass Fremdkörper
und Schmutz mit dem Wasser in die Waschmaschine
gelangen. Die Filter sollten bei Verschmutzung gereinigt
werden.
Schließen Sie die Wasserhähne. Entfernen Sie
die Muttern an den Wasserzulaufschläuchen und
reinigen Sie die Filter am Wassereinlauf mit einer
passenden Bürste. Falls die Filter stark verschmutzt
sein sollten, können Sie diese mit einer kleinen Zange
herausnehmen und säubern. Die Filter an den flachen
Enden der Wasserzulaufschläuche nehmen Sie
zusammen mit den Dichtungen heraus und reinigen
sie gründlich unter fließendem Wasser. Setzen Sie die
Dichtungen und Filter sorgfältig wieder an den alten
Platz und ziehen Sie die Muttern an den Schläuchen
von Hand an.
Restliches Wasser ablaufen lassen
und Pumpenfilter reinigen
Die Filtersysteme in Ihrer Maschine sorgen dafür,
dass Festkörper wie Knöpfe, Münzen und Textilfasern
ausgefiltert werden und den Propeller der Pumpe beim
Ablaufen des Wassers nicht zusetzen können. So wird
die Pumpe beim Abpumpen des Wassers weniger
stark belastet und hält länger.
Falls das Wasser nicht mehr vollständig aus Ihrer
Maschine abgepumpt wird, kann der Pumpenfilter
verstopft sein. Dieser Filter muss mindestens alle drei
Monate (und natürlich, wenn er verstopft ist) gereinigt
werden. Zum Reinigen des Pumpenfilters muss das
Wasser zunächst abgelassen werden.
In bestimmten Fällen – beispielsweise bei einem
Umzug oder wenn Frostgefahr droht – muss das
Wasser komplett abgelassen werden.
Pumpenfilter verbliebene Fremdkörper können
A Im
die Maschine beschädigen und zu starken
Betriebsgeräuschen führen.
So lassen Sie das Wasser ab und reinigen einen
verschmutzten Filter:
Trennen Sie das Gerät vollständig von der
Stromversorgung, indem Sie den Netzstecker ziehen.
Wassertemperatur im Inneren der Maschine
A Die
kann bis zu 90 °C erreichen. Damit es nicht zu
Verbrühungen oder Verbrennungen kommt, darf
der Filter erst gereinigt werden, wenn das Wasser
in der Maschine abgekühlt ist.
Öffnen Sie die Filterkappe.
Wenn die Filterkappe aus zwei Teilen besteht,
drücken Sie die Lasche an der Filterkappe nach
unten und ziehen das Teil zu sich hin heraus.
Wasserzulauffilter reinigen
Am Endstück jedes Wasserzulaufventils an der
Rückseite der Maschine sowie am Ende der
31
DE
des Schlauches mit dem Stopfen und schieben den
Schlauch wieder an seinen Platz. Drehen Sie den
Pumpenfilter heraus.
Wasser bei Geräten ohne Notfall-Ablaufschlauch
ablassen:
Bei einer einteiligen Filterkappe öffnen Sie die Kappe,
indem Sie sie an beiden Seiten nach oben ziehen.
Die Filterabdeckung lässt sich entfernen,
C indem
Sie einen dünnen Gegenstand mit
Kunststoffspitze zur Hand nehmen und die
Abdeckung durch die Öffnung oberhalb der
Filterabdeckung etwas nach unten drücken.
Versuchen Sie nicht, die Abdeckung mit
Metallgegenständen zu lösen.
Bestimmte Modelle sind mit einem NotfallAblaufschlauch ausgestattet. Mit den nachstehenden
Schritten lassen Sie das Wasser ab.
Wasser bei Geräten mit Notfall-Ablaufschlauch
ablassen:
Stellen Sie ein großes Gefäß unter die Öffnung des
Filters, damit das ablaufende Wasser hineinfließen
kann. Lösen Sie den Pumpenfilter (gegen den
Uhrzeigersinn), bis Wasser austritt. Leiten Sie den
Wasserfluss in das Gefäß, das Sie unter dem Filter
aufgestellt haben. Halten Sie am besten einen Lappen
für den Fall bereit, dass etwas Wasser auf den Boden
gelangen sollte. Wenn das Wasser vollständig aus
der Maschine abgelaufen ist, drehen Sie den Filter
komplett heraus. Reinigen Sie den Filter sorgfältig von
sämtlichen Rückständen und entfernen Sie sämtliche
Textilfasern (sofern vorhanden) in der Nähe der
Pumpenflügel. Installieren Sie den Filter.
Ihre Maschine mit einer Wasserdüse
A Falls
ausgestattet sein sollte, achten Sie besonders gut
darauf, den Filter wieder richtig an seinen Platz
in der Pumpe zu setzen. Versuchen Sie niemals,
den Filter mit Gewalt wieder an Ort und Stelle zu
bringen. Achten Sie darauf, dass der Filter wieder
vollständig im Gehäuse sitzt. Andernfalls kann
Wasser durch die Filterkappe auslaufen.
Falls die Filterkappe aus zwei Teilen besteht, schließen
Sie die Filterkappe, indem Sie auf die Lasche drücken.
Bei einer einteiligen Filterkappe setzen Sie zuerst die
Nasen im unteren Teil entsprechend ein, anschließend
drücken Sie zum Verschließen den oberen Teil nach
unten.
Ziehen Sie den Notfall-Ablaufschlauch aus seinem
Gehäuse. Stellen Sie ein großes Gefäß unter das
Ende des Schlauches. Lassen Sie das Wasser in den
Behälter ablaufen, indem Sie den Stopfen am Ende
des Schlauches herausziehen. Wenn der Behälter
voll ist, verschließen Sie das Ende des Schlauches,
indem Sie den Stopfen wieder einsetzen. Leeren
Sie den Behälter aus. Anschließend wiederholen
Sie den Vorgang und lassen das restliche Wasser
aus der Maschine ablaufen. Nachdem das Wasser
komplett abgelaufen ist, verschließen Sie das Ende
Auffrischen
Öko 20
(Öko-sauber)
(Öko-Rein)
Maschinenpflege
Dessous
Mini-(Täglich)
Mini 14
(Selbstreinigung) (Damenwäsche) (Tageskleidung (Superschnell)
-Express)
(SuperschnellExpress)
Ein/Aus
Start
Pause
Baumwolle
Synthetik
Handwäsche
Vorwäsche
Hauptwäsche
Spülen +
Waschen
Ende
Kindersicherung
Abbrechen, 3 s
Halbe Menge
Schnellwäsche
Dunkles
(Dunkle
Wäsche)
Gemischt
Mini-(Täglich)
(Tageskleidung
-Express)
Feinwäsche
Intensiv
Sport
Hemden
Bettzeug
Hygiene
Einweichen
Knitterschutz
Spülstopp
Nicht
schleudern
Schleudern
Kalt
Bereit
Temperatur
Zeitverzögerung
Abpumpen
Super
Super-Öko
Spülen
Baumwoll-Öko
Wolle
32
DE
Modelle (DE)
WNF 7301 WE20
WNF 7321 AE20
WNF 7341 AE20
WNF 7361 AE20
6 Technische Daten
Maximale Trockenwäschefüllmenge (kg)
7
7
7
7
Höhe (cm)
84
84
84
84
Breite (cm)
60
60
60
60
Tiefe (cm)
55
55
55
55
Nettogewicht (±4 kg)
72
72
71
76
Stromversorgung (V/Hz)
230 V / 50Hz
Maximaler Strom (A)
10
10
Gesamtleistung (W)
10
10
2200
Schleudergeschwindigkeit (U/min, max.)
1000
1200
1400
1600
Stromverbrauch im Bereitschaftsmodus (W)
1.35
1.35
1.35
1.35
Stromverbrauch bei abgeschaltetem Gerät (W)
0.25
0.25
0.25
0.25
C
C
C
Im Zuge der Qualitätsverbesserung können sich die technischen Daten dieses Gerätes ohne Vorankündigung
ändern.
Bei den Abbildungen in dieser Anleitung handelt es sich um schematische Darstellungen, die möglicherweise
nicht exakt mit Ihrem Gerät übereinstimmen.
Die am Gerät oder in der Dokumentation angegebenen Werte wurden unter Laborbedingungen in
Übereinstimmung mit den zutreffenden Normen ermittelt. Diese Werte können je nach Einsatz- und
Umweltbedingungen variieren.
Dieses Gerät ist mit dem Symbol zur selektiven Behandlung von Elektro- und
Elektronikausstattungen gekennzeichnet. Dies bedeutet, dass das ausgediente Gerät gemäß der
EG-Richtlinie 2002/96 zwecks Zerlegen oder Recycling von einem selektiven Sammelsystem erfasst
werden muss, um jegliche Auswirkungen auf die Umwelt zu reduzieren
Weitere Auskünfte können von den zuständigen örtlichen oder landesweiten Behörden erhalten
werden.
Nicht selektiv behandelte Elektronikprodukte können auf Grund der in ihnen enthaltenen Schadstoffe
für die Umwelt und die menschliche Gesundheit schädlich sein.
33
DE
7 Problemlösung
Schaum tritt aus der Waschmittelschublade aus.
• Zu viel Waschmittel. >>> Mischen Sie einen Teelöffel Weichspüler mit einem halben Liter Wasser,
gießen Sie die Mischung in das Hauptwäschefach der Waschmittelschublade.
Orientieren Sie sich bei der Auswahl der passenden Waschmittelmenge an den Angaben zu
C Programmen
und maximaler Beladung in der „Programm- und Verbrauchstabelle“. Wenn Sie zusätzliche
Chemikalien (Fleckentferner, Bleichmittel und dergleichen) verwenden, geben Sie weniger Waschmittel
hinzu.
Die Wäsche ist nach Abschluss des Programms noch nass
• Durch übermäßig viel Waschmittel hat sich zu viel Schaum gebildet; das automatische
Schaumbeseitigungssystem wurde aktiv. >>> Verwenden Sie nicht mehr als die empfohlene
Waschmittelmenge.
Bei unregelmäßiger Wäscheverteilung (Unwucht) in der Trommel schleudert die Maschine nicht, damit
C es
nicht zu Beschädigungen der Maschine oder ihrer Umgebung kommt. In diesem Fall sollten Sie die
Wäsche auflockern, gleichmäßiger verteilen und erneut schleudern.
Falls sich Störungen nicht durch die Hinweise in diesem Abschnitt beseitigen lassen sollten, wenden
A Sie
sich bitte an Ihren Händler oder an den autorisierten Kundendienst. Versuchen Sie niemals, ein
defektes Gerät selbst zu reparieren.
34
DE
2820522240_DE/190911.1649
Programme lassen sich nicht starten oder auswählen.
• Die Waschmaschine hat sich eventuell aus Sicherheitsgründen selbst abgeschaltet; dies kann äußere
Ursachen (z. B. Schwankungen von Spannung oder Wasserdruck, etc.) haben. >>> Setzen Sie die
Maschine auf die Werkseinstellungen zurück, indem Sie die Start/Pause-Taste 3 Sekunden lang
gedrückt halten. (Siehe „Programme abbrechen“.)
Wasser in der Maschine.
• Eventuell befindet sich noch etwas Wasser in der Trommel. Dies liegt daran, dass das Gerät vor der
Auslieferung noch einmal gründlich geprüft wurde. >>> Dies ist kein Defekt – natürlich wird Ihre
Waschmaschine nicht von Wasser beeinträchtigt.
Die Maschine vibriert stark oder arbeitet sehr laut.
• Die Maschine steht eventuell nicht gerade. >>> Balancieren Sie die Maschine mit den einstellbaren
Füßen aus.
• Ein Fremdkörper ist in den Pumpenfilter eingedrungen. >>> Reinigen Sie den Pumpenfilter.
• Die Transportsicherungen (Bolzen) wurden nicht entfernt. >>> Entfernen Sie die
Transportsicherungsbolzen.
• Zu wenig Wäsche in der Maschine. >>> Geben Sie mehr Wäsche in die Maschine.
• Die Maschine wurde eventuell überladen. >>> Reduzieren Sie die Wäschemenge in der Maschine
oder verteilen Sie die Wäsche von Hand gleichmäßiger.
• Die Maschine stößt gegen einen anderen Gegenstand. >>> Achten Sie darauf, dass die Maschine
nirgendwo anstößt.
Die Maschine stoppt kurz nach Programmbeginn.
• Die Maschine kann vorübergehend anhalten, wenn die Spannung zu niedrig ist. >>> Sie setzt den
Betrieb fort, wenn die Spannung wieder den Normalwert erreicht hat.
Die Programmdauer wird nicht heruntergezählt. (bei Modellen mit Anzeige)
• Der Timer hält an, solange Wasser in die Maschine einläuft. >>> Die Zeit läuft erst dann weiter, wenn
sich ausreichend viel Wasser in der Maschine befindet. Die Maschine wartet, bis eine ausreichende
Menge Wassers eingelaufen ist; ansonsten kann es vorkommen, dass die Wäsche nicht richtig
sauber wird. Anschließend läuft die Zeit weiter.
• Der Timer hält an, solange das Wasser aufgewärmt wird. >>> Die Zeit läuft erst dann weiter, wenn das
Wasser die vorgegebene Temperatur erreicht hat.
• Die Zeit läuft beim Schleudern eventuell nicht weiter. >>> Bei sehr ungleichmäßiger Wäscheverteilung
spricht eine spezielle Schutzschaltung an.
Bei unregelmäßiger Wäscheverteilung (Unwucht) in der Trommel schleudert die Maschine nicht, damit
C es
nicht zu Beschädigungen der Maschine oder ihrer Umgebung kommt. In diesem Fall sollten Sie die
Wäsche auflockern, gleichmäßiger verteilen und erneut schleudern.
•
1 Σημαντικές οδηγίες ασφαλείας
Η ενότητα αυτή περιλαμβάνει οδηγίες ασφαλείας που
θα σας βοηθήσουν να προστατευτείτε από τον κίνδυνο
τραυματισμού ή υλικών ζημιών. Μη τήρηση αυτών των
οδηγιών θα καταστήσει άκυρη οποιαδήποτε εγγύηση.
•
Γενικά για την ασφάλεια
•
•
•
•
•
•
•
•
•
•
•
•
•
•
•
Το προϊόν δεν θα πρέπει να χρησιμοποιείται από
άτομα με μειωμένες σωματικές, αισθητηριακές ή
πνευματικές ικανότητες ή με έλλειψη εμπειρίας
ή γνώσης (περιλαμβανομένων παιδιών), εκτός αν
τα άτομα αυτά επιτηρούνται από άτομο που θα
είναι υπεύθυνο για την ασφάλειά τους ή που θα τα
καθοδηγεί σχετικά με τη χρήση του προϊόντος.
Ποτέ μην τοποθετήσετε το προϊόν σε δάπεδο
που καλύπτεται από χαλί ή μοκέτα. Διαφορετικά,
η έλλειψη ροής αέρα κάτω από τη συσκευή θα
προκαλέσει υπερθέρμανση των ηλεκτρικών
εξαρτημάτων. Αυτό θα προκαλέσει προβλήματα
στη συσκευή σας.
Μη χρησιμοποιήσετε τη συσκευή αν υπάρχει φθορά
ή ζημιά στο καλώδιο / το φις ρευματοληψίας.
Καλέστε τον εξουσιοδοτημένο αντιπρόσωπο
σέρβις.
Αναθέστε σε αδειούχο ηλεκτρολόγο να συνδέσει
ασφάλεια 16 Α που να αντιστοιχεί στη θέση
εγκατάστασης του προϊόντος.
Αν το προϊόν παρουσιάζει βλάβη, δεν θα πρέπει να
τεθεί σε λειτουργία αν πρώτα δεν επισκευαστεί
από εξουσιοδοτημένο αντιπρόσωπο σέρβις.
Υπάρχει κίνδυνος ηλεκτροπληξίας!
Η συσκευή σας έχει σχεδιαστεί ώστε να συνεχίζει
τη λειτουργία από το σημείο που σταμάτησε, στην
περίπτωση επαναφορά της τροφοδοσίας ρεύματος
μετά από διακοπή. Αν θέλετε να ακυρώσετε το
πρόγραμμα, ανατρέξτε στην ενότητα "Ακύρωση
του προγράμματος".
Συνδέστε το προϊόν σε γειωμένη πρίζα
που προστατεύεται από ασφάλεια η οποία
συμμορφώνεται με τις τιμές στον πίνακα "Τεχνικές
προδιαγραφές". Μην αμελήσετε να αναθέσετε σε
αδειούχο ηλεκτρολόγο να κάνει την εγκατάσταση
γείωσης. Η εταιρεία μας δεν θα φέρει καμία ευθύνη
για τυχόν βλάβες που θα προκύψουν αν η συσκευή
χρησιμοποιηθεί χωρίς γείωση σύμφωνη με τους
ισχύοντες τοπικούς κανονισμούς.
Οι εύκαμπτοι σωλήνες τροφοδοσίας και
αποστράγγισης νερού πρέπει πάντα να είναι καλά
στερεωμένοι και να μην παρουσιάζουν φθορά.
Διαφορετικά, υπάρχει κίνδυνος διαρροής νερού.
Ποτέ μην ανοίξετε την πόρτα φόρτωσης και μην
αφαιρέσετε το φίλτρο όσο υπάρχει ακόμη νερό
στο τύμπανο. Διαφορετικά, θα προκληθεί κίνδυνος
πλημμύρας και τραυματισμού από καυτό νερό.
Ποτέ με ανοίγετε με τη βία την ασφαλισμένη
πόρτα φόρτωσης. Η πόρτα φόρτωσης θα μπορεί
να ανοίξει λίγα μόλις λεπτά μετά τη λήξη του
κύκλου πλυσίματος. Σε περίπτωση που ασκήσετε
βία για να ανοίξει η πόρτα φόρτωσης, η πόρτα και ο
μηχανισμός ασφάλισης μπορεί να υποστούν ζημιά.
Όταν η συσκευή σας δεν είναι σε χρήση,
αποσυνδέετέ την από την πρίζα.
Ποτέ μην πλένετε τη συσκευή απλώνοντας ή
χύνοντας νερό πάνω της! Υπάρχει κίνδυνος
ηλεκτροπληξίας!
Ποτέ μη αγγίξετε το φις με βρεγμένα χέρια! Ποτέ
μην αφαιρέσετε το φις από την πρίζα τραβώντας
το καλώδιο, τραβάτε πιάνοντας μόνο το φις.
Πρέπει να χρησιμοποιούνται μόνο απορρυπαντικά,
μαλακτικά και πρόσθετα κατάλληλα για χρήση σε
αυτόματα πλυντήρια.
Ακολουθείτε τις οδηγίες πάνω στις ετικέτες των
ρούχων και στη συσκευασία του απορρυπαντικού.
36
Το προϊόν πρέπει να είναι αποσυνδεδεμένο
από την πρίζα κατά τη διάρκεια των εργασιών
εγκατάστασης, συντήρησης, καθαρισμού και
επισκευών.
Πάντα αναθέτετε τις διαδικασίες εγκατάστασης
και επισκευών σε εξουσιοδοτημένο αντιπρόσωπο
σέρβις. Ο κατασκευαστής δεν θα είναι
υπεύθυνος για ζημιές που μπορεί να προκύψουν
από διαδικασίες που εκτελούνται από μη
εξουσιοδοτημένα άτομα.
Προβλεπόμενη χρήση
•
•
•
Το προϊόν αυτό έχει σχεδιαστεί για οικιακή χρήση.
Δεν είναι κατάλληλο για επαγγελματική χρήση
και δεν πρέπει να χρησιμοποιείται για άλλη χρήση
πέραν της προβλεπόμενης.
Αυτό το προϊόν πρέπει να χρησιμοποιείται μόνο για
το πλύσιμο και ξέβγαλμα ρούχων που φέρουν την
αντίστοιχη σήμανση.
Ο κατασκευαστής δεν δέχεται οποιαδήποτε ευθύνη
προκύψει από λανθασμένη χρήση ή μεταφορά.
Σχετικά με την ασφάλεια των παιδιών
•
•
•
Οι ηλεκτρικές συσκευές είναι επικίνδυνες για
τα παιδιά. Κρατάτε τα παιδιά μακριά από τη
συσκευή όταν αυτή είναι σε χρήση. Μην τα αφήνετε
να πειράζουν τη συσκευή. Χρησιμοποιείτε το
κλείδωμα προστασίας για να εμποδίζετε τα παιδιά
να επεμβαίνουν στη συσκευή.
Μην ξεχνάτε να κλείνετε την πόρτα φόρτωσης
όταν εγκαταλείπετε το χώρο όπου βρίσκεται η
συσκευή.
Αποθηκεύετε όλα τα απορρυπαντικά και τα
πρόσθετα σε ασφαλές μέρος μακριά από τα
παιδιά.
2 Εγκατάσταση
Για την εγκατάσταση του προϊόντος απευθυνθείτε στον
πλησιέστερο εξουσιοδοτημένο αντιπρόσωπο σέρβις. Για
να προετοιμάσετε το προϊόν για χρήση, πριν καλέσετε
τον εξουσιοδοτημένο αντιπρόσωπο σέρβις μελετήστε
τις πληροφορίες που περιέχει το εγχειρίδιο χρήσης
και βεβαιωθείτε ότι είναι κατάλληλα τα συστήματα
ηλεκτρισμού, παροχής νερού βρύσης και αποχέτευσης.
Αν δεν είναι, καλέστε έναν ειδικευμένο τεχνικό και
υδραυλικό για να πραγματοποιήσει τυχόν αναγκαίες
εργασίες.
Η προετοιμασία της θέσης και των εγκαταστάσεων
ηλεκτρικού ρεύματος, νερού βρύσης και
αποχέτευσης στη θέση εγκατάστασης αποτελούν
ευθύνη του πελάτη.
Η εγκατάσταση και οι ηλεκτρικές συνδέσεις
της συσκευής πρέπει να εκτελεστούν από
τον εξουσιοδοτημένο αντιπρόσωπο σέρβις. Ο
κατασκευαστής δεν θα είναι υπεύθυνος για ζημιές
που μπορεί να προκύψουν από διαδικασίες που
εκτελούνται από μη εξουσιοδοτημένα άτομα.
Πριν την εγκατάσταση, ελέγξτε οπτικά αν το
προϊόν παρουσιάζει οποιαδήποτε βλάβη ή ζημιά. Αν
ναι, τότε μην το εγκαταστήσετε. Τα προϊόντα που
έχουν υποστεί ζημιά προκαλούν κινδύνους για την
ασφάλειά σας.
Βεβαιωθείτε ότι οι εύκαμπτοι σωλήνες εισόδου
νερού και εξόδου απόνερων, καθώς και το
καλώδιο ρεύματος, δεν θα διπλώσουν, τσακίσουν
ή συμπιεστούν καθώς σπρώχνετε το προϊόν στη
θέση του μετά τις διαδικασίες εγκατάστασης ή
καθαρισμού.
C
B
A
C
Κατάλληλη θέση εγκατάστασης
•
EL
Τοποθετήστε τη συσκευή σε στέρεο δάπεδο. Μην
την τοποθετήσετε πάνω σε χαλί με παχύ πέλος ή
σε παρόμοιες επιφάνειες.
•
Αν τοποθετηθεί πλυντήριο και στεγνωτήριο το ένα
πάνω στο άλλο, το συνολικό τους βάρος μπορεί να
φθάσει περίπου στα 180 κιλά όταν είναι γεμάτα.
Τοποθετήστε τη συσκευή σε στέρεο και επίπεδο
δάπεδο με επαρκή φέρουσα ικανότητα!
Μην τοποθετείτε τη συσκευή πάνω στο καλώδιο
ρεύματος.
Μην τοποθετείτε τη συσκευή σε μέρη όπου η
θερμοκρασία μπορεί να πέσει κάτω από τους 0ºC.
Κρατάτε τη συσκευή τουλάχιστον 1 εκ. από τις
πλευρές άλλων επίπλων.
•
•
•
1.
Συνδέστε τους ειδικούς εύκαμπτους σωλήνες
που συνοδεύουν τη συσκευή στις εισόδους νερού
της συσκευής. Ο κόκκινος εύκαμπτος σωλήνας
(αριστερά) (μέγ. θερμοκρασία 90 ºC) προορίζεται
για την είσοδο ζεστού νερού και ο μπλε εύκαμπτος
σωλήνας (δεξιά) (μέγ. θερμοκρασία 25 ºC)
προορίζεται για είσοδο κρύου νερού.
Αφαίρεση της ενίσχυσης της συσκευασίας
Γείρετε τη συσκευή προς τα πίσω για να αφαιρέσετε
την ενίσχυση της συσκευασίας. Αφαιρέστε την ενίσχυση
της συσκευασίας τραβώντας την κορδέλα.
Αφαίρεση των ασφαλιστικών μεταφοράς
αφαιρέσετε τα ασφαλιστικά μεταφοράς πριν
A Μην
αφαιρέσετε την ενίσχυση συσκευασίας.
Αφαιρέστε
ασφαλούς μεταφοράς
A πριν θέσετετασεμπουλόνια
λειτουργία το πλυντήριο, αλλιώς, η
συσκευή θα υποστεί ζημιά.
Ξεσφίξτε όλα τα μπουλόνια με ένα κλειδί έως ότου
περιστρέφονται ελεύθερα .
Αφαιρέστε τα μπουλόνια ασφαλούς μεταφοράς
περιστρέφοντάς τα απαλά.
Τοποθετήστε στις οπές στο πίσω τοίχωμα τα
πλαστικά καλύμματα που υπάρχουν στη σακούλα
του εγχειριδίου χρήστη. (P)
1.
2.
3.
C
Φυλάξτε τα μπουλόνια ασφαλούς μεταφοράς σε
ασφαλές μέρος για να τα χρησιμοποιήσετε πάλι
όταν το πλυντήριο χρειάζεται να μεταφερθεί στο
μέλλον.
Ποτέ μη μετακινήσετε το προϊόν χωρίς τα
μπουλόνια ασφαλούς μεταφοράς κατάλληλα
στερεωμένα στη θέση τους!
την εγκατάσταση της συσκευής, βεβαιωθείτε
A Κατά
ότι έχουν γίνει σωστά οι συνδέσεις κρύου και
ζεστού νερού. Διαφορετικά, τα ρούχα σας μπορεί
να βγουν καυτά στο τέλος της διαδικασίας
πλυσίματος και να υποστούν φθορές.
Σφίξτε όλα τα παξιμάδια των εύκαμπτων σωλήνων
με το χέρι. Ποτέ μη χρησιμοποιήσετε κλειδί για να
σφίξετε τα παξιμάδια.
2.
3.
Αφού κάνετε τη σύνδεση των εύκαμπτων σωλήνων,
ανοίξτε πλήρως τους διακόπτες παροχής νερού
για να ελέγξετε για διαρροές στα σημεία σύνδεσης.
Αν εμφανιστούν διαρροές, κλείστε το διακόπτη
παροχής νερού και αφαιρέστε το παξιμάδι. Σφίξτε
πάλι προσεκτικά το παξιμάδι αφού ελέγξετε τη
στεγανοποίηση. Για να αποφύγετε διαρροές νερού
και οποιαδήποτε ζημιά μπορεί να προκληθεί από
αυτές, διατηρείτε τους διακόπτες παροχής νερού
κλειστούς όταν δεν χρησιμοποιείται το πλυντήριο.
C
Σύνδεση της παροχής νερού
C
C
C
A
A
Η πίεση της παροχής νερού που απαιτείται για τη
λειτουργία της συσκευής είναι 1 έως 10 bar (0,1 –
10 MPa). Είναι απαραίτητο να έχετε παροχή νερού
10 – 80 λίτρων ανά λεπτό από τον πλήρως ανοικτό
διακόπτη για να λειτουργεί ομαλά το πλυντήριό
σας. Σε περίπτωση που η πίεση του νερού είναι
υψηλότερη, τοποθετήστε βαλβίδα μείωσης της
πίεσης.
Αν πρόκειται να χρησιμοποιήσετε τη συσκευή
διπλής εισόδου νερού ως μονάδα μίας εισόδου
(κρύου) νερού, τότε πρέπει να τοποθετήσετε την
παρεχόμενη τάπα στη βαλβίδα ζεστού νερού πριν
θέσετε σε λειτουργία τη συσκευή. (Έχει εφαρμογή
στα προϊόντα που συνοδεύονται από συγκρότημα
τάπας).
Αν θέλετε να χρησιμοποιήσετε και τις δύο εισόδους
νερού του προϊόντος, συνδέστε το λαστιχένιο
σωλήνα ζεστού νερού αφού αφαιρέσετε το
συγκρότημα τάπας και στεγανοποιητικού από
τη βαλβίδα ζεστού νερού. (Έχει εφαρμογή στα
προϊόντα που συνοδεύονται από συγκρότημα
τάπας).
Στα μοντέλα με μία μόνο είσοδο νερού, αυτή δεν θα
πρέπει να συνδεθεί στην παροχή ζεστού νερού. Σε
μια τέτοια περίπτωση, τα ρούχα θα υποστούν ζημιά
ή η συσκευή θα μεταβεί σε κατάσταση προστασίας
και δεν θα λειτουργήσει.
Μη χρησιμοποιήσετε παλιούς ή μεταχειρισμένους
εύκαμπτους σωλήνες εισόδου νερού στην
καινούργια συσκευή. Μπορεί να δημιουργηθούν
λεκέδες στα ρούχα σας.
37
Σύνδεση με την αποχέτευση
•
Το άκρο του σωλήνα αποστράγγισης πρέπει να
είναι απ' ευθείας συνδεδεμένο με την αποχέτευση ή
το νιπτήρα.
Αν ο εύκαμπτος σωλήνας βγει από την υποδοχή
του κατά τη διάρκεια της εκκένωσης του νερού,
μπορεί να προκληθεί πλημμύρα στο σπίτι σας.
Επιπλέον, υπάρχει κίνδυνος ζεματίσματος λόγω
των υψηλών θερμοκρασιών πλυσίματος! Για
να αποφύγετε τέτοιες καταστάσεις και για να
εξασφαλίσετε ομαλή τροφοδοσία και εκκένωση
του νερού από τη συσκευή, στερεώστε καλά το
άκρο του λαστιχένιου σωλήνα εξόδου νερού ώστε
να μην μπορεί να φύγει από τη θέση του.
Ο εύκαμπτος σωλήνας θα πρέπει να αναρτηθεί σε
ύψος τουλάχιστον 40 εκ. έως το πολύ 100 εκ.
Σε περίπτωση που ο εύκαμπτος σωλήνας
ανυψώνεται αφού έχει τοποθετηθεί στο επίπεδο
του δαπέδου ή κοντά στο δάπεδο (λιγότερο από
40 εκ. από το δάπεδο), η αποστράγγιση του νερού
γίνεται πιο δύσκολη και τα ρούχα μπορεί να
βγουν υπερβολικά υγρά. Επομένως θα πρέπει να
τηρούνται τα ύψη που αναφέρονται στο σχήμα.
A
•
•
EL
χρησιμοποιήσετε οποιαδήποτε εργαλεία
A Μη
για τη χαλάρωση των παξιμαδιών ασφάλισης.
Διαφορετικά, θα υποστούν ζημιά.
•
•
•
Για να αποτρέψετε την επιστροφή των
απόνερων στη συσκευή και να διευκολύνετε την
αποστράγγιση, μη βυθίσετε το άκρο του εύκαμπτου
σωλήνα στα απόνερα και μην το εισάγετε στο
σωλήνα αποχέτευσης περισσότερο από 15 εκ. Αν
είναι πολύ μακρύ, κόψτε το για να το κοντύνετε.
Το άκρο του εύκαμπτου σωλήνα δεν πρέπει να
λυγίζεται ή να πατιέται και ο σωλήνας δεν πρέπει
να συμπιέζεται ανάμεσα στην αποχέτευση και το
πλυντήριο.
Αν το μήκος του εύκαμπτου σωλήνα είναι πολύ
μικρό, μπορείτε να προσθέσετε ένα τμήμα
επέκτασης στο αρχικό τμήμα του εύκαμπτου
σωλήνα. Το μήκος του εύκαμπτου σωλήνα δεν
επιτρέπεται να είναι μεγαλύτερο από 3,2 μ. Για να
αποφύγετε βλάβες με διαρροή νερού, η σύνδεση
μεταξύ του εύκαμπτου σωλήνα επέκτασης και του
εύκαμπτου σωλήνα αποστράγγισης της συσκευής
πρέπει να έχει γίνει καλά με κατάλληλο σφιγκτήρα
για να μην αποσυνδεθούν και προκύψει διαρροή.
Ρύθμιση των ποδιών
να εξασφαλίσετε λειτουργία της συσκευής σας
A Για
με λιγότερο θόρυβο και χωρίς κραδασμούς, πρέπει
να την τοποθετήσετε σε οριζόντια θέση και να τη
ρυθμίσετε ώστε να στηρίζεται καλά στα πόδια της.
Ισορροπήστε τη συσκευή ρυθμίζοντας τα πόδια.
Διαφορετικά, η συσκευή μπορεί να μετακινηθεί
από τη θέση της και να προκαλέσει προβλήματα
σύνθλιψης και κραδασμών.
1.
2.
3.
Χαλαρώστε με το χέρι τα παξιμάδια ασφάλισης
των ποδιών.
Ρυθμίστε τα πόδια ώστε η συσκευή να είναι
οριζόντια και να μην ταλαντεύεται.
Σφίξτε όλα τα παξιμάδια ασφάλισης πάλι με το
χέρι.
Σύνδεση ηλεκτρικού ρεύματος
Συνδέστε το προϊόν σε γειωμένη πρίζα που
προστατεύεται από ασφάλεια η οποία συμμορφώνεται
με τις τιμές στον πίνακα "Τεχνικές προδιαγραφές".
Η εταιρεία μας δεν θα φέρει καμία ευθύνη για τυχόν
βλάβες που θα προκύψουν αν η συσκευή χρησιμοποιηθεί
χωρίς γείωση σύμφωνη με τους ισχύοντες τοπικούς
κανονισμούς.
•
Η σύνδεση πρέπει να συμμορφώνεται με τους
εθνικούς κανονισμούς.
•
Το φις καλωδίου ρεύματος πρέπει να είναι εύκολα
προσβάσιμο μετά την εγκατάσταση.
•
Οι προδιαγραφές για την τάση και την
επιτρεπόμενη ασφάλεια ή ασφαλειοδιακόπτη
προστασίας δίνονται στην ενότητα "Τεχνικές
Προδιαγραφές". Αν η τρέχουσα τιμή της
ασφάλειας ή του ασφαλειοδιακόπτη στην
εγκατάσταση του σπιτιού είναι μικρότερη από 16
Α, αναθέστε σε εξειδικευμένο ηλεκτρολόγο να
εγκαταστήσει ασφάλεια 16 Α.
•
Η τάση όπως ορίζεται στις προδιαγραφές πρέπει
να είναι σύμφωνη με την τάση δικτύου.
•
Μην κάνετε συνδέσεις μέσω καλωδίων επέκτασης
ή πολύπριζων.
Τυχόν φθαρμένα καλώδια ρεύματος πρέπει να
αντικαθίσταται από εξουσιοδοτημένο αντιπρόσωπο
σέρβις.
B
Πρώτη χρήση
Πριν ξεκινήσετε τη χρήση της συσκευής, βεβαιωθείτε
ότι έχουν γίνει όλες οι προετοιμασίες σύμφωνα με τις
οδηγίες στις ενότητες "Σημαντικές οδηγίες ασφαλείας"
και "Εγκατάσταση".
Για να προετοιμάσετε τη συσκευή για το πλύσιμο
ρούχων, εκτελέστε πρώτα ένα κύκλο λειτουργίας
στο πρόγραμμα Καθαρισμός τυμπάνου. Αν η συσκευή
σας δεν διαθέτει πρόγραμμα Καθαρισμός τυμπάνου,
χρησιμοποιήστε το πρόγραμμα Βαμβακερά 90 και
επιλέξτε συγχρόνως τις βοηθητικές λειτουργίες
Επιπλέον νερό ή Πρόσθετο ξέβγαλμα. Πριν ξεκινήσετε
το πρόγραμμα, προσθέστε το πολύ 100 γρ. σκόνης
αποσκληρυντικού στο διαμέρισμα απορρυπαντικού
κύριας πλύσης (διαμέρισμα αρ. II). Αν το αποσκληρυντικό
είναι σε μορφή ταμπλέτας, τοποθετήστε μόνο μία
ταμπλέτα στο διαμέρισμα αρ. ΙΙ. Αφού ολοκληρωθεί το
πρόγραμμα, χρησιμοποιήστε ένα καθαρό πανί για να
στεγνώσετε το εσωτερικό της λαστιχένιας πτυχωτής
στεγανοποίησης.
C
C
38
EL
Χρησιμοποιείτε αποσκληρυντικό κατάλληλο για
πλυντήριο ρούχων.
Υπάρχει πιθανότητα να έχει παραμείνει στη
συσκευή σας μια μικρή ποσότητα νερού λόγω των
διαδικασιών ελέγχου ποιότητας στο εργοστάσιο.
Αυτό δεν είναι επιβλαβές για τη συσκευή σας.
πλένετε τα ρούχα αφού τα τοποθετήσετε μέσα σε
σάκο πλυντηρίου ή μαξιλαροθήκη.
Αφαιρείτε όλα τα αντικείμενα από τις τσέπες,
όπως κέρματα, στυλό και συνδετήρες και
αναποδογυρίζετε τις τσέπες και βουρτσίζετέ
τις. Αντικείμενα αυτού του είδους μπορούν να
προκαλέσουν ζημιά στη συσκευή ή πρόβλημα
θορύβου.
Τοποθετείτε τα ρούχα μικρού μεγέθους, όπως
παιδικές κάλτσες και καλσόν, μέσα σε σάκο
πλυντηρίου ή μαξιλαροθήκη.
Τοποθετείτε τις κουρτίνες στο πλυντήριο χωρίς
να τις συμπιέζετε. Αφαιρείτε τα εξαρτήματα
ανάρτησης των κουρτινών.
Κλείνετε τα φερμουάρ, ράβετε τα χαλαρά κουμπιά
και επιδιορθώνετε ξηλώματα και σχισίματα.
Πλένετε μόνο με ένα κατάλληλο πρόγραμμα τα
ρούχα με σήμανση “machine washable” (πλένεται
στο πλυντήριο) ή “hand washable” (πλύσιμο στο
χέρι).
Μην πλένετε μαζί χρωματιστά και λευκά. Τα
καινούργια, σκούρα βαμβακερά ξεβάφουν πολύ.
Πλένετέ τα ξεχωριστά.
Οι δύσκολοι λεκέδες πρέπει να προετοιμάζονται
κατάλληλα πριν την πλύση. Αν έχετε αμφιβολίες,
ρωτήστε σε στεγνοκαθαριστήριο.
Χρησιμοποιείτε μόνο βαφές/ προϊόντα αλλαγής
χρώματος και αποσκληρυντικά που είναι κατάλληλα
για πλύσιμο σε πλυντήριο. Ακολουθείτε πάντα τις
οδηγίες στη συσκευασία των προϊόντων.
Πλένετε τα παντελόνια και τα ευπαθή ρούχα
γυρισμένα το μέσα έξω.
Διατηρείτε τα ρούχα από μαλλί Ανγκόρα στην
κατάψυξη για λίγες ώρες πριν το πλύσιμο. Έτσι θα
μειωθεί η δημιουργία κόμπων.
Ρούχα που έχουν λερωθεί σε μεγάλο βαθμό με
υλικά όπως αλεύρι, γύψο, σκόνη γάλακτος κλπ.
πρέπει να τιναχτούν πριν τοποθετηθούν στο
πλυντήριο. Τέτοιες σκόνες στα ρούχα μπορεί να
συσσωρευτούν στα εσωτερικά μέρη του πλυντηρίου
με την πάροδο του χρόνου και να προκαλέσουν
ζημιά.
Απόρριψη των υλικών συσκευασίας
Τα υλικά συσκευασίας είναι επικίνδυνα για τα παιδιά.
Φυλάσσετε όλα τα υλικά συσκευασίας σε ασφαλές
μέρος μακριά από παιδιά.
Τα υλικά συσκευασίας της συσκευής αποτελούνται
από ανακυκλώσιμα υλικά. Απορρίψτε τα με κατάλληλο
τρόπο και διαχωρίστε τα σύμφωνα με τους κανονισμούς
ανακύκλωσης αποβλήτων. Μην τα πετάξετε μαζί με τα
κανονικά οικιακά απορρίμματα.
Μεταφορά της συσκευής
Αποσυνδέστε τη συσκευή από την πρίζα πριν τη
μεταφορά της. Αφαιρέστε τις συνδέσεις αποχέτευσης
και τροφοδοσίας νερού. Αποστραγγίστε πλήρως
το υπολειπόμενο νερό. Βλ. "Αποστράγγιση του
υπολειπόμενου νερού και καθαρισμός του φίλτρου
αντλίας". Τοποθετήστε τα μπουλόνια ασφαλούς
μεταφοράς με σειρά αντίστροφη από τη διαδικασία
αφαίρεσης. Βλ. "Αφαίρεση των ασφαλιστικών
μεταφοράς".
Ποτέ μη μετακινήσετε το προϊόν χωρίς τα
μπουλόνια ασφαλούς μεταφοράς κατάλληλα
στερεωμένα στη θέση τους!
•
•
•
•
•
C
•
Τελική διάθεση της παλιάς συσκευής
•
Η τελική διάθεση της παλιάς συσκευής πρέπει να γίνει
με τρόπο φιλικό προς το περιβάλλον.
Απευθυνθείτε στον τοπικό σας αντιπρόσωπο ή το
τοπικό σας κέντρο συλλογής στερεών αποβλήτων για
να ενημερωθείτε για τον τρόπο τελικής διάθεσης της
συσκευής σας.
Για την ασφάλεια των παιδιών, πριν την τελική διάθεση
της συσκευής κόψτε το καλώδιο ρεύματος και σπάστε
τον μηχανισμό ασφάλισης της πόρτας φόρτωσης ώστε
να μην μπορεί να λειτουργήσει.
3 Προετοιμασία
Οι πληροφορίες που ακολουθούν θα σας βοηθήσουν
να χρησιμοποιείτε τη συσκευή με τρόπο φιλικό για το
περιβάλλον και ενεργειακά αποδοτικό.
•
Χρησιμοποιείτε τη συσκευή στη μεγαλύτερη
χωρητικότητα που επιτρέπεται από το πρόγραμμα
που έχετε επιλέξει, χωρίς να την υπερφορτώντε.
Βλ. "Πίνακας προγραμμάτων και καταναλώσεων".
•
Ακολουθείτε πάντα τις οδηγίες στη συσκευασία
των απορρυπαντικών.
•
Πλένετε τα ελαφρά λερωμένα ρούχα σε
χαμηλότερες θερμοκρασίες.
•
Χρησιμοποιείτε συντομότερα προγράμματα για
μικρές ποσότητες ελαφρά λερωμένων ρούχων.
•
Μη χρησιμοποιείτε πρόπλυση και υψηλές
θερμοκρασίες για ρούχα που δεν είναι πολύ
λερωμένα ή λεκιασμένα.
•
Αν σκοπεύετε να στεγνώσετε τα ρούχα σε
στεγνωτήριο, κατά τη διαδικασία πλυσίματος
επιλέξτε τον υψηλότερο συνιστώμενο αριθμό
στροφών στυψίματος.
•
Μη χρησιμοποιείτε το απορρυπαντικό σε
ποσότητες μεγαλύτερες από τις συνιστώμενες στη
συσκευασία του απορρυπαντικού.
+Ταξινόμηση των ρούχων
•
•
•
•
Πράγματα που πρέπει να γίνονται
για εξοικονόμηση ενέργειας
•
•
Ταξινομείτε τα ρούχα ανάλογα με τον τύπο του
υφάσματος, το χρώμα, το βαθμό λερώματος και την
επιτρεπόμενη θερμοκρασία πλυσίματος.
Ακολουθείτε πάντα τις οδηγίες που αναφέρονται
στις ετικέτες των ρούχων.
Σωστή ποσότητα ρούχων
Η μέγιστη ικανότητα φορτίου εξαρτάται από τον τύπο
των ρούχων, το βαθμό λερώματος και το πρόγραμμα
πλυσίματος που επιθυμείτε.
Το πλυντήριο προσαρμόζει αυτόματα την ποσότητα του
νερού στην ποσότητα των ρούχων που έχουν φορτωθεί.
Ακολουθείτε τις πληροφορίες στον "Πίνακα
προγραμμάτων και καταναλώσεων". Αν
υπερφορτωθεί το πλυντήριο, θα υποβαθμιστεί
η απόδοση πλυσίματος. Επιπλέον, μπορεί να
προκύψουν προβλήματα θορύβου και κραδασμών.
A
Τοποθέτηση ρούχων στο πλυντήριο
•
•
•
C
A
Προετοιμασία των ρούχων για πλύσιμο
•
Ρούχα που έχουν μεταλλικά τμήματα όπως π.χ.
στηθόδεσμοι με μπανέλες, αγκράφες ζωνών ή
μεταλλικά κουμπιά, θα προκαλέσουν ζημιά στη
συσκευή. Αφαιρείτε τα μεταλλικά εξαρτήματα ή
39
Ανοίξτε την πόρτα φόρτωσης.
Τοποθετήστε τα ρούχα χαλαρά στη συσκευή.
Πιέστε την πόρτα φόρτωσης να κλείσει μέχρι
να ακούσετε χαρακτηριστικό ήχο ασφάλισης.
Βεβαιωθείτε ότι δεν έχουν πιαστεί ρούχα στην
πόρτα.
Η πόρτα φόρτωσης είναι ασφαλισμένη όσο
εκτελείται ένα πρόγραμμα. Η πόρτα μπορεί να
ανοίξει μόνο λίγο αφού τελειώσει το πρόγραμμα.
Σε περίπτωση κακής τοποθέτησης των ρούχων,
μπορεί να προκύψουν προβλήματα θορύβου και
κραδασμών στο πλυντήριο.
EL
Χρήση απορρυπαντικού και μαλακτικού
Συρτάρι απορρυπαντικού
Το συρτάρι απορρυπαντικού περιλαμβάνει τρία
διαμερίσματα:
- (I) για πρόπλυση
- (ΙΙ) για την κύρια πλύση
– (III) για μαλακτικό
– (*) επιπλέον, υπάρχει εξάρτημα σιφωνίου στο
διαμέρισμα μαλακτικού.
3 2
1
3
•
•
Χρήση μαλακτικών
Προσθέστε το μαλακτικό στο διαμέρισμα μαλακτικού
του συρταριού διανομής απορρυπαντικού.
• Χρησιμοποιείτε τη δοσολογία που συνιστάται στη
συσκευασία.
• Να μην υπερβαίνετε τη στάθμη της ένδειξης
(>max<) στο διαμέρισμα μαλακτικού.
• Αν το μαλακτικό έχει χάσει τη ρευστότητά του,
αραιώστε το με νερό πριν το προσθέσετε στο
συρτάρι απορρυπαντικού.
2 1
Χρήση υγρών απορρυπαντικών
Αν το προϊόν περιέχει κύπελλο υγρού
απορρυπαντικού:
μονάδα προσθήκης απορρυπαντικού μπορεί να
CΗανήκει
σε έναν από δύο τύπους, ανάλογα με το
•
μοντέλο του πλυντηρίου σας, όπως φαίνεται πιο
πάνω.
Απορρυπαντικό, μαλακτικό και άλλα προϊόντα
καθαρισμού
•
•
•
•
•
•
προβλήματα υπερβολικού αφρισμού ή κακής
ποιότητας ξεβγάλματος καθώς και για λόγους
οικονομίας και προστασίας του περιβάλλοντος.
Χρησιμοποιείτε λιγότερο απορρυπαντικό γα μικρή
ποσότητα ρούχων ή για ελαφρά λερωμένα ρούχα.
Χρησιμοποιείτε τα συμπυκνωμένα απορρυπαντικά
στη συνιστώμενη δοσολογία.
•
Προσθέστε απορρυπαντικό και μαλακτικό πριν την
έναρξη του προγράμματος.
Ποτέ μην ανοίγετε το συρτάρι προσθήκης
απορρυπαντικού ενώ εκτελείται το πρόγραμμα
πλυσίματος!
Όταν χρησιμοποιείτε πρόγραμμα χωρίς πρόπλυση,
μην προσθέσετε καθόλου απορρυπαντικό στο
διαμέρισμα πρόπλυσης (διαμέρισμα αρ. I).
Σε πρόγραμμα με πρόπλυση, μην προσθέσετε
υγρό απορρυπαντικό στο διαμέρισμα πρόπλυσης
(διαμέρισμα αρ. I).
Μην επιλέξετε πρόγραμμα με πρόπλυση αν
χρησιμοποιείτε απορρυπαντικό σε σακουλάκι ή
μπαλάκι. Μπορείτε να τοποθετήσετε το σακουλάκι
ή το μπαλάκι του απορρυπαντικού απ' ευθείας
ανάμεσα στα ρούχα, στο εσωτερικό του πλυντηρίου
σας.
Αν χρησιμοποιείτε υγρό απορρυπαντικό, μην
ξεχάσετε να τοποθετήσετε το κύπελλο υγρού
απορρυπαντικού μέσα στο διαμέρισμα κύριας
πλύσης (διαμέρισμα αρ. II).
Επιλογή τύπου απορρυπαντικού
Ο τύπος απορρυπαντικού που πρέπει να χρησιμοποιηθεί
εξαρτάται από τον τύπο και το χρώμα του υφάσματος.
•
Χρησιμοποιείτε διαφορετικά απορρυπαντικά για
χρωματιστά και λευκά ρούχα.
•
Πλένετε τα ευπαθή ρούχα σας μόνο με ειδικά
απορρυπαντικά (υγρό απορρυπαντικό, σαμπουάν
για μάλλινα κλπ.), τα οποία χρησιμοποιούνται
αποκλειστικά για ευπαθή ρούχα.
•
Όταν πλένετε σκούρα χρωματιστά ρούχα και
παπλώματα, συνιστάται να χρησιμοποιείτε υγρό
απορρυπαντικό.
•
Πλένετε τα μάλλινα ρούχα με ειδικό απορρυπαντικό
παρασκευασμένο ειδικά για μάλλινα.
Χρησιμοποιείτε μόνο απορρυπαντικά που έχουν
παρασκευαστεί ειδικά για πλυντήρια.
Μη χρησιμοποιείτε σαπούνι σε σκόνη.
A
A
Ρύθμιση της ποσότητας απορρυπαντικού
Η ποσότητα απορρυπαντικού που πρέπει να
χρησιμοποιήσετε εξαρτάται από την ποσότητα των
ρούχων, το βαθμό λερώματος και τη σκληρότητα
του νερού. Διαβάστε προσεκτικά τις οδηγίες του
κατασκευαστή στη συσκευασία του απορρυπαντικού και
ακολουθείτε τις οδηγίες δοσολογίας.
•
Μη χρησιμοποιείτε ποσότητες μεγαλύτερες από τις
συνιστώμενες στη συσκευασία, για να αποφύγετε
40
•
•
Φροντίστε απαραίτητα το κύπελλο υγρού υγρού
απορρυπαντικού να τοποθετηθεί στο διαμέρισμα
αρ. "II".
Χρησιμοποιείτε τη μεζούρα του κατασκευαστή του
απορρυπαντικού και ακολουθείτε τις οδηγίες στη
συσκευασία.
Χρησιμοποιείτε τη δοσολογία που συνιστάται στη
συσκευασία.
Αν το υγρό απορρυπαντικό έχει χάσει τη
ρευστότητά του, αραιώστε το με νερό πριν το
προσθέσετε στο κύπελλο απορρυπαντικού.
Αν το προϊόν δεν περιέχει κύπελλο υγρού
απορρυπαντικού:
•
•
•
Μη χρησιμοποιείτε υγρό απορρυπαντικό για την
πρόπλυση σε πρόγραμμα με πρόπλυση.
Χρησιμοποιείτε τη μεζούρα του κατασκευαστή του
απορρυπαντικού και ακολουθείτε τις οδηγίες στη
συσκευασία.
Το υγρό απορρυπαντικό δημιουργεί λεκέδες στα
ρούχα σας αν χρησιμοποιηθεί με τη λειτουργία
Καθυστέρηση έναρξης. Αν πρόκειται να
χρησιμοποιήσετε τη λειτουργία Καθυστέρηση
έναρξης, μη χρησιμοποιήσετε υγρό απορρυπαντικό.
Χρήση απορρυπαντικού σε τζελ και ταμπλέτα
Όταν χρησιμοποιείτε απορρυπαντικά σε ταμπλέτα,
τζελ κλπ., διαβάζετε προσεκτικά τις οδηγίες του
κατασκευαστή στη συσκευασία του απορρυπαντικού
και ακολουθείτε τις τιμές δοσολογίας. Αν δεν υπάρχουν
οδηγίες στη συσκευασία, εφαρμόστε τα εξής:
•
Αν η πυκνότητα του απορρυπαντικού σε τζελ είναι
παρόμοια με υγρού και η συσκευή σας δεν περιέχει
ειδικό κύπελλο απορρυπαντικού, προσθέστε
το απορρυπαντικό σε τζελ στο διαμέρισμα
απορρυπαντικού κύριας πλύσης κατά την πρώτη
εισαγωγή νερού. Αν το πλυντήριό σας περιέχει
κύπελλο υγρού απορρυπαντικού, προσθέστε το
απορρυπαντικό στο κύπελλο αυτό πριν ξεκινήσετε
το πρόγραμμα.
•
Αν η πυκνότητα του απορρυπαντικού σε τζελ δεν
είναι ρευστή ή είναι ταμπλέτα υγρού σε σχήμα
κάψουλας, τοποθετήστε το απ' ευθείας στο
τύμπανο πριν το πλύσιμο.
•
Τοποθετείτε τα απορρυπαντικά σε ταμπλέτα στο
διαμέρισμα κύριας πλύσης (διαμέρισμα αρ. ΙΙ) ή απ'
EL
ευθείας στο τύμπανο πριν το πλύσιμο.
Τα απορρυπαντικά σε ταμπλέτες μπορεί
να αφήσουν κατάλοιπα στο διαμέρισμα
απορρυπαντικού. Αν αντιμετωπίσετε τέτοιο
πρόβλημα, σε μελλοντικά πλυσίματα τοποθετείτε
το απορρυπαντικό σε ταμπλέτα ανάμεσα στα
ρούχα, κοντά στο κάτω μέρος του τυμπάνου.
Χρησιμοποιείτε το απορρυπαντικό σε ταμπλέτα ή
τζελ χωρίς να επιλέξετε τη λειτουργία πρόπλυσης.
C
C
Χρήση κόλλας (κολλαρίσματος)
•
•
•
Προσθέστε υγρή κόλλα, κόλλα σε σκόνη ή τη
βαφή στο διαμέρισμα μαλακτικού σύμφωνα με τις
οδηγίες στη συσκευασία.
Μην χρησιμοποιείτε μαλακτικό και κόλλα μαζί στον
ίδιο κύκλο πλυσίματος.
Μετά τη χρήση κόλλας σκουπίστε το εσωτερικό της
συσκευής με ένα ελαφρά υγρό και καθαρό πανί.
Χρήση λευκαντικών
•
•
•
•
•
Επιλέξτε ένα πρόγραμμα με πρόπλυση και
προσθέστε το λευκαντικό στην αρχή της
πρόπλυσης. Μην προσθέσετε απορρυπαντικό στο
διαμέρισμα πρόπλυσης. Εναλλακτικά, επιλέξτε ένα
πρόγραμμα με πρόσθετο ξέβγαλμα και προσθέστε
το λευκαντικό ενώ το πλυντήριο προσλαμβάνει
νερό από το διαμέρισμα απορρυπαντικού κατά την
πρώτη φάση ξεβγάλματος.
Μη χρησιμοποιήσετε λευκαντικό και απορρυπαντικό
αναμιγνύοντάς τα.
Χρησιμοποιείτε μικρή ποσότητα (περ. 50 ml)
λευκαντικού και ξεβγάζετε τα ρούχα πολύ καλά
γιατί προκαλεί ερεθισμό στο δέρμα. Μη χύνετε
το λευκαντικό πάνω στα ρούχα και μην το
χρησιμοποιείτε για χρωματιστά ρούχα.
Όταν χρησιμοποιείτε λευκαντικό με βάση το
οξυγόνο, ακολουθείτε τις οδηγίες που αναφέρει η
συσκευασία του και επιλέγετε ένα πρόγραμμα σε
χαμηλότερη θερμοκρασία.
Τα λευκαντικά με βάση το οξυγόνο μπορούν να
χρησιμοποιηθούν μαζί με τα απορρυπαντικά.
Ωστόσο αν η πυκνότητα δεν είναι ίδια με του
απορρυπαντικού, προσθέστε το απορρυπαντικό
στο διαμέρισμα αρ. "II" στο συρτάρι
απορρυπαντικού και περιμένετε έως ότου το
απορρυπαντικό απομακρυνθεί με το νερό που
εισάγει το πλυντήριο. Προσθέστε το λευκαντικό
από το ίδιο διαμέρισμα ενώ το πλυντήριο συνεχίζει
να προσλαμβάνει νερό.
Χρήση αποσκληρυντικού
•
•
Όταν απαιτείται, χρησιμοποιείτε αποσκληρυντικά
προϊόντα παρασκευασμένα ειδικά για πλυντήρια
ρούχων μόνο.
Ακολουθείτε πάντα τις οδηγίες στη συσκευασία
των προϊόντων.
41
EL
Πρακτικές συμβουλές για αποδοτικό πλύσιμο
Ρούχα
Ανοιχτόχρωμα και
λευκά
Χρωματιστά
Σκούρα
Ευπαθή/Μάλλινα/
Μεταξωτά
(Συνιστώμενη
περιοχή
θερμοκρασιών
ανάλογα με το
βαθμό λερώματος:
40-90C)
(Συνιστώμενη
περιοχή
θερμοκρασιών
ανάλογα με το βαθμό
λερώματος: κρύο40C)
(Συνιστώμενη
περιοχή
θερμοκρασιών
ανάλογα με το
βαθμό λερώματος:
κρύο-40C)
(Συνιστώμενη
περιοχή
θερμοκρασιών
ανάλογα με
το βαθμό
λερώματος: κρύο30C)
Μπορεί να
χρειαστεί
προεπεξεργασία
των λεκέδων ή
να περιληφθεί
φάση πρόπλυσης.
Μπορούν να
χρησιμοποιηθούν
απορρυπαντικά
σε σκόνη και υγρά
απορρυπαντικά
που συνιστώνται
για λευκά, σε
δόσεις που
συνιστώνται για
πολύ λερωμένα
ρούχα. Συνιστάται
να χρησιμοποιείτε
απορρυπαντικά
σε σκόνη για τον
καθαρισμό λεκέδων
από λάσπη και
χώμα και λεκέδων
με ευαισθησία σε
λευκαντικά.
Μπορούν να
χρησιμοποιηθούν
απορρυπαντικά
σε σκόνη και υγρά
απορρυπαντικά
που συνιστώνται
για χρωματιστά,
σε δόσεις που
συνιστώνται για
πολύ λερωμένα
ρούχα. Συνιστάται
να χρησιμοποιείτε
απορρυπαντικά
σε σκόνη για τον
καθαρισμό λεκέδων
από λάσπη και
χώμα και λεκέδων
με ευαισθησία
σε λευκαντικά.
Χρησιμοποιείτε
απορρυπαντικά
χωρίς λευκαντικό.
Μπορούν να
χρησιμοποιηθούν
υγρά
απορρυπαντικά
που συνιστώνται
για χρωματιστά
και σκούρα,
σε δόσεις που
συνιστώνται για
πολύ λερωμένα
ρούχα.
Προτιμάτε υγρά
απορρυπαντικά
σχεδιασμένα για
ευπαθή ρούχα.
Τα μάλλινα
και μεταξωτά
ρούχα πρέπει
να πλένονται
με ειδικά
απορρυπαντικά
για μάλλινα.
Μπορούν να
χρησιμοποιηθούν
απορρυπαντικά
Κανονικά λερωμένα σε σκόνη και υγρά
απορρυπαντικά
(Για παράδειγμα,
που συνιστώνται
σωματικοί λεκέδες για λευκά, σε
σε κολάρα και
δόσεις που
μανίκια)
συνιστώνται για
κανονικά λερωμένα
ρούχα.
Μπορούν να
χρησιμοποιηθούν
απορρυπαντικά
σε σκόνη και υγρά
απορρυπαντικά
που συνιστώνται
για χρωματιστά,
σε δόσεις που
συνιστώνται
για κανονικά
λερωμένα ρούχα.
Χρησιμοποιείτε
απορρυπαντικά
χωρίς λευκαντικό.
Μπορούν να
χρησιμοποιηθούν
υγρά
απορρυπαντικά
που συνιστώνται
για χρωματιστά
και σκούρα,
σε δόσεις που
συνιστώνται
για κανονικά
λερωμένα ρούχα.
Προτιμάτε υγρά
απορρυπαντικά
σχεδιασμένα για
ευπαθή ρούχα.
Τα μάλλινα
και μεταξωτά
ρούχα πρέπει
να πλένονται
με ειδικά
απορρυπαντικά
για μάλλινα.
Μπορούν να
χρησιμοποιηθούν
απορρυπαντικά
σε σκόνη και υγρά
Ελαφρά λερωμένα απορρυπαντικά
που συνιστώνται
(Δεν υπάρχουν
για λευκά, σε
ορατοί λεκέδες).
δόσεις που
συνιστώνται για
ελαφρά λερωμένα
ρούχα.
Μπορούν να
χρησιμοποιηθούν
απορρυπαντικά
σε σκόνη και υγρά
απορρυπαντικά
που συνιστώνται
για χρωματιστά,
σε δόσεις που
συνιστώνται
για ελαφρά
λερωμένα ρούχα.
Χρησιμοποιείτε
απορρυπαντικά
χωρίς λευκαντικό.
Μπορούν να
χρησιμοποιηθούν
υγρά
απορρυπαντικά
που συνιστώνται
για χρωματιστά
και σκούρα,
σε δόσεις που
συνιστώνται για
ελαφρά λερωμένα
ρούχα.
Προτιμάτε υγρά
απορρυπαντικά
σχεδιασμένα για
ευπαθή ρούχα.
Τα μάλλινα
και μεταξωτά
ρούχα πρέπει
να πλένονται
με ειδικά
απορρυπαντικά
για μάλλινα.
Πολύ λερωμένα
Βαθμός λερώματος
(δύσκολοι λεκέδες
όπως από γρασίδι,
καφέ, φρούτα και
αίμα).
42
EL
4 Χειρισμός της συσκευής
Πίνακας ελέγχου
1
2
8
7
6
3
4
5
1 - Περιστροφικό κουμπί Επιλογής προγράμματος
(Πάνω θέση Ενεργοποίηση/ Απενεργοποίηση)
2 - Οθόνη
3 - Κουμπί Καθυστέρηση έναρξης.
4 - Ενδείξεις Παρακολούθησης προγράμματος
5 - Κουμπί Έναρξη/Παύση
6 - Κουμπιά Βοηθητικών λειτουργιών
7 - Κουμπί Ρύθμισης αριθμού στροφών στυψίματος
8 - Κουμπί Ρύθμισης θερμοκρασίας
Προετοιμασία της συσκευής
C
Επιλέγετε πάντα τη χαμηλότερη απαιτούμενη
θερμοκρασία. Υψηλότερες θερμοκρασίες
συνεπάγονται υψηλότερη κατανάλωση ενέργειας.
Για περισσότερες λεπτομέρειες σχετικά με
τα προγράμματα, ανατρέξτε στον “Πίνακα
προγραμμάτων και καταναλώσεων”
Βεβαιωθείτε ότι οι εύκαμπτοι σωλήνες έχουν συνδεθεί
στεγανά. Συνδέστε το πλυντήριο στην παροχή
ρεύματος. Ανοίξτε πλήρως τη βάνα παροχής νερού.
Τοποθετήστε τα ρούχα στο πλυντήριο. Προσθέστε
απορρυπαντικό και μαλακτικό.
C
Επιλογή προγράμματος
Επιλέξτε το πρόγραμμα που είναι κατάλληλο για
τον τύπο, την ποσότητα και το βαθμό λερώματος
των ρούχων σύμφωνα με τον πίνακα "Πίνακας
προγραμμάτων και καταναλώσεων " και τον παρακάτω
πίνακα θερμοκρασιών.
90˚C
Πολύ λερωμένα, λευκά βαμβακερά και
ασπρόρουχα. (σεμέν, τραπεζομάντιλα,
πετσέτες, σεντόνια κλπ.)
60˚C
Κανονικά λερωμένα, χρωματιστά,
ανεξίτηλα βαμβακερά ή συνθετικά
ρούχα (πουκάμισα, νυχτικά, πυτζάμες
κλπ.) και ελαφρά λερωμένα λευκά
ασπρόρουχα (εσώρουχα κλπ.)
40˚C30˚C- Κρύο
Ρούχα με ανάμικτες ίνες
περιλαμβανόμενων ευαίσθητων
υφασμάτων (βελούδινες κουρτίνες
κλπ.), συνθετικά και μάλλινα.
Κύρια προγράμματα
Ανάλογα με τον τύπο του υφάσματος, διατίθενται τα
εξής κύρια προγράμματα:
• Βαμβακερά
Χρησιμοποιήστε αυτό το πρόγραμμα για τα βαμβακερά
σας ρούχα (όπως σεντόνια, σετ καλυμμάτων
παπλωμάτων και μαξιλαριών, πετσέτες, μπουρνούζια,
εσώρουχα κλπ.). Τα ρούχα σας θα πλυθούν με έντονες
κινήσεις πλυσίματος σε κύκλο μεγάλης διάρκειας.
• Συνθετικά
Επιλέξτε το επιθυμητό πρόγραμμα με το κουμπί
επιλογής προγράμματος.
Στα προγράμματα υπάρχει περιορισμός στις
ανώτατες στροφές στυψίματος, ανάλογα με το
συγκεκριμένο είδος υφάσματος.
Όταν επιλέγετε ένα πρόγραμμα, πάντα να
λαμβάνετε υπόψη σας τον τύπο του υφάσματος, το
χρώμα, το βαθμό λερώματος και την επιτρεπόμενη
θερμοκρασία νερού.
C
C
43
Χρησιμοποιήστε αυτό το πρόγραμμα για να πλύνετε τα
συνθετικά ρούχα σας (πουκάμισα, μπλούζες, ρούχα από
βαμβάκι ανάμικτο με συνθετικές ίνες κλπ.). Πλένει με
απαλές κινήσεις και έχει μικρότερο κύκλο πλυσίματος
σε σχέση με το πρόγραμμα Βαμβακερά.
Για κουρτίνες και δαντέλες, χρησιμοποιήστε το
πρόγραμμα Συνθετικά 40˚C με επιλεγμένες τις
λειτουργίες για πρόπλυση και για λιγότερο τσαλάκωμα.
Επειδή η πλεκτή δομή τους προκαλεί υπερβολικό
αφρισμό, πλένετε τα βελούδινα/τις δαντέλες
προσθέτοντας μικρή ποσότητα απορρυπαντικού
στο διαμέρισμα κύριας πλύσης. Μην προσθέσετε
απορρυπαντικό στο διαμέρισμα πρόπλυσης.
• Μάλλινα
Χρησιμοποιήστε αυτό το πρόγραμμα για να πλένετε
τα μάλλινα ρούχα σας. Επιλέξτε την κατάλληλη
θερμοκρασία σύμφωνα με τις πληροφορίες
στις ετικέτες των ρούχων σας. Χρησιμοποιείτε
απορρυπαντικό ειδικό για μάλλινα.
EL
Πρόσθετα προγράμματα
Για ειδικές περιπτώσεις υπάρχουν και πρόσθετα
προγράμματα στο πλυντήριο.
Τα πρόσθετα προγράμματα ενδέχεται να
διαφέρουν, ανάλογα με το μοντέλο του πλυντηρίου.
C
• Βαμβακερά Οικον
Ενδεχομένως θέλετε να πλένετε τα κανονικά λερωμένα
ανθεκτικά βαμβακερά και λινά σας ρούχα σε αυτό το
πρόγραμμα με τη μεγαλύτερη εξοικονόμηση ενέργειας
και νερού σε σύγκριση με όλα τα άλλα προγράμματα
πλυσίματος που είναι κατάλληλα για βαμβακερά. Η
πραγματική θερμοκρασία του νερού μπορεί να διαφέρει
από την προβλεπόμενη θερμοκρασία κύκλου. Η διάρκεια
του προγράμματος μπορεί να μειωθεί αυτόματα κατά
τις τελευταίες φάσεις του προγράμματος αν πλένετε
μικρότερη ποσότητα ρούχων (π.χ. 1/2 χωρητικότητα
ή λιγότερα). Στην περίπτωση αυτή η κατανάλωση
ενέργειας και νερού θα μειωθεί ακόμα περισσότερο
δίνοντάς σας την ευκαιρία για πιο οικονομικό πλύσιμο.
Αυτή η δυνατότητα διατίθεται για ορισμένα μοντέλα που
διαθέτουν ένδειξη υπολειπόμενου χρόνου.
• Πλύσ στο χέρι
Χρησιμοποιείτε αυτό το πρόγραμμα για να πλένετε
τα μάλλινα/ευπαθή ρούχα με ετικέτες “not machinewashable” (να μην πλένεται στο πλυντήριο) για τα οποία
συνιστάται πλύσιμο στο χέρι. Πλένει τα ρούχα με πολύ
απαλές κινήσεις για να μην τους προξενεί φθορά.
• Πολύ σύντομο εξπρές
Χρησιμοποιείτε αυτό το πρόγραμμα για να πλένετε
γρήγορα μικρές ποσότητες από τα ελαφρά λερωμένα
βαμβακερά ρούχα σας.
C
Επιλογή θερμοκρασίας
Όταν επιλέγετε ένα νέο πρόγραμμα, στην ένδειξη
θερμοκρασίας εμφανίζεται η μέγιστη θερμοκρασία για το
επιλεγμένο πρόγραμμα.
Για να μειώσετε τη θερμοκρασία, πιέστε πάλι το κουμπί
Ρύθμιση θερμοκρασίας. Η θερμοκρασία μειώνεται
βαθμιαία.
Αν το πρόγραμμα δεν έχει φθάσει στη φάση
θέρμανσης, μπορείτε να αλλάξετε τη θερμοκρασία
χωρίς να θέσετε τη συσκευή σε λειτουργία Παύσης.
C
Επιλογή ταχύτητας
περιστροφής στυψίματος
Όταν επιλέγεται ένα νέο πρόγραμμα, στην ένδειξη
αριθμού στροφών στυψίματος εμφανίζεται ο
συνιστώμενος αριθμός στροφών στυψίματος για το
επιλεγμένο πρόγραμμα.
Για να μειώσετε τις στροφές στυψίματος, πιέστε
το κουμπί Ρύθμιση στροφών στυψίματος. Ο αριθμός
στροφών στυψίματος μειώνεται βαθμιαία. Τότε, ανάλογα
με το μοντέλο της συσκευής, στην οθόνη εμφανίζονται
οι επιλογές "Ξέβγαλμα & Αναμονή" και "Χωρίς στύψιμο".
Για εξήγηση αυτών των επιλογών βλ. την ενότητα
"Επιλογή βοηθητικών λειτουργιών".
Αν το πρόγραμμα δεν έχει φθάσει στη φάση
στυψίματος, μπορείτε να αλλάξετε τις στροφές
στυψίματος χωρίς να θέσετε τη συσκευή σε
λειτουργία Παύσης.
C
• Σκούρα
Χρησιμοποιήστε αυτό το πρόγραμμα για να πλύνετε
τα σκούρα ρούχα σας, ή τα ρούχα σας που δεν θέλετε
να ξεθωριάσουν. Η πλύση εκτελείται με μικρή μηχανική
δράση και σε χαμηλές θερμοκρασίες. Για το πλύσιμο
των σκούρων χρωματιστών ρούχων συνιστάται να
χρησιμοποιείτε υγρό απορρυπαντικό ή σαμπουάν για
μάλλινα.
• Πουκάμισα
Χρησιμοποιείτε αυτό το πρόγραμμα για να πλένετε μαζί
πουκάμισα από υφάσματα βαμβακερά, συνθετικά και
βαμβακερά ανάμικτα με συνθετικές ίνες.
• Sports
Χρησιμοποιείτε αυτό το πρόγραμμα για να πλένετε τα
ρούχα σας που έχουν φορεθεί για λίγο, όπως αθλητικά.
Είναι κατάλληλο για πλύσιμο μικρής ποσότητας
ανάμικτων βαμβακερών / συνθετικών ρούχων.
Ειδικά προγράμματα
Για ειδικές εφαρμογές, επιλέξτε οποιοδήποτε από τα
προγράμματα που ακολουθούν.
• Ξέβγαλμα
Χρησιμοποιείτε αυτό το πρόγραμμα όταν θέλετε
ξεχωριστό ξέβγαλμα ή κολλάρισμα.
• Στύψιμο + Άντληση
Χρησιμοποιείτε αυτό το πρόγραμμα για την εκτέλεση
ενός πρόσθετου κύκλου στυψίματος των ρούχων ή για να
αποστραγγιστεί το νερό από το πλυντήριο.
Πριν επιλέξετε αυτό το πρόγραμμα, επιλέξτε τον
επιθυμητό αριθμό στροφών στυψίματος και πατήστε
το κουμπί "Έναρξη/Παύση". Πρώτα, το πλυντήριο θα
στραγγίξει το νερό που περιέχει. Κατόπιν θα στύψει τα
ρούχα στη ρυθμισμένη ταχύτητα και θα αποστραγγίσει
το νερό που αυτά θα ελευθερώσουν.
Αν θέλετε μόνο να αποστραγγίσετε το νερό χωρίς
να στύψετε τα ρούχα σας, επιλέξτε το πρόγραμμα
Άντληση+Στύψιμο και κατόπιν με το κουμπί επιλογής
στροφών στυψίματος επιλέξτε τη λειτουργία Χωρίς
στύψιμο. Πατήστε το κουμπί Έναρξη/Παύση.
44
Για ευπαθή ρούχα θα πρέπει να χρησιμοποιείτε
χαμηλότερο αριθμό στροφών στυψίματος.
EL
Πίνακας προγραμμάτων και καταναλώσεων
Κατανάλωση ρεύματος
(kWh)
Μέγ. αριθμ. στροφών***
Πρόπλυση
Σύντομo
Ξέβγαλμα Συν
Αποφυγή τσαλακώματος
Παύση ξεβγάλματος
Μούλιασμα
βοηθητική λειτουργία
Κατανάλωση νερού (lt)
12
Μέγιστο φορτίο (kg)
EL
Βαμβακερά
90
7
74
2.30
1600
•
•
•
•
•
•
Κρύο-90
Βαμβακερά
60
7
70
1.54
1600
•
•
•
•
•
•
Κρύο-90
Βαμβακερά
40
7
69
0.85
1600
•
•
•
•
•
•
Κρύο-90
Βαμβακερά Οικον
60**
7
44
1.00
1600
•
40-60
Βαμβακερά Οικον
60**
3.5
38
0.84
1600
•
40-60
Βαμβακερά Οικον
40**
3.5
38
0.65
1600
•
40-60
Πολύ σύντομο εξπρές
30
2
50
0.11
1400
•
•
Κρύο-30
Σκούρα
40
3.5
66
0.55
800
*
•
Κρύο-40
Sports
40
4
67
0.58
800
Πλύσ στο χέρι
30
1
34
0.20
600
Μάλλινα
40
1.5
47
0.34
600
Πουκάμισα
60
3.5
60
1.00
600
•
•
•
*
•
•
Κρύο-60
Συνθετικά
60
3
55
1.00
800
•
•
•
•
•
•
Κρύο-60
Συνθετικά
40
3
55
0.55
800
•
•
•
•
•
•
Κρύο-60
Πρόγραμμα
• :
* :
** :
*** :
•
•
•
•
•
•
Περιοχή
επιλέξιμων
θερμοκρασιών
σε °C
Κρύο-40
Κρύο-30
•
•
Κρύο-40
Επιλέγεται
Επιλέγεται αυτόματα, δεν μπορεί να ακυρωθεί.
Πρόγραμμα Ενεργειακής Σήμανσης (EN 60456 Ed.3)
Αν οι μέγιστες στροφές στυψίματος του πλυντηρίου σας είναι χαμηλότερες από την τιμή αυτή, μπορείτε να
επιλέξετε μόνο το διαθέσιμο μέγιστο αριθμό στροφών.
- : Για το μέγιστο φορτίο, δείτε την περιγραφή του προγράμματος.
Η κατανάλωση νερού και ρεύματος είναι δυνατόν να διαφέρουν, ανάλογα με τις μεταβολές στην πίεση, τη
σκληρότητα και τη θερμοκρασία του νερού, τη θερμοκρασία του περιβάλλοντος, το είδος και την ποσότητα των
ρούχων, την επιλογή βοηθητικών λειτουργιών και τον αριθμό στροφών στυψίματος, καθώς και ανάλογα με τις
μεταβολές της τάσης του ρεύματος.
Μπορείτε να δείτε στην οθόνη του μηχανήματος το χρόνο πλυσίματος του προγράμματος που επιλέξατε. Είναι
κανονικό να εμφανίζονται μικρές διαφορές ανάμεσα στο χρόνο που εμφανίζεται στην οθόνη και τον πραγματικό
χρόνο πλυσίματος.
Οι βοηθητικές λειτουργίες στον πίνακα ενδέχεται να διαφέρουν ανάλογα με το μοντέλο της συσκευής σας.
C
C
C
45
EL
Επιλογή βοηθητικών λειτουργιών
Επιλέξτε τις επιθυμητές βοηθητικές λειτουργίες πριν
αρχίσετε το πρόγραμμα. Επιπλέον, ενώ λειτουργεί η
συσκευή, μπορείτε και να επιλέξετε ή να ακυρώσετε
βοηθητικές λειτουργίες που είναι κατάλληλες για το
εκτελούμενο πρόγραμμα χωρίς να πατήσετε το κουμπί
Έναρξη/Παύση. Για να γίνει αυτό, η συσκευή πρέπει
να είναι σε φάση πριν τη βοηθητική λειτουργία που
πρόκειται να επιλέξετε ή να ακυρώσετε.
Αν η βοηθητική λειτουργία δεν μπορεί να επιλεγεί ή
να ακυρωθεί, η λυχνία της αντίστοιχης βοηθητικής
λειτουργίας θα αναβοσβήσει 3 φορές για να
προειδοποιήσει το χρήστη.
Ορισμένες λειτουργίες δεν μπορούν να επιλεγούν
μαζί Αν επιλεγεί μια δεύτερη βοηθητική λειτουργία
που αντιβαίνει με την πρώτη που επιλέχτηκε
πριν την εκκίνηση της συσκευής, η λειτουργία
που επιλέχτηκε πρώτη θα ακυρωθεί και θα
παραμείνει ενεργή η δεύτερη βοηθητική λειτουργία
που επιλέχτηκε. Για παράδειγμα, αν θέλετε να
επιλέξετε Σύντομη Πλύση αφού επιλέξατε την
Πρόπλυση, η Πρόπλυση θα ακυρωθεί και η Σύντομη
Πλύση θα παραμείνει ενεργή.
Δεν μπορεί να επιλεγεί βοηθητική λειτουργία που
δεν είναι συμβατή με το πρόγραμμα. (Βλ. "Πίνακας
προγραμμάτων και καταναλώσεων")
Τα κουμπιά των βοηθητικών λειτουργιών ενδέχεται
να διαφέρουν, ανάλογα με το μοντέλο της
συσκευής σας.
C
C
C
• Πρόπλυση
Η πρόπλυση είναι αναγκαία μόνο για πολύ λερωμένα
ρούχα. Χωρίς τη χρήση πρόπλυσης μπορείτε να
εξοικονομήσετε ενέργεια, νερό, απορρυπαντικό και
χρόνο.
Για δαντέλες, τούλι και κουρτίνες συνιστάται
πρόπλυση χωρίς απορρυπαντικό.
C
• Σύντομo
Η λειτουργία αυτή μπορεί να χρησιμοποιηθεί στα
προγράμματα Βαμβακερά και Συνθετικά. Μειώνει το
χρόνο πλυσίματος καθώς και τον αριθμό των φάσεων
ξεβγάλματος για ελαφρά λερωμένα ρούχα.
Όταν επιλέγετε αυτή τη λειτουργία, τοποθετήστε
στο πλυντήριό σας τη μισή ποσότητα ρούχων από
αυτή που καθορίζεται στον πίνακα προγραμμάτων.
C
• Ξέβγαλμα Συν
Η λειτουργία αυτή επιτρέπει στο πλυντήριο να
πραγματοποιήσει ένα ξέβγαλμα επιπλέον αυτού που
ήδη έγινε μετά την κύρια πλύση. Έτσι μπορεί να μειωθεί
ο κίνδυνος να επηρεαστούν τα ευαίσθητα δέρματα
(μωρών, αλλεργικών ατόμων κλπ.) από τα ελάχιστα
κατάλοιπα απορρυπαντικού.
• Πρόσθετο νερό
Αυτή η λειτουργία σας επιτρέπει να πλύνετε και
να ξεβγάλετε τα ρούχα σας με άφθονο νερό στα
προγράμματα Βαμβακερά, Συνθετικά, Ευπαθή και
Μάλλινα. Χρησιμοποιείτε τη λειτουργία αυτή για ευπαθή
ρούχα που τσαλακώνονται εύκολα.
Όταν επιλέγετε αυτή τη λειτουργία, τοποθετήστε
στο πλυντήριό σας τη μισή ποσότητα ρούχων από
αυτή που καθορίζεται στον πίνακα προγραμμάτων.
C
• Αποφυγή τσαλακώματος
Αυτή η λειτουργία μειώνει το τσαλάκωμα από το
πλύσιμο των ρούχων. Η κίνηση του τυμπάνου μειώνεται
και ο αριθμός στροφών στυψίματος περιορίζεται, για
την αποφυγή του τσαλακώματος. Επιπλέον, το πλύσιμο
γίνεται με υψηλότερη στάθμη νερού.
• Παύση ξεβγάλματος
Αν δεν θέλετε να βγάλετε τα ρούχα αμέσως μετά το
τέλος του προγράμματος, μπορείτε να χρησιμοποιήσετε
τη λειτουργία Ξέβγαλμα & Αναμονή και να διατηρήσετε
τα ρούχα μέσα στο νερό του τελικού ξεβγάλματος, ώστε
να αποτρέψετε να τσαλακωθούν αν παραμείνουν στο
πλυντήριο χωρίς νερό. Μετά από αυτή τη διαδικασία,
46
αν θέλετε να αποστραγγίσετε το νερό χωρίς στύψιμο
των ρούχων σας, πατήστε το κουμπί Έναρξη/Παύση.
Το πρόγραμμα συνεχίζεται και ολοκληρώνεται αφού
αποστραγγιστεί το νερό.
Αν θέλετε να στύψετε τα ρούχα σας που είχαν
παραμείνει στο νερό, ρυθμίστε τον Αριθμό στροφών
στυψίματος και πατήστε το κουμπί Έναρξη/Παύση.
Τότε το πρόγραμμα συνεχίζεται. Το πλυντήριό σας
αδειάζει το νερό, στύβει τα ρούχα και το πρόγραμμα
ολοκληρώνεται.
• Μούλιασμα
Η βοηθητική λειτουργία Μούλιασμα εξασφαλίζει
καλύτερη αφαίρεση λεκέδων που έχουν διεισδύσει στα
ρούχα, κρατώντας τα ρούχα στο νερό με απορρυπαντικό
πριν την έναρξη του προγράμματος.
• Τρίχες κατοικίδιων
Αυτή η λειτουργία βοηθά στην αφαίρεση τριχών
κατοικίδιων που παραμένουν στα ρούχα σας.
Όταν επιλέγετε αυτή τη λειτουργία, προστίθενται στο
κανονικό πρόγραμμα οι φάσεις Πρόπλυση και Πρόσθετο
ξέβγαλμα. Έτσι, το πλύσιμο γίνεται με περισσότερο
νερό (30%) και οι τρίχες κατοικίδιων αφαιρούνται πιο
αποτελεσματικά.
Ποτέ μην πλύνετε τα κατοικίδιά σας στο πλυντήριο.
A
Καθυστέρηση έναρξης
Με τη λειτουργία Καθυστέρηση έναρξης, η έναρξη του
προγράμματος μπορεί να καθυστερήσει έως 19 ώρες.
Ο χρόνος καθυστέρησης έναρξης μπορεί να αυξηθεί σε
βήματα της 1 ώρας.
Όταν έχετε επιλέξει Καθυστέρηση έναρξης, μη
χρησιμοποιείτε υγρό απορρυπαντικό! Υπάρχει
κίνδυνος να σχηματιστούν λεκέδες στα ρούχα.
Ανοίξτε την πόρτα, τοποθετήστε τα ρούχα στο
πλυντήριο και προσθέστε απορρυπαντικό κλπ. Επιλέξτε
το πρόγραμμα πλυσίματος, τη θερμοκρασία, τον αριθμό
στροφών στυψίματος και βοηθητικές λειτουργίες,
αν απαιτούνται. Ρυθμίστε τον επιθυμητό χρόνο
πατώντας το κουμπί Καθυστέρηση έναρξης. Πατήστε
το κουμπί Έναρξη/Παύση. Εμφανίζεται τότε ο χρόνος
Καθυστέρησης έναρξης που έχετε ρυθμίσει. Αρχίζει η
αντίστροφη μέτρηση της καθυστέρησης έναρξης. Το
σύμβολο “_” δίπλα στο χρόνο καθυστέρησης έναρξης
κινείται πάνω και κάτω στην οθόνη.
Κατά το χρόνο καθυστέρησης έναρξης μπορούν να
φορτωθούν περισσότερα ρούχα.
5. Στο τέλος της αντίστροφης μέτρησης, θα
εμφανιστεί η διάρκεια του επιλεγμένου
προγράμματος. Το σύμβολο “_” θα πάψει να
εμφανίζεται και θα ξεκινήσει το επιλεγμένο
πρόγραμμα.
C
C
Τροποποίηση του χρόνου Καθυστέρησης έναρξης
Αν θέλετε να αλλάξετε το χρόνο κατά τη διάρκεια της
αντίστροφης μέτρησης:
Πατήστε το κουμπί Καθυστέρηση έναρξης. Ο χρόνος
θα αυξάνεται κατά μία ώρα κάθε φορά που πατάτε το
κουμπί. Αν θέλετε να μειώσετε το χρόνο καθυστέρησης
έναρξης, πιέστε επανειλημμένα το κουμπί καθυστέρησης
έναρξης, έως ότου στην οθόνη εμφανιστεί ο επιθυμητός
χρόνος καθυστέρησης έναρξης.
Ακύρωση της λειτουργίας Καθυστέρηση έναρξης
Εάν θελήσετε να ακυρώσετε την αντίστροφη μέτρηση
της καθυστέρησης έναρξης και να ξεκινήσετε αμέσως
το πρόγραμμα: Θέστε το χρόνο Καθυστέρησης έναρξης
σε μηδέν ή γυρίστε το περιστροφικό κουμπί Επιλογής
προγράμματος σε οποιοδήποτε πρόγραμμα. Έτσι θα
ακυρωθεί η λειτουργία Καθυστέρησης έναρξης. Η λυχνία
Τέλος/Ακύρωση αναβοσβήνει συνεχώς. Κατόπιν επιλέξτε
πάλι το πρόγραμμα που θέλετε να εκτελεστεί. Πιέστε το
κουμπί Έναρξη/Παύση ώστε να ξεκινήσει το πρόγραμμα.
EL
Εκκίνηση του προγράμματος
Πιέστε το κουμπί Έναρξη/Παύση ώστε να ξεκινήσει
το πρόγραμμα. Θα ανάψει η λυχνία ένδειξης
παρακολούθησης του προγράμματος που δείχνει την
έναρξη του προγράμματος.
Αν δεν εκκινηθεί κανένα πρόγραμμα ή δεν
πατηθεί κανένα πλήκτρο εντός 1 λεπτού κατά τη
διαδικασία επιλογής προγράμματος, η συσκευή
θα μεταβεί σε κατάσταση Παύσης και θα μειωθεί
η ένταση φωτισμού των ενδείξεων θερμοκρασίας,
αριθμού στροφών και πόρτας φόρτωσης. Οι άλλες
ενδεικτικές λυχνίες και ενδείξεις θα σβήσουν.
Αν γυρίσετε το περιστροφικό κουμπί Επιλογής
προγράμματος ή αν πατήσετε οποιοδήποτε κουμπί,
οι λυχνίες και οι ενδείξεις θα ανάψουν πάλι.
C
Κλείδωμα προστασίας
Χρησιμοποιείτε το Κλείδωμα προστασίας για να
εμποδίζετε τα παιδιά να επεμβαίνουν στη συσκευή. Έτσι
μπορείτε να αποφύγετε αλλαγές σε ένα πρόγραμμα που
εκτελείται.
Αν το περιστροφικό κουμπί επιλογής
προγράμματος γυριστεί ενώ είναι ενεργό το
Κλείδωμα προστασίας, στην οθόνη εμφανίζεται
η ένδειξη "Con". Το Κλείδωμα προστασίας δεν
επιτρέπει οποιαδήποτε αλλαγή στα προγράμματα
και στη θερμοκρασία, στον αριθμό στροφών
στυψίματος και στις βοηθητικές λειτουργίες που
έχουν επιλεγεί.
Ακόμα και αν επιλεγεί άλλο πρόγραμμα με το
περιστροφικό κουμπί επιλογής προγράμματος,
ενώ το Κλείδωμα προστασίας είναι ενεργό,
θα συνεχίσει να εκτελείται το προηγούμενο
πρόγραμμα που είχε επιλεγεί.
Για να ενεργοποιήσετε το Κλείδωμα προστασίας:
Πατήστε και κρατήστε πατημένα για 3 δευτερόλεπτα
τα κουμπιά της 1ης και 2ης Βοηθητικής λειτουργίας.
Ενώ κρατάτε πατημένα για 3 δευτερόλεπτα τα κουμπιά
1ης και 2ης Βοηθητικής λειτουργίας, θα αναβοσβήσουν
οι λυχνίες στα κουμπιά και στην οθόνη θα εμφανιστεί
αντίστοιχα η ένδειξη "C03", "C02", "C01". Κατόπιν θα
εμφανιστεί στην οθόνη η ένδειξη "Con" για να δείξει
ότι το Κλείδωμα προστασίας είναι ενεργοποιημένο.
Αν πατήσετε οποιοδήποτε κουμπί ή γυρίσετε το
περιστροφικό κουμπί επιλογής προγράμματος ενώ
είναι ενεργό το Κλείδωμα προστασίας, στην οθόνη
θα εμφανιστεί πάλι η ίδια ένδειξη. Οι λυχνίες στα
κουμπιά 1ης και 2ης βοηθητικής λειτουργίας που
χρησιμοποιούνται για απενεργοποίηση του Κλειδώματος
προστασίας θα αναβοσβήσουν 3 φορές.
Για να απενεργοποιήσετε το Κλείδωμα προστασίας:
Πατήστε και κρατήστε πατημένα για 3 δευτερόλεπτα
τα κουμπιά της 1ης και 2ης Βοηθητικής λειτουργίας
ενώ εκτελείται οποιοδήποτε πρόγραμμα. Ενώ κρατάτε
πατημένα για 3 δευτερόλεπτα τα κουμπιά 1ης και 2ης
Βοηθητικής λειτουργίας, θα αναβοσβήσουν οι λυχνίες
στα κουμπιά και στην οθόνη θα εμφανιστεί αντίστοιχα
η ένδειξη "C03", "C02", "C01". Κατόπιν στην οθόνη
θα εμφανιστεί η ένδειξη "COFF" για να δείξει ότι το
Κλείδωμα προστασίας είναι απενεργοποιημένο.
Επιπλέον της πιο πάνω μεθόδου, για να
απενεργοποιήσετε το Κλείδωμα προστασίας,
γυρίστε το περιστροφικό κουμπί επιλογής
προγράμματος στη θέση Ενεργοποίηση /
Απενεργοποίηση όταν δεν εκτελείται κανένα
πρόγραμμα και επιλέξτε ένα άλλο πρόγραμμα.
Το Κλείδωμα προστασίας δεν απενεργοποιείται
μετά από διακοπές του ηλεκτρικού ρεύματος ή αν η
συσκευή αποσυνδεθεί από την πρίζα.
C
C
C
C
Εξέλιξη του προγράμματος
Η εξέλιξη ενός προγράμματος που εκτελείται
παρακολουθείται από τις ενδείξεις Παρακολούθησης
του προγράμματος. Στην αρχή κάθε φάσης του
47
προγράμματος, θα ανάβει η αντίστοιχη ενδεικτική λυχνία
και θα σβήνει η λυχνία της φάσης που ολοκληρώθηκε.
Μπορείτε να τροποποιήσετε τις βοηθητικές λειτουργίες
και τις ρυθμίσεις αριθμού στροφών και θερμοκρασίας
ενώ το πρόγραμμα εκτελείται, χωρίς να σταματήσετε τη
ροή του προγράμματος. Για να το κάνετε αυτό, η αλλαγή
που πρόκειται να κάνετε πρέπει να είναι σε φάση
που είναι μετά την τρέχουσα φάση του εκτελούμενου
προγράμματος. Αν η αλλαγή δεν είναι συμβατή, οι
αντίστοιχες λυχνίες θα αναβοσβήσουν 3 φορές.
Αν η συσκευή δεν περνά στη φάση στυψίματος,
τότε μπορεί να είναι ενεργή η επιλογή Ξέβγαλμα
& Αναμονή ή να έχει ενεργοποιηθεί το αυτόματο
σύστημα ανίχνευσης ανισοκατανεμημένου φορτίου
λόγω ανισοκατανομής των ρούχων στο πλυντήριο.
C
Κλείδωμα πόρτας φόρτωσης
Στην πόρτα φόρτωσης διατίθεται σύστημα κλειδώματος
της συσκευής που εμποδίζει άνοιγμα της πόρτας
σε περιπτώσεις που η στάθμη του νερού δεν είναι
κατάλληλη.
Το φως της πόρτας φόρτωσης θα αρχίσει να
αναβοσβήνει όταν το μηχάνημα τεθεί σε λειτουργία
παύσης. Η συσκευή ελέγχει τη στάθμη του νερού στο
εσωτερικό. Αν η στάθμη είναι κατάλληλη, η λυχνία
Πόρτα φόρτωσης ανάβει μόνιμα εντός 1-2 λεπτών και η
πόρτα μπορεί να ανοίξει.
Αν η στάθμη δεν είναι κατάλληλη, η λυχνία Πόρτα
φόρτωσης σβήνει και η πόρτα δεν μπορεί να ανοίξει. Αν
πρέπει να ανοίξετε την πόρτα φόρτωσης ενώ η λυχνία
Πόρτα φόρτωσης είναι σβηστή, τότε χρειάζεται να
ακυρώσετε το τρέχον πρόγραμμα. Βλ. "Ακύρωση του
προγράμματος".
Αλλαγή των επιλογών αφού έχει
ξεκινήσει το πρόγραμμα
Θέση του πλυντηρίου σε κατάσταση παύσης
Για να θέσετε τη συσκευή σας σε κατάσταση παύσης
κατά την εξέλιξη ενός προγράμματος, πατήστε το
κουμπί Έναρξη/Παύση. Η λυχνία της φάσης στην οποία
βρίσκεται η συσκευή αρχίζει να αναβοσβήνει στις
ενδείξεις Παρακολούθησης προγράμματος, για να δείξει
ότι η συσκευή έχει τεθεί σε κατάσταση παύσης.
Επίσης, όταν είναι έτοιμη να ανοίξει η πόρτα, θα
είναι μόνιμα αναμμένη και η λυχνία Πόρτα φόρτωσης
επιπλέον της λυχνίας που αντιστοιχεί στη φάση του
προγράμματος.
Αλλαγή των ρυθμίσεων αριθμού στροφών και
θερμοκρασίας για βοηθητικές λειτουργίες
Ανάλογα με τη φάση όπου έχει φθάσει το πρόγραμμα,
μπορείτε να ακυρώσετε ή να ενεργοποιήσετε τις
βοηθητικές λειτουργίες. Βλ. "Επιλογή βοηθητικών
λειτουργιών".
Μπορείτε επίσης να αλλάξετε τις ρυθμίσεις αριθμού
στροφών και θερμοκρασίας. Βλ. "Επιλογή αριθμού
στροφών στυψίματος" και "Επιλογή θερμοκρασίας".
Αν δεν επιτρέπεται καμία αλλαγή, η αντίστοιχη
λυχνία θα αναβοσβήσει 3 φορές.
C
Προσθήκη ή αφαίρεση ρούχων
1.
Πατήστε το κουμπί Έναρξη/Παύση για να θέσετε
το πλυντήριό σας σε κατάσταση παύσης.
Θα αναβοσβήσει η λυχνία παρακολούθησης
προγράμματος της αντίστοιχης φάσης κατά την
οποία η συσκευή τέθηκε σε κατάσταση Παύσης.
2. Περιμένετε έως ότου επιτρέπεται να ανοίξει η
Πόρτα φόρτωσης.
3. Ανοίξτε την πόρτα φόρτωσης και προσθέστε ή
αφαιρέστε ρούχα.
4. Κλείστε την πόρτα φόρτωσης.
5. Κάνετε αλλαγές σε βοηθητικές λειτουργίες,
ρυθμίσεις θερμοκρασίας και αριθμού στροφών, αν
απαιτείται.
6. Πατήστε το κουμπί Έναρξη/Παύση ώστε να
ξεκινήσει το πρόγραμμα.
EL
Ακύρωση του προγράμματος
Για να ακυρώσετε το πρόγραμμα, γυρίστε το
περιστροφικό κουμπί Επιλογής προγράμματος για να
επιλέξετε άλλο πρόγραμμα. Το προηγούμενο πρόγραμμα
θα ακυρωθεί. Η λυχνία Τέλος / Ακύρωση θα αναβοσβήνει
συνεχώς για να δείξει ότι ακυρώθηκε το πρόγραμμα.
Η λειτουργία Άντληση ενεργοποιείται για 1-2 λεπτά
ανεξάρτητα από τη φάση του προγράμματος και από το
αν υπάρχει νερό στη συσκευή ή όχι. Μετά από αυτό το
διάστημα, η συσκευή σας θα είναι έτοιμη να ξεκινήσει με
την πρώτη φάση του νέου προγράμματος.
Ανάλογα με τη φάση στην οποία ακυρώθηκε το
προηγούμενο πρόγραμμα, ίσως χρειαστεί να
προσθέσετε πάλι απορρυπαντικό και μαλακτικό για
το νέο πρόγραμμα που επιλέξατε.
C
Τέλος του προγράμματος
Στο τέλος του προγράμματος εμφανίζεται στην οθόνη
ή ένδειξη “End” (Τέλος). Περιμένετε να ανάψει μόνιμα η
λυχνία της πόρτας φόρτωσης. Πατήστε το κουμπί On /
Off για να απενεργοποιήσετε τη συσκευή. Αφαιρέστε τα
ρούχα και κλείστε την πόρτα φόρτωσης. Το πλυντήριό
σας είναι έτοιμο για τον επόμενο κύκλο πλυσίματος.
5 Συντήρηση και καθαρισμός
Αν καθαρίζετε το προϊόν σε κανονικά διαστήματα, η
διάρκεια ζωής του μεγαλώνει ενώ συγχρόνως μειώνονται
τα συχνά παρουσιαζόμενα προβλήματα.
Καθαρισμός του συρταριού απορρυπαντικού
Καθαρίζετε το συρτάρι απορρυπαντικού σε κανονικά
διαστήματα (κάθε 4-5 κύκλους πλυσίματος) όπως
φαίνεται πιο κάτω, για την πρόληψη της συσσώρευσης
απορρυπαντικού σε σκόνη με την πάροδο του χρόνου.
Πιέστε το σημείο με τις τελείες στο σιφώνιο στο
διαμέρισμα μαλακτικού και τραβήξτε το προς το
μέρος σας έως ότου αφαιρεθεί το διαμέρισμα από το
πλυντήριο.
Αν στο διαμέρισμα μαλακτικού αρχίζει να
συγκεντρώνεται περισσότερη από την κανονική
ποσότητα μίγματος νερού και μαλακτικού, τότε
πρέπει να καθαριστεί το σιφώνιο.
Πλύνετε το συρτάρι απορρυπαντικού και το σιφώνιο
με άφθονο χλιαρό νερό σε ένα νιπτήρα. Κατά
τον καθαρισμό φοράτε προστατευτικά γάντια ή
χρησιμοποιήστε κατάλληλη βούρτσα για να αποφύγετε
την επαφή του δέρματός σας με τα κατάλοιπα στο
συρτάρι. Τοποθετήστε πάλι το συρτάρι στη θέση του
αφού το καθαρίσετε, και βεβαιωθείτε ότι έχει πάρει
σωστή θέση.
C
Καθαρισμός των φίλτρων εισόδου νερού
Υπάρχει ένα φίλτρο στην άκρη κάθε μιας από
τις βαλβίδες εισόδου νερού στο πίσω μέρος του
μηχανήματος και επίσης στο άκρο κάθε εύκαμπτου
σωλήνα εισόδου νερού εκεί όπου συνδέονται στο
διακόπτη παροχής. Αυτά τα φίλτρα εμποδίζουν τις ξένες
ύλες και τις ακαθαρσίες από το νερό να εισχωρήσουν
στο πλυντήριο. Τα φίλτρα πρέπει να καθαρίζονται
επειδή λερώνονται.
Κλείστε τους διακόπτες παροχής νερού. Αφαιρέστε
τα παξιμάδια των εύκαμπτων σωλήνων εισόδου
νερού για να αποκτήσετε πρόσβαση στα φίλτρα που
βρίσκονται στις βαλβίδες εισόδου νερού. Καθαρίστε
τα με κατάλληλη βούρτσα. Αν τα φίλτρα είναι πολύ
λερωμένα, αφαιρέστε τα με μια πένσα και καθαρίστε τα.
Αφαιρέστε τα φίλτρα από τα ίσια άκρα των εύκαμπτων
σωλήνων εισόδου νερού μαζί με τα στεγανοποιητικά και
καθαρίστε τα καλά σε τρεχούμενο νερό. Τοποθετήστε
πάλι προσεκτικά στις θέσεις του τα στεγανοποιητικά
και τα φίλτρα και σφίξτε τα παξιμάδια των εύκαμπτων
σωλήνων με το χέρι.
Αποστράγγιση του υπολειπόμενου νερού
και καθαρισμός του φίλτρου αντλίας
Το σύστημα φίλτρου στο πλυντήριό σας εμποδίζει
στερεά σώματα όπως κουμπιά, νομίσματα και ίνες
υφασμάτων να αποφράξουν τη φτερωτή της αντλίας
κατά την εκκένωση του νερού πλυσίματος. Έτσι η
αποστράγγιση του νερού θα γίνεται χωρίς πρόβλημα και
θα επεκταθεί η διάρκεια ωφέλιμης ζωής της αντλίας.
Αν το πλυντήριό σας δεν μπορεί να αποστραγγίσει το
νερό, τότε είναι φραγμένο το φίλτρο της αντλίας. Το
φίλτρο θα πρέπει να καθαρίζεται όταν αποφράσσεται ή
κάθε 3 μήνες. Για να καθαριστεί το φίλτρο της αντλίας
θα πρέπει να αποστραγγιστεί πρώτα το νερό.
Επιπλέον, πριν τη μεταφορά της συσκευής (π.χ. κατά τη
μετακόμιση σε άλλο σπίτι) και σε περίπτωση συνθηκών
που το νερό παγώνει, ίσως χρειαστεί να αποστραγγιστεί
τελείως το νερό.
Ξένα υλικά που παραμένουν στο φίλτρο αντλίας
μπορεί να προξενήσουν ζημιά στη συσκευή σας ή να
προκαλέσουν πρόβλημα θορύβου.
Για να καθαρίσετε το λερωμένο φίλτρο και να
αποστραγγίσετε το νερό:
Βγάλτε το φις της συσκευής από την πρίζα για να
διακόψετε την παροχή ρεύματος.
Η θερμοκρασία του νερού μέσα στο πλυντήριο
μπορεί να φθάσει τους 90 ºC. Για την αποφυγή
κινδύνου εγκαύματος, το φίλτρο πρέπει να
καθαρίζεται μόνο αφού έχει κρυώσει το νερό στο
εσωτερικό της συσκευής.
Ανοίξτε το καπάκι του φίλτρου.
Αν το καπάκι του φίλτρου αποτελείται από δύο
τμήματα, πιέστε την προεξοχή στο καπάκι του
φίλτρου προς τα κάτω και τραβήξτε το τμήμα έξω
προς το μέρος σας.
A
A
Αν το καπάκι του φίλτρου είναι μονοκόμματο, τραβήξτε
το καπάκι και από τις δύο πλευρές στο πάνω μέρος για
να το ανοίξετε.
Μπορείτε να αφαιρέσετε το κάλυμμα φίλτρου
σπρώχνοντας ελαφρά προς τα κάτω με εργαλείο
με λεπτή πλαστική μύτη, περνώντας το μέσα από
EL
C
48
το διάκενο πάνω από το κάλυμμα φίλτρου. Μη
χρησιμοποιήσετε εργαλεία με μεταλλική μύτη για
την αφαίρεση του καλύμματος.
Ορισμένα από τα προϊόντα μας διαθέτουν εύκαμπτους
σωλήνες αποστράγγισης έκτακτης ανάγκης, ενώ
ορισμένα όχι. Ακολουθήστε τα πιο κάτω βήματα για να
αδειάσετε το νερό.
Εκκένωση του νερού όταν το προϊόν διαθέτει εύκαμπτο
σωλήνα αποστράγγισης έκτακτης ανάγκης:
Τοποθετήστε ένα μεγάλο δοχείο μπροστά από το
φίλτρο ώστε να δεχθεί το νερό από το φίλτρο.
Χαλαρώστε το φίλτρο της αντλίας (αριστερόστροφα)
έως ότου αρχίσει να ρέει νερό απ' αυτό. Κατευθύνετε
τη ροή του νερού στο δοχείο που έχετε τοποθετήσει
μπροστά από το φίλτρο. Πάντα να έχετε πρόχειρο ένα
πανί για να απορροφήσει τυχόν νερό που χύθηκε. Όταν
τελειώσει το νερό από τη συσκευή, αφαιρέστε τελείως
το φίλτρο περιστρέφοντάς το. Καθαρίστε τυχόν
κατάλοιπα στο εσωτερικό του φίλτρου καθώς και τυχόν
ίνες, αν υπάρχουν, γύρω από την περιοχή της φτερωτής.
Τοποθετήστε το φίλτρο.
Αν το προϊόν σας διαθέτει τη λειτουργία πίδακα
νερού, φροντίστε απαραίτητα να προσαρμόσετε το
φίλτρο στο περίβλημά του στην αντλία. Ποτέ μην
ασκήσετε βία στο φίλτρο ενώ το τοποθετείτε στο
περίβλημά του. Τοποθετήστε το φίλτρο τελείως
πίσω στη θέση του. Διαφορετικά, μπορεί να
διαρρέει νερό από το καπάκι του φίλτρου.
Αν το καπάκι του φίλτρου αποτελείται από δύο τμήματα,
κλείστε το καπάκι του φίλτρου πιέζοντας την προεξοχή.
Αν είναι μονοκόμματο, τοποθετήστε πρώτα στις θέσεις
τους τις προεξοχές του κάτω μέρους και πιέστε το πάνω
τμήμα για να κλείσει.
A
Τραβήξτε τον εύκαμπτο σωλήνα αποχέτευσης έκτακτης
ανάγκης έξω από τη θέση του. Τοποθετήστε ένα μεγάλο
δοχείο στο άκρο του εύκαμπτου σωλήνα. Αδειάστε το
νερό στο δοχείο τραβώντας το πώμα από την άκρη του
εύκαμπτου σωλήνα. Όταν το δοχείο γεμίσει, κλείστε
την είσοδο του σωλήνα επανατοποθετώντας το πώμα.
Αφού αδειάσετε το δοχείο, επαναλάβετε την πιο πάνω
διαδικασία για αδειάσετε πλήρως το νερό από τη
συσκευή. Όταν ολοκληρωθεί η αποστράγγιση του νερού,
κλείστε το άκρο πάλι με το πώμα και στερεώστε τον
εύκαμπτο σωλήνα στη θέση του. Περιστρέψτε το φίλτρο
αντλίας για να το αφαιρέσετε.
Εκκένωση του νερού όταν το προϊόν δεν διαθέτει
εύκαμπτο σωλήνα αποστράγγισης έκτακτης ανάγκης:
Φρεσκάρισμα
Οικον. 20
(Οικον.
καθάρισμα)
Φροντίδα
συσκευής
(αυτοκαθαρισ
μός)
Εσώρουχα
Μίνι (Ημέρας
εξπρές)
Ενεργοποίηση
/Απενεργοποί
ηση
Έναρξη
Παύση
Βαμβακερά
Συνθετικά
Μάλλινα
Πλύσιμο στο
χέρι
Πρόπλυση
Κύρια πλύση
Πρόσθετο
ξέβγαλμα
Πλύσιμο
Τέλος
Κλείδωμα
προστασίας
Ακύρωση 3”
Μίνι 14
(Πολύ
σύντομο
εξπρές)
Μισό φορτίο Σύντομη πλύση
Σκούρα
(Φροντίδα
σκούρων)
Ανάμικτα
Μίνι (Ημέρας
εξπρές)
Σπορ
Πουκάμισα
Πάπλωμα
Υγιεινή
Έτοιμο
Ευπαθή
Εντατικό
Μούλιασμα
Λιγότερο
τσαλάκωμα
Ξέβγαλμα &
Αναμονή
Χωρίς
Στύψιμο
Στύψιμο
Κρύο
Θερμοκρασία
Χρονική
καθυστέρηση
Αποστράγγισ
η
Σούπερ
Σούπερ Οικον
Ξέβγαλμα
49
EL
(Sports)
Βαμβακερά
Οικον.
Μοντέλα (EL)
WNF 7301 WE20
WNF 7321 AE20
WNF 7341 AE20
WNF 7361 AE20
6 Τεχνικές προδιαγραφές
Μέγιστη χωρητικότητα στεγνών ρούχων (κιλά)
7
7
7
7
Ύψος (εκ.)
84
84
84
84
Πλάτος (εκ.)
60
60
60
60
Βάθος (εκ.)
55
55
55
55
Καθαρό βάρος (±4 κιλά)
72
72
71
76
230 V / 50Hz
Ηλεκτρική τροφοδοσία (V/Hz)
10
Συνολικό ρεύμα (A)
10
10
10
2200
Συνολική ισχύς (W)
Αριθμός στροφών στυψίματος (σ.α.λ. μέγ.)
1000
1200
1400
1600
Κατανάλωση ισχύος, κατάσταση αναμονής (W)
1.35
1.35
1.35
1.35
Κατανάλωση ισχύος, κατάσταση απενεργοποίησης (W)
0.25
0.25
0.25
0.25
C
C
C
Οι προδιαγραφές ενδέχεται να αλλάξουν χωρίς προηγούμενη γνωστοποίηση, για λόγους βελτίωσης της
ποιότητας του προϊόντος.
Οι εικόνες στο παρόν εγχειρίδιο είναι σχηματικές και ενδέχεται να μην αντιστοιχούν ακριβώς με τη συσκευή σας.
Οι τιμές που αναφέρονται στις ετικέτες του πλυντηρίου ή στην τεκμηρίωση που το συνοδεύει έχουν μετρηθεί
στο εργαστήριο σύμφωνα με τα σχετικά πρότυπα. Ανάλογα με τις συνθήκες λειτουργίας και περιβάλλοντος της
συσκευής, οι τιμές αυτές ενδέχεται να διαφέρουν.
Στη συσκευή αυτή υπάρχει το σύμβολο της επιλεκτικής διαλογής το σχετικό με τα απορρίμματα
ηλεκτρικών και ηλεκτρονικών συσκευών Αυτό σημαίνει ότι το προϊόν αυτό πρέπει να το αναλάβει
ένα σύστημα επιλεκτικής συλλογής, σύμφωνα με την ευρωπαϊκή οδηγία 2002/96/CΕ, προκειμένου
να μπορέσει είτε να το ανακυκλώσει είτε να το αποσυναρμολογήσει ώστε να μειωθεί κάθε
επίπτωση για το περιβάλλον.
Γιο: περισσότερες πληροφορίες, μπορείτε να επικοινωνήσετε με τη διοίκηση του τόπου κατοικίας
σας ή της περιφέρειάς σας
Τα ηλεκτρονικά προϊόντα τα οποία δεν έχουν γίνει αντικείμενο επιλεκτικής διαλογής μπορεί να
αποβούν επικίνδυνα για το περιβάλλον και την ανθρώπινη υγεία λόγω της παρουσίας επικίνδυνων
ουσιών.
50
EL
7 Αντιμετώπιση προβλημάτων
Το πρόγραμμα δεν μπορεί να ξεκινήσει ή να επιλεγεί.
•
Το πλυντήριο έχει μεταβεί σε λειτουργία αυτοπροστασίας λόγω προβλήματος σε παροχή (όπως τάση
δικτύου ρεύματος, πίεση νερού κλπ.). >>> Πιέστε και κρατήστε πατημένο το κουμπί Έναρξη / Παύση για
3 δευτερόλεπτα για να επαναφέρετε τη συσκευή στις εργοστασιακές ρυθμίσεις. (Βλ. "Ακύρωση του
προγράμματος")
Νερό στη συσκευή.
•
Ενδέχεται να έχει παραμείνει στη συσκευή σας μικρή ποσότητα νερού λόγω των διαδικασιών ελέγχου ποιότητας
στο εργοστάσιο. >>> Αυτό δεν αποτελεί ένδειξη βλάβης. Το νερό δεν είναι επιβλαβές για τη συσκευή.
Η συσκευή δονείται ή κάνει θόρυβο.
Ίσως δεν στηρίζεται με ευστάθεια η συσκευή. >>> Ρυθμίστε τα πόδια ώστε να οριζοντιωθεί η συσκευή.
Ίσως έχει εισέλθει κάποιο σκληρό αντικείμενο στο φίλτρο αντλίας. >>> Καθαρίστε το φίλτρο της αντλίας.
Δεν αφαιρέθηκαν τα μπουλόνια ασφαλούς μεταφοράς. >>> Αφαιρέστε τα μπουλόνια ασφαλούς μεταφοράς.
Ίσως η ποσότητα ρούχων στο πλυντήριο είναι πολύ μικρή. >>> Προσθέστε περισσότερα ρούχα στο πλυντήριο.
Ίσως η συσκευή είναι υπερφορτωμένη με ρούχα. >>> Αφαιρέστε μερικά από τα ρούχα από τη συσκευή ή
•
•
•
•
•
μοιράστε με το χέρι το φορτίο ομοιόμορφα μέσα στη συσκευή.
Ίσως η συσκευή έρχεται σε επαφή με σταθερό αντικείμενο. >>> Βεβαιωθείτε ότι η συσκευή δεν έρχεται σε
επαφή με τίποτα.
•
Η λειτουργία της συσκευής σταμάτησε σύντομα μετά την έναρξη του προγράμματος.
Η λειτουργία μπορεί να σταμάτησε προσωρινά λόγω χαμηλής τάσης. >>> Η λειτουργία θα συνεχίσει όταν η
•
τάση επανέλθει στο κανονικό επίπεδο.
Δεν γίνεται αντίστροφη μέτρηση του υπολειπόμενου χρόνου προγράμματος. (Για μοντέλα με οθόνη)
•
•
•
C
Το χρονόμετρο μπορεί να σταματήσει κατά την εισαγωγή νερού. >>> Δεν θα γίνεται αντίστροφη μέτρηση
στο χρονόμετρο έως ότου το πλυντήριο γεμίσει με επαρκή ποσότητα νερού. Η συσκευή θα περιμένει έως
ότου υπάρχει επαρκής ποσότητα νερού, για να αποφευχθούν άσχημα αποτελέσματα πλυσίματος λόγω
έλλειψης νερού. Μετά από αυτό θα συνεχιστεί η αντίστροφη μέτρηση στην ένδειξη χρονομέτρου.
Το χρονόμετρο μπορεί να σταματήσει κατά τη φάση θέρμανσης. >>> Δεν θα γίνεται αντίστροφη μέτρηση στο
χρονόμετρο έως ότου η συσκευή επιτύχει την επιλεγμένη θερμοκρασία.
Το χρονόμετρο μπορεί να σταματήσει κατά τη φάση στυψίματος. >>> Το αυτόματο σύστημα ανίχνευσης
ανισοκατανομής φορτίου μπορεί να ενεργοποιήθηκε λόγω ανομοιόμορφης κατανομής των ρούχων στο
τύμπανο.
Όταν τα ρούχα δεν είναι ομοιόμορφα κατανεμημένα στο τύμπανο, το πλυντήριο δεν μεταβαίνει στη φάση
στυψίματος, για να αποτραπεί τυχόν ζημιά στο πλυντήριο και το περιβάλλον του. Θα πρέπει να γίνει
ανακατανομή των ρούχων και να επαναληφθεί το στύψιμο.
Υπάρχει υπερχείλιση αφρού από το συρτάρι απορρυπαντικού.
•
C
Χρησιμοποιήθηκε υπερβολική ποσότητα απορρυπαντικού. >>> Αναμίξτε μια κουταλιά της σούπας
μαλακτικού και 1/2 λίτρο νερού και προσθέστε το στο διαμέρισμα κύριας πλύσης στο συρτάρι προσθήκης
απορρυπαντικού.
Τοποθετήστε στη συσκευή απορρυπαντικό κατάλληλο για τα προγράμματα και μέγιστα φορτία που
αναφέρονται στον "Πίνακα προγραμμάτων και καταναλώσεων". Όταν χρησιμοποιείτε πρόσθετα χημικά
(παράγοντες αφαίρεσης λεκέδων, λευκαντικά κλπ.), μειώνετε την ποσότητα του απορρυπαντικού.
Στο τέλος του προγράμματος τα ρούχα παραμένουν βρεγμένα.
•
Ίσως λόγω υπερβολικής χρήσης απορρυπαντικού έχει προκύψει υπερβολικός αφρισμός και έχει ενεργοποιηθεί το
αυτόματο σύστημα απορρόφησης αφρού. >>> Χρησιμοποιείτε την συνιστώμενη ποσότητα απορρυπαντικού.
Όταν τα ρούχα δεν είναι ομοιόμορφα κατανεμημένα στο τύμπανο, το πλυντήριο δεν μεταβαίνει στη φάση
στυψίματος, για να αποτραπεί τυχόν ζημιά στο πλυντήριο και το περιβάλλον του. Θα πρέπει να γίνει
ανακατανομή των ρούχων και να επαναληφθεί το στύψιμο.
C
το πρόβλημα δεν εξαλείφεται παρόλο που ακολουθήσατε τις οδηγίες αυτής της ενότητας, συμβουλευτείτε
A Αν
το συνεργαζόμενο κατάστημα ή τον εξουσιοδοτημένο αντιπρόσωπο σέρβις. Μην προσπαθήσετε ποτέ να
2820522240_EL/190911.1649
επιδιορθώσετε μόνοι σας τη συσκευή αν δεν λειτουργεί σωστά.
51
EL
1 Istruzioni importanti per la
sicurezza
•
Questa sezione contiene istruzioni sulla sicurezza
che aiutano a proteggere dal rischio di lesioni
personali o danni alla proprietà. La mancata
osservanza di queste istruzioni rende la garanzia
priva di validità.
•
•
Sicurezza generale
•
•
•
•
•
•
•
•
•
•
•
Questo prodotto non deve essere usato da
persone con disturbi fisici, sensoriali o mentali
o da persone senza adeguata formazione o
esperienza (compresi bambini) a meno che
non ricevano la supervisione di una persona
responsabile della loro sicurezza o che le
istruisca nel modo giusto sull'uso del prodotto.
Non posizionare mai il prodotto su un
pavimento coperto da tappeto; altrimenti
la mancanza del flusso di aria al di sotto
della macchina provoca il surriscaldamento
delle parti elettriche. Ciò può provocare
malfunzionamenti del prodotto.
Non utilizzare il prodotto se il cavo di
alimentazione / la spina sono danneggiati.
Contattare l'agente autorizzato per
l'assistenza.
Far collegare da un elettricista qualificato
il fusibile da 16 ampere sul luogo della
installazione del prodotto.
Se il prodotto presenta un guasto, non deve
essere utilizzato, a meno che non sia riparato
da un agente autorizzato per l'assistenza. C'è
il rischio di shock elettrico!
Il prodotto è progettato per riprendere a
funzionare in caso di ripristino di corrente dopo
un guasto elettrico. Se si desidera annullare il
programma, vedere la sezione "Annullamento
del programma".
Collegare il prodotto ad una presa messa
a terra protetta da un fusibile conforme ai
valori della tabelle "Specifiche tecniche". Non
trascurare la possibilità di fare installare la
messa a terra da un elettricista qualificato. La
nostra azienda non sarà responsabile dei danni
derivanti dall'uso del prodotto senza la messa
a terra conforme ai regolamenti locali.
L'alimentazione dell'acqua e i flessibili di
scarico devono essere montati in modo sicuro
e restare privi di danni. Altrimenti c'è il rischio di
perdite di acqua.
Non aprire mai lo sportello né togliere il filtro
mentre vi è ancora dell’acqua nel cestello.
Altrimenti si verifica il rischio di allagamenti e
lesioni provocate dall'acqua calda.
Non forzare per aprire lo sportello di carico
bloccato. Lo sportello di carico sarà pronto per
l’apertura pochi minuti dopo la fine del ciclo
di lavaggio. Se si forza per aprire lo sportello
di carico bloccato, sportello e meccanismo di
blocco potrebbero danneggiarsi.
Scollegare il prodotto quando non è in uso.
53
•
•
•
Non lavare mai il prodotto versando o
cospargendo acqua su di esso! C'è il rischio di
shock elettrico!
Non toccare mai la spina con le mani bagnate!
Non scollegare mai tirando dal cavo, estrarre
sempre tirando dalla spina.
Usare solo detersivi, ammorbidenti e additivi
adatti alle lavatrici automatiche.
Seguire le istruzioni sulle etichette dei tessuti e
sulla confezione del detersivo.
Il prodotto deve essere scollegato durante
le procedure di installazione, manutenzione,
pulizia e riparazione.
Far eseguire sempre le procedure di
installazione e riparazione dall'agente
autorizzato per l'assistenza. Il produttore
non sarà ritenuto responsabile per danni che
possono derivare da procedure eseguite da
persone non autorizzate.
Uso previsto
•
•
•
Questo prodotto è progettato per un
uso domestico. Non è adatto ad un uso
commerciale e non deve essere usato al di là
dell'uso previsto.
Il prodotto può essere utilizzato esclusivamente
per il lavaggio e il risciacquo di bucato che in
etichetta preveda tale tipo di lavaggio.
Il produttore declina ogni responsabilità che
derivi da uso o trasporto non corretti.
Sicurezza dei bambini
•
•
•
I prodotti elettrici sono pericolosi per i bambini.
Tenere i bambini lontani dal prodotto mentre
questo è in uso. Non lasciarli giocare con il
prodotto. Usare il blocco bambini per evitare
che i bambini possano interferire con il
funzionamento del prodotto.
Non dimenticare di chiudere lo sportello di
carico quando si esce dalla stanza in cui si
trova il prodotto.
Conservare tutti i detersivi e gli additivi in un
posto sicuro fuori dalla portata dei bambini.
2 Installazione
Rivolgersi al più vicino agente autorizzato per
l'assistenza per l'installazione del prodotto. Per
rendere il prodotto pronto per l'uso, rivedere le
informazioni del manuale utente e assicurarsi che
elettricità, fornitura di acqua e sistemi di scarico
dell'acqua siano appropriati prima di chiamare
l'agente autorizzato per l'assistenza. Se non lo
sono, chiamare un tecnico e un idraulico qualificati
per eseguire tutte le regolazioni necessarie.
La preparazione del luogo e le installazioni
C elettriche,
idriche e dell'acqua di scarico
sul luogo della installazione sono una
responsabilità del cliente. e collegamenti elettrici del
B Installazione
prodotto devono essere eseguiti dall'agente
autorizzato per l'assistenza. Il produttore
non sarà ritenuto responsabile per danni che
possono derivare da procedure eseguite da
persone non autorizzate.
IT
della installazione, ispezionare
A Prima
visivamente il prodotto per rilevare la presenza
di eventuali difetti. Se è così, non farlo
installare. I prodotti danneggiati rappresentano
un rischio per la sicurezza.
Assicurarsi che i flessibili di ingresso e scarico
C dell'acqua
nonché il cavo di alimentazione non
siano piegati, schiacciati o strappati quando
si riposiziona il prodotto dopo le procedure di
installazione o pulizia.
Posizione adeguata di montaggio
•
•
•
•
•
Posizionare la macchina su un suolo solido.
Non posizionare la macchina su tappeti a pelo
lungo o su superfici simili.
Il peso totale di lavatrice e asciugatrice - a
pieno carico - quando sono poste l'una
sull'altra raggiunge circa 180 kg. Mettere il
prodotto su una superficie solida e piana che
abbia una sufficiente capacità di sopportare il
carico!
Non posizionare il prodotto sul cavo di
alimentazione.
Non installare il prodotto in luoghi in cui la
temperatura può scendere al di sotto di 0ºC.
Mettere il prodotto ad una distanza di almeno
1 cm dai bordi degli altri arredi.
Se si usa il doppio ingresso per l’acqua come
C unità
a singolo ingresso dell’acqua (fredda),
è necessario installare il tappo in dotazione
con la lavatrice, sulla valvola dell’acqua calda,
prima di utilizzare il prodotto. (Si applica ai
prodotti forniti di un gruppo tappo cieco).
Se si desidera usare entrambi gli ingressi
C dell’acqua
del prodotto, collegare il flessibile
dell’acqua calda dopo aver rimosso il tappo e
la guarnizione dalla valvola dell’acqua calda. (Si applica ai prodotti forniti di un gruppo tappo
cieco).
modelli con ingresso singolo dell'acqua non
A Idevono
essere collegati al rubinetto dell'acqua
calda. In questo caso il bucato si danneggia o
il prodotto passa in modalità protezione e non
funziona.
usare su prodotti nuovi flessibili per
A Non
l'acqua vecchi o usati. Altrimenti il bucato
potrebbe macchiarsi.
1. I flessibili specifici in dotazione con la
lavatrice sono collegati alle valvole di
ingresso dell'acqua sul prodotto. Il flessibile
rosso (sinistra) (max. 90 ºC) è per l'ingresso
dell'acqua calda, il flessibile blu (destra) (max.
25 ºC) è per l'ingresso dell'acqua fredda.
Rimozione dei rinforzi dell'imballaggio
Ribaltare la lavatrice all'indietro per rimuovere
i rinforzi dell’imballaggio. Tirare il nastro per
rimuovere i rinforzi dell’imballaggio.
Rimozione dei blocchi di trasporto
rimuovere i blocchi di trasporto prima di
A Non
aver estratto i rinforzi dell'imballaggio.
i bulloni di sicurezza per il trasporto
A Rimuovere
prima di azionare la lavatrice, altrimenti il
prodotto si danneggia.
1. Allentare tutti i bulloni con un’apposita chiave,
sino a quando ruoteranno liberamente (C).
2. Rimuovere i bulloni di sicurezza di trasporto
ruotandoli delicatamente.
3. Inserire i coperchietti in plastica nei fori del
pannello posteriore, in dotazione nel sacchetto
allegato al manuale utente. (P)
Conservare i bulloni di sicurezza in un posto
C sicuro
per riutilizzarli in caso di ulteriori trasporti.
Non spostare mai il prodotto senza avere
C prima
ripristinato correttamente i bulloni di
sicurezza!
Collegamento della fornitura idrica
pressione idrica necessaria per utilizzare
C ilLaprodotto
è compresa tra 1 e 10 bars (0,1 –
10 MPa). È necessario disporre di 10-80 litri
di acqua corrente al minuto con il rubinetto
completamente aperto perché la lavatrice
funzioni senza problemi. Collegare una valvola
di riduzione della pressione se la pressione
dell’acqua è più alta.
54
si installa la lavatrice, assicurarsi
A Quando
che i rubinetti di acqua calda e fredda siano
collegati in modo corretto. Altrimenti il bucato
resta caldo alla fine del processo di lavaggio
usurandosi.
2. Stringere a mano tutti i dadi del flessibile. Non
usare mai una chiave per stringere i dadi.
3. Aprire completamente i rubinetti dopo aver
collegato il flessibile per controllare se ci sono
perdite di acqua nei punti di connessione.
In caso di perdite, chiudere il rubinetto e
rimuovere il dado. Stringere nuovamente il
dado dopo aver controllato la guarnizione. Per
evitare perdite di acqua e danni conseguenti,
tenere i rubinetti chiusi quando la lavatrice non
è in uso.
IT
Collegamento dello scarico
•
L’estremità del flessibile deve essere collegata
direttamente alla fognatura o al lavandino.
casa potrebbe allagarsi se il flessibile esce
A La
dal suo alloggiamento durante lo scarico
dell’acqua. Inoltre, c'è il rischio di ustioni
dovuto alle alte temperature di lavaggio! Per
evitare tali situazioni e per assicurare ingresso
e scarico dell'acqua privi di problemi, montare
l'estremità del flessibile di scarico in modo
sicuro, così che non possa fuoriuscire.
• Il flessibile deve essere installato ad un'altezza
minima di 40 cm e massima di 100 cm.
• Nel caso in cui il cavo venga sollevato dopo
essere stato a livello o in prossimità del
pavimento (a meno di 40 cm dal suolo),
lo scarico dell’acqua risulta più difficoltoso
e la biancheria potrebbe uscire ancora
eccessivamente bagnata. Pertanto, seguire le
altezze descritte in figura.
•
•
•
Per evitare il flusso di acqua sporca che rientra
nella macchina e per consentire uno scarico
facile, non immergere l'estremità del flessibile
nell'acqua sporca o tenerla ad una distanza di
almeno 15 cm. Se il flessibile è troppo lungo,
tagliarlo.
L'estremità del flessibile non deve essere
piegata, non deve essere calpestata e
non deve essere piegata fra lo scarico e la
macchina.
Se la lunghezza del flessibile non è sufficiente,
aggiungere una prolunga originale per flessibili. La lunghezza del flessibile non deve superare
3,2 m. Per evitare guasti provocati dalla perdita
dell’acqua, la connessione tra la prolunga del
flessibile e il flessibile di scarico della lavatrice
deve essere eseguita con un morsetto
adeguato che si mantenga fermo e non perda.
Regolazione dei piedini
lavatrice deve stare su una superficie
A La
pianeggiante e in equilibrio, perché funzioni
in modo più silenzioso e senza vibrazioni. Mettere in equilibrio la macchina regolando
i piedini. Altrimenti il prodotto può spostarsi
provocando problemi di rumori e vibrazioni.
1. Allentare manualmente i controdadi posti sui
piedini.
2. Regolare i piedini finché il prodotto non è allo
stesso livello e in equilibrio.
3. Stringere di nuovo a mano tutti i controdadi del
flessibile.
utilizzare alcun utensile per allentare i
A Non
controdadi. Potrebbero subire dei danni.
Collegamento elettrico
Collegare il prodotto ad una presa messa a terra
protetta da un fusibile conforme ai valori della
tabelle "Specifiche tecniche". La nostra azienda
non sarà responsabile dei danni derivanti dall'uso
del prodotto senza la messa a terra conforme ai
regolamenti locali.
• Il collegamento deve essere effettuato in
ottemperanza ai regolamenti vigenti.
• Una volta terminata l'installazione, il cavo di
alimentazione deve essere a portata di mano.
• La tensione e la protezione o l'interruttore dei
fusibili consentiti sono precisati nella sezione
“Specifiche tecniche”. Se il valore corrente del
fusibile o dell'interruttore in casa è inferiore a
16 Amps, far installare un fusibile da 16 Amp
da un elettricista qualificato.
• La tensione dell’apparecchio deve
corrispondere alla tensione di rete.
• Non eseguire collegamenti usando prolunghe
o spine multiple.
di alimentazione danneggiati devono
B Cavi
essere sostituiti da un agente autorizzato per
l'assistenza.
Primo utilizzo
Prima di cominciare ad usare il prodotto, assicurarsi
di eseguire tutte le preparazioni secondo le
istruzioni delle sezioni "Istruzioni importanti per la
55
IT
sicurezza" e "Installazione".
Per preparare il prodotto al lavaggio del bucato,
eseguire la prima operazione del programma
per la pulizia del cestello. Se la lavatrice non ha
un programma per la pulizia del cestello, usare il
programma Cotone 90 e selezionare le funzioni
ausiliarie di acqua aggiuntiva o risciacquo extra.
Prima di avviare il programma, mettere max.
100 g di anticalcare in polvere nello scomparto
detersivo per lavaggio principale (scomparto n. II).
Se l'anticalcare è in compresse, mettere un'unica
compressa nello scomparto n. II. Asciugare
l'interno del soffietto con un panno pulito quando il
programma è completo.
un anticalcare appropriato alle lavatrici.
C Usare
Potrebbe restare dell'acqua nel prodotto in
C seguito
ai processi di controllo della qualità
durante la produzione. Non è dannosa per il
prodotto.
Smaltimento dei materiali
per l'imballaggio
3 Preparazione
Cose da fare ai fini del
risparmio energetico
Le informazioni che seguono aiutano ad usare
il prodotto in modo ecologico e con risparmio
energetico.
• Utilizzare il prodotto alla massima capacità
consentita dal programma selezionato, ma non
sovraccaricarlo; vedere la tabella "Programma
e consumo".
• Seguire sempre le istruzioni sulla confezione
del detersivo.
• Lavare il bucato poco sporco a temperature
basse.
• Usare programmi più veloci per piccole
quantità di bucato poco sporco.
• Non usare prelavaggio e temperature alte per
bucato poco sporco o macchiato.
• Se si desidera asciugare il bucato
nell'asciugatrice, selezionare la velocità
di centrifuga più alta consigliata durante il
programma di lavaggio.
• Non usare detersivo in quantità superiore a
quella consigliata sulla confezione.
Selezione del bucato
•
•
I materiali di imballaggio sono dannosi per i
bambini. Tenere i materiali di imballaggio in un
luogo sicuro lontano dalla portata dei bambini.
I materiali di imballaggio della macchina sono
prodotti con materie riciclabili. Smaltirli in modo
corretto e dividerli secondo le istruzioni per il
riciclaggio dei rifiuti. Non smaltirli insieme ai normali
rifiuti domestici.
Trasporto del prodotto
Scollegare il prodotto prima di trasportarlo.
Rimuovere i collegamenti idrici per scarico e
fornitura d'acqua. Scaricare completamente
l'acqua rimanente nel prodotto; vedere "Scarico
dell'acqua rimanente e pulizia del filtro della
pompa". Installare bulloni di sicurezza per il
trasporto nell'ordine inverso alla procedura di
rimozione; vedere "Rimozione dei blocchi di
trasporto".
Non spostare mai il prodotto senza avere
C prima
ripristinato correttamente i bulloni di
sicurezza!
Smaltimento della vecchia lavatrice
Liberarsi del vecchio apparecchio rispettando
l’ambiente.
Fare riferimento all'agente locale o a un centro per
lo smaltimento dei rifiuti per avere informazioni sullo
smaltimento della lavatrice.
Per la sicurezza dei bambini, prima di smaltire il
prodotto, tagliare il cavo di alimentazione e rompere
il meccanismo di blocco dello sportello di carico in
modo che non funzioni.
56
Selezionare il bucato in base al tipo di tessuto,
al colore, al livello di sporco e alla temperatura
di lavaggio consentita.
Rispettare sempre le istruzioni presenti sulle
etichette dei capi.
Preparazione del bucato da lavare
•
Gli indumenti con accessori in metallo, quali
reggiseno, fibbie di cinture o bottoni metallici
possono danneggiare la lavatrice. Rimuovere
le parti in metallo o lavare questi capi ponendoli
in una borsa apposita o nella federa di un
cuscino.
• Togliere dalle tasche tutti gli oggetti, quali
monete, penne e graffette, capovolgere le
tasche e spazzolare. Tali oggetti possono
danneggiare il prodotto o provocare problemi
dovuti al rumore.
• Mettere i capi piccoli, come i calzini dei neonati
e le calze di nylon, in una borsa apposita o
nella federa di un cuscino.
• Mettere le tende all'interno senza comprimerle.
Rimuovere gli accessori dalle tende.
• Chiudere le cerniere, cucire i bottoni allentati e
sistemare strappi e lacerazioni.
• Scegliere il programma corretto per i capi che
recano scritto in etichetta “lavare in lavatrice” o
“lavare a mano”.
• Non lavare insieme capi bianchi e colorati. I
capi in cotone nuovi o di colori scuri perdono
molto colore. Lavarli separatamente.
• Macchie resistenti devono essere trattate
correttamente prima del lavaggio. Se non si è
sicuri, utilizzare un pulitore a secco.
• Utilizzare solo tinte/coloranti e smacchiatori
adatti per l’utilizzo con la lavatrice. Seguire
sempre le istruzioni indicate sulla confezione.
IT
•
•
•
Lavare pantaloni e capi delicati girandoli al
rovescio.
Tenere i capi fatti in lana d’angora nel
congelatore per qualche ora prima del lavaggio. Questo ridurrà la perdita del pelo.
Il bucato molto sporco di materiale come farina,
polvere di calcare, polvere di latte, ecc. deve
essere scosso prima di metterlo in lavatrice. Tali
tipi di polvere sul bucato possono raccogliersi
nelle parti interne della lavatrice nel tempo e
possono provocare danni.
Corretta capacità di carico
La capacità massima di carico dipende dal tipo di
bucato, dal grado di sporco e dal programma di
lavaggio desiderato.
La macchina regola automaticamente la quantità di
acqua secondo il peso del bucato che viene posto
all'interno.
le informazioni della tabella
A Seguire
“Programma e consumo”. In caso di
sovraccarico, la prestazione della lavatrice
peggiora. Inoltre possono verificarsi problemi di
rumore e vibrazioni.
Caricamento del bucato
•
•
•
Aprire lo sportello di carico.
Mettere il bucato sciolto dentro alla macchina.
Chiudere lo sportello di carico fino a sentire un
suono di blocco. Fare attenzione a che non vi
siano capi impigliati nello sportello.
Lo sportello di carico è bloccato durante
C l'esecuzione
dei programmi. Lo sportello può
essere aperto solo dopo un certo periodo di
tempo dalla fine del programma.
caso di cattivo posizionamento del bucato,
A In
possono verificarsi rumori e vibrazioni nella
lavatrice.
Uso di detersivo e ammorbidente
Cassetto del detersivo
Il cassetto del detersivo è suddiviso in tre scomparti:
- (I) per il prelavaggio
– (II ) per il lavaggio principale
– (III) per l’ammorbidente
– (*) inoltre c'è un sifone nello scomparto
dell'ammorbidente.
3 2
1
3
2 1
distributore del detersivo può essere di due
CIltipi,
in funzione del modello della lavatrice,
come mostrato sopra.
Detersivo, ammorbidente e altri detergenti
• Aggiungere il detersivo e l’ammorbidente prima
di avviare il programma di lavaggio.
• Non aprire mai il cassetto del detersivo mentre
il programma è in corso!
• Quando si usa un programma senza
prelavaggio, non mettere detersivo nello
57
scomparto del prelavaggio (scomparto n. I).
Quando si usa un programma con prelavaggio,
non mettere detersivo liquido nello scomparto
del prelavaggio (scomparto n. I).
• Non selezionare un programma con
prelavaggio se si usa un sacchetto detergente
o una sfera detergente. Mettere il sacchetto
detergente o la sfera direttamente tra il bucato
nella lavatrice.
• Se si usa detersivo liquido, non dimenticare
di mettere il contenitore per il detersivo liquido
nello scomparto per il lavaggio principale
(scomparto n. II).
Scelta del tipo di detersivo
Il tipo di detersivo da usare dipende dal tipo e dal
colore del tessuto.
• Usare detersivi diversi per bucato bianco e
colorato.
• Lavare i capi delicati solo con detersivi speciali
(detersivo liquido, shampoo per lana, ecc.) che
si usano solo per capi delicati.
• Quando si lavano capi di colore scuro e
trapunte, si consiglia di usare detersivo liquido.
• Lavare i capi in lana con un detersivo speciale
specifico per i capi in lana.
solo detersivi prodotti specificamente per
A Usare
lavatrici.
Non usare sapone in polvere.
A
Regolazione della quantità di detersivo
La quantità di detersivo da utilizzare dipende
dal volume di biancheria, dal grado di sporco e
dalla durezza dell’acqua. Leggere le istruzioni
del produttore sulla confezione del detersivo con
attenzione e seguire i valori di dosaggio.
• Non utilizzare quantità superiori a quelle
indicate sulla confezione del detersivo, per
evitare la formazione eccessiva di schiuma e
un risciacquo inadeguato. Inoltre si risparmia
denaro e non si inquina l’ambiente.
• Usare una quantità minore di detersivo per
piccole quantità di bucato o bucato poco
sporco.
• Usare detersivi concentrati nelle dosi
consigliate.
Uso di ammorbidenti
Versare l’ammorbidente nello scomparto apposito
del cassetto del detersivo.
• Usare i dosaggi consigliati indicati sulla
confezione.
• Non superare il contrassegno di livello (>max<)
dello scomparto ammorbidente.
• Se l’ammorbidente ha perso fluidità, diluirlo
con acqua prima di metterlo nel cassetto del
detersivo.
Uso di detersivi liquidi
Se il prodotto contiene un contenitore per
detersivo liquido:
• Assicurarsi di aver posizionato il contenitore per
detersivo liquido nello scomparto n. "II".
• Usare solo il misurino del produttore per il
detersivo e seguire le istruzioni sulla confezione.
• Usare i dosaggi consigliati indicati sulla
confezione.
•
IT
• Se il detersivo liquido ha perso fluidità, diluirlo
con acqua prima di metterlo nel contenitore del
detersivo.
Se il prodotto non contiene un contenitore per
detersivo liquido:
• Non usare detersivo liquido per il prelavaggio in
un programma con prelavaggio.
• Usare solo il misurino del produttore per il
detersivo e seguire le istruzioni sulla confezione.
• Il detersivo liquido macchia il bucato se usato
con la funzione di avvio con ritardo. Se si usa
la funzione di avvio con ritardo, non usare
detersivo liquido.
Uso di detersivo in gel e compresse
Quando si usano detersivi in compresse, gel, ecc.,
leggere le istruzioni del produttore sulla confezione
del detersivo con attenzione e seguire i valori di
dosaggio. Se non ci sono istruzioni sulla confezione,
applicare quanto segue.
• Se la consistenza del detersivo in gel è fluida
e la lavatrice non contiene un contenitore
speciale per detersivo liquido, mettere il
detersivo in gel nello scomparto del lavaggio
principale durante il primo carico di acqua.
Se la lavatrice contiene un contenitore per
detersivo liquido, riempirlo di detersivo prima di
avviare il programma.
• Se la consistenza del detersivo in gel non
è fluida o esso è contenuto in una capsula,
metterlo direttamente nel cestello prima del
lavaggio.
• Mettere il detersivo in compresse nello
scomparto lavaggio principale (scomparto n. II)
o direttamente nel cestello prima del lavaggio.
Il detersivo in compresse può lasciare residui
C nello
scomparto detersivo. In questo caso,
mettere il detersivo in compresse nel bucato,
chiudere la parte inferiore del cestello nei
lavaggi successivi.
Usare il detersivo in compresse o gel senza
C selezionare
la funzione di prelavaggio.
Uso dell'appretto
• Aggiungere appretto liquido, in polvere o
colorante nello scomparto ammorbidente se
viene indicato sulla confezione.
• Non usare insieme ammorbidente e appretto,
in un ciclo di lavaggio.
• Pulire l'interno della lavatrice con un panno
umido e pulito dopo aver usato l'appretto.
Uso di candeggina
• Selezionare un programma con prelavaggio
e aggiungere la candeggina all'inizio del
prelavaggio. Non versare detersivo nello
58
scomparto del prelavaggio. Come applicazione
alternativa, selezionare un programma con
risciacquo extra e aggiungere la candeggina
mentre la macchina aspira l'acqua dallo
scomparto detersivo durante la prima fase di
risciacquo.
• Non usare candeggina e detersivo
mescolandoli.
• Usare una piccola quantità (circa 50 ml) di
candeggina e sciacquare i capi molto bene,
perché provoca irritazione della pelle. Non
versare la candeggina sui capi e non usarla per
capi colorati.
• Quando si usa candeggina a base di
ossigeno, seguire le istruzioni sulla confezione
e selezionare un programma a bassa
temperatura.
• La candeggina a base di ossigeno può
essere usata insieme al detersivo; però se
la consistenza non è la stessa del detersivo,
mettere il detersivo prima nello scomparto n.
"II" del cassetto del detersivo e aspettare finché
il detersivo non fluisce quando la lavatrice
aspira l'acqua. Aggiungere candeggina dallo
stesso scomparto quando la lavatrice sta
ancora aspirando l'acqua.
Uso di un agente anticalcare
• Quando necessario, usare agenti anticalcare
prodotti specificamente solo per lavatrici.
• Seguire sempre le istruzioni sulla confezione.
IT
Consigli per un lavaggio efficace
Indimenti
Colori chiari e capi
bianchi
Colori scuri
Delicati/lana/
seta
(Intervallo di
temperatura
consigliata basato
sul livello di sporco:
40-90C)
(Intervallo di
temperatura consigliata
basato sul livello di
sporco: freddo-40C)
(Intervallo di
temperatura
consigliata
basato sul
livello di sporco:
freddo-40C)
(Intervallo di
temperatura
consigliata
basato sul
livello di sporco:
freddo-30C)
Potrebbe essere
necessario pretrattare
le macchine ed
eseguire il prelavaggio. Detersivi
in polvere e liquidi
consigliati per i capi
bianchi possono
essere usati ai
dosaggi consigliati
per capi molto
sporchi. Si consiglia
di usare detersivi
liquidi per pulire
macchie di argilla e
creta e macchie che
sono sensibili alla
candeggina.
Detersivi in polvere
e liquidi consigliati
per i capi colorati
possono essere usati
ai dosaggi consigliati
per capi molto sporchi.
Si consiglia di usare
detersivi liquidi per
pulire macchie di argilla
e creta e macchie
che sono sensibili
alla candeggina.
Usare detersivi senza
candeggina.
Detersivi iliquidi
consigliati
adatti per capi
colorati e scuri
possono essere
usati ai dosaggi
consigliati per
capi molto
sporchi.
Preferire i
detersivi liquidi
prodotti per
capi delicati.
Capi in lana e
seta devono
essere lavati con
detersivi speciali
per la lana.
Detersivi in polvere
e liquidi consigliati
Sporco normale
per i capi bianchi
possono essere usati
(Per esempio,
macchie naturali su ai dosaggi consigliati
per capi con sporco
colletti e polsini)
normale.
Detersivi in polvere e
liquidi consigliati per i
capi colorati possono
essere usati ai dosaggi
consigliati per capi
con sporco normale.
Usare detersivi senza
candeggina.
Detersivi iliquidi
consigliati
adatti per capi
colorati e scuri
possono essere
usati ai dosaggi
consigliati per
capi con sporco
normale.
Preferire i
detersivi liquidi
prodotti per
capi delicati.
Capi in lana e
seta devono
essere lavati con
detersivi speciali
per la lana.
Detersivi in polvere
e liquidi consigliati
per i capi bianchi
possono essere usati
ai dosaggi consigliati
per capi poco
sporchi.
Detersivi in polvere
e liquidi consigliati
per i capi colorati
possono essere usati
ai dosaggi consigliati
per capi poco sporchi.
Usare detersivi senza
candeggina.
Detersivi iliquidi
consigliati
adatti per capi
colorati e scuri
possono essere
usati ai dosaggi
consigliati per
capi poco
sporchi.
Preferire i
detersivi liquidi
prodotti per
capi delicati.
Capi in lana e
seta devono
essere lavati con
detersivi speciali
per la lana.
Molto sporco
(macchie difficili
come erba, caffé,
frutta e sangue).
Livello di sporco
Colori
Poco sporco
(Non sono presenti
macchie visibili).
59
IT
4 Funzionamento del prodotto
Pannello di controllo
1
2
8
Preparazione dell'elettrodomestico
sporco e la temperatura dell'acqua consentita.
Selezionare sempre la più bassa temperatura
C richiesta.
Temperatura più alta significa
maggiore consumo energetico.
Selezione del programma
Selezionare il programma adatto a tipo, quantità
e livello di sporco del bucato secondo la tabella
"Programma e consumo" e la tabella "Temperatura"
sotto.
40˚C30°CFreddo
5
Quando si seleziona il programma, considerare
C sempre
il tipo di tessuto, il colore, il livello di
Assicurarsi che i flessibili siano collegati in modo
sicuro. Collegare la macchina alla presa elettrica.
Aprire completamente il rubinetto. Mettere il
bucato nella macchina. Aggiungere detersivo e
ammorbidente per bucato.
60˚C
6
4
4 - Indicatore di follow-up del programma
5 - Tasto avvio/pausa
6 - Tasti funzioni ausiliarie
7 - Tasto di regolazione velocità della centrifuga
8 - Tasto di regolazione della temperatura
1 - Manopola di selezione programma (posizione
superiore accensione/spegnimento)
2 - Display
3 - Tasto avvio con ritardo
90˚C
7
3
Capi bianchi e tessuti in cotone,
molto sporco. (tovagliette, tovaglie,
asciugamani, lenzuola, ecc.)
Capi in cotone o sintetici che non
scoloriscono, colorati, sporco
normale (magliette, camicie da
notte, pigiami, ecc.) e capi bianchi
leggermente sporchi (biancheria
intima, ecc.).
Bucato misto compresi tessuti
delicati (tende di velo, ecc.), capi
sintetici e in lana.
Selezionare il programma desiderato con il tasto di
selezione del programma.
programmi sono dotati di limitatore per la
C Ivelocità
di centrifuga appropriata per quel
particolare tipo di tessuto.
60
Per maggiori dettagli sui programmi, vedere la
C tabella
"Programma e consumo".
Programmi principali
A seconda del tipo di tessuto, usare i programmi
principali che seguono.
• Cotone
Usare questo programma per il bucato in cotone
(come lenzuola, federe e set da letto, asciugamani,
accappatoi, biancheria intima, ecc.). Il bucato sarà
lavato con un'azione di lavaggio vigorosa per un
ciclo di lavaggio più lungo.
• Sintetici
Usare questo programma per lavare i capi sintetici
(magliette, camicie, tessuti misti sintetici/cotone,
ecc.). Lava con un'azione gentile ed ha un ciclo di
lavaggio più breve rispetto al programma Cotone.
Per tende e tulle, usare il programma Sintetici
40˚C con le funzioni di prelavaggio e antipieghe
selezionate. Poiché i tessuti a rete provocano
schiuma in eccesso, lavare veli/tulle mettendo
poco detersivo nello scomparto del lavaggio
principale. Non versare detersivo nello scomparto
del prelavaggio.
IT
• Lana
Usare questo programma per lavare i capi in lana. Selezionare la temperatura appropriata conforme
alle etichette degli abiti. Usare detersivi appropriati
per i capi in lana.
Programmi aggiuntivi
Per casi speciali, sono disponibili programmi
aggiuntivi.
I programmi aggiuntivi possono differire in
C funzione
del modello della macchina.
• Cotone Eco
È possibile lavare il bucato normalmente sporco
di cotone e lino con questo programma con il
massimo risparmio di energia e acqua, rispetto
agli altri programmi di lavaggio adatti ai capi in
cotone. La temperatura reale dell’acqua può
differire dalla temperatura dichiarata del ciclo. La
durata del programma può essere abbreviata
automaticamente durante le ultime fasi del
programma se si lava una minore quantità di
bucato (per es. ½ capacità o meno). In questo
caso il consumo di energia e acqua diminuisce
ulteriormente dando l’opportunità di un lavaggio
ancora più economico. Questa funzione è
disponibile per determinati modelli dotati del display
del tempo rimanente.
• Lavaggio a mano
Usare questo programma per lavare indumenti in
lana/delicati che portano l’etichetta “non lavare in
lavatrice” per i quali si raccomanda il lavaggio a
mano. Lava il bucato con una azione di lavaggio
molto delicata per non danneggiare il bucato
stesso.
• Super short express (Super breve express)
Usare questo programma per lavare una piccola
quantità di capi in cotone poco sporchi, in poco
tempo.
• Lavaggio bucato scuro
Usare questo programma per lavare il bucato
di colore scuro o il bucato colorato, per non farli
scolorire. Il lavaggio è eseguito con una azione
meccanica ridotta e a basse temperature. Si
consiglia di usare detersivo liquido o shampoo per
lana per il bucato di colore scuro.
• Maglie
Usare questo programma per lavare insieme
camicie in cotone, capi sintetici e capi in misto
sintetico.
• Capi sportivi (Sports)
Usare questo programma per lavare i capi che sono
stati indossati per poco tempo, come i capi sportivi.
È adatto per lavare piccole quantità di capi misti
cotone / sintetico.
scaricare l’acqua dalla macchina.
Prima di selezionare questo programma, selezionare
la velocità di centrifuga desiderata, premere il
pulsante avvio/pausa. Per prima cosa, la macchina
scarica l'acqua interna. Poi, centrifuga il bucato
con la velocità impostata per la centrifuga e scarica
l'acqua che ne deriva.
Se si desidera solo scaricare l'acqua senza
l'azione di centrifuga, selezionare il programma
Pompa+centrifuga e poi selezionare la funzione
Nessuna centrifuga con l'aiuto del tasto di
regolazione della velocità di centrifuga. Premere il
tasto avvio/pausa.
Per il bucato delicato usare una velocità di
C centrifuga
inferiore.
Selezione della temperatura
Quando viene selezionato un nuovo programma, la
temperatura massima per il programma selezionato
viene visualizzata sull’indicatore della temperatura.
Per diminuire la temperatura, premere di nuovo
il tasto di regolazione della temperatura. La
temperatura diminuisce gradualmente.
Se il programma non ha raggiunto la fase di
C riscaldamento,
si può modificare la temperatura
senza portare la macchina in modalità pausa.
Selezione velocità centrifuga
Quando si seleziona un nuovo programma, la
velocità di centrifuga consigliata del programma
selezionato è visualizzata sull’indicatore di velocità di
centrifuga.
Per diminuire la velocità di centrifuga, premere il
tasto di regolazione della velocità di centrifuga.
La velocità di centrifuga diminuisce in modo
graduale. Poi, a seconda del modello del prodotto,
compaiono sul display le opzioni "Trattieni
risciacquo" e "Nessuna centrifuga". Vedere la
sezione "Selezione funzioni ausiliarie" per chiarimenti
su queste opzioni.
Se il programma non ha raggiunto la fase di
C centrifuga,
si può modificare la velocità senza
portare la macchina in modalità pausa.
Programmi speciali
Per applicazioni specifiche, selezionare uno dei
seguenti programmi.
• Risciacquo
Usare questo programma quando si vuole
risciacquare o inamidare separatamente.
• Centrifuga + Pompa
Usare questo programma per applicare un ciclo
di centrifuga aggiuntivo per la biancheria o per
61
IT
Tabella Programma e consumo
IT
Funzione ausiliaria
Carico max.(Kg)
Consumo d’acqua (l)
Consumo energia (KWh)
Velocità max. ***
Prelavaggio
Rapido
Extra risciacquo
Anti-grinze
Risciacquo Aggiuntivo
Ammollo
26
Cotone
90
7
74
2.30
1600
•
•
•
•
•
•
Freddo-90
Cotone
60
7
70
1.54
1600
•
•
•
•
•
•
Freddo-90
•
•
•
•
•
•
Freddo-90
Programma
Cotone
°C gamma
temperatura
selezionabile
40
7
69
0.85
1600
Cotone Eco
60**
7
44
1.00
1600
•
40-60
Cotone Eco
60**
3.5
38
0.84
1600
•
40-60
Cotone Eco
40**
3.5
38
0.65
1600
•
40-60
Super short express (Super
breve express)
30
2
50
0.11
1400
•
•
Freddo-30
Lavaggio bucato scuro
40
3.5
66
0.55
800
*
•
Freddo-40
Capi sportivi (Sports)
40
4
67
0.58
800
Lavaggio a mano
30
1
34
0.20
600
Lana
40
1.5
47
0.34
600
Maglie
60
3.5
60
1.00
600
•
•
•
*
•
•
Freddo-60
Sintetici
60
3
55
1.00
800
•
•
•
•
•
•
Freddo-60
Sintetici
40
3
55
0.55
800
•
•
•
•
•
•
Freddo-60
•
•
•
•
•
•
Freddo-40
Freddo-30
•
•
Freddo-40
• : Selezionabile
* : Selezionato automaticamente, non annullabile.
** : Etichetta Energia programma (EN 60456 Ed.3)
*** : Se la velocità di centrifuga massima della lavatrice è inferiore a questo valore, si può selezionare solo
fino alla velocità massima di centrifuga.
- : Vedere la descrizione del programma per il carico massimo.
Il consumo di acqua ed energia potrebbe variare in base a differenze nella pressione dell'acqua, alla
C durezza
e alla temperatura dell'acqua, alla temperatura ambiente, al tipo e alla quantità di bucato, alla
scelta di funzioni ausiliarie e a modifiche della tensione elettrica.
Si può vedere il tempo di lavaggio del programma selezionato sul display della macchina. È normale
C che
possano verificarsi piccole differenze tra il tempo mostrato sul display e il tempo reale di lavaggio.
62
IT
Le funzioni ausiliarie nella tabella possono
C variare
in funzione del modello della lavatrice.
Selezione funzione ausiliaria
Selezionare le funzioni ausiliarie desiderate prima di
avviare il programma. Inoltre è possibile selezionare
o annullare le funzioni ausiliarie che sono adatte
all'esecuzione del programma senza premere il
tasto avvio/pausa durante il funzionamento della
lavatrice. Per questo, la macchina deve essere in
una fase precedente alla funzione ausiliaria che si
sta per selezionare o annullare.
Se la funzione ausiliaria non può essere selezionata
o annullata, la spia della relativa funzione ausiliaria
lampeggia 3 volte per avvertire l'utente.
Alcune funzioni non possono essere
C selezionate
insieme. Se una seconda funzione
ausiliaria è in conflitto con la prima selezionata
prima dell'avvio della lavatrice, la funzione
selezionata come prima viene annullata e la
seconda funzione ausiliaria resta attiva. Per
esempio, se si desidera selezionare lavaggio
veloce dopo aver selezionato prelavaggio,
prelavaggio sarà annullato e lavaggio veloce
resterà attivo.
Una funzione ausiliaria che non è compatibile
C con
il programma non può essere selezionata.
(Vedere la tabella "Programma e consumo")
I tasti della funzione ausiliaria possono differire a
C seconda
del modello della lavatrice.
• Prelavaggio
Conviene effettuare il prelavaggio solo con bucato
molto sporco. Non usare il prelavaggio consente di
risparmiare energia, acqua, detersivo e tempo.
Il prelavaggio senza detersivo è consigliato per
C tulle
e tende.
• Rapido
Questa funzione può essere utilizzata con i
programmi per il cotone e le fibre sintetiche. Essa
diminuisce i tempi di lavaggio e anche il numero di
fasi di risciacquo per bucato poco sporco.
si seleziona questa funzione, caricare
C laQuando
macchina con metà del carico massimo
specificato nella tabella del programma.
• Extra risciacquo
Questa funzione consente alla lavatrice di eseguire
un altro risciacquo oltre a quello già eseguito dopo
il lavaggio principale. Si riduce così il rischio che la
pelle sensibile (neonati, pelli con allergie ecc) venga
attaccata dal detersivo che rimane sul bucato.
• Anti-grinze
Questa funzione fa formare meno pieghe al bucato
durante il lavaggio. Il movimento del cestello è
ridotto e la velocità di centrifuga è limitata per evitare
la formazione di pieghe. Inoltre, il lavaggio viene
eseguito con un livello di acqua superiore.
• Risciacquo Aggiuntivo
Se non si tolgono i capi dalla lavatrice
immediatamente dopo il completamento del
programma, è possibile usare la funzione trattieni
risciacquo e lasciare il bucato nell'acqua del
risciacquo finale per evitare che si riempiano di
pieghe quando non c'è acqua nella macchina.
63
Dopo questa procedura, premere il tasto avvio/
pausa se si desidera scaricare l'acqua senza
centrifugare il bucato. Il programma riprende e si
completa dopo lo scarico dell'acqua.
Se si desidera centrifugare il bucato trattenuto
in acqua, regolare la velocità della centrifuga e
premere il tasto avvio/pausa.
Il programma riprende. L'acqua viene scaricata, il
bucato è centrifugato e il programma è completato.
• Ammollo
La funzione ausiliaria di ammollo assicura una
migliore rimozione delle macchie resistenti dagli
abiti, trattenendoli in acqua e detersivo prima
dell'avvio del programma.
• Peli animali
Questa funzione aiuta a rimuovere in modo più
efficace i peli animali che restano sugli abiti.
Quando si seleziona questa funzione, sono
aggiunte le fasi di prelavaggio e risciacquo extra
al programma normale. Così il lavaggio è eseguito
con più acqua (30%) e i peli animali sono rimossi in
modo più efficace.
Non lavare mai gli animali in lavatrice.
A
Avvio con ritardo
Con la funzione di avvio con ritardo, l'avvio del
programma può essere ritardato fino a 19 ore. Il
tempo di ritardo dell'avvio può essere aumentato a
scatti di 1 ora.
Non utilizzare detersivo liquido se si desidera
C effettuare
il lavaggio con avvio con ritardo!
Esiste il rischio di macchiare gli indumenti.
Aprire lo sportello di carico, mettere il bucato
e il detersivo, ecc. Selezionare il programma di
lavaggio, la temperatura, la velocità di centrifuga
e, se necessario, le funzioni ausiliarie. Impostare il
tempo desiderato premendo il tasto di avvio con
ritardo. Premere il tasto avvio/pausa. Il tempo
di ritardo dell'avvio impostato viene visualizzato.
Comincia il conto alla rovescia per l'avvio con
ritardo. Il simbolo “_” vicino al tempo dell'avvio con
ritardo si sposta su e giù sul display.
Durante il tempo del ritardo, potrà essere
C caricata
altra biancheria.
5. Alla fine del conto alla rovescia, sarà
visualizzata la durata del programma
selezionato. Il simbolo “_” scompare e il
programma selezionato si avvia.
Modifica del periodo di ritardo per l'avvio
Se si desidera cambiare il tempo durante il conto
alla rovescia:
Premere il tasto dell'avvio con ritardo. Il tempo
aumenta di 1 ora ogni volta che si preme il tasto. Se
si desidera far diminuire il tempo di ritardo, premere
il tasto dell'avvio con ritardo ripetutamente finché il
tempo desiderato per il ritardo compare sul display.
Annullamento della funzione di avvio con
ritardo
Per annullare il tempo del ritardo durante il conto alla
rovescia e avviare immediatamente il programma:
Impostare il periodo di ritardo dell'avvio a zero o
ruotare la manopola di selezione del programma
su qualsiasi programma. Così la funzione di avvio
con ritardo viene annullata. La spia fine/annulla
IT
lampeggia in modo continuo. Poi, selezionare
di nuovo il programma che si desidera eseguire.
Premere il tasto avvio/pausa per avviare il
programma.
Il blocco bambini non è disattivato dopo
C un'interruzione
di alimentazione o quando la
macchina è scollegata.
Avanzamento del programma
Avvio del programma
Premere il tasto avvio/pausa per avviare il
programma. La spia del programma di follow-up
che mostra l'avvio del programma si accenderà.
Se non si avvia alcun programma né si preme
C alcun
tasto entro 1 minuto durante il processo
di selezione del programma, la macchina
passa a modalità pausa e diminuiscono il
livello di illuminazione della temperatura e delle
spie degli indicatori di velocità e sportello di
carico. Altre spie e altri indicatori si spengono.
Una volta che la manopola di selezione del
programma è ruotata o un tasto è premuto, le
spie e gli indicatori si accendono di nuovo.
Blocco bambini
Usare la funzione di blocco bambini per evitare che
i bambini possano interferire con il funzionamento
del prodotto. In questo modo si possono evitare
cambiamenti ai programmi in corso.
la manopola di selezione del programma
C èSeruotata
quando il blocco bambini è attivo,
"Con" compare sul display. Il blocco bambini
non consente modifiche ai programmi e a
temperatura, velocità e funzioni ausiliarie
selezionate.
Anche se viene selezionato un altro programma
C con
la manopola di selezione del programma
quando il blocco bambini è attivo, il programma
selezionato in precedenza continua a
funzionare.
Per attivare il blocco bambini:
Tenere premuti i tasti della 1a e 2a funzione ausiliaria
per 3 secondi. Le spie sui tasti della 1a e 2a funzione
ausiliaria lampeggiano e "C03", "C02", "C01"
compaiono rispettivamente sul display mentre si
tengono i tasti premuti per 3 secondi. Poi, "Con"
compare sul display indicando che il blocco
bambini è attivato. Se si preme un tasto o si ruota
la manopola di selezione del programma quando
il blocco bambini è attivo, compare la stessa cosa
sul display. Le spie sui tasti della prima e seconda
funzione ausiliaria usati per disattivare il blocco
bambini lampeggiano 3 volte.
Per disattivare il blocco bambini:
Tenere premuti i tasti della 1a e 2a funzione ausiliaria
per 3 secondi mentre un programma è in funzione.
Le spie sui tasti della 1a e 2a funzione ausiliaria
lampeggiano e "C03", "C02", "C01" compaiono
rispettivamente sul display mentre si tengono i
tasti premuti per 3 secondi. Poi, "COFF" compare
sul display indicando che il blocco bambini è
disattivato.
aggiunta al metodo suddetto, per disattivare
C ilInblocco
bambini, portare la manopola di
selezione del programma sulla posizione
acceso/spento quando nessun programma è
in corso e selezionare un altro programma.
64
L'avanzamento di un programma in corso può
essere seguito grazie all'indicatore di follow-up del
programma. All’inizio di tutte le fasi di programma,
la spia dell’indicatore appropriato si accenderà e
rimarrà accesa fino al termine della fase.
Si possono modificare le impostazioni di funzioni
ausiliarie, velocità e temperatura senza interrompere
il programma in esecuzione. Per farlo, la modifica
che si sta per apportare deve essere in una fase
successiva a quella del programma in corso. Se
la modifica non è compatibile, le spie appropriate
lampeggiano 3 volte.
Se la lavatrice non supera la fase di centrifuga,
C potrebbe
essere attiva la funzione di risciacquo
trattenuto o potrebbe essersi attivato il sistema
automatico di rilevamento carico non bilanciato
a causa di una distribuzione sbilanciata del
bucato nella lavatrice.
Blocco sportello di carico
C'è un sistema di blocco sullo sportello di carico
della lavatrice che impedisce l'apertura dello
sportello nel caso in cui il livello dell'acqua non è
adatto.
La spia dello sportello di carico comincia a
lampeggiare quando la macchina viene portata
in modalità pausa. La macchina controlla il livello
interno dell'acqua. Se il livello è adatto, la spia dello
sportello di carico si accende fissa entro 1-2 minuti
e lo sportello di carico può essere aperto.
Se il livello non è adatto, la spia dello sportello di
carico si spegne e lo sportello di carico non può
essere aperto. Se si è costretti ad aprire lo sportello
di carico quando la la spia dello sportello di carico
è spenta, bisogna annullare il programma corrente;
vedere "Annullamento del programma".
Cambiare le selezioni dopo che
il programma è iniziato
Portare la lavatrice in modalità pausa
Premere il tasto avvio/pausa per passare in modalità
pausa mentre è in esecuzione un programma.
La spia della fase in cui è la macchina inizia a
lampeggiare nell'indicatore di follow-up per mostrare
che la macchina è passata alla modalità pausa.
Inoltre, quando lo sportello di carico è pronto per
l'apertura, si accende in modo continuo anche
la spia pertinente oltre alla spia della fase del
programma.
Modifica delle impostazioni di velocità e
temperatura per le funzioni ausiliarie.
A seconda della fase raggiunta dal programma, si
possono annullare o attivare le funzioni ausiliarie;
vedere "Selezione funzioni ausiliarie".
Si possono anche modificare le impostazioni di
velocità e temperatura; vedere "Selezione velocità di
centrifuga" e "Selezione temperatura".
Se non è consentita alcuna modifica, la spia
C pertinente
lampeggia 3 volte.
IT
Aggiunta o rimozione bucato
1. Premere il tasto avvio/pausa per passare
in modalità pausa. La spia di follow-up del
programma della fase da cui la macchina è
passata in modalità pausa lampeggia.
2. Aspettare finché non è possibile aprire lo
sportello di carico.
3. Aprire lo sportello di carico e aggiungere o
estrarre il bucato.
4. Chiudere lo sportello di carico.
5. Eseguire i cambiamenti nelle impostazioni di
funzioni ausiliarie, temperatura e velocità, se
necessario.
6. Premere il tasto avvio/pausa per avviare la
lavatrice.
una quantità d’acqua o una miscela di
C Se
ammorbidente superiore al normale inizia ad
accumularsi nel comparto dell’ammorbidente,
è necessario pulire il sifone.
Lavare il cassetto del detersivo e il sifone con
abbondante acqua tiepida in un lavandino.
Indossare guanti di protezione o usare una spazzola
adatta per evitare di toccare i residui nel cassetto
durante la pulizia. Reinserire il cassetto dopo la
pulizia ed assicurarsi che sia posizionato bene.
Pulire i filtri di ingresso dell'acqua
Annullamento del programma
Per annullare il programma, ruotare la manopola
di selezione del programma per selezionare un
altro programma. Il programma precedente viene
annullato. La spia fine / annulla lampeggia in modo
continuo per avvisare che il programma è stato
annullato.
La funzione pompa è attivata per 1-2 minuti a
prescindere dalla fase del programma e dalla
presenza o meno dell'acqua nella macchina. Dopo
questo periodo, la macchina è pronta ad avviarsi
con la prima fase del nuovo programma.
seconda della fase in cui è stato annullato
C ilAprogramma,
potrebbe essere necessario
mettere di nuovo detersivo e ammorbidente
per il programma appena selezionato.
Fine del programma
“Fine” compare sul display alla fine del programma.
Aspettare finché la spia dello sportello di carico
si accende fissa. Premere il tasto di accensione/
spegnimento per spegnere la macchina. Estrarre
il bucato e chiudere lo sportello di carico. La
macchina è pronta per il successivo ciclo di
lavaggio.
5 Manutenzione e pulizia
La vita di servizio del prodotto è più lunga e i
problemi affrontati di frequente diminuiscono se si
esegue la pulizia ad intervalli regolari.
Pulizia del cassetto del detersivo
Pulire il cassetto del detersivo ad intervalli regolari
(ogni 4-5 cicli di lavaggio) come mostrato di seguito
per evitare l'accumulo di polvere di detersivo nel
tempo.
Premere il punto colorato sul sifone all’interno
del comparto destinato all’ammorbidente e
premere sino a quando il comparto fuoriesce dalla
macchina.
65
C'è un filtro nella parte terminale di ciascuna valvola
di immissione dell’acqua sul lato posteriore della
lavatrice e anche alla fine di ciascun flessibile di
immissione dell’acqua, nel punto di collegamento
al rubinetto. Questi filtri evitano che le sostanze
estranee e lo sporco dell'acqua entrino nella
lavatrice. I filtri devono essere puliti quando si
sporcano.
Chiudere i rubinetti. Rimuovere i dadi dei flessibili
di ingresso dell'acqua per accedere ai filtri delle
valvole di ingresso dell'acqua. Pulirli con una
spazzola appropriata. Se i filtri sono troppo
sporchi, è possibile estrarli con le pinze e pulirli.
I filtri sull'estremità piatta dei flessibili di ingresso
dell'acqua devono essere estratti a mano con le
relative guarnizioni e puliti sotto l'acqua corrente.
Sostituire guarnizioni e filtri correttamente e quindi
serrare manualmente i dadi.
Eliminare eventuale acqua residua
e pulire il filtro della pompa
Il sistema filtro della lavatrice evita che gli oggetti
solidi come bottoni, monete e fibre si blocchino
nella pompa durante lo scarico dell'acqua di
lavaggio. Così, l'acqua sarà scaricata senza
problemi e la vita di servizio della pompa si allunga.
Se la lavatrice non scarica l’acqua, il filtro della
pompa è intasato. Il filtro deve essere pulito ogni
volta che si intasa o ogni 3 mesi. Per pulire il filtro
della pompa è necessario scaricare l’acqua.
Inoltre, prima di trasportare la lavatrice (per es.,
quando si trasloca) ed in caso di congelamento
dell'acqua, l'acqua potrebbe dover essere scaricata
completamente.
estranee che restano nel filtro della
A Sostanze
pompa possono danneggiare la lavatrice o
provocare problemi di rumori.
Per pulire il filtro sporco e scaricare l’acqua:
IT
Scollegare la lavatrice per interrompere
l’alimentazione.
temperatura dell'acqua interna alla lavatrice
A La
può arrivare fino a 90 ºC. Per evitare il rischio di
bruciature, il filtro deve essere pulito dopo che
la lavatrice si è raffreddata.
Aprire il coperchio del filtro.
Se il coperchio del filtro è composto da due
elementi, premere verso il basso la linguetta sul
coperchio del filtro e tirare l’elemento verso di
sé.
Se il coperchio del filtro si compone di un unico
elemento, tirare il coperchio da entrambi i lati sulla
parte alta per aprire.
Si può rimuovere la copertura del filtro
C spingendo
leggermente verso il basso con
un piccolo strumento appuntito in plastica,
attraverso l'apertura posta sopra la copertura
stessa del filtro. Non usare strumenti appuntiti
in metallo per rimuovere la copertura.
Alcuni dei nostri prodotti hanno un flessibile di
scarico di emergenze e alcuni no. Seguire le fasi
sotto per scaricare l'acqua.
Scarico dell'acqua quando il prodotto ha un
flessibile di scarico di emergenza:
Collocare un ampio contenitore davanti al filtro
per raccogliere l’acqua in uscita dal filtro. Allentare
il filtro della pompa (in senso antiorario) sino a
quando l’acqua inizierà a fluire. Dirigere il flusso
d’acqua nel contenitore davanti al filtro. Utilizzare
sempre un panno per assorbire l’acqua fuoriuscita.
Quando l'acqua all'interno della lavatrice è finita,
estrarre completamente il filtro ruotandolo. Eliminare
eventuali residui nel filtro, o eventuali fibre, attorno
all'area del rotore della pompa. Installare il filtro.
il prodotto è dotato di un getto d’acqua,
A Se
assicurarsi che il filtro sia correttamente
alloggiato nella pompa. Non forzare mai il filtro
quando lo si installa nel suo alloggiamento.
Installare completamente il filtro in posizione.
Altrimenti potrebbero esserci perdite di acqua
dal coperchio del filtro.
Se il coperchio del filtro si compone di due elementi,
chiuderlo premendo sulla linguetta. Se si compone
di un unico elemento, per prima cosa sistemare
le linguette nella parte inferiore in posizione e poi
premere la parte superiore per chiudere.
Estrarre il flessibile di scarico di emergenza dal
suo alloggiamento. Disporre un ampio contenitore
Rinfresco
(rinfrescante)
Cura
Eco 20
Lingerie
(Eco Pulito) dell'elettrodomestico
(Autopulizia) (Pulizia
(Eco
tamburo)
Lavaggio)
Rapido
(Quotidiano
express) (Daily
express)
all’estremità del flessibile. Scaricare l’acqua del
contenitore, tirando la presa all'estremità del
flessibile. Quando il contenitore è pieno, bloccare
l'ingresso del flessibile riposizionando il tappo.
Quando il contenitore si è svuotato, ripetere la
procedura suddetta per scaricare completamente
l'acqua dalla lavatrice. Quando lo scarico dell'acqua
è completato, chiudere l'estremità di nuovo usando
il tappo e fissare il flessibile in posizione. Ruotare il
filtro della pompa per estrarlo.
Scarico dell'acqua quando il prodotto non ha un
flessibile di scarico di emergenza:
Rapido 14
(Super short
express) (Super
breve express)
Metà carico
Lavaggio
veloce
Capi di
colore scuro
(cura dei
capi scuri)
Misti
Rapido
(Quotidiano
express) (Daily
express)
On/Off
Avvio
Pausa
Cotone
Sintetici
Lana
Delicati
Intensivo
Sport
Camicie
Piumoni
Lavaggio
igiene
Lavaggio a
mano
Pre-lavaggio
Lavaggio
principale
Risciacquo
plus
Ammollo
Antipiega
Trattieni
risciacquo
Nessuna
centrifuga
Centrifuga
Freddo
Pronto
Lavaggio
Fine
Temperatura
Avvio con
ritardo
Scarico
Super
Super Eco
Risciacquo
Cotone Eco
Sicurezza
bambini
Annulla 3”
66
IT
Modelli (IT)
WNF 7301 WE20
WNF 7321 AE20
WNF 7341 AE20
WNF 7361 AE20
6 Specifiche tecniche
Capacità massimo di lavaggio a secco (kg)
7
7
7
7
Altezza (cm)
84
84
84
84
Larghezza (cm)
60
60
60
60
Profondità (cm)
55
55
55
55
Peso netto (±4 kg.)
72
72
71
76
Elettricità in ingresso (V/Hz)
230 V / 50Hz
Corrente totale (A)
10
10
10
10
2200
Energia totale (W)
Velocità centrifuga(gpm max.)
1000
1200
1400
1600
Alimentazione modalità stand-by (W)
1.35
1.35
1.35
1.35
Alimentazione modalità di spegnimento (W)
0.25
0.25
0.25
0.25
Le specifiche tecniche possono essere modificate senza preavviso per migliorare la qualità del
C prodotto.
Le illustrazioni contenute in questa guida sono schematiche e potrebbero non corrispondere
C esattamente
al prodotto in uso.
I valori indicati sulle etichette della macchina o nella documentazione di accompagnamento sono
C ottenuti
in laboratorio, in conformità con gli standard di riferimento. I valori possono cambiare in
funzione delle condizioni operative e ambientali dell’elettrodomestico.
Questo apparecchio è contrassegnato dal simbolo della raccolta differenziata relativa allo
smaltimento di materiale elettrico ed elettronico. Ciò significa che questo prodotto deve
essere portato presso un centro di raccolta differenziata conformemente alla direttiva
europea 2002/96/CE, in modo tale da potere essere riciclato o smantellato così da ridurne
l’eventuale impatto su l’ambiente
Per ulteriori informazioni in proposito si consiglia di rivolgersi alla propria amministrazione
locale o regionale.
I prodotti elettronici che non sono oggetto di una raccolta differenziata sono
potenzialmente nocivi per l’ambiente e la salute umana a causa della presenza di sostanze
pericolose.
67
IT
7 Ricerca e risoluzione dei problemi
La schiuma fuoriesce dal cassetto del detersivo.
• È stato usato troppo detersivo. >>> Mescolare un cucchiaio di ammorbidente e mezzo litro di
acqua e versare nello scomparto principale del cassetto per il detersivo.
Mettere il detersivo nella macchina secondo il programma e i carichi massimi indicati nella tabella
C “Programma
e consumo”. Se si usano additivi chimici (agenti di rimozione macchie, candeggine,
ecc.), ridurre la quantità di detersivo.
Il bucato resta bagnato alla fine del programma
• Potrebbe essersi formata schiuma in eccesso e potrebbe essersi attivato un sistema di
assorbimento schiuma a causa del troppo detersivo usato. >>> Usare la quantità di detersivo
consigliata.
Se la biancheria non è disposta in maniera uniforme nel cestello, la lavatrice non eseguirà la fase
C della
centrifuga, per evitare danni alla lavatrice e al suo ambiente. Ridisporre la biancheria ed
eseguire una nuova centrifuga.
non si riesce ad eliminare il problema nonostante si siano rispettate le istruzioni in questa
A Se
sezione, consultare il rivenditore o l'agente autorizzato per l'assistenza. Non cercare mai di riparare
il prodotto da soli.
68
IT
2820522240_IT/190911.1649
Impossibile avviare o selezionare il programma.
• La lavatrice potrebbe essere in modalità protezione automatica a causa di problemi alla fornitura
(tensione della griglia, pressione dell'acqua, ecc.) >>> Tenere premuto il tasto avvio / pausa
per 3 secondi per riportare la lavatrice alle impostazioni di fabbrica. (Vedere "Annullamento del
programma")
Acqua nella lavatrice.
• Potrebbe restare dell'acqua nel prodotto in seguito ai processi di controllo della qualità durante la
produzione. >>> Questo non è un guasto; l'acqua non è pericolosa per la lavatrice.
La lavatrice vibra o fa rumore.
• La lavatrice potrebbe non essere in equilibrio. >>> Regolare i piedini per livellare la lavatrice.
• Una sostanza dura potrebbe essere entrata nel filtro della pompa. >>> Pulire il filtro della pompa.
• I bulloni di sicurezza per il trasporto non sono stati rimossi. >>> Rimuovere i bulloni di sicurezza per
il trasporto.
• La quantità di bucato nella lavatrice potrebbe essere scarsa. >>> Aggiungere altro bucato nella
lavatrice.
• La lavatrice potrebbe essere sovraccarica di bucato. >>> Estrarre parte del bucato dalla lavatrice o
distribuire il carico a mano per renderlo più omogeneo nella lavatrice.
• La lavatrice potrebbe essere inclinata su qualcosa di rigido. >>> Assicurarsi che la macchina non
penda su alcunché.
La lavatrice si è fermata subito dopo l’avvio del programma.
• La macchina può fermarsi occasionalmente a causa di bassa tensione. >>> Riprenderà a
funzionare quando la tensione sarà stata riportata a livelli normali.
Il tempo del programma non esegue il conto alla rovescia. (Su modelli con display)
• Il timer potrebbe arrestarsi durante l'aspirazione dell'acqua. >>> L'indicatore del timer non esegue
il conto alla rovescia finché la lavatrice non aspira una quantità adeguata di acqua. La lavatrice
resterà in attesa sino a quando ci sarà una quantità di acqua sufficiente per evitare risultati di
lavaggio inadeguati a causa della mancanza d’acqua. L'indicatore del timer riprende il conto alla
rovescia dopo ciò.
• Il timer potrebbe arrestarsi durante la fase di riscaldamento. >>> L'indicatore del timer non esegue
il conto alla rovescia finché la lavatrice non raggiunge la temperatura selezionata.
• Il timer potrebbe arrestarsi durante la fase di centrifuga. >>> Il sistema automatico di rilevamento
carico non bilanciato potrebbe essersi attivato a causa della distribuzione sbilanciata del bucato nel
cestello.
Se la biancheria non è disposta in maniera uniforme nel cestello, la lavatrice non eseguirà la fase
C della
centrifuga, per evitare danni alla lavatrice e al suo ambiente. Ridisporre la biancheria ed
eseguire una nuova centrifuga.