1
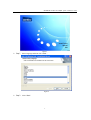
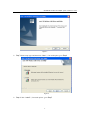
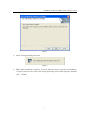
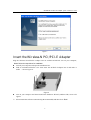
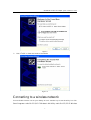
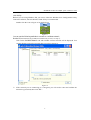
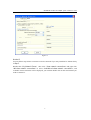
Wireless-N PCI/PCI-E Adapter Quick Installation Guide
netis Wireless N PCI-E Adapter
Quick Installation Guide
1
Wireless-N PCI/PCI-E Adapter Quick Installation Guide
Indication that the product meets the requirements of 47 CFR Part 68.
Check Your Package Contents
The following items should be found in your package:
Ø Wireless-N PCI/PCI –E Adapter
Ø Quick Installation Guide
Ø CD-ROM
Make sure that the package contains above items. If any of the above items is missing or damaged,
please contact the store you bought this product from.
Before You Begin
Minimum Requirements:
Ø Available PCI/PCI-E slot
Ø 300 MHz processor and 32 MB of memory
Ø CD-ROM drive
Ø An 802.11b/g/n access point (for Infrastructure Mode) or another 802.11b/g/n wireless
adapter (for Ad-Hoc; Peer-to-Peer networking mode.)
Ø Microsoft® Windows® 7, Vista™, XP, 2000 SP4
Insert the CD
Turn on the computer and insert the included CD in the CD-ROM drive. The install screen will
appear,as figure 3-1. If not, click the Start button and choose Run and enter D:\install.exe (if ‘D’
is your CD-ROM drive)
Click “Install Driver,” choose your product model, click “Install” and follow the software
instructions. The following is the step-by-step instructions in Windows XP. The steps and
screens are similar for the other Windows operating systems.
2
Wireless-N PCI/PCI-E Adapter Quick Installation Guide
Figure 1
Ø
Step 1 Select language and then click “Next ”
Figure 2
Ø
Step 2 Click “Next”
3
Wireless-N PCI/PCI-E Adapter Quick Installation Guide
Figure 3
Ø
Step 3 Select setup type and then click “Next ”, if no such option, go to Step 4
Figure 4
Ø
Step 4 Click “Install ”, if no such option,go to Step 5
4
Wireless-N PCI/PCI-E Adapter Quick Installation Guide
Figure 5
Ø
Driver is being installed, please wait.
Figure 6
Ø
Step 5 After installation is complete, if you are asked to restart you may do so immediately,
or you may choose to do so later, after closing and saving work in other programs. And then
click “Finish”
5
Wireless-N PCI/PCI-E Adapter Quick Installation Guide
Figure 7
Insert the Wireless-N PCI/PCI-E Adapter
Plug the Wireless-N PCI/PCI-E Adapter into an available PCI/PCI-E slot on your computer,
Please follow the steps below for installation.
l
turn off your computer and open the mainframe box.
l
Find an available PCI/PCI-E slot,then insert the PCI/PCI-E adapter into it and make it
stable ,refer to Figure 8.
l
Ø
Figure 8
turn on your computer and then Found New Hardware Wizard (windows XP) screen will
appear:
Select Install the software automatically (Recommended) and then click “Next”
6
Wireless-N PCI/PCI-E Adapter Quick Installation Guide
Figure 9
Ø
Click “Finish” to finish the hardware installation
Figure 10
Connecting to a wireless network
You can double-click the icon on your desktop to run it. Another way to start the utility is to click
Start>Programs> netis 11n PCI/PCI-E Wireless LAN Utility> netis 11n PCI/PCI-E Wireless
7
Wireless-N PCI/PCI-E Adapter Quick Installation Guide
LAN Utility.
Note: If you are using Windows XP, you can use either the Windows Zero Configuration Utility
or the netis software, but netis Wireless LAN Utility is recommended.
Double click the icon as Figure 10 on the desk-top
Figure 11
You can use the following methods to connect to a wireless network.
Method 1(This method is only suitable for installed unity of users, see step 3):
Click on the Available Network tab and available wireless networks will be displayed. You
can then double click on the network that you wish to connect to.
Figure 12
Ø
If the network you are connecting to is encrypted, you will need to enter and confirm the
network key/password, then click “OK”.
8
Wireless-N PCI/PCI-E Adapter Quick Installation Guide
Figure 13
Method 2
You can follow steps below to connect to wireless network if you only install Drive without Unity
in Step 3.
Double click “My Network Places”, then click “View network connections” and right click
“Wireless network connections” to select “Available wireless network connections”, and
available wireless networks will be displayed, you can then double click on the network that you
wish to connect to.
9