1
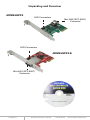
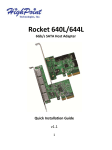
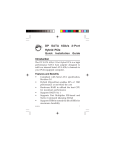
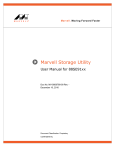
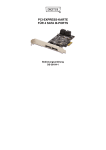
T E C H N O L O G I E S
User Guide
External / Internal mini
SAS/4-SATA PCIe controller
(ADMS6GPX2, ADMS6GPX2-E)
www.addonics.com
v6.1.11
Technical Support
If you need any assistance to get your unit functioning properly, please have your
product information ready and contact Addonics Technical Support at:
Hours: 8:30 am - 6:00 pm PST
Phone: 408-453-6212
Email: http://www.addonics.com/support/query/
Unpacking and Overview
ADMS6GPX2
LED Connectors
Mini SAS (SFF-8087)
Connector
LED Connectors
ADMS6GPX2-E
Mini SAS (SFF-8087)
Connector
www.addonics.com
Technical Support (M-F 8:30am - 6:00pm PST)
Phone: 408-453-6212
Email: www.addonics.com/support/query/
Hardware Installation
NOTE: This controller is not compatible with SAS targets.
1. Power off the computer and install the card in a PCI Express slot that
can accept a 2X or larger card.
2. Connect the Mini SAS cable to target devices. NOTE: This host adapter
can support up to a total of 7 targets, with the use of one port multiplier.
However, it will only recognize up to four drives on a port multiplier and
will not recognize any other hardware after finding one. Therefore when
connecting drives directly to the card and through a port multiplier, make
sure the port multiplier is connected to Port 4.
3. Turn on the computer. At this point an AHCI-aware Operating system
such as Linux, MacOS X or Windows Vista, 7, or 8 will immediately
recognize the card as a generic AHCI controller and begin using it.
Windows XP Driver Installation (Windows XP 32-bit)
1.
After following the Hardware Installation steps, Windows XP will
start with the “Found New Hardware Wizard.” Before proceeding, insert the
Host Adapter Driver Disc.
2.
Respond to the first question: “Can Windows connect to Windows
Update to search for software?” by choosing “No, not this time.” Then click
Next.
3.
Respond to the question: “What do you want the wizard to do?” by
keeping the default setting “Install the software automatically
[Recommended].”
4.
Respond to the next step “Please select the best match for your
hardware from the list below” by choosing the line that ends with
“\miniport\i386\mv91xx.inf.”
5.
Another wizard will appear next. Also choost “No, not this time” and
“Install the software automatically” to the next prompts, and during selection, choose the line ending with “\miniport\i386\mv91cons.inf.”
Software Installation (Windows Only)
1. Insert the Host Adapter Driver Disc if not already done.
2. Launch the application MSUSetup.exe.
3. Read and accept the License Agreement.
4. Respond to all remaining prompts by clicking Next.
5. During this process, a “Windows Security Alert” dialog should appear,
asking about firewall blocking for a program called “Apache HTTP
Server.” Click “Unblock” to enable the software to connect to the hard
ware properly, then click Finish on the Installation Wizard.
www.addonics.com
Technical Support (M-F 8:30am - 6:00pm PST)
Phone: 408-453-6212
Email: www.addonics.com/support/query/
Setting Up Hardware RAID
This adapter's hardware RAID capabilities may be configured using either
the BIOS utility or the Marvell Storage Utility. There is no functional
difference, other than the BIOS utility can prepare an array without an
operating system (which may then be installed onto the array) and the
Marvell Storage Utility has the convenience of a Graphical User Interface.
This adapter supports RAID 0 (2, 3 or 4 drives), RAID 1 (2 drives), RAID
10 (4 drives), and “HyperDuo” (hybrid HDD/SDD mode). Drives connected
through a port multiplier cannot be used as RAID members.
Starting the Marvell Storage Utility
The first time this program is started, it will launch your default web
browser, which should immediately show a security warning. This is due to
the secure connection to the Controller subsystem using a “self-signed
certificate” (cookie). Allow your browser to add this certificate as an
exception to proceed.
Logging onto the Storage Utility uses the same credentials you use for
Windows. Your current Windows username should appear. Enter your
Windows password and click Login. If this doesn't work, try deleting the
password (leaving that box blank) then click Login.
To set up an array, click on the Adapter listed under Device. On the right
side is the Operation tab – move the mouse to that tab to find the Create
RAID function. For more information on using the Marvell Storage Utility
or the RAID BIOS, click on the small blue circle containing a question
mark in the upper-right corner of the Utility, then select User Guide.
CONTACT US
www.addonics.com
Phone:
Fax:
Email:
408-573-8580
408-573-8588
http://www.addonics.com/sales/query/