1
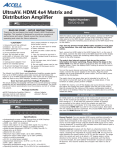
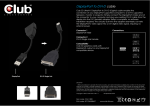
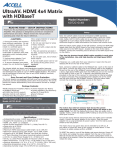
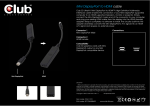
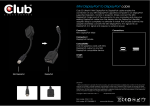
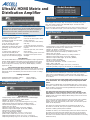
UltraAV HDMI Matrix and
Distribution Amplifier
®
Model Numbers:
K072C-011B (2x4)
K072C-012B (4x2)
4x2 HDMI Distribution Amplifier and Matrix
Audio Output
READ ME FIRST – SETUP INSTRUCTIONS
Thank you for purchasing the Accell UltraAV HDMI Distribution
Amplifier. This product is designed to provide an exceptional
performance and value. Please review the manual before
operating and retain for future reference.
- CAUTION 1. Ensure the unit has sufficient
ventilation. Do not cover
ventilation openings. Do not install
in a confined space.
2. Do not operate near source
of heat. Do not stack on top,
underneath or between other heat
generating unit/s including other
amplifiers.
3. Unplug power adapter if not
used for an extended period.
4. To prevent damage from power
surges, the unit should be plugged
into a surge protector or surge protected power source.
5. Do not use near liquid or areas
of heavy moisture.
6. Clean unit with a clean and dry
cloth only.
7. This unit cannot be serviced in
the field. Contact Accell if service is
required.
8. Do not open case, risk of shock shock hazard.
9. Do not modify power cord or use
the product if the power cord is
damaged.
Introduction
The UltraAV HDMI Matrix and Distribution Amplifier accepts signala from
multiple HDMI enabled audio/video sources and distributes the signal
to up to 2 (4x2 Matrix) or 4 (2x4) HDMI enabled displays. The matrix
can be configured to send any input to any HDMI displays, monitors,
projectors or TV’s.
Over-Current and Over-Voltage Protection
The circuit boards are equipped with both over-current and over-voltage
protection and will automatically power down if encountered. The circuit
boards will restore automatically once the excessive current or voltage
has passed.
Package Contents
●HDMI Distribution Amplifier (Matrix)
●Remote Control (with battery)
●Power Adapter
●Owner’s Manual
4x2 HDMI Distribution Amplifier and Matrix
Model: K072C-012B
B
Specifications
● Independently access 4 HDMI Sources from 2 HDMI Displays
● Supports HD resolutions up to 1080P and 3D
● HDMI 1.4a, HDCP 1.2 compliant
● Input video signal: 5v p-p, Input DDC signal: 5v p-p (TTL)
● Data transfer speed of 6.75Gbps (2.25Gbps/channel)
● Audio formats supported: DTS-HD 7.1, Dolby True-HD 7.1
● Deep color up to 36-bit
● Maximum input cable length: Up to 20m (24AWG)
● Maximum output cable length: Up to 20m (24AWG)
● Rack shelf or surface mountable
● 5V DC, UL Listed power adapter
● Approximate dimensions: 10.9”W x 1.1”H x 6.1”D
(277W x 28H x 156D mm) 5 to 131°F (-15 to 55°C)
● Operating temperature range: 5 to 131°F (-15 to 55°C)
● Operating humidity range: 5% to 90% RH (no condensation)
The 4x2 matix features analog stereo outputs and a TOSLINK fiber
optical digital audio output. Only one output is functional at any given
time. The primary output is the TOSLINK output. Connect an audio
output to your audio receiver.
The audio output provides audio from source device used by Output 1. If
Output 1 is switched to Input 3, the audio from Input 3 will be provided.
2x4 HDMI Distribution Amplifier and Matrix
Model: K072C-011B
Specifications
● Independently access 2 HDMI Sources from 4 HDMI Displays
● Supports HD resolutions up to 1080P and 3D
● HDMI 1.4a, HDCP 1.2 compliant
● Input video signal: 5v p-p, Input DDC signal: 5v p-p (TTL)
● Data transfer speed of 6.75Gbps (2.25Gbps/channel)
● Deep color up to 36-bit
● Audio formats supported: DTS-HD 7.1, Dolby True-HD 7.1
● Maximum input cable length: Up to 20m (24AWG)
● Maximum output cable length: Up to 20m (24AWG)
● Shelf or surface mountable
● 5V DC, UL Listed power adapter
● Approximate dimensions: 10.9”W x 1.1”H x 6.1”D
277W x 28H x 156D mm
● Operating temperature range: 5 to 131°F (-15 to 55°C)
● Operating humidity range: 5% to 90% RH (no condensation)
Setup
With the matrix power switch in the OFF position, connect an HDMI High
Speed cable from the HDMI Output of the most commonly used audio/
video source to the HDMI Input 1 located on the rear of the matrix.
Similarly, connect the remaining source devices to the HDMI Input Ports
on the matrix.
Tips: Use the shortest length HDMI cables possible in each point
in the installation. Use only High Quality and High Speed HDMI
cables.
Next, connect an HDMI cable to the HDMI Output Port 1 on the rear of
the matrix. Connect the other end to the HDMI Input Port of the display
device. Similarly, connect the remaining HDMI Output Ports from the
matrix to the other displays.
The matrix has internal memory that stores the system
information for faster switching. Please follow the steps in the
order listed: Turn ON the displays and ensure they are awake (not in
standby mode). Check the displays INPUT setting to ensure the correct
HDMI port is active.
Turn on the source devices and ensure they are awake (not in standby
mode). Connect the power adapter to the matrix. Plug the power
adapter into a surge protected AC power outlet. Turn the matrix power
switch to the ON position.
The matrix has a low power draw and is intended to be left on. If
the matrix is turned off, start up the system as noted above. If new
hardware is added, please perform a RESET.
To RESET the matrix, turn off the display and source devices. Power off
the matrix and unplug the power adapter from the rear of the matrix.
Wait 20 minutes for the memory of the system configuration inside of
the matrix to be deleted. Follow the setup instructions above to correctly
initiate the setup.
LEDIndicator
indicatorLights
lights
LED
On initial power on, all LED lights on the matrix should come on solid
blue. All the numerical LED displays will momentarily read ‘0’ and
then change to ‘1’. If less than the maximum number of Displays
are connected to the matrix (not all the outputs are used) the
numerical indicator will indicate ‘0’ for that output and there will be no
corresponding HDMI OUT blue LED for the unused output. Blue lights
will only appear for devices connected. Any unused HDMI Input ports will
also have its HDMI IN blue LED unlit.
Operation
Manual Control: You can operate HDMI source switching manually by
using the buttons labeled ‘Out” located on the front panel. Press the
button that corresponds to the output that you want to change the HDMI
source on and toggle through until the desired HDMI input source video
is being displayed. A numerical LED indicates which HDMI source input is
being shown on each output (HDTV).
Remote Control: Included with the Matrix is a Remote Control. The
remote control can control the matrix by pointing it at the front of the
matrix, targeting the integrated IR receiver labeled IR. IR uses line-ofsight between the remote control (or IR-TX) and the receiver. The angle
which the remote will work is at about a 15° degree angle in either
direction to the receiver. If the receiver is postioned such that there
is not line-of-sight, the port labeled “IR Extender” accepts an optional
IR Receiver. This receiver enables line-of-sight if the matrix is out of
position.
Infrared Control (IR)
The Ultra-IR Adapter Kit (optional) enables the user to control the source
device from the location of the display. The HDMI cable, at the display
end, plugs into the IR Adapter. Next the adapter’s HDMI connector plugs
into the display. The adapter has a port that accepts an optional IR
receiver (IR-RX). When the IR-RX receives an IR signal from the remote
control, it uses the HDMI cable’s CEC line to send the signal to the switch.
The switch has an IR port that accepts the optional IR transmitter (IRTX). The IR-TX sends the signal to the source device.
Note: As the Ultra IR-Adapter uses the CEC channel of the HDMI cable,
the CEC function cannot be used when using this device. Turn off CEC or
HDMI Link functionality in the source devices and displays.
Ultra-IR Adapter Kit: PN: B164B-001B
Includes IR-Adapter: 1 pc.
IR Transmitter (5 ft.): 1 pc.
Dual Frequency: 38KHZ-60KHZ
IR Receiver (5 ft.): 1 pc.
Ultra-IR Receiver (5 ft.)
Dual Frequency: 38KHZ-60KHZ
PN: B164B-002B
Ultra-IR Transmitter (5 ft.)
Dual Frequency: 38KHZ-60KHZ
PN: B164B-003B
Ultra-IR Receiver and
Transmitter Pin assignment
Troubleshooting
A. One of the display does not show a picture or output audio.
Q. Check the displays input setting to ensure it is set to receive a signal
from the connected HDMI port.
Q. One or more of the connected displays will not display a picture while
one or more of the displays do display a picture:
A1. Turn off the power to the matrix, source and displays. Wait 1 minute.
Turn the source on. Turn the displays on. Turn the matrix on.
A2. The HDMI cables on the non-functonal display/s cannot support
their long length. Use only high-quality High Speed HDMI cables. Keep
the cable length as short as possible. Test by locating the non-working
display close to the matrix. Use a short HDMI cable to connect the matrix
to the TV. A working TV using a short HDMI cable indicates an issue with
the HDMI cable.
...troubleshooting continued
Q. Get the message “This protocol is not supported” or other error
message.
A. See answer A1 above and repeat the steps outlined.
Q. The matrix is not down sampling the video and some of the TV’s are
not displaying a picture.
A1. Go into the TV’s setup and configure the resolution to match all the
connected TV’s. The TV’s should share the same resolution.
A2. In the source devices menu options set the source device to output a
resolution that matches all the connected displays.
Q. My TV’s resolution are not optimized.
A. The matrix will query the displays and provide the highest common
video resolution amongst them. Example: Using a 1080p source, if 3
of the displays support a maximum resolution of 1080p and 1 display
supports a maximim resolution of 720p, all 4 display will operate at a
resolution of 720p. If the 720p TV in the example is then turned off,
the other 3 displays can then operate in 1080p resolution. Turn Off then
turn On the matrix to refresh the configuration. The three 1080p TV’s will
refresh (flicker) then each will display a 1080p resolution picture.
Support
ASSISTANCE: Questions regarding this product or its product
warranty, please check out our Web site at: www.accellcables.com.
Customer service can be reached by email at [email protected]
or phone at 510-438-9288, toll free 877-353-0772 (M-F 9am-5pm PST).
1-YEAR MANUFACTURERS WARRANTY
The Accell UltraAV Matrix is warranted for one year from date of
purchase to be free of defects in material and workmanship. In the event
of such defects, the Accell product will be repaired without charge or
replaced with a new one at our option, if delivered to Accell Corporation
prepaid, together with a copy of the sales receipt indicating the proof of
purchase date and place of purchase. This warranty excludes defects due
to normal wear, abuse, shipping damage, or failure to use the product
in accordance with the instructions. ACCELL CORPORATION SHALL NOT
BE LIABLE FOR DAMAGES BASED UPON INCONVENIENCE, LOSS OF
USE OF THE PRODUCT, LOSS OF TIME, INTERRUPTED OPERATION OR
COMMERCIAL LOSS, OR ANY OTHER DAMAGES, WHETHER INCIDENTAL,
CONSEQUENTIAL OR OTHERWISE. YOU AGREE THAT ACCELL’S MAXIMUM
LIABILITY ARISING FROM ANY PRODUCT SOLD BY ACCELL SHALL NOT
EXCEED THE PRICE OF SUCH PRODUCT. SOME JURISDICTIONS DO NOT
ALLOW THE LIMITATION OF EXCLUSION OF LIABILITY FOR CERTAIN
DAMAGES, SO THE ABOVE MAY NOT APPLY TO YOU TO THE EXTENT
SUCH JURISDICTION’S LAW IS APPLICABLE TO THIS AGREEMENT. This
warranty gives you specific legal rights, and you may have other rights
that vary from state to state.
LIMITATION OF LIABILITY
IN NO EVENT SHALL ACCELL CORPORATION, ITS SUBSIDIARIES
OR AFFILIATES, OR THEIR RESPECTIVE PARTNERS, OFFICERS,
DIRECTORS, EMPLOYEES, SHAREHOLDERS, REPRESENTATIVES OR
AGENTS (COLLECTIVELY, “ACCELL”) BE LIABLE FOR DIRECT, SPECIAL,
INCIDENTAL, CONSEQUENTIAL, PUNITIVE, OR INDIRECT DAMAGES
(INCLUDING BUT NOT LIMITED TO, LOSS OF DATA, USE OR PROFITS),
HOWEVER CAUSED, WHETHER FOR BREACH OF CONTRACT, NEGLIGENCE,
OR OTHERWISE, AND WHETHER OR NOT ACCELL HAS BEEN ADVISED
OF THE POSSIBILITY OF ANY SUCH DAMAGES. YOU AGREE THAT
ACCELL’S MAXIMUM LIABILITY ARISING FROM ANY PRODUCT SOLD
BY ACCELL SHALL NOT EXCEED THE PRICE OF SUCH PRODUCT. SOME
JURISDICTIONS DO NOT ALLOW THE LIMITATION OF EXCLUSION OF
LIABILITY FOR CERTAIN DAMAGES, SO THE ABOVE MAY NOT APPLY TO
YOU TO THE EXTENT SUCH JURISDICTION’S LAW IS APPLICABLE TO
THIS AGREEMENT.
WARRANTY RETURNS PROCEDURE
Contact Customer Support to obtain a Return Authorization (RMA)
number. RMA numbers are valid for 30 days from the date of issuance.
We are unable to accept returns without an RMA number. Returns
without an RMA number clearly printed on the outside of the package
will be refused and returned unopened. All returns must be shipped
prepaid at the expense of the shipper.
Accell assumes no responsibility for any inaccuracies and liability for
direct, indirect, special, incidental, or consequential damages as a result.
Due to ongoing improvements, Accell reserves the right to make changes
to hardware, packaging and any accompanying documentation without
prior written notice.
©2013 Accell Corporation, All Rights Reserved. Accell and UltraAV are
registered trademarks of Accell Corporation.