1
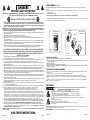
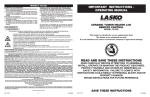
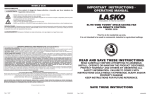
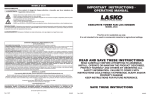
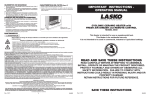
MODELO 5591
IMPORTANT INSTRUCTIONS OPERATING MANUAL
TOUCH CONTROL CERAMIC TOWER HEATER
with REMOTE CONTROL
MODEL 5591
This Heater is intended for use as supplemental heat.
This Heater is for residential use only.
It is not intended to be used in commercial, industrial or agricultural settings.
GARANTÍA LIMITADA DE LASKO PRODUCTS, INC. (NO VÁLIDO EN MÉXICO)
QUÉ CUBRE ESTA GARANTÍAS:  Este producto está garantizado contra defectos de mano de obra y/o materiales.
CUÁNTO DURA ESTA GARANTÍA:  Esta garantía se extiende únicamente al comprador original del producto y dura tres (3) años a partir de la fecha
original de compra o hasta que el comprador original del producto venda o transfiera el producto, cualesquiera de ambas que ocurriera en primer lugar.
QUÉ HARÁ LASKO:  Durante el período de garantía, Lasko, a opción propia, reparará o reemplazará cualquier parte o partes que demuestren ser
defectuosas o reemplazará el producto completo por el mismo modelo u otro comparable.
QUÉ NO CUBRE ESTA GARANTÍA:  Esta garantía no tiene validez si el producto fue dañado o falló debido a un accidente, manipulación u
operación inadecuadas, daño en el envío, abuso, mal uso, reparaciones no autorizadas hechas o el intento de hacerlas, o el uso del producto
para servicio comercial o no residencial. Esta garantía no cubre los costos de envío para la devolución de productos a Lasko para su reparación
o reemplazo.  Lasko abonará los cargos de envío de devolución a Lasko con posterioridad a las reparaciones o el reemplazo bajo garantía.
CUALESQUIERA Y TODAS LAS GARANTÍAS, EXPLÍCITAS O IMPLÍCITAS (INCLUYENDO, SIN LIMITACIÓN, CUALESQUIERA GARANTÍA
IMPLÍCITA DE COMERCIABILIDAD), DURAN TRES AÑOS A PARTIR DE LA FECHA ORIGINAL DE COMPRA O HASTA QUE EL COMPRADOR
ORIGINAL DEL PRODUCTO VENDA O TRANSFIERA EL PRODUCTO, CUALESQUIERA DE AMBAS QUE OCURRIERA EN PRIMER LUGAR
Y EN NINGÚN CASO LA RESPONSABILIDAD DE LASKO BAJO CUALQUIER GARANTÍA EXPLÍCITA O IMPLÍCITA INCLUIRÁ (I) DAÑOS
INCIDENTALES O POR CONSECUENCIA POR CUALQUIER CAUSA QUE FUERE, O (II) REEMPLAZO O REPARACIÓN DE CUALESQUIERA
FUSIBLES HOGAREÑOS, CORTA-CIRCUITOS O TOMACORRIENTES.  INDEPENDIENTEMENTE DE CUALQUIER DECLARACIÓN CONTRARIA,
EN NINGÚN CASO LA RESPONSABILIDAD DE LASKO BAJO CUALQUIER GARANTÍA EXPLÍCITA O IMPLÍCITA PODRÁ EXCEDER EL PRECIO
DE COMPRA DEL PRODUCTO Y DICHA RESPONSABILIDAD TERMINARÁ AL VENCIMIENTO DEL PERÍODO DE GARANTÍA.
Algunos estados y provincias no permiten limitaciones sobre la duración de una garantía implícita, o sobre la exclusión o limitación de los daños
incidentales o por consecuencia, por lo tanto dichas exclusiones o limitaciones podrían no aplicarse en su caso.  Esta garantía le otorga a usted
derechos legales específicos.  Usted también podría tener otros derechos que varían de estado en estado y de provincia en provincia.
Se requiere prueba de compra antes que se acepte un reclamo bajo garantía.
SERVICIO AL CLIENTE:
Línea gratuita (800) 233-0268. Correo electrónico: [email protected]
Nuestro equipo de Servicio al Cliente está disponible para ayudarle con preguntas sobre productos, ubicaciones de los centros de
reparación y repuestos. Se puede comunicar con nuestro equipo de Servicio al Cliente de lunes a viernes, de 8 a.m. a 5 p.m. hora del Este.
Por favor tenga disponible el número de modelo, así como también el tipo y estilo
(ubicados en la parte inferior de su producto). Customer Service Dept., 820 Lincoln Ave., West Chester, PA 19380
(Por favor no envíe el producto a esta dirección)
www.laskoproducts.com
READ AND SAVE THESE INSTRUCTIONS
READ CAREFULLY BEFORE ATTEMPTING TO ASSEMBLE,
INSTALL, OPERATE OR MAINTAIN THE PRODUCT DESCRIBED.
PROTECT YOURSELF AND OTHERS BY OBSERVING ALL
SAFETY INFORMATION. FAILURE TO COMPLY WITH
INSTRUCTIONS COULD RESULT IN PERSONAL INJURY AND/OR
PROPERTY DAMAGE!
RETAIN INSTRUCTIONS FOR FUTURE REFERENCE.
LOS REPUESTOS PARA PRODUCTOS DISCONTINUADOS, OBSOLETOS Y ALGUNOS OTROS PRODUCTOS PODRÍAN NO ESTAR DISPONIBLES. DEBIDO A
RAZONES DE SEGURIDAD, MUCHOS COMPONENTES ELECTRÓNICOS Y LA MAYORÍA DE LOS COMPONENTES DE LOS CALENTADORES NO ESTÁN
DISPONIBLES AL CONSUMIDOR PARA SU INSTALACIÓN O REEMPLAZO.
El manual imprimió en la China
Rev. B 6/10
12
5591ES
SAVE THESE INSTRUCTIONS
Rev. B 6/10
1
5591ES
CONTROL REMOTO (Figuras 4 y 5)
Todas las funciones realizadas con el Control Remoto operan del mismo modo que los controles manuales, excepto que usted no puede cambiar
de °F a °C.
Important Safety Instructions
When using electrical appliances, basic precautions should always be followed to reduce the risk
of fire, electrical shock and injury to persons, including the following:
Read all instructions before using this Heater.
1.Instale la batería que vienen con el equipo, como se indica en la Figura 5. El lado (+) debe estar colocado hacia arriba
(hacia la cubierta)
2. La batería es el tipo CR 2025.
3. No se deshága de baterías en el fuego. baterías pueden estallar o pueden salirse.
Si usted pierde su mando a distancia, por favor Cliente de llamada Serive para ordenar un reaplacement en 1-800 -233-0268, de lunes a viernes, entre las
8 a.m. y las 5 p.m. (Horario Estándar del Este de los Estados Unidos).
1. ALWAYS PLUG HEATERS DIRECTLY INTO A WALL OUTLET/RECEPTACLE. NEVER USE WITH AN EXTENSION CORD DO NOT
plug Heater into any other cord connected device, such as a power strip, surge protector, multiple
outlet adapter, cord reel or outlet-type air freshener. The use of such devices may create a fire hazard. Plug unit directly into a 120V wall outlet only.
WARNING: Faulty wall outlet connections may cause the wall outlet to overheat. Be sure that heater plug
fits tightly into outlet before each use. During use, check to make certain the Heater plug is not overheating. If necessary have a qualified electrician check and/or replace the wall outlet.
2. Use this Heater only as described in this manual. Any other use not recommended by the manufacturer may cause fire, electrical
shock, or injury to persons.
3. Make certain that the room is equipped with a working smoke detector.
4. Make certain that the power source conforms to the electrical requirements of the Heater.
5. Extreme caution is necessary when any Heater is used by or near children or invalids and whenever the Heater is left
operating unattended.
6. This appliance has a polarized plug (one blade is wider than the other). To reduce the risk of electric shock, this plug is intended
to fit in a polarized outlet only one way. If the plug does not fit fully in the outlet, reverse the plug. If it still does not fit, contact a
qualified electrician. Do not attempt to defeat this safety feature.
7. Do not operate any Heater with a damaged cord or plug or after the Heater malfunctions, or has been dropped or damaged in any manner. Please contact Customer Service at 800-233-0268 Monday through Friday from 8am to 5pm EST for assistance.
Paso 2
19.
NOTE: This equipment has been tested and found to comply with the limits for a Class B digital device, pursuant to Part 15 of
the FCC Rules. These limits are designed to provide reasonable protection against harmful interference in a residential
installation. This equipment generates, uses and can radiate radio frequency energy and, if not installed and used in accordance
with the instructions, may cause harmful interference to radio communications. However, there is no guarantee that interference will not occur in
a particular installation. If this equipment does cause harmful interference to radio or television reception, which can be determined by turning the
equipment off and on, the user is encouraged to try to correct the interference by one or more of the following measures: • Reorient or relocate the
receiving antenna. • Increase the separation between the equipment and receiver. • Connect the equipment into an outlet on a circuit different from
that to which the receiver is connected. • Consult the dealer or an experienced radio/TV technician for help.The user is cautioned that changes and
modifications made to the equipment without the approval of manufacturer could void the user’s authority to operate this equipment.
20. This Heater is not suitable for use in agricultural facilities including areas where livestock, poultry or other animals are confined. Please
refer to National Electric Code (NEC) Article 547-7 (2008), or applicable state or local codes or standards relating to electrical requirements for Agricultural Buildings. THIS HEATER DOES NOT MEET THE REQUIREMENTS OF NEC ARTICLE 547-7 (2008).
21. This Heater is not suitable for use in hazardous locations. Please refer to National Electric Code (NEC) Article 500 or applicable state
or local codes or standards relating to electrical requirements for Hazardous locations. THIS HEATER DOES NOT MEET
THE REQUIREMENTS OF NEC ARTICLE 500 (2008).
WARNING: REDUCE THE RISK OF FIRE OR ELECTRIC SHOCK – DO NOT USE THIS HEATER WITH ANY SOLID STATE SPEED
CONTROL DEVICES.
Rev. B 6/10
SAVE THESE INSTRUCTIONS
2
5591ES
Vista posterior del
Control Remoto
Paso 3
DO NOT DEPEND ON THE ON/OFF SWITCH AS THE SOLE MEANS OF DISCONNECTING POWER WHEN
SERVICING OR MOVING THE HEATER. ALWAYS UNPLUG THE POWER CORD. ALWAYS TURN OFF AND
UNPLUG HEATER BEFORE LEAVING THE AREA. NEVER LEAVE CHILDREN UNATTENDED WHEN THE
HEATER IS ON OR PLUGGED IN.
8. To disconnect Heater, turn the Heater OFF then remove the plug from the outlet.
9. Always unplug Heater when not in use. Unplug power cord before servicing or moving the Heater.
10. Do not insert or allow fingers or foreign objects to enter any ventilation or exhaust opening as it may cause an electric shock,
fire, or damage the Heater. Do not block or tamper with the Heater in any manner while it is in operation.
11. To prevent a possible fire, do not block air intakes or exhaust in any manner. Do not place on soft surfaces, like a bed, where openings may become blocked.
12. Always place the Heater on a stable, flat, level surface when operating, to avoid the chance of the Heater overturning. Locate the
Power Cord so the Heater or other objects are not resting on it. Do not run Power Cord under carpeting. Do not cover Power Cord
with throw rugs, runners, or similar coverings. Arrange Power Cord away from room traffic and where it will not be tripped over.
13. This Heater is HOT when in use. To avoid burns, do not let bare skin touch hot surfaces. Always use handle when moving this
Heater. Keep combustible materials, such as furniture, pillows, bedding, papers, clothes and curtains at least 3 feet (0.9 m) from
the front of the Heater and keep them at least 1 foot (0.3 m) from the sides and rear.
14. A Heater has hot and arcing or sparking parts inside. Do not use the Heater in areas where gasoline, paint, or flammable liquids
are used or stored. DO NOT use Heater in locations where flammable or explosive chemicals are stored, or in wet atmospheres. This
Heater is intended for general use ONLY.
15. This Heater is not intended for use in wet or damp locations. This Heater is not intended for use in bathrooms, laundry areas and
similar indoor locations. Never locate a Heater where it may fall into a bathtub or other water container.
16. Do not use Heater outdoors.
17. Remote controls for other appliances or electronic equipment can sometimes interfere with the operation of this Heater. If this occurs, move the Heater to another location.
18. Keep Heater remote control unit away from chairs and your bed where it may be sat or laid upon and inadvertently turn on the Heater.
Paso 1
Vista de frente del
Control Remoto
Figura 4
Figura 5
ELEMENTOS DE SEGURIDAD
1. Hay un protector de sobrecarga térmica incorporado para evitar el sobrecalentamiento.
2. Si se alcanza una temperatura de sobrecalentamiento, el Calefactor se apagará automáticamente. Sólo podrá retomar el funcionamiento cuando el
usuario reinicie la unidad.
Para Reiniciar el Calefactor:
1. Desconecte el Calefactor y espere 10 minutos hasta que la Unidad se enfríe.
2. Después que el Calefactor se haya enfriado, conecte la unidad a un tomacorriente eléctrico de 120V~ y siga las instrucciones de funcionamiento
descriptas en este manual.
CONSEJOS DE SOLUCIÓN DE PROBLEMAS
Si su calefactor se apaga inesperadamente o no funciona, el elemento de seguridad arriba mencionado podría haber sido activado para evitar el
sobrecalentamiento.
1. Asegúrese que el cable eléctrico esté conectado a un tomacorriente eléctrico en funcionamiento.
2. Verifique la posición de su Temperatura. El Calefactor puede haberse apagado por haber alcanzado la posición de temperatura deseada.
3. Si su Calefactor opera durante varios minutos y se apaga repetidamente, es posible que el mismo requiera limpieza. Ver la sección de Mantenimiento
abajo.
Si usted tiene un problema que no pueda ser resuelto siguiendo los pasos enumerados arriba, comuníquese con Asistencia Técnica al 1-800-233-0268,
de lunes a viernes, entre las 8 am y las 5 pm EST.
MANTENIMIENTO
-
-
-
-
-
-
-
-
Para reducir el riesgo de choque eléctrico e incendio por favor obedezca las siguientes instrucciones.
Limpiar el Calefactor regularmente ayudará a mantener su eficiencia.
Siempre desconecte el cable eléctrico antes de mover, reparar o limpiar.
NUNCA coloque el Calefactor dentro de o cerca de agua. NO SUMERJA EL CALEFACTOR EN AGUA
Limpie el Calefactor solamente con una aspiradora equipada con un accesorio de cepillo; la aspiradora quitará el polvo y los desperdicios del interior del Calefactor.
Aspire las parrillas de entrada cada dos semanas; esto ayudará a mantener el rendimiento óptimo del calefactor.
Use un cepillo de dientes u otro cepillo de cerdas suaves para aflojar suavemente cualquier polvo que no haya sido retirado por
la aspiradora
NUNCA intente desarmar el Calefactor.
Limpie el cuerpo del Calefactor únicamente con un trapo suave.
NUNCA use ALCOHOL o SOLVENTES tales como gasolina, bencina, disolvente de pinturas u otros limpiadores duros.
REPARACIONES: Para cualquier reparación, que no sea de mantenimiento general por parte del usuario, por favor contacte a nuestro equipo de Servicio
al Cliente al (800) 233-0268 de Lunes a Viernes de 8 a.m. a 5 p.m.
AMACENAMIENTO: Almacene el Calefactor con estas instrucciones en la caja original en un lugar fresco y seco.
Rev. B 6/10
11
5591ES
MODELO 5591 - MANUAL DE USO
INSTRUCCIONES IMPORTANTES
MODEL 5591
restante en la pantalla, hasta que el Calefactor se apague solo.
Si oprime una vez más el Icono De Temporizado ( ) después de
que la pantalla indique 8 horas, reiniciará el Calefactor para que
funcione en forma continua. El Calefactor se apagará cuando el
tiempo fijado haya transcurrido. La unidad puede ser encendida
nuevamente presionando el Icono de Encendido ( ).
OPERACIÓN (Figura 1 a 3)
Este Calefactor puede operarse mediante los controles manuales
ubicados en el Calefactor (como se indica en la Figura 1) o
mediante su control remoto (como se indica en la Figura 4).
1. Retire cuidadosamente el Calefactor de su bolsa y caja.
2. Coloque el Calefactor sobre una superficie firme y plana.
ADVERTENCIA: Las etiquetas de plástico o caucho, quieren los
pies en esta unidad, pueden atascar a superficies de muebles. La
unidad puede salir un residuo que podría oscurecer, poder manchar
o podría salir imperfecciones permanentes en el fin de ciertas
superficies de muebles, inclusive superficies de madera.
3. Enchufe el cable eléctrico a un tomacorriente de 120V.
Asegúrese que el enchufe quede bien ajustado. Un ajuste suelto
puede causar sobrecalentamiento y dañar el enchufe.
4. Al enchufar inicialmente el Calefactor, se encenderá la luz
indicadora roja, señalando que la unidad está energizada. La
luz roja permanecerá encendida hasta que se desenchufe el
Calefactor del tomacorriente.
5. Encienda el Calefactor al tocando el Icono De Encendido
( ). (Figura 1)
6. Cuándo prendió inicialmente, el Calefactor mostrará la
temperatura actual del Espacio en º Fahrenheit. Apriete el ( ) y
( ) los iconos al mismo tiempo hasta que el despliegue refleje º
Centígrado. Apretar los mismos iconos otra vez cambiará de
nuevo el despliegue a º Fahrenheit.
7. La unidad visualizará la temperatura ambiente actual. Al
encender el Calefactor, la unidad estará en el modo de
calefacción ALTO ( ). (1500 vatios)
8. Tocando el Icono De ( ) en este momento, el Calefactor
funcionará en el modo de calefacción BAJO ( ).
9. Tocando una vez más el Icono De ( ), el Calefactor funcionará
en el modo ALTO ( ).
10.Para apagar el Calefactor, apretar el Icono De Encendido
( ) y remover la unidad de la salida eléctrica. El Calefactor
volverá º Fahrenheit después de ser desconectado.
Tools Required: #2 Phillips Head Screwdriver (not included)
Carefully remove the Heater from the bag and the carton.
For ease of assembly, lay the Heater down so that the front grill
and control panel are facing up.
(4) - M5 X 13mm
Función de
Temporizador en
Calor Bajo
2. Secure the Base halves with (2) M4 X 13mm Screws.Thread
the Power Supply Cord through the large hole in the Base Assembly. NOTE: The Cord Channel on the bottom of the Base
should be towards the back of the Heater. (Figure 3)
ASSEMBLY (Figures 1 through 4)
Cord
Channel
(2) - M4 X 13mm
Power Supply
Cord
Función de Temporizador
en Calor Alto y Control
Automático de Temperatura
Screws Shown Actual Size
Base
Assembly
Figure 1
Figura 2
CONTROL AUTOMÁTICO DE LA TEMPERATURA (Figura 3)
La función de temperatura automática sólo operará en calefacción
“Alto” ( ). No puede fijar la temperatura automáticamente cuando
la unidad se encuentre en la modalidad de calefacción baja.
1. Para fijar una temperatura específica en la habitación, tocando
los iconos de (+) o (-) hasta la temperatura deseada. La pantalla
mostrará la letra
y la temperatura estará iluminada. El
Calefactor ahora se encuentra en la modalidad de temperatura
automática.
2. Cuando alcance la temperatura en la cual desea establecer la
unidad, la temperatura fijada titilará varias veces y luego la pantalla
volverá a indicar la temperatura actual y cambiará gradualmente
a medida que cambia la temperatura de la habitación. NOTA:
la pantalla de la temperatura no indica la temperatura del aire
caliente emitido por el Calefactor.
3. Una vez que la temperatura de la habitación alcanza los 2 grados
por encima de la temperatura fijada, el Calefactor se apagará.
Una vez que la temperatura de la habitación alcanza 1 grado por
debajo de la temperatura fijada, el Calefactor se encenderá de
nuevo y continuará con el ciclo de apagado y encendido para
mantener la temperatura fijada.
4. Esta función se cancelará si el icono De Mode está presionado.
Ahora el Calefactor estará en calefacción “Alto” (III) y operará
continuamente.
Función automática de muestra de aire: Funciona sólo
cuando se fija el calefactor en la modalidad automática. Es normal
que el ventilador del calefactor opere durante aproximadamente
15 segundos después de que el calefactor ha alcanzado la
temperatura fijada. A partir de ese momento, el ventilador del
calefactor se encenderá cada 10 minutos durante 10 segundos
hasta que la habitación requiera calefacción adicional.
Pantalla al ser encendido por primera vez
Figura 1
OSCILACIÓN
1. Assemble the Base by interlocking the Bosses into the Boss
Holes. (Figure 2)
Figure 3
3. Align the Base Assembly with the Column Support Assembly.
Make certain to align the Locating Notch on the Column Support Assembly with the Key on the Base Assembly (Figure 4).
Attach the Base Assembly to the Column Support Assembly
with (4) M5 X 13mm Screws. Gently pull any excess slack of
the Power Supply Cord and place it in the Cord Channel of the
Base Assembly.
Bosses
Boss
Holes
Key
Figure 2
La pantalla refleja calor Alto y Función de
Control Automático de Temperatura
Tocando el Icono de Oscilación ( ) le permitirá al Calefactor oscilar
hacia atrás y hacia delante. Para detener la oscilación, vuelva a
tocando el Icono de Oscilación ( ). Cuando el calefactor esté
en control automático de temperatura, la función de oscilación
se detendrá cuando se alcance la temperatura fijada y reiniciará
cuando el calefactor vuelva a encenderse.
Cord
Channel
FUNCIÓN TEMPORIZADORA (Figura 2)
(4) - M5 X 13mm
Esta función operará en cualquier modo. La función temporizadota
permite fijar los intervalos de operación de 1 a 8 horas. Si oprime
el Icono De Temporizador ( ) , aumentará el tiempo de operación
a intervalos de 1 hora cada uno cada vez que oprima el botón.
Una vez fijado el temporizador, éste contará las horas en forma
regresiva en intervalos de 1 hora, indicando el tiempo de operación
Rev. B 6/10
(2) - M4 X 13mm
Power Supply
Cord
Figura 3
10
Figure 4
5591ES
Rev. B 6/10
3
5591ES
MODELO 5591
MODEL 5591
OPERATION (Figures 1 through 3)
TIMER FUNCTION (Figure 2)
The timer function will work in any mode. The timer function allows you to set the length of operation from 1 hour to 8 hours.
Touching the Timer Icon ( ) will increase the length of operation
by 1 hour each time the button is touched. Touching the Timer
Icon ( ) once more after the display reflects 8 hours will reset
the Heater to continuously running. Once the timer has been set,
the timer will count down the hours in 1 hour increments, showing
on the display the remaining operating time. The Heater will turn
itself off when the set time has elapsed. The unit can be turned
back by touching the Power Icon ( ).
The Heater may be operated by the manual controls located
on the Heater (as shown in Figure 1) or by your remote control
(shown in Figure 4).
1. Carefully remove the Heater from the bag and the carton.
2. Place the Heater on a firm, level surface.
WARNING: Plastic or rubber tabs, like the feet on this unit, may
stick to furniture surfaces and/or hardwood floors. The unit may
leave a residue that could darken, stain or leave permanent
blemishes on the finish of certain furniture surfaces, including
wood surfaces.
3. Plug the cord set into a 120 V~ electrical outlet. Be sure plug
fits tightly in outlet. A loose fit will cause overheating and damage the plug. Plug and cord set may feel warm during normal
usage.
4. When the Heater is initially plugged in, the red light will come
on indicating that there is power to the unit. The red light
will remain lit until the Heater is unplugged from the electrical
outlet.
5. Turn the Heater ON by touching the Power Icon ( ) .
6. When initially turned on, the Heater will display the current room temperature in º Fahrenheit. Touch the ( ) and ( )
icons at the same time to change the display to º Celsius.
Touching the same icons again will change the display back to
º Fahrenheit.The Heater will reset to º Fahrenheit after being
unplugged.
7. Upon turning the Heater on, the unit will be in HIGH heat ( ) (1500
Watts) and will display the current room temperature.
(Figure 1)
8. Touching the ( ) Icon at this point will set the Heater into Low
heat mode.
9. Touching the ( ) Icon once more will set the Heater into High
heat mode.
10.To turn the Heater OFF, touch the Power Icon ( ) and unplug the unit from the electrical outlet.
Timer Function in
Low Heat
2. Fije las mitades de la base con (2) tornillos M4 X 13 mm. Pase
el Cable Eléctrico por el gran orificio que se encuentra del
Conjunto de la Base. NOTA: El Canal Para Cable en la parte
inferior de la base debe estar hacia la parte posterior del Calefactor.
(Figura 3)
Herramientas Necesarias: Destornillador de Cabeza #2 Phillips
(no incluido)
Retire cuidadosamente el Calefactor de su bolsa y caja.
Para facilitar el armado, coloque el Calefactor de manera que la
parrilla frontal y el panel de control den hacia arriba.
(4) - M5 X 13mm
Canal Para
Cable
(2) - M4 X 13mm
Cable
Eléctrico
Timer Function in
High Heat and Automatic
Temperature Control
Figure 2
Tamaño Real De Tornillos
Conjunto de
la Base
Figura 1
1. Arme la base enclavando las Protuberancias en los Orificios
para Protuberancias. (Figura 2)
AUTOMATIC TEMPERATURE CONTROL (Figure 3)
The automatic temperature function will only operate on "High"
heat ( ). You cannot set the temperature automatically when
the unit is in the low heat mode.
1. To set the room at a specific temperature touch the ( ) or ( ) icons
to the desired temperature. The display will now reflect the ( )
and the temperature will be flashing. The Heater is now in Auto
Temperature Mode.
2. When you reach the temperature at which you want to set the
unit, the set temperature will flash several times and then the
display will return to indicate the current room temperature and
will gradually change as the room temperature changes. NOTE:
the temperature display does not indicate the temperature of
the heated air being emitted by the heater.
3. Once the room temperature reaches 2 degrees above the set
temperature, the Heater will shut off. Once the room temperature reaches 1 degree below the set temperature, the Heater
will turn back on and continue to cycle off and on to maintain
the set temperature.
4. This function will cancel if the icon is touched.
Automatic air sampling feature: Functions only when the heater
is set in the automatic mode. It is normal for the heater fan to run for
approximately 15 seconds after the heater has reached the set
temperature. From this point on, the heater fan will turn on every 10
minutes for 10 seconds until the room requires additional heat.
Display when initially turned on
ARMADO (Figuras 1 a 4)
Figura 3
3. Alinee el Conjunto de la Base con el Conjunto de Soporte de
Columna. Cerciórese de que la Muesca de Ubicación en el
Conjunto de Soporte de Columna quede alineada con la Llave
en el Conjunto de la Base (Figura 4). Una el Conjunto de la
Base al Conjunto de Soporte de Columna con (4) tornillos M5 X
13 mm. Jale suavemente el Cable Eléctrico para que no quede
holgado, y colóquelo en el Canal Para Cable del Conjunto de
la Base.
Protuberancias
Conjunto de
la Base
Llave
Orificios
para
Protuberancias
Figura 2
Canal Para
Cable
Display reflects High Heat and
Automatic Temperature Control Function
Figure 1
(2) - M4 X 13mm
Cable Eléctrico
OSCILLATION
Touching the Oscillation Icon ( ) will allow the Heater to oscillate back and forth. To stop the oscillation, touch the Oscillation
Icon ( ) again. When the Heater is in Automatic Temperature
Control, the oscillation function will stop when the set temperature is reached and resume when the Heater turns back on.
Rev. B 6/10
Figura 4
Figure 3
4
5591ES
Rev. B 6/10
9
5591ES
MODEL 5591
REMOTE CONTROL (Figures 4 and 5)
INSTRUCCIONES IMPORTANTES DE SEGURIDAD
Al usar artefactos eléctricos, siempre deben tomarse precauciones básicas para reducir el
riesgo de incendio, choque eléctrico y lesiones a personas, incluyendo las siguientes:
Lea todas las instrucciones antes de usar este Calefactor.
All the functions performed with the Remote Control work identically to the manual controls, except the ability to change from
°F to °C.
1. Install the battery supplied as shown in Figure 5. The (+) side must be toward the cover.
2. The battery is type CR2025.
3. DO NOT DISPOSE OF BATTERIES IN FIRE. BATTERIES MAY EXPLODE OR LEAK.
If you lose your remote control, please call Customer Service to order a replacement at 1-800-233-0268, Monday through Friday, between
the hours of 8:00 a.m. and 5:00 p.m. EST.
SIEMPRE CONECTE LOS CALENTADORES DIRECTAMENTE A UN TOMACORRIENTE/INTERRUPTOR DE PARED. NO conecte el
Calefactor a cualquier otro dispositivo conectado a un cable, como un cable de contactos múltiples, protector
de sobrecargas, adaptadores de tomacorrientes múltiples o refrescantes de aire tipo tomacorriente. El uso de
tales dispositivos podría crear un riesgo de incendio. Conecte la unidad directamente a un tomacorriente de pared
de 120V únicamente.
ADVERTENCIA: Conexiones defectuosas al tomacorriente de pared pueden causar que el tomacorriente de pared se
sobrecaliente. Asegúrese que el enchufe del calefactor encaje firmemente en el tomacorriente antes de cada uso.
Durante el uso, verifique para asegurarse que el enchufe del calefactor no esté sobrecalentando. De ser necesario,
haga que un electricista calificado revise y/o reemplace el tomacorriente de pared.
2. Use este Calefactor solamente como se describe en este manual. Cualquier otro uso no recomendado por el fabricante podría causar incendio,
choque eléctrico o lesiones a personas.
3. Asegúrese que la habitación esté equipada con un detector de humo en funcionamiento.
4. Garantice que la fuente de alimentación eléctrica sea la adecuada a los requerimientos eléctricos del Calefactor.
5. Es necesario practicar extrema precaución al utilizar cualquier Calefactor cerca de o por niños o personas discapacitadas y cuando el Calefactor
esté funcionando sin atención.
6. Este electrodoméstico cuenta con un enchufe polarizado (una clavija es más ancha que la otra). Para reducir el riesgo de choque eléctrico, este enchufe
está diseñado para encajar en un tomacorriente polarizado solamente en un sentido. Si el enchufe no encaja perfectamente en el tomacorriente,
coloque el enchufe a la inversa. Si sigue sin funcionar, póngase en contacto con un electricista calificado. No intente alterar esta característica de
seguridad.
7. No ponga en funcionamiento ningún calefactor con un cable eléctrico o enchufe dañados, después que un calefactor haya funcionado mal o haya
sido arrojado o dañado en cualquier modo. Por favor contacte a Servicio al Cliente al 800-233-0268 de lunes a viernes de 8 am a 5 pm EST para
obtener asistencia.
1.
Step 1
Front View of
Remote Control
Step 2
Step 3
Figure 4
NO DEPENDA DEL INTERRUPTOR DE ENCENDIDO / APAGADO COMO EL ÚNICO MEDIO DE DESCONECTAR LA ELECTRICIDAD CUANDO ESTÉ
REPARANDO O TRASLADANDO EL CALEFACTOR. SIEMPRE DESCONECTE EL CABLE ELÉCTRICO. SIEMPRE APAGUE Y DESCONECTE EL CALEFACTOR
ANTES DE DEJAR EL ÁREA. NUNCA DEJE NIÑOS SIN ATENCIÓN CUANDO EL CALEFACTOR ESTÉ ENCENDIDO O CONECTADO.
8. Para desconectar el Calefactor, APAGUE el Calefactor y luego retire el enchufe del tomacorriente.
9. Siempre desconecte el Calefactor cuando no esté en uso. Desconecte el cable eléctrico antes de reparar o trasladar el Calefactor.
10. No inserte ni permita que los dedos u objetos extraños se introduzcan en ninguna abertura o escape de ventilación ya que esto podría causar un choque
eléctrico, incendio o dañar el Calefactor. No bloquee ni altere el Calefactor de ninguna manera mientras esté en funcionamiento.
11. Para evitar un posible incendio, no bloquee las tomas o escapes de aire de ninguna manera. No coloque sobre superficies suaves como una cama,
donde las aberturas podrían resultar bloqueadas.
12. Siempre coloque el calefactor sobre una superficie estable, plana y nivelada mientras esté en funcionamiento para evitar la posibilidad
de que el calefactor se caiga. Ubique el cable de corriente de manera que el ventilador calefactor o los demás objetos no queden
sobre éste. No coloque el cable de corriente debajo de alfombras. NO cubra el cable de corriente con tapetes, alfombras estrechas o
artículos coberturas similares. Coloque el cable de corriente lejos del tráfico de la habitación, donde las personas no se tropiecen con éste.
13. Este Calefactor está CALIENTE cuando está en funcionamiento. Para evitar quemaduras, no permita que la piel desnuda toque las superficies
calientes. Siempre use la agarradera cuando traslade este Calefactor. Mantenga los materiales combustibles, tales como muebles, almohadas,
ropa de cama, papeles, vestimenta y cortinas por lo menos a 3 pies (0.9 m) del frente del Calefactor y manténgalos por lo menos a 1 pie (0.3 m) de
los costados y de la parte trasera.
14. Un Calefactor tiene partes calientes y arcos eléctricos o partes que producen chispas en su interior. no use el Calefactor en áreas donde se
almacene o use gasolina, pintura o líquidos inflamables. NO use el Calefactor en lugares donde sustancias químicas inflamables o explosivas, sean
almacenadas, o en atmósferas húmedas. Este Calefactor está diseñado ÚNICAMENTE para uso general.
15. Este Calefactor no está diseñado para ser usado en lugares húmedos o mojados. Este Calefactor no está diseñado para usar en baños, áreas de
lavandería o lugares interiores similares. NUNCA ubique un Calefactor en un lugar donde podría caer dentro de una tina de baño o cualquier otro
recipiente de agua.
16.no use Calefactores al aire libre.
17. Cuando use el control remoto de su televisor u otro equipamiento, verifique para controlar que no encienda el Calefactor también.
18. Mantenga la unidad de control remoto del Calefactor lejos de sillas y de su cama donde exista la posibilidad de que alguien se siente encima,
deposite elementos sobre él o encienda el Calefactor inadvertidamente.
19. NOTA: Este equipo ha sido probado y cumple con los límites para aparatos digitales Clase B, conforme a la Parte 15 de las Normas de la FCC. Estos
límites están diseñados para brindar protección razonable contra la interferencia perjudicial en una instalación residencial. Este equipo genera,
utiliza y puede irradiar energía de frecuencias de radio y, si no se instala y utiliza de conformidad con las instrucciones, puede causar interferencia
perjudicial a las comunicaciones de radio. Sin embargo, no hay garantía de que la interferencia no ocurra en una instalación en particular. Si este
equipo no causa interferencia perjudicial a la recepción de radio o televisión, lo cual se puede determinar al encender y apagar el equipo, el usuario
puede intentar corregir la interferencia con una o más de las siguientes medidas: •Reorientar o reubicar la antena receptora. •Aumentar la separación
entre el equipo y el receptor. •Conectar el equipo en un tomacorriente de un circuito diferente a donde está conectado el receptor. •Pedir ayuda
al distribuidor o a un técnico experimentado de televisión y radio. Se informa al usuario que los cambios y las modificaciones realizadas al equipo
sin la aprobación del fabricante pueden anular la autoridad del usuario de operar este equipo.
20. Este Calefactor no es adecuado para usar en instalaciones de agricultura incluyendo áreas donde se almacene ganado, aves de corral u otros
animales. Por favor consulte el Articulo 547-7 (2008) del Código Eléctrico Nacional (NEC), o los códigos o normas estatales o locales aplicables
con relación a los requisitos eléctricos para edificios destinados a las agricultura. ESTE CALEFACTOR NO CUMPLE CON LOS REQUISITOS DEL
ARTICULO 547-7 DEL NEC (2008).
21. Este Calefactor no es adecuado para usar en lugares peligrosos. Por favor consulte el Artículo 500 del Código Eléctrico Nacional (NEC), o los
códigos o normas estatales o locales aplicables con relación a los requisitos eléctricos para lugares peligrosos. ESTE CALEFACTOR NO CUMPLE
CON LOS REQUISITOS DEL ARTICULO 500 (2008).
ADVERTENCIA: REDUZCA EL RIESGO DE INCENDIO O CHOQUE ELÉCTRICO – NO USE ESTE CALEFACTOR CON DISPOSITIVOS
DE CONTROL DE VELOCIDAD DE ESTADO SÓLIDO.
Rev. B 6/10
CONSERVE ESTAS INSTRUCCIONES
8
5591ES
Rear View of
Remote Control
Figure 5
SAFETY FEATURE
1. A thermal overload protector is built in to prevent overheating.
2.If an overheat temperature is reached, the Heater will automatically shut off. It can only resume operation when the unit
is reset.
To Reset Heater:
1. Unplug the Heater and wait 10 minutes for the unit to cool down.
2 . A f t e r t h e 1 0 m i n u t e s , p l u g t h e H e a t e r i n a g a i n a n d f o l low the OPERATION I N ST R U C T I O N d e s c r i b e d i n t h i s
inst ruct ion manual.
TROUBLE SHOOTING TIPS
If your heater shuts off unexpectedly or fails to operate, the above-mentioned safety features may have been activated to prevent overheating.
1. Be sure the power cord is plugged into a working electrical outlet.
2. Check your Temperature setting. The Heater may be off because it has reached the desired temperature setting.
3. If your Heater runs for several minutes and shuts off repeatedly, your Heater may require cleaning. See Maintenance section below.
If you have a problem that can not be resolved by the steps listed above, contact Technical Assistance at 800-233-0268, Monday through
Friday, between the hours of 8am and 5pm EST.
MAINTENANCE
-
-
-
-
-
-
-
-
To reduce the risk of electrical shock and fire please observe the following instructions.
Cleaning the Heater regularly will help to maintain its efficiency.
Always unplug the cord before moving, servicing or cleaning.
NEVER place the Heater in or near water.
Clean the Heater only with a vacuum equipped with a brush attachment; the vacuum will remove
the lint and dirt from the surface of the Heater.
Vacuum intake grills every two weeks; this will help to maintain the optimum Heater performance.
Use a toothbrush or other soft bristle brush to gently loosen any dirt not removed by the vacuum.
NEVER attempt to take apart the Heater.
Clean the body of the Heater with a soft cloth only.
NEVER use ALCOHOL or SOLVENTS such as gasoline, benzene, paint thinner, or other harsh cleaners.
SERVICING: For servicing, other than general user maintenance, please contact Customer Service at 800-233-0268, Monday through
Friday, from 8am-5pm Eastern.
STORAGE: Store the Heater with these instructions in the original carton in a cool, dry place.
Rev. B 6/10
5
5591ES
MODEL 5591
INSTRUCCIONES IMPORTANTES MANUAL DE USO
CALEFACTOR CERÁMICO DE TORRE CON CONTROL
TÁCTIL y CONTROL REMOTO
MODELO 5591
Este Calefactor está diseñado para ser usado como calefacción complementaria.
Este Calefactor es para uso residencial únicamente.
No está destinado para usar en instalaciones comerciales, industriales
o de agricultura.
 LASKO PRODUCTS, INC. LIMITED WARRANTY
(NOT VALID IN MEXICO)
WHAT THIS WARRANTY COVERS:  This product is warranted against defects in workmanship and/or materials.
HOW LONG THIS WARRANTY LASTS:  This warranty extends only to the original purchaser of the product and lasts for three (3) years from the
date of original purchase or until the original purchaser of the product sells or transfers the product, whichever first occurs.
WHAT LASKO WILL DO:  During the warranty period, Lasko will, at its sole option, repair or replace any part or parts that prove to be defective
or replace the whole product with the same or comparable model.
WHAT THIS WARRANTY DOES NOT COVER:  This warranty does not apply if the product was damaged or failed because of accident,
improper handling or operation, shipping damage, abuse, misuse, unauthorized repairs made or attempted, or the use of the product for
commercial or nonresidential service. This warranty does not cover shipping costs for the return of products to Lasko for repair or replacement.
Lasko will pay return shipping charges from Lasko following warranty repairs or replacement.
ANY AND ALL WARRANTIES, EXPRESSED OR IMPLIED (INCLUDING, WITHOUT LIMITATION, ANY IMPLIED WARRANTY OF
MERCHANTABILITY), LAST THREE YEARS FROM THE DATE OF ORIGINAL PURCHASE OR UNTIL THE ORIGINAL PURCHASER OF THE
PRODUCT SELLS OR TRANSFERS THE PRODUCT, WHICHEVER FIRST OCCURS AND IN NO EVENT SHALL LASKO’S LIABILITY UNDER
ANY EXPRESS OR IMPLIED WARRANTY INCLUDE (I) INCIDENTAL OR CONSEQUENTIAL DAMAGES FROM ANY CAUSE WHATSOEVER, OR
(II) REPLACMENT OR REPAIR OF ANY HOUSE FUSES, CIRCUIT BREAKERS OR RECEPTACLES.  NOTWITHSTANDING ANYTHING TO THE
CONTRARY, IN NO EVENT SHALL LASKO’S LIABILITY UNDER ANY EXPRESS OR IMPLIED WARRANTY EXCEED THE PURCHASE PRICE
OF THE PRODUCT AND ANY SUCH LIABILITY SHALL TERMINATE UPON THE EXPIRATION OF THE WARRANTY PERIOD.
Some states and provinces do not allow limitations on how long an implied warranty lasts, or the exclusion or limitation of incidental or
consequential damages, so these exclusions or limitations may not apply to you.  This warranty gives you specific legal rights. You may also
have other rights which vary from state to state and province to province.
Proof of purchase is required before a warranty claim will be accepted.
CUSTOMER SERVICE:
Toll-Free (800) 233-0268. Email: [email protected]
Our Customer Service team is available to assist you with product and service questions, and replacement parts. They can
be reached Monday through Friday, 8am-5pm Eastern. Please have your model number available, as well as the type and
style (located on the underside of your product).
Customer Service Dept., 820 Lincoln Ave., West Chester, PA 19380
(Please do not send product to this location) www.laskoproducts.com
PARTS FOR DISCONTINUED, OBSOLETE AND CERTAIN OTHER PRODUCTS MAY NOT BE AVAILABLE. DUE TO SAFETY REASONS,
MANY ELECTRONIC COMPONENTS AND MOST HEATER COMPONENTS ARE NOT AVAILABLE TO CONSUMERS FOR INSTALLATION OR
REPLACEMENT.
LEA Y GUARDE ESTAS INSTRUCCIONES
LEA CUIDADOSAMENTE LAS INSTRUCCIONES ANTES DE
INTENTAR ARMAR, INSTALAR, USAR O DAR MANTENIMIENTO
AL PRODUCTO DESCRITO.
PROTÉJASE A SÍ MISMO Y A LOS DEMÁS CUMPLIENDO CON
TODA LA INFORMACIÓN DE SEGURIDAD. EL NO SEGUIR
LAS INSTRUCCIONES PODRÍA RESULTAR EN LESIONES
PERSONALES Y/O DAÑOS A LA PROPIEDAD.
CONSERVE LAS INSTRUCCIONES COMO FUTURA REFERENCIA.
Manual printed in China
CONSERVE ESTAS INSTRUCCIONES
Rev. B 6/10
6
5591ES
Rev. B 6/10
7
5591ES