1
Your handy guidebook.
emporiaCONNECT.
V88_emporiaCONNECT_Manual-V1_55367-ENG.indd 1
12.07.13 08:51
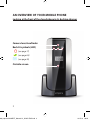
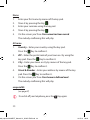
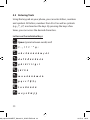
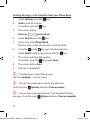
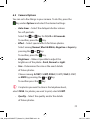
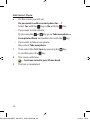
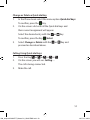
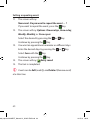
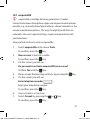
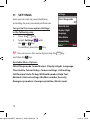
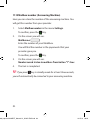
An Overview of Your Mobile Phone
Looking at the front of the closed phone in its desktop charger
Camera lens/viewfinder
Back-lit symbols (LED)
(see page 17)
(see page 64)
(see page 35)
Outside screen
2
V88_emporiaCONNECT_Manual-V1_55367-ENG.indd 2
12.07.13 08:52
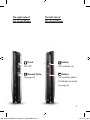
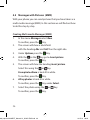
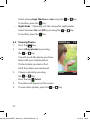
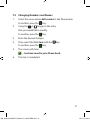
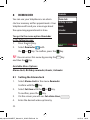
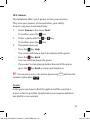
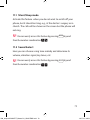
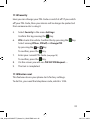
Looking at the back of the closed phone in its desktop charger
Charger Jack
(see page 17)
Tourch (LED)
Emergency button
(see page 89)
Charger Jack
(see page 17)
3
V88_emporiaCONNECT_Manual-V1_55367-ENG.indd 3
12.07.13 08:52
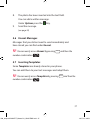
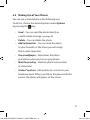
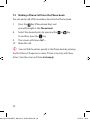
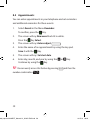
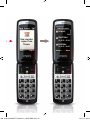
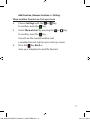
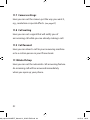
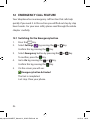
Opened-up Phone
Loudspeaker
Screen (see page 24)
Key (see page 21)
Navigation Keys Key Favourite Key menu
(see page 22)
(see page 22)
(see page 81)
Menu Key (see page 21)
Photo Key (see page 40)
Keypad On/Off Button (see page 30)
(see page 25)
4
V88_emporiaCONNECT_Manual-V1_55367-ENG.indd 4
12.07.13 08:52
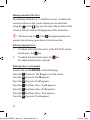
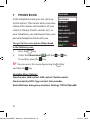
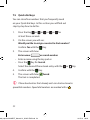
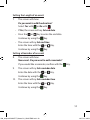
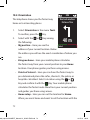
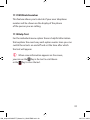
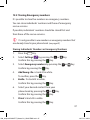
The right side of
The left side of
the closed Phone
the closed Phone
Torch
On / Off
Kamera Taste
(see page 40)
Button
Turn volume up
Button
Turn volume down
Put phone on mute
(see page 28)
5
V88_emporiaCONNECT_Manual-V1_55367-ENG.indd 5
12.07.13 08:52
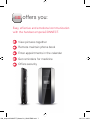
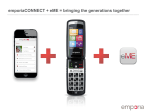
What separates us: 739 km.
What connects us: emporiaME.
eME
The new kind of sharing. emporiaME: the app to share
all that is important with everybody close to your heart –
special moments, contacts and appointments.
V88_emporiaCONNECT_Manual-V1_55367-ENG.indd 6
12.07.13 08:52
eME
offers you:
Easy, effective and emotional communication
with the handset emporiaCONNECT.
View pictures together
Remote maintain phone book
Enter appointments in the calendar
Get reminders for medicine
Offers security
V88_emporiaCONNECT_Manual-V1_55367-ENG.indd 7
12.07.13 08:52
Contents
1For Your Safety . . . . . . . . . . . . . . . . . . . . . . . . . . . . . . . . . . . . 15
2First Steps . . . . . . . . . . . . . . . . . . . . . . . . . . . . . . . . . . . . . . . . . 16
2.1 Installing your SIM-card and battery . . . . . . . . . . . . . . . . . . . . . 16
2.2 Charging your battery . . . . . . . . . . . . . . . . . . . . . . . . . . . . . . . . . . . 17
2.3 Turning on your phone; First use . . . . . . . . . . . . . . . . . . . . . . . . . 18
2.4 Information for Beginners . . . . . . . . . . . . . . . . . . . . . . . . . . . . . . . 21
2.5Screen Symbols in Standby Mode . . . . . . . . . . . . . . . . . . . . . . . . 24
3
Phone Settings . . . . . . . . . . . . . . . . . . . . . . . . . . . . . . . . . . . . . 25
3.1
Switching on your phone . . . . . . . . . . . . . . . . . . . . . . . . . . . . . . . . 25
3.2 Switching off your phone . . . . . . . . . . . . . . . . . . . . . . . . . . . . . . . . 25
4Calling . . . . . . . . . . . . . . . . . . . . . . . . . . . . . . . . . . . . . . . . . . . . . 26
4.1
Making a call . . . . . . . . . . . . . . . . . . . . . . . . . . . . . . . . . . . . . . . . . . . . 26
4.2 Ending a call . . . . . . . . . . . . . . . . . . . . . . . . . . . . . . . . . . . . . . . . . . . . 26
4.3 Answering a call . . . . . . . . . . . . . . . . . . . . . . . . . . . . . . . . . . . . . . . . . 26
4.4 Redialling from your Call List . . . . . . . . . . . . . . . . . . . . . . . . . . . . 27
4.5 Putting the ring-tone on mute for an incoming call . . . . . . . 28
4.6 Hands-free Talking . . . . . . . . . . . . . . . . . . . . . . . . . . . . . . . . . . . . . . 28
8
V88_emporiaCONNECT_Manual-V1_55367-ENG.indd 8
12.07.13 08:52
5Messages . . . . . . . . . . . . . . . . . . . . . . . . . . . . . . . . . . . . . . . . . . 29
5.1
Writing Text Messages (SMS) . . . . . . . . . . . . . . . . . . . . . . . . . . . . .29
5.2 Entering Texts . . . . . . . . . . . . . . . . . . . . . . . . . . . . . . . . . . . . . . . . . . . 30
5.3 Sending Messages . . . . . . . . . . . . . . . . . . . . . . . . . . . . . . . . . . . . . . 33
5.4 Receiving and Reading Messages . . . . . . . . . . . . . . . . . . . . . . . . 35
5.5 Messages with Pictures (MMS) . . . . . . . . . . . . . . . . . . . . . . . . . . 36
5.6 Unsent Messages . . . . . . . . . . . . . . . . . . . . . . . . . . . . . . . . . . . . . . . .37
5.7 Inserting Templates . . . . . . . . . . . . . . . . . . . . . . . . . . . . . . . . . . . . . 37
6Camera . . . . . . . . . . . . . . . . . . . . . . . . . . . . . . . . . . . . . . . . . . . . 38
6.1 Taking Photos . . . . . . . . . . . . . . . . . . . . . . . . . . . . . . . . . . . . . . . . . . . 38
6.2 Camera Options . . . . . . . . . . . . . . . . . . . . . . . . . . . . . . . . . . . . . . . . . 39
6.3 Viewing Photos . . . . . . . . . . . . . . . . . . . . . . . . . . . . . . . . . . . . . . . . . 40
6.4 Making Use of Your Photos . . . . . . . . . . . . . . . . . . . . . . . . . . . . . . 41
7
Phone book . . . . . . . . . . . . . . . . . . . . . . . . . . . . . . . . . . . . . . . . 44
7.1
Storing Numbers and Names . . . . . . . . . . . . . . . . . . . . . . . . . . . . 45
7.2
Changing Numbers and Names . . . . . . . . . . . . . . . . . . . . . . . . . . 47
7.3
Making a Phone Call from the Phone book . . . . . . . . . . . . . . . 48
7.4
Remote Maintenance of Numbers and Names . . . . . . . . . . . . 49
7.5
Quick dial keys . . . . . . . . . . . . . . . . . . . . . . . . . . . . . . . . . . . . . . . . . . 52
9
V88_emporiaCONNECT_Manual-V1_55367-ENG.indd 9
12.07.13 08:52
8Reminder . . . . . . . . . . . . . . . . . . . . . . . . . . . . . . . . . . . . . . . . . . 54
8.1 Setting the Alarm clock . . . . . . . . . . . . . . . . . . . . . . . . . . . . . . . . . . 54
8.2 Switching the Alarm clock off . . . . . . . . . . . . . . . . . . . . . . . . . . . . 55
8.3 Birthday reminder . . . . . . . . . . . . . . . . . . . . . . . . . . . . . . . . . . . . . . . 56
8.4Appointments . . . . . . . . . . . . . . . . . . . . . . . . . . . . . . . . . . . . . . . . . . 58
8.5Calendar . . . . . . . . . . . . . . . . . . . . . . . . . . . . . . . . . . . . . . . . . . . . . . . . 61
9
Call info . . . . . . . . . . . . . . . . . . . . . . . . . . . . . . . . . . . . . . . . . . . 64
9.1
Missed calls . . . . . . . . . . . . . . . . . . . . . . . . . . . . . . . . . . . . . . . . . . . . . 64
9.2 Dialled numbers . . . . . . . . . . . . . . . . . . . . . . . . . . . . . . . . . . . . . . . . 65
9.3 Received calls . . . . . . . . . . . . . . . . . . . . . . . . . . . . . . . . . . . . . . . . . . . 65
9.4 Call duration . . . . . . . . . . . . . . . . . . . . . . . . . . . . . . . . . . . . . . . . . . . . 65
9.5Delete . . . . . . . . . . . . . . . . . . . . . . . . . . . . . . . . . . . . . . . . . . . . . . . . . . 65
10Tools . . . . . . . . . . . . . . . . . . . . . . . . . . . . . . . . . . . . . . . . . . . . . . 66
10.1emporiaME . . . . . . . . . . . . . . . . . . . . . . . . . . . . . . . . . . . . . . . . . . . . . 67
10.2Games . . . . . . . . . . . . . . . . . . . . . . . . . . . . . . . . . . . . . . . . . . . . . . . . . . 69
10.3Weather . . . . . . . . . . . . . . . . . . . . . . . . . . . . . . . . . . . . . . . . . . . . . . . . 70
10.4Orientation . . . . . . . . . . . . . . . . . . . . . . . . . . . . . . . . . . . . . . . . . . . . . 72
10.5Calculator . . . . . . . . . . . . . . . . . . . . . . . . . . . . . . . . . . . . . . . . . . . . . . . 73
10.6Magnifier . . . . . . . . . . . . . . . . . . . . . . . . . . . . . . . . . . . . . . . . . . . . . . . 74
10.7 Emergency button . . . . . . . . . . . . . . . . . . . . . . . . . . . . . . . . . . . . . . 74
10.8Position . . . . . . . . . . . . . . . . . . . . . . . . . . . . . . . . . . . . . . . . . . . . . . . . . 75
10.9Bluetooth . . . . . . . . . . . . . . . . . . . . . . . . . . . . . . . . . . . . . . . . . . . . . . . 76
10
V88_emporiaCONNECT_Manual-V1_55367-ENG.indd 10
12.07.13 08:52
11Settings . . . . . . . . . . . . . . . . . . . . . . . . . . . . . . . . . . . . . . . . . . . 78
11.1 Silent/Sleep mode . . . . . . . . . . . . . . . . . . . . . . . . . . . . . . . . . . . . . . 79
11.2 Sound & alert . . . . . . . . . . . . . . . . . . . . . . . . . . . . . . . . . . . . . . . . . . . 79
11.3 Display & light . . . . . . . . . . . . . . . . . . . . . . . . . . . . . . . . . . . . . . . . . . . 80
11.4Language . . . . . . . . . . . . . . . . . . . . . . . . . . . . . . . . . . . . . . . . . . . . . . . 81
11.5 Time & date . . . . . . . . . . . . . . . . . . . . . . . . . . . . . . . . . . . . . . . . . . . . . 81
11.6 Favourite key . . . . . . . . . . . . . . . . . . . . . . . . . . . . . . . . . . . . . . . . . . . . 81
11.7 Camera settings . . . . . . . . . . . . . . . . . . . . . . . . . . . . . . . . . . . . . . . . . 82
11.8 Call waiting . . . . . . . . . . . . . . . . . . . . . . . . . . . . . . . . . . . . . . . . . . . . . 82
11.9 Call forward . . . . . . . . . . . . . . . . . . . . . . . . . . . . . . . . . . . . . . . . . . . . . 82
11.10 Auto Pickup . . . . . . . . . . . . . . . . . . . . . . . . . . . . . . . . . . . . . . . . . . . . . 82
11.11 Withhold number . . . . . . . . . . . . . . . . . . . . . . . . . . . . . . . . . . . . . . . 83
11.12 Help Text . . . . . . . . . . . . . . . . . . . . . . . . . . . . . . . . . . . . . . . . . . . . . . . 83
11.13 Mailbox number (Answering Machine) . . . . . . . . . . . . . . . . . . . 84
11.14Security . . . . . . . . . . . . . . . . . . . . . . . . . . . . . . . . . . . . . . . . . . . . . . . . . 85
11.15 Master reset . . . . . . . . . . . . . . . . . . . . . . . . . . . . . . . . . . . . . . . . . . . . . 85
12Emergency Call Feature . . . . . . . . . . . . . . . . . . . . . . . . . . . . 86
12.1 Switching On the Emergency button . . . . . . . . . . . . . . . . . . . . 86
12.2 Storing Emergency numbers . . . . . . . . . . . . . . . . . . . . . . . . . . . . 87
12.3 Starting the Emergency Call Function . . . . . . . . . . . . . . . . . . . . 89
12.4Additional Information about
the Emergency Call Function . . . . . . . . . . . . . . . . . . . . . . . . . . . . 90
11
V88_emporiaCONNECT_Manual-V1_55367-ENG.indd 11
12.07.13 08:52
13
Safety Hints . . . . . . . . . . . . . . . . . . . . . . . . . . . . . . . . . . . . . . . . 91
14Disposal . . . . . . . . . . . . . . . . . . . . . . . . . . . . . . . . . . . . . . . . . . . 93
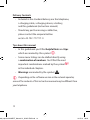
15Warranty . . . . . . . . . . . . . . . . . . . . . . . . . . . . . . . . . . . . . . . . . . 94
16
Technical Product Data . . . . . . . . . . . . . . . . . . . . . . . . . . . . . 94
17EU Declaration of Conformity (DOC) . . . . . . . . . . . . . . . . . 95
12
V88_emporiaCONNECT_Manual-V1_55367-ENG.indd 12
12.07.13 08:52
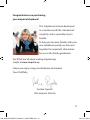
Congratulations on purchasing
your emporia telephone!
This telephone has been developed
in accordance with the standards of
simplicity and is especially easy to
handle.
To help you become familiar with your
new telephone quickly, we have put
together the important information
for you in this handy guidebook.
You`ll find out all about making telephoning
simple at www.emporia.eu
I hope you enjoy using your telephone and remain
Yours faithfully,
Eveline Pupeter
CEO emporia Telecom
13
V88_emporiaCONNECT_Manual-V1_55367-ENG.indd 13
12.07.13 08:52
Delivery Contents
•• Included in the standard delivery are the telephone,
a charging cable, a charging device, a battery,
and this guidebook (instruction manual).
•• Should any part be missing or defective,
please contact the emporia Hotline
on/at +43 · 732 · 77 77 17 · 0
Tips about this manual
•• In this guidebook you`ll find helpful hints and tips
which are marked by this symbol
.
•• Some menu listings can be dialled directly using
a combination of numbers. You`ll find the most
important combinations marked by the symbol
№
in the individual chapters.
•• Warnings are marked by the symbol
.
LLDepending on the software version or the network operator,
some of the contents of this instruction manual may be different from
your telephone.
14
V88_emporiaCONNECT_Manual-V1_55367-ENG.indd 14
12.07.13 08:52
1
For Your Safety
Please read all of the safety guidelines in this guidebook carefully
and follow them. Not following them may be dangerous or illegal.
Do not use this device while driving.
When using this device, keep it 15 mm from your body.
Keep the device 20 cm from a pacemaker and
other medical devices.
When in a hospital or medical facilities,
turn off the device when so instructed.
When on a plane or at an airport,
turn off the device when so instructed.
Do not use the phone in an area where blasting is occurring.
Do not use the phone at a petrol/refuelling station.
Do not shine the torch directly into a person`s or
animal`s eyes.
15
V88_emporiaCONNECT_Manual-V1_55367-ENG.indd 15
12.07.13 08:52
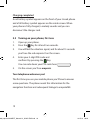
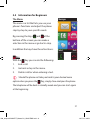
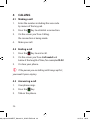
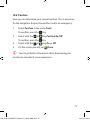
2
First Steps
2.1 Installing your SIM-card and battery
This is how to install your SIM-card
As shown in the drawing, slide off the
back cover in the direction of the arrow.
The SIM-card slot is located in the
upper right-hand corner. Make sure its
gold contact area is facing downwards
and slide the SIM-card from left to right
into the SIM-card slot.
This is how to install your battery
As the drawing shows, insert the
battery by aligning the gold contacts
in the phone and on the battery at
the upper right.
Slide the cover back in the direction of
the heart symbol until it clicks into place.
16
V88_emporiaCONNECT_Manual-V1_55367-ENG.indd 16
12.07.13 08:52
2.2 Charging your battery
LLBefore using your phone for the first time,
make sure the battery has been charged for at least four hours.
Failure to do this can result in a shorter battery lifetime.
Insert the charger cord into the jack at
the top of the phone and then insert the
plug of the charger cord into an
electrical outlet.
While charging
On the front of your closed phone you`ll see a blinking red
symbol of a battery, and on the narrow screen on the front
a battery symbol that is slowly filling up will appear for
approximately 10 seconds.
LLAt the beginning and end of charging a short melody plays.
On the inside screen a battery symbol that is slowly filling up
appears. When the level is low, the symbol is red; at mid-level it is
yellow, at high green.
17
V88_emporiaCONNECT_Manual-V1_55367-ENG.indd 17
12.07.13 08:52
Charging completed
A red battery symbol appears on the front of your closed phone
and a full battery symbol appears on the inside screen. When
your phone is fully charged, a melody sounds and you can
disconnect the charger cord.
2.3 Turning on your phone; First use
1.
Open up your phone.
2.
Press the
3.
You will feel the vibration signal, and for about 15 seconds
Key for at least two seconds.
you`ll see the red emporia O on the screen.
4.
Enter your 4-digit PIN-code and
confirm it by pressing the
Key.
You can note down your PIN-code here:
5.
On the screen you`ll see emporia.
Your telephone welcomes you!
The first time you use your mobile phone you`ll have to answer
some questions. The phone needs this information for the
navigation function and subsequent linkage to emporiaME.
18
V88_emporiaCONNECT_Manual-V1_55367-ENG.indd 18
12.07.13 08:52
LLYou can also adjust the settings later under the menu option
Settings, but we recommend you do this now.
Language
1.
English is back-lit in white.
Press the
2.
Key to confirm it.
On the screen you`ll see Language "English" selected!
The melody confirming this will play.
Time
1.
Enter the current time by means of the key pad.
Press the 2.
Key to confirm it.
On the screen you`ll see Time set!.
The melody confirming this will play.
Date
1.
Enter today`s date by means of the key pad.
Press the 2.
Key to confirm it.
On the screen you`ll see Date set!.
The melody confirming this will play.
19
V88_emporiaCONNECT_Manual-V1_55367-ENG.indd 19
12.07.13 08:52
Name
1.
Enter your first name by means of the key pad.
2.
Store it by pressing the Key 3.
Enter your surname using the key pad.
4.
Store it by pressing the Key 5.
On the screen you`ll see Your name has been saved.
.
.
The melody confirming this will play.
At home
1.
Country – Enter your country using the key pad.
2.
ZIP – Enter the postal code of your town or city using the
Press the Key to confirm it.
key pad. Press the 3.
City – Enter your town or city by means of the key pad.
Press the 4.
Key to confirm it.
Street & Number – Enter your address by means of the key
pad. Press the 5.
Key to confirm it.
Key to confirm it.
On the screen you`ll see Your home is defined now!.
The melody confirming this will play.
emporiaME
(see page 67)
LLTo switch off your telephone, press the
Key again.
20
V88_emporiaCONNECT_Manual-V1_55367-ENG.indd 20
12.07.13 08:52
2 .4 information for beginners
The Menu
Messages
The menu is a list that lets you use your
phone`s functions and adjust the phone
step by step to your specific needs.
By pressing the Keys
and
at the
bottom of the screen you can make a
selection in the menu or go back a step.
In addition the keys have these functions:
Select
Back
Key
With the
Key you can do the following:
1.
End a call.
2.
Go back a step in the menu.
3.
Delete a letter when entering a text.
LShould the phone not take you back to your desired menu
option when you press the
Key, simply close and open the phone.
The telephone will be back in standby mode and you can start again
at the beginning.
21
V88_emporiaCONNECT_Manual-V1_55367-ENG.indd 21
12.07.13 08:52
Key
With the Key you can do the following:
1.
Make a call.
2.
Take/Receive a call.
3.
Confirm your selection in the menu.
4.
Go to the Call List in standby mode.
On the screen you`ll see the heading Call info.
Selecting a menu option
With the
and
Keys you can make a selection, which is back-
lit in white.
You can also go to a menu option by using the number navigation.
Press the number on the key pad that is next to the desired
function on the screen.
(Example: You are in the menu. Press the number
2a b c
for
and
you will go directly to the Phone book.)
Energy-saving Mode / Standby Mode
If you`ve opened up your phone and don`t press a key for a longer
time, the screen will go black. This means that your phone is in its
energy-saving mode to save electricity.
By pressing any key, you can turn the screen on again. Your phone
is ready for you to use again – it`s in the standby mode.
22
V88_emporiaCONNECT_Manual-V1_55367-ENG.indd 22
12.07.13 08:52
PIN-Code (Personal Identification Number)
The 4-digit combination of numbers should protect your
telephone against abuse. It`s your secret number so that no
stranger can switch on your phone.
LLWhen switching on you phone, you are required to enter your
4-digit PIN-code. You`ll find your PIN-code in the information you got
from your network operator.
SIM-Card
The SIM-card is a chip card that you insert into your telephone.
Only then can you make a call with your mobile telephone.
(SIM stands for Subscriber Identity Module.)
23
V88_emporiaCONNECT_Manual-V1_55367-ENG.indd 23
12.07.13 08:52
GSM
2.5 Screen Symbols in Standby Mode
14 48
When your phone is in standby mode,
the symbols on the screen mean as follows:
Monday,
24.06.13
Call info
:Shows the battery level. 4 bars: Battery full
:Shows the reception quality. 4 bars: Optimal
:Shows the GPS is working.
:Shows the alarm is switched on.
:Shows the profile Silent/Sleep mode is on.
:Shows the profile Meeting/Theatre mode is on.
:Shows the profile Maximum/Bus mode is on.
:Shows a message has been received.
:Shows a call has been missed.
:Shows that Bluetooth is switched on.
:Shows that a Bluetooth device is paired.
:Shows that incoming calls have been diverted.
:Shows that data are just being transferred.
24
V88_emporiaCONNECT_Manual-V1_55367-ENG.indd 24
12.07.13 08:52
3
Phone Settings
3.1 Switching on your phone
1.
Open up your phone.
Key for at least two seconds.
2.
Press the
3.
You`ll feel the vibration signal. On the screen
you`ll see the red emporia O for about 15 seconds.
4.
Enter your 4-digit PIN-code.
Confirm it by pressing the
5.
Key.
The letters emporia appear one after the other on the screen.
3.2 Switching off your phone
1.
Press the
Key for at least two seconds.
2.
The letters emporia disappear one after the other
on the screen.
3.
Your phone is off.
Last step: Close the phone.
25
V88_emporiaCONNECT_Manual-V1_55367-ENG.indd 25
12.07.13 08:52
4
Calling
4.1 Making a call
1.
Enter the number including the area code
by means of the key pad.
Key to establish a connection.
2.
Press the
3.
On the screen you`ll see Calling,
the connection is being made.
4.
Make your call.
4.2 Ending a call
1.
Press the
Key to end a call.
2.
On the screen you`ll see Call ended and
3.
Or close your phone.
below it the length of time, for example 00:00.
LLIf the person you are talking with hangs up first,
you needn`t press any key.
4.3 Answering a call
1.
Your phone rings.
2.
Press the
3.
Talk on the phone.
Key.
26
V88_emporiaCONNECT_Manual-V1_55367-ENG.indd 26
12.07.13 08:52
4.4 Redialling from your Call List
It`s very easy to call a person again whom you`ve already called.
1.
Press the
2.
On the screen you`ll see the people
Key.
you`ve called recently.
3.
Go to the name of the person
you want to call by using the
or the Key. Confirm your
selection with the
Key.
4.
The screen will say Call.
5.
Make your call.
LLPeople you have stored in your phone
Call info
06501324569
24.06.13 10:45
Andreas
Mom
Delete
Call duration
Options
Back
book appear on the screen by name. Only the
others` phone numbers appear.
27
V88_emporiaCONNECT_Manual-V1_55367-ENG.indd 27
12.07.13 08:52
Display Symbols in the Call List
In the Call List the symbols on the screen mean the following:
Information about the dialled numbers.
Information about answered calls.
Information about missed calls.
4.5 Putting the ring-tone on mute for an incoming call
1.
Your phone rings.
2.
You don`t want to take the call and
the ring-tone is unpleasant.
Key on the side of your phone.
3.
Press the
4.
The ring-tone is immediately silent.
4.6 Hands-free Talking
1.
While talking, press the
Key.
2.
Speaker is back-lit in white.
3.
Confirm by pressing the
4.
The screen will say Speaker on.
5.
To end the hands-free mode, press the
Key.
Key again.
The telephone switches over to the handset mode.
28
V88_emporiaCONNECT_Manual-V1_55367-ENG.indd 28
12.07.13 08:52
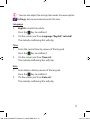
5
Messages
Messages
You can write and send text messages with
New
your phone. In this section you`ll find out
step-by-step how to do this.
You get to the menu option Messages
in the following way:
1.
2.
Press the menu Key.
is highlighted. To confirm,
press the
and than the
1
Select
Key under Select.
№ You get to this menu by pressing the
Received
Sent
Unsent
Templates
Delete messages
menu
Back
Key
Key.
Available Menu Options:
New, Received, Sent, Unsent, Templates, Delete messages,
Send contact by SMS, SMS in PhoneBk, Message settings
5.1 Writing Text Messages (SMS)
1.
In the menu Messages select New.
To confirm, press the
2.
Key.
The screen will show a black field with
the heading Abc and 160/1 on the right side.
3.
Now you can write your text message (SMS).
29
V88_emporiaCONNECT_Manual-V1_55367-ENG.indd 29
12.07.13 08:52
5.2 Entering Texts
Using the key pad on your phone, you can enter letters, numbers
and symbols. All letters, numbers from 0 to 9 as well as symbols
(e.g. „?“, „€“) are stored on the keys. By pressing the keys a few
times, you can access the desired characters.
Letters on the individual keys
0
1
Space (space between words) or 0
1 . , ! ? 1 ´ " @ :
2a b c
a b c 2 ä à å ā â æ ç á ć
3d e f
d e f 3 đ é ē € è ê ë
4g h i
g h i 4 î ï í ì ğ ι î
5j k l
j k l 5 £
6
mno
m n o 6 ö ñ ô œ ó ò
7
pqrs
p q r s 7 β $ ş
8t u v
t u v 8 ü ù û ú
9
wx yz
w x y z 9 ŵ ý ÿ
30
V88_emporiaCONNECT_Manual-V1_55367-ENG.indd 30
12.07.13 08:52
+ . , @ ? - ' ! _ / \ & : ; + * = " € £ $ ¥ % ( ) < > [ ] { } ^ ~ | ¿ # ¡ : ) :-) :-( Ω § ¤
#
a A1
Abc ABC abc 123. Change from capitalized and
lower case letters and numbers.
Entering Special Characters
Key.
1.
Press the
2.
The screen will show the Special
+
Symbols with the heading Symbol.
3.
4.
To select the special symbols you can
move the
2a b c
Key up
move the
4g h i
Key to the left
move the
6
mno
Key to the right
move the
8tu v
Key down.
When you`ve selected the desired
Symbol
.
, @ ?
! _ /
-
'
\ & :
; + * = " €
Select
Back
special symbol (back-lit in white),
press the
5.
Key to confirm.
The special symbol has now been inserted into the text.
31
V88_emporiaCONNECT_Manual-V1_55367-ENG.indd 31
12.07.13 08:52
Moving around in the Text
The blinking white line „|“ is called the “cursor”. It shows the
current position on the screen where you can enter text.
or the
Using the
Key, you can move the position of the
cursor in the text without changing any of the characters.
LLWhen pressing the
or the
Key approximately two
seconds, you can jump up or down in the text one line.
Deleting Typing Errors
1.
To delete individual characters to the left of the cursor,
briefly press the
2.
Key.
To delete the whole text, press the
Key
for approximately three seconds.
Entering Texts: an Example
To write the word EMPORIA, do the following:
Press the
3d e f
Key twice. The E appears on the screen.
Press the
6
mno
Key once. The M appears.
Press the
7
pqrs
Key once. The P appears.
Press the
6
mno
Key three times. The O appears.
Press the
7
pqrs
Key three times. The R appears.
Press the
4g h i
Key three times. The I appears.
Press the
2a b c
Key once. The A appears
32
V88_emporiaCONNECT_Manual-V1_55367-ENG.indd 32
12.07.13 08:52
5.3 Sending Messages
You`ve written a text message (SMS) and want to send it. You
have two options:
Sending Messages by entering a phone number
1.
Under Options press the
2.
Send is back-lit in white.
3.
The screen will say
To confirm, press the
Enter no.
4.
Key.
Key.
or search no.
Enter the number.
To confirm, press the
Key.
5.
The screen will show Sent.
6.
The task is completed.
33
V88_emporiaCONNECT_Manual-V1_55367-ENG.indd 33
12.07.13 08:52
Sending Messages with a Number from your Phone Book
1.
Under Options press the
2.
Send is back-lit in white.
3.
The screen will say
Key.
To confirm, press the
Enter no.
Key.
or search no.
4.
Under Search press the
5.
You`re now in the Phone book.
Key.
The first entry in the phone book is back-lit white.
6.
Using the
or the
Key, go to the desired entry.
Under Select confirm your choice with the
7.
Key.
The screen will show the number.
Key under Send.
To confirm, press the
8.
The screen will say Sent.
9.
The task is completed.
LLIf it takes longer to send the message,
you`ll see Sending … on your screen.
LLYou can store a message or send it at a later time.
To do this, press
Options and select Save as unsent.
LLYou can store a message and use it as a template for future
messages. To do this, press
Options and select Save as template.
34
V88_emporiaCONNECT_Manual-V1_55367-ENG.indd 34
12.07.13 08:52
5.4 Receiving and Reading Messages
A message tone lets you know that you have received a
new message. On the front of your closed telephone
you will see a blinking white symbol of a letter,
and the screen will say 1 New message!
Key.
1.
Press the
2.
The screen will show the sender (name or number),
date, time, and the contents of the message (SMS).
3.
The task is completed.
35
V88_emporiaCONNECT_Manual-V1_55367-ENG.indd 35
12.07.13 08:52
5.5 Messages with Pictures (MMS)
With your phone you can send pictures that you have taken as a
multi-media message (MMS). In this section we will find out how
to do this step by step.
Creating Multi-media Messages (MMS)
1.
In the menu Messages select New.
To confirm, press the
2.
Key.
The screen will show a black field
with the heading Abc and 160/1 on the right side.
3.
Under Options press the
4.
With the
or the
To confirm, press the
5.
Key.
Key go to Insert picture.
Key.
The screen will show the heading Insert picture.
Select this using the
or
Key.
From photo album is back-lit in white.
To confirm, press the
6.
To confirm, press the
7.
Key.
All my photos is back-lit in white.
Key under Select.
Select the photo using the
To confirm, press the
or
Key.
Key.
36
V88_emporiaCONNECT_Manual-V1_55367-ENG.indd 36
12.07.13 08:52
8.
The photo has been inserted into the text field.
You can add a written message.
Under Options press the
9.
Key.
Send the message.
(see page 33)
5.6 Unsent Messages
Messages that you did not want to send immediately and
have stored you can find under Unsent.
№ You can easily access Unsent by pressing
number combination
1
menu
and then the
4g h i .
5.7 Inserting Templates
Some Templates are already stored in your phone.
You can add them to your text messages and adapt them.
№ You can easily access Templates by pressing
number combination
1
menu
and then the
5j k l .
37
V88_emporiaCONNECT_Manual-V1_55367-ENG.indd 37
12.07.13 08:52
6
Camera
46
You can also take photos with
your telephone. In this section
you will find out step by step
how to do this.
6.1 Taking Photos
1.
Press the
Key at the side of your
Options
phone.
2.
OK
Back
Point your screen at the object or person
you would like to take a picture of.
3.
To take the photo, press the
or
Key.
You will hear the sound of the shutter.
4.
The photo is automatically stored.
5.
The task is completed.
Last step: Close your phone.
38
V88_emporiaCONNECT_Manual-V1_55367-ENG.indd 38
12.07.13 08:52
6.2 Camera Options
You can set a few things in your camera. To do this, press the
Key under Options and select the desired settings:
•• Auto timer – Select the delayed-shutter release
for self-portraits.
Select the
Key for 10, 20 or 30 seconds.
or
Key.
To confirm, press the
•• Effect – Select special effects for future photos.
Select among Normal, Black & White, Negative or Sepia by
pressing the
or
Key.
To confirm, press the
Key.
•• Brightness – Makes it possible to adjust the
brightness of the photo: Dark, Normal or Light.
•• Size – Determines the size or the exact details
of future photos.
Choose among 2.0 MP, 1.2 MP, XVGA (1.0 MP), VGA (0.3 MP)
or MMS by pressing the
To confirm press the
or
Key.
Key.
LLFor photos you want to store in the telephone book,
select XVGA. For photos you want to print, select 2.0 MP.
•• Quality – Select the quality and/or the details
of future photos.
39
V88_emporiaCONNECT_Manual-V1_55367-ENG.indd 39
12.07.13 08:52
Select among High, Medium or Low using the
To confirm, press the
or
Key.
Key.
•• Night Mode – Optimally sets the camera for night photos.
Select between On and Off by pressing the
To confirm, press the
1.
Press the
2.
Go to All my photos by pressing
or
Key.
Key.
6.3 Viewing Photos
the
or
IMG0001A.jpg
1/12
Options
Back
Key.
Key.
You will see all the photos you have
taken with your mobile phone.
The last photo you took is first.
All of the photos are numbered.
3.
Choose a photo by pressing
the
or
Press the key
Key.
Select.
4.
The photo will appear on the screen.
5.
To view other photos, press the
or
Key.
40
V88_emporiaCONNECT_Manual-V1_55367-ENG.indd 40
12.07.13 08:52
6.4 Making Use of Your Photos
You can use a stored photo in the following way:
To do this, choose the desired options under Options
by pressing the
Key:
•• Send – You can send the photo directly as
a multi-media message. (see page 36)
•• Delete – You can delete the photo
•• Add to favourites – You can mark the photo
as your favourite. In the future you will simply
find it under Favourites.
•• Use as wallpaper – Determines the photo
you will see when you turn on your phone.
•• Mark for printing – Mark the photo to be printed
at a later time.
•• Contact's picture - Add a photo to a contact in your
telephone book. When you talk on the phone with this
person, the photo will appear on the screen.
41
V88_emporiaCONNECT_Manual-V1_55367-ENG.indd 41
12.07.13 08:52
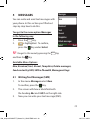
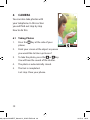
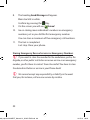
Picture sharing.
Share the special moments with emporiaME.
Receive pictures from children and grandchildren.
Make a call and view the pictures together.
V88_emporiaCONNECT_Manual-V1_55367-ENG.indd 42
Video
12.07.13 08:52
Thomas
wants to start
collaborative
viewing
Accept Reject
V88_emporiaCONNECT_Manual-V1_55367-ENG.indd 43
Headset End
12.07.13 08:53
7
Phone book
Phone book
In the telephone book you can store up
to 500 entries. This means when you have
entered the names and numbers of your
contacts (family, friends, doctor, etc.) in
your telephone, you will always have your
personal telephone book with you.
You get to the menu option Phone book
in the following way:
1.
Press the menu Key.
2.
Select the Phone book
To confirm, press the
with the
and then the
Select
or
Back
Key.
Key.
№ You can access this menu by pressing the
2a b c
Search name
Add contact
Edit contact
Delete contact
Send contact by SMS
Copy contact
Own number
menu
Key
Key.
Available Menu Options:
Search name, Add contact, Edit contact, Delete contact,
Send contact by SMS, Copy contact, Own number,
Quick dial keys, Emergency numbers, Settings, SMS in PhoneBk
44
V88_emporiaCONNECT_Manual-V1_55367-ENG.indd 44
12.07.13 08:53
7.1 Storing Numbers and Names
№ You can easily access the Phone book by pressing the
and then the number combination
1.
Key
In the Phone book menu select Add contact.
To confirm press the
2.
menu
2a b c 2a b c .
Key.
On the screen you will see Enter name:
Enter the name using the key pad.
Save the name by pressing the
3.
Key.
On the screen you will see Enter number:
Enter the number including the area code.
Save this by pressing the
Key.
Add Birthday Reminder:
4.
On the screen you will see:
Do you want to add a birthday reminder for … ?
Select Yes with the
Key or No with the
Key.
•• If you have selected Yes,
enter the birthday using the key pad.
•• Press the
Key for Continue.
•• On the screen you will see, e.g., 01.01.2000: You will
get a reminder 3 days before and on the birthday.
5.
Press the
Key for OK or
press the
Key for Edit if you want to correct anything.
45
V88_emporiaCONNECT_Manual-V1_55367-ENG.indd 45
12.07.13 08:53
Add Contact Photo:
6.
On the screen you will see:
Do you want to add a contact photo for … ?
Key or No with the
Select Yes with the
Key.
•• If you want to add a photo:
By pressing the
or
Key go to Take new photo or
From photo album and confirm this with the
Key.
•• If you want to take a new photo,
then select Take new photo.
7.
Then select the field Save by pressing the
To confirm press the
8.
The screen will show:
9.
The task is completed.
Key.
Key.
… has been saved to your Phone book.
46
V88_emporiaCONNECT_Manual-V1_55367-ENG.indd 46
12.07.13 08:53
7.2 Changing Numbers and Names
1.
Select the menu option Edit contact in the Phone book.
To confirm, press the
2.
Using the
or
Key.
Key go to the entry
that you would like to modify.
To confirm, press the
Key.
3.
Enter the desired changes.
4.
Then select the field Save with the
To confirm, press the
5.
Key.
Key.
The screen will show:
… has been saved to your Phone book.
6.
The task is completed.
47
V88_emporiaCONNECT_Manual-V1_55367-ENG.indd 47
12.07.13 08:53
7.3 Making a Phone Call from the Phone book
You can easily call all the numbers stored in the Phone book.
7.
Press the
Key (Phone book Key) and
you will be right in the Phone book.
8.
Select the desired entry by pressing the
To confirm, press the
9.
or
Key.
Key.
The screen will show: Call …
10. Make the call.
LLYou can find the entries quickly in the Phone book by entering
the first letters of the person`s name. If there is no entry with these
letters, then the screen will show List empty.
48
V88_emporiaCONNECT_Manual-V1_55367-ENG.indd 48
12.07.13 08:53
7.4 Remote Maintenance of Numbers and Names
You can send Phone book entries by text message (SMS)
from another mobile phone (e.g., from relatives, friends)
to your own phone.
1.
The person has to send a text message (SMS) in the
following format to you: #name#number#
(e. g. #Fritz#01509876543#)
2.
You will receive a message. The screen will say:
New PhoneBk entry from …
To confirm, press the
3.
Key
The number and the name are automatically stored
in your Phone book.
4.
The task is completed.
49
V88_emporiaCONNECT_Manual-V1_55367-ENG.indd 49
12.07.13 08:53
Maintain phone book.
Remote maintain the phone book with emporiaME.
Create and update phone book entries.
V88_emporiaCONNECT_Manual-V1_55367-ENG.indd 50
Video
12.07.13 08:53
New contact
from
Thomas
New
contact: Fritz
+437327717253
View Reject
View Reject
V88_emporiaCONNECT_Manual-V1_55367-ENG.indd 51
12.07.13 08:53
7.5 Quick dial keys
You can store five numbers that you frequently need
on your Quick dial keys. In this section you will find out
step by step how to do this.
1.
Press the Key
2a b c
or
3d e f
or
4g h i
or
5j k l
or
6
mno
for
at least three seconds.
2.
On the screen you will see:
Would you like to assign a contact to that number?
Confirm Yes with the
3.
Key.
The screen will show:
or search number
Enter name:
•• Enter a name using the key pad or
•• Press the
Key for Search.
Select the desired Phone book entry with the
or
Key.
Key.
4.
Confirm with the
5.
The screen will show:
Saved.
The task is completed.
LLPhone book entries that already exist can also be stored as
speed dial numbers. Speed dial numbers are marked with a
.
52
V88_emporiaCONNECT_Manual-V1_55367-ENG.indd 52
12.07.13 08:53
Change or Delete a Quick dial key
1.
In the Phone book select the menu option Quick dial keys.
Key.
To confirm, press the
2.
On the screen a list with all the Quick dial keys and
their current assignment will appear.
or
Select the desired entry with the
Select.
To confirm, press the Key
3.
Key.
Select Change or Delete with the
or
Key and
proceed as described above.
Calling Using Quick dial keys
2a b c
or
or
or
5j k l
or
1.
Press the Key
2.
On the screen you will see: Calling …
3d e f
4g h i
6
mno .
The call is being connected.
3.
Make the call.
53
V88_emporiaCONNECT_Manual-V1_55367-ENG.indd 53
12.07.13 08:53
8
Reminder
Reminder
You can use your telephone as an alarm
clock or memory aid for appointments. Your
telephone will send you a message about
the upcoming appointment in time.
Alarm clock
Birthday reminder
Events
Calendar
You get to the menu option Reminder
in the following way:
1.
Press the menu Key.
2.
Select Reminder
the
or
Select
with
Key. To confirm, press the
№ You can access this menu by pressing the
and then the
3d e f
Back
Key.
menu
Key
Key.
Available Menu Options:
Alarm clock, Birthday reminder, Events, Calendar
8.1 Setting the Alarm clock
1.
Select Alarm clock in the menu Reminder.
Confirm with the
2.
Key.
Select Set time with the
To confirm, press the
or
Key.
Key.
3.
On the screen you will see: Set alarm time:
4.
Enter the desired wake-up time by
54
V88_emporiaCONNECT_Manual-V1_55367-ENG.indd 54
12.07.13 08:53
pressing the
5.
or
Key. Then press the
Key.
The screen will say:
Time until your alarm: … hours … minutes
6.
The task is completed.
LLWhen the alarm rings, press the
Key to switch the alarm off.
If you want it to ring again in ten minutes, then press the
№ You can easily access the alarm clock by pressing the
and then the number combination
3d e f 1
1
Key.
menu
Key
menu
Key
.
8.2 Switching the Alarm clock off
1.
Select Alarm clock in the menu Reminder.
Confirm with the
2.
Key.
Select Off with the
Confirm this with the
or
Key.
Key.
3.
The screen will say: Deactivated
4.
The task is completed.
№ You can easily access the alarm clock by pressing the
and then the number combination
3d e f 1
2a b c .
55
V88_emporiaCONNECT_Manual-V1_55367-ENG.indd 55
12.07.13 08:53
8.3 Birthday reminder
You can assign a birthday reminder to every contact in your
Phone book. The Phone book will remind you about the birthday
in time.
1.
Select Birthday reminder in the menu Reminder.
Key.
Confirm by pressing the
2.
New birthday will appear back-lit in white.
Press Select with the
3.
Key.
On the screen you will see:
or search name
Enter Name:
Enter the name using the key pad or
press the
Key to search for it in the Phone book.
Key to Save.
4.
Press
5.
The screen will show the heading: Set birth date
6.
Enter the date and the time by pressing the
To confirm, press the
7.
or
Key.
Key.
The screen will show, e.g.,
Saved.
Reminder: 3 days before and on the birthday.
To confirm, press the
Key.
56
V88_emporiaCONNECT_Manual-V1_55367-ENG.indd 56
12.07.13 08:53
8.
If you want to be reminded at a different time,
press the Key
Edit.
The screen will show the heading: Edit reminder
•• The screen will say: Days before back-lit in white.
Press the Key
Change.
or
•• Change the days with the
.
To confirm, press the Key
•• Select Alarm with the
Press the Key
Key.
or
Key.
Change.
•• Set the desired time with the
To confirm, press the
or
Key.
Key.
•• If you no longer want to be reminded on the birthday,
select Repeat at birthday by pressing the
Press the Key
or
Key.
Change. You will no longer be reminded
on the actual birthday.
9.
The task is completed.
57
V88_emporiaCONNECT_Manual-V1_55367-ENG.indd 57
12.07.13 08:53
8.4 Appointments
You can enter appointments in your telephone and set reminders
and additional reminders for these events.
1.
Select Events in the Menu Reminder.
To confirm, press the
Key.
2.
The screen will say New event back-lit in white.
3.
The screen will say: Enter subject:
4.
Enter the name of an appointment by using the key pad.
Press the
Key Select.
Save it with the
Key.
5.
The screen will say: Set start date
6.
Enter day, month, and year by using the
Continue by using the
Key.
Key.
№ You can easily access this feature by pressing
number combination
or
menu
and then the
3d e f 3d e f .
58
V88_emporiaCONNECT_Manual-V1_55367-ENG.indd 58
12.07.13 08:53
Setting the Length of an event:
7.
The screen will show:
Do you want to add the duration?
Select Yes with
or No with
.
•• If Yes, the screen will say Set end date
•• Press the
or
Key to enter the end date.
Continue by using the
Key.
•• The screen will say Set end time
Enter the time with the
or
Continue by using the
Key.
Key.
Setting a Reminder of an event
8.
The screen will show:
New event. Do you want to add a reminder?
If you would like a reminder, confirm with the
9.
Key.
The screen will say Set reminder date
Enter the date with the
or
Continue by using the
Key.
Key.
10. The screen will say Set reminder time
Enter the time with the
or
Continue by using the
Key.
Key.
59
V88_emporiaCONNECT_Manual-V1_55367-ENG.indd 59
12.07.13 08:53
Setting a repeating event:
11. The screen will say:
New event. Do you want to repeat the event … ?
Key.
If you want to repeat the event, press the
12. The screen will say Options: Choose days, Once a day,
Weekly, Monthly, or Once a year
Select the desired by pressing the
Continue by pressing the
or
Key.
Key.
13. You want an appointment reminder on different days.
Enter the desired days by pressing the
Select Save with the
Continue by pressing the
14. The screen will say:
or
Key.
Key.
Key.
Entry saved
15. The task is completed.
LLEvents can be Edit (modify) and Deleted (Remove event)
at a later time.
60
V88_emporiaCONNECT_Manual-V1_55367-ENG.indd 60
12.07.13 08:53
8.5 Calendar
№
May 2013
You can easily access this feature
Mo 29 6 13 20 27 3
by pressing menu and then the number
combination
1.
Mi 1
3.
menu Reminder.
Fr 3 10 17 24 31 7
Sa
Key.
11 18 25 1 8
The screen will show the
So 5 12 19 26 2 9
current month.
Options
Select a certain day by pressing the
or
Back
Key.
Key Options.
Select New entry with the
To confirm, press the
5.
15 22 29 5
Select Calendar in the
Press the
4.
28 4
Do 2 9 16 23 30 6
Confirm with the
2.
Di 30 7 14
3d e f 4g h i .
By pressing the
or
or
Key.
Key.
Key select between:
•• New event (see page 58)
•• New birthday(see page 56)
and confirm your choice with the
Key.
61
V88_emporiaCONNECT_Manual-V1_55367-ENG.indd 61
12.07.13 08:53
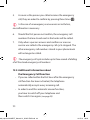
Enter appointments.
Organize your calendar with emporiaME.
Save and send birthdays, meetings and
doctor’s appointments with emporiaME.
V88_emporiaCONNECT_Manual-V1_55367-ENG.indd 62
Video
12.07.13 08:53
Reminder request
Subject:
Doc
New reminder
request from
Thomas
Start time
22.04.13 - 07:00
End time
22.04.13 - 08:00
View Reject
V88_emporiaCONNECT_Manual-V1_55367-ENG.indd 63
Accept Reject
12.07.13 08:53
9
Call info
Call info
Here you find an overview of all the
telephone connections.
You get to the menu option Call info
in the following way:
1.
Press the menu Key.
2.
Select Call info
the
or
with
Key.
To confirm, press the
Key.
№ You can access this menu by pressing the
and then the
4g h i
Missed calls
Dialled numbers
Received calls
Call duration
Delete
Select
menu
Back
Key
Key.
Available Menu Options::
Missed calls, Dialled numbers, Received calls,
Call duration, Delete
9.1 Missed calls
Here you find all the calls that you did not anwer. If you have
missed a call, it is shown on the standby screen with
1.
Select Missed calls in the menu Call info.
Confirm with the
2.
.
Key.
The last 20 missed calls are shown.
Confirm the list and
on the screen disappears.
64
V88_emporiaCONNECT_Manual-V1_55367-ENG.indd 64
12.07.13 08:53
3.
The task is completed.
№ You can easily access this feature by pressing
then the number combination
4g h i 1
menu
and
.
9.2 Dialled numbers
Here you find the last numbers you dialled.
9.3 Received calls
Here you find the last numbers you answered.
9.4 Call duration
For a better overview of your telephone conversations you find
here a list of the calls you last made and their length.
9.5 Delete
Deletes All Call Lists (all, missed, dialled and answered).
65
V88_emporiaCONNECT_Manual-V1_55367-ENG.indd 65
12.07.13 08:53
10 Tools
Tools
Here you find a number of useful helpers
emporiaME
Games
Weather
Orientation
Calculator
Magnifier
Emergency button
and some diversions.
You get to the menu option Tools
in the following way:
1.
2.
Press the menu Key.
Select Tools
the
or
with
Key.
To confirm, press the
Key.
№ You can access this menu by pressing the
and then the
5j k l
Select
menu
Back
Key
Key.
Available Menu Options:
emporiaME, Games, Weather, Orientation, Calculator,
Magnifier, Emergency button, Position, Bluetooth
66
V88_emporiaCONNECT_Manual-V1_55367-ENG.indd 66
12.07.13 08:53
10.1 emporiaME
LLemporiaMe is a bridge between generations. It makes
interaction between Smartphone-Apps and emporia mobile phones
possible, e.g., mutually shared photo albums, shared calendars or the
remote maintenance options. This way, the digital possibilities are
reduced to the most important thing: simple communication with
your loved ones.
Here you find out how to access emporiaMe:
1.
Select emporiaMe in the menu Tools.
2.
New account is back-lit in white.
To confirm, press the
To confirm, press the
3.
Key.
Key.
On the screen you will see:
Do you want to activate emporiaME service now?
Confirm Yes with the
Key.
4.
Please accept the licensing contracts by pressing the
5.
On the screen you will see:
Key.
Enter telephone number
Enter your telephone number.
To confirm, press the
Key.
6.
Your account is set up now.
7.
Select Friends by pressing the
To confirm, press the
or
Key.
Key.
67
V88_emporiaCONNECT_Manual-V1_55367-ENG.indd 67
12.07.13 08:53
8.
Select New friend by pressing the
To confirm, press the
or
Key.
Key.
The phone book is displayed.
9.
Select a contact with the
To confirm, press the
or
Key.
Key.
Your phone will send a »Friend Me« request to your friend`s
smartphone. They have to confirm the contact. As soon as
they have done this, you will receive a confirmation on your
emporia mobile phone.
You can now decide what degree of access this friend
should have. Confirm if they can remotely maintain your
Phone book and calendar.
LLemporiaMe only works with friends who use a smartphone
and have already installed the emporiaME App.
LLThe license agreement can be found at:
www.emporia.eu/termsandconditions/emporiaME
68
V88_emporiaCONNECT_Manual-V1_55367-ENG.indd 68
12.07.13 08:53
10.2 Games
This telephone offers you 3 games to train your memory.
They train your powers of concentration, your ability
to react, and your visual orientation.
1.
Select Games in the menu Tools.
To confirm, press the
2.
Select a game with the
To confirm, press the
3.
Key.
or
Key.
Key.
The game opens up.
•• Press the
Key Help.
The screen will show a short description of the game.
•• Press the
Key Back.
You can continue/begin the game.
•• If you want to stop playing before the end of the game,
press the
Key Back or close your telephone.
№ You can easily access this feature by pressing
number combination
menu
and then the
5j k l 2a b c .
Quadis
In this game you have to find the right end of the way that is
shown as fast as possible. Quadis trains your visual orientation
and ability to concentrate.
69
V88_emporiaCONNECT_Manual-V1_55367-ENG.indd 69
12.07.13 08:53
PickQuick
PickQuick requires an ability to react quickly. You have to react
correctly to different stimuli. You only have a short time to think.
This game trains your resilience.
Jappo
Jappo trains your powers of concentration and attentiveness.
You have to quickly check if a certain symbol is present in a group
of symbols.
10 .3 weather
London
Your telephone can show the current
weather at your location and the forecast
for the coming days.
№ You can easily access this feature
by pressing menu and then the number
combination
1.
5j k l 3d e f .
Select Weather in the menu Tools.
To confirm, press the
2.
Key.
22.05.
19°C Tue
max 24°/min 12°
20°C
18°C
17°C
23°C
Wed
Thu
Fri
Sat
Options
Back
The current weather as well as a four-day forecast will
appear on your screen.
3.
Press the
Key Options.
You can Update current location, Change location,
70
V88_emporiaCONNECT_Manual-V1_55367-ENG.indd 70
12.07.13 08:53
Add location, Remove location or Setting.
Show weather forecast on start-up screen
4.
Choose Settings with the
To confirm, press the
5.
or
Key.
Key.
Select Show at start by pressing the
To confirm, press the
or
Key.
Key.
You will see the current weather and
a weather forecast right on your start-up screen.
6.
Press the
Key Back or
close your telephone to end the forecast.
71
V88_emporiaCONNECT_Manual-V1_55367-ENG.indd 71
12.07.13 08:53
10.4 Orientation
GSM
The telephone shows you the fastest way
home or to interesting places.
1.
Select Orientation in the menu Tools.
To confirm, press the
2.
Next cash machine
Distance 75 m
Select with the
or
Key.
Key among
the following:
•• My position – Here you see the
40 m
Select
address of your current location. Below
the address you will see the exact coordinates of where you
are.
•• Bring me home – Here your mobile phone calculates
the fastest way from your current position to your Home
location. Your phone guides you there using arrows.
•• Points of interest – Here you can have the fastest way to
pre-determined places like cafes, chemists´, the police, or
hospitals calculated. Select a location using the
Key and confirm it with the
or
Key. Your mobile phone
calculates the fastest route there from your current position
and guides you there using arrows.
•• Home setup – Here you can set the location for Home.
When you are at home and want to set the location with the
72
V88_emporiaCONNECT_Manual-V1_55367-ENG.indd 72
12.07.13 08:53
help of the GPS, select Actual position.
Or select Enter address to enter your address manually.
•• Settings – Here you can choose between kilometres and
miles and set the maximum distance within which you want
to find interesting locations.
10.5 Calculator
This menu option helps you to do simple calculations.
№ You can easily access this feature by pressing
number combination
menu
and then the
5j k l 5j k l .
73
V88_emporiaCONNECT_Manual-V1_55367-ENG.indd 73
12.07.13 08:53
10.6 Magnifier
You can use the camera in the telephone as a magnifying glass.
1.
Select Magnifier in the menu Tools.
To confirm, press the
2.
Key.
Now the magnifying glass is working.
Hold the camera about 5 cm above the object
that you want to see magnified.
3.
Press the
Key for Back or close the telephone
to end magnifying.
№ You can easily access this feature by pressing
number combination
menu
and then the
5j k l 6
mno .
10.7 Emergency button
•• Emergency button OFF: No emergency number will be
dialled in case the key is pressed.
•• Emergency button ON and no emergency number is
stored: When the key is pressed, the emergency number
112 will automatically be dialled. Using the Settings in your
Phone book, you can store up to 5 emergency numbers.
(see page 87)
74
V88_emporiaCONNECT_Manual-V1_55367-ENG.indd 74
12.07.13 08:53
10.8 Position
Here you can determine your current location. This is necessary
for the navigation feature, the weather, and in an emergency.
1.
Select Position in the menu Tools.
To confirm, press the
or
Key.
Key Position On/Off.
2.
Select with the
3.
Select with the
4.
On the screen you will see
To confirm, press the
or
Key.
Key On or Off.
Done.
LLYou can get further information about determining your
location on our website: www.emporia.eu
75
V88_emporiaCONNECT_Manual-V1_55367-ENG.indd 75
12.07.13 08:53
10.9 Bluetooth
Bluetooth is a wireless connection between electronic devices.
You can connect your telephone with, e.g. the hands-free system
on your car or a Bluetooth headset.
1.
Select Bluetooth in the menu Tools.
To confirm, press the
2.
Key.
Select Bluetooth On/Off using the
Press the
or
Key.
Key for Select.
3.
Select On or Off with the
4.
On the screen you will see:
To confirm, press the
or
Key.
Key.
Bluetooth is now switched on
Connecting Bluetooth:
1.
Select Bluetooth in the menu Tools.
To confirm, press the
2.
Select Connect with the
Press the
3.
Key.
or
Key.
Key for Select.
Select Search for new devices with the
Key.
Your phone looks for devices to connect with
in the surroundings.
76
V88_emporiaCONNECT_Manual-V1_55367-ENG.indd 76
12.07.13 08:53
Managing Devices
1.
Select Bluetooth in the menu Tools.
To confirm, press the
2.
Select Manage devices with the
Press the
3.
Key.
or
Key.
Key for Select.
Choose among Visibility, Device name,
and Use default PIN.
Press the
Key for Select.
•• Visibility (Pre-setting: On)
You can hide your phone from other Bluetooth devices.
•• Device name (Pre-setting: EMPORIA)
Here you determine the name with which other
Bluetooth devices can find your telephone.
•• Use default PIN (Pre-setting: On)
When a new Bluetooth device is connected,
the PINs 0000 and 1234 automatically used.
In case the PINs are incorrect, you have to enter
them manually.
77
V88_emporiaCONNECT_Manual-V1_55367-ENG.indd 77
12.07.13 08:53
11 Settings
Settings
Here you can set up your telephone
Silent/Sleep mode
Off
according to your personal preferences.
You get to the menu option Settings
in the following way:
1.
2.
Press the menu Key.
Select Settings
the
or
with
Key.
To confirm, press the
Key.
№ You can access this menu by pressing the
and then the
6
mno
Sound & alert
Display & light
Language
Time & date
Favourite key
Select
menu
Back
Key
Key.
Available Menu Options:
Silent/Sleep mode, Sound & alert, Display & light, Language,
Time & date, Favourite key, Camera settings, Call waiting,
Call forward, Auto Pickup, Withhold number, Help Text,
Network, Internet settings, Mailbox number, Security,
Emergency numbers, Emergency button, Master reset
78
V88_emporiaCONNECT_Manual-V1_55367-ENG.indd 78
12.07.13 08:53
11.1 Silent/Sleep mode
Activate this feature when you do not want to switch off your
phone, but it should not ring, e.g., at the doctor`s surgery or in
church. The calls will be shown on the screen but the phone will
not ring.
№ You can easily access this feature by pressing
then the number combination
6
1
mno
menu
Key and
.
11.2 Sound & alert
Here you can choose a ring tone melody and determine its
volume, vibration signal, key tones, etc.
№ You can easily access this feature by pressing
then the number combination
menu
Key and
2a b c .
6
mno
79
V88_emporiaCONNECT_Manual-V1_55367-ENG.indd 79
12.07.13 08:53
11.3 Display & light
Here you can set how long the screen and the keypad are lit
before the telephone goes into the energy saving mode.
Keypad light
LLIf the keypad is lit longer, it requires more energy,
reducing the operation time of your phone.
Text size
Here you can adjust the size of the texts on the screen
to your needs.
SMS Text size
Here you can determine the size of the letters for text messages.
80
V88_emporiaCONNECT_Manual-V1_55367-ENG.indd 80
12.07.13 08:53
11.4 Language
Here you can choose among different languages. Should you set
the wrong language by mistake, you can reset it to English here.
№ You can easily access this feature by pressing
then the number combination
menu
Key and
6
4g h i .
mno
11.5 Time & date
Here you can set the time and date. This is where you have to,
e.g., change the clock to daylight savings time.
11.6 Favourite key
Using the
Key you can store either your favourite telephone
contact or the feature that you use the most. Here you can choose
or change a feature for this.
81
V88_emporiaCONNECT_Manual-V1_55367-ENG.indd 81
12.07.13 08:53
11.7 Camera settings
Here you can set the camera just the way you want it,
e.g., resolution or special effects. (see page 39)
11.8 Call waiting
Here you can set a signal that will notify you of
an incoming call while you are already making a call.
11.9 Call forward
Here you can divert a call to your answering machine
or to a certain person in your Phone book.
11.10Auto Pickup
Here you can set the automatic call answering feature.
An incoming call will be answered immediately
when you open up your phone.
82
V88_emporiaCONNECT_Manual-V1_55367-ENG.indd 82
12.07.13 08:53
11.11Withhold number
This feature allows you to decide if your own telephone
number will be shown on the display of the phone
of the person you are calling.
11.12Help Text
For the individual menu option there is helpful information
that explains the exact way each option works. Here you can
switch these texts on and off and set the time after which
the text will appear.
LLWhen some information appears on the screen,
you can use the
or the
Key in the text to scroll down
Key to close the text.
83
V88_emporiaCONNECT_Manual-V1_55367-ENG.indd 83
12.07.13 08:53
11.13Mailbox number (Answering Machine)
Here you can store the number of the answering machine. You
will get this number from your provider.
1.
Select Mailbox number in the menu Settings.
To confirm, press the
2.
Key.
On the screen you will see:
Mailbox no.
Enter the number of your Mobilbox.
You will find the number in the paperwork that your
provider gave you.
To confirm, press the
3.
Key.
On the screen you will see:
Number saved. Listen to mailbox: Press button "1" 2 sec.
4.
The task is completed.
№ If you press
1
key in standby mode for at least three seconds,
you will automatically be connected to your answering machine.
84
V88_emporiaCONNECT_Manual-V1_55367-ENG.indd 84
12.07.13 08:53
11.14Security
Here you can change your PIN-Code or switch it off. If you switch
off your PIN-Code, then your device will no longer be protected
from someone else`s using it.
5.
Select Security in the menu Settings.
Confirm this by pressing the
6.
Key.
PIN is back-lit in white. Confirm this by pressing the
Key.
Select among PIN on, PIN off, or Change PIN.
or
Key.
To confirm, press the
Key.
by pressing the
7.
Enter your current PIN-Code. (see page 18)
To confirm, press the
Key.
8.
On the screen you will see: PIN OK! PIN Request …
9.
The task is completed.
11.15Master reset
This feature returns your phone to its factory settings.
To do this, you need the telephone code, which is 1234.
85
V88_emporiaCONNECT_Manual-V1_55367-ENG.indd 85
12.07.13 08:53
12 Emergency Call Feature
Your telephone has an emergency call function that calls help
quickly if you need it. In this section you will find out step by step
how it works. For your own safety please read through the whole
chapter carefully.
12.1 Switching On the Emergency button
1.
Press the menu Key.
2.
Select Settings
3.
Select Emergency button by pressing the
by pressing the
4.
or
Key.
Key.
Go to On by pressing the
Confirm this by pressing the
5.
Key.
Key.
Confirm this by pressing the
To confirm, press the
or
or
Key.
Key.
On the screen you will see:
Emergency button Activated
The task is completed.
Last step: Close your phone.
86
V88_emporiaCONNECT_Manual-V1_55367-ENG.indd 86
12.07.13 08:53
12.2Storing Emergency numbers
It`s possible to store five numbers as emergency numbers.
You can store individuals` numbers and those of emergency
rescue services.
If possible, individuals` numbers should be stored first and
then those of the rescue services.
LLIt is only possible to use numbers as emergency numbers that
are already stored in your phone book. (see page 45)
Storing Individuals` Numbers as Emergency Numbers
1.
Press the menu Key.
2.
Select Settings
3.
Select Emergency numbers by pressing the
by pressing the
Confirm this by pressing the
7.
or
Key.
Key.
EmNo. 1 is back-lit in white.
Confirm this by pressing the
6.
Key.
Add Emerg. No. is back-lit in white.
To confirm, press the
5.
Key.
Key.
Confirm by pressing the
4.
or
Key.
Select your desired contact from your
phone book by pressing the
or
Confirm this by pressing the
Key.
Key.
Privat is back-lit in white.
Confirm this by pressing the
Key.
87
V88_emporiaCONNECT_Manual-V1_55367-ENG.indd 87
12.07.13 08:53
8.
The heading Send Message will appear.
Yes is back-lit in white.
Confirm by pressing the
9.
Key.
On the screen you will see:
Saved
10. Go on storing more individuals` numbers as emergency
numbers just as you did the first emergency number.
You can store a maximum of five emergency call numbers.
11. The task is completed.
Last step: Close your phone.
Storing Emergency Rescue Services as Emergency Numbers
LLIf you want to store the number for the ambulance, police, fire
brigade, or other public institution or rescue service as an emergency
number, you first have to contact them. Be careful! You have to store
the desired institution or service in your Phone book!
LLWe cannot accept any responsibility or liability in the event
that you, for instance, call a rescue service by mistake.
88
V88_emporiaCONNECT_Manual-V1_55367-ENG.indd 88
12.07.13 08:53
12.3Starting the Emergency Call Function
1.
Press the Emergency Call Button
on the back of your
telephone for at least three seconds.
2.
The emergency call cycle is started. A shrill, piercing
warning tone sounds immediately to alert the people
around you.
LLIf you have pressed the emergency call button by mistake,
immediately press the
Key for three seconds to cancel it.
LLIf no emergency number is stored or there`s no credit left on
your phone card, the European emergency call number 112 will be
dialled. This means that your call will be forwarded directly to the
next police station.
3.
The telephone automatically calls the emergency number
that is stored first and also sends it a text message (SMS).
The text message (SMS) notifies the person about the
emergency call.
LLFor an emergency call, your number will always be displayed,
even if you selected Withhold number under Settings.
4.
For the emergency call the telephone automatically
switches on the handsfree speech function at the highest
volume.
89
V88_emporiaCONNECT_Manual-V1_55367-ENG.indd 89
12.07.13 08:53
5.
As soon as the person you called receives the emergency
call, they are asked to confirm by pressing three times
.
LLIn the case of an emergency rescue service or institution,
no confirmation is necessary.
6.
Should the first person not confirm, the emergency call
numbers that are stored next in that order will be called.
7.
Only when a person answers and confirms or a rescue
service was called is the emergency call cycle stopped. The
other emergency call numbers stored in your phone book
will no longer be called.
LLThe emergency call cycle includes up to three rounds of dialling
of all the stored emergency call numbers.
12.4 Additional Information about
the Emergency Call Function
•• If you are called within the first hour after the emergency
call function has been activated, the telephone
automatically accepts every incoming call.
•• In order to end this automatic answer function,
you have to switch off your telephone and
then switch it on again. (see page 25).
90
V88_emporiaCONNECT_Manual-V1_55367-ENG.indd 90
12.07.13 08:53
13 Safety Hints
Small phone parts can cause choking if swallowed.
This device can produce loud tones.
Do not dispose of by burning.
Avoid contact with magnetic fields.
Avoid exposing the device to extreme temperatures.
Avoid contact with liquids, keep the device dry.
Do not dismantle the device.
In an emergency do not only rely on this device.
Use approved accessories only.
Handling the Battery & Safety
Always switch off the device and disconnect the battery charger before you remove
the battery. Only use the battery and the charger for your device that are supplied by
the manufacturer or spare parts approved by the manufacturer. Using other batteries
and chargers can be dangerous. Don`t take the battery apart and don`t cause a short
circuit. If the battery poles touch a metal object by mistake, e.g., a key, a paper clip or a
pen, a short circuit can result. The improper use of the battery can damage the device
and be hazardous to your health due to fire, explosion, or chemical burns. If you think
that the battery is damaged, stop using it and have it checked at your service center.
91
V88_emporiaCONNECT_Manual-V1_55367-ENG.indd 91
12.07.13 08:53
Handling the Product
You are solely responsible for the use of the device and for any consequences of
its use. The device must be switched off wherever the use of a mobile telephone is
prohibited. The use of the device is subject to safety measures that were developed
for the protection of the user and their surroundings.
•• Always use the device carefully and keep it in a clean and dust-free place.
•• Don`t expose the device to an open flame or burning tobacco products.
•• Don`t expose the device to liquids or dampness.
•• Don`t drop the device, throw it, or try to bend it.
•• Don`t use aggressive chemicals, detergents, or aerosols to clean the device.
•• Don`t paint the device.
•• Don`t dismantle the device. Only let authorized personnel take it apart.
•• Don`t expose your device to extreme temperatures below 0° and above 40°
Centigrade.
•• Follow your local regulations concerning the disposal of electronic devices.
•• Don`t carry the device in the back pocket of your trousers, because it can
break when you sit down.
Electricity Supply
Only put the battery into the device and start using the device when the instruction
manual says to do so. The power plug is only suitable for use in conventional electrical outlets of the public mains supplying 230 voltage / 50 Hz (10/16A).
92
V88_emporiaCONNECT_Manual-V1_55367-ENG.indd 92
12.07.13 08:53
14 Disposal
•• Disposing of the packaging
The box and other packaging materials are recyclable and should,
in principle, be brought to a recycling centre.
•• Disposing of the battery
Batteries do not belong in with household rubbish!
As a consumer you have a legal obligation to return used
batteries. You can give them back at your local collection
centre or retail store.
•• Disposing of the device
When the day comes that your device is worn out,
please don`t throw it in with your household rubbish.
For the sake of the environment, take it to a materials
recycling centre, where old devices can be left and sent
off to be used in an environmentally compatible way.
93
V88_emporiaCONNECT_Manual-V1_55367-ENG.indd 93
12.07.13 08:53
15 Warranty
The 24-month warranty (6 months for the battery) begins with the sale
of the device to the user. Be sure to keep the original sales receipt
(cash register slip, invoice) with the IMEI-number to prove the date of sale.
Our warranty is determined by the conditions of warranty that were valid at
the time of purchase. To the greatest possible extent that is legally valid,
emporia is in no way to be held responsible for the following situations:
•• Any loss of data or income.
•• Any special or incidental damage as well as indirect or
consequential damage, regardless of the cause.
16 Technical Product Data
·· Loudspeakers are suitable for the
hearing impaired
·· Standby time: up to 170 hours
·· Talk time: up to 6 hours
·· Dual band GSM 900 / 1800 MHz
·· Internal antenna: SAR 1.6 W/kg
·· Measurements: 108 x 53 x 20 mm
·· Power supply: RL-V170EU (In: 100 - 240 V,
·· Weight: 110 gr
AC 50/60 Hz | Out: 5,0 V - 550 mA DC)
·· Screen size: 2.8” FSTN
·· 2 MP Digital camera
·· Screen resolution: 240 x 400 pixels
·· Bluetooth 2.1 HFP, HSP
·· Operating temperature: 0 - 40° C
·· Torch: protection class 3
·· Battery: AK-V88 – Li-Ion 3.7 V / 1150 mAh
94
V88_emporiaCONNECT_Manual-V1_55367-ENG.indd 94
12.07.13 08:53
17 EU Declaration of Conformity (DOC)
We, Emporia Telecom Produktions- und Vertriebs-GmbH & Co. KG,
hereby declare that the design of the device referred to below complies
with the pertinent EU-Directives.
Name of Product: GSM 3G/2G Dual Band Mobile Phone
Product Number: V88
Pertinent EU-Directives: Radio Equipment 1999/5/EG R & TTE Directive 1999/5/EC
Harmonised EN Standards, specific and basic standards:
•• Safety and Health: EN 60950-1:2006+A12:2011; EN 50360:2001;
EN 62209-1-2006; EN 62209-2-2010; EN 62479:2010
•• EMC: EN 301 489-1 V1.9.2; EN 301 489-3 V1.4.1; EN 301 489-7 V1.3.1;
EN 301 489-17 V2.1.1; EN 301 489-24 V1.5.1
•• Radio spectrum: EN 300 440-1 V1.6.1; EN 300 440-2 V1.4.1;
EN 300 328 V1.7.1; EN 301 511 V9.0.2; EN 301 908-1 V5.2.1; EN 301 908-2 V5.2.1
2200
Eveline Pupeter 10.04.2013, Linz/Austria
CEO
95
V88_emporiaCONNECT_Manual-V1_55367-ENG.indd 95
12.07.13 08:53
Industriezeile 36
4020 Linz, Austria
fon
fax
+43.732.77 77 17-0
+43.732.77 77 17-8
www.emporia.eu
V88_emporiaCONNECT_Manual-V1_55367-ENG.indd 96
2200
Subject to print errors, mistakes and technical changes. | PartNo.: 55367-ENG; ENGLISG; V88-IM-V1_G2-201307
Emporia Telecom Produktionsund Vertriebs-GmbH & CoKG
12.07.13 08:53