1
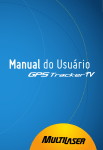
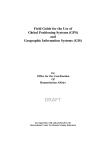
Always there to help you
Register your product and get support at
www.philips.com/welcome
Question?
Contact
Philips
User manual
PNS400/410BT
PNS500/510BT
Contents
1 Important
Safety
Notice
2
2
3
2 Yor navigation system
5
5
5
6
3 Get started
7
7
8
8
8
8
4 Navigation
9
9
9
11
13
15
16
16
5 Use Bluetooth devices
Connect a device
Make a call
SMS
17
17
17
18
6 Adjust settings
19
7 Product information
20
8 Troubleshooting
21
21
Introduction
What's in the box
Overview of the main unit
Connect power
Switch the navigator on or off
Use the bracket
Use the touch pen
For the first time use
Access navigation mode
Choose a destination
Start navigation
Settings
Plan a route
Map Mode
Additional information
About the Bluetooth device
EN
1
1 Important
Safety
•
•
•
•
•
•
•
•
•
•
•
•
Read and understand all instructions
before you use your apparatus. If damage is
caused by failure to follow instructions, the
warranty does not apply.
To ensure safe driving, adjust the volume to
a safe and comfortable level.
Use only the supplied mounting hardware
for a safe and secure installation.
To avoid short circuit, do not expose the
apparatus to rain or water.
Never insert objects into the ventilation
slots or other openings on the apparatus.
Clean the apparatus and frame with a soft,
damp cloth. Never use substances such as
alcohol, chemicals or household cleaners
on the apparatus.
Never use solvents such as benzene,
thinner, cleaners available commercially, or
anti-static sprays intended for discs.
Risk of damage to the apparatus screen!
Never touch, push, rub or strike the screen
with any object.
Batteries (battery pack or batteries
installed) shall not be exposed to excessive
heat such as sunshine, fire or the like.
Danger of explosion if battery is incorrectly
replaced. Replace only with the same or
equivalent type.
The apparatus shall not be exposed to
dripping or splashing.
Do not place any sources of danger on the
apparatus (e.g. liquid filled objects, lighted
candles).
Hearing safety
A pleine puissance, l’écoute prolongée du
baladeur peut endommager l’oreille de
l’utilisateur.
2
EN
Warning
•• To prevent possible hearing damage, do not listen at
hight volume levels for long periods.
The maximum output voltage of headphone is
not greater than 150 mV.
Listen at a moderate volume.
• Using headphones at a high volume can
impair your hearing. This product can
produce sounds in decibel ranges that may
cause hearing loss for a normal person,
even for exposure less than a minute. The
higher decibel ranges are offered for those
that may have already experienced some
hearing loss.
• Sound can be deceiving. Over time your
hearing 'comfort level' adapts to higher
volumes of sound. So after prolonged
listening, what sounds 'normal' can actually
be loud and harmful to your hearing. To
guard against this, set your volume to a safe
level before your hearing adapts and leave
it there.
To establish a safe volume level:
• Set your volume control at a low setting.
• Slowly increase the sound until you can
hear it comfortably and clearly, without
distortion.
Listen for reasonable periods of time:
• Prolonged exposure to sound, even
at normally 'safe' levels, can also cause
hearing loss.
• Be sure to use your equipment reasonably
and take appropriate breaks.
Be sure to observe the following guidelines
when using your headphones.
• Listen at reasonable volumes for
reasonable periods of time.
•
•
•
Be careful not to adjust the volume as your
hearing adapts.
Do not turn up the volume so high that
you can't hear what's around you.
You should use caution or temporarily
discontinue use in potentially hazardous
situations. Do not use headphones while
operating a motorized vehicle, cycling,
skateboarding, etc.; it may create a traffic
hazard and is illegal in many areas.
•
•
individual hardware characteristics. This
system is not capable of determining
variances in positioning results due to
hardware differences.
This navigation system is provided only
for non-commercial use. Philips will accept
no liability for any loss or damage caused
by the use of this system to the extent
permissible by law.
Use of this system constitutes your
consent to the above disclaimer.
Notice
Any changes or modifications made to this
device that are not expressly approved by
Philips Consumer Lifestyle may void the user’s
authority to operate the equipment.
Disclaimer
•
•
•
•
•
The map data provided by this system is
for reference only. Your current location
must be determined based on actual
conditions.
The route plan, voice indication and
junction information offered by this system
are recommendations based on routing
algorithms and electronic map database.
They are provided for reference only
and the user must take the local road
conditions into account.
The user is required to follow local laws
and drive safely. Do not operate this
system when the vehicle is in motion.
The GPS positioning results are provided
for the users reference only. They should
not affect the actual driving because this
system does not guarantee absolute
accuracy.
The accuracy of GPS positioning may
be affected by weather and location (tall
buildings/tunnels/underpasses/trees). Most
GPS do not work indoors because the
signal cannot pass through buildings or
metallic solar film on car windows. The
quality of reception varies according to
This product complies with the radio
interference requirements of the European
Community.
A copy of the EC declaration of Conformity
is available in the Portable Document Format
(PDF) version of the user manual at www.
philips.com/support.
Environmental information
All unnecessary packaging has been omitted.
We have tried to make the packaging easy to
separate into three materials: cardboard (box),
polystyrene foam (buffer) and polyethylene
(bags, protective foam sheet.)
Your system consists of materials which can
be recycled and reused if disassembled by
a specialized company. Please observe the
local regulations regarding the disposal of
packaging materials, exhausted batteries and old
equipment.
Your product is designed and manufactured
with high quality materials and components,
which can be recycled and reused.
EN
3
When this crossed-out wheeled bin symbol is
attached to a product it means that the product
is covered by the European Directive 2002/96/
EC.
Please inform yourself about the local separate
collection system for electrical and electronic
products.
Please act according to your local rules and
do not dispose of your old products with your
normal household waste. Correct disposal of
your old product helps to prevent potential
negative consequences for the environment and
human health.
Your product contains batteries covered by
the European Directive 2006/66/EC, which
cannot be disposed with normal household
waste.Please inform yourself about the local
rules on separate collection of batteries
because correct disposal helps to prevent
negative consequences for the environmental
and human health.
Always bring your product to a professional to
remove the built-in battery.
The Bluetooth® word mark and logos are
registered trademarks owned by Bluetooth
SIG, Inc. and any use of such marks by Philips is
under license.
4
EN
2013 © Koninklijke Philips Electronics N.V. All
rights reserved.
Specifications are subject to change without
notice. Trademarks are the property of
Koninklijke Philips Electronics N.V. or their
respective owners. Philips reserves the right
to change products at any time without being
obliged to adjust earlier supplies accordingly.
2 Yor navigation
system
What's in the box
Check and identify the contents of your
package:
a The navigator
b Vehicle power adaptor
Introduction
With the navigation system, you can:
• Get a clear guidance while you are driving
• Make a call or answer a call through
Bluetooth
c Touch pen
d Bracket & holder
e USB cable
f Printing material
EN
5
Overview of the main unit
a
i
b
c
h
g
d
f
e
a
•
Press and hold to turn on the navigator.
b Indicator light
• Light up when the navigator is charging.
c Touch screen
d Speaker
e RESET
• Restore default settings.
f
•
MINI USB socket for power charging
and data transfer.
g Micro SD/SDHC card slot
h
•
Headphone socket.
i Touch pen
6
EN
3 Get started
Caution
•• Use the controls only as stated in this user manual.
Always follow the instructions in this chapter in
sequence.
If you contact Philips, you will be asked for the
model and serial number of your apparatus. The
model number and serial number are on the
bottom of your apparatus. Write the numbers
here:
Model No. __________________________
Serial No. ___________________________
Connect power
The navigator has a built-in battery that can be
charged through the USB socket of a computer,
or the vehicle power adapter.
Charge through USB socket
Charge through car adapter
Use the supplied car adapter to connect to:
• The MINI USB socket of the navigator
• The cigarette lighter socket of a car
Note
•• Rechargeable batteries have a limited number of charge
cycles. Battery life and number of charge cycles vary by
use and settings.
Turn off the navigator and connect the supplied
USB cable to:
• The MINI USB socket of the navigator.
• The USB socket of the computer.
EN
7
Switch the navigator on or off
Press and hold
on or off.
until the navigator is switched
Switch the navigator to sleep mode
To switch navigator to sleep mode, press and
hold . A dialog box prompts, select [SLEEP]
within 5 seconds.
• Press to switch on the navigator again.
Use the bracket
You can use the bracket and the holder to fix
the navigator in a car.
Use the touch pen
Caution
•• The touch pen with a broken nib, ballpoint pen, as
well as any sharp and rough objects may scratch and
damage the touch screen.
•• Please use a touch pen with a nib in good condition.
Do not use the touch pen if the nib is broken.
You can use the touch pen to operation on the
navigator.
For the first time use
When you switch on the navigator for the
first time, the system prompts you to select
language, keyboard, and measurement system.
1
Press and hold
navigator.
2
Tap / to select languages and
keyboard type that displayed in the search
screen, then tap to confirm.
3
4
Tap [I AGREE] to accept the legal notice.
to switch on the
Select a measurement system.
After complete the setting, your navigator is
ready to use.
8
EN
4 Navigation
Choose a destination
You can set your destinations by one of
following ways:
Access navigation mode
1
Press and hold
navigator.
2
Tap [Navigation] to access navigation
mode.
»» The navigation main menu is displayed
in a few seconds.
•
to switch on the
To quit the navigation mode, tap ,
then choose [Yes] to confirm.
Home
With this menu, you can set your home address.
1
2
Tap [Home].
3
Tap [Navigate to] to start navigation.
To remove your home address
1
2
Tap [Home].
•
Note
Select your city/street/street number in
the list.
Tap [Remove] and then [Yes] to confirm
the deletion.
•• Before you enter navigation mode, we suggest that you
stand in an open space so you can get good reception.
The first GPS initialization can take a few minutes,
depending on the surrounding area and the quality of
GPS signal reception.
•
•
•
•
•
•
: Go back to the navigation home screen
without saving the changes.
: Save your choices and go back to the
previous screen.
: Close the current screen without saving
the changes.
/ : Go to the next or previous page of
the screen that contains the list.
/ : Display or hide the keyboard on
the screen.
: Give the number of results found.
Note
•• For the first time use or the home address has been
deleted, you will be required to enter an address when
you tap [Home].
Favorite
You can store your favorite addresses and set
one of them as your destination.
1
2
Tap [Favorite].
3
Use the keyboard to name the favorite
address and tap to save.
Tap [Add new favorite destination...],
select the address as instructed.
EN
9
4
Tap [Navigate to] to start navigation.
2
Type zip code on the keyboard, then select
the zip code from the list.
Set an address as destination
1
2
Tap [Address].
3
Choose the city. Type the first letters of the
city name on the keyboard, the names of
the city are displayed with a list. Tap the city
name in the list.
•
Search by Point of Interest(POI)
1
2
On the street search screen, tap [POI].
Choose the street. Type the first letters
of the street name on the keyboard, the
names of the streets are displayed with a
list. Tap the street name in the list.
3
Tap the POI name you want to reach in
the list.
Search by crossing
4
5
Choose a country from the list.
• To choose another country, tap .
• For the next time you use the system,
the address will be searched in the
country you previously selected.
Choose the street number.
• Anywhere on the street
• Street number: Enter a street number
you want tor reach, and tap ok on the
keyboard.
•
1
On the street number selection screen, tap
[Crossing].
2
Tap the name of the adjacent street in the
list.
• You can also tap the first letters of the
adjacent street name on the keyboard
and tap its name in the list.
Tip
•• To go back to the previous screen, tap .
•• To hide the keyboard and display the list, tap
.
Address search option
The system provides other ways during search
for the destination address.
• Search by Zip code
1
On the city search screen, tap [Zip].
10
EN
Select the POI category in the list.
Use last destination
The system can memorize up to 20 last
destinations that were searched previously,
users can quickly access and set as the
destination.
1
2
Tap [Last destinations].
Tap one of the address in the list.
3
Tap [Navigate to] to to start the navigation
guidance.
Find nearby
You can search for a POI that is near to the
place where you are.
1
2
Tap [Find nearby].
In the displayed list, choose a POI category
in which you are interested.
2
3
Tap the POI you want to reach or select
it from the list by typing the first letter of
its name.
Enter latitude and longitude using the
keyboard.
3
Tap
4
Tap [Navigate to] to start navigation.
Start navigation
to confirm.
My POIs
Tap [My POIs], you can view your personal
POIs. Select your desired POI and start
navigation. There are two ways to add a POI:
To add a POI in navigation mode
1
2
3
Tap .
Use the keyboard to name the POI
Tap
to confirm.
When you have selected your destination, you
can tap:
To add a POI in map mode
[Navigate to]: start navigation guidance
1
Move the map with your finger and place
your desired POI under the cross at the
center of the screen.
[Find nearby]:find a POI in the vicinity of the
selected address.
2
3
4
Tap .
Use the keyboard to name the POI.
Tap
[Save as]: save the destination.
[Show]: view the address on the map.
to confirm.
GPS Coordinates
This option allows you to set your destination
with latitude and longitude coordinates.
1
Tap [GPS Coordinates].
EN
11
During navigation
After you select the destination, tap [Navigate to] the start guidance and the navigation screen appears.
M
L
K
A
C
H
D
A50
F
G
•
•
•
•
•
•
•
•
•
•
•
•
E
J
A:Rerouting button : calculates an alternative route. You will return on the navigation screen after 10
seconds if you make no modification.
B: Save the current position as POI.
C: Mute or unmute.
D: Change to map mode.
E: Name of the current street.
F: Estimated time left to destination. Tap to switch to arrival time.
G: Distance left to destination.
H: Current speed.
I: current selected transportation mode.
J: GPS signal
K: Symbol of second next maneuver
L: Symbol of next maneuver
Navigation menu
Tap anywhere of the navigation screen, the navigation menu displays.
12
I
EN
•
•
•
•
•
•
[View&Sound]: Refer to chapter 4
'Navigation' - 'Settings'.
[Route profile] : Refer to chapter 4
'Navigation' - 'Settings'.
[Stop navigation]: Tap to stop navigation.
[Alarm]: Refer to chapter 4 'Navigation' 'Settings'.
[Vehicle's profile]: Refer to chapter 4
'Navigation' - 'Settings'.
[Go to]: Go to [Destination] destination
menu.
Find nearby
View & Sound
•
Once the address is set, you can choose a Point
of Interest (POI_ in its vicinity.
1
2
3
4
Tap [Find nearby].
Select the POI category.
Tap the POI you want to reach.
Tap [Navigate to] to start the navigation
guidance.
Save as a destination
Once the address is set, you can save it to your
favorite destination.
1
2
3
4
Tap [Save as].
Type a name using the key board.
Tap
to confirm.
Tap navigate to to start the navigation
guidance.
• To remove the address, tap [Remove],
then [Yes] to confirm.
Settings
•
•
•
[Day/Night]
Select a night or day display of the map, or
set mode to automatic.
In Night mode,the colors of the map are
designed for a comfortable display adapted
to night driving.
In Auto mode the system changes
automatically to day or night display
depending on the time of day. It also goes
automatically into night mode when you
are in a tunnel.
[View 2D/3D/North/Auto]
Select a map display mode.
[Sound]
Adjust the speaker volume.
[POI Visibility]
Select the POI categories that will be
displayed on the map. Check the box next
to each of the category
• To display all POI categories, tap [All].
• To hide all POI categories, tap [None].
• To to back to the View&Sound menu
without saving ,tap .
Tip
•• To confirm your choice, tap
•• To go back to top menu, tap .
With the setting menu, you can customize your
navigator.
EN
13
Route profile
Tap one of the options to set the route profile.
• [Fastest/Shortest]
Choose between a route optimized for
time or for distance.
• [Tolls/No tolls]
Choose whether to include toll roads or
not.
• [Motorway/No Motorway]
Choose whether to include highways or
not.
• [Ferry/No Ferry]
Choose whether to include a ferry line or
not.
• [Side arrival/No side arrival]
• Arrival side: When the destination is
a street number, this option makes
the calculated route arrive at the
destination street on the side of the
selected number.
• No arrival side: The route can arrive on
the side of the number or the opposite
side. This option is only effective when
the destination is a two-way street.
• [Unpaved roads/No unpaved roads]:
Enable or disable the unpaved roads
(tarred). By default it allows unpaved roads.
• [Border crossing]
Enable or disable the crossing of a country
border. The “No border crossing” will not
be taken into account if the destination is
in another country.
Language and Keyboard
You can change the navigator language and the
voice instructions.
14
EN
•
•
•
To select language or keyboard, tap
To save the changes, tap
To go back to top menu, tap .
/
.
Alarm
Tap the button to enable or disable radar-alarm
function.
• [Danger Zone]
• [Risk area]
• [Overspeed]
Vehicle's profile
1
Tap /
mode.
2
Tap [Speed profile] to set the parameters.
to choose a transportation
last resort in your route search. If on the other
hand, the value is set at 150% for a category, the
roads in this category will be given preference.
Plan a route
•
•
•
•
•
•
[Speed limit]: Set the maximum speed
of your vehicle.
[Profile]: Select a speed profile to be
used by the route calculator. There
are 3 default profiles and they can be
modified.
[Main roads] (red ones on the map)
These are part of the network of the
main roads connecting the large cities.
They basically include most of the
freeway network and the bypasses
around the large cities.
[2nd level roads] (yellow ones on the
map)
These roads are of lesser importance
but connect most cities and are
intended for high traffic. Access to
them is also usually controlled.
[3rd level roads] (brown ones on the
map)
These roads are of even lesser
importance; they connect to villages
as well as to the main districts in a city;
they are intended for fairly high traffic.
[4th level roads] (gray ones on the
map)
These are all the other roads : streets/
roads of low importance, dead ends,
pedestrian streets, etc. They are usually
only taken around the starting and
arrival points of a trip.
When the value is set to 100%, no speed
change is applied. But if the value is set, for
instance, at 50% for one the categories, the
speed for the roads in this category will
be divided by two. This will give travel time
estimates for these roads that are twice as long,
and these roads will only be factored in as a
You can plan your route in two ways:
• Start navigation with via points
• Start simulation (without GPS) to prepare
a route or just to visualize the route with
driving distance and time.
1
2
Tap [Plan a route].
Tap
•
•
•
3
to add a via points.
To delete the selected via point, tap .
When two or more via points are set,
tap up/down arrow to change their
order.
is activated when you plan a trip
with more than three destinations. Tap
, and then if you tap [Yes] you will
return to your starting point at the end
of your trip. Your destination points will
be reorganized to optimize your trip. If
you tap [No] your trip will optimized
from your starting point to the last
destination. (without going back to
your starting point.)
Tap [Yes] or [No] to run or not run
simulation mode.
EN
15
Map Mode
D
E
D
I
G
H
C
B
J
A
F
Map displays your current position on the map if navigation mode is not activated. If navigation is in
progress, you can switch to map mode by tapping button J.
• A: Go back to top menu.
• B: Display the whole map.
• C: Mute or restore sound.
• D: Zoom in or zoom out the map.
• E: The current navigation route (blue)
• F: Route sheet : lists maneuvers (turns) for the calculated route.
• G: Save the position under the central cursor as POI.
• H: View the total route and the vehicle's position on it.
• I: View the remaining route starting from the vehicle's current position.
• J: Go back to the navigation mode.
Additional information
Tap copyright on the navigation home menu to display the software that is installed on your navigator
and copyright information.
16
EN
5 Use Bluetooth
devices
»» After connection successfully, tap
the following screen appears.
,
With this navigator, you can also make a call
through Bluetooth. Tap to enter Bluetooth
menu. (For PNS410BT and PNS510BT only)
Connect a device
Tip
Note
•• Philips does not guarantee the compatibility with all
Bluetooth devices.
•• Before pairing a device with this system, read its user
manual for Bluetooth compatibility.
•• Make sure that Bluetooth function is enabled on your
device, and your device is set as visible to all other
Bluetooth devices.
•• At one time, you can connect only one Bluetooth
device to this system.
•• The operational range between this system and a
Bluetooth device is approximately 3 meters (9 feet).
•• Any obstacle between this system and a Bluetooth
device can reduce the operational range.
•• Keep away from any other electronic device that may
cause interference.
Connect a device
1
Enable the bluetooth function on your
mobile phone.
2
Tap [Open] to active the Bluetooth
function and tap [Pair/Connect].
3
Tap [Search] and then tap [Re-search] to
search the Bluetooth devices that can be
paired.
• You can tap [Stop] to stop searching.
•• To change the default password, tap [Modify the PIN].
•• To change the default device name, tap [Modify the
name].
Disconnect a device
Tap [Disconnect] to disconnect the device.
Make a call
Note
•• Keep the Bluetooth connection active between the
system and your mobile phone.
4
In the device list, tap your device name and
tap connect to start paring.
Call a number
5
On your device, accept the paring request
and enter the default password '1234'.
1
Tap [Dialing].
EN
17
»» The following screen appears, tap the
number using the keyboard.
Transfer a call to mobile phone
By default, the voice comes from the
loudspeakers during a call.
2
Tap to send the call.
• To end a call, tap
.
1
Tap .
»» The loudspeakers are muted, and the
voice comes from your mobile phone
only.
2
Take up your mobile phone for the
conversation.
Call a number from your phonebook
1
Tap the [Phonebook], the navigator
synchronizes the phone book with your
mobile phone automatically.
2
Tap a number from the list and tap dialing
to send the call.
Redial the called number
1
Tap [Call history], the navigator
synchronizes the call history with your
mobile phone.
2
Tap a phone number from the list, and tap
[Dialing] to redial the number.
Tip
•• You can check received calls, dialed calls and missing
calls by tapping [Received], [Dialed], or [Missing].
Pick up an incoming call
When the system receives an incoming call, the
phone number is displayed. Tap [Answer] to
answer the call.
Reject an incoming call
Tap [Reject] the reject an incoming call.
18
EN
SMS
Tap [SMS], the navigator synchronizes the SMS
with your mobile phone.
6 Adjust settings
Settings
Description
[Backlight]
Set the screen brightness and
the backlight time.
Adjust the volume and screen
tap sound.
Set the OSD(on-screen
display) languages.
View the GPS information.
Set date and time.
Follow the on-screen
instructions to calibrate the
touch screen.
View the navigation path.
View the built-in battery
power status.
Restore to default settings.
View the system information.
Select USB mode:
• [MASS STORAGE]
• [MS ACTIVESYNC]
[Volume]
[Language]
[GpsInfo]
[DateTime]
[Calibration]
[Navi Path]
[Power]
[Restore Set]
[System Info]
[USB]
EN
19
7 Product
information
Note
•• Product information is subject to change without prior
notice.
Speaker Working
temperature
Temperature
for storage and
transportation
Atmospheric
pressure
Dimensions of
navigator
(W x H x D)
Dimensions of
holder
(W x H x D)
Weight (main unit)
Weight (holder)
Rechargeable lithium
battery, 3.7V
1.5W @ 8
-10 °C - 55 °C
-20 °C - 70 °C
86 Kpa - 106 Kpa
117.5 x 77.4 x 11.8 mm
(PNS400/PNS410BT)
133.9 x 84.4 x 11.5 mm
(PNS500/PNS510BT)
80.0 x 110.0 x 130.0
mm
0.13 kg (PNS400/
PNS410BT)
0.16 kg (PNS500/
PNS510BT)
0.10 kg
LCD
Screen size
4.3 inches
(PNS400/PNS410BT)
5.0 inches
(PNS500/PNS510BT)
20
EN
800 x 480 dots
500 450 cd/m²
Bluetooth(For PNS410BT and
PNS510BT only)
Communication
system
Output General
Battery
Display
resolution
Contrast ratio
Brightness Frequency band
Bluetooth Standard version
2.0
Bluetooth Standard Power
Class 2
2.4 GHz band (2.4000 GHz
- 2.4835 GHz)
8 Troubleshooting
Warning
•• Never remove the casing of this product.
To keep the warranty valid, never try to repair
the product yourself.
If you encounter problems when using this
product, check the following points before
requesting service. If the problem remains
unsolved, go to the Philips Web page (www.
philips.com/support). When you contact Philips,
make sure that the product is nearby and the
model number and serial number are available.
No power
•• The built-in battery need to recharge.
No sound
•• Volume is too low. adjust the volume.
Weak GPS signal
• if there are not enough satellites to
determine position, or if there is no
reception, the navigator displays the
message No GPS Signal. Initialization and
reception of GPS signals can be altered
by the windshields some vehicles are
equipped with; if this is the case, place your
terminal on the non-treated part of the
windshield and in an open space.
About the Bluetooth device
Cannot connect with the system.
•• The device does not support the profiles
required for the system.
•• The Bluetooth function of the device is
not enabled. Refer to the user manual of
the device to find out how to enable the
function.
•• The system is not in the pairing mode.
•• The system is already connected with
another Bluetooth-enabled device.
Disconnect that device or all other
connected devices and then try again.
The paired mobile phone connects and
disconnects constantly.
•• The Bluetooth reception is poor. Move
the mobile phone closer to the system or
remove any obstacle between the mobile
phone and the system.
•• Some mobile phones may connect and
disconnect constantly when you make
or end calls. This does not indicate any
malfunction of the system.
•• For some mobile phones, the Bluetooth
connection may be deactivated
automatically as a power-saving feature.
This does not indicate any malfunction of
the system.
Point of destination unreachable
• Some destinations can be unreachable,
depending on the selected transportation
mode; for instance, a pedestrian street is
not reachable in Car mode. The system will
nonetheless attempt to guide you to the
nearest reachable point to your destination.
EN
21
Specifications are subject to change without notice
© 2013 Koninklijke Philips Electronics N.V.
All rights reserved.
PNS400/410BT/500/510BT_12_UM_V1.0