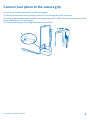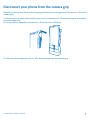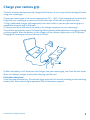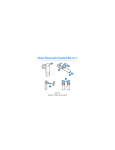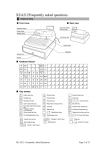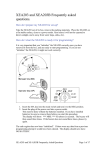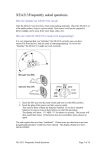
1
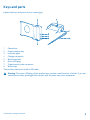
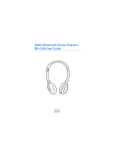
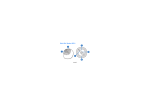
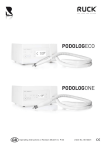
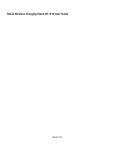
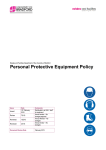
User Guide
Nokia Camera Grip PD-95G for Lumia 1020
Issue 1.0 EN
User Guide
Nokia Camera Grip PD-95G for Lumia 1020
Contents
Safety
3
About your camera grip
4
Keys and parts
5
Connect your phone to the camera grip
6
Disconnect your phone from the camera
grip
7
Charge your camera grip
8
Charge your phone with the camera grip
Take a photo or record a video
9
10
Attach your camera grip to a tripod
mount
11
Product and safety information
12
Copyrights and other notices
13
© 2013 Nokia. All rights reserved.
2
Safety
Read these simple guidelines. Not following them may be dangerous or illegal.
ROAD SAFETY COMES FIRST
Obey all local laws. Always keep your hands free to operate the vehicle while driving. Your first
consideration while driving should be road safety.
INTERFERENCE
All wireless devices may be susceptible to interference, which could affect performance.
QUALIFIED SERVICE
Only qualified personnel may install or repair this product.
BATTERIES, CHARGERS, AND OTHER ACCESSORIES
Use only batteries, chargers, and other accessories approved by Nokia for use with this device.
Do not connect incompatible products.
KEEP YOUR DEVICE DRY
Your device is not water-resistant. Keep it dry.
PROTECT YOUR HEARING
To prevent possible hearing damage, do not listen at high volume levels for long periods.
© 2013 Nokia. All rights reserved.
3
About your camera grip
Use the camera grip to improve your photo and video shooting experience.
The Nokia Camera Grip PD-95G is a functional and protective cover for your phone. Your phone can
take extra charge from the camera-grip's built-in battery, for longer camera and phone usage. When
taking photos, use the dedicated two-stage camera key for better focus and composition, and use
the wrist strap for a comfortable and secure one-handed hold. You can also attach a universal tripod
mount to the camera grip for more stability.
You can easily take the camera grip anywhere you want.
Read this user guide carefully before using the product. Also, read the user guide for the device that
you connect to the product.
© 2013 Nokia. All rights reserved.
4
Keys and parts
Explore the keys and parts of your camera grip.
1
2
3
4
5
6
7
8
Camera key
Power indicator key
Indicator lights
Charger connector
Wrist strap hole
Micro-USB plug
Tripod mount screw connector
Wrist strap
This product does not include a USB cable.
Warning: The micro-USB plug of this product may contain a small amount of nickel. If you are
sensitised to nickel, prolonged skin contact with the parts may cause symptoms.
© 2013 Nokia. All rights reserved.
5
Connect your phone to the camera grip
Learn how to connect your phone to the camera grip.
1. Attach the wrist strap to your phone, and pull it out through the wrist strap hole.
2. Push your phone downwards carefully, and connect the micro-USB connector of your phone to the
micro-USB plug on the camera grip.
3. Press your phone gently through the upper clips to lock it.
© 2013 Nokia. All rights reserved.
6
Disconnect your phone from the camera grip
Want to use your phone freely after charging the batteries or taking photos? Disconnect it from the
camera grip.
1. Gently press one upper clip and pull it away from your phone until it's released. Repeat and release
the other upper clip.
2. Pull your phone upwards to disconnect it from the micro-USB plug.
3. Slide your phone upwards until it's fully disconnected from the camera grip.
© 2013 Nokia. All rights reserved.
7
Charge your camera grip
The built-in battery has been partially charged at the factory, but you may need to recharge it before
using your camera grip.
Charge your camera grip in the correct temperature: 0°C – +60°C. If the temperature is outside this
range and your camera grip is connected to the wall outlet, all the indicator lights blink fast.
1. Plug a compatible charger (sold separately) into a wall outlet, or connect your camera grip to a
compatible computer with a USB cable.
2. Connect the micro-USB end of the cable to the charger connector on your camera grip.
The indicator lights switch on and 1 indicator light blinks steadily while the battery is charging, showing
you the progress. When the battery is fully charged, all the indicator lights stay on for 15 minutes.
Charging the camera grip fully may take up to 3 hours.
3. When the battery is full, disconnect the charger from your camera grip, then from the wall outlet.
When you unplug a charger, hold and pull the plug, not the cord.
Check the battery level
Press the power indicator key. The indicator lights switch on for 3 seconds, showing you the remaining
battery level. Each indicator light represents 25% of the battery capacity.
© 2013 Nokia. All rights reserved.
8
Charge your phone with the camera grip
Battery running out and no wall outlet or charger nearby? Use the camera grip to charge your phone.
Use your camera grip to charge your phone in the correct temperature: -10°C – +60°C.
Connect your phone to the camera grip. The camera grip charges your phone automatically.
The indicator lights switch on for 3 seconds, showing you the remaining camera grip battery level,
and switch off while charging. You can press the power indicator key to check the remaining battery
level. If the indicator light closest to charger connector blinks fast, the power from the camera grip
has been transferred to the phone, and the camera grip battery is running low. You may need to
recharge the camera grip.
Check your phone for the charging progress. The charging time varies based on your phone usage.
Charge your phone and camera grip together
Connect a compatible USB cable to the charger connector on the camera grip, and charge both your
phone and camera grip from the wall outlet or a computer.
Your phone charges first if the camera grip has sufficient power. If not, the camera grip charges itself
first for a few minutes. Once your phone battery is full, the camera grip begins charging itself
automatically, and the indicator lights switch on, showing you the progress.
Stop and resume charging your phone with the camera grip
Press the power indicator key for at least 3 seconds. All the battery indicator lights blink twice and
the charging stops. The camera key remains operational. Repeat this step to resume charging.
The camera grip automatically resumes charging your phone every time they are connected, or when
the camera grip is connected to a wall charger or computer.
Tip: To completely switch off your phone while connected to the camera grip, stop charging
your phone first.
© 2013 Nokia. All rights reserved.
9
Take a photo or record a video
Curious how to use the camera grip to take a photo or record a video with your phone? Read on and
learn how.
Your camera grip is optimized for right-handed usage.
1. Connect your phone to the camera grip.
2. Press the camera key on the camera grip to switch on your phone's camera.
If your phone is locked, press and hold the camera key.
3. Select the camera mode you want to use.
4. Press the camera key.
Tip: When taking a photo, press and hold the camera key halfway down to focus. To take the
photo, press the camera key down fully.
Tip: To get a comfortable and secure hold on your phone and camera grip, attach the wrist strap
to your phone, and pull it out through the camera grip.
For more info on taking photos or recording videos, see your phone’s user guide.
© 2013 Nokia. All rights reserved.
10
Attach your camera grip to a tripod mount
Want better stability when taking photos? Use a universal tripod mount to help.
1. Place the tripod screw thread into the tripod mount screw connector on your camera grip.
2. Rotate your camera grip clockwise, until it connects to the tripod mount.
Tip: For optimal stability, position one of the tripod legs parallel to your camera grip.
© 2013 Nokia. All rights reserved.
11
Product and safety information
Take care of your device
Handle your device, battery and accessories with care. The following suggestions help you keep your device operational.
•
•
•
•
•
•
•
•
Keep the device dry. Precipitation, humidity, and all types of liquids or moisture can contain minerals that corrode electronic
circuits. If your device gets wet, let the device dry.
Do not use or store the device in dusty or dirty areas.
Do not store the device in high temperatures. High temperatures may damage the device or battery.
Do not store the device in cold temperatures. When the device warms to its normal temperature, moisture can form inside
the device and damage it.
Do not open the device.
Unauthorised modifications may damage the device and violate regulations governing radio devices.
Do not drop, knock, or shake the device. Rough handling can break it.
Only use a soft, clean, dry cloth to clean the surface of the device.
Recycle
Always return your used electronic products, batteries, and packaging materials to dedicated collection points. This way you
help prevent uncontrolled waste disposal and promote the recycling of materials. All materials of the device can be recovered
as materials and energy. Check how to recycle your Nokia products at www.nokia.com/recycle.
Crossed-out wheeled-bin symbol
The crossed-out wheeled-bin symbol on your product, battery, literature, or packaging reminds you that all electrical and
electronic products and batteries must be taken to separate collection at the end of their working life. Do not dispose of these
products as unsorted municipal waste: take them for recycling. For info on your nearest recycling point, check with your local
waste authority, or go to www.nokia.com/support. For more info on the environmental attributes of your device, see
www.nokia.com/ecoprofile.
Battery and charger info
Your device has an internal, non-removable, rechargeable battery. Do not attempt to remove the battery, as you may damage
the device.
Charge your device with AC-10, AC-16, AC-20, AC-50, AC-60, DC-6, DC-17, or DC-20 charger. Charger plug type may vary.
The battery can be charged and discharged hundreds of times, but it will eventually wear out. When the operating times are
noticeably shorter than normal, to replace the battery, take the device to the nearest authorised service facility.
Battery and charger safety
To unplug a charger or an accessory, hold and pull the plug, not the cord.
When your charger is not in use, unplug it. If left unused, a fully charged battery will lose its charge over time.
Always keep the battery between 15°C and 25°C (59°F and 77°F). Extreme temperatures reduce the capacity and lifetime of the
battery. A device with a hot or cold battery may not work temporarily.
Do not dispose of batteries in a fire as they may explode. Obey local regulations. Recycle when possible. Do not dispose as
household waste.
Do not dismantle, cut, crush, bend, puncture, or otherwise damage the battery in any way. If a battery leaks, do not let liquid
touch skin or eyes. If this happens, immediately flush the affected areas with water, or seek medical help. Do not modify, attempt
to insert foreign objects into the battery, or immerse or expose it to water or other liquids. Batteries may explode if damaged.
© 2013 Nokia. All rights reserved.
12
Use the battery and charger for their intended purposes only. Improper use, or use of unapproved or incompatible batteries or
chargers may present a risk of fire, explosion, or other hazard, and may invalidate any approval or warranty. If you believe the
battery or charger is damaged, take it to a service centre before continuing to use it. Never use a damaged battery or charger.
Only use the charger indoors.
Copyrights and other notices
DECLARATION OF CONFORMITY
Hereby, NOKIA CORPORATION declares that this PD-95G product is in compliance with the essential requirements and other
relevant provisions of Directive 2004/108/EC.
The availability of products may vary by region. For more info, contact your Nokia dealer. This device may contain commodities,
technology or software subject to export laws and regulations from the US and other countries. Diversion contrary to law is
prohibited.
The contents of this document are provided "as is". Except as required by applicable law, no warranties of any kind, either express
or implied, including, but not limited to, the implied warranties of merchantability and fitness for a particular purpose, are made
in relation to the accuracy, reliability or contents of this document. Nokia reserves the right to revise this document or withdraw
it at any time without prior notice.
To the maximum extent permitted by applicable law, under no circumstances shall Nokia or any of its licensors be responsible
for any loss of data or income or any special, incidental, consequential or indirect damages howsoever caused.
Reproduction, transfer or distribution of part or all of the contents in this document in any form without the prior written
permission of Nokia is prohibited. Nokia operates a policy of continuous development. Nokia reserves the right to make changes
and improvements to any of the products described in this document without prior notice.
Nokia does not provide a warranty for or take any responsibility for the functionality, content, or end-user support of third-party
apps provided with your device. By using an app, you acknowledge that the app is provided as is. Nokia does not make any
representations, provide a warranty, or take any responsibility for the functionality, content, or end-user support of third-party
apps provided with your device.
FCC/INDUSTRY CANADA NOTICE
This device complies with part 15 of the FCC rules and Industry Canada licence-exempt RSS standard(s). Operation is subject to
the following two conditions: (1) This device may not cause harmful interference, and (2) this device must accept any interference
received, including interference that may cause undesired operation. Any changes or modifications not expressly approved by
Nokia could void the user's authority to operate this equipment.
Note: This equipment has been tested and found to comply with the limits for a Class B digital device, pursuant to part 15 of the
FCC Rules. These limits are designed to provide reasonable protection against harmful interference in a residential installation.
This equipment generates, uses and can radiate radio frequency energy and, if not installed and used in accordance with the
instructions, may cause harmful interference to radio communications. However, there is no guarantee that interference will
not occur in a particular installation. If this equipment does cause harmful interference to radio or television reception, which
can be determined by turning the equipment off and on, the user is encouraged to try to correct the interference by one or more
of the following measures:
•
•
•
•
Reorient or relocate the receiving antenna.
Increase the separation between the equipment and receiver.
Connect the equipment into an outlet on a circuit different from that to which the receiver is connected.
Consult the dealer or an experienced radio/TV technician for help.
TM © 2013 Nokia. All rights reserved. Third party product/names may be TM of respective owner.
© 2013 Nokia. All rights reserved.
13