1
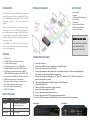
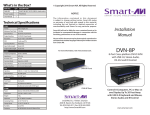
RS-232 SETUP TECHNICAL SPECIFICATIONS Baud Rate 9600 Start Bits 1 INPUTS Data Bits 8 Composite (3) RCA CVBS: PAL, NTSC, SECAM with stereo audio input Parity None Component (5) RCA YPbPr: 1080p@50/60Hz, 1080i@50/60Hz, 720p@50/60Hz, 576i/p, 480i/p with stereo audio input Stop Bits 1 RS-232 COMMANDS Baud Rate 9600 PC DB15 Female with Jack stereo supports Start Bits 1 VGA 640x480@60Hz, 800x600@60Hz, 1024x768@60Hz, 1280x1024@60Hz, 1280x720@60Hz, 1360x768@60Hz, 1440x900@60Hz, 1680x1050@60Hz, 1920x1080@60Hz with stereo audio input Data Bits 8 Parity None Stop Bits 1 Switch source to AV //AV* (2) HDMI Inputs: 1080p@50/60Hz, 1080i@50/60Hz, 720p@50/60Hz, 576i/p, 480i/p, 640x480@60Hz, 800x600@60Hz, 1024x768@60Hz, 1280x1024@60Hz, 1280x720@60Hz, 1360x768@60Hz, 1440x900@60Hz, 1680x1050@60Hz, 1920x1080@60Hz Switch source to YPbPr //YP* Switch source to VGA //VG* Switch source to HDMI 1 //H1* Switch source to HDMI 2 //H2* Switch source to USB //US* MPEG, H.264, RM/RMVB movie decode, JPEG, BMP, PNG Picture decode and MPEG1/2, MP3 audio decode Menu //MU* Exit //XT* Navigate Left //LF* Navigate Right //RT* Navigate Up //UP* Navigate Down //DN* Ok //MK* Power //PW* Source //SC* Ratio //RO* Vol- //V-* Vol+ //V+* Timing //TG* Mute/un-Mute //MT* Picture mode //PR* HDMI USB type A OUTPUT Output HDMI Set 720p or 1080p output format with integrated audio CONTROL Control Front panel with pushbuttons and LED indicators, IR infrared with remote control supplied, RS232 DB9Female with simple protocol OTHER Power Switching Power Supply 110/220v 5VDC 4A Operating Tem- -5 to +35°C (-41 to +95 °F) perature Range Operating Humidity Range 5 to 90 % RH (no condensation) Dimensions 10.0125 in. W x 2 in. H x 6 in. D Weight 2.75 lbs. 800.AVI.2131 SmartAVI.com V2VMax FULL HD MULTI FORMAT SWITCHER WITH INTEGRATED SCALER VGA, COMPONENT, COMPOSITE, USB, AUDIO AND HDMI SWITCHER, SCALER AND CONVERTER USER MANUAL INTRODUCTION INSTALLATION DIAGRAM APPLICATIONS The V2V-MAX is a 6 port video switcher supporting multiple video formats with an integrated HDTV scaler. The V2V-MAX supports 1080p and 720p output resolutions, making it the ideal presentation switcher. You can now use one device to connect your composite video, YPbPr video, VGA (PC), USB media file and 2 HDMI sources to a single 1080p HDMI output. Any input will be automatically scaled and converted to HDMI 1080p. Each video input also support the native audio format. Courtrooms Schools Conference Center Systems Universities Hospitals Control Room Systems Broadcasting Facilities Recording Studios SUPPORTED FILE TYPES Video: MOV, MPG, WMV, MP4 The V2V-MAX is the perfect solution for presentations in court rooms, schools, universities and hospitals, among many others. Audio: MP3, WAV, WMA Images: BMP, JPEG, PNG FEATURES 6 input ports (1) CVBS NTSC and PAL with Audio input (1) YPbPr with Audio input (1) VGA with Local audio up to 1920x1080 (2) HDMI 1080p with automatic EDID learning (1) USB input supports flash disk drive: MPEG, H.264, RM/RMVB movie decode, JPEG, BMP, PNG Picture decode and MPEG1/2, MP3 audio decode RS232 simple protocol for port selection Front panel with led indicator for fast selection On Screen Display with menu selection IR remote control for easy switching HDCP 1.3 Compliant WHAT’S IN THE BOX? PART NO. QTY DESCRIPTION V2V-MAX 1 6 Port Multi Format Switcher, Scaler and Converter V2V-MXR 1 Remote Control PS5VDC4A 2 Power Supply CONNECTING THE V2V-MAX 1. 2. 3. 4. 5. 6. 7. 8. 9. 10. 11. 12. Power off all devices Connect two HDMI sources to HDMI input 1 and HDMI input 2 Connect the VGA source to the VGA input Connect the composite video Yellow jack, to the composite input, and the corresponding audio jacks R and L into Audio-R and Audio-L respectively. Connect the component video green “Pr,” blue “Pb,” and red to the “Y” RCA jacks and the component source audio to L and R. Connect the HDMI monitor or HDMI screen to the HDMI output. Connect the RS232 port Connect a USB stick with video, pictures, or audio Connect the power supply to the DC 5v Turn on the power to each external device Turn on the power to the V2V by toggling the power switch Use the RS232 connection, Remote control, or front control panel to change sources. V2V-MAX Front V2V-MAX Back