1
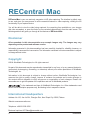
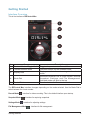
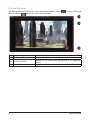
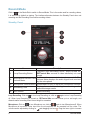
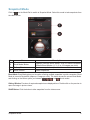
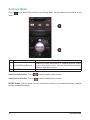
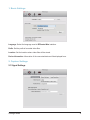
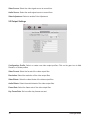
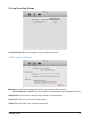
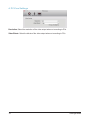
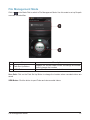
RECentral Mac
I675
User Manual
RECentral Mac
RECentral Mac is your one and only companion in HD video capturing. The interface is stylish, easy
to use, and gives you easy access to all the essential features in video capturing, utilizing the full
functionality of your capture device.
You will be able to view the video being captured, the remaining time available on your storage
disk, take a snapshot, or open the finder to view recorded videos directly from the main screen. The
following sections will guide you through all the features of RECentral Mac.
Disclaimer
All screenshots in this documentation are example images only. The images may vary
depending on the product and software version.
Information presented in this documentation has been carefully checked for reliability; however, no
responsibility is assumed for inaccuracies. The information contained in this documentation is subject
to change without notice.
Copyright
©2014 AVerMedia Technologies, Inc. All rights reserved.
No part of this document may be reproduced or transmitted in any form, or by any means (electronic,
mechanical, photocopying, recocrding, or otherwise) without prior written permission of AVerMedia
Technologies, Inc.
Information in this document is subject to change without notice. AVerMedia Technologies, Inc.
reserves the right to modify, change, improve or enhance its products and to make changes in
the content without obligation to notify any person or organization of such changes. Please visit
avermedia.com to get the updates of the operation and use of AVerMedia products.
®
is the trademark and logo of AVerMedia Technologies, Inc. Other trademarks used
herein are for description purposes only, and belong to their respective owners.
International Headquarters
Address: No.135, Jian 1st Rd., Zhonghe Dist., New Taipei City 23585, Taiwan
Website: www.avermedia.com
Telephone: +886-2-2226-3630
Business Inquiries: [email protected]
2
Disclaimer
Getting Started
Interface Overview
This is the interface of RECentral Mac:
No.
Name
Descriptions
1 Preview Window Toggle Switch Toggles the preview window on/off
2 Function Buttons Area
Function buttons for the selected mode
Display area for info and warnings in the selected
3 Display Area
mode
Switches between the 4 main modes: Record,
4 Mode Dial
Snapshot, Settings, and File Management.
Selected mode will spin to the top
5 Central Button
Function button for the selected mode
The RECentral Mac interface changes depending on the mode selected. Use the Mode Dial to
switch between the 4 main modes:
Record Mode
Snapshot Mode
Settings Mode
: Interface for video recording. This is the default interface upon startup.
: Interface for capturing snapshots.
: Interface for adjusting settings.
File Management Mode
Getting Started
: Interface for file management.
3
Preview Window
The Preview Window is where the video input can be viewed. Click on
Window, click on
again to close the Preview Window.
No.
Name
1 Fullscreen Button
4
2
Prevew Screen
3
Audio Button
to open the Preview
Descriptions
Switches to fullscreen view
Preview of the video being transmitted to the capturing
device
Quick access button to switch the sound on/off
Getting Started
Fullscreen Preview
Click on
or double-click on the Preview Screen to enter Fullscreen Preview. Double-click again on
the screen to exit Fullscreen Preview.
No.
Name
1
Fullscreen Preview
2
Mini Control Panel
Descriptions
Fullscreen view of the video being transmitted to the
capturing device
Remaining Time: Displays the remaining recording time
available on the selected storage media
Record: Starts recording videos
Snapshot: Takes a snapshot of the video
Microphone: Switches connected microphone on/off
Audio Input: Switches the sound on/off
For more information on recording videos, see the next section.
Getting Started
5
Record Mode
Click on
on the Mode Dial to switch to Record Mode. This is the mode used for recording videos,
it is selected by default on startup. The interface alternates between the Standby Panel when not
recording and the Recording Panel while recording videos.
Standby Panel
No.
1
2
3
4
5
Name
Descriptions
Toggles Loop Recording on/off. When turned on,
Loop Recording Button
RECentral Mac records a video indefinitely at a set
length
Switches the connected microphone on/off. The
Microphone Button and
Volume Meter displays the audio signal level received
Volume Meter
by the microphone
Microphone Volume Button Shows/hides a lever to adjust the microphone volume
Displays the available recording time remaining on the
Remaining Time
selected storage media
REC Button
Starts recording
Loop Recording: Click on
to turn Loop Recording on, click on
again to turn Loop Recording
off. When Loop Recording is turned on, RECentral Mac records videos up to a set length, and
discards earlier recording when the set length is exceeded.
to turn Microphone on, click on
again to turn Microphone off. When
Microphone: Click on
Microphone is turned on, voice input from the microphone will be recorded into the video. The
and dragging the lever . Drag the lever right to increase
volume can be adjusted by clicking on
6
Record Mode
the volume, drag it left to decrease the volume. You can check the Volume Meter at any time for the
audio signal level.
Remaining Time: Displays the available recording time remaining on the selected storage media.
RECentral Mac calculates the remaining time based on the remaining disk capacity on the selected
storage media. The format is [#Hours]H [#Minutes]M.
REC Button: Click the button to start recording. The interface alternates to the Recording Panel as
recording begins.
Recording Panel
No.
Name
1 Duration
2
Remaining Time
3
Capacity Ring
4
Stop Button
5
Function Buttons
Record Mode
Descriptions
Displays current length of the video
Displays the remaining recording time available on the
selected storage media disk space on the selected
storage media
Displays the available disk space (highlighted in red) in
proportion to the total
Stops recording
Save (appears when Loop Recording is turned on):
Saves the current video
Snapshot: Takes a snapshot of the video
Microphone: Switches connected microphone on/off
File Management: Opens the file manager to view
saved videos
7
Duration: Displays the length of the video recorded. The format is [#Hours]:[#Minutes]:[#Seconds].
Capacity Ring: The Capacity Ring is a circular meter that indicates the percentage of available disk
space on the selected storage media. Available disk space are displayed in bright orange-red marks,
each mark representing 1% of the total disk space. As more disk space are used up, the marks
disappear clockwise from the top.
Function Buttons:
Save: When Loop Recording is turned on, click on
Snapshot: Click on
Microphone: Click on
to save the current video
to take a snapshot of the video
to switch the microphone on/off
File Management: Click on
to open the file manager
Stop Button: Click the button to stop recording. If Loop Recording is turned on, a prompt will pop-up
asking if you want to save the current video. The interface alternates back to the Standby Panel after
recording stops.
8
Record Mode
Snapshot Mode
Click on
on the Mode Dial to switch to Snapshot Mode. Select this mode to take snapshots from
the video source.
No.
Name
1
Burst Mode Button
2
3
Gallery Window
SNAP Button
Descriptions
Displays current Burst Mode, click to switch between
different Burst Modes (1, 3, 6, or 12 images per click)
Preview snapshots captured in the current session
Takes snapshots
Burst Mode: Burst Mode gives you the option of taking multiple snapshots in quick succession. Burst
Mode is turned off by default (captures 1 image per click). The button shows the current Burst Mode,
,
,
, and
burst modes.
and clicking on the button cycles you between
Gallery Window: Previews of captured snapshots are displayed here. Double-click on the preview to
open the image in picture viewer.
SNAP Button: Click the button to take snapshots from the video source.
Snapshot Mode
9
Settings Mode
Click on
mode.
No.
on the Mode Dial to switch to the Settings Mode. You can adjust various settings in this
Name
1
Quick Settings Buttons
2
ENTER Button
Descriptions
Displays current selections of capture device, video
source, and audio source, click on each button to switch
between available sources
Opens the Preferences window
Video Source Selection: Click on
to switch between video sources.
Audio Source Selection: Click on
to switch between audio sources.
ENTER Button: Click the button to open preferences window for more detailed settings. Detailed
settings are described below.
10
Settings Mode
1. Basic Settings
Language: Select the language used in RECentral Mac interface.
Prefix: Set the prefix of recorded video files.
Location: Set the location where video files will be stored.
Device information: Information of the connected device will be displayed here.
2. Capture Settings
2.1 Signal Settings
Settings Mode
11
Video Source: Select the video signal source to record from.
Audio Source: Select the audio signal source to record from.
Video Adjustment: Select to enable Color Adjustment.
2.2 Output Settings
Configuration Profile: Select or create new video output profiles. Click on the gear icon to Add,
Rename, or Delete profiles.
Video Format: Select the format of the video output files.
Resolution: Select the resolution of the video output files.
Video Bitrate: Select the video bitrate of the video output files.
Audio Bitrate: Select the audio bitratet of the video output files.
Frame Rate: Select the frame rate of the video output files.
Key Frame Rate: Set how often key frames are sent.
12
Settings Mode
2.3 Loop Recording Settings
Loop Recording Time: Set the length of Loop Recording video files.
3. Microphone Settings
Microphone: Select the microphone from which external audio will be recorded.
Save as Separate *.mp3 File: Tick the checkbox to save external audio as separate mp3 files.
Input Volume: Use the lever to adjust the input volume of the microphone.
Input Level: Check the current level of input volume.
Volume Test: Click Start Test to conduct a volume test.
Settings Mode
13
4. PC-Free Settings
Resolution: Select the resolution of the video output when not recording to PCs.
Video Bitrate: Select the bitrate of the video output when not recording to PCs.
14
Settings Mode
File Management Mode
Click on
on the Mode Dial to switch to File Management Mode. Use this mode to set up file path
or access recorded files.
No.
Name
1
Path Set Up Button
2
VIEW Button
Descriptions
Displays the current folder where recordings are saved,
click to change the location
Opens Finder to view recorded videos
Save Path: Click on the Path Set Up Button to change the location where recorded videos are
saved.
VIEW Button: Click the button to open Finder and view recorded videos.
File Management Mode
15