1
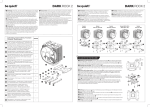
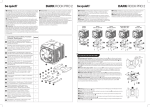
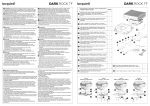
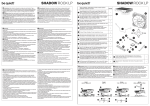
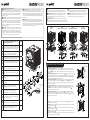
Introduction: Congratulations on your purchase of a high-quality be quiet! product. These instructions provide step-by-step help with the installation process. If you encounter problems during installation, please don’t hesitate to contact us at [email protected]. Our customer service team will gladly answer your questions. be quiet! cannot assume any responsibility for damages related to compatibility problems. Einleitung: Vielen Dank, dass Sie sich für ein hochwertiges be quiet! Produkt entschieden haben. Diese Anleitung wird Ihnen beim Installationsprozess behilflich sein, und Sie Schritt für Schritt durch diesen leiten. Sollten bei der Installation Schwierigkeiten auftreten, zögern Sie nicht, uns unter [email protected] zu kontaktieren. Unser Customer-Service-Team steht Ihnen gerne für Fragen zur Verfügung. be quiet! kann keinerlei Haftung für durch Kompatibilitätsprobleme bedingte Schäden übernehmen. Introduction : Nous vous remercions d’avoir choisi un produit de qualité be quiet!. Cette notice est conçue pour vous aider à installer votre matériel. Elle vous guidera pas à pas dans cette tâche. Si vous rencontrez des difficultés au cours de cette installation, n’hésitez pas à nous contacter à [email protected]. Notre équipe se fera un plaisir de répondre à vos questions. be quiet! ne peut assumer la responsabilité des dommages résultants de problèmes d’incompatibilité. Scope of delivery/ Lieferumfang/ Contenu/ Zestaw zawiera/ Contenido Installation: NOTE: If your mainboard already has a retention module for affixing the CPU cooler, then you must first remove it. Please check that all parts required for installation are on hand before attempting to install the cooler. Installation: ACHTUNG: Sollte Ihr Mainboard bereits über ein RetentionModul zur Befestigung von CPU-Kühlern verfügen, so entfernen Sie dieses zunächst. Überprüfen Sie vor dem Einbau des Kühlers, ob sämtliche Teile zur Installation vorhanden sind. Montage : ATTENTION: Si la carte mère est déjà équipée d’un système de rétention pour la fixation d’un ventirad, veuillez le retirer. Avant de monter le ventirad, veuillez vous assurer da la présence de l'ensemble des pièces nécessaires au montage. Socket LGA2011 Socket LGA1155, 1156, 1150, 1366, 775 Montaż: UWAGA: Jeśli płyta główna posiada już moduł przytrzymujący do zamocowania schładzaczy CPU, należy go najpierw wyjąć. Przed montażem schładzacza sprawdzić, czy obecne są wszystkie części potrzebne do instalacji. Montaje: ATENCIÓN: Si la placa base ya dispone de un módulo de retención para la fijación de ventiladores de CPU, retírelo primero. Antes de montar el ventilador, compruebe que tiene todas las piezas para la instalación. Socket AM2(+), AM3(+), FM1, FM2 Socket 754, 939, 940 Quantity be quiet! Shadow Rock 2 CPU cooler/ be quiet! Shadow Rock 2 CPU-Kühler/ Ventirad Shadow Rock 2/ chłodzenie CPU Shadow Rock 2 be quiet!/ Ventilador de CPU be quiet! Shadow Rock 2 1 Silence optimized be quiet! fan/ Geräuschoptimierter be quiet! Lüfter/ Ventilateur silencieux be quiet!/ Zoptymalizowany wentylator be quiet!/ Ventilador optimizado de be quiet! 1 Intel/AMD back plate/ Intel/AMD Backplate/ Plaque arrière Intel/ AMD/ backplate Intel/AMD/ Placa de apoyo de Intel/AMD 1 Intel mounting brackets/ Intel Montagebrücken/ Supports de montage Intel/ Mostki montażowe Intel/ Puentes de montaje de Intel 2 Hexagonal nut with sleeve/ Sechskantmutter mit Hülse/ Ecrou hexagonal / śruby/ Tuerca hexagonal con casquillo Wprowadzenie: Dziękujemy, że zdecydowali się Państwo na zakup produktu najwyższej jakości marki be quiet!. Niniejsza instrukcja pomoże Państwu w procesie instalacji i poprowadzi Was przez niego krok po kroku. W razie wystąpienia trudności podczas instalacji proszę skontaktować się z nami pod adresem serwis@ listan.pl. W razie pytań nasz dział obsługi klienta jest do Państwa dyspozycji. Firma be quiet! nie ponosi odpowiedzialności za uszkodzenia spowodowane problemami z kompatybilnością. Instrucciones: Muchas gracias por haber elegido un producto de calidad de be quiet! Estas instrucciones le ayudarán en el proceso de instalación y le guiarán paso por paso. Si se topase con dificultades durante la instalación, no dude en dirijirse a nosotros a través de [email protected]. Nuestro equipo de atención al cliente estará encantado de ayudarle. be quiet! no asume ninguna responsabilidad por los daños debidos a problemas de compatibilidad. Intel LGA775/ 1155/ 1156/ 1150/ 1366 & AMD 4 AMD mounting brackets/ AMD Montagebrücken/ Supports de montage AMD/ mostki montażowe AMD/ Puentes de montaje de AMD 2 M3x15 screws/ M3x15 Schrauben/ Vis M3x15/ śruby M3x15/ Tornillos M3x15 4 M3x3 screws/ M3x3 Schrauben/ Vis M3x3/ śruby M3x3/ Tornillos M3x3 4 C profile spacers/ C-Profil Distanzhalter/ Entretoises C/ Uchwyty dystansowe o profilu C/ Distanciador perfil C 4 LGA2011 spacer nuts/ LGA2011 Distanzmuttern/ Écrous-entretoises pour support LGA2011/ Nakrętki dystansowe LGA2011/ Tuercas distanciadoras LGA2011 4 Intel hexagonal nut/ Intel Sechskant-Muttern/ Écrous hexagonaux pour support Intel/ Nakrętki sześciokątne Intel/ Tuercas hexagonales Intel 4 Hexagonal spanner/ Sechskant-Maulschlüssel/ Clef hexagonale/ Klucz płaski sześciokątny/ Llave de boca hexagonal 1 Thermal paste/ Wärmeleitpaste/ Pâte thermique/ pasta termoprzewodząca/ Pasta conductora de calor 1 775 1150, 1155, 1156 1366, 2011 Installing the back plate: Move the long screws through the drill holes from the rear toward the front of the back plate . Please mind that the correct drill hole is used for the respective socket. Then use the C-profile spacers to fix the back plate to the mainboard. These are pressed onto the screw from the side until they click into place. Befestigung der Backplate: Platzieren Sie die längeren Schrauben auf der Rückseite der Backplate befindlichen Bohrlöcher. Beachten Sie hierzu die Bohrlöcher für den jeweiligen Sockel (siehe Abbildung rechts). Zum fixieren der Backplate auf dem Mainboard verwenden Sie anschließend die C-Profil Distanzhalter . Diese werden seitlich an der Schraube angedrückt bis diese einrasten. Fixation de la plaque arrière : Placez les vis longues à l'arrière de la plaque dans les perforations. Vérifiez que les vis correspondent aux trous de montage (voir figure à droite). Pour la fixation de la plaque arrière sur la carte mère, utilisez en dernier les entretoises C . Ces dernières sont appliqués contre les vis latéralement jusqu'à encliquetage. Mocowanie backplate: Umieścić dłuższe śruby w wywierconych otworach znajdujących się z tyłu backplate . Mieć przy tym na względzie wywiercone otwory dla danego gniazda (patrz rysunek po prawej). Do zamocowania backplate na płycie głównej należy następnie użyć uchwytów dystansowych o profilu C . Są one przyciskane bokiem do śruby, aż zaskoczą. Fijación de placa de apoyo: coloque los tornillos más largos en los orificios de perforación de la parte posterior de la placa de apoyo . Tenga en cuenta los orificios para cada zócalo (consulte la ilustración de la derecha). Para fijar la placa de apoyo en la placa base, utilice el distanciador de perfil C que se aprieta lateralmente en los tornillos hasta encajar. Note: For LGA1155/ 1156 mainboards, mind that the cut-outs on the back plate are positioned next to the fastening point of the intel back plate. Achtung: Beachten sie bei LGA1155/ 1156 Mainboards, dass die Befestigung der Intel Backplate innerhalb der Aussparungen der Backplate liegen. Attention : Avec les plateformes LGA1155/ 1156, assurez-vous que la fixation de la plaque arrière Intel s'insère dans les découpes de celle-ci . Uwaga: W przypadku płyt głównych LGA1155/ 1156 zwrócić uwagę na to, żeby mocowania backplate intel leżały w wyżłobieniach backplate . Atención: Con las placas base LGA1155/ 1156, tenga en cuenta que la fijación de la placa de apoyo de intel esté dentro de las ranuras de la placa de apoyo . 1366 1150, 1155, 1156 775 AM2(+) AM3(+) FM1/ FM2 754 939 940 ( Bottom view ) Intel LGA2011 Intel LGA2011 Affixing of the LGA2011 clamping system: First screw the spacing nut into the threads of is used for this. Befestigung der LGA2011 Haltevorrichtung: Schrauben Sie zuerst die Distanzmuttern in die Gewinde des LGA2011 Sockelrahmens. Verwenden Sie hierzu den Sechskant-Maulschlüssel . Fixation du système de support LGA2011 : Commencez par visser les entretoises dans les filetages du cadre du support LGA2011. À cet effet, utilisez la clef hexagonale . Mocowanie mechanizmu podtrzymującego LGA2011: Wkręcić najpierw nakrętki dystansowe na gwinty ramy gniazda LGA2011. Użyć do tego klucza płaskiego sześciokątnego . Fijación del dispositivo de fijación LGA2011: atornille primero las tuercas distanciadoras en la rosca de la estructura del zócalo LGA2011. Para ello, emplee la llave de boca hexagonal . the LGA2011 socket frame. The hexagonal spanner Intel & AMD Installation of the mounting brackets: Affix the two mounting brackets for Intel or AMD onto the bottom of the cooler. Use the short screws for this . For Intel, stick the hexagonal nut with sleeve through the Intel mounting brackets from below and fix with the hexagonal nut on top. Installation der Montagebrücken: Bringen Sie die zwei Montagebrücken für Intel oder AMD an der Unterseite des Kühlers an. Verwenden Sie hierzu die kurzen Schrauben . Für Intel die Sechskantmutter mit Hülse von unten durch die Intel Montagebrücke stecken und diese mit der Sechskantmutter von oben fixieren. Installation des supports de montage: Placez les deux barres pour Intel ou AMD sous le radiateur. À cet effet, utilisez les vis courtes . Pour Intel, tenez l'écrou hexagonal par le manchon , placez-le dessous, à travers les supports de montage Intel et fixez-le par dessus avec l'écrou hexagonal . Instalacja mostków montażowych: Mostki montażowe do podstawki Intel lub AMD przymocować u spodu schładzacza. Użyć do tego krótkich śrub . Dla gniazda Intel użyć śrub sześciokątnych z gwintem wewnętrznym od spodu mostka montażowego i dokręcić sześciokątną śrubą od góry. Instalación de los puentes de montaje: Coloque los dos puentes de montaje para Intel o AMD en la parte inferior del ventilador. Para ello emplee los tornillos cortos . Para Intel, pegue la tuerca hexagonal con manguito a través de los soportes de montaje de Intel desde abajo y fije con la tuerca hexagonal en la parte superior. 1150, 1155, 1156 AMD 775 1366, 2011 Intel Intel & AMD Fan Connecting the fan: Connect the fan to the mainboard's PWM signal. Anschluss des Lüfters: Verbinden Sie den Lüfter mit dem PWM Signal des Mainboards. Raccordement du ventilateur : Raccordez le ventilateur au signal PWM de la carte mère. Podłączenie wentylatorów: Podłączyć wentylatory do generatora sygnału PMW płyty głównej. Conexión de los ventiladores: Conecte los ventiladores a la señal PWM de la placa base. Warranty: Intel & AMD Application of the heat-conducting paste: Clean any sediment away from the CPU. Apply a small drop of the heat-conducting paste onto the surface of the CPU. Distribute that into a thin, uniform coat. NOTE: Too much heat-conducting paste impedes the transfer of heat and thus the cooling performance! The amount included with delivery is sufficient for 2-3 applications. Aufbringen der Wärmeleitpaste: Reinigen Sie die CPU von allen eventuell vorhandenen Rückständen.Pressen Sie einen kleinen Tropfen der Wärmeleitpaste auf die CPU-Oberfläche. Verteilen Sie eine dünne, gleichmäßige Schicht. ACHTUNG: Zu viel Wärmeleitpaste verschlechtert den Wärmetransfer und somit die Kühlleistung! Die mitgelieferte Menge ist für 2-3 Anwendungen ausreichend. Application de pâte thermique: Nettoyez le processeur, pour enlever les éventuels résidus de pâte thermique. Déposez une petite goutte de pâte thermique sur la surface du processeur et veuillez l'étaler en une mince couche uniforme. ATTENTION : une quantité trop importante de pâte thermique réduit le transfert de chaleur et par conséquent diminue la qualité du refroidissement. La quantité de pâte livrée est suffisante pour deux à trois applications. Nakładanie pasty termoprzewodzącej: Oczyścić jednostkę CPU z wszelkich pozostałości, o ile są obecne. Wycisnąć małą kroplę pasty termoprzewodzącej na powierzchnię jednostki CPU. Rozprowadzić cienką równomierną warstwę. UWAGA: Zbyt duża ilość pasty termoprzewodzącej pogarsza przewodzenie ciepła i tym samym moc chłodzenia! Dołączona ilość wystarczy na 2-3 użycia. Aplicación de la pasta conductora de calor: En caso necesario limpie los posibles restos que queden en la CPU. Aplique una gotita de pasta conductora de calor sobre la superficie de la CPU. Consiga una capa fina y homogénea. ATENCIÓN: si aplica demasiada pasta, se empeora la transmisión térmica y por tanto la refrigeración. La cantidad suministrada es suficiente para 2-3 aplicaciones. Intel LGA775/ 1155/ 1156/ 1150/ 1366 & AMD Installation of the CPU cooler: NOTE: Don't forget to first remove the protective wrap from the bottom of the cooler! Place the cooling element on the CPU. Tighten the screws on the back plate from below until the end of the threads. Check that all screws are tightened and correctly situated before turning on the computer. The cooler must be assembled with a firm fit to the mainboard! Montage des CPU-Kühlers: ACHTUNG: Entfernen Sie zunächst die Schutzfolie von der Unterseite des Kühlers! Platzieren Sie den Kühlkörper auf der CPU. Ziehen Sie die Schrauben der Backplate von unten bis zum Anschlag an. Überprüfen Sie vor der Inbetriebnahme des Rechners, ob alle Schrauben richtig und fest angezogen sind. Der Kühler muss mit dem Mainboard fest verbunden sein! Montage du ventirad : ATTENTION : retirez le film de protection qui recouvre le dessous du radiateur. Placez le radiateur sur le processeur. Serrez les vis de la plaque arrière par en dessous jusqu'à la butée. Avant de remettre l'ordinateur en service, contrôlez que toutes les vis sont en place et serrées correctement. Le radiateur doit être fermement fixé à la carte mère. Montaż schładzacza CPU: UWAGA: Usunąć najpierw folię ochronną ze spodu schładzacza! Umieścić radiator na jednostce CPU. Dokręcić od dołu śruby backplate do oporu. Przed uruchomieniem komputera sprawdzić, czy wszystkie śruby są prawidłowo i mocno dokręcone. Zamontowany schładzacz musi być mocno złączony z płytą główną! Montaje del ventilador de la CPU: ATENCIÓN: primero retire el film protector de la parte inferior del ventilador. Coloque el disipador térmico sobre la CPU. Apriete los tornillos de la placa de apoyo desde abajo hasta el tope. Antes de poner en marcha el ordenador, compruebe que todos los tornillos estén bien apretados. El ventilador debe estar bien fijo a la placa base. Installation of the CPU cooler: NOTE: Do not forget to first remove the protective wrap and add some thermal paste to the base of the cooler! Place the cooling element on the CPU. Using the hexagonal spanner , tighten the hexagonal nut as tight as possible while still being careful. Check that all screws are tightened and correctly situated before turning on the computer. The cooler must be firmly installed to the mainboard! Montage des CPU-Kühlers: ACHTUNG: Entfernen Sie zunächst die Schutzfolie von der Unterseite des Kühlers! Platzieren Sie den Kühlkörper auf der CPU. Ziehen Sie die Sechskant-Muttern mit Hilfe des SechkantMaulschlüssels vorsichtig bis zum Anschlag an. Überprüfen Sie vor der Inbetriebnahme des Rechners, ob alle Schrauben richtig und fest angezogen sind. Der Kühler muss mit dem Mainboard fest verbunden sein! Montage du ventirad : ATTENTION : retirez le film de protection qui recouvre le dessous du radiateur et appliquez de la pâte thermique sur la base du refroidisseur. Positionnez le corps du refroidisseur sur le processeur. Serrez avec précaution les écrous hexagonaux jusqu'à la butée à l'aide de la clé hexagonale prévue à cet effet . Avant de remettre l'ordinateur en service, vérifiez que toutes les vis sont en place et serrées correctement. Le radiateur doit être fermement fixé à la carte mère. Montaż schładzacza CPU: UWAGA: Usunąć najpierw folię ochronną ze spodu schładzacza! Umieścić radiator na jednostce CPU. Ostrożnie dokręcić do oporu nakrętki sześciokątne za pomocą klucza płaskiego sześciokątnego . Przed uruchomieniem komputera sprawdzić, czy wszystkie śruby są prawidłowo i mocno dokręcone. Schładzacz musi być mocno złączony z płytą główną! Montaje del ventilador de la CPU: ATENCIÓN: primero retire el film protector de la parte inferior del ventilador. Coloque el disipador térmico sobre la CPU. Apriete con cuidado las tuercas hexagonales con la llave de boca hexagonal hasta el tope. Antes de poner en marcha el ordenador, compruebe que todos los tornillos estén bien apretados. El ventilador debe estar bien fijo a la placa base. • 3 years manufacturer guarantee for consumers (original purchase from authorised be quiet! dealers only). • Guarantee work can only be processed with an included copy of the purchase receipt from an authorised be quiet! dealer. • Manipulation of any kind, structural changes of any kind as well as damages through external mechanical forces lead to a complete voiding of the guarantee. • Our General Warranty Conditions apply, which can be viewed on the Internet on www.bequiet.com. Listan GmbH & Co.KG . Biedenkamp 3a . 21509 Glinde . Germany For further information, you can contact us via e-mail: [email protected] Garantie: • 3 Jahre Hersteller-Garantie für Endkonsumenten (nur Ersterwerb vom autorisierten be quiet! Händler), ab Datum des Kaufbelegs. • Eine Garantieabwicklung ist nur in Verbindung mit einer beigefügten Kopie des Kaufbeleges eines autorisierten be quiet! Händlers möglich. • Manipulationen jeglicher Art, bauliche Veränderungen jeglicher Art, sowie Beschädigungen durch äußere mechanische Einwirkungen führen zum totalen Garantieverlust. • Es gelten unsere Allgemeinen Garantiebestimmungen, die Sie unter www.bequiet.com im Internet abrufen können. Listan GmbH & Co. KG . Biedenkamp 3a . 21509 Glinde . Germany Für weitere Unterstützung erreichen Sie uns via der E-Mail: [email protected]. Garantie : Socket LGA1155/ 1156/ 1150/ 1366/ 775 Socket AM2(+), AM3(+), FM1 Socket 754, 939, 940 • 3 ans de garantie constructeur pour le client final (uniquement pour un premier achat auprès d’un distributeur be quiet! agréé). • La prise en charge de la garantie est assujettie à la copie de la preuve d’achat auprès d’un distributeur be quiet! agréé. • Les manipulations, les modifications de construction de tout type ainsi que les dommages causés par des actions mécaniques extérieures entraînent la perte totale de la garantie. • Les conditions détaillées de garantie peuvent être consultées sur le site web www.bequiet.com dans la rubrique Service/Conditions de garantie. Listan GmbH & Co.KG - 65 avenue Georges Politzer - 78190 Trappes - France Si vous avez des questions sur nos produits, veuillez nous contacter par mail à l'adresse suivante : [email protected] Gwarancja: • Trzy lata gwarancji producenta dla klienta końcowego (tylko pierwszy zakup u autoryzowanego dystrybutora be quiet!). • Rozpatrzenie gwarancji jest możliwe jedynie na podstawie dołączonej kopii dowodu zakupu u autoryzowanego dystrybutora be quiet!. • Jakiekolwiek manipulacje i zmiany w budowie, jak również uszkodzenia powstałe w wyniku mechanicznych działań zewnętrznych prowadzą do całkowitej utraty gwarancji. • Obowiązujące Ogólne warunki gwarancji na nasze produkty można znaleźć w Internecie pod adresem www.bequiet.com. Listan Poland Sp. z o.o. ul. Drzeworytników 66, 01-385 Warszawa Na terenie Polski szersze wsparcie mogą Państwo uzyskać: e-mail: [email protected] Garantía: • 3 años de garantía del fabricante para el consumidor final a partir de la fecha de compra (sólo para compra original de distribuidores autorizados de be quiet!). • Sólo se podrán ejercer los derechos de la garantía presentando una copia del comprobante de compra expedido por un distribuidor autorizado de be quiet! • La manipulación de cualquier tipo, las modificaciones estructurales de cualquier tipo y los daños por influencias mecánicas externas provocarán la pérdida total de la garantía. • Los términos y condiciones íntegros de la garantía se pueden consultar en la página web www.bequiet.com dentro de la sección de servicio técnico / condiciones de la garantía. Listan GmbH & Co. KG . Biedenkamp 3a . 21509 Glinde . Alemania Si tiene más preguntas acerca de nuestros productos, póngase en contacto con nuestra línea gratuita de atención al cliente en el número: Correo electrónico del servicio de atención: [email protected]