1
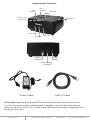
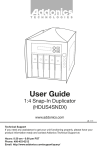
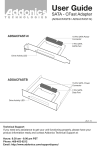
T E C H N O L O G I E S
User Guide
Mini HDD Duplicator Station
(HDMU3, HDMU3-X)
www.addonics.com
Technical Support
If you need any assistance to get your unit functioning properly, please have your
product information ready and contact Addonics Technical Support at:
Hours: 8:30 am - 6:00 pm PST
Phone: 408-453-6212
Email: http://www.addonics.com/support/query/
Unpacking and Overview
Disk 2
Drive Slot
Disk 1
Drive Slot
Clone Button
Back-up button
Eject Buttons
Progress LEDs
Disk 1 LED
Disk 2 LED
Power LED
USB 3.0
Connector
Power
Switch
Power Supply
Connector
Power Cable
USB 3.0 Cable
Drive slots: Insert hard drive with SATA connector facing down and on the left side.
For 2.5” drives and smaller media installed in adapters, insert the drive thorough the
slot in the top of the unit. For 3.5” drives, insert the drive by pressing it through the door
on the top of the unit.
www.addonics.com
Technical Support (M-F 8:30am - 6:00pm PST)
Phone: 408-453-6212
Email: www.addonics.com/support/query/
Eject buttons: Press down firmly to unseat the drive from the SATA connector
inside the unit.
Power LED: Glows to indicate the unit is powered up.
Disk LED (Disk1 and Disk2): Glows to indicate a drive is connected and powered
up, blinks to indicate activity.
Duplication Progress LEDs: When connected to a USB host, these blink in
unison to indicate I/O activity. With no host connected, they will remain dark until a
copy operation is started.
Clone Button: Press and hold for three seconds to start copying from Disk1 to
Disk2, when no USB host is connected.
Backup Button: Press to launch the HDMU3 backup utility.
Disk Cloning
1. Be sure to insert the SOURCE drive into the Disk1 slot and the TARGET drive
into the Disk2 slot.
2. The TARGET drive must be equal to or greater than the capacity of the
SOURCE drive.
3. Power up the unit with the SOURCE and TARGET drives inserted and the USB
cable disconnected, then wait a few moments for the drives to become ready.
4. Press and hold the Clone button for three seconds.
The unit will then blink the Disk1 and Disk2 LEDs to indicate activity, then if no
errors occur, the Progress LEDs will begin flashing in a back-and-forth pattern, and
as the process completes past each percentage on an LED, that LED will glow
steadily and the remaining LEDs will continue the pattern. When all four LEDs are
glowing steadily, the process is complete.
If there is an error after starting the copy process, all four Progress LEDs will blink
rapidly in unison, and the LED associated with the drive having a problem will
remain dark. For example, if the TARGET drive is not equal to or greater than the
capacity of the SOURCE, holding the Clone button will cause all four Progress
LEDs to blink rapidly, the Disk1 LED will be glowing, and the Disk2 LED will be
dark.
Using the One-Touch Backup Feature
The backup utility is provided on CD or download with its own user guide. Once
installed and the backup settings are in place, pressing the Backup button will
launch the backup utility from the system tray and begin the backup process
automatically.
www.addonics.com
Technical Support (M-F 8:30am - 6:00pm PST)
Phone: 408-453-6212
Email: www.addonics.com/support/query/
CONTACT US
www.addonics.com
Phone:
Fax:
Email:
408-573-8580
408-573-8588
http://www.addonics.com/sales/query/