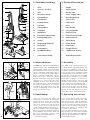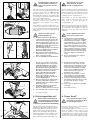
1
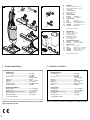
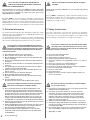
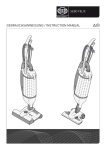
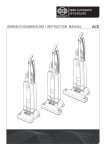
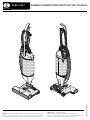
SEBO DART
GEBRAUCHSANWEISUNG/INSTRUCTION MANUAL
SEBO Stein&Co. GmbH, Wülfrather Straße 47-49, 42553 Velbert, Germany
Telefon +49 (0) 20 53 / 89 81, Telefax +49 (0) 20 53 / 89 85, www.sebo.de
SEBO (UK) Ltd - The Merlin Centre
Cressex Business Park, High Wycombe, Bucks HP12 3QL.
Phone: 0 14 94 - 46 55 33 , Fax: 0 14 94 - 46 10 44, www.sebo.co.uk
©2005 SEBO Stein&Co. GmbH ®Eingetragenes Warenzeichen. Technische Änderungen vorbehalten.
©2005 SEBO Stein&Co. GmbH ®Registered Trademark. Subject to change.
Art.-No. 06935, 05/2005
MADE IN GERMANY
A
B
5
6
7
4
8
3
C
12
2
1
9
10
1. Technische Daten
Zubehör*
Elektroteppichbürste 31 cm
Elektroteppichbürste 37 cm
Parkettdüse
Kombibodendüse
Zubehörklammer
Fugendüse
Sonderzubehör
1094 hg
Staubpinsel
1491 hg
Polsterdüse
Service-Teile
7029
Filtertüte
7012
Motorschutzfilter
5010 ER
Ersatzbürste 31 cm
2838 ER
Ersatzbürste 37 cm
7015 ER
Abluftfilter
*
je nach Ausstattung.
A
1
2
3
4
5
6
B
7
8
C
9
10
11
11
12
Attachments*
Power Head 31 cm
Power Head 37 cm
Parquet Nozzle
Combination Nozzle
Attachments Clip
Crevice Nozzle
Optional Attachments
1094 hg
Dusting Brush
1491 hg
Upholstery Nozzle
Service Parts
7029
Filter Bag
7012
Motor Protection Filter
5010 ER
Brush Roller 31 cm
2838 ER
Brush Roller 37 cm
7015 ER
Exhaust Filter
*
depending on model.
1. Technical Details
Staubsauger:
Vacuum Cleaner:
Elektroteppichbürste*
Power head*
Gebläsemotor.............................................. 1000 Watt
max.............................................. 1300 Watt
Unterdruck.................................................. 225 mbar
(2300 mm WS)
Luftmenge................................................... 50 liter
Filtertüte..................................................... 3,5 liter, 3-lagig
Gewicht....................................................... 4,5 - 7,2 kg
Isolationsklasse.......................................... II, doppelt isoliert
Anschlussleitung......................................... 9,5 Meter
Vacuum Motor..............................................1000 Watt
max............................................. 1300 Watt
Suction........................................................ 225 mbar
(2300 mm WS)
Air Flow........................................................50 l/s
Filter Bag.....................................................3,5 litres, 3-layer
Weight......................................................... 4,5 - 7,2 kg
Protection.................................................... double insulated
Cable............................................................9,5 Meter
Bürstenmotor.............................................. 31 cm, 175 Watt
Bürstenmotor.............................................. 37 cm, 200 Watt
Arbeitsbreite, Elektroteppichbürste........... 31 cm / 37 cm
Bürstenantrieb............................................ Zahnriemen
Bürstendrehzahl......................................... 2700 U/min
Brush Motor................................................. 31 cm, 175 Watt
Brush Motor................................................. 37 cm, 200 Watt
Working width Power Head......................... 31 cm / 37 cm
Brush Drive..................................................tooth belt
Brush Speed................................................ 2700 rpm
* je nach Ausstattung.
* depending on model.
Arbeiten an der elektrischen Installation dürfen nur von Sachkundigen ausgeführt werden.
2
11
A
1
2
3
4
5
6
B
7
8
C
9
10
11
11
12
For Service please contact your supplier or the address below.
Please read all the instructions before using this
machine.
Lesen Sie bitte vor Gebrauch gründlich diese
Gebrauchsanweisung und die darin enthaltenen
Sicherheits- und Warnhinweise.
Vielen Dank, dass Sie sich für einen SEBO entschieden haben. Wir
sind sicher, dass Sie viel Freude an diesem Gerät haben werden.
Für Ihre Hinweise und Wünsche stehen wir Ihnen gerne unter
www.sebo.de zur Verfügung.
Ihr neuer SEBO ist ein hochwertiges, langlebiges und innovatives
Produkt, das nach neuester Technologie in Deutschland entwickelt
und gefertigt wurde. Seine effiziente Saugleistung und seine serienmäßig integrierte S-Klasse-Filtration bieten Ihnen außergewöhnlich
hohe Standards. Erleben Sie selbst das professionelle Saugerlebnis!
Thank you for choosing a SEBO. We are sure you will enjoy owning
this machine.
Your new SEBO is a high quality, reliable, innovative product that was
developed in Germany with the most modern technology. The SClass filtration and the effective cleaning power give you the highest
standards of cleaning efficiency.
2. Sicherheitshinweise
2. Safety Instructions
Die Gebrauchsanweisung bitte gut aufbewahren. Wird der Staubsauger an Dritte weitergegeben, muss unbedingt die Gebrauchsanweisung mit übergeben werden.
Die Benutzung des Gerätes geschieht auf eigene Verantwortung.
Der Hersteller haftet nicht für Schäden, die durch falsche Bedienung
oder nicht bestimmungsgemäßen Gebrauch verursacht werden.
Save these instructions. If you pass this vacuum to a third party,
please give them the instructions as well. The use of this machine is
at your own risk. The manufacturer/supplier is not liable for any
injury or damage caused by incorrect usage of the machine.
Das Gerät darf nur mit Original SEBO Filtertüten und Original SEBO Ersatz- und Verschleißteilen betrieben werden.
Nur die Verwendung von Originalteilen für dieses Produkt
berechtigt zu Garantieleistungen und gewährleistet die Betriebssicherheit des Gerätes.
This machine should only be operated with genuine SEBO
filter bags, filters and replacement parts. The use of nongenuine parts will waive the warranty for this product and
could mean a serious security risk.
➔ Benutzung durch Kinder nur unter Aufsicht.
➔ Menschen oder Tiere nicht ab- bzw. aufsaugen.
➔ Nur zur Reinigung trockener Flächen, nichts Glühendes oder
Heißes aufsaugen.
➔ Keine leicht entflammbaren oder explosiven Stoffe oder Gase
aufsaugen.
➔ Elektrisches Gerät: Vor Wasser, Feuchtigkeit und Hitzequellen
schützen.
➔ Den Staubsauger nur gemäß der Anschlusswerte des Typenschildes anschließen und betreiben.
➔ Niemals bei angeschlossenem oder laufendem Gerät an die
Bürste* fassen!
➔ Das Gerät niemals ohne Filtertüte benutzen.
➔ Ein Gerät mit Defekten nicht anschließen.
➔ Mit eingeschaltetem Gerät nicht über die Anschlussleitung
fahren.
➔ Vor allen Arbeiten am Gerät:
Erst das Gerät ausschalten und den Netzstecker ziehen.
➔
➔
➔
➔
➔
➔
➔
➔
➔
➔
➔
➔
All repairs should be performed by an authorized SEBO
service representative.
Reparaturen und Ersatzteileaustausch am Staubsauger
dürfen nur von Fachkräften ausgeführt werden.
➔ Aus Sicherheitsgründen ist die Elektroteppichbürste* mit
einem elektronischen Überlastungsschutz ausgestattet. Bei
bestimmten Teppichqualitäten kann eine derart starke Bürstwirkung eintreten, dass sie automatisch abschaltet. Sollte dies
der Fall sein: Gerät ausschalten, Netzstecker ziehen und
Bürste auf Verunreinigung prüfen. Danach ist es ratsam, die
Saugleistung zurückzunehmen bzw. den Stellknopf der Elektroteppichbürste* auf eine höhere Stufe (bis Stufe 4) zu drehen.
➔ Nach der Benutzung des Gerätes den Staubsauger ausschalten
und den Netzstecker ziehen.
➔ Bei Beschädigung der Netzanschlussleitung, muss diese durch
eine besondere Anschlussleitung ersetzt werden, die beim
Hersteller oder beim Kundendienst erhältlich ist.
➔ Zur Benutzung der Elektroteppichbürste* achten Sie bitte
zusätzlich auf die Sicherheitshinweise unter dem Abschnitt
5. Handhabung.
3
*
je nach Ausstattung.
Do not use with a damaged cable.
Do not run over the cable.
Do not expose to liquid or moisture.
Children and pets must be strictly supervised.
Do not use outdoors or on inappropriate surfaces, e.g. stone or
concrete.
Do not use in the presence of flammable gases.
Do not pick up hot material, such as fire ash.
Do not touch the brush roller while the machine is plugged in.
Do not use the machine without a bag.
Do not re-use the bag.
Do not wash filters.
Always turn off the machine, and then unplug it, before you
service the machine.
➔ If the machine shuts down, be sure to turn off the machine and
unplug it before troubleshooting.
➔ For safety, the machine contains an electronic overload
protection. The power head* could shut itself off if used on
certain carpets. If that should occur, turn off the machine,
unplug it, and look for a blockage. If there is no blockage,
reduce the load on the brush roller by adjusting the brush
height to a higher level (up to 4).
➔ Always turn off and unplug the machine when it is not in use.
➔ If the power supply cable fitted to this machine is damaged, it
must be replaced by a cable designed to fit this machine which
is available from SEBO.
➔ For using the power head * please read the safety instructions
that are included throughout the 5. Operating Instructions.
*
depending on model.
1
2
4
1
3
8
6
5
10
4
5
12
7
10
11
3. Machine Description
1
Griff
1
Handle
2
Schalter - Ein/Aus
2
On/Off Switch
3
Stiel
3
Handle Tube
4
Anschlussleitung
4
Power Supply Cable
5
Filtergehäuse
5
Dust Bag Housing
6
Filterdeckel
6
Filter Cover
7
Leitungshaken
7
Cable Hook
8
Schlauch
8
Hose
9
Schlauchdüse
9
Hose Handle
12
10
Tragegriff
10
Carrying Handle
13
16
11
Abluftfilter
11
Exhaust Filter
12
Filterbefestigungsringe
12
Filter Retaining Rings
12
13
Entriegelungstaste
13
Release Button
9
14
Gelenk
14
Swivel Neck
15
Elektroteppichbürste*
15
Power Head*
16
Rastpedal*
16
Foot Pedal*
17
Parkettdüse*
17
Parquet Brush*
18
Kombibodendüse*
18
Combination Nozzle*
*
je nach Ausstattung.
*
depending on model.
15
16
14
18
17
8
6
14
13
9
15
4
+
2
7
4
3. Gerätebeschreibung
16
4. Inbetriebnahme
4. Assembly
Ihr SEBO kann mit Elektroteppichbürste*
(15), Parkett(17)- oder Kombibodendüse*
(18) betrieben werden. Stecken Sie dazu
den Staubsauger vorsichtig auf das Gelenk
(14) des jeweiligen Saugvorsatzes bis es
einrastet. Bei Betrieb mit Elektroteppichbürste* kann der Staubsauger aufrecht
hingestellt werden. Achten Sie darauf,
dass der Staubsauger in der Mittelstellung
eingerastet ist, sonst kann das Gerät
umkippen. Danach den Schlauch (8) mit
der schwarzen Buchse in die Öffnung am
Filterdeckel (6) drücken bis sie einrastet.
Schließlich die Schlauchdüse (9) in die
seitliche Saugöffnung stecken und den
Schlauch andrücken. Fertig!
Your SEBO can be operated with an electric power brush* (15), parquet brush* (17)
or convenient combination nozzle* (18). To
assemble, carefully attach the brush nozzle
to the vacuum cleaner through the fitting
at the bottom of the vacuum until it locks.
The machine can be placed in an upright
position when used with the electric power
brush. When locking the vacuum in the
upright position, please ensure the bag
housing is clicked in place, facing forward
to the centre or the unit could overturn.
Push the black end of the hose (8) into the
connection on the filter cover (6). Finally,
insert the hose handle (9) into the suction
opening on the side and press the hose
into its place on the side of the machine.
5. Handhabung
5. Operating Instructions
Stellen Sie sicher, dass der Schalter (2)
ausgeschaltet ist. Danach die Anschlussleitung (4) durch Drehen des Leitungshakens (7) lösen und den Netzstecker
einstecken. Schalten Sie nun das Gerät
ein (2). Je nach Geräteausstattung lässt
sich die Saugleistung am Griff regulieren.
Für den Gebrauch der Elektroteppichbürste* zuerst das Rastpedal (16) drücken.
Durch Abkippen des Gelenkes kann nun
das Gerät betrieben werden (siehe
Abschnitt 6. Elektroteppichbürste*).
* je nach Ausstattung.
Please ensure that the on/off switch (2) is
in the off position. Then turn the cable
hook (7), release the cable (4) and plug it
into the wall mains outlet. Now you can
start the machine by moving the on/off
switch to the on position. Depending on
model your machine is equipped with
electronic suction control.
To use the power head*, press the foot pedal (16) on the rear of the power head and
lower the machine handle to an angled position. The brush motor will then turn on.
* depending on model.
When using the hose (8) and
attachments (9) , keep the
machine in upright position.
Zur Benutzung des Schlauchs (8)
mit Schlauchdüse (9) das Gerät
immer in die aufrechte Position
stellen!
8
1
9
10
Durch Herausnehmen der Schlauchdüse (9)
aus der seitlichen Saugöffnung kann der
Schlauch alleine oder mit SEBO Zubehör
benutzt werden. Achten Sie bei der
Benutzung des Schlauchs stets darauf, dass
Sie den Griff (1) weiterhin festhalten, da das
Gerät sonst umfallen könnte.
Das Gerät kann auch ohne Saugvorsatz
verwendet werden. Dazu können Sie es
problemlos am Tragegriff (10) transportieren.
Nach Ende des Gebrauchs das Gerät ausschalten (2). Ziehen Sie dann den Netzstecker und wickeln die Anschlussleitung (4)
über den Griff-(1) und Leitungshaken (7)
wieder auf.
The hose handle (9) can be removed from the
side of the vacuum and can be used with or
without attachments. Also maintain a grasp
on the machine when using the hose as it
could tip if the hose is pulled too far.
The machine can also be used without a
power head* or other floor tool*. You can
easily carry the machine by using the
carrying handle (10).
When you have finished using the machine,
turn it off by moving the on/off switch (2) into
the off position. Then unplug the cable (4)
and wind it onto the cable hook (7) and
handle (1).
Hinweise zum Gebrauch der
Elektroteppichbürste*:
Die Bürste der Elektroteppichbürste
schaltet nur ab, wenn das Gerät in der
aufrechten Position (A) eingerastet ist
oder die Schlauchdüse (9) aus der seitlichen Saugöffnung gezogen wird*. Im
abgekippten Zustand sollte das Gerät
ständig in Bewegung sein.
Rotiert die Bürste längere Zeit auf einer
Stelle kann die Oberfläche des Bodenbelags beschädigt werden.
Bitte achten Sie immer darauf, dass
Teppichkanten und –ecken nicht von der
Bürste eingezogen werden.
Bei sehr empfindlichen Bodenbelägen
➔
➔
➔
wie z.B. lose gewebten, extrem langflorigen Teppichen oder sehr weichen,
empfindliche Bodenbeschichtungen
weisen wir darauf hin, dass durch die
Benutzung der Elektroteppichbürste
Oberflächenschäden entstehen können.
Bitte benutzen Sie bei den oben genannten Bodenbelägen die Kombibodendüse mit ausgeschwenkten
Borsten, die Parkettdüse oder die
Schlauchdüse (9) und eine der Düsen
aus dem SEBO-Zubehör.
Wir raten davon ab, alte und besonders
wertvolle handwerklich gearbeitete
Teppichbrücken mit der Elektroteppichbürste zu reinigen.
Auf unebenen Böden ist der Kontakt
mit dem Bodenblech möglich.
Vorsicht, es können Kratzer entstehen!
Das Gerät über hohe Schwellen tragen.
*
je nach Ausstattung.
➔
1
+
4
2
➔
7
➔
A
➔
9
➔
15
6. Elektroteppichbürste*
Bitte beachten Sie unbedingt die
Sicherheitshinweise zum Gebrauch
der Elektroteppichbürste vor Inbetriebnahme (siehe Abschnitt 5 Handhabung).
14
5
16
Caution: Important instructions
for the use of a power head*
Für die professionelle und optimale Reinigung Ihrer Teppichböden empfehlen wir die
Elektroteppichbürste (15). Durch ein DrehKipp-Gelenk* (14) ist die Elektroteppichbürste in alle Richtungen beweglich und
umsteuert spielerisch jedes Hindernis. Die
Elektroteppichbürste ist in der Stärke der
Bürstenwirkung variabel und sorgt für eine
➔
➔
➔
➔
*
The brush roller is off and stopped
only when the machine is in an upright
position (A) and the handle is completely locked in place, or when the hose
handle (9) is removed from the side of
the vacuum*. If you have the machine
handle at an angle, the brush roller will
spin. Leaving the machine in a stationary position for an extended period of
time while the brush roller is spinning
may cause damage to your floor or
carpet.
Be sure not to allow carpet edges or
fringe into the brush.
As with any vacuum with a rotating
brush, this machine could cause damage to loosely woven carpets or rugs,
wool loop carpets, long-piled carpets,
or very soft, sensitive floor coverings.
Please use the Combination Nozzle or
Parquet Brush on these types of
flooring or floor coverings.
We do not recommend the use of the
power head for cleaning old and specially valuable hand-crafted carpets.
If you have uneven flooring, the metal
part underneath the machine may come
in contact with the floor, causing
scratches.
Please carry the machine across high
thresholds.
depending on model.
6. Power Head*
Please pay attention to the safety
instructions for the power head* in
the operating instructions.
The use of a power head is recommended for
the optimal cleaning of carpets.
The rotating design of the swivel neck* (14)
allows the power head to move in any
direction, making it easily maneuverable
around obstacles. The power head also has
an adjustable brush height and to-the-edge
brush action for effective all round cleaning.
16
22
21
20
23
24
optimale Reinigung bis zum Rand.
Das Rastpedal (16) arretiert das Gerät in
senkrechter Ruhestellung und schaltet die
Bürste ab.
Zum Arbeiten Rastpedal (16) betätigen und
Gerät nach hinten kippen. Die Bürste läuft
jetzt an. Ein Arbeiten ohne Betätigen des
Rastpedals führt auf Dauer zur Beschädigung des Gerätes. Die Bürstenkontrolle
überwacht ständig die Funktion der Bürste.
Grün- und Rot: Die Bürstwirkung ist nicht
ausreichend. Durch Drehen des Stellknopfes (22) auf eine niedrigere Position,
wird die Bürste abgesenkt. Leuchten das
grüne und rote Signal auch auf Stufe 1, so ist
die Bürste abgenutzt und muss ausgetauscht werden. Diese Angaben gelten nur
für Teppichboden.
Grün: (20) Bürste arbeitet gut. Wir empfehlen für den Gebrauch eine Bürsteneinstellung zu wählen, die nur eine Stufe
unterhalb der grün-roten Anzeige liegt.
Rot: (21) Die Bürste wurde blockiert oder
überlastet (siehe Abschnitt 12. Verstopfungen beseitigen). Gerät ausschalten, Netzstecker ziehen, Bürste auf Verunreinigung
prüfen.
Für die Reinigung von empfindlichen Bodenbelägen ist die Elektroteppichbürste zusätzlich mit einem Schalter* (20) ausgestattet.
Ist dieser betätigt steht die Bürste still und
die Kontrollleuchten sind aus.
By pushing the foot pedal (16) and lowering
the handle, you activate the power head and
the brush begins spinning. Failure to use the
foot pedal will cause lasting damage to the
machine. The electronic brush control
constantly monitors the status of the brush,
communicating the status through the lights
on top.
Green and red – The brush is not fully
engaged in the carpet. The height
adjustment should be lowered. If the height
adjustment is at its lowest setting, the brush
is worn and needs to be replaced.
Green light only – Brush is working well. We
strongly recommend selecting a brush height
that is only one level beneath that at which
both the green and red lights are on.
Red light only – The brush is blocked. (see
below 12.Removing Blockages) Turn off the
machine, unplug it, and then remove the
blockage.
To clean delicate floor surfaces the power
head is equipped with an on/off switch* (20).
When this switch is used to turn off the brush
roller the indicator lights are also turned off.
* depending on model.
* je nach Ausstattung.
7. Entnahme der Rundbürste*
Bei allen Wartungs- und Reinigungsarbeiten Gerät ausschalten
und Netzstecker ziehen.
25
14
17
Um die Rundbürste der Elektroteppichbürste* zu entnehmen, die Press-Taste (23)
drücken und gleichzeitig das Loslager (24)
nach unten wegdrehen. Die Bürste (25)
etwas im Uhrzeigersinn drehen und
herausziehen. Es empfiehlt sich, regelmäßig
die auf der Rundbürste aufgewickelten
Fäden und Haare zu entfernen.
7. Removing the Brush Roller *
Always unplug the vacuum from
the mains outlet before dismantling any part of the machine.
The remove the brush roller, press the
button marked "PRESS" (23) and turn the
bearing downward. Turn the brush slightly to
the right and pull it out. We recommend to
regularly remove threads and hair, which
have been wound around the brush roller.
* depending on model.
* je nach Ausstattung.
14
26
18
27
6
8. Kombibodendüse*
Parkettdüse*
8. Combination Nozzle*
Parquet Brush*
Die Kombiboden-(18) und Parkettdüse (17)
bieten mit dem 90°-Dreh-Kipp-Gelenk (14)
größten Saugkomfort. Beide Düsen verfügen
über federnd gelagerte Naturborstenstreifen, die zudem einfach auswechselbar
sind. Die Kombibodendüse kann mit dem
Umschalter (26) je nach Bedarf auf Hartboden (Borsten raus) oder Teppichboden
(Borsten rein) eingestellt werden. Sie ist
zusätzlich mit eingelassenen Verschleißbügeln aus Edelstahl für hohe Beanspruchung ausgestattet.
The Combination Nozzle (18) and Parquet
Brush (17) are equipped with a turnable
swivel neck and offer a full range of
maneuverability for ease-of-use and
comfort. Both nozzles have natural bristles
that can be easily replaced if worn.
The Combination Nozzle can be adjusted for
hard floors (bristles out) or carpet (bristles
in) through a dial (26).
Furthermore this nozzle is equipped with
heavy-duty embedded stainless steel
clamps.
* je nach Ausstattung.
* depending on model.
9. Filteranzeige
9. Filters
Die orangefarbene Filteranzeige (27) zeigt
einen reduzierten Luftstrom an. Entweder
liegt eine Verstopfung vor (siehe Abschnitt 12.
Verstopfungen beseitigen) oder die Filtertüte
muss gewechselt werden. Je nach Art des
Füllgutes kann ein Wechsel erforderlich sein,
ohne dass die Filtertüte bis oben gefüllt ist.
When the orange bag full indicator (27) is
showing, airflow is reduced. This could be
because the filter bag is full, the filters
clogged, or there may be a blockage (see 12.
Removing blockages).
6
29
28 30
12
28
11
31
12
5
11
11
10. Wechsel der Filtertüte
10. Changing the Filter Bag
Zum Wechseln der Filtertüte (28) den Filterdeckel (6) auf der Oberseite an der Verschlusslasche (29) entriegeln und aufschwenken. Die Filtertüte mit dem Filtertütendeckel (30) schließen und aus dem
Filterraum herausheben. Der Wechsel der
Filtertüte ist auf deren Vorderseite illustriert.
Ohne korrekt eingelegte Filtertüte lässt sich
der Filterdeckel nicht schließen.
To remove the filter bag (28), open the latch
on the side of the bag housing (29). Close the
filter bag with the sealing cap (30) and lift it
out. The procedure to replace the bag is
illustrated on the front of each bag. You
cannot close the bag housing if the bag is
fitted incorrectly.
11. Motorschutzfilter
Abluftfilter
11. Motor Protection Filter
and Exhaust Filter
Der Motorschutzfilter (31) ist nur zugänglich
nach Entnahme der Filtertüte. Ziehen Sie
nun den Filter an seinem Bügel nach oben
heraus. Beim Einsetzen eines neuen Motorschutzfilters muss dieser fest angedrückt
werden. Der Motorschutzfilter muss gewechselt werden, wenn er stark verschmutzt
ist oder spätestens nach 20 Filtertüten.
Gleichzeitig sollte auch der außen liegende
Abluftfilter (11) gewechselt werden. Hierzu
müssen die beiden Filterbefestigungsringe
(12) vorsichtig gelöst und seitlich entfernt
werden. Dann die beiden Kunststoffschienen
aus der Nut im Filtergehäuse (5) herausziehen und den Abluftfilter entfernen. Die
Montage erfolgt in umgekehrter Reihenfolge.
Nur wenn der Abluftfilter richtig montiert ist,
d.h. die Kunststoffschienen richtig in der Nut
liegen und die Filterbefestigungsringe den
Filter abdichten und verschlossen sind, kann
der Abluftfilter seine Wirkung entfalten.
The motor protection filter (31) is only
accessible by removing the filter bag. Lift the
motor protection filter up by the bracket.
When replacing the motor protection filter
make sure that it is pressed in position
tightly. The motor protection filter should be
changed when it is dirty or at the latest when
you have used 20 filter bags.
Change the exhaust filter (11) at the same
time as the motor protection filter. To do this,
carefully remove the filter retaining rings
(12) and put them to the side. Next pull the
enforcement strips of the exhaust filter out
of the housing slot (5) and remove the
exhaust filter from the housing.
When reassembling, please ensure the
exhaust filter is fitted correctly in the
housing slots and the filter retaining rings
are installed correctly. Otherwise the filter
will be ineffective.
Zur Gewährleistung der Sicherheit
und richtigen Funktion, nur Original SEBO Ersatzfilter verwenden.
Alle Filtermedien dürfen auf
keinen Fall gewaschen werden.
32
8
27
6
8
8
9
6
9
33
12. Verstopfungen beseitigen
12. Removing Blockages
Erscheint das orangefarbene Signal (27) am
Filterdeckel (6) bei neuwertiger Filtertüte,
kann eine Verstopfung vorliegen.
Zuerst den Schlauch (8) an der Schlauchdüse
überprüfen. Wenn dort nur eine geringe
Saugwirkung spürbar ist, ist er verstopft.
Zuerst den Schlauch durch Drehen des
Sicherungsrings (32) an der Innenseite des
Deckels lösen. Stecken Sie dann die
Schlauchdüse (9) in den Schlauchstutzen des
Filterdeckels (6) und saugen sie von der
anderen Seite aus. Dazu den Schlauch an der
Verstopfung dehnen und mit der flachen
Hand auf die Öffnung des Schlauches
klopfen.
Überprüfen Sie auch den Saugkanal an der
Einsteckstelle (33) für die Schlauchdüse (9). !
If the orange bag full indicator (27) is
showing after the filter bag has been
changed and the filters are in good condition,
there is likely a blockage in the system. First,
check for suction at the end of the hose (8). If
you can only feel a small amount of suction,
the blockage is in the hose. To unblock,
loosen the safety ring (32) on the lid. Remove
the hose from the machine and reverse the
airflow through the hose by putting the hose
handle (9) in the connecting tube of the filter
cover (6). Stretch the hose in the spot where
the blockage is and open and close the end
of the hose.
Also check the suction opening, which the
hose handle (9) fits into.
Den Schlauch niemals mit
einem Stab reinigen!
34
7
Use only genuine SEBO replacement bags and filters to ensure
effectiveness and safety.
Do not wash any filters.
Danach das Gelenk (14) des Saugvorsatzes
an der Einsteckstelle des Staubsaugers und
dann ggf. durch die Klappe (34) auf der
Unterseite der Elektroteppichbürste* überprüfen. Stellen Sie sicher, dass sich
zwischen der Klappe und der Einsteckstelle
im Gelenk keine Verstopfung befindet.
* je nach Ausstattung.
Note – Never clean down the hose
with a stick or pointed object.
Other places to check for a blockage include
the suction neck (14) of the power head* and
the orange trap-door (34) on the bottom of
the power head. Also check between these
two openings in the power head.
* depending on model.