Transcript
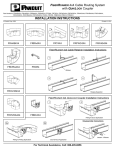
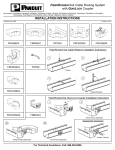
HINGED WALL MOUNT BRACKET
PART NUMBERS: WBH1, WBH2, WBH3, WBH4,
WBH2E, WBH4E, WBH6E
CM23A INSTALLATION INSTRUCTIONS
© Panduit Corp. 2002
Printed in U.S.A.
TO MOUNT BRACKET TO WALL OR 19” RACK:
1. Determine desired wall or rack mounting location.
2. Insert appropriate hardware (screws not included) through keyways in rear of bracket and
fasten securely to wall, or insert through round holes and fasten securely to rack..
3. Hinged bracket is removable so that equipment can hinge open on either side.
TO INSTALL EQUIPMENT ON BRACKET:
1. Determine desired mounting location for equipment.
2. Align equipment on bracket.
3. Insert #12-24 screws (not included) into equipment and screw into mounting bracket holes
on either side .
4. To access back of equipment, remove L-bracket screws.
Hinged Bracket
Main Bracket
Back opening for in wall
cable access
L-Bracket for
quick access to
back of panels
Hinged Bracket
Screws
Cable Tie
or Tak-Ty
slots
NOTE: WBHE models are packaged without hinges or L-brackets installed. Mount hinges
and L-brackets on the outside of the Main Bracket as shown, using the supplied #12-24
screws and pem nuts.Make certain the pem nuts are facing the back of the Main Bracket.
WORLDWIDE SUSIDIARIES AND SALES OFFICES
NETWORK CONNECTIVITY GROUP
412 Rockwell Court
Burr Ridge, Illinois 60521
Technical Support: 866-405-6654
Fax: 708-444-6993
Page 1 of 1
E-mail: [email protected]
Web site: www.panduit.com/ncg