1
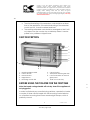
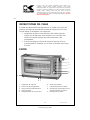
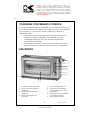
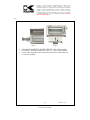
Fax +1 305 430 9280
Copies of the I/B. Please reproduce them without any
changes except under special instruction from Team
International USA. The pages must be reproduced and folded
in order to obtain a booklet A5 (+/- 148.5 mm width x 210 mm
height). When folding, make sure you keep the good
numbering when you turn the pages of the I/B. Don’t change
the page numbering. Keep the language integrity. Print only
what is inside the frame.
Toaster
Tostador
Grille-Pain
TO 39085
120V~60Hz - 900W (7.5A)
www.KALORIK.com
Front cover page (first page)
Assembly page 1/28
Fax +1 305 430 9280
Copies of the I/B. Please reproduce them without any
changes except under special instruction from Team
International USA. The pages must be reproduced and folded
in order to obtain a booklet A5 (+/- 148.5 mm width x 210 mm
height). When folding, make sure you keep the good
numbering when you turn the pages of the I/B. Don’t change
the page numbering. Keep the language integrity. Print only
what is inside the frame.
IMPORTANT SAFEGUARDS
When using electrical appliances, basic safety precautions should
always be followed, including the following:
1. READ ALL INSTRUCTIONS
2. Check that your mains voltage corresponds to that stated on the
appliance.
3. Do not touch the hot surfaces. Use handles or knobs.
4. To protect against electrical shock do not immerse cord, plugs, or
toaster in water or any other liquid.
5. Warning: to prevent electric shock, unplug before cleaning
6. Please keep out of reach of children and pets. This product is not
intended for use by children, by persons with reduced physical,
sensory or mental capabilities, or lacking experience or
knowledge, unless they have been given supervision or instruction
concerning the use of the product, by a person responsible for
their safety. Extra caution is always necessary when using this
product.
7. Do not operate any appliance with a damaged cord or plug, or
after the appliance malfunctions or has been damaged in any
manner. Return appliance to the nearest authorized service
facility for examination, repair, or adjustment.
8. The use of accessories or attachments not recommended by the
appliance’s manufacturer may cause injuries, fire or electric
shock.
9. Do not use outdoors.
10. Do not let cord hang over edge of table or counter, or touch hot
surfaces.
11. Do not place on or near a hot gas or electric burner, or in a
heated oven.
12. Always attach plug to appliance first, then plug cord into the wall
outlet. To disconnect, turn any control to off, then remove plug
from wall outlet.
13. Do not use appliance for other than intended use.
2
Assembly page 2/28
TO 39085 - 120501
Fax +1 305 430 9280
Copies of the I/B. Please reproduce them without any
changes except under special instruction from Team
International USA. The pages must be reproduced and folded
in order to obtain a booklet A5 (+/- 148.5 mm width x 210 mm
height). When folding, make sure you keep the good
numbering when you turn the pages of the I/B. Don’t change
the page numbering. Keep the language integrity. Print only
what is inside the frame.
14. Oversized foods, metal foil packages, or utensils must not be
inserted in a toaster as they may involve a risk of fire or electric
shock.
15. A fire may occur if toasters are covered or touching flammable
material, including curtains, draperies, walls, and the like, when in
operation.
16. Do not attempt to dislodge food when toaster is plugged in.
17. IMPORTANT: If the bread carriage handle gets blocked during use
(e.g. because the bread slices are too thick) and the bread starts
burning, unplug the appliance immediately and let it cool down
before emptying and cleaning it. Should the problem persist,
contact a qualified electrician.
18. Do not use the appliance for defrosting food other than bread
and only insert unbuttered slices of bread of which the thickness
does not risk to prevent the bread from coming up. Be extremely
strict about this as toasters are the cause of many fires when
these elementary safety precautions are not observed.
19. The appliance shall not be operated using a separate timer or
separate remote device.
SAVE THESE INSTRUCTIONS
HOUSEHOLD USE ONLY
POLARIZED PLUG INSTRUCTIONS
This appliance is equipped with a polarized plug (one blade is wider
than the other). To reduce the risk of electric shock, this plug will fit
into the polarized outlet only one way. If the plug does not properly
fit into the outlet at first, reverse it. If it still does not fit, contact a
qualified electrician. Do not attempt to modify the plug in any way.
SHORT CORD INSTRUCTIONS
A short power supply cord is provided to reduce the hazards resulting
from becoming entangled in, or tripping over a longer cord.
Extension cords may be used if care is exercised in their use.
3
Assembly page 3/28
TO 39085 - 120501
Fax +1 305 430 9280
•
•
Copies of the I/B. Please reproduce them without any
changes except under special instruction from Team
International USA. The pages must be reproduced and folded
in order to obtain a booklet A5 (+/- 148.5 mm width x 210 mm
height). When folding, make sure you keep the good
numbering when you turn the pages of the I/B. Don’t change
the page numbering. Keep the language integrity. Print only
what is inside the frame.
The electrical rating of the extension cord should be at least
that of the appliance. If the electrical rating of the extension
cord is too low, it could overheat and burn.
The resulting extended cord should be arranged so that it will
not drape over the counter top or tabletop where it can be
pulled on by children or tripped over.
PART DESCRIPTION
1
2
3
4
5
6
9
8
1.
2.
3.
4.
5.
7
Bread carriage handle
Defrost button
Reheat button
Bagel button
Browning control dial
6. Cancel button
7. Transparent double glass side
8. Lock mechanism for internal
glass panel
9. Slide-out crumb tray
BEFORE USING THE TOASTER FOR THE FIRST TIME
Note: the bread carriage handle will not stay down if the appliance is
not plugged in!
In order to eliminate any manufacturing residues, operate the toaster
a couple of times without bread with the browning control selector
on a medium browning level. Some smoke might escape, which is
perfectly normal.
4
Assembly page 4/28
TO 39085 - 120501
2
4
Fax +1 305 430 9280
Copies of the I/B. Please reproduce them without any
changes except under special instruction from Team
International USA. The pages must be reproduced and folded
in order to obtain a booklet A5 (+/- 148.5 mm width x 210 mm
height). When folding, make sure you keep the good
numbering when you turn the pages of the I/B. Don’t change
the page numbering. Keep the language integrity. Print only
what is inside the frame.
OPERATION
•
•
•
•
•
•
•
•
•
•
•
Before using your appliance for the first time, check if it is clean
(see “Maintenance and cleaning”) as it comes into direct
contact with bread. Check if any object has fallen into the slots.
Plug the appliance into a wall outlet.
Place the bread slices in the slot (for the French bread, cut a loaf
shorter than the slot, then cut it in two pieces along its length.).
Your appliance is provided to receive French bread, but also
pieces of toast or other bread slices if their thickness and their
length are shorter than the one of the slot. The maximum
thickness allowed for bread is 38mm / 1 ½”.
Press down the bread carriage handle until it stops (at the same
time, the grid inside the slots will tighten around the bread in
order to keep it away from the quartz heating elements). Then
release the pressure and the handle will stay in the lower position,
which means that the heating process has begun. If the handle
comes up immediately, check if the appliance is plugged in, as
the bread carriage cannot be locked if the toaster is not
plugged-in.
You can adjust the browning intensity to obtain a more/less
toasted bread, by positioning the browning control dial to one of
the degrees marked from 1 to 7. Therefore you only have to turn
clockwise to increase the browning intensity, and anticlockwise
to decrease it. The higher the number is, the more toasted the
bread will be.
During operation, if you think that the bread is toasted enough or
for any another reason, you can stop the heating process, simply
by pressing the Cancel button.
The reheat button allows you to reheat already toasted bread or
to toast bread which is not toasted enough, during a short time,
without modifying the browning degree that you are used to.
The defrost button allows you to toast bread that has been frozen
beforehand. It offers a longer heating time.
If you want to reheat bagels, push the "BAGEL" button. Only one
side in the toaster will then be heating.
Always unplug the appliance after use and let it cool down
before handling or storing it.
Excess lengths of power cord can be stored under the base.
When you store your appliance, wind the cord around the hooks.
5
Assembly page 5/28
TO 39085 - 120501
Fax +1 305 430 9280
Copies of the I/B. Please reproduce them without any
changes except under special instruction from Team
International USA. The pages must be reproduced and folded
in order to obtain a booklet A5 (+/- 148.5 mm width x 210 mm
height). When folding, make sure you keep the good
numbering when you turn the pages of the I/B. Don’t change
the page numbering. Keep the language integrity. Print only
what is inside the frame.
USEFUL ADVICE ON TOASTING
•
•
•
•
•
•
If the toasted bread pieces are too small to be picked up easily
from the toaster, simply raise the bread carriage handle to its
uppermost position (High-lift function), to lift the carriage and pick
up the toasted bread. If still not accessible, please use thin heatresistant tongs to pick up the bread in the slot.
Do NOT touch the metal parts as they will be hot!
For pop tarts or frozen waffles, please follow the instruction on the
box.
Do NOT toast food, other than bread, that is not specifically said
to be toasted in a slot toaster.
If the toaster jams, the bread might simply be too thick. Remove
the bread from the toaster and slice it thinner.
The second or third toast might toast too dark. This is normal. In
case of repeated, successive toasting, it might be useful to adjust
the browning level so that the second toasts’ browning is
consistent with the first.
MAINTENANCE AND CLEANING
•
•
•
•
•
Before attempting any cleaning operation, make sure the toaster
is unplugged from the supply socket and fully cooled down.
To remove bread crumbs, slide the crumb tray (9) situated on the
bottom of the appliance, out from the side for removal (Fig. 2)
Caution! It is very important to empty the crumb tray regularly.
Crumbs that have accumulated in the toaster might burn and
may become a fire hazard.
To clean the exterior surface/housing, simply wipe over with a
soft, damp cloth. Do not use abrasive cleaners or material
(scouring pads) as they may damage the finish of your
appliance.
To clean the interior glass panel, make sure the crumb tray is
empty, turn the toaster upside down or on the side and press on
the clamp situated underneath the base, on the handle of the
interior glass panel. Cautiously slide the interior glass panel out of
the toaster for cleaning. The interior glass panel can be washed in
warm soapy water. Rinse and dry cautiously, then put the glass
panel back in place and slide it into its grooves until the clamp
can maintain the glass panel securely in place (Fig. 3).
6
Assembly page 6/28
TO 39085 - 120501
Fax +1 305 430 9280
Copies of the I/B. Please reproduce them without any
changes except under special instruction from Team
International USA. The pages must be reproduced and folded
in order to obtain a booklet A5 (+/- 148.5 mm width x 210 mm
height). When folding, make sure you keep the good
numbering when you turn the pages of the I/B. Don’t change
the page numbering. Keep the language integrity. Print only
what is inside the frame.
Fig. 2
•
•
Fig. 3
THE TOASTER SHALL NEVER BE IMMERSED IN WATER OR USED NEAR
WATER.
All other maintenance and repair should be performed by a
qualified technician.
7
Assembly page 7/28
TO 39085 - 120501
Fax +1 305 430 9280
Copies of the I/B. Please reproduce them without any
changes except under special instruction from Team
International USA. The pages must be reproduced and folded
in order to obtain a booklet A5 (+/- 148.5 mm width x 210 mm
height). When folding, make sure you keep the good
numbering when you turn the pages of the I/B. Don’t change
the page numbering. Keep the language integrity. Print only
what is inside the frame.
WARRANTY
We suggest that you complete and return the enclosed Product
Registration Card promptly to facilitate verification of the date of
original purchase. However, return of the Product Registration Card is
not a condition of these warranties. You can also fill out this warranty
card online, at the following address: www.KALORIK.com
This KALORIK product is warranted in the U.S.A. for 1 year from the
date of purchase against defects in material and workmanship. This
warranty is not transferable. Keep the original sales receipt. Proof of
purchase is required to obtain warranty performance.
During this period, if the KALORIK product, upon inspection by
KALORIK, is proven defective, it will be repaired or replaced, at
Kalorik’s option, without charge to the customer. If a replacement
product is sent, it will carry the remaining warranty of the original
product.
This warranty does not apply to any defect arising from a buyer's or
user's misuse of the product, negligence, failure to follow KALORIK
instructions noted in the user’s manual, use on current or voltage
other than that stamped on the product, wear and tear, alteration
or repair not authorized by KALORIK, or use for commercial purposes.
There is no warranty for glass parts, glass containers, filter basket,
blades and agitators, and accessories in general. There is also no
warranty for parts lost by the user.
ANY WARRANTY OF MERCHANTABILITY OR FITNESS WITH RESPECT TO
THIS PRODUCT IS ALSO LIMITED TO THE ONE YEAR LIMITED WARRANTY
PERIOD.
Some states do not allow limitation on how long an implied warranty
lasts or do not allow the exclusion of incidental or consequential
damages, so the above limitations may not apply to you. This
warranty gives you specific legal rights, and you may also have other
rights which vary from state to state.
8
Assembly page 8/28
TO 39085 - 120501
Fax +1 305 430 9280
Copies of the I/B. Please reproduce them without any
changes except under special instruction from Team
International USA. The pages must be reproduced and folded
in order to obtain a booklet A5 (+/- 148.5 mm width x 210 mm
height). When folding, make sure you keep the good
numbering when you turn the pages of the I/B. Don’t change
the page numbering. Keep the language integrity. Print only
what is inside the frame.
If the appliance should become defective within the warranty
period and more than 30 days after date of purchase, do not return
the appliance to the store: often, our Customer Service
Representatives can help solve the problem without having the
product serviced. If servicing is needed, a Representative can
confirm whether the product is under warranty and direct you to the
nearest service location.
If this is the case, bring the product, or send it, postage prepaid by
the user (all Kalorik customers are responsible for the initial shipment
back to the warranty center), along with proof of purchase and
indicating a return authorization number given by our Customer
Service Representatives, to the authorized KALORIK Service Center
(please visit our website at www.KALORIK.com or call our Customer
Service Department for the address of our authorized KALORIK
Service Center).
If you send the product, please include a letter explaining the nature
of the claimed defect.
If you have additional questions, please call our Customer Service
Department (please see below for complete contact information),
Monday through Thursday from 9:00am - 5:00pm (EST) and Friday
from 9:00am - 4:00pm (EST). Please note hours are subject to change.
If you would like to write, please send your letter to:
KALORIK Customer Service Department
Team International Group of America Inc.
1400 N.W 159th Street, Suite 102
Miami Gardens, FL 33169 USA
Or call:
Toll Free: +1 888-521-TEAM / +1 888-KALORIK
Only letters can be accepted at this address above. Shipments and
packages that do not have a return authorization number will be
refused.
9
Assembly page 9/28
TO 39085 - 120501
Fax +1 305 430 9280
Copies of the I/B. Please reproduce them without any
changes except under special instruction from Team
International USA. The pages must be reproduced and folded
in order to obtain a booklet A5 (+/- 148.5 mm width x 210 mm
height). When folding, make sure you keep the good
numbering when you turn the pages of the I/B. Don’t change
the page numbering. Keep the language integrity. Print only
what is inside the frame.
CONSEJOS DE SEGURIDAD
Cuando se utilizan aparatos eléctricos, hay unas precauciones
básicas de seguridad que siempre se deben seguir, tales como:
1. LEA TODAS LAS INSTRUCCIONES.
2. Antes de utilizar el aparato, compruebe que el voltaje de la red
eléctrica coincide con el del aparato.
3. No toque las superficies calientes. Siempre utilice las asas o los
botones.
4. Para protegerse contra una descarga eléctrica, no sumerja el
aparato o el enchufe en agua o en otros líquidos.
5. ¡Cuidado! Para protegerse contra una descarga eléctrica,
desenchufe el aparato antes de limpiarlo.
6. Manténgalo fuera del alcance de los niños y mascotas. Este
producto no está destinado a ser utilizado por niños, personas
con discapacidades físicas, sensoriales o mentales, o que
carecen de experiencia o conocimiento, a menos que no sean
supervisados o instruidos acerca del uso del producto, por una
persona responsable de su seguridad. Cuando se utiliza este
producto siempre es necesaria una precaución extrema.
7. Desconecte el aparato de la toma de corriente cuando la
unidad no se encuentre en uso y antes de limpiarla. Deje enfriar
el aparato antes de insertar o sacar accesorios.
8. No opere este y ningún aparato si el cable o el enchufe están
quemados o dañados, o después de que el aparato ha
funcionado inadecuadamente, se ha caído o ha sido dañado
en cualquier manera. El aparato debe ser remplazado por el
fabricante o por un centro de servicio autorizado o por una
persona similar calificada.
9. El uso de accesorios o aditamentos que no sean los
recomendados por el fabricante pueden causar incendios,
descargas eléctricas o lesiones.
10. No use en exteriores
11. No permita que el cable cuelgue de la orilla de la mesa o del
mostrador o toque las partes calientes.
12. No coloque este aparato cerca de quemadores de estufas de
gas o eléctricas, o dentro de un horno caliente.
10
Assembly page 10/28
TO 39085 - 120501
Fax +1 305 430 9280
Copies of the I/B. Please reproduce them without any
changes except under special instruction from Team
International USA. The pages must be reproduced and folded
in order to obtain a booklet A5 (+/- 148.5 mm width x 210 mm
height). When folding, make sure you keep the good
numbering when you turn the pages of the I/B. Don’t change
the page numbering. Keep the language integrity. Print only
what is inside the frame.
13. Enchufe siempre primero el cable al aparato y después en el
enchufe de la red eléctrica. Para desconectar el aparato, gire
los botones hacia la posición apagada y desenchufe el aparato.
14. No use este aparato más que para lo que ha sido diseñado.
15. Los alimentos grandes o utensilios metálicos no deben
introducirse en el aparato ya que pueden crear el riesgo de
incendio.
16. Puede ocurrir un incendio si el aparato está en funcionamiento y
se encuentra en contacto o cubierto con materiales inflamables,
incluyendo cortinas, tapicerías, paredes, etc.
17. No trate de despegar comida adherida a la tostadora mientras
ésta esté enchufada.
18. IMPORTANTE: Si la palanca de sujeción está bloqueada durante
el uso (por ejemplo. porque las rajas de pan son demasiado
gruesas) y el pan se quema, desenchufe el aparato
inmediatamente y déjelo enfriar antes de vaciar y limpiarlo. Si a
caso el problema sigue, contacta a un centro de servicio
autorizado o a una persona similar calificada.
19. No utilice este aparato para la descongelación de alimentos
excepto pan, y solo inserte rebanadas de pan no untadas cuyo
espesor no dañe el interior. Sea riguroso en este punto, ya que
los tostadores son origen de muchos incendios como
consecuencia de no respetar las normas de seguridad.
20. El aparato no es compatible para el uso de minutaría o
dispositivo de control remoto.
GUARDE ESTAS INSTRUCCIONES
SOLAMENTE PARA USO DOMESTICO
INFORMACIÓN SOBRE EL ENCHUFE POLARIZADO
El aparato está provistos con un enchufe polarizado (una pata es
más ancha que la otra). Para reducir el riesgo de choque eléctrico,
este enchufe calza en el tomacorriente polarizado de una sola
manera. Si el enchufe no cabe totalmente en el tomacorriente, gire
el enchufe. Si aun así no calza, consulte a un servicio técnico
cualificado. No intente anular esta característica de seguridad.
11
Assembly page 11/28
TO 39085 - 120501
Fax +1 305 430 9280
Copies of the I/B. Please reproduce them without any
changes except under special instruction from Team
International USA. The pages must be reproduced and folded
in order to obtain a booklet A5 (+/- 148.5 mm width x 210 mm
height). When folding, make sure you keep the good
numbering when you turn the pages of the I/B. Don’t change
the page numbering. Keep the language integrity. Print only
what is inside the frame.
INSTRUCCIONES DEL CABLE
El cable de alimentación del aparato es un cable corto a fin de
disminuir el riesgo de accidentes (caídas al tropezar con él, etc.)
Puede utilizar un alargador si es necesario.
• Asegúrese de que el nivel eléctrico del cable es igual o
mayor que el indicado. Una extensión con un bajo nivel
eléctrico correría el riesgo de sobrecalentarse y de
estropearse.
• Para evitar riesgos colocar de forma tal que los niños no
puedan jalarlo o tropezar con él. Que no arrastre nunca por
el suelo.
PARTES
1
2
3
4
5
6
9
8
1.
2.
3.
4.
5.
7
Palancas de sujeción
Botón de descongelación
Botón para recalentamiento
Botón "bagel”
Regulaciones de la potencia
6. Botón de parada
7. Cristal transparente doble
8. Mecanismo de bloqueo para
el panel interior de cristal.
9. Bandeja de residuos
12
Assembly page 12/28
TO 39085 - 120501
Fax +1 305 430 9280
Copies of the I/B. Please reproduce them without any
changes except under special instruction from Team
International USA. The pages must be reproduced and folded
in order to obtain a booklet A5 (+/- 148.5 mm width x 210 mm
height). When folding, make sure you keep the good
numbering when you turn the pages of the I/B. Don’t change
the page numbering. Keep the language integrity. Print only
what is inside the frame.
ANTES DE SU PRIMERA UTILIZACION
ATENCIÓN: la palanca de sujeción no quedará abajo sí el aparato
no está enchufado!
Para eliminar todo residuo procedente de la producción, antes de
utilizar por primera vez su tostador, hágalo funcionar por lo menos
dos veces al vacío (sin pan), colocando su termostato a un nivel de
potencia media. Puede producirse un ligero humo.
UTILIZACION
•
•
•
•
•
•
•
•
•
•
Antes de usar el aparato por primera vez, asegúrese que esté
limpio (vea “limpieza”) porque tiene contacto directo con el
pan. Compruebe que ningún objeto este dentro de las ranuras
del tostador.
Antes que nada, conecte el aparato a la corriente eléctrica.
Coloque el pan en la ranura. El aparato está provisto para recibir
pan francés, pero también tostadas u otros panes si su grosor y
longitud es más corto que la de la ranura del pan. El espesor
máximo de las lonchas de pan es de 38mm / 1 ½”.
Presione la manecilla hacia abajo, hasta la posición de cierre. Si
el asa sube inmediatamente compruebe si el aparato esta
enchufado y que no haya nada que lo bloquee.
Usted puede ajustar la intensidad de la regulación para que sus
tostadas salgan como usted desee. Los niveles de la regulación
electrónica van del 1 al 7. Gire el regulador electrónico de la
potencia para incrementar la intensidad.
Si desea interrumpir el proceso, presione el botón de parada
(“CANCEL”)
Si desea recalentar pan, presione el botón de recalentamiento
(“REHEAT”)
Si desea descongelar pan, presione el botón descongelación
(“DEFROST”)
Si desea recalentar "bagels" (dulce americano), presione sobre el
botón "BAGEL".
Desenchufe siempre el aparato después de usarlo y déjelo
enfriar antes de tocarlo o guardarlo.
13
Assembly page 13/28
TO 39085 - 120501
Fax +1 305 430 9280
•
Copies of the I/B. Please reproduce them without any
changes except under special instruction from Team
International USA. The pages must be reproduced and folded
in order to obtain a booklet A5 (+/- 148.5 mm width x 210 mm
height). When folding, make sure you keep the good
numbering when you turn the pages of the I/B. Don’t change
the page numbering. Keep the language integrity. Print only
what is inside the frame.
En la base del tostador hay 4 pestañas que sirven para recoger
el cable. Cuando usted guarde su tostador enrolle el cable
alrededor del aparato.
CONSEJOS ÚTILES
•
•
•
•
•
•
Si las piezas de pan tostado son demasiado pequeños para ser
recogidos fácilmente de la tostadora, simplemente levante el
mango del pan a su posición más alta (“High-lift” función), para
levantar el carril y coger el pan tostado. Si todavía no es
accesible, por favor, utilice pinzas finas resistentes al calor, para
recoger el pan de la ranura.
NO toque las partes metálicas con la mano, ya que estarán
calientes!
Para tartas de pop o gofres congelados, por favor, siga las
instrucciones de la caja.
NO tostar alimentos, distintas de pan, por los que no se diga
específicamente que se pueden tostar en tostadoras de ranura.
Si se atasca la tostadora, puede ser simplemente que el pan sea
demasiado grueso. Quítelo de la tostadora y córtelo mas fino.
Las segundas o terceras tostadas pueden salir más oscuras, es
normal. En caso de tostado sucesivo, si queremos tostadas
como las primeras habrá que ajustar el nivel de tostado para
que las tostadas salgan como las primeras.
LIMPIEZA Y MANTENIMIENTO
•
•
•
•
•
Desenchufe el aparato y déjalo enfriar antes de limpiarlo.
Para una mejor utilización, quitar con frecuencia la miga de pan
del tostador (Retire la bandeja (9) situada en el lateral del
tostador) (FIG. 2)
¡Cuidado! Es muy importante vaciar la bandeja recogemigas
regularmente. Las migas que han acumulado en el tostador
través se quemen y el aparato quizás se incendie.
Limpie las partes exteriores con un paño humedecido. No use
productos ni materiales abrasivos como estropajos ya que
pueden dañar el acabado de su aparato.
Para limpiar el cristal interior, asegúrese de que la bandeja de
residuos está vacía, ponga el tostador al revés o por el lado y
presionar sobre la abrazadera situada debajo de la base, en el
14
Assembly page 14/28
TO 39085 - 120501
Fax +1 305 430 9280
Copies of the I/B. Please reproduce them without any
changes except under special instruction from Team
International USA. The pages must be reproduced and folded
in order to obtain a booklet A5 (+/- 148.5 mm width x 210 mm
height). When folding, make sure you keep the good
numbering when you turn the pages of the I/B. Don’t change
the page numbering. Keep the language integrity. Print only
what is inside the frame.
asa del panel de vidrio interior. Cuidadosamente deslice el panel
de vidrio interior de la tostadora para su limpieza. El panel de
cristal interior se puede lavar con agua tibia y jabón. Enjuague y
seque con cuidado, a continuación, poner el cristal en su lugar,
deslizándolo en sus ranuras hasta que la abrazadera pueda
mantener el cristal en su lugar (Fig. 3)
FIG. 2
•
•
FIG. 3
NO SUMERJA NUNCA EL APARATO EN EL AGUA O EN CUALQUIER
OTRO LÍQUIDO. NI LO USE CERCA DEL AGUA.
Toda otra limpieza o reparación deberá ser realizada por un
servicio especializado.
15
Assembly page 15/28
TO 39085 - 120501
Fax +1 305 430 9280
Copies of the I/B. Please reproduce them without any
changes except under special instruction from Team
International USA. The pages must be reproduced and folded
in order to obtain a booklet A5 (+/- 148.5 mm width x 210 mm
height). When folding, make sure you keep the good
numbering when you turn the pages of the I/B. Don’t change
the page numbering. Keep the language integrity. Print only
what is inside the frame.
GARANTÍA
Le sugerimos rellenen y nos envíen rápidamente la Tarjeta de
Registro de Producto adjunta para facilitar la verificación de la
fecha de compra. Por lo tanto, la devolución de esa Tarjeta de
Registro de Producto no es una condición imprescindible para la
aplicación de esa garantía. Puede también rellenar dicha tarjeta de
garantía en línea en la dirección siguiente: www.KALORIK.com
A partir de la fecha de compra, este producto KALORIK está
garantizado un año contra los defectos materiales y de fabricación,
en los Estados Unidos. Esta garantía no es transferible. Conserve la
prueba de compra original. Se exige una prueba de compra para
obtener la aplicación de la garantía.
Durante este período, si el producto KALORIK después de una
inspección por parte de KALORIK, se manifiesta defectuoso, será
reparado o remplazado, según lo que decida KALORIK, sin gastos
para el consumidor. Si se envía un producto de remplazo, se
aplicará la garantía que queda del producto original.
Esta garantía no se aplica a los defectos causados por una mala
utilización por parte del comprador o del usuario, o una negligencia
al no respeto del manual de instrucciones KALORIK, o una utilización
en un circuito eléctrico cuyo voltaje es diferente al que figura en el
producto, o un desgaste normal, o modificaciones o reparaciones
no autorizadas por KALORIK, o por un uso con fines comerciales. No
existe garantía por las partes de cristal, jarras de cristal, filtros, cestos,
cuchillas y accesorios en general. No existe tampoco garantía por
las piezas perdidas por el usuario.
Toda garantía de valor comercial o de adaptabilidad a este
producto está limitada a un año también.
Algunos estados no ponen límites a la duración de la garantía tácita
o no autorizan la exclusión de daños y perjuicios accesorios o
indirectos, por lo que puede que las restricciones anteriormente
mencionadas no le sean aplicables a Usted. Esta garantía le otorga
derechos legales particulares, pero usted puede tener también otros
16
Assembly page 16/28
TO 39085 - 120501
Fax +1 305 430 9280
Copies of the I/B. Please reproduce them without any
changes except under special instruction from Team
International USA. The pages must be reproduced and folded
in order to obtain a booklet A5 (+/- 148.5 mm width x 210 mm
height). When folding, make sure you keep the good
numbering when you turn the pages of the I/B. Don’t change
the page numbering. Keep the language integrity. Print only
what is inside the frame.
derechos que varían de un estado a otro y algunos derechos
pueden variar de un estado a otro.
Si el aparato tuviera un defecto durante el periodo de garantía y / o
más de 30 días después de que se compró, no devuelva el aparato
en la tienda donde le compró: a menudo, nuestro Servicio al
Consumidor puede ayudar a resolver el problema sin que el
producto tenga que ser reparado. Si hace falta una reparación, uno
de nuestros representantes puede confirmar si el producto está bajo
garantía y dirigirle al servicio post-venta más próximo.
Si fuera el caso, traiga el producto (o envíelo, correctamente
franqueado) con la prueba de compra que mencione el número de
autorización de devolución indicado por nuestro Servicio al
Consumidor, al servicio post-venta KALORIK más próximo. (Visite
nuestra web www.KALORIK.com o llame al Servicio al Consumidor
para obtener la dirección del Servicio post-venta KALORIK exclusivo
más próximo).
Si envía el producto, le rogamos añadan una carta explicando la
naturaleza del defecto.
Si tiene preguntas adicionales, por favor llame al Servicio al
Consumidor (véase abajo para los datos completos), de lunes a
jueves, de las 9:00 a las 17:00 (EST), y el viernes de las 9:00 a las 16:00
(EST). Note que las horas pueden ser modificadas.
Si quiere escribirnos, puede hacerlo a la dirección siguiente:
KALORIK Servicio al Consumidor
Team International Group of America Inc.
1400 N.W 159th Street, Suite 102
Miami Gardens, FL 33169 USA
O llame gratuitamente (U.S.A.) al +1 888-521-TEAM / +1 888-KALORIK
Las cartas se aceptan solamente en la dirección anteriormente
mencionada. Los envíos y paquetes que no tengan número de
autorización de devolución serán rechazados.
17
Assembly page 17/28
TO 39085 - 120501
Fax +1 305 430 9280
Copies of the I/B. Please reproduce them without any
changes except under special instruction from Team
International USA. The pages must be reproduced and folded
in order to obtain a booklet A5 (+/- 148.5 mm width x 210 mm
height). When folding, make sure you keep the good
numbering when you turn the pages of the I/B. Don’t change
the page numbering. Keep the language integrity. Print only
what is inside the frame.
CONSIGNES DE SECURITE
Pour utiliser un appareil électrique, des précautions élémentaires
sont à respecter, telles que celles énumérées ci-dessous :
1. LISEZ L’ENSEMBLE DES INSTRUCTIONS.
2. Avant d'utiliser l'appareil, vérifiez que la tension du réseau
corresponde bien à celle de l'appareil.
3. Ne touchez pas les surfaces chaudes. Manipulez les poignées et
les boutons.
4. Pour écarter les risques d’électrocution, n'immergez pas le
cordon, la fiche ou l'appareil dans l'eau ou tout autre liquide.
5. Attention : pour éviter tout risque d’électrocution, débranchez
l’appareil avant de le nettoyer.
6. Gardez hors de portée des enfants et des animaux domestiques.
Cet appareil n’est pas conçu pour être utilisé par des enfants, ou
par des personnes ayant des capacités physiques, sensorielles ou
mentales réduites, ou sans expérience ; à moins qu’une personne
responsable pour leur sécurité leur donne des instructions ou les
supervise pour l’utilisation de l’appareil. Faites extrêmement
attention lors de l’utilisation de cet appareil.
7. Débranchez l'appareil de la prise murale lorsqu’il n’est pas utilisé
ou avant de le nettoyer. Laissez l'appareil refroidir avant d'insérer
ou retirer des pièces.
8. Ne faites pas fonctionner l'appareil si son cordon ou sa fiche est
endommagé ou si l'appareil a présenté un dysfonctionnement
ou est endommagé. Retournez l’appareil au centre de service
autorisé pour le faire vérifier ou réparer.
9. L'utilisation d’accessoires non recommandés par le fabricant
présente des risques d’incendie, d’électrocution ou de blessure.
10. N'utilisez pas l'appareil à l'extérieur.
11. Ne laissez pas le cordon pendre de la table ou d'un comptoir et
évitez qu’il touche une surface chaude.
12. Ne placez pas l'appareil sur ou près d'un brûleur à gaz ou
électrique ou dans un four chaud.
13. Insérez toujours le cordon d'abord dans l'appareil et ensuite dans
la prise murale. Pour déconnecter l'appareil, placez tous les
boutons sur la position arrêt et débranchez l'appareil.
14. N'utilisez pas cet appareil à des fins autres que celles pour
lesquelles il est conçu.
18
Assembly page 18/28
TO 39085 - 120501
Fax +1 305 430 9280
Copies of the I/B. Please reproduce them without any
changes except under special instruction from Team
International USA. The pages must be reproduced and folded
in order to obtain a booklet A5 (+/- 148.5 mm width x 210 mm
height). When folding, make sure you keep the good
numbering when you turn the pages of the I/B. Don’t change
the page numbering. Keep the language integrity. Print only
what is inside the frame.
15. En raison de risques d’incendie, d’électrocution ou de blessure,
n'introduisez pas d’ustensiles de cuisine ni d’aliments de taille
excessive dans l'appareil.
16. Pour écarter les risques d’incendie pendant le fonctionnement
du four, ne le couvrez pas et assurez-vous qu'il n'entre pas en
contact avec des matières inflammables notamment rideaux,
tentures, cloisons, etc.
17. N'essayez pas de décoincer ou de retirer des aliments lorsque
l'appareil est en fonctionnement.
18. IMPORTANT : Au cas où la manette d’enclenchement reste
bloquée pendant le fonctionnement (tranches de pains trop
grosse par exemple) et que le pain commence à carboniser,
débranchez immédiatement votre appareil et laissez-le refroidir
complètement dans un endroit suffisamment ventilé avant de
procéder à son vidage et nettoyage complets. Si le problème
persiste alors que les tranches sont adaptées à la taille des fentes,
n’utilisez plus votre appareil et faites appel à un centre de service
autorisé pour réparation.
19. N’utilisez pas cet appareil pour la décongélation d’aliments
(autres que du pain) et n’insérez que des tranches de pain nontartinées de quelque matière que ce soit et dont l’épaisseur ne
risque pas de gêner la remontée. Soyez très rigoureux à ce sujet
car les grille-pain sont causes de beaucoup d’incendie suite à un
non-respect des élémentaires consignes de sécurité.
20. Ne tentez pas de faire fonctionner cet appareil en utilisant un
système de minuterie externe, ou de contrôle à distance
CONSERVEZ CES INSTRUCTIONS
USAGE DOMESTIQUE UNIQUEMENT
INSTRUCTIONS POUR LES FICHES POLARISÉES
Cet appareil a une fiche polarisée (une des deux tiges métalliques
est plus longue que l’autre). Pour réduire le risque de choc
électrique, cette prise ne peut être introduite que d’une seule façon
dans la fiche murale. Si cette prise ne rentre pas correctement dans
la fiche, retournez-la. Si elle ne rentre toujours pas, contactez un
électricien qualifié et reconnu. N’essayez jamais de modifier vousmême la prise polarisée.
19
Assembly page 19/28
TO 39085 - 120501
Fax +1 305 430 9280
Copies of the I/B. Please reproduce them without any
changes except under special instruction from Team
International USA. The pages must be reproduced and folded
in order to obtain a booklet A5 (+/- 148.5 mm width x 210 mm
height). When folding, make sure you keep the good
numbering when you turn the pages of the I/B. Don’t change
the page numbering. Keep the language integrity. Print only
what is inside the frame.
CONSIGNES CONCERNANT LE CORDON
Le cordon d’alimentation de l’appareil est un cordon de type court,
et ce afin de diminuer les risques d’accidents (chute si vous marchez
sur le cordon...). Vous pouvez toutefois utiliser une rallonge si
nécessaire mais:
• Assurez-vous que l'ampérage de la rallonge soit égal ou
supérieur à celui de l'appareil. Une rallonge avec un
ampérage inférieur à celui de l'appareil risquerait de
surchauffer et de brûler.
• La rallonge ne doit pas pendre du plan de travail ou de la
table afin d'éviter que les enfants ne le tirent ou trébuchent.
DESCRIPTION
1
2
3
4
5
6
9
8
7
1. Manette d'enclenchement
2. Bouton de décongélation
(DEFROST)
3. Bouton de réchauffage
(REHEAT)
4. Bouton de réglage de
l'intensité
5. Bouton "bagel" (BAGEL)
6. Bouton d'arrêt (CANCEL)
7. Double panneau en verre
transparent
8. Mécanisme de verrouillage
de la paroi intérieure
9. Tiroir ramasse-miettes
20
Assembly page 20/28
TO 39085 - 120501
Fax +1 305 430 9280
Copies of the I/B. Please reproduce them without any
changes except under special instruction from Team
International USA. The pages must be reproduced and folded
in order to obtain a booklet A5 (+/- 148.5 mm width x 210 mm
height). When folding, make sure you keep the good
numbering when you turn the pages of the I/B. Don’t change
the page numbering. Keep the language integrity. Print only
what is inside the frame.
AVANT LA PREMIERE UTILISATION
Note: tant que l'appareil n'est pas branché, la manette
d'enclenchement ne restera pas abaissée!
Afin d'éliminer tout résidu provenant de la production, faites
fonctionner le grille-pain au moins deux fois à vide (sans pain) avant
la première utilisation, en plaçant le bouton du thermostat sur un
niveau de puissance moyen. Une légère fumée pourra alors se
dégager.
MODE D’EMPLOI
•
•
•
•
•
•
Avant d’utiliser votre appareil pour la première fois, vérifiez qu’il
est propre (voir paragraphe "Nettoyage") car il est en contact
avec du pain. Veillez aussi à ce qu’aucun objet ne soit tombé
dans les fentes.
Branchez votre appareil sur une prise de courant murale.
Placez les tranches de pain dans la fente. Votre appareil est
prévu pour recevoir des toasts ou autres tranches de pain dès lors
que l’épaisseur et la longueur entrent dans la fente. L’épaisseur
maximale des tranches de pain est de 38mm (1 ½ pouces)
Ensuite, baissez la manette d’enclenchement jusqu’à venir en
butée (en même temps, la grille à l’intérieur des fentes se
resserrera autours du pain afin de le maintenir éloigné des
éléments chauffants au quartz). Une fois ceci réalisé, relâchez la
pression et la manette restera en position basse signifiant ainsi
que la chauffe est en cours. Si la manette remonte
immédiatement, vérifiez que l’appareil est branché car elle ne se
bloque que si l’appareil est sous tension.
Vous pouvez régler l’intensité de chauffe pour obtenir un pain
plus ou moins grillé en plaçant le bouton de réglage d’intensité
sur une des positions graduées de 1 à 7. Pour cela, il vous suffit de
le tourner dans le sens horaire pour augmenter l’intensité et dans
le sens inverse pour la diminuer. Plus le chiffre est élevé, plus le
pain sera grillé.
En cours de fonctionnement, si vous estimez que le pain est
suffisamment grillé ou pour une toute autre raison, vous pouvez
interrompre la chauffe, simplement en appuyant sur le bouton
d’arrêt (CANCEL).
21
Assembly page 21/28
TO 39085 - 120501
Fax +1 305 430 9280
•
•
•
•
•
Copies of the I/B. Please reproduce them without any
changes except under special instruction from Team
International USA. The pages must be reproduced and folded
in order to obtain a booklet A5 (+/- 148.5 mm width x 210 mm
height). When folding, make sure you keep the good
numbering when you turn the pages of the I/B. Don’t change
the page numbering. Keep the language integrity. Print only
what is inside the frame.
Le bouton de réchauffage (REHEAT) vous permet soit de
réchauffer du pain déjà grillé, soit de remettre du pain
insuffisamment grillé en chauffe, pendant un court délai, sans
modifier le réglage d’intensité dont vous avez l’habitude.
Le bouton décongélation (DEFROST) vous permet de griller du
pain qui a été congelé au préalable. Le temps de chauffe est
plus long.
Si vous désirez réchauffer des "bagels" (pains américains), il suffit
de pousser sur le bouton "BAGEL". Le grille-pain ne fonctionnera
alors que sur un des côtés.
Débranchez toujours votre appareil après usage et laissez-le
refroidir avant de le ranger ou de le manipuler.
Un emplacement pour le rangement du cordon est prévu audessous de votre grille-pain et se présente sous la forme de
quatre crochets. Lors du rangement de votre appareil, enroulez
le cordon autour de ces crochets.
NETTOYAGE
•
•
•
•
•
Débranchez l'appareil et laissez-le refroidir.
Un tiroir ramasse-miettes (9) placé au fond de l’appareil est prévu
pour récupérer les miettes de pains après l’usage, afin de faciliter
le nettoyage de cette partie difficilement accessible. Pour
l’ouvrir, il vous suffit de tirer sur la poignée, sur le côté de
l’appareil, pour faire coulisser le tiroir. Pour le remettre en place,
effectuez la manœuvre en sens inverse. (FIG. 2)
Attention, il est important de vider régulièrement le tiroir ramassemiettes car une accumulation trop importante peut être à
l’origine d’un départ de feu dans la fente de votre appareil.
Nettoyez l’extérieur uniquement avec un chiffon sec légèrement
humide. N’utilisez pas de produits de nettoyage abrasifs pour ne
pas endommager la finition de votre appareil.
Pour nettoyer le panneau en verre intérieur, vérifiez que le tiroir
ramasse-miettes est bien vide, et retournez l’appareil (ou mettezle sur le côté). Appuyez sur la gâchette situe sur la poignée du
panneau en verre pour le libérer soigneusement, en le faisant
glisser. Le panneau intérieur peut être lavé dans de l’eau chaude
savonneuse. Rincez et séchez soigneusement avant de le
remettre en place, en le glissant dans ses guides et en prenant
soin que la gâchette verrouille bien le panneau en position.
22
Assembly page 22/28
TO 39085 - 120501
Fax +1 305 430 9280
Copies of the I/B. Please reproduce them without any
changes except under special instruction from Team
International USA. The pages must be reproduced and folded
in order to obtain a booklet A5 (+/- 148.5 mm width x 210 mm
height). When folding, make sure you keep the good
numbering when you turn the pages of the I/B. Don’t change
the page numbering. Keep the language integrity. Print only
what is inside the frame.
Fig. 2
•
•
Fig. 3
NE JAMAIS UTILISER CET APPAREIL PRÈS DE L’EAU, NE JAMAIS
PLONGER L’APPAREIL DANS DE L’EAU OU TOUT AUTRE LIQUIDE.
Toute autre opération de maintenance doit être effectuée par
un service qualifié.
23
Assembly page 23/28
TO 39085 - 120501
Fax +1 305 430 9280
Copies of the I/B. Please reproduce them without any
changes except under special instruction from Team
International USA. The pages must be reproduced and folded
in order to obtain a booklet A5 (+/- 148.5 mm width x 210 mm
height). When folding, make sure you keep the good
numbering when you turn the pages of the I/B. Don’t change
the page numbering. Keep the language integrity. Print only
what is inside the frame.
GARANTIE
Nous vous suggérons de remplir et de nous renvoyer rapidement la
Carte d’Enregistrement Produit ci-jointe afin de faciliter la vérification
de la date d’achat. Cependant, le renvoi de la Carte
d’Enregistrement Produit n’est pas une condition indispensable à
l’application de la présente garantie. Vous pouvez aussi remplir
cette carte de garantie en ligne à l’adresse suivante :
www.KALORIK.com.
A compter de la date d’achat, ce produit KALORIK est garanti un
an, sur le territoire des Etats-Unis, contre les défauts matériels et de
fabrication. Cette garantie n’est pas transférable. Conservez la
preuve d’achat originelle. Une preuve d’achat est exigée pour
obtenir l’application de la garantie.
Durant cette période, le produit KALORIK qui, après inspection par
KALORIK, s’avère défectueux, sera réparé ou remplacé, au choix de
KALORIK, sans frais pour le consommateur. Si un produit de
remplacement est envoyé, c’est la garantie restante du produit
originel qui s’appliquera.
La présente garantie ne s’applique pas aux défauts dus à une
mauvaise utilisation de la part de l’acheteur ou de l’utilisateur, à une
négligence, au non-respect des consignes du manuel d’utilisation
KALORIK, à une utilisation sur un circuit électrique au voltage
différent de celui renseigné sur le produit, à une usure normale, à des
modifications ou réparations non autorisées par KALORIK, ou par un
usage à des fins commerciales. Il n’existe pas de garantie pour les
parties en verre, récipients en verre, filtres, paniers, lames et
accessoires en général. Il n’existe également pas de garantie pour
les pièces perdues par l’utilisateur.
Toute garantie de valeur commerciale ou d’adaptabilité à ce
produit est également limitée à la garantie d’un an.
Certains états ne limitent pas la longueur de la garantie tacite ou
n’autorisent pas l’exclusion de dommages-intérêts accessoires ou
indirects, les restrictions ci-dessus peuvent donc ne pas s’appliquer à
24
Assembly page 24/28
TO 39085 - 120501
Fax +1 305 430 9280
Copies of the I/B. Please reproduce them without any
changes except under special instruction from Team
International USA. The pages must be reproduced and folded
in order to obtain a booklet A5 (+/- 148.5 mm width x 210 mm
height). When folding, make sure you keep the good
numbering when you turn the pages of the I/B. Don’t change
the page numbering. Keep the language integrity. Print only
what is inside the frame.
vous. Cette garantie vous donne des droits légaux particuliers, et
certains droits peuvent varier d’un état à l’autre.
Si l’appareil devait présenter un défaut durant la période de
garantie et plus de 30 jours après l’achat, ne ramenez pas l’appareil
au magasin : souvent, notre Service Clientèle peut aider à résoudre
le problème sans que le produit ne doive être réparé. Si une
réparation est nécessaire, un représentant peut confirmer si le
produit est sous garantie et vous rediriger vers notre centre de
réparation.
Le cas échéant, ramenez le produit (ou envoyez-le, dûment
affranchi), ainsi qu’une preuve d’achat, en mentionnant le numéro
d’autorisation de retour, indiqué par notre service clientèle, au
service après-vente KALORIK agrée (visitez notre site internet
www.KALORIK.com ou appelez notre département Service Clientèle
pour obtenir l’adresse du service après-vente KALORIK agréé).
Si vous envoyez le produit, veuillez y joindre une lettre expliquant la
nature du défaut.
Si vous avez des questions complémentaires, veuillez appeler notre
département Service Clientèle (voyez plus bas pour les coordonnées
complètes), du Lundi au Jeudi de 9h à 17h (EST) et le Vendredi de 9h
à 16h (EST). Veuillez noter que les heures sont sujettes à modification.
Si vous souhaitez nous écrire, adressez votre courrier à:
KALORIK Customer Service Department
Team International Group of America Inc.
1400 N.W 159th Street, Suite 102
Miami Gardens, FL 33169 USA
Ou appelez (Gratuitement des Etats-Unis): +1 888-521-TEAM ou +1
888-KALORIK.
Seules les lettres seront acceptées à l’adresse ci-dessus. Les envois
et colis n’ayant pas de numéro d’autorisation de retour seront
refusés.
25
Assembly page 25/28
TO 39085 - 120501
Fax +1 305 430 9280
Copies of the I/B. Please reproduce them without any
changes except under special instruction from Team
International USA. The pages must be reproduced and folded
in order to obtain a booklet A5 (+/- 148.5 mm width x 210 mm
height). When folding, make sure you keep the good
numbering when you turn the pages of the I/B. Don’t change
the page numbering. Keep the language integrity. Print only
what is inside the frame.
26
Assembly page 26/28
TO 39085 - 120501
Fax +1 305 430 9280
Copies of the I/B. Please reproduce them without any
changes except under special instruction from Team
International USA. The pages must be reproduced and folded
in order to obtain a booklet A5 (+/- 148.5 mm width x 210 mm
height). When folding, make sure you keep the good
numbering when you turn the pages of the I/B. Don’t change
the page numbering. Keep the language integrity. Print only
what is inside the frame.
27
Assembly page 27/28
TO 39085 - 120501
Fax +1 305 430 9280
Copies of the I/B. Please reproduce them without any
changes except under special instruction from Team
International USA. The pages must be reproduced and folded
in order to obtain a booklet A5 (+/- 148.5 mm width x 210 mm
height). When folding, make sure you keep the good
numbering when you turn the pages of the I/B. Don’t change
the page numbering. Keep the language integrity. Print only
what is inside the frame.
I/B Version
120501
www.KALORIK.com
Back cover page (last page)
Assembly page 28/28