1
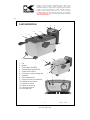
Fax +1 305 430 9692
Copies of the I/B. Please reproduce them without any
changes except under special instruction from Team
International USA. The pages must be reproduced and folded
in order to obtain a booklet A5 (+/- 148.5 mm width x 210 mm
height). When folding, make sure you keep the good
numbering when you turn the pages of the I/B. Don’t change
the page numbering. Keep the language integrity. Print only
what is inside the frame.
Deep fryer
Freidora
Friteuse
USK FT 36673
120V~60Hz 1500W (12.5A)
Front cover page (first page)
Assembly page 1/40
Fax +1 305 430 9692
Copies of the I/B. Please reproduce them without any
changes except under special instruction from Team
International USA. The pages must be reproduced and folded
in order to obtain a booklet A5 (+/- 148.5 mm width x 210 mm
height). When folding, make sure you keep the good
numbering when you turn the pages of the I/B. Don’t change
the page numbering. Keep the language integrity. Print only
what is inside the frame.
IMPORTANT SAFEGUARDS
When using electrical appliances, basic safety precautions should
always be followed, including the following:
1. READ ALL INSTRUCTIONS BEFORE USE
2. Check that your mains voltage corresponds to that stated on the
rating plate of the appliance before using the appliance.
3. Do not touch hot surfaces. Use handles or knobs.
4. To protect against electric shock do not immerse cord, plugs, the
appliance or its control panel in water or other liquid.
5. Close supervision is necessary when the appliance is used by or
near children.
6. Do not operate any appliance with a damaged cord or plug or
after the appliance malfunctions or has been damaged in any
manner. Return appliance to the manufacturer’s authorized
service facility for examination, repair, or adjustment.
7. Do not place any items on top or next to this appliance at any
time. To prevent a fire, keep this appliance clear of contact with
any flammable materials including curtains, draperies, walls,
plastic materials, etc., at all times.
8. Unplug from outlet when not in use and before cleaning. Allow to
cool before putting on or taking off parts, and before cleaning
the appliance.
9. Do not place any flammable materials in or close to the
appliance, such as paper, cardboard, plastic or flammable
substances.
10. Oversized foods must not be inserted into the Deep Fryer as they
may create a fire.
11. The use of accessory attachments not recommended by the
appliance manufacturer may cause injuries, electric shocks or
fire.
12. Do not use outdoors.
13. Do not let cord hang over edge of table or counter or touch hot
surfaces.
14. Do not use with an extension cord!
2
Assembly page 2/40
FT 36673 - 120501
Fax +1 305 430 9692
Copies of the I/B. Please reproduce them without any
changes except under special instruction from Team
International USA. The pages must be reproduced and folded
in order to obtain a booklet A5 (+/- 148.5 mm width x 210 mm
height). When folding, make sure you keep the good
numbering when you turn the pages of the I/B. Don’t change
the page numbering. Keep the language integrity. Print only
what is inside the frame.
15. Do not place on or near a hot gas or electric burner, or in a
heated oven.
16. Extreme caution must be used when moving an appliance
containing hot oil or other hot liquids.
17. It is not always recommended to place the lid on the deep fryer
when it is in use, as this could cause oil overflow and not give the
best cooking results if too much steam is generated. For this kind
of fryer the lid could only be used for storing and moving (as soon
as the deep fryer has cooled down).
18. Always attach plug to appliance first, then plug cord in the wall
outlet. To disconnect, remove plug from wall outlet.
19. Do not use appliance for other than intended use.
20. Be sure the handle is properly assembled to basket and locked in
place. See detailed assembly instructions
SAVE THESE INSTRUCTIONS
HOUSEHOLD USE ONLY
POLARIZED PLUG INSTRUCTIONS
This appliance has a polarized plug (one blade is wider than the
other). To reduce the risk of electric shock, this plug will fit into the
polarized outlet only one way. If the plug does not properly fit into
the outlet at first, reverse it. If it still does not fit, contact a qualified
electrician. Do not attempt to modify the plug in any way.
SHORT CORD INSTRUCTIONS
A short power supply cord is provided to reduce the hazards resulting
from becoming entangled in, or tripping over a longer cord. Do not
use the appliance with an extension cord.
3
Assembly page 3/40
FT 36673 - 120501
Fax +1 305 430 9692
Copies of the I/B. Please reproduce them without any
changes except under special instruction from Team
International USA. The pages must be reproduced and folded
in order to obtain a booklet A5 (+/- 148.5 mm width x 210 mm
height). When folding, make sure you keep the good
numbering when you turn the pages of the I/B. Don’t change
the page numbering. Keep the language integrity. Print only
what is inside the frame.
PART DESCRIPTION
3
4
5
6
11
1
12
13
7
2
14
2
10
1. Lid
2. Basket
3. Power light (POWER)
9
4. Temperature light (HEAT)
5. Thermostat control
6. Control box with heating element 8
7. Handles
8. Removable bowl
3
9. Support/hook of the basket
10. Handle of the basket
11. Handle of the lid
12. Filter box opening
13. Viewing window
14. Non-skid feet
4
Assembly page 4/40
4
5
FT 36673 - 120501
Fax +1 305 430 9692
Copies of the I/B. Please reproduce them without any
changes except under special instruction from Team
International USA. The pages must be reproduced and folded
in order to obtain a booklet A5 (+/- 148.5 mm width x 210 mm
height). When folding, make sure you keep the good
numbering when you turn the pages of the I/B. Don’t change
the page numbering. Keep the language integrity. Print only
what is inside the frame.
BEFORE USE
•
•
•
Remove all packaging from the unit.
Remove the lid, basket, handle and any accessory from the
appliance.
Before you use the deep fryer for the first time, we recommend
that you clean the lid, bowl, basket, handle and housing of the
deep fryer with warm soapy water with a soft cloth.
DISASSEMBLING THE DEEP FRYER
•
•
•
Put aside the basket and lid
Remove the control panel from the appliance. To do this, gently
pull the control panel upwards until it is released.
Take the interior bowl with your two hands and pull it up gently.
ASSEMBLING THE DEEP FRYER
Stand the appliance on a dry horizontal surface.
Place the bowl back in the housing and push it downwards.
Replace the control panel and the accessories. To replace the
control panel, gently slide the control panel downward into the
location grooves on the back of the housing until it is locked.
NOTE: The appliance will only operate when the control panel is
correctly fitted into the outer jacket. A safety switch (on the front of
the control box) prevents the function if the control panel is not
assembled correctly.
• Insert the pins of the basket handle into the 2 slots in the basket,
and then unfold the handle of the basket until it is locked, to
make raising the basket easy.
•
•
•
FIRST USE
•
•
•
When using the appliance for the first time, pour the required
amount of oil in the bowl, making sure that the level is between
the MIN and MAX marks indicated inside the bowl.
We recommend that you use liquid oil that is suitable for deep
frying. Check the label on the bottle.
If you wish to use a solid fat, cut the fat in small pieces. Plug in the
appliance, set the thermostat on the lowest temperature setting
and add the fat pieces slowly. When the fat has melted, set the
5
Assembly page 5/40
FT 36673 - 120501
Fax +1 305 430 9692
Copies of the I/B. Please reproduce them without any
changes except under special instruction from Team
International USA. The pages must be reproduced and folded
in order to obtain a booklet A5 (+/- 148.5 mm width x 210 mm
height). When folding, make sure you keep the good
numbering when you turn the pages of the I/B. Don’t change
the page numbering. Keep the language integrity. Print only
what is inside the frame.
thermostat to the desired temperature. Warning: failure to
observe this will damage your deep fryer.
USE
•
•
•
Before plugging in your appliance, always make sure that the oil
is at least at the minimum marking on the inside of the enameled
tank. Failure to fill the tank with oil, to at least the minimum, will
result in overheating and triggering the safety thermostat (see
below for details). Your fryer will hold 3.2L / 3.3qt of oil at the
minimum oil mark and 3.8L / 4.0 qt of oil at the maximum mark.
Attach the magnetic cord to the appliance and plug it into the
electric wall outlet. Use care to position the magnetic plug
correctly (the plug indicates which side needs to be up)
Set the thermostat to the desired temperature. The power light
(POWER) (3) and the temperature pilot light (HEAT) (4) will
illuminate. As soon as the desired temperature is reached, the
temperature pilot light HEAT (4) will go out.
Note: the green HEAT light (4) will cycle from green to off as the
thermostat cycles to maintain the correct oil temperature.
•
•
•
•
Allow the oil to come to temperature before placing any food in
the oil.
Place the food in the fry basket. Do not overload the basket to
avoid lowering the temperature of the oil too much. Also
overloading can cause a boil over. As a rule, do not fill the fry
basket more than ½ full, or 1 ½” to 2” from the bottom of the
basket.
Once the oil is at the correct temperature and the HEAT light is
off, slowly lower the fry basket(s) into the oil.
You can place the lid on the unit during cooking, or leave it off.
Note: Do not put the lid on the deep fryer when frying French fries or
high moisture foods.
•
When the food is ready, remove the lid if put on, raise the basket
by lifting the handle and let the food drain its excess oil, by
hanging the basket using the drain support hook (9) located at
the back of the fry basket.
6
Assembly page 6/40
FT 36673 - 120501
Fax +1 305 430 9692
•
•
•
Copies of the I/B. Please reproduce them without any
changes except under special instruction from Team
International USA. The pages must be reproduced and folded
in order to obtain a booklet A5 (+/- 148.5 mm width x 210 mm
height). When folding, make sure you keep the good
numbering when you turn the pages of the I/B. Don’t change
the page numbering. Keep the language integrity. Print only
what is inside the frame.
After the excess oil has drained, remove the basket and turn the
food out onto a paper towel-lined baking sheet, to allow the
remaining oil to drain away.
Ensure the food is thoroughly cooked inside and out.
Your deep fryer does not have a separate ON/OFF switch. After
use, turn the thermostat to its “MIN” position and unplug the
appliance. Never move or store the appliance as long as the oil
or fat is still hot. Do not expose to excessively cold temperatures
when oil is still hot.
CAUTION:
• Use only metal utensils when deep frying. Plastic or rubber utensils
will be ruined from the hot oil. Do not leave metal utensils sitting in
the hot oil.
• Always use caution when frying to prevent severe personal injury,
fire, scalding, etc… Never leave unattended when in use. Always
use caution around children.
• Steam will escape from vents in lid. Do not place your hand over
the vents. When removing lid, always open towards the back of
the unit to allow steam to escape away from you.
• To reduce the risk of oil overflow or spatter, lower the basket
slowly into the oil. Should oil begin to foam and rise in the oil tank,
lift the basket up and allow the oil to lower, and the begin
lowering food slowly into the oil again, until foaming stops.
FOR BEST RESULTS
•
•
•
•
•
•
Always dry food well before frying. Very ‘wet’ food can cause the
oil to ‘foam’ and hot oil may overflow.
Do not use the lid for frying French fries or food with high moisture
content.
French fries are best when fried in 2 stages (see Time and
Temperature table)
Food for frying should be roughly of the same size to ensure the
food cooks evenly and thoroughly.
Many types of food may need to be coated before frying typical coatings are batter or breadcrumbs.
Always wait until the fryer has reached the desired temperature
and the pilot light has gone out, before adding the food.
7
Assembly page 7/40
FT 36673 - 120501
Fax +1 305 430 9692
•
•
•
•
•
Copies of the I/B. Please reproduce them without any
changes except under special instruction from Team
International USA. The pages must be reproduced and folded
in order to obtain a booklet A5 (+/- 148.5 mm width x 210 mm
height). When folding, make sure you keep the good
numbering when you turn the pages of the I/B. Don’t change
the page numbering. Keep the language integrity. Print only
what is inside the frame.
Do not overfill the basket.
If you are frying more than one load, please give the oil a
chance to heat up to the proper temperature (HEAT light will turn
from green to off) before placing another load in the oil.
It is important to replace the oil if you notice any of the following:
1. Unpleasant odor to the oil
2. Excessive smoking when heating the oil
3. Oil is dark in color
4. The oil has been stored for a long period of time
Frying food that has a batter or coating will require changing the
oil more often.
When re-using oil, it is recommended that you strain the oil to
remove food particles. Use a mesh strainer over a bowl to
separate the food particles from the oil. For best results, you can
line the strainer with 2 layers of cheesecloth. Once the oil is
strained, keep in the refrigerator or return the oil to the oil tank.
SECURITY THERMOSTAT
CAUTION: This fryer has a built-in security thermostat that switches the
unit off if it accidentally overheats (e.g. temperature control fails to
function.) Overheating can also happen if the oil is too old or too
thick, if there is not enough oil in the tank (or if there is no oil).
To reset the security thermostat after a cut-off:
•
•
•
•
•
•
Turn the unit off by turning the temperature control to “MIN”,
unplug from the wall outlet and remove the magnetic cord.
Allow the unit to cool.
Remove the control panel from the tank.
Using a small screwdriver or toothpick, press the reset button on
the left at the back of the control box.
Correct the oil situation by changing the oil if too old, or adding
oil if not enough in the tank.
Reassemble the unit and resume cooking.
Your deep fryer is now ready to use. To make sure this does not
happen again, please read the instruction manual thoroughly.
8
Assembly page 8/40
FT 36673 - 120501
Fax +1 305 430 9692
Copies of the I/B. Please reproduce them without any
changes except under special instruction from Team
International USA. The pages must be reproduced and folded
in order to obtain a booklet A5 (+/- 148.5 mm width x 210 mm
height). When folding, make sure you keep the good
numbering when you turn the pages of the I/B. Don’t change
the page numbering. Keep the language integrity. Print only
what is inside the frame.
TEMPERATURE GUIDE FOR BEST RESULTS
FOOD
TEMPERATURE*
Breaded Fillet of fish
Scampi
Chicken Breast
Breaded Chicken pieces
Onion Rings
Breaded Mushrooms
Broccoli Fritters
Courgette Fritters
Celery in batter
Chips First Stage
Chips Second Stage
340°F / 170°C
300°F / 150°C
350°F / 175°C
340°F / 170°C
355°F / 180°C
355°F / 180°C
365°F / 185°C
365°F / 185°C
355°F / 180°C
340°F / 170°C
355°F / 180°C
(MINUTES
(approximately)*
6-7
4-6
4-5
12-15
4
3-4
3-4
3-4
3-4
8
2
* Temperature and time indications are indicative and shall be
modified/adapted, depending on the recipe or personal
preferences.
CLEANING
•
•
•
•
•
•
•
•
Caution: never immerse the control box in water or any other
liquid.
Unplug the deep fryer.
Wait until the unit is completely cool before cleaning. Be careful
when touching the heating element as it might stay hot for quite
some time after you have unplugged the appliance.
NEVER IMMERSE THE CONTROL BOX WITH THE HEATING ELEMENT
AND THE MAGNETIC CORD IN WATER, OR ANY OTHER LIQUID, FOR
ANY REASON WHATSOEVER.
Follow the section ‘Disassembling the deep fryer’.
All the parts, except the control panel with the heating element,
the magnetic plug, and the filters, are dishwasher safe.
Alternatively, clean the fryer’s tank and housing with warm soapy
water. It may help to soak the parts for a short time.
The control panel and heating element can be wiped down with
a damp dishcloth. Rinse the dishcloth and wipe off all residual
dish soap.
9
Assembly page 9/40
FT 36673 - 120501
Fax +1 305 430 9692
•
•
•
•
•
Copies of the I/B. Please reproduce them without any
changes except under special instruction from Team
International USA. The pages must be reproduced and folded
in order to obtain a booklet A5 (+/- 148.5 mm width x 210 mm
height). When folding, make sure you keep the good
numbering when you turn the pages of the I/B. Don’t change
the page numbering. Keep the language integrity. Print only
what is inside the frame.
Do not use strong detergents or abrasive cloths/liquid, as this will
damage the deep fryer.
To clean the lid and filters, remove the filters by removing the filter
cover. 2 filters are included. Wash in warm soapy water and rinse
thoroughly. Allow the filters to dry completely, and replace in lid.
The white filter (cloth filter) shall be placed in the lid first, then the
black filter (charcoal filter). Snap the filter cover back in place
when done.
Thoroughly dry all parts of the appliance after cleaning.
Change the oil regularly.
To re-assemble, follow the section ‘Assembling the deep fryer’.
NOTE: You may notice a slight discoloration of the parts, when you
choose to use the dishwasher. This will not affect the performance.
STORAGE
•
•
Wait until the deep fryer is completely cool before storing.
The unit can be stored with the oil inside. Ensure the lid is tightly
closed to avoid dust getting into the oil.
TROUBLESHOOTING
Problems
Appliance does not work.
Machine stops running
suddenly or does not restart
Solutions
Make sure the appliance is
plugged into the mains; make
sure the plug is powered; check
the assembly of the control box
(red safety switch on the front of
the control box needs to be
pressed); make sure the
magnetic cord is well connected
to control box and the wall
outlet.
Make sure the magnetic plug is
well connected to control box;
Appliance may have
overheated. Please follow
instructions indicated under
“Safety Cut Off Thermostat”
10
Assembly page 10/40
FT 36673 - 120501
Fax +1 305 430 9692
Copies of the I/B. Please reproduce them without any
changes except under special instruction from Team
International USA. The pages must be reproduced and folded
in order to obtain a booklet A5 (+/- 148.5 mm width x 210 mm
height). When folding, make sure you keep the good
numbering when you turn the pages of the I/B. Don’t change
the page numbering. Keep the language integrity. Print only
what is inside the frame.
RECIPES
Fresh Chips
•
•
•
•
•
•
•
•
•
Fresh chips are best fried in two stages.
Use preferably ‘old’ potatoes (not ‘new crop’ potatoes). Cut the
potatoes into equal sizes. Rinse the chipped potatoes under running
water to reduce the starch level. Dry thoroughly and separate the
pieces.
Do not exceed the recommended quantity in the basket. When the
temperature has reached 340°F, place the chips in the basket and
slowly lower the basket into the oil.
For 1 lb. of chips, fry for 8 minutes on 340°F then raise the basket.
Increase temperature to 355°F
Wait until the temperature light goes out again, lower the basket and fry
for another 2 minutes.
Raise the basket and let the chips drain.
For best results, before serving, gently dab the chips with absorbent
paper to remove the excess oil.
Frying times may vary slightly depending on the type of potatoes used
and the thickness of the chips.
Onion Rings
•
•
•
•
•
Frying temperature: 350°F for 4 to 5 minutes
Peel the onions and slice. Separate the slices into rings
Dip the rings into a bowl of seasoned milk
Then dust the rings in plain flour
Place the rings separately in the frying basket and fry a few at a time.
Breaded Mushrooms
•
•
•
•
Frying temperature: 350°F for 4 to 5 minutes
Beat 1 egg and dip the mushrooms into the egg
Then coat the mushrooms with breadcrumbs
Place separately into the frying basket and fry a few at a time.
Sole sticks
•
•
•
•
Frying temperature: 320°F for 3-4 minutes
Cut the sole fillet into thin slices. Coat the slices in some seasoned plain
flour
Then dip the slices into beaten egg and coat with bread crumbs.
Place separately into the frying basket and fry a few at a time.
11
Assembly page 11/40
FT 36673 - 120501
Fax +1 305 430 9692
Copies of the I/B. Please reproduce them without any
changes except under special instruction from Team
International USA. The pages must be reproduced and folded
in order to obtain a booklet A5 (+/- 148.5 mm width x 210 mm
height). When folding, make sure you keep the good
numbering when you turn the pages of the I/B. Don’t change
the page numbering. Keep the language integrity. Print only
what is inside the frame.
WARRANTY
We suggest that you complete and return the enclosed Product
Registration Card promptly to facilitate verification of the date of
original purchase. However, return of the Product Registration Card is
not a condition of these warranties. You can also fill out this warranty
card online, at the following address: www.KALORIK.com
This KALORIK product is warranted in the U.S.A. for 1 year from the
date of purchase against defects in material and workmanship. This
warranty is not transferable. Keep the original sales receipt. Proof of
purchase is required to obtain warranty performance.
During this period, if the KALORIK product, upon inspection by
KALORIK, is proven defective, it will be repaired or replaced, at
Kalorik’s option, without charge to the customer. If a replacement
product is sent, it will carry the remaining warranty of the original
product.
This warranty does not apply to any defect arising from a buyer's or
user's misuse of the product, negligence, failure to follow KALORIK
instructions noted in the user’s manual, use on current or voltage
other than that stamped on the product, wear and tear, alteration
or repair not authorized by KALORIK, or use for commercial purposes.
There is no warranty for glass parts, glass containers, filter basket,
blades and agitators, and accessories in general. There is also no
warranty for parts lost by the user.
ANY WARRANTY OF MERCHANTABILITY OR FITNESS WITH RESPECT TO
THIS PRODUCT IS ALSO LIMITED TO THE ONE YEAR LIMITED WARRANTY
PERIOD.
Some states do not allow limitation on how long an implied warranty
lasts or do not allow the exclusion of incidental or consequential
damages, so the above limitations may not apply to you. This
warranty gives you specific legal rights, and you may also have other
rights which vary from state to state.
12
Assembly page 12/40
FT 36673 - 120501
Fax +1 305 430 9692
Copies of the I/B. Please reproduce them without any
changes except under special instruction from Team
International USA. The pages must be reproduced and folded
in order to obtain a booklet A5 (+/- 148.5 mm width x 210 mm
height). When folding, make sure you keep the good
numbering when you turn the pages of the I/B. Don’t change
the page numbering. Keep the language integrity. Print only
what is inside the frame.
If the appliance should become defective within the warranty
period and more than 30 days after date of purchase, do not return
the appliance to the store: often, our Customer Service
Representatives can help solve the problem without having the
product serviced. If servicing is needed, a Representative can
confirm whether the product is under warranty and direct you to the
nearest service location.
If this is the case, bring the product, or send it, postage prepaid by
the user (all Kalorik customers are responsible for the initial shipment
back to the warranty center), along with proof of purchase and
indicating a return authorization number given by our Customer
Service Representatives, to the authorized KALORIK Service Center
(please visit our website at www.KALORIK.com or call our Customer
Service Department for the address of our authorized KALORIK
Service Center).
If you send the product, please include a letter explaining the nature
of the claimed defect.
If you have additional questions, please call our Customer Service
Department (please see below for complete contact information),
Monday through Thursday from 9:00am - 5:00pm (EST) and Friday
from 9:00am - 4:00pm (EST). Please note hours are subject to change.
If you would like to write, please send your letter to:
KALORIK Customer Service Department
Team International Group of America Inc.
1400 N.W 159th Street, Suite 102
Miami Gardens, FL 33169 USA
Or call:
Toll Free: +1 888-521-TEAM / +1 888-KALORIK
Only letters can be accepted at this address above. Shipments and
packages that do not have a return authorization number will be
refused.
13
Assembly page 13/40
FT 36673 - 120501
Fax +1 305 430 9692
Copies of the I/B. Please reproduce them without any
changes except under special instruction from Team
International USA. The pages must be reproduced and folded
in order to obtain a booklet A5 (+/- 148.5 mm width x 210 mm
height). When folding, make sure you keep the good
numbering when you turn the pages of the I/B. Don’t change
the page numbering. Keep the language integrity. Print only
what is inside the frame.
CONSEJOS DE SEGURIDAD
Cuando se utilizan aparatos eléctricos, hay unas precauciones
básicas de seguridad que siempre se deben seguir, tales como:
1. LEA TODAS LAS INSTRUCCIONES.
2. Antes de utilizar el aparato, compruebe que el voltaje de la red
eléctrica coincide con el indicado en la placa de datos técnicos
del aparato.
3. No toque las superficies calientes. Utilice las asas o los botones.
4. Para protegerse contra una descarga eléctrica, no sumerja el
aparato o el enchufe en agua o en otros líquidos.
5. Es siempre necesaria la supervisión cercana cuando este
aparato sea utilizado cerca de niños. Este aparato no debe ser
usado por niños.
6. No opere el aparato si el cable o el enchufe están dañados, o
después de que el aparato ha funcionado inadecuadamente,
se ha caído o ha sido dañado en cualquier manera. El aparato
debe ser llevado al fabricante o a un centro de servicio
autorizado para ser comprobado y reparado.
7. No ponga ningún objeto encima o cerca del aparato. Procure
que el aparato no entre nunca en contacto con materiales
inflamables como cortinas, tejidos, etc., podría provocar un
incendio.
8. Desenchufe el aparato cuando no lo use o antes de limpiarlo.
Deje que el aparato enfrie antes de quitar o poner accesorios o
antes de limpiar el aparato.
9. No ponga materiales inflamables como papel, cartón o plástico
en la freidora.
10. Alimentos muy grandes no deben ser freidos en la freidora ya
que podrían provocar un incendio.
11. El uso de accesorios que no sean los recomendados por el
fabricante puede causar incendios, descargas eléctricas o
heridas.
12. No use en el exterior.
14
Assembly page 14/40
FT 36673 - 120501
Fax +1 305 430 9692
Copies of the I/B. Please reproduce them without any
changes except under special instruction from Team
International USA. The pages must be reproduced and folded
in order to obtain a booklet A5 (+/- 148.5 mm width x 210 mm
height). When folding, make sure you keep the good
numbering when you turn the pages of the I/B. Don’t change
the page numbering. Keep the language integrity. Print only
what is inside the frame.
13. No permita que el cable cuelgue del borde de la mesa o del
mostrador o toque las partes calientes.
14. No utilice con un alargador.
15. No coloque este aparato sobre o cerca de quemadores de gas
o eléctricos, o dentro de un horno caliente.
16. Tenga mucho cuidado cuando desplace un aparato lleno de
aceite caliente o otros líquidos calientes.
17. NO es recomendable colocar la tapadera en la freidora durante
su funcionamiento, ya que podría provocar desbordamiento del
aceite y no dar los mejores resultados si se genera demasiado
vapor. Para este tipo de freidora, la tapadera se usa para
guardar y desplazar el aparato (una vez que haya enfriado).
18. Enchufe siempre primero el cable al aparato y después en el
enchufe de la red eléctrica. Para desconectar el aparato,
desenchúfelo.
19. No use este aparato más que para lo que ha sido diseñado.
20. Asegúrese que el asa está correctamente acoplada en la cesta
y bloqueada en su lugar. Véase las instrucciones de montaje.
GUARDE ESTAS INSTRUCCIONES
SOLAMENTE PARA USO DOMESTICO
INFORMACIÓN SOBRE EL ENCHUFE POLARIZADO
Para reducir el riesgo de choque eléctrico, este aparato tiene un
enchufe polarizado (una pata es más ancha que la otra).
Como medida de seguridad, este enchufe calza en el
tomacorriente polarizado de una sola manera. Si el enchufe no
cabe en el tomacorriente, pruebe en el otro sentido. Si aún así no
calza, consulte a un servicio técnico cualificado. No intente anular
esta característica de seguridad.
INSTRUCCIONES DEL CABLE
El cable de alimentación del aparato es un cable corto a fin de
disminuir el riesgo de accidentes (caídas al tropezar con él, etc.).
No utilice el aparato con un alargador.
15
Assembly page 15/40
FT 36673 - 120501
Fax +1 305 430 9692
Copies of the I/B. Please reproduce them without any
changes except under special instruction from Team
International USA. The pages must be reproduced and folded
in order to obtain a booklet A5 (+/- 148.5 mm width x 210 mm
height). When folding, make sure you keep the good
numbering when you turn the pages of the I/B. Don’t change
the page numbering. Keep the language integrity. Print only
what is inside the frame.
PARTES
3
4
5
6
11
1
12
13
7
14
2
10
1. Tapaderas
9
2. Cesta
3. Testigo de funcionamiento
8
(POWER)
4. Testigo de temperatura
(HEAT)
5. Termostato de control
6. Caja de control con resistencia 3
7. Asa
8. Cuba amovible
9. Suporte de la cesta
10. Asa de la cesta
11. Asa de la tapadera
12. Rejilla del forta-filtro
13. Ventana
14. Patas antideslizantes
16
Assembly page 16/40
4
5
FT 36673 - 120501
Fax +1 305 430 9692
Copies of the I/B. Please reproduce them without any
changes except under special instruction from Team
International USA. The pages must be reproduced and folded
in order to obtain a booklet A5 (+/- 148.5 mm width x 210 mm
height). When folding, make sure you keep the good
numbering when you turn the pages of the I/B. Don’t change
the page numbering. Keep the language integrity. Print only
what is inside the frame.
ANTES DE LA UTILIZACIÓN
•
•
•
Quite el embalaje del aparato.
Quite la tapadera, la cesta, el asa y todos los accesorios del
aparato.
Antes de su primer uso, se recomienda limpiar cuidadosamente
la tapadera, la cubeta, la cesta y los accesorios de la freidora
con un paño humedecido con agua tibia jabonosa.
DESMONTAJE DE LA FREIDORA
•
•
•
Quite la tapa y la cesta.
Quite el panel de mandos del aparato. Para esto, liberte el panel
de mandos levantándolo despacio.
Quite la cubeta interior agarrándola por ambos los lados y
sáquela despacio.
MONTAJE DE LA FREIDORA
•
•
•
•
•
Ponga el aparato en una superficie horizontal y seca.
Vuelva a poner la cubeta en el cuerpo de la freidora y bájela
lentamente.
Coloque el panel de mandos y los accesorios. Para volver a
colocar el panel de mandos, deslícelo suavemente hacia abajo
para que se inserte en las ranuras en la parte trasera del cuerpo
del aparato hasta que esté bloqueado.
NOTA: El aparato no será operacional hasta que el panel de
mandos esté bien colocado. Si su panel de mandos no está bien
colocado, un interruptor de seguridad impedirá que su aparato
sea operacional. Compruebe su colocación.
Inserte las clavijas del asa en las 2 ranuras de la cesta, y después
despliegue el asa de la cesta hasta que esté bloqueado y que
se pueda agarrar fácilmente la cesta.
17
Assembly page 17/40
FT 36673 - 120501
Fax +1 305 430 9692
Copies of the I/B. Please reproduce them without any
changes except under special instruction from Team
International USA. The pages must be reproduced and folded
in order to obtain a booklet A5 (+/- 148.5 mm width x 210 mm
height). When folding, make sure you keep the good
numbering when you turn the pages of the I/B. Don’t change
the page numbering. Keep the language integrity. Print only
what is inside the frame.
PRIMERA UTILIZACION
•
•
•
Llene la cubeta de aceite entre el nivel mínimo y máximo
indicado en el interior de la cubeta.
Utilice preferentemente aceite especial para freír, compruebe la
etiqueta de la botella.
Si prefiere utilizar grasa, incorpórela a la cubeta en pequeñas
porciones. Enchufe el aparato, ponga el termostato en la
posición mínima y añada la grasa poco a poco. Cuando la
grasa esté fundida, accione el termostato hasta la temperatura
deseada. Atención: Si no respeta estas indicaciones puede
dañar seriamente su freidora.
USO
•
•
•
Antes de enchufar su aparato, compruebe que el aceite llegue
al menos al mínimo marcado en el interior del tanque. Si no lo
hace si, dará lugar a sobrecalentamiento y saltara el termostato
de seguridad (ver más abajo). El contenido mínimo de la
freidora marcado 3.2L / 3.3 cuartos, y el contenido máximo
marcado 3.8L / 4.0 cuartos.
Conecte el cable magnético al aparato y enchufe a la corriente
eléctrica.
Ponga el termostato en la posición deseada. Los testigos
luminosos de funcionamiento “POWER” (3) y de temperatura
“HEAT” (4) se encenderán. Cuando el aparato alcance la
temperatura deseada, el testigo luminoso de temperatura (4) se
apagará.
Nota: La luz verde “HEAT” (4) de “encendido/listo” alternará entre
encendida y apagada, indicando que el termostato funciona de
forma que la temperatura del aceite sea la correcta.
•
•
Espere a que le aceite alcance la temperatura deseada antes
de introducir cualquier alimento en el aceite.
Coloque los alimentos en la cesta. No las sobrecargue para
evitar la disminución de temperatura del aceite en exceso.
Además la sobrecarga puede provocar desbordes. Como regla
general no llene las cestas más de la mitad o 1 ½” a 2” desde el
fondo de la cesta.
18
Assembly page 18/40
FT 36673 - 120501
Fax +1 305 430 9692
•
•
Copies of the I/B. Please reproduce them without any
changes except under special instruction from Team
International USA. The pages must be reproduced and folded
in order to obtain a booklet A5 (+/- 148.5 mm width x 210 mm
height). When folding, make sure you keep the good
numbering when you turn the pages of the I/B. Don’t change
the page numbering. Keep the language integrity. Print only
what is inside the frame.
Una vez que le aceite haya alcanzado la temperatura correcta
y la luz “HEAT” sea apagará, baje lentamente la cesta de freír en
el aceite.
Durante la cocción puede colocar la tapa o no.
Nota: No coloque la tapa sobre la freidora cuando fría patatas fritas
o alimentos con alto contenido de humedad.
•
•
•
•
Cuando la comida este lista, retire la tapa si esta está puesta,
levante la cesta levantando el mango y deje que los alimentos
se escurran del exceso de aceite, colocando la cesta en el
gancho situado en la parte posterior de la cesta.
Cuando el exceso de aceite se haya escurrido, quite la cesta y
ponga los alimentos sobre una servilleta de papel para acabar
de escurrirlos.
Asegúrese de que los alimentos queden bien cocinados tanto
por dentro como por fuera.
Su aparato no lleva interruptor encendido / apagado. Por eso,
ponga el termostato en la posición MIN y desenchufe el aparato.
Nunca mueva el aparato cuando el aceite o la grasa estén
todavía calientes. No lo exponga a temperaturas excesivamente
frías, cuando el aceite todavía este caliente.
PRECAUCIÓN:
• Utilice únicamente utensilios de metal para freír. Utensilios de
plástico o caucho, se estropean y derriten en le aceite caliente.
No deje utensilios de metal en el aceite caliente.
• Siempre tenga cuidado al freír para evitar lesiones personales
graves, incendios, quemaduras, etc. Nunca deje sin vigilancia
cuando esté en uso. Siempre ponga más cuidado haya
alrededor niños.
• El vapor sale por la ventilación de la tapa. No coloque la mano
sobre las rejillas de ventilación. Al quitar la tapa, ábrala hacia la
parte posterior de la unidad para permitir que el vapor salga
lejos de usted.
• Para reducir las salpicaduras de aceite, baje la cesta lentamente
en el aceite. En caso de que el aceite comience a hacer
espuma y levantarse en el tanque de aceite, levante la cesta y
deje que el aceite baje, vuelva a bajar lentamente los alimentos
en el aceite hasta que deje de hacer espuma.
19
Assembly page 19/40
FT 36673 - 120501
Fax +1 305 430 9692
Copies of the I/B. Please reproduce them without any
changes except under special instruction from Team
International USA. The pages must be reproduced and folded
in order to obtain a booklet A5 (+/- 148.5 mm width x 210 mm
height). When folding, make sure you keep the good
numbering when you turn the pages of the I/B. Don’t change
the page numbering. Keep the language integrity. Print only
what is inside the frame.
PARA OBTENER LOS MEJORES RESULTADOS
•
•
•
•
•
•
•
•
•
•
•
Seque los alimentos antes de freírlos, los alimentos muy húmedos
pueden provocar una ebullición del aceite y hacerlo desbordar
de la cubeta.
No utilice la tapa para freír patatas fritas o alimentos con alto
contenido de humedad.
Las patatas fritas son mejores cuando se fríen en dos etapas
(véase el cuadro tiempo y temperatura)
Procure que todos los alimentos tengan aproximadamente el
mismo tamaño para permitir una fritura uniforme.
Ciertos alimentos tienen que ser empanados o rebozados. Para
este fin, se utiliza en general pan rallado o albardilla.
Espere siempre que la freidora alcance la temperatura deseada
y el testigo luminoso de temperatura se apague antes de añadir
los alimentos.
No llene en exceso la cesta.
Si fríe más de una carga, por favor, de al aceite de la
oportunidad de calentar a la temperatura adecuada antes de
poner otra carga en el aceite
Es importante remplazar el aceite en cuanto note cualquiera de
los siguientes puntos:
1. Olor desagradable del aceite
2. Humo excesivo cuando se calienta el aceite.
3. El aceite es de color oscuro
4. El aceite se ha almacenado durante un largo período de
tiempo.
Será necesario cambiar el aceite más a menudo cuando los
alimentos que fría estén envueltos en una masa o capa.
Cuando vuelva a usar el aceite, se recomienda colar el aceite
para eliminar las partículas de alimentos, usando un colador de
malla sobre un recipiente. Para obtener mejores resultados,
puede cubrir el colador con dos capas de gasa. Una vez que el
aceite este filtrado, guárdelo en el refrigerador o vuelva a
ponerlo en el tanque de aceite.
20
Assembly page 20/40
FT 36673 - 120501
Fax +1 305 430 9692
Copies of the I/B. Please reproduce them without any
changes except under special instruction from Team
International USA. The pages must be reproduced and folded
in order to obtain a booklet A5 (+/- 148.5 mm width x 210 mm
height). When folding, make sure you keep the good
numbering when you turn the pages of the I/B. Don’t change
the page numbering. Keep the language integrity. Print only
what is inside the frame.
TERMOSTATO DE SEGURIDAD
CUIDADO: Su freidora está provista de un sistema de seguridad que
para el aparato si éste recalienta accidentalmente (por ejemplo en
caso de disfunción del termostato). El sobrecalentamiento también
puede ocurrir si el aceite es demasiado viejo o demasiado grueso, o
si no hay suficiente aceite en el tanque (o no hay aceite).
Para restablecer el termostato de seguridad después de un corte:
• Ponga el termostato en la posición mínima (MIN), desenchufe
y desconecte el cable magnético.
• Deje que la unidad se enfríe.
• Retire el panel de control del tanque.
• Con un destornillador pequeño, o un palillo, presione el botón
de “Reset” situado detrás de la caja de control, al lado
Izquierdo.
• Corrija la situación del aceite, cámbielo si es demasiado
viejo, o añada aceite si no hay suficiente
• Volver a montar la unidad y sigua cocinando
ALGUNOS CONSEJOS DE UTILIZACIÓN
ALIMENTOS
TEMPERATURA*
Filetes de pescado empanados
Gambas
Pechugas de pollo
Pollo empanado
Aros de cebolla
Champiñones empanados
Brécoles fritos
Calabacines fritos
Apio rebozado
Patatas fritas (1ª cocción)
Patatas fritas (2ª cocción)
340°F / 170°C
300°F / 150°C
350°F / 175°C
340°F / 170°C
355°F / 180°C
355°F / 180°C
365°F / 185°C
365°F / 185°C
355°F / 180°C
340°F / 170°C
355°F / 180°C
TIEMPO*
(aproximado)
6-7
4-6
4-5
12-15
4
3-4
3-4
3-4
3-4
8
2
* La temperatura y las indicaciones del tiempo son indicativas y
deben modificarse o adaptarse, en función de la receta o las
preferencias personales.
21
Assembly page 21/40
FT 36673 - 120501
Fax +1 305 430 9692
Copies of the I/B. Please reproduce them without any
changes except under special instruction from Team
International USA. The pages must be reproduced and folded
in order to obtain a booklet A5 (+/- 148.5 mm width x 210 mm
height). When folding, make sure you keep the good
numbering when you turn the pages of the I/B. Don’t change
the page numbering. Keep the language integrity. Print only
what is inside the frame.
LIMPIEZA
•
•
•
•
•
•
•
•
•
•
•
•
•
Advertencia importante: No sumerja en agua o en cualquier otro
líquido el aparato en su conjunto.
Desconecte su freidora.
Antes de limpiar su freidora, asegúrese de que está totalmente
fría. Atención: la resistencia puede permanecer caliente mucho
tiempo después que tenga desenchufado el aparato.
NO SUMERJA NUNCA EL PANEL DE MANDOS NI EL CABLE
MAGNETICO EN EL AGUA O EN CUALQUIER OTRO LÍQUIDO.
Vea párrafo "Desmontaje de la freidora".
Todas las piezas, excepto el panel de mandos con el elemento
de calefacción y el cable magnético se pueden meter en el
lavavajillas.
Como alternativa limpie el tanque y el cuerpo con agua tibia y
jabón.
Evite el uso de detergentes agresivos o de cepillos demasiado
duros que podrían estropear la freidora.
El panel de control y el elemento de calefacción se pueden
limpiar con un paño humedecido en agua de jabón. Después
enjuague el paño y limpie el jabón residual.
Limpieza de la tapa y filtros: quite los filtros mediante la
eliminación de la cubierta del filtro. 2 filtros están incluidos.
Lávelos con agua tibia y jabón y enjuáguelos bien. Deje que los
filtros se sequen completamente y vuelva a colocarlos en la
tapa. El filtro blanco (filtro de tela) se colocan en la tapa primero,
luego el filtro negro (filtro de carbón). Coloque la tapa del filtro
en su sitio cuando haya terminado.
Seque cuidadosamente todas las partes del aparato.
Cambie el aceite con regularidad.
Para acoplar su freidora, vea el párrafo “Montaje de la freidora”.
NOTA: Puede notar una ligera decoloración de las partes, cuando
elija utilizar el lavavajillas. Esto no afectará al rendimiento del
aparato.
22
Assembly page 22/40
FT 36673 - 120501
Fax +1 305 430 9692
Copies of the I/B. Please reproduce them without any
changes except under special instruction from Team
International USA. The pages must be reproduced and folded
in order to obtain a booklet A5 (+/- 148.5 mm width x 210 mm
height). When folding, make sure you keep the good
numbering when you turn the pages of the I/B. Don’t change
the page numbering. Keep the language integrity. Print only
what is inside the frame.
PARA GUARDAR SU FREIDORA
•
•
Compruebe que su freidora está totalmente fría antes de
guardarla.
Puede dejar el aceite restante en el aparato. Asegúrese que la
tapadera está bien cerrada para que no pueda entrar polvo en
el aceite.
SOLUCIÓN DE PROBLEMAS
Problemas
El aparato no funciona.
El aparato deja de funcionar
repentinamente o no vuelve a
ponerse en funcionamiento.
Soluciones
Asegúrese de que el aparato
esté conectado, asegúrese de
que el enchufe tenga carga
eléctrica; comprobar el montaje
de la caja de control (El
interruptor de seguridad debe
estar presionado); compruebe
que el cable magnético está
bien conectado con la caja de
control.
Compruebe que el enchufe
magnético está bien conectado
a la caja de control. El aparato
puede haberse sobrecalentado.
Siga las instrucciones indicadas
en “TERMOSTATO DE
SEGURIDAD”
23
Assembly page 23/40
FT 36673 - 120501
Fax +1 305 430 9692
Copies of the I/B. Please reproduce them without any
changes except under special instruction from Team
International USA. The pages must be reproduced and folded
in order to obtain a booklet A5 (+/- 148.5 mm width x 210 mm
height). When folding, make sure you keep the good
numbering when you turn the pages of the I/B. Don’t change
the page numbering. Keep the language integrity. Print only
what is inside the frame.
RECETAS
Patatas fritas (no congeladas)
•
•
•
•
•
•
•
•
•
Se recomienda cocer las patatas en dos veces.
Utilice unas patatas viejas (no de nueva cosecha). Córtelas en trozos
iguales. Pase los trozos por agua para quitarles el almidón. Séquelas
cuidadosamente.
No supere el peso recomendado. Cuando la temperatura haya
alcanzado los 340°F (170°C), coloque las patatas en la cesta y baje la
cesta en el aceite.
El tiempo de cocción necesario para 500 g de patatas fritas es de 8
minutos a 340°F/170°C. Luego, saque la cesta del aceite.
Ponga la temperatura a 355°F/180°C
Espere que el testigo luminoso se apague y vuelva a bajar la cesta;
deje cocer todavía durante unos dos minutos.
Suba la cesta y deje escurrir las patatas.
Para obtener el mejor resultado, seque las patatas fritas con papel de
cocina para absorber el exceso de grasa.
El tiempo de fritura puede variar ligeramente según la calidad de las
patatas y su espesor.
Aros de cebolla
•
•
•
•
•
Tiempo de fritura: 4 - 5 minutos a 350°F/175°C.
Pele las cebollas y córtelas en rodajas.
Sumerja las rodajas en leche sazonada.
Espolvoree luego con harina.
Ponga las rodajas una al lado de otra en la cesta y freía pocas a la vez.
Champiñones empanados
•
•
•
•
Tiempo de fritura: 4 - 5 minutos a 350°F/175°C.
Pase los champiñones en un huevo batido.
Vuelva a pasarlos en pan rallado.
Póngalos en la cesta unos al lado de otros y freía los champiñones
pocos a la vez.
Bastoncitos de lenguado
•
•
•
•
Tiempo de fritura: 3 - 4 minutos a 320°F/160°C.
Corte el filete de lenguado en bastoncitos. Espolvoréelos de harina.
Páselos en un huevo batido y, luego, en pan rallado.
Coloque los bastoncitos unos al lado de otros en la cesta y freía pocos
a la vez.
24
Assembly page 24/40
FT 36673 - 120501
Fax +1 305 430 9692
Copies of the I/B. Please reproduce them without any
changes except under special instruction from Team
International USA. The pages must be reproduced and folded
in order to obtain a booklet A5 (+/- 148.5 mm width x 210 mm
height). When folding, make sure you keep the good
numbering when you turn the pages of the I/B. Don’t change
the page numbering. Keep the language integrity. Print only
what is inside the frame.
GARANTÍA
Le sugerimos rellenen y nos envíen rápidamente la Tarjeta de
Registro de Producto adjunta para facilitar la verificación de la
fecha de compra. Por lo tanto, la devolución de esa Tarjeta de
Registro de Producto no es una condición imprescindible para la
aplicación de esa garantía. Puede también rellenar dicha tarjeta de
garantía en línea en la dirección siguiente: www.KALORIK.com
A partir de la fecha de compra, este producto KALORIK está
garantizado un año contra los defectos materiales y de fabricación,
en los Estados Unidos. Esta garantía no es transferible. Conserve la
prueba de compra original. Se exige una prueba de compra para
obtener la aplicación de la garantía.
Durante este período, si el producto KALORIK después de una
inspección por parte de KALORIK, se manifiesta defectuoso, será
reparado o remplazado, según lo que decida KALORIK, sin gastos
para el consumidor. Si se envía un producto de remplazo, se
aplicará la garantía que queda del producto original.
Esta garantía no se aplica a los defectos causados por una mala
utilización por parte del comprador o del usuario, o una negligencia
al no respeto del manual de instrucciones KALORIK, o una utilización
en un circuito eléctrico cuyo voltaje es diferente al que figura en el
producto, o un desgaste normal, o modificaciones o reparaciones
no autorizadas por KALORIK, o por un uso con fines comerciales. No
existe garantía por las partes de cristal, jarras de cristal, filtros, cestos,
cuchillas y accesorios en general. No existe tampoco garantía por
las piezas perdidas por el usuario.
Toda garantía de valor comercial o de adaptabilidad a este
producto está limitada a un año también.
Algunos estados no ponen límites a la duración de la garantía tácita
o no autorizan la exclusión de daños y perjuicios accesorios o
indirectos, por lo que puede que las restricciones anteriormente
mencionadas no le sean aplicables a Usted. Esta garantía le otorga
derechos legales particulares, pero usted puede tener también otros
25
Assembly page 25/40
FT 36673 - 120501
Fax +1 305 430 9692
Copies of the I/B. Please reproduce them without any
changes except under special instruction from Team
International USA. The pages must be reproduced and folded
in order to obtain a booklet A5 (+/- 148.5 mm width x 210 mm
height). When folding, make sure you keep the good
numbering when you turn the pages of the I/B. Don’t change
the page numbering. Keep the language integrity. Print only
what is inside the frame.
derechos que varían de un estado a otro y algunos derechos
pueden variar de un estado a otro.
Si el aparato tuviera un defecto durante el periodo de garantía y / o
más de 30 días después de que se compró, no devuelva el aparato
en la tienda donde le compró: a menudo, nuestro Servicio al
Consumidor puede ayudar a resolver el problema sin que el
producto tenga que ser reparado. Si hace falta una reparación, uno
de nuestros representantes puede confirmar si el producto está bajo
garantía y dirigirle al servicio post-venta más próximo.
Si fuera el caso, traiga el producto (o envíelo, correctamente
franqueado) con la prueba de compra que mencione el número de
autorización de devolución indicado por nuestro Servicio al
Consumidor, al servicio post-venta KALORIK más próximo. (Visite
nuestra web www.KALORIK.com o llame al Servicio al Consumidor
para obtener la dirección del Servicio post-venta KALORIK exclusivo
más próximo).
Si envía el producto, le rogamos añadan una carta explicando la
naturaleza del defecto.
Si tiene preguntas adicionales, por favor llame al Servicio al
Consumidor (véase abajo para los datos completos), de lunes a
jueves, de las 9:00 a las 17:00 (EST), y el viernes de las 9:00 a las 16:00
(EST). Note que las horas pueden ser modificadas.
Si quiere escribirnos, puede hacerlo a la dirección siguiente:
KALORIK Servicio al Consumidor
Team International Group of America Inc.
1400 N.W 159th Street, Suite 102
Miami Gardens, FL 33169 USA
O llame gratuitamente (U.S.A.) al +1 888-521-TEAM / +1 888-KALORIK
Las cartas se aceptan solamente en la dirección anteriormente
mencionada. Los envíos y paquetes que no tengan número de
autorización de devolución serán rechazados.
26
Assembly page 26/40
FT 36673 - 120501
Fax +1 305 430 9692
Copies of the I/B. Please reproduce them without any
changes except under special instruction from Team
International USA. The pages must be reproduced and folded
in order to obtain a booklet A5 (+/- 148.5 mm width x 210 mm
height). When folding, make sure you keep the good
numbering when you turn the pages of the I/B. Don’t change
the page numbering. Keep the language integrity. Print only
what is inside the frame.
CONSIGNES DE SECURITE
Pour utiliser un appareil électrique, des précautions élémentaires
sont à respecter, telles que celles énumérées ci-dessous :
1. LISEZ L’ENSEMBLE DES INSTRUCTIONS AVANT L’USAGE
2. Avant d'utiliser l'appareil, vérifiez que la tension du réseau
correspond bien à celle notée sur la plaque signalétique de votre
appareil.
3. Ne touchez pas les surfaces chaudes. Utilisez les poignées et les
boutons.
4. Pour éviter les risques d’électrocution, n'immergez pas le cordon,
la fiche, l’appareil ou le panneau de contrôle dans l'eau ou dans
tout autre liquide.
5. Faites particulièrement attention lorsque l’appareil est utilisé par
ou en présence d’enfants.
6. Ne faites pas fonctionner l'appareil si son cordon ou sa fiche est
endommagé ou si l'appareil a présenté un dysfonctionnement
ou est endommagé. Retournez l’appareil au centre de service
autorisé pour le faire vérifier ou réparer.
7. Ne posez jamais d’objets sur l’appareil ou à proximité. Pour éviter
tout risque d’incendie, veillez à ce que l’appareil n’entre pas en
contact avec des matières inflammables comme des rideaux,
une nappe, etc.
8. Débranchez l'appareil de la prise murale lorsqu’il n’est pas utilisé
ou avant de le nettoyer. Laissez-le refroidir avant d’enlever ou
d’ajouter des accessoires ou de le nettoyer.
9. Ne placez jamais de matériaux facilement inflammables comme
du papier, du carton ou du plastique à l’intérieur ou à proximité
de l’appareil.
10. N’utilisez pas la friteuse pour faire frire des aliments de trop
grande taille car un incendie pourrait se déclarer.
11. L'utilisation d’accessoires non recommandés par le fabricant
présente des risques d’incendie, d’électrocution ou de blessure.
12. N'utilisez pas l'appareil à l'extérieur.
13. Ne laissez pas le cordon pendre de la table ou du comptoir et
évitez qu’il touche une surface chaude.
14. N’utilisez pas de rallonge.
27
Assembly page 27/40
FT 36673 - 120501
Fax +1 305 430 9692
Copies of the I/B. Please reproduce them without any
changes except under special instruction from Team
International USA. The pages must be reproduced and folded
in order to obtain a booklet A5 (+/- 148.5 mm width x 210 mm
height). When folding, make sure you keep the good
numbering when you turn the pages of the I/B. Don’t change
the page numbering. Keep the language integrity. Print only
what is inside the frame.
15. Ne placez pas l'appareil sur ou près d'un brûleur à gaz ou
électrique ou dans un four chaud.
16. Prenez un maximum de précautions lorsque vous déplacez un
appareil contenant de l’huile chaude ou tout autre liquide
chaud.
17. Il n’est pas spécifiquement recommandé de placer le couvercle
sur la friteuse pendant son utilisation, car cela peut causer des
débordements et ne pas donner les meilleurs résultats de cuisson.
Pour ce type de friteuse, le couvercle peut n’être utilisé que pour
le stockage et quand vous déplacez la friteuse (en prenant soin
auparavant qu’elle soit refroidie complètement)
18. Insérez toujours le cordon d'abord dans l'appareil et ensuite dans
la prise murale. Pour déconnecter l'appareil, débranchez-le
d’abord de la prise murale.
19. N'utilisez pas cet appareil à des fins autres que celles pour
lesquelles il est conçu.
20. Vérifiez que la poignée et le panier sont correctement assemblés
et qu’ils ne risquent pas de se détacher. Référez-vous aux
instructions d’assemblage pour plus de détails.
CONSERVEZ CES INSTRUCTIONS
USAGE DOMESTIQUE UNIQUEMENT
INSTRUCTIONS POUR LES FICHES POLARISÉES
Cet appareil est équipé d’une prise polarisée (une des deux tiges
métalliques est plus longue que l’autre). Pour réduire le risque de
choc électrique, cette prise ne peut être introduite que d’une seule
façon dans la fiche murale. Si cette prise ne rentre pas correctement
dans la fiche, retournez-la. Si elle ne rentre toujours pas, contactez
un électricien qualifié et reconnu. N’essayez jamais de modifier
vous-même la prise polarisée.
CONSIGNES CONCERNANT LE CORDON
Le cordon d’alimentation de l’appareil est un cordon de type court,
et ce afin de diminuer les risques d’accidents (chute si vous marchez
sur le cordon...). N’utilisez pas l’appareil avec une rallonge.
28
Assembly page 28/40
FT 36673 - 120501
Fax +1 305 430 9692
Copies of the I/B. Please reproduce them without any
changes except under special instruction from Team
International USA. The pages must be reproduced and folded
in order to obtain a booklet A5 (+/- 148.5 mm width x 210 mm
height). When folding, make sure you keep the good
numbering when you turn the pages of the I/B. Don’t change
the page numbering. Keep the language integrity. Print only
what is inside the frame.
DESCRIPTION
4
3
5
6
11
1
12
13
7
14
2
1. Couvercle
2. Panier de friture
3. Témoin lumineux de
fonctionnement (POWER)
4. Témoin lumineux de
température (HEAT)
5. Contrôle du thermostat
6. Boitier de contrôle avec
élément chauffant
7. Poignées latérales
8. Cuve amovible
9. Crochet de suspension du
panier
10. Poignée du panier
11. Poignée du couvercle
12. Boitier du filtre
13. Fenêtre du couvercle
14. Pieds antidérapants
10
9
8
3
29
Assembly page 29/40
4
5
FT 36673 - 120501
Fax +1 305 430 9692
Copies of the I/B. Please reproduce them without any
changes except under special instruction from Team
International USA. The pages must be reproduced and folded
in order to obtain a booklet A5 (+/- 148.5 mm width x 210 mm
height). When folding, make sure you keep the good
numbering when you turn the pages of the I/B. Don’t change
the page numbering. Keep the language integrity. Print only
what is inside the frame.
AVANT LE PREMIER USAGE
•
•
•
Retirez tout matériel d'emballage de l'appareil.
Retirez le couvercle, le panier, la poignée et tous les accessoires
de l’appareil.
Avant le premier usage il est recommandé de laver
soigneusement le couvercle, la cuve, le panier, la poignée et
l'extérieur de l'appareil à l’eau chaude savonneuse à l’aide d’un
chiffon doux.
DEMONTAGE DE LA FRITEUSE
•
•
•
Mettez de côté le panier et le couvercle.
Retirez la résistance et le panneau de commande de l’appareil
en faisant coulisser ce dernier vers le haut.
Prenez la cuve des deux côtés et soulevez-la doucement.
MONTAGE DE LA FRITEUSE
Posez la partie extérieure sur une surface horizontale et sèche.
Placez la cuve intérieure dans la partie extérieure et descendezla doucement.
• Replacez le boitier de contrôle et les accessoires. Pour remettre
en place le boitier de contrôle, faites-le glisser dans les rainures
au dos de la partie extérieure jusqu'à ce que le panneau soit
bien fixé.
NOTE: L’appareil ne sera opérationnel que si le panneau de
commande est bien positionné. Un interrupteur de sécurité (sur la
partie avant du boitier de contrôle) empêche toute opération si le
boitier n’est pas correctement mis en place correctement.
• Fixez la poignée du panier. Pour cela, insérez les deux
extrémités de la poignée dans les emplacements (anneaux)
prévus sur la paroi à l'intérieur du panier. Faites ensuite pivoter
la poignée jusqu’à la position de verrouillage, afin de pouvoir
remonter le panier lors de l'utilisation.
• Poussez la partie trop longue du cordon dans le logement à
l’arrière de l’appareil.
•
•
30
Assembly page 30/40
FT 36673 - 120501
Fax +1 305 430 9692
Copies of the I/B. Please reproduce them without any
changes except under special instruction from Team
International USA. The pages must be reproduced and folded
in order to obtain a booklet A5 (+/- 148.5 mm width x 210 mm
height). When folding, make sure you keep the good
numbering when you turn the pages of the I/B. Don’t change
the page numbering. Keep the language integrity. Print only
what is inside the frame.
PREMIERE UTILISATION
•
•
•
Lors de la première utilisation, remplissez la cuve d’huile entre le
niveau minimum et le niveau maximum indiqué dans la cuve.
Utilisez de préférence de l’huile spéciale pour friture. Vérifiez
l’étiquette sur la bouteille d’huile.
Si néanmoins vous préférez utiliser des pains de graisse, coupezles en petits morceaux. Branchez l’appareil, mettez le
thermostat sur la température la plus basse et ajoutez la graisse
petit à petit. Quand la graisse est fondue, réglez le thermostat sur
la température désirée. Attention : le non-respect de cette
prescription peut endommager sérieusement votre friteuse.
UTILISATION
Avant de brancher l’appareil, prenez toujours soin de vérifier que
le niveau d’huile dans la friteuse est au-dessus du niveau MIN
indiqué dans la cuve. Le non-respect du niveau minimum d’huile
aura pour conséquence une surchauffe de l’huile dans la cuve,
et déclenchera le thermostat de sécurité. (voir plus loin pour plus
de détails). Votre friteuse contient 3.2L / 3.3qt au niveau de la
marque « MIN » et 3.8L / 4.0qt d’huile au niveau « MAX ».
• Attachez le cordon magnétique à la friteuse, et ensuite insérez la
fiche dans la prise murale. Respectez le sens indiqué sur la fiche
magnétique.
• Ajustez le thermostat sur la température désirée. Le témoin
lumineux de fonctionnement « POWER » (3) et le témoin de
chauffe « HEAT » (4) s'allument. Dès que la température désirée
est atteinte, le témoin lumineux de chauffe « HEAT » s'éteint.
Lorsque la température baisse, le thermostat se réenclenche ainsi
que ce témoin lumineux, qui s’éteint de nouveau dès que la
température requise est atteinte.
Note : la lampe verte (4) s’allume et s’éteint par cycles, indiquant
que le thermostat ajuste la température pour maintenir l‘huile a la
température désirée.
•
•
Laissez l’huile arriver à la température désirée avant d’y placer la
nourriture à frire.
31
Assembly page 31/40
FT 36673 - 120501
Fax +1 305 430 9692
Copies of the I/B. Please reproduce them without any
changes except under special instruction from Team
International USA. The pages must be reproduced and folded
in order to obtain a booklet A5 (+/- 148.5 mm width x 210 mm
height). When folding, make sure you keep the good
numbering when you turn the pages of the I/B. Don’t change
the page numbering. Keep the language integrity. Print only
what is inside the frame.
Mettez la nourriture à frire dans le panier. Ne surchargez pas le
panier, de façon à ce que la température de l’huile ne chute
pas quand la nourriture y sera immergée, ou pour éviter tout
débordement. En règle générale, ne remplissez pas le panier a
plus de la moitie, ou au-dessus d’un niveau situé 5cm en dessous
du bord du panier.
• Une fois que l’huile a atteint la température désirée (témoin
lumineux « HEAT » éteint), abaissez lentement le panier dans
l’huile.
• Placez le couvercle sur la friteuse, ou non. Ce couvercle est muni
de filtres qui réduiront les odeurs et la fumée.
Note : ne mettez pas le couvercle pour faire des frites ou pour frire
des aliments contenant beaucoup d’eau
•
•
•
•
•
Dès que les aliments sont cuits, enlevez le couvercle et remontez
le panier par sa poignée, et laissez égoutter les aliments en
l’accrochant sur le bord de la cuve, avec le crochet situé à
l’arrière du panier.
Quand l’huile excédentaire s’est égouttée, placez la nourriture
sur une plaque de cuisson bordée de papier à graisse ou
absorbant, pour permettre à toute l’huile excédentaire d’être
évacuée.
Assurez-vous que les aliments sont bien cuits à l’intérieur ainsi qu’à
l’extérieur.
Votre friteuse ne possède pas d'interrupteur marche/arrêt séparé.
Après utilisation, veuillez donc remettre le thermostat sur la
position « MIN » et débranchez la friteuse. Ne manipulez pas
l'appareil avant que l'huile ou la graisse ait totalement refroidi. Ne
l’exposez pas à une température excessivement froide quand
l’huile est encore chaude.
ATTENTION :
• N’utilisez que des instruments ustensiles avec la friteuse. Des
ustensiles de cuisine en plastique ou en caoutchouc fondraient
et seraient endommages par l’huile chaude.
• Faites toujours très attention en cours d’utilisation, afin d’éviter
tout risque de blessure, brulures ou de départ de feu. Ne laissez
pas sans surveillance pendant l’utilisation. Faites attention quand
utilisé près des enfants.
32
Assembly page 32/40
FT 36673 - 120501
Fax +1 305 430 9692
•
•
Copies of the I/B. Please reproduce them without any
changes except under special instruction from Team
International USA. The pages must be reproduced and folded
in order to obtain a booklet A5 (+/- 148.5 mm width x 210 mm
height). When folding, make sure you keep the good
numbering when you turn the pages of the I/B. Don’t change
the page numbering. Keep the language integrity. Print only
what is inside the frame.
De la vapeur va s’échapper de la ventilation prévue dans le
couvercle. Ne placez pas votre main au-dessus des évents. En
retirant le couvercle, ouvrez le toujours en ouvrant vers l’arrière
de l’appareil pour laisser la vapeur s’échapper loin de vous.
Pour limiter les risques d’éclaboussure ou de débordement,
abaissez le panier très lentement dans l’huile. Si l’huile se ment a
mousser et monter, relevez le panier et laisser l’huile redescendre.
Recommencez à abaisser le panier très doucement, et répétez
jusqu’à ce que l’huile ne mousse plus.
CONSEILS PRATIQUES
•
•
•
•
•
•
•
•
•
•
•
Essuyez l’humidité des aliments avant de les frire. De la nourriture
très humide peux faire bouillonner ou mousser l’huile et
éventuellement la faire déborder.
N’utilisez pas le couvercle pour faire des frites ou pour frire des
aliments contenant beaucoup d’eau.
Les frites sont meilleures si elles sont cuites en deux phases (voir la
table des températures et temps de cuisson ci-après).
Coupez les aliments à frire de façon uniforme pour qu’ils cuisent
de façon uniforme.
Certains aliments peuvent être panés ou enrobés de pâte pour
Attendez que le préchauffage soit terminé et que le témoin
s’éteigne avant de mettre les aliments dans l’huile.
Ne remplissez pas trop le panier.
Si vous devez frire en plusieurs bains, laisser le temps a l’huile de
revenir à température (voyant « HEAT » éteint) avant d’y
replonger un nouveau panier de nourriture.
Il est nécessaire de remplacer l’huile si vous rencontrez les
symptômes suivants :
1. Odeur désagréable de l’huile
2. Fumée excessive en cours de chauffage
3. Huile très foncée
4. Huile restée en stockage pendant une longue
période.
Frire de la nourriture enrobée de pâte (beignets, …) vous
demandera de remplacer l’huile plus régulièrement.
Si vous souhaitez réutiliser l’huile de friture, il est recommandé
d’en retirer les particules de nourriture qui pourraient y être
restées. Utilisez une passoire métallique fine au-dessus d’un grand
33
Assembly page 33/40
FT 36673 - 120501
Fax +1 305 430 9692
Copies of the I/B. Please reproduce them without any
changes except under special instruction from Team
International USA. The pages must be reproduced and folded
in order to obtain a booklet A5 (+/- 148.5 mm width x 210 mm
height). When folding, make sure you keep the good
numbering when you turn the pages of the I/B. Don’t change
the page numbering. Keep the language integrity. Print only
what is inside the frame.
bol pour passer l’huile. Pour des meilleurs résultats, vous pouvez
filtrer l’huile à travers deux couches d’étamine placées dans la
passoire. Une fois l’huile passée, conservez-la au réfrigérateur ou
dans la cuve.
THERMOSTAT DE SECURITE
ATTENTION : Votre friteuse est munie d'un thermostat de sécurité qui
arrête l'appareil en cas de surchauffe accidentelle (par exemple en
cas de dysfonctionnement du thermostat principal). Une surchauffe
peut aussi survenir si l’huile utilisée est trop vieille, et a épaissi, et s’il
n’y a pas assez d’huile dans la cuve.
Pour réinitialiser le thermostat de sécurité après une coupure :
•
•
•
•
•
•
Eteignez tout d’abord l’appareil en tournant le thermostat sur
MIN, puis débranchez la prise de courant.
Attendez alors le refroidissement de votre friteuse (environ 15
minutes).
Retirez le boitier de contrôle du corps de l’appareil.
Réenclenchez le bouton RESET en insérant un tournevis fin ou un
cure-dent au fond de l'orifice marqué du mot RESET à l'arrière de
l'appareil, sur la gauche.
Corrigez le niveau d’huile ou changez l’huile si elle est trop vieille.
Réassemblez la friteuse et recommencez l’opération.
Votre friteuse est alors de nouveau opérationnelle. Pour vous assurer
que ceci ne se reproduise plus, lisez attentivement les instructions
d’utilisation.
34
Assembly page 34/40
FT 36673 - 120501
Fax +1 305 430 9692
Copies of the I/B. Please reproduce them without any
changes except under special instruction from Team
International USA. The pages must be reproduced and folded
in order to obtain a booklet A5 (+/- 148.5 mm width x 210 mm
height). When folding, make sure you keep the good
numbering when you turn the pages of the I/B. Don’t change
the page numbering. Keep the language integrity. Print only
what is inside the frame.
TEMPÉRATURES ET TEMPS DE CUISSON
ALIMENTS
TEMPERATURE
Filets de poissons panés
Scampi
Blanc de poulet
Poulet pané
Rondelles d’oignons
Champignons panés
Brocoli frit
Courgettes frites
Beignet de céleri
Frites (1ère cuisson)
Frites (2ème cuisson)
340°F / 170°C
300°F / 150°C
350°F / 175°C
340°F / 170°C
355°F / 180°C
355°F / 180°C
365°F / 185°C
365°F / 185°C
355°F / 180°C
340°F / 170°C
355°F / 180°C
MINUTES
(approximativement)
6-7
4-6
4-5
12-15
4
3-4
3-4
3-4
3-4
8
2
NETTOYAGE
•
•
•
•
•
•
•
•
Mise en garde: Ne pas immerger l’appareil assemblé dans l'eau
ou tout autre liquide.
Retirez la fiche de la prise.
Laissez refroidir l’appareil avant de commencer le nettoyage.
Attention: la résistance peut rester chaude longtemps après avoir
débranché l'appareil. NE PLONGEZ JAMAIS LE PANNEAU DE
COMMANDE DANS L'EAU OU DANS TOUT AUTRE LIQUIDE.
Voir chapitre "Démontage de la friteuse".
Evitez d’utiliser des détergents agressifs ou des éponges trop
dures qui abîmeraient la friteuse.
Séchez soigneusement toutes les parties de l’appareil.
Remplacez votre huile régulièrement.
Pour assembler votre friteuse, référez-vous au paragraphe
“Montage de la friteuse”.
RANGEMENT
•
•
Attendez que la friteuse ait complètement refroidi.
L’huile peut rester dans l’appareil. Fermez bien le couvercle pour
éviter que la poussière n’entre dans la cuve.
35
Assembly page 35/40
FT 36673 - 120501
Fax +1 305 430 9692
Copies of the I/B. Please reproduce them without any
changes except under special instruction from Team
International USA. The pages must be reproduced and folded
in order to obtain a booklet A5 (+/- 148.5 mm width x 210 mm
height). When folding, make sure you keep the good
numbering when you turn the pages of the I/B. Don’t change
the page numbering. Keep the language integrity. Print only
what is inside the frame.
EN CAS DE PROBLEME
Problèmes
Solutions
Assurez-vous que l’appareil
est branché sur la prise de
courant, et que la prise n’est
pas disjonctée ; vérifiez le
bon assemblage du boitier
de contrôle sur le corps de
l’appareil (l’interrupteur de
sécurité doit être
enclenché), assurez-vous
que la fiche magnétique est
bien reliée à l’appareil.
Assurez-vous que la fiche
magnétique est bien reliée à
l’appareil. Il est possible que
l’appareil ait surchauffé ;
dans ce cas suivez les
instructions décrites au
paragraphe « Thermostat de
sécurité ».
L’APPAREIL NE
FONCTIONNE PAS
L’APPAREIL S’ARRETE
SUBITEMENT DE
FONCTIONNER EN
COURS D’OPERATION
36
Assembly page 36/40
FT 36673 - 120501
Fax +1 305 430 9692
Copies of the I/B. Please reproduce them without any
changes except under special instruction from Team
International USA. The pages must be reproduced and folded
in order to obtain a booklet A5 (+/- 148.5 mm width x 210 mm
height). When folding, make sure you keep the good
numbering when you turn the pages of the I/B. Don’t change
the page numbering. Keep the language integrity. Print only
what is inside the frame.
RECETTES
Frites fraîches
• Il est recommandé de cuire les frites en deux fois.
• Utilisez de vieilles pommes de terre (pas des nouvelles). Coupez-les en
morceaux égaux. Rincez les morceaux sous l’eau pour les débarrasser
de leur amidon. Essuyez-les soigneusement.
• Ne dépassez pas le poids recommandé. Mettez les frites dans le panier
quand la température atteint les 340°F/170°C et descendez le panier
lentement dans l’huile.
• Le temps de friture requis pour 500 g de frites est de 8 minutes à
340°F/170°C. Enlevez ensuite le panier de l’huile.
• Portez la température à 355°F/180°C
• Attendez que le témoin s’éteigne de nouveau, redescendez le panier
et faites cuire encore pendant environ deux minutes.
• Soulevez le panier et laissez égoutter les frites.
• Pour obtenir le meilleur résultat, séchez les frites avec de l’essuie-tout
pour absorber la graisse.
• Le temps de friture peut varier légèrement selon la qualité des pommes
de terre et l’épaisseur des frites.
Rondelles d’oignons
• Temps de friture: 4 à 5 minutes à 350°F/175°C.
• Epluchez et coupez les oignons. Divisez les morceaux en rondelles.
• Plongez les rondelles dans du lait épicé.
• Saupoudrez de farine.
• Mettez les rondelles les unes à côté des autres dans le panier et faitesen cuire quelques-unes à la fois.
Champignons panés
• Temps de friture: 4 à 5 minutes à 350°F/175°C.
• Plongez les champignons dans un œuf battu.
• Couvrez-les de chapelure.
• Mettez les champignons les uns à côté des autres dans le panier et
faites-en cuire quelques-uns à la fois.
Bâtonnets de sole
• Temps de friture : 3 à 4 minutes à 320°F/160°C.
• Coupez le filet de sole en bâtonnets. Saupoudrez de farine.
• Plongez-les dans un œuf battu et couvrez-les de chapelure.
• Mettez les bâtonnets les uns à côté des autres dans le panier et faitesen cuire quelques-uns à la fois.
37
Assembly page 37/40
FT 36673 - 120501
Fax +1 305 430 9692
Copies of the I/B. Please reproduce them without any
changes except under special instruction from Team
International USA. The pages must be reproduced and folded
in order to obtain a booklet A5 (+/- 148.5 mm width x 210 mm
height). When folding, make sure you keep the good
numbering when you turn the pages of the I/B. Don’t change
the page numbering. Keep the language integrity. Print only
what is inside the frame.
GARANTIE
Nous vous suggérons de remplir et de nous renvoyer rapidement la
Carte d’Enregistrement Produit ci-jointe afin de faciliter la vérification
de la date d’achat. Cependant, le renvoi de la Carte
d’Enregistrement Produit n’est pas une condition indispensable à
l’application de la présente garantie. Vous pouvez aussi remplir
cette carte de garantie en ligne à l’adresse suivante :
www.KALORIK.com.
A compter de la date d’achat, ce produit KALORIK est garanti un
an, sur le territoire des Etats-Unis, contre les défauts matériels et de
fabrication. Cette garantie n’est pas transférable. Conservez la
preuve d’achat originelle. Une preuve d’achat est exigée pour
obtenir l’application de la garantie.
Durant cette période, le produit KALORIK qui, après inspection par
KALORIK, s’avère défectueux, sera réparé ou remplacé, au choix de
KALORIK, sans frais pour le consommateur. Si un produit de
remplacement est envoyé, c’est la garantie restante du produit
originel qui s’appliquera.
La présente garantie ne s’applique pas aux défauts dus à une
mauvaise utilisation de la part de l’acheteur ou de l’utilisateur, à une
négligence, au non-respect des consignes du manuel d’utilisation
KALORIK, à une utilisation sur un circuit électrique au voltage
différent de celui renseigné sur le produit, à une usure normale, à des
modifications ou réparations non autorisées par KALORIK, ou par un
usage à des fins commerciales. Il n’existe pas de garantie pour les
parties en verre, récipients en verre, filtres, paniers, lames et
accessoires en général. Il n’existe également pas de garantie pour
les pièces perdues par l’utilisateur.
Toute garantie de valeur commerciale ou d’adaptabilité à ce
produit est également limitée à la garantie d’un an.
Certains états ne limitent pas la longueur de la garantie tacite ou
n’autorisent pas l’exclusion de dommages-intérêts accessoires ou
indirects, les restrictions ci-dessus peuvent donc ne pas s’appliquer à
38
Assembly page 38/40
FT 36673 - 120501
Fax +1 305 430 9692
Copies of the I/B. Please reproduce them without any
changes except under special instruction from Team
International USA. The pages must be reproduced and folded
in order to obtain a booklet A5 (+/- 148.5 mm width x 210 mm
height). When folding, make sure you keep the good
numbering when you turn the pages of the I/B. Don’t change
the page numbering. Keep the language integrity. Print only
what is inside the frame.
vous. Cette garantie vous donne des droits légaux particuliers, et
certains droits peuvent varier d’un état à l’autre.
Si l’appareil devait présenter un défaut durant la période de
garantie et plus de 30 jours après l’achat, ne ramenez pas l’appareil
au magasin : souvent, notre Service Clientèle peut aider à résoudre
le problème sans que le produit ne doive être réparé. Si une
réparation est nécessaire, un représentant peut confirmer si le
produit est sous garantie et vous rediriger vers notre centre de
réparation.
Le cas échéant, ramenez le produit (ou envoyez-le, dûment
affranchi), ainsi qu’une preuve d’achat, en mentionnant le numéro
d’autorisation de retour, indiqué par notre service clientèle, au
service après-vente KALORIK agrée (visitez notre site internet
www.KALORIK.com ou appelez notre département Service Clientèle
pour obtenir l’adresse du service après-vente KALORIK agréé).
Si vous envoyez le produit, veuillez y joindre une lettre expliquant la
nature du défaut.
Si vous avez des questions complémentaires, veuillez appeler notre
département Service Clientèle (voyez plus bas pour les coordonnées
complètes), du Lundi au Jeudi de 9h à 17h (EST) et le Vendredi de 9h
à 16h (EST). Veuillez noter que les heures sont sujettes à modification.
Si vous souhaitez nous écrire, adressez votre courrier à:
KALORIK Customer Service Department
Team International Group of America Inc.
1400 N.W 159th Street, Suite 102
Miami Gardens, FL 33169 USA
Ou appelez (Gratuitement des Etats-Unis): +1 888-521-TEAM ou +1
888-KALORIK.
Seules les lettres seront acceptées à l’adresse ci-dessus. Les envois
et colis n’ayant pas de numéro d’autorisation de retour seront
refusés.
39
Assembly page 39/40
USK FT 36673 - 120501
Fax +1 305 430 9692
K120501
Copies of the I/B. Please reproduce them without any
changes except under special instruction from Team
International USA. The pages must be reproduced and folded
in order to obtain a booklet A5 (+/- 148.5 mm width x 210 mm
height). When folding, make sure you keep the good
numbering when you turn the pages of the I/B. Don’t change
the page numbering. Keep the language integrity. Print only
what is inside the frame.
40
Assembly page 40/40
USK FT 36673 - 120501