1
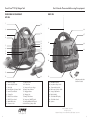
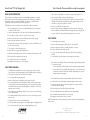
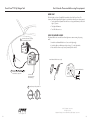
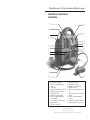
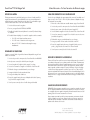
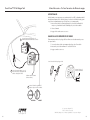
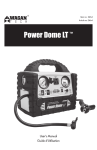
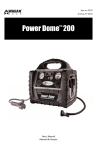
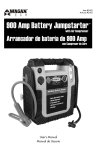
Item no. 2485
Artículo Nº 2485
User’s Manual
Manual de Usuario
Power Dome™ NX by Wagan Tech
User’s Manual—Please read before using this equipment.
POWER DOME NX COMPONENTS
RIGHT SIDE:
LEFT SIDE:
1.
13.
21.
2.
26.
14.
3.
27.
4.
15.
16.
17.
5.
6.
22.
28.
18.
19.
7.
29.
8.
23.
9.
24.
10.
11.
20.
12.
1. Inverter AC Outlets
11. USB Power Port
21. Extendable Antenna
2. Inverter ON/OFF Switch
12.DC Power Port
22.Jump Starter Safety Switch
3. Work Light
13.Compressor Pressure Gauge
23.3.5mm Audio Input Jack
4. Black Negative (−) Jumper Cable
14.Battery Status Voltmeter
24.Red Positive (+) Jumper Cable
5. Inverter Power Indicator
15.Charging Indicator
25.Storage Compartment
6. 25 Amp Fuse
16.Charging Jack
26.Rubber Handle
7. USB/DC Power Indicator
17. Battery Check Button
27. Clock Radio LED Display
8. USB/DC Power Switch
18.Compressor ON/OFF Switch
28.Clock Radio Controls
9. Hazard Flasher Lens
19. Work-Light/Blinker/OFF Switch
29.Speakers
10.Compressor Hose
20.Red Positive (+) Jumper Cable
www.wagan.com
2
25.
*MP3 player and Audio
Cable not included
© 2010 Wagan Corporation.
All Rights Reserved.
Wagan and wagan.com are trademarks used by Wagan Corporation.
3
Power Dome™ NX by Wagan Tech
Thank you for purchasing the Power Dome™ NX by Wagan Tech. This product has been
carefully engineered and manufactured to operate dependably. Keep this manual on file for
future reference.
PLEASE READ AND UNDERSTAND ALL WARNINGS, CAUTIONS, AND NOTES INCLUDED IN
THIS MANUAL. FOLLOW INSTRUCTIONS PROVIDED BY YOUR VEHICLE MANUFACTURER AND
OTHER MANUALS FOR ANY DEVICE INTENDED TO BE USED WITH THIS UNIT.
User’s Manual—Please read before using this equipment.
BATTERY CHECK
The Battery Check button provides the user with the current state of charge on the internal
battery. It is the user’s responsibility to periodically monitor the battery charge and to
recharge the battery after each use. Recharge every three months even if the Power Dome is
not used.
1. Make sure charging adapters are unplugged.
2. Press and hold the BATTERY CHECK button.
FEATURES
• 500 Cranking Amp jump starter with heavy duty cable and clamps
• 260 PSI high flow air compressor for inflating tires and accessories
• Easy to read analog pressure gauge
• 200 watt power inverter (500 watt peak surge)
• Two 110 volt AC outlets
• One 12 volt accessory outlet for powering DC appliance loads to 11 Amps
• One USB power port for charging/operating cell phones, PDAs and MP3 players
• AM/FM radio with built-in speakers
• 3.5mm Audio input jack for external music players
• Bright 9 LED area light
• Hazard Flasher Lens and blinking mode for light
• AC recharging adapter
3. The Battery Check meter (DC Voltmeter) will display the battery voltage.
4. Battery status (voltage) is read with charging adapters disconnected.
• 12.6V DC and above: battery is ready for use
• 12.0V DC and below: battery needs charging
• Below 10.5V DC: battery is discharged, charge immediately
CHARGING THE POWER DOME NX AT HOME WITH AC POWER
Only use the AC charging adapter supplied with this unit.
• Make sure all Power Dome switches are set to OFF.
• Open the dust cover on the Charging Jack.
• Connect the AC Charging Adapter to the AC outlet.
• Plug the Charging Adapter’s cord into the Power Dome’s Charging Jack.
• The Charging Indicator will light up during the charging process.
• DC recharging adapter
• Easy to read analog voltmeter for checking battery status
• Initial AC charge can take up to 48 hours.
• DO NOT charge for more than 48 hours.
• After charging the battery, disconnect the adapter from the AC outlet first, then from
the charging jack.
WARNINGS
• Do not attempt to remove or replace the battery used in this device. When
the battery has reached the end of its lifetime, please take the entire unit to a
battery recycling facility.
• Use only the provided chargers, cables and clamps. Unauthorized parts may
damage the unit.
• Replace the dust cover on the charging jack.
CHARGING THE POWER DOME NX IN YOUR VEHICLE WITH DC POWER
Only use the DC charging adapter supplied with this unit.
• This product has no consumer serviceable parts, other than the 25A fuse.
• Note that the engine must be running while charging the Power Dome.
• For proper and safe operation of the 12 Volt DC power accessory outlet, do
• Make sure all Power Dome switches are switched OFF.
not place anything in it except the plug of the accessory to be used.
• Open the dust cover on the Charging Jack.
• Plug the Charging Adapter’s cord into the Power Dome’s Charging Jack.
• Plug the DC Charging Adapter into an accessory outlet (cigarette lighter).
• The Charging Indicator will light up during the charging process.
• DO NOT charge more than 16 hours through the DC outlet.
www.wagan.com
4
© 2010 Wagan Corporation.
All Rights Reserved.
Wagan and wagan.com are trademarks used by Wagan Corporation.
5
Power Dome™ NX by Wagan Tech
• After charging the battery, disconnect the adapter from the accessory socket first,
then from the charging jack.
• Replace the dust cover on the charging jack.
DC TO AC POWER INVERTER
The Power Dome’s inverter can operate most AC appliances or a combination of appliances
up to 200 watts. Operating time is dependant on the AC load (watts) and the charge
and condition of Power Dome’s internal battery. Reduced AC loads and a full charge on
the battery will result in longer operating time. Be sure to turn off or disconnect any AC
appliance not in use. There is a user replaceable 25 amp automotive type fuse below the
inverter ON/OFF switch. This fuse protects the inverter from an unlikely excessive input
current. Ordinary overloads will cause the inverter to automatically shut down. Reduce the
load and restart the inverter.
USING THE POWER INVERTER
CAUTION: Some rechargeable devices are equipped with a separate AC charger. These
devices are likely to operate properly with this inverter. Rechargeable devices that have builtin chargers, on the other hand, may not be compatible with this type of inverter (see device
owner’s manual).
Some motorized devices may operate at excessively elevated temperature when used
with this inverter. During first use with this inverter, check for excessive motor temperature.
Abnormally elevated temperature of the device is an indication that they should not be
used with this inverter.
User’s Manual—Please read before using this equipment.
DC POWER PORT
The DC Power Port (accessory socket) is located to the left of the Air Compressor Hose
Compartment. The port can power a DC load up to 11 Amps. Overloading the port results
in “tripping” and self-resetting circuit breaker. Removing the overload automatically restores
power to the DC power port.
1. Uncover the dust cover from the Power Port.
2. Turn the DC/USB Power Switch (next to the DC power port) to the ON “|” position.
Maker sure the LED next to the switch is lit.
3. Insert the 12V DC accessory plug into the Power Port.
4. Operate the appliance as usual.
5. After use, disconnect the accessory plug from the Power Port
and store the accessory.
6. Replace the Power Port’s dust cover and switch the DC/USB Power Switch to the
OFF “O” position.
7. Recharge the Power Dome as soon as convenient.
USB POWER PORT
1. Uncover the dust cover from the Power Port.
2. Turn the DC/USB Power Switch (next to the DC power port) to the ON “|” position.
Maker sure the LED next to the switch is lit.
3. Insert the USB plug into the Power Port.
1. Open the AC outlet dust cover.
4. Operate the appliance as usual.
2. Connect the AC appliance or appliances to either AC outlet.
5. After use, disconnect the USB plug.
3. Turn on the inverter by switching the Inverter’s ON/OFF switch to the ON “|”
position.
6. Replace the Power Port’s dust cover and switch the DC/USB Power Switch to the
OFF “O” position.
4. If the Inverter Power Indicator LED light is green, the inverter is operating.
7. Recharge the Power Dome as soon as convenient.
5. Turn on one AC appliance and observe the Power Indicator.
• If the LED remains green, then turn on the second appliance.
• If the Power Indicator remains green, then both
appliances are operating properly.
• If the Power indicator LED is not lit, then reduce the AC load. If the
inverter is still not operating, refer to the troubleshooting table at the
end of this User’s Manual.
6. After use, remove the appliances from the plugs.
7. Replace the Inverter dust covers and switch the Inverter Power Switch to the OFF
“O” position.
8. Recharge the Power Dome as soon as convenient.
www.wagan.com
6
AM/FM RADIO
The Radio can receive frequencies in the standard AM and FM broadcast bands (AM
520–1710 kHz, FM 88–108 MHz). An extendable rod antenna provides adequate signal
to receive all local radio stations. When not in use, the antenna should be stored in the
retracted position. This will prevent damage to the antenna while Power Dome is being
moved. All Radio controls are conveniently located in one area.
NOTE: All AM band radios are subject to receiving noise interference from electronic
devices, static lightning strikes and some motorized equipment. If you are operating the
Power Dome inverter and noise is being received on the AM band, either turn OFF the
inverter or change the radio to receive the FM band.
© 2010 Wagan Corporation.
All Rights Reserved.
Wagan and wagan.com are trademarks used by Wagan Corporation.
7
Power Dome™ NX by Wagan Tech
CH +
User’s Manual—Please read before using this equipment.
LED screen
PWR/BAND
VOL +
SETTING THE CLOCK
1. With the radio off and the Display showing in Clock Mode, press and hold the
MEMORY button for at least 1 second.
2. The clock display will flash and enter Clock Set Mode.
3. Tap the CH + button to increase the hour. Hold the button continuously to increase
the adjustment speed. The display will switch from AM to PM and PM to AM
appropriately.
4. Tap the CH − button to increase the minutes. Hold the button continuously to
increase the adjustment speed.
5. Tap the MEMORY button again to confirm the new clock time, returning to regular
Clock Mode.
Memory
SETTING RADIO STATION PRESETS
1. While the radio is playing, press and hold the MEMORY button for at least 1
second to record the current station as a preset.
Audio Input
2. When the “M” on screen flashes, tap the MEMORY button repeatedly to select the
desired memory position between 1–10.
TURNING ON AND TUNING THE RADIO
1. Carefully raise and extend the antenna.
2. Press and hold the PWR/BAND button for at least 1 second to turn the radio on.
The current frequency is displayed, with the AM/FM band shown in the corner.
3. Tap the PWR/BAND button quickly to switch between AM and FM bands.
4. Tap the CH + and CH − buttons to adjust the station. Press and hold the buttons to
automatically scan stations.
5. Tap the MEMORY button to switch to your station preset. Continue pressing the
button to cycle through each preset. See the section on setting radio station presets
on the next page.
6. When finished, press and hold the PWR/BAND button for at least 1 second to turn
off the radio and return to Clock Mode. Carefully retract the antenna and return it
to the lowered position.
3. Press and hold the MEMORY button once more to confirm the station preset at that
position. The radio will switch back to regular Radio Mode.
4. Repeat steps 1 to 3 for each desired preset.
5. When using the radio, tap the MEMORY button to select a preset. The current
preset is displayed on screen with the “M” and the preset number 1–10.
6. The radio can hold up to 10 AM or 10 FM station presets in memory. If presets are
stored for AM, then the FM presets will be lost. The same applies for FM presets
replacing AM ones.
3.5MM AUDIO INPUT
1. Turn the radio on.
2. Insert a 3.5mm audio cable into the audio input jack.
3. The opposite end of the cable should be plugged into a compatible audio device.
4. Turn on the audio device and set it to output sound. The sound should be audible
from the Power Dome speakers.
ADJUSTING THE VOLUME
5. The Power Dome’s USB Power Port can conveniently power your audio device.
1. With the radio turned on, Tap the VOL + and VOL − buttons to adjust the volume.
Press and hold the buttons to adjust the volume quickly. The radio can be adjusted
by 32 levels.
2. When using an external audio device in the Audio Input Jack, the volume will be
controlled by the external device.
www.wagan.com
8
© 2010 Wagan Corporation.
All Rights Reserved.
Wagan and wagan.com are trademarks used by Wagan Corporation.
9
Power Dome™ NX by Wagan Tech
User’s Manual—Please read before using this equipment.
USING THE AIR COMPRESSOR
• This product is not intended for use in the rain or temperatures above 130° F.
The Air Compressor can inflate a variety of tires and inflatable equipment. It can provide
inflation pressure up to 260 PSI (pounds per square inch). Be careful not to over-inflate by
monitoring the compressor gauge while inflating. The Compressor’s ON/OFF switch is
located above the compressor hose and nozzle compartment.
• Never attempt to charge or jump start a frozen battery.
CAUTION: Never connect or disconnect the nozzle with the compressor operating.
• After use, turn OFF the Power Safety switch.
1. Before inflating any tire, look for the recommended inflation pressure information
on the inside of the car door.
2. Open the compartment door on the side of the Power Dome and extend the hose.
• To prevent short-circuits, power arcing, and/or explosions, never allow the metal
ends/tips of the black and red clamps (positive and negative terminals) to touch
each other or connect to the same piece of metal.
• Excessive engine cranking can damage the vehicle’s starter motor. If the engine
fails to start after the recommended number of attempts, discontinue the jump start
procedure and look for other problems that may need to be corrected.
3. Position the Power Dome so that you can see the Pressure Gauge.
4. Make sure the chuck lever is positioned UP (away from the chuck opening).
JUMP STARTING:
5. Remove the valve cap from the valve stem.
1. Review the Jump starter warnings.
6. Attach the chuck to the tire’s valve stem and move the chuck lever DOWN to secure
the chuck to the valve stem.
2. Make sure all vehicle appliances, lights, radio, etc. are turned OFF.
7. Turn compressor switch to the ON position.
8. Monitor the pressure gauge while inflating the tire.
3. Make sure the vehicle’s brake is set and the transmission is in park.
4. Make sure all Power Dome switches are OFF.
9. When the recommended tire pressure has been reached, turn the compressor OFF.
5. Securely connect the Red (+) cable clamp to the vehicle’s Positive (+) battery
terminal.
10.Disconnect the hose and replace the valve cap.
6. Connect the Black (-) cable clamp to a non-moving part on the vehicle.
11.Store the hose in the Air Hose compartment.
12.Recharge the Power Dome as soon as convenient.
* If the vehicle to be started has a Positive Grounded System (positive battery terminal
is connected to chassis):
i. Connect the negative (−) black clamp to the vehicle battery’s negative terminal.
JUMP STARTER WARNINGS
• CAUTIONS: Lead-acid batteries can release explosive gasses. Failure to follow
instructions may cause property damage, explosion hazard and/or personal injury.
• This product is not a toy. Keep out of the reach of children.
• Do not smoke while using the jump starter.
• Make sure that someone is available to give assistance if needed.
• Do not operate this device while wearing vinyl clothing. Friction can cause static
electricity sparks. Remove any metallic jewelry, such as rings, bracelets, necklaces
and watches while working with a lead acid battery. It can produce a short-circuit
that may cause severe burns.
ii. Connect the positive (+) red clamp to the vehicle chassis or a solid, non-moving,
metal vehicle component or body part. DO NOT clamp directly to the positive
battery terminal or moving parts.
7. Switch ON the Jumper Safety Switch located at the back of the Power Dome.
8. Inside the vehicle, turn on the ignition switch and attempt to start the engine.
9. Crank for a maximum of three seconds. If the engine does not start, wait three
minutes before the next attempt.
10.After the engine starts, turn OFF the Jumper Safety Switch.
• Wear complete eye and clothing protection. Do not touch your eyes while working
near or with the battery.
11.Disconnect the Black Clamp first, and then disconnect the Red Clamp.
• Keep battery terminals clean. Be careful to keep corrosion from coming in contact
with your eyes.
13.Recharge the Power Dome as soon as convenient.
• Jump start vehicles or boats in well ventilated areas.
• Do not operate this unit submerged in or around water. Water can damage the unit.
12.Be sure that the cables and clamps are securely stored.
NOTE: If the engine does not start, there may be a problem other than a discharged battery.
Call for service.
• Do not let the cords of the jump starter or attached appliances get wet.
www.wagan.com
10
© 2010 Wagan Corporation.
All Rights Reserved.
Wagan and wagan.com are trademarks used by Wagan Corporation.
11
Power Dome™ NX by Wagan Tech
User’s Manual—Please read before using this equipment.
WORK LIGHT
The Work Light is a cluster of bright LEDs located at the front of the Power Dome. The
location of the Work Light allows the light to be used while the Power Dome is being carried.
• Turn the Light Switch (located below the Pressure Gauge and Voltmeter) to the Work
Light “|” position.
• The light will illuminate.
• Turn OFF while not in use.
USING THE HAZARD FLASHER
The Hazard Flasher Lens turns the Power Dome light into a caution warning for passing
traffic.
Connect Red, Positive (+) Clamp
1 to Positive Battery Terminal
1. Attach the red Hazard Flasher Lens Cover over the light snugly.
2. Switch the light on to Blinking mode by selecting “||” on the Light Switch.
3. Place the Power Dome in a spot easily noticed by other vehicles.
Attach Hazard Flasher Lens to Light
2
Switch to Blinker Mode
to vehicle chassis or non-moving,
metal vehicle component
Voltmeter
(Measures Power
Dome Battery)
3 Switch Jumper Safety Switch On
ON
www.wagan.com
12
OFF
© 2010 Wagan Corporation.
All Rights Reserved.
Wagan and wagan.com are trademarks used by Wagan Corporation.
13
Power Dome™ NX by Wagan Tech
User’s Manual—Please read before using this equipment.
INVERTER TROUBLESHOOTING GUIDE
SPECIFICATIONS
Trouble
Cause
Remedy
Sealed Lead Acid - Rechargeable
12 Volt, 14 Amp Hour
Lack of power
output
Power Dome battery
voltage below 10 volts
Recharge the Power Dome immediately
Work Light with On/Off Switch
9 × LED’s
Excessive current
drawn by appliance
being operated
Reduce load to maximum of 200 watts
Compressor
260 PSI Analog Gauge
Inverter Output - Two AC outlets
110 Volts AC 60 Hz
Maximum Inverter Output
200 Watts
Inverter Peak Surge
500 Watts (max of 0.3 seconds)
I2V Accessory Outlet
11 Amps max
USB Power Port
5V up to 500mA
AM/FM Radio
AM 520–1710 kHz/FM 88–108 MHz
Audio Input Jack
3.5 mm diameter (1/8 in.)
Full charge of Power Dome with AC charger
46 hours
Full charge with DC Charger (engine running)
12 hours
Jump Starter Cables and Clamps
6 Gauge, heavy duty clamps 24 in. length
1. Turn OFF the device and inverter
2. Disconnect device
3. Turn the inverter ON and run for
a minimum of 2 minutes
4. Turn OFF inverter, quickly plug
in device to inverter making sure
device is OFF prior to connection
5. Turn ON the inverter and device
Inverter fuse blown
Check and replace if necessary. Be sure
any replacement fuse is the same type
and rating.
Excessive voltage drop
Check Power Dome and recharge if
voltage drops below 12 volts.
Inverter is overloaded
Reduce load to maximum of 200 watts.
Television/Power
Tool will not start
High surge wattage
requirement to start-up
Toggle the On/Off switch in quick
succession five times. If the device does
not start, the device is not compatible with
this type of inverter.
Television
Interference
Picture breaking up
(snow).
Place the Power Dome as far from the TV,
antenna, and coaxial cable as possible.
Inverter Power
Indicator is not lit.
TV station may be out or range.
Static/noise
interference in
audio system
Sound system has
weak alternating
current shielding
Do not use inverter with low quality audio
AC filtering system.
Replace audio system with high quality
noise filtering
www.wagan.com
14
© 2010 Wagan Corporation.
All Rights Reserved.
Wagan and wagan.com are trademarks used by Wagan Corporation.
15
Manual de usuario—Por favor leer antes de utilizar este equipo
COMPONENTES DEL POWER DOME NX
LADO IZQUIERDO:
1.
13.
2.
14.
3.
4.
15.
16.
17.
5.
6.
18.
19.
7.
8.
9.
10.
11.
20.
12.
1. Un enchufe de corriente AC
2. Botón de encendido-apagado del
inversor
3. Luz de trabajo
4. Cable de jumpstarter negro negativo (−)
5. Indicador de corriente del inversor
6. Fusibles de 25 Amps
7. Indicador de corriente USB/DC
8. Botón de encendido-apagado de
corriente USB/DC
9. Lente intermitente de luces de peligro
10. Manguera de aire
11. Puerto de corriente USB
12. Zócalo de corriente DC
13. Calibrador del compresor
14. Medidor del estado de batería
15. Indicador de carga
16. Enchufe para el cargador de corriente
AC
17. Botón para monitorear el estado de la
batería
18. Botón de encendido-apagado del
compresor
19. Botón de Luz de trabajo/intermitente
20.Cable de jumpstarter rojo positivo (+)
© Corporación Wagan 2010
Todos los derechos reservados
WAGAN y Wagan.com son marcas registradas de la Corporación Wagan
17
Power Dome™ NX de Wagan Tech
Manual de usuario—Por favor leer antes de utilizar este equipo
LADO DERECHO:
¡Gracias por adquirir el generador compacto Power Dome NX de Wagan Tech! Con cuidado mínimo y el tratamiento apropiado proporcionará años de uso confiable.
INFORMACIÓN IMPORTANTE
21.
26.
ANTES DE UTILIZAR SU NUEVO POWER DOME NX, LEA Y ENTIENDA TODAS LAS ADVERTENCIAS, PRECAUCIONES Y NOTAS INCLUIDAS EN ESTE MANUAL. SIGA LAS INSTRUCCIONES
PROPORCIONADAS POR EL FABRICANTE DE SU VEHÍCULO Y FABRICANTE DE LOS APARATOS
QUE SE PROPONGA UTILIZAR CON ESTA UNIDAD. CERCIÓRESE DE QUE LA UNIDAD ESTE
COMPLETAMENTE CARGADA ANTES DEL PRIMER USO.
27.
CARACTERÍSTICAS IMPORTANTES
• Jumpstarter de 500 Amps con cables y pinzas resistentes
• Compresor de aire de 260 PSI para inflar llantas y otros accesorios
22.
28.
• Calibrador de presión análogo de lectura fácil
• Inversor de corriente de 200 Watts – oleada máxima de 500 Watts
29.
• Dos enchufes de 110 V AC
• Un enchufe para accesorios de 12 voltios DC para utilizar aparatos con cargas de
hasta 11 Amperios
23.
• Un Puerto de energía USB para cargar/utilizar teléfonos celulares, PDAs y
reproductores MP3
24.
• Radio AM-FM con altavoz incorporado
• Enchufe de entrada para audífonos de 3.5mm para reproductores de música
• 9 Potentes luces de trabajo – tipo LED
• Lente intermitente de luces de peligro
• Cargador AC para recargar la unidad en la comodidad del hogar
• Cargador DC
25.
21.
22.
23.
24.
25.
26.
27.
28.
29.
• Voltímetro análogo de fácil lectura para monitorear el estado de la batería
Antena extensible
Botón de seguridad del jumper
Enchufe de entrada para audífonos de 3.5mm
Cable de jumpstarter rojo positivo (+)
Compartimiento para almacenaje
Manija de hule
Pantalla LED para radio- reloj
Controles para el radio- reloj
Altavoces
* No incluye reproductor
de MP3 o cables de audio
PRECAUCIÓN
• No intente quitar o reemplazar la batería en este dispositivo. Cuando la batería
haya llegado al final de su vida útil, por favor, lleve toda la unidad a un centro de
reciclaje de baterías.
• Utilice solamente los cargadores, los cables y las pinzas suministrados con esta
unidad. Partes no autorizadas podrían dañar la unidad.
• Este producto no tiene ninguna pieza q pueda darle servicio al consumidor, con
excepción del fusible 25A.
• Para un funcionamiento adecuado y seguro del enchufe para accesorios de 12
voltios, no coloque nada en él excepto el enchufe del accesorio para ser utilizado.
www.wagan.com
18
© Corporación Wagan 2010
Todos los derechos reservados
WAGAN y Wagan.com son marcas registradas de la Corporación Wagan
19
Power Dome™ NX de Wagan Tech
Manual de usuario—Por favor leer antes de utilizar este equipo
ESTADO DE LA BATERÍA
CARGA POR CORRIENTE DC EN SU VEHÍCULO O BOTE
El botón para monitorear el estado de la batería, provee al usuario el estado actual de la
carga de la batería interna. Es responsabilidad del usuario supervisar periódicamente la
carga de la batería y recargar la batería después de cada uso. Es recomendable recargar
su Power Dome NX cada 3 meses en caso de no utilizarse la unidad.
Cerciórese de que el adaptador de carga suministrado de corriente AC sea utilizado con el
voltaje correcto (es decir 110 V AC o 220 V AC). Utilice solamente el adaptador de carga
AC suministrado con esta unidad.
1. Cerciórese de desconectar los cargadores
2. Presione y sostenga el botón de ESTADO de la BATERÍA
3. El medidor del estado de la batería (voltímetro de corriente DC) indicará el voltaje
de la batería
4. El estado de la batería (voltaje) se lee cuando los cargadores estén desconectados
• 12.6 V DC o más - la batería esta lista para usar
• 12.0 V DC o menos - la batería necesita recargarse mas
• Menos de 10.5 V DC – la batería esta descargada- recargue
Inmediatamente
RECARGANDO SU POWER DOME
Carga por corriente AC desde su hogar Utilice solamente el adaptador de carga AC suministrado con esta unidad.
1. Cerciórese de que todos los interruptores de su Power Dome NX estén APAGADOS
2. Abra el protector contra el polvo del enchufe para el cargador
3. Conecte el cargador AC en algún zócalo de carga AC en su hogar
4. Conecte el otro extremo de su cargador en el enchufe de su Power Dome NX
5. El indicador de carga se encenderá durante el proceso de carga
6. La carga inicial de la AC puede tomar hasta 48 horas
7. No cargue la unidad por más de 48 horas
8. Después de cargar la batería, desconecte el adaptador del zócalo AC primero, y
luego el enchufe de carga de la unidad.
1. El motor de su vehículo debe estar encendido mientras cargue su Power Dome NX
2. Cerciórese de que todos los interruptores de su Power Dome NX estén APAGADOS
3. Abra el protector contra el polvo del enchufe para el cargador DC
4. Conecte el alambre cargador en el zócalo de corriente DC de su Power Dome NX
5. Conecte el otro extremo de su cargador DC en el zócalo de accesorios de su auto
(encendedor de cigarrillos)
6. El indicador de carga se encenderá durante el proceso de carga
7. No cargue por más de 16 horas usando el método de corriente DC
8. Después de cargar la batería, desconecte el cargador del zócalo accesorio
primero, y luego del zócalo de corriente DC en el Power Dome NX
9. Cierre el protector contra el polvo del el zócalo de corriente DC
INVERSOR DE CORRIENTE DC A CORRIENTE AC
El inversor del Power Dome puede funcionar con la mayoría de aparatos de corriente AC o
una combinación de aparatos que usen hasta un máximo de 200 Watts. El máximo tiempo
de operación depende de la carga AC (watts) del aparato que piense usar y la condición
de la batería interna del Power Dome. Cargas AC de baja potencia y baterías completamente recargadas, resultarán en tiempos de operación más largos. Asegúrese de apagar
o de desconectar cualquier aparato de corriente AC que no este en uso. Hay un fusible
automotor reemplazable de 25 amperios debajo del botón de encendido/apagado. Este fusible protege el inversor contra corrientes de entrada excesivas. Las sobrecargas ordinarias
harán que el inversor se apague automáticamente. Reduzca la carga y encienda el inversor
nuevamente.
9. Cierre el protector contra el polvo en el enchufe de carga de la unidad.
USANDO EL INVERSOR DE CORRIENTE
PRECAUCIÓN: Algunos aparatos recargables vienen con cargadores separados de corriente
AC. Estos aparatos probablemente funcionaran correctamente con este inversor. Los dispositivos recargables que tienen cargadores integrados (refiérase al manual de instrucciones del
aparato), pueden no funcionar correctamente con el inversor.
Algunos aparatos motorizados pueden funcionar a temperaturas excesivamente elevadas
cuando son utilizados con este inversor. Durante el primer uso del inversor, monitoree la
temperatura del motor del aparato. Temperaturas excesivamente elevadas indican que el
aparato no debe utilizarse con el inversor.
www.wagan.com
20
© Corporación Wagan 2010
Todos los derechos reservados
WAGAN y Wagan.com son marcas registradas de la Corporación Wagan
21
Power Dome™ NX de Wagan Tech
Manual de usuario—Por favor leer antes de utilizar este equipo
1. Abra el protector de polvo del zócalo AC
3. Inserte el enchufe de la corriente USB en el puerto de corriente
2. Conecte el aparato(s) de corriente AC en cualquiera de los dos enchufes de
corriente AC
4. Utilice la aplicación como lo hace usualmente
3. Encienda el inversor usando el botón de Encendido/Apagado
4. Si la luz indicadora LED se torna verde, el inversor esta funcionando
5. Encienda el aparato de corriente AC que desea utilizar y observe el indicador de
energía
• Si la luz indicadora de LED sigue siendo verde, puede proceder a
encender la segunda aplicación.
• Si la luz indicadora se mantiene verde, esto significa que ambas
aplicaciones están funcionando correctamente
• Si la luz indicadora LED no se enciende, reduzca la carga de AC. Si
el inversor todavía no funciona, refiérase a la guía de localización de
problemas que se encuentra al final de esta manual de usuarios.
6. Al terminar el uso del aparato AC, desconecte el aparato(s)
7. Cierre el zócalo con el protector de polvo y apague el inversor
8. Recargue su Power Dome NX tan pronto le sea conveniente
5. Después de utilizar, desconecte el enchufe del puerto de corriente USB
6. Cierre el protector contra polvo del puerto de corriente y apague el inversor
7. Recargue su Power Dome tan pronto como sea conveniente
RADIO AM-FM
La radio puede recibir frecuencias de las bandas comunes AM y FM. En AM de 520 a 1710
kHz; FM de 88 a 108 MHz. La antena extensible provee señal adecuada para recibir todas
las estaciones locales. Cuando la radio no este en uso, la antena debe ser almacenada en
su ranura. Esto prevendrá daños a la antena mientras el Power Dome este en movimiento.
Todos los controles de la radio, están ubicados convenientemente en una misma área.
NOTA: Todas las radios de banda AM son propensos a recibir ruido de interferencia por
aparatos electrónicos, rayos de relámpagos y también de otros equipos motorizados. Si
usted está utilizando el inversor del Power Dome y esta recibiendo ruido de interferencia por
la banda AM, apague el inversor o cambie de frecuencia a la banda FM.
PUERTO DE CORRIENTE DC
El puerto de corriente DC (o Zócalo accesorio) está situado a la izquierda del compartimiento para manguera de aire. El puerto de corriente DC puede accionar una carga de DC de
hasta 11 amperios. Si el puerto se sobrecarga, esto puede dar lugar a “disparar” un disyuntor de reconexión automática. La eliminación de la sobrecarga restaura automáticamente la
energía al puerto de corriente DC.
CH +
Encendido
Pantalla LED
VOL +
(PWR/BAND)
1. Destape el protector contra el polvo del puerto de corriente DC
2. Presione el botón de corriente DC/USB (al lado del Zócalo de corriente DC) en la
posición de encendido “I”. Asegúrese q la luz indicadora LED este encendida
3. Inserte el enchufe del accesorio de 12 V DC en el puerto de corriente
4. Utilice la aplicación como lo hace usualmente
5. Después de utilizar, desconecte el enchufe del accesorio del puerto de corriente
DC y almacene el accesorio
Memoria
6. Cierre el protector contra polvo del puerto de corriente y apague el inversor
(MEMORY)
7. Recargue su Power Dome tan pronto como sea conveniente
PUERTO DE CORRIENTE USB
Entrada Para Audífonos
(AUDIO INPUT)
1. Destape el protector contra el polvo del puerto de corriente
2. Presione el botón de corriente DC/USB (al lado del Zócalo de corriente DC) en la
posición de encendido “I”. Asegúrese q la luz indicadora LED este encendida
www.wagan.com
22
© Corporación Wagan 2010
Todos los derechos reservados
WAGAN y Wagan.com son marcas registradas de la Corporación Wagan
23
Power Dome™ NX de Wagan Tech
ENCENDIENDO Y APAGANDO EL RADIO
1. Levante y extienda cuidadosamente la antena
2. Presione y sostenga el botón de Encendido (PWR/BAND) por lo menos por un
segundo para encender la radio. La frecuencia AM/FM será mostrada en la
esquina de la pantalla
3. Pulse el botón de Encendido(PWR/BAND) para seleccionar la banda AM o FM
4. Pulse los botones de CH+ y CH− para ajustar la estación deseada. Presione y
sostenga los botones para escanear automáticamente las estaciones
5. Pulse el botón de memoria para volver a la estación anterior. Continúe presionando
el botón para completar el ciclo de cada estación pre-establecida. Vea la sección
sobre la configuración de estaciones de radio pre-establecidas.
6. Cuando haya terminado, presione y sostenga el botón encendido (PWR/BAND)
por lo menos por 1 segundo para apagar la radio y volver a la modalidad de
reloj. Cierre la antena cuidadosamente y colóquela de vuelta en su ranura.
2. Cuando “M” se encienda en la pantalla, pulse el botón de memoria(MEMORY)
repetidamente para seleccionar la memoria deseada entre la posición 1–10
3. Presione y sostenga el botón de memoria (MEMORY) una vez mas para confirmar
la estación pre-establecida en esa posición. La radio cambiará a la modalidad de
radio.
4. Repita los pasos 1–3 para cada estación pre-establecida deseada.
5. Cuando use la radio, pulse el botón de memoria (MEMORY) para seleccionar
una estación pre-establecida. La actual estación pre-establecida se mostrará en la
pantalla con “M” y el número pre-establecido 1–10
6. El radio puede almacenar hasta 10 horas o 10 pre-sintonías en la memoria. Si las
estaciones pre-establecidas son almacenados en la banda AM, los pre-ajustes
para la banda FM se perderán. Lo mismo se aplica para sustituir los pre-ajustes de
FM a AM
ENTRADA PARA AUDÍFONOS DE 3.5MM
1. Encienda la radio
AJUSTANDO EL VOLUMEN
1. Con la radio encendida, pulse los botones de VOL+ VOL− para ajustar el volumen,
presione y sostenga los botones para ajustar la intensidad rápidamente. La radio
se puede ajustar en 32 niveles
2. Cuando se utilice un dispositivo de audio externo en la entrada auxiliar de audio,
el volumen será controlado por el dispositivo externo
CONFIGURACIÓN DEL RELOJ
1. Con la radio apagada y la pantalla mostrando la modalidad de reloj, presione y
sostenga el botón de memoria (MEMORY) por lo menos por 1 segundo
2. La pantalla del reloj se encenderá y se pondrá en el modo de ajuste de reloj
3. Pulse el botón CH+ para aumentar la hora. Mantenga presionado el botón
continuamente para aumentar la velocidad del ajuste. La pantalla cambiará de AM
a PM
4. Pulse el botón CH− para aumentar los minutos. Mantenga presionado el botón
continuamente para aumentar la velocidad del ajuste
5. Pulse el botón de memoria (MEMORY) una vez mas para confirmar la nueva hora,
volviendo a la modalidad de reloj
CONFIGURANDO ESTACIONES DE RADIO PRE-STABLECIDAS
1. Mientras este utilizando la radio, presione y sostenga el botón de memoria
(MEMORY) por la menos 1 segundo para grabar la estación actual como preestablecida
www.wagan.com
24
Manual de usuario—Por favor leer antes de utilizar este equipo
2. Inserte el cable de audio de 3.5mm al enchufe de entrada para audífonos
3. Conecte el otro extremo del cable a un dispositivo de audio compatible
4. Encienda el dispositivo de audio y póngalo en el modo de salida de sonido. El
sonido se escuchará por los altavoces del Power Dome
5. El puerto de corriente USB del Power Dome puede alimentar a su dispositivo de
sonido
COMPRESOR DE AIRE
El compresor de aire de su Power Dome puede inflar una gran variedad de neumáticos y
equipos inflables. Este puede proporcionar una presión de inflación de hasta 260 PSI (libras
por pulgada cuadrada). Tenga cuidado de no inflar excesivamente. Supervise el calibrador
del compresor mientras que el compresor este en uso. El botón de encendido/apagado del
compresor esta localizado encima del compartimiento para la manguera de aire.
PRECAUCIÓN: Nunca conecte o desconecte el inyector cuando del compresor este en
funcionamiento.
1. Antes de inflar cualquier neumático, busque la formación de la presión
recomendada dentro de la puerta de su vehículo
2. Abra la puerta de compartimiento en la parte lateral del Power Dome y extienda la
manguera de aire
3. Coloque el Power Dome de modo que usted pueda ver la presión calibrador
4. Asegúrese que la palanca del adaptador de la válvula este hacia arriba (lejos de
la abertura del adaptador de la válvula)
5. Remueva el casquillo de la válvula
© Corporación Wagan 2010
Todos los derechos reservados
WAGAN y Wagan.com son marcas registradas de la Corporación Wagan
25
Power Dome™ NX de Wagan Tech
6. Conecte el adaptador de la válvula, a la manguera del compresor, y baje la
palanca del adaptador
7. Encienda el botón para el compresor
8. Supervise el calibrador de presión mientras que infla el neumático
9. Cuando alcance la presión adecuada para el neumático, apague el compresor
Manual de usuario—Por favor leer antes de utilizar este equipo
• Recargar el motor excesivamente puede dañar el motor. Si el motor no se enciende
después del número de atentos recomendado, pare el procedimiento de carga de
la batería y busque otros problemas que necesiten ser corregidos
CARGANDO (JUMPSTARTING) LA BATERÍA
10.Desconecte la manguera y cierre el casquillo de la válvula
1. Repase las advertencias de Jumpstarting (en la sección anterior)
11.Almacene la manguera en su compartimiento apropiado
2. Cerciórese que todas las aplicaciones del vehículo, luces, radio, etc. estén
apagadas
12.Recargue el Power Dome tan pronto como le sea conveniente
ADVERTENCIAS PARA CARGAR LA BATERÍA DE SU AUTO
(JUMPSTARTING)
• Las baterías de plomo pueden desprender gases explosivos. No seguir estas
instrucciones puede causar daños materiales, peligro de explosión, y/o daños
corporales
• Este producto no es un juguete. Mantenga esta unidad fuera del alcance de los
niños
• No fume mientras que este cargando la batería de su auto
• Cerciórese que haya alguien disponible en caso necesite asistencia
• No use ropa de vinil cuando este cargando la batería — la fricción puede causar
chispas estáticas de electricidad. Despójese de toda la joyería de metal ya que
pueden causar cortocircuitos
• Utilice siempre gafas de seguridad cuando este cargando una batería, ya que el
ácido de batería puede causar ceguera y/o quemaduras severas
• Mantenga los terminales de la batería limpios y tenga cuidado que la corrosión
podría entrar contacto con los ojos
• Cargue la batería del vehículo o barco en un área ventilada
3. Cerciórese de que el freno del vehículo este puesto y la transmisión este en
“parqueo”
4. Cerciórese de que todos los botones del Power Dome estén apagados
5. Conecte de forma segura la pinza roja positiva (+) a la terminal positiva (+) de la
batería
6. Conecte la pinza negra negativa (−) con alguna parte fija y q no este en
movimiento del vehículo
*Si el vehículo que va a cargarse tiene un sistema “Grounded” positivo (Esto quiere
decir que la terminal positiva de la batería esta conectada al chasis):
i. Conecte la pinza negra negativa (−) con la terminal negativa de la batería del
vehículo.
ii. Conecte la pinza roja positiva (+) con el chasis del vehículo o alguna parte del
vehículo sólida, fija de metal. NO conecte directamente a la terminal positiva
de la batería o a ninguna parte en movimiento.
7. Encienda el botón de seguridad del jumper localizado en la parte posterior del
Power Dome
8. Dentro del vehículo, encienda la ignición e intente encender el vehículo
• No utilice esta unidad si esta sumergida o cerca del agua, podría dañar su unidad.
9. Intente un máximo de tres segundos. Si el motor no enciende, espere 3 minutos
antes de intentar nuevamente
• No intente cargar una batería congelada
10.Después de que el motor encienda, apague el botón de seguridad del Jumper
• No permita que los cables del jumpstarter o los aparatos conectados se mojen
11.Desconecte la pinza negra primero, y luego la pinza roja
• Esta producto no esta diseñado para ser usado en la lluvia o en temperaturas
encima de 130°F
12.Asegúrese de que los cables y las pinzas estén almacenadas en sus lugares
13.Recargue el Power Dome tan pronto le sea conveniente
• No intente cargar una batería congelada
• Para evitar corto circuitos, arcos de energía o explosiones, nunca pegue las pinzas
roja y negra juntas o conecte las misma pieza de metal
NOTA: Si el motor no enciende, esto puede significar que el problema no es la batería
Llame a un agente de servicio.
• Después de que termine de cargar la batería, apague el botón de seguridad del
Jumper
www.wagan.com
26
© Corporación Wagan 2010
Todos los derechos reservados
WAGAN y Wagan.com son marcas registradas de la Corporación Wagan
27
Power Dome™ NX de Wagan Tech
Manual de usuario—Por favor leer antes de utilizar este equipo
LUZ DEL TRABAJO
La luz del trabajo esta compuesta por una combinación de luces LED, localizadas arriba del
área de almacenamiento de los cables del Jumper. La ubicación de la luz del trabajo permite que la luz sea utilizada mientras que el Power Dome se este transportando.
1. Mueva el botón de la luz de trabajo (debajo de los botones del calibrador del
compresor y el medidor del estado de batería), a la posición de encendido
2. La luz se iluminará
3. Apague la luz cuando esta no este en uso
1
USANDO LAS LUCES INTERMITENTES DE PELIGRO
Conecte la pinza roja positiva (+) a la
terminal positiva de la batería de su vehículo
El lente intermitente de luces de peligro del Power Dome sirven de advertencia de precaución para el tráfico
1. Conecte la cubierta de luz roja intermitente de peligro sobre el lente de luz
2. Mueva a la posición de intermitente “II” en el botón de la luz
3. Apague cuando no este en uso
Una el lente de la luz de peligro a la luz
Mueva el botón a el
modo de intermitente
2 Conecte la pinza negativa (−) con el
chasis del vehículo o alguna parte del
vehículo sólida, fija de metal.
Voltímetro (mide la batería
del Power Dome)
3
Mueva el botón de seguridad del
Jumper a la posición de encendido.
ENCIENDA
www.wagan.com
28
APAGUE
© Corporación Wagan 2010
Todos los derechos reservados
WAGAN y Wagan.com son marcas registradas de la Corporación Wagan
29
Power Dome™ NX de Wagan Tech
Manual de usuario—Por favor leer antes de utilizar este equipo
GUÍA DE LOCALIZACIÓN DE PROBLEMAS
Batería
Batería de plomo recargable 12 Voltios,
14 Amp por Hora
Luz de trabajo
9 luces de LED
Compresor
260 PSI con inyector análogo
Salida del inversor – 2 zócalos de AC
110 Voltios AC 60 Hz
Salida máxima continua del inversor
200 Watts
2. Desconecte el aparato
Oleada máxima
3. Encienda el inversor y déjelo
correr por un mínimo de 2 min.
500 Watts de oleada máxima por un
período de 0.3 segundos
Zócalo de accesorio de 12 voltios
11 Amps máximos
4. Apague el inversor y
rápidamente conecte el aparato,
asegurándose que el aparato
este desconectado
Puerto de corriente USB
5V up to 500mA
Radio AM-FM
AM 520 a 1710 kHz/FM 88 a 108 MHz
Salida auxiliar de audio
3.5 mm de diámetro (1/8 pulgadas)
5. Encienda el inversor y el aparato
Tiempo de carga máxima AC con batería
descargada
46 horas
Tiempo de carga máxima de DC (con el
motor encendido)
12 horas
Cables del Jumpstarter (cargador) y pinzas
Cables de calidad industrial de calibre #6
y pinzas de uso pesado 24 pulgadas de
longitud
Problema
Posibles causas
Solución
No hay corriente
de salida, o la
corriente es muy
baja
Voltaje de la batería
del Power Dome es de
menos de 10 voltios
Recargue el Power Dome inmediatamente
El aparato que
está utilizando esta
extrayendo una
corriente excesiva
Reduzca la carga a un máximo de 200
Watts
1. Apague el aparato y el inversor
Fusible del inversor
quemado por sobre
carga
Reemplace el fusible si es necesario y
asegúrese de que el fusible de reemplazo
es del mismo tipo que el del inversor
Luz indicadora del
inversor no está
encendida
Bajada de voltaje
excesiva
Recargue su Power Dome si el voltaje ha
bajado a menos de 12 voltios
El inversor esta
sobrecargado
Reduzca la carga a un máximo de 200
Watts
Televisión/
Herramienta
eléctrica no
enciende
Alta oleada máxima
de voltaje requerida
para encender el
aparato
Encienda y apague el inversor en
sucesiones repetidas un total de 5 veces.
Si el aparato no enciende esto significa
que el aparato no va a funcionar con este
tipo de inversor
Imagen de
televisión
distorsionada
Interferencia debido al
inversor
Ponga el Power Dome lo mas lejos posible
de su TV, antena, y cable coaxial
Sonido de
interferencia en el
sistema de audio
Algunos sistemas
de audio de baja
calidad no tienen
un filtro de corriente
interna adecuado, de
modo que causan un
sonido de interferencia
cuando están en uso
con el inversor
La estación puede estar fuera de área
No use el inversor con sistemas de filtros
de audio AC de baja calidad
Reemplace el sistema de audio con filtros
reductores de ruido de mejor calidad
www.wagan.com
30
ESPECIFICACIONES
© Corporación Wagan 2010
Todos los derechos reservados
WAGAN y Wagan.com son marcas registradas de la Corporación Wagan
31
32
Attn: Customer Service
WAGAN Corporation
31088 San Clemente St.
Hayward, CA 94544
U.S.A.
Fecha
Artículo Nº
Todos los productos de la corporación Wagan deberán
ser registrados dentro de un periodo de (30) días después
de la compra para activar la garantía.
Envíe el formulario de inscripción junto con una copia del
recibo original a :
Firma
Fecha de Compra
Nombre del
Almacén
Artículo
Adquirido
© Corporación Wagan 2010
Todos los derechos reservados
WAGAN y Wagan.com son marcas registradas de la Corporación Wagan
Correo
Electrónico
Condiciones de la garantía: Durante el antedicho periodo de un (1) año, productos
defectuosos serán reemplazados por un modelo comparable, cuando el producto sea
devuelto a la corporación WAGAN con un recibo de compra original. El producto de
reemplazo estará bajo garantía por el resto del periodo de un (1) año. Revisado en
Agosto del 2008
Estado,
Código Postal
Excepción de la garantía: Esta garantía toma efecto en lugar de cualquier otra
garantía expresada o implicada, que no represente a ninguna persona autorizada
de asumir ninguna otra responsabilidad conectada con la venta de productos de la
Corporación Wagan. Demandas debido a defectos o fallas de productos no deberán
ocurrir bajo ninguna teoría de disputas, contratos, o leyes comerciales, incluyendo
pero no limitando negligencia, responsabilidad estricta, infracción de la garantía, o
infracción de contrato.
Ciudad
Números de autorización de devolución de mercancía (RMA) son REQUERIDOS en
caso de enviar un artículo defectuoso. La corporación WAGAN no es responsable
por ningún articulo devuelto sin el debido numero RMA. La corporación WAGAN
no es responsable de gastos incurridos en la devolución de productos que necesiten
reparación o reemplazo. Esta garantía será cancelada en caso de que el producto
haya sido dañado por accidente en el envío, por uso irrazonable, mal uso,
negligencia, servicio inapropiado, uso comercial, reparaciones por personal no
autorizado, u otras causas que se no se presenten debido defectos en materiales o la
fabricación. Esta garantía excluye unidades que hayan sido utilizadas en violación de
las instrucciones escritas en este manual de usuarios.
Dirección de
correo
Duración de la garantía: Este producto es garantizado al comprador original por
un período de un (1) año a partir de la fecha original de la compra. El producto
esta garantizado de estar libre de defectos en los materiales o en la fabricación
del mismo. La corporación Wagan no se hace responsable por ningún tipo de
daños consecuentes. La corporación WAGAN no se hace responsable en ningún
momento de cualquier daño más allá de la cantidad pagada por el producto a un
precio al detal. En el caso de recibir un artículo defectuoso, por favor contacte a
la corporación WAGAN al 1-800-231-5806 y obtenga un número de autorización
de devolución de mercancía (RMA) al igual que instrucciones de devolución. Cada
artículo devuelto necesitara un número RMA diferente. Después de recibir el número
RMA y las instrucciones de devolución de la Corporación WAGAN, por favor siga las
instrucciones y envíe el artículo (pagando por el envío) junto con la documentación
requerida, una explicación completa del problema, nombre, dirección, y número de
teléfono. La corporación Wagan decidirá a su discreción reparar o reemplazar el
producto defectuoso.
Corte la porción de abajo y envíela de vuelta a la dirección indicada arriba.
Nombre:
Todos los productos de la corporación WAGAN son garantizados al comprador
original de este producto.
Wagan Corp. Garantía limitada de formulario de inscripción
Por Favor Activen mi garantía limitada de Wagan Tech.
Garantía Limitada de la Corporación Wagan
WAGAN Corp. Limited Warranty Registration Form
Attn. Customer Service
WAGAN Corporation
31088 San Clemente St.
Hayward, CA 94544
All WAGAN Corporation products are warranted to the original purchaser of this
product.
Signature
Date of purchase
Store name
Item purchased
E-mail address
State, Zip code
City
Mailing
address
Name
All WAGAN Corporation Products must be registered
within (30) days of purchase to activate this warranty.
Mail the complete registration form, along with a copy
of the original sales receipt to:
Please activate my limited warranty for WAGAN Corp.
Date
Item no.
Please return this card to the address listed below
WAGAN Corp. Limited Warranty
Warranty Duration: This product is warranted to the original purchaser for a period
of one (1) Year from the original purchase date, to be free of defects in material
and workmanship. WAGAN Corporation disclaims any liability for consequential
damages. In no event will WAGAN Corporation be responsible for any amount of
damages beyond the amount paid for the product at retail. In the event of a defective
item, please contact WAGAN Corporation at (800) 231-5806 to obtain a Returned
Merchandise Authorization number (RMA#), and return instructions. Each item returned
will require a separate RMA#. After you have received the RMA# and the return
instructions from WAGAN Corporation, please follow the instructions and send the
item with PREPAID SHIPPING, along with all of the required documentation, a complete
explanation of the problem, your name, address and daytime phone number. WAGAN
Corporation will, at its option, replace or repair the defective part.
A Returned Merchandise Authorization number (RMA#) is REQUIRED when sending
in any defective item. WAGAN Corporation is not responsible for any item(s) returned
without an official Returned Merchandise Authorization number. The item(s) must
be returned with prepaid shipping. WAGAN Corporation is not responsible for any
shipping charges incurred in returning the item(s) back to the company for repair or
replacement. This warranty is void if the product has been damaged by accident, in
shipment, unreasonable use, misuse, neglect, improper service, commercial use, repairs
by unauthorized personnel or other causes not arising out of defects in materials or
workmanship. This warranty does not extend to any units which have been used in
violation of written instructions furnished.
Warranty Disclaimers: This warranty is in lieu of all warranties expressed or implied
and no representative or person is authorized to assume any other liability in
connection with the sale of our products. There shall be no claims for defects or failure
of performance or product failure under any theory of tort, contract or commercial
law including, but not limited to negligence, gross negligence, strict liability, breach of
warranty and breach of contract.
Warranty Performance: During the above one (1) Year warranty period, a product with
a defect will be replaced with a comparable model when the product is returned to
WAGAN Corporation with an original store receipt. The replacement product will be in
warranty for the balance of the one (1) Year warranty period. Updated August 2008
© 2010 Wagan Corporation.
All Rights Reserved.
Wagan and wagan.com are trademarks used by Wagan Corporation.
35
R
www.wagan.com
31088 San Clemente Street, Hayward, CA 94544 U.S.A.
1.800.231.5806
[email protected]
Revised February 2010
Revisado en Febrero del 2010
© 2010 Wagan Corporation.
All Rights Reserved.
Wagan and wagan.com are trademarks used by Wagan Corporation.
© Corporación Wagan 2010
Todos los derechos reservados
WAGAN y Wagan.com son marcas registradas de la Corporación Wagan