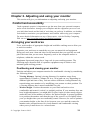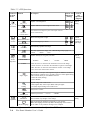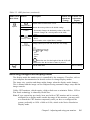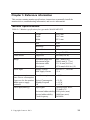
1
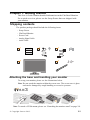
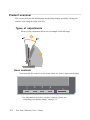
LT2423wC Flat Panel Monitor
User's Guide
Product numbers
60A8-KAR2-WW
First Edition (May 2013)
© Copyright Lenovo 2013.
All rights reserved.
LENOVO products, data, computer software, and services have been developed exclusively
at private expense and are sold to governmental entities as commercial items as defined by
48 C.F.R. 2.101 with limited and restricted rights to use,reproduction and disclosure.
LIMITED AND RESTRICTED RIGHTS NOTICE: If products, data, computer software, or
services are delivered pursuant a General Services Administration "GSA" contract, use,
reproduction, or disclosure is subject to restrictions set forth in Contract No. GS-35F-05925.
© Copyright Lenovo 2013.
i
Contents
Safety information ..................................................................... iii
Chapter 1. Getting started .......................................................1-1
Shipping contents ............................................................................................................. 1-1
Attaching the base and handling your monitor .................................................................1-1
Product overview ..............................................................................................................1-2
Types of adjustments ....................................................................................................1-2
User controls ...............................................................................................................1-2
Cable lock slot .............................................................................................................1-3
Setting up your monitor ...................................................................................................1-3
Connecting and turning on your monitor ....................................................................1-3
Registering your option ....................................................................................................1-6
Chapter 2. Adjusting and using your monitor .........................2-1
Comfort and accessibility ................................................................................................. 2-1
Arranging your work area ............................................................................................ 2-1
Positioning and viewing your monitor ......................................................................2-1
Quick tips for healthy work habits .............................................................................2-2
Accessibility information...........................................................................................2-2
Adjusting your monitor image ..........................................................................................2-3
Using the direct access controls .................................................................................. 2-3
Using the On-Screen Display (OSD) controls ............................................................2-3
Selecting a supported display mode .................................................................................2-5
Understanding power management ..................................................................................2-6
Caring for your monitor ....................................................................................................2-7
Preparing the monitor for wall-mounting..........................................................................2-8
Chapter 3. Reference information ..........................................3-1
Monitor specifications .....................................................................................................3-1
Troubleshooting ................................................................................................................3-3
Manual image setup .....................................................................................................3-4
Installing the monitor driver in Windows Vista...........................................................3-5
Installing the monitor driver in Windows 7.................................................................3-6
Installing the monitor driver in Windows 8/Windows 8.1 ...........................................3-7
Service informatio....................................................................................................3-8
Customer responsibilities ......................................................................................... 3-8
Service parts ............................................................................................................. 3-8
Appendix A. Service and Support ........................................... A-1
Registering your option ...................................................................................................A-1
Online technical support .................................................................................................A-1
Telephone technical support ...........................................................................................A-1
Appendix B. Notices .................................................................B-1
Recycling information ..................................................................................................... B-2
Trademarks ......................................................................................................................B-3
© Copyright Lenovo 2013.
ii
Safty information
General Safety guidelines
Before installing this product, read the Safety Information.
í
© Copyright Lenovo 2013.
í
í
iii
Chapter 1. Getting started
This User’s Guide contains detailed information on the Flat Panel Monitor.
For a quick overview, please see the Setup Poster that was shipped with
your monitor.
Shipping contents
The product package should include the following items:
· Setup Poster
· Flat Panel Monitor
· Power Cord
· Analog Signal Cable
· Audio Cable
Attaching the base and handling your monitor
To set up your monitor, please see the illustrations below.
Note: Do not touch the monitor within the screen area. The screen area is glass
and can be damaged by rough handling or excessive pressure.
Note: To attach a VESA mount, please see “Detaching the monitor stand” on page 2-8.
© Copyright Lenovo 2013.
1-1
Product overview
This section will provide information on adjusting monitor positions, setting user
controls, and using the cable lock slot.
Types of adjustments
Please see the illustration below for an example of the tilt range.
User controls
Your monitor has controls on the front which are used to adjust the display.
For information on how to use these controls, please see
“Adjusting your monitor image” on page 2-3.
1-2
Flat Panel Monitor User’s Guide
Cable lock slot
Your monitor is equipped with a cable lock slot located on the rear of your monitor
(in the lower left corner). Please follow the instructions that came with the cable
lock to attach it.
Setting up your monitor
This section provides information to help you set up your monitor.
Connecting and turning on your monitor
1. Power off your computer and all attached devices, and unplug the computer
power cord.
2. Connect the analog signal cable to the video port on the back of the computer.
Chapter 1. Getting started
1-3
3. Plug the monitor power cord and the computer cord into grounded electrical outlets.
Note: A certified power supply cord has to be used with this equipment. The relevant
national installation and/or equipment regulations shall be considered. A certified
power supply cord not lighter than ordinary polyvinyl chloride flexible cord according
to IEC 60227 (designation H05VV-F 3G 0.75mm2or H05VVH2-F2 3G 0.75mm2) shall be
used. Alternative a flexible cord be of synthetic rubber according to IEC 60245
(designation H05RR-F 3G 0.75mm2) shall be used.
4. Connect one end of the HDMI cable to the HDMI connector on the back of the
computer, and the other end to the HDMI connector on the monitor.
1-4
Flat Panel Monitor User’s Guide
5. Connect the audio cable to the video port on the back of the computer.
6. Power on the monitor and the computer.
7. Install the monitor driver, download the driver of the corresponding monitor model
from the Lenovo Website http://support.lenovo.com/LT2423wC, and then click on
the driver and install it following the on-screen instructions.
Chapter 1. Getting started
1-5
8. To optimize your monitor image, if using the analog cable, press the Automatic Image
Setup key. Automatic image setup requires that the monitor is warmed up for at least 15
minutes.
Note: If automatic image setup does not establish the image that you prefer, perform
manual image setup. See “Manual image setup” on page 3-4.
Registering your option
Thank you for purchasing this Lenovo ® product. Please take a few moments to register
your product and provide us with information that will help Lenovo to better serve you
in the future. Your feedback is valuable to us in developing products and services that
are important to you, as well as in developing better ways to communicate with you.
Register your option on the followingWeb site:
http://www.lenovo.com/register
Lenovo will send you information and updates on your registered product unless you
indicate on the Web site questionnaire that you do not want to receive further
information.
1-6
Flat Panel Monitor User’s Guide
Chapter 2. Adjusting and using your monitor
This section will give you information on adjusting and using your monitor.
Comfort and accessibility
Good ergonomic practice is important to get the most from your personal computer
and to avoid discomfort. Arrange your workplace and the equipment you use to suit
your individual needs and the kind of work that you perform. In addition, use healthy
work habits to maximize your performance and comfort while using your computer.
For more detailed information on any of these topics, visit the Healthy Computing
Web site at: http://www.ibm.com/pc/ww/healthycomputing
Arranging your work area
Use a work surface of appropriate height and available working area to allow you
to work in comfort.
Organize your work area to match the way you use materials and equipment.
Keep your work area clean and clear for the materials that you typically use and
place the items that you use most frequently, such as the computer mouse or
telephone, within the easiest reach.
Equipment layout and setup play a large role in your working posture. The
following topics describe how to optimize equipment setup to achieve and
maintain good working posture.
Positioning and viewing your monitor
Position and adjust your computer monitor for comfortable viewing by considering
the following items:
· Viewing distance: Optimal viewing distances for monitors range from
approximately 510mm to 760mm (20 in to 30 in) and can vary depending on
ambient light and time of day. You can achieve different viewing distances by
repositioning your monitor or by modifying your posture or chair position. Use
a viewing distance that is most comfortable for you.
· Monitor height: Position the monitor so your head and neck are in a
comfortable and neutral (vertical, or upright) position. If your monitor does not
have height adjustments, you might have to place books or other sturdy objects
under the base of the monitor to achieve the desired height. A general guideline
is to position the monitor such that the top of the screen is at or slightly below
your eye-height when you are comfortably seated. However, be sure to optimize
your monitor height so the line of site between your eyes and the center the
monitor suits yourpreferences for visual distance and comfortable viewing
when your eye muscles are in a relaxed state.
© Copyright Lenovo 2013.
2-1
· Tilt: Adjust the tilt of your monitor to optimize the appearance of the screen
content and to accommodate your preferred head and neck posture.
· General location: Position your monitor to avoid glare or reflections on the
screen from overhead lighting or nearby windows.
The following are some other tips for comfortable viewing of your monitor:
· Use adequate lighting for the type of work you are performing.
· Use the monitor brightness, contrast, and image adjustment controls, if equipped,
to optimize the image on your screen to meet your visual preferences.
· Keep your monitor screen clean so you can focus on the screen’s contents.
Any concentrated and sustained visual activity can be tiring for your eyes. Be sure to
periodically look away from your monitor screen and focus on a far object to allow
your eye muscles to relax. If you have questions on eye fatigue or visual discomfort,
consult a vision care specialist for advice.
Quick tips for healthy work habits
The following information is a summary of some important factors to consider to
help you remain comfortable and productive while you use your computer.
· Good posture starts with equipment setup: The layout of your work area and
the setup of your computer equipment have a large effect on your posture while
using your computer. Be sure to optimize the position and orientation of your
equipment by following the tips outlined in “Arranging your work area” on page 2-1
so you can maintain a comfortable and productive posture. Also, be sure to use the
adjustment capabilities of your computer components and office furniture to best
suit your preferences now and as your preferences change over time.
· Minor changes in posture can help avoid discomfort: The longer you sit and
work with your computer, the more important it is to observe your working
posture. Avoid assuming any one posture for an extended period of time.
Periodically make minor modifications in your posture to help deter any
discomforts that might arise. Make use of any adjustments that your office
furniture or equipment provide to accommodate changes in posture
· Short, periodic breaks help ensure healthy computing: Because computing is
primarily a static activity, it is particularly important to take short breaks from
your work. Periodically, stand up from your work area, stretch, walk for a drink of
water, or otherwise take a short break from using your computer. A short break
from work gives your body a welcome change in posture and helps to ensure you
remain comfortable and productive while you do work.
Accessibility information
Lenovo is committed to providing greater access to information and technology to
people with disabilities. With assistive technologies, users can access information in
the way most appropriate to their disability. Some of these technologies are already
provided in your operating system; others can be purchased through vendors or
accessed at:
https://www-03.ibm.com/research/accessibility/requests/accvpat.nsf/lenovo-bidx?
OpenForm 2-2
Flat Panel Monitor User’s Guide
Adjusting your monitor image
This section describes the user control features used to adjust your monitor image.
Using the direct access controls
The direct access controls can be used when the On Screen Display (OSD) is not
displayed.
Table 2-1. Direct access controls
Icon
Control
Description
Image Setup
Activates automatic image adjustment.
Brightness
Direct access to Brightness adjustment.
Volume
Adjust the volume.
To use other direct access controls:
1. Press and hold
for 10 seconds to lock the OSD. This will prevent accidental
adjustments to the OSD. Press and hold for 10 seconds to unlock the OSD and
allow adjustments to the OSD.
button
2. Enables DDC/CI by default. Use OSD Exit Key, Press and hold the
for 10 seconds to disable / enable DDC/CI function. The words " DDC/CI
Disable" or “DDC/CI Enable” will be displayed.
Using the On-Screen Display (OSD) controls
The settings adjustable with the user controls are viewed through the On-Screen
Display (OSD), as shown below.
Brightness/Contrast
To use the controls:
1. Press to open the main OSD menu.
2. Use or to move among the icons. Select an icon and press to access that
function. If there is a sub-menu, you can move between options using or ,
then press to select that function. Use or to make adjustments. Press to
save.
3. Press
to move backwards through the sub-menus and exit from the OSD.
Chapter 2. Adjusting and using your monitor
2-3
Table 2-2. OSD functions
OSD Icon Submenu
on Main
Menu
Brightness/Contrast
Brightness
Contrast
Dynamic
Contrast Ratio
Image
Position
Horizontal Position
Description
Controls and Controls
Adjustments
and
(Analog)
Adjustments
(Digital)
Same as
Analog
Adjusts overall brightness
Adjusts difference between light and dark areas
This function can improve your video input contrast
ration automatically.
Moves the image left or right.
Controls
Locked not
required for
digital input
Moves the image up or down.
Vertical Position
Image
Setup
Automatic
Manual
Image /
Audio
Properties
Color
Automatically optimizes the image.
Manually optimizes the image. See "Menual mage setup" page 3-4.
.
.
Clock
Phase
Save
.
Preset mode
Custom
.
.
.
.
.
Input Signal
Same as
Analog
Adjusts intensity of red, green, and blue.
Reddish
.
.
sRGB *
Neutral
.
Bluish
Red: Increases or decreases the saturation of "red" in the image.
Green: Increases or decreases the saturation of "green" in the image.
Blue: Increases or decreases the saturation of "blue" in the image.
Save: Saves the custom color choices.
This monitor can accept video signals through two different connectors.
Most desktop computers use a D-SUB connector. Select digital among
OSD Controls when you use HDMI connector.
.
Selects D-SUB (Analog)
.
Selects HDMI
Expends image size to full screen.
Off (Original AR): same Aspect Ratio with input signal.
.
On (Full): Expends image size to full screen.
.
Scaling
Volume
Audio input
Options
Adjust the volume.
Audio input select:
.
Line in
.
HDMI
Information
Shows resolution, refresh rate, and product details. Note: This screen
does not allow any changes to the settings.
Menu Language
This section lists the languages supported by your monitor.
Note: The language chosen only affects the language of the OSD. It
has no effect on any software running on the computer.
* Note: Brightness and Contrast can not be adjusted in sRGB mode.
2-4
Flat Panel Monitor User’s Guide
Same as
Analog
Table 2-2. OSD functions (continued)
OSD Icon on Submenu
Main Menu
Controls and
Adjustments
(Analog)
Description
Adjusts menu location on the screen.
Options
Menu Position
Default
Custom
Factory Default
Accessibility
Controls and
Adjustments
(Digital)
Same as Analog
Returns the menu position to the default settings.
· Horizontal: Changes the horizontal position of the OSD.
· Vertical: Changes the vertical position of the OSD.
· Save
· Cancel
· Reset
Resets monitor to the original factory settings.
Change button repeat rate and menu time-out settings.
Button repeat rate:
Select or to change.
· Off
· Default
· Slow
Menu time out: Sets the length of time the OSD will
remain active after the last time a button is pressed.
Exit the main menu
Same as Analog
Exit
Selecting a supported display mode
The display mode the monitor uses is controlled by the computer. Therefore, refer to
your computer documentation for details on how to change display modes.
The image size, position and shape might change when the display mode changes.
This is normal and the image can be readjusted using automatic image setup and the
image controls.
Unlike CRT monitors, which require a high refresh rate to minimize flicker, LCD or
Flat Panel technology is inherently flicker-free.
Note: If your system has previously been used with a CRT monitor and is currently
configured to a display mode outside the range of this monitor, you may need
to re-attach the CRT monitor temporarily until you have re-configured the
system; preferably to 1920 x 1080 at 60 Hz, which is the Native Resolution
Display mode.
Chapter 2. Adjusting and using your monitor
2-5
The display modes shown below have been optimized at the factory.
Table 20-3. Factory set display modes
Addressability
Refresh rate
640 x 480
60 Hz, 72 Hz, 75 Hz
720 x 400
70 Hz
800 x 600
56 Hz, 60 Hz, 72 Hz, 75 Hz
832 x 624
75 Hz
1024 x 768
60 Hz, 70 Hz, 75 Hz
1152 x 864
75 Hz
1280 x 1024
60 Hz, 70 Hz, 75 Hz
1366 x 768
60 Hz
1440 x 900
60 Hz
1600 x 900
60 Hz, 75 Hz
1680 x 1050
60 Hz
1920 x 1080
60 Hz
Understanding power management
Power management is invoked when the computer recognizes that you have not used
your mouse or keyboard for a user-definable period. There are several states as
described in the table below.
For optimal performance, switch off your monitor at the end of each working day, or
whenever you expect to leave it unused for long periods during the day.
2-6
Flat Panel Monitor User’s Guide
Table 2-4. Power indicator
State
Power Indicator
Screen
Restoring Operation
Compliance
On
Steady green
Normal
Standby/Suspend
Steady orange
Blank
Press a key or move the ENERGY STAR
mouse
There may be a slight
delay before the image
reappears.
Note: Standby also
occurs if there is no image
output to the monitor.
Off
Off
Blank
Press the power button ENERGY STAR
There may be a slight
delay before the image
reappears.
Caring for your monitor
Be sure to turn off the power before you perform any maintenance on the monitor.
Do not:
· Apply water or liquid directly to your monitor.
· Use solvents or abrasives.
· Use flammable cleaning materials to clean your monitor or any other electrical
equipment.
· Touch the screen area of your monitor with sharp or abrasive items. This type of
contact may cause permanent damage to your screen.
· Use any cleaner which contains an anti-static solution or similar additives. This
may harm the coating of the screen area.
Do:
· Lightly dampen a soft cloth with water and use this to gently wipe the covers and
the screen.
· Remove grease or finger marks with a damp cloth and a little mild detergent.
Chapter 2. Adjusting and using your monitor
2-7
Preparing the monitor for wall-mounting
WARNING: To reduce the risk of personal injury or of damage to the equipment, check
that the wall-mounting fixture is adequately installed and secured before attaching the
monitor. Refer to the instructions supplied with the wall-mounting fixture and check
that it is capable of supporting the monitor.
1. Disconnect the power cable and any other cables from the monitor.
2. Place the monitor face down on a flat, protected surface.
3. Remove the monitor base from stand.
4. Remove the three screws in the monitor stand. Lift the monitor stand off the monitor.
5. Four threaded holes are exposed. These holes are for screws to attach the swing arm
or other mounting fixture to the back of the monitor.
6. Follow the instructions included with the mounting fixture to ensure that the
monitor is safely attached.
7. Attach a swing arm or other mounting fixture.
NOTE: For use only with UL(expand UL) Listed Wall Mount Bracket with minimum
weight/load bearing capacity of 3.7 kg.
2-8
Flat Panel Monitor User’s Guide
Chapter 3. Reference information
This section contains monitor specfications, instructions to manually install the
monitor driver, troubleshooting information, and service information.
Monitor specifications
Table 3-1. Monitor specfications for type-model 60A8-KAR2-WW
Dimensions
Panel
Height
Depth
414.3 mm
216.7 mm
Width
567.1 mm
Size
24 in.
Backlingt
LED
Aspect Ratio
16:9
Stand
Tilt range
Range: 5º, +22º
VESA mount
Supported
100 mm(3.94 in)
Image
Viewable image size
Maximum height
Maximum width
Pixel pitch
609.7 mm(24 in.)
298.89 mm(11.77 in.)
531.36 mm(20.92 in.)
0.276 mm(0.0109 in.) (V)
Power input
Supply voltage
Max supply current
100-240 V~, 50/60 Hz
1.5 A
Power consumption
Note: Power consumption
figures are for the monitor
andthe power supply
combned.
Max Consumption
< 31 W
Typical Consumption
Standby/Suspend
Off
< 21 W
< 0.5 W
< 0.5 W
Video input(Analog)
Input signal
© Copyright Lenovo 2013.
Analog Direct Drive,
75 ohm 0.7 V
Horizontal addressability 1920 pixels (max)
Vertical addressability
1080 lines (max)
Clock frequency
205 MHz
3-1
Table 3-1. Monitor specfications for type-model 60A8-KAR2-WW(continued)
Communic atons
VESA DDC
HDMI input
Input signal
Horizontal addressability
Vertical addressability
Clock frequency
Supported Display Modes
(VESA Standard modes
between noted ranges)
Temperature
TMDS
1920 pixels (max)
1080 lines (max)
205 MHz
Horizontal frequency
VGA: 30 kHz - 81 kHz
Vertical frequency
50 Hz - 75 Hz
Native Resolution
1920 x 1080 at 60 H
Operating
Storage
Shpping
0º to 45ºC (32º to 104º F)
-20º to 60ºC (-4º to 140º F)
-20º to 60ºC (-4º to 140º F)
Humidity Operating
Storage
Shipping
3-2
CI
Flat Panel Monitor User’s Guide
10% to 90%
10% to 90%
10% to 90%
Troubleshooting
If you have a problem setting up or using your monitor, you might be able to solve
it yourself. Before calling your dealer or Lenovo, try the suggested actions that are
appropriate to your problem.
Table 3-2. Troubleshooting
Problem
Possible cause
Suggested action
Reference
The words“Out
of Range” are
shown on the
screen, and the
power indicator
is flashing
green
The system is set to a
display mode which is
not supported by the
monitor.
• If you are replacing an old monitor,
reconnect it and adjust the display
mode to within the specified range
for your new monitor.
• If using a Windows system, restart
the system in safe mode, then select
a supported display mode for your
computer.
• If these options do not work,
contact the Support Center.
“Selecting a
supported
display
mode” on
page 2-5
The image
quality is
unacceptable.
The video signal cable
is not conneced with
the monitor or system
completely.
“Connecting
Be sure the signal cable is firmly
plugged into the system and monitor. and turning
on your
monitor” on
page 1-3
The color settings may
be incorrect.
Select another color setting from the
OSD menu.
The automatic image
setup function was not
performed.
Perform autormatic image setup.
“Adjusting
your monitor
image” on
page 2-3
The monitors power
switch is not switched
on. The power cord is
loose or disconnected.
There is no power at
the outlet.
Be sure the power cord is connected
properly.
Be sure the outlet has power.
Power on the monitor.
Try using another power cord.
Try using another electrical outlet.
“Connecting
and turning
on your
monitor” on
page 1-3
The power
indicator is not
lit and there is
no image.
“Adjusting
your monitor
image” on
page 2-3
Chapter 3. Reference information 3-3
Table 3-2. Troubleshooting (continued)
Problem
Possible cause
Screen is
The monitor is in
blank and
Standby/Suspend
power
mode.
indicator is
steady amber
or flashing
green.
Suggested action
• Press any key on the
“Understanding power
keyboard or move the mouse management” on
to restore operation.
page 2-6
• Check the Power Options
settings on your computer.
Be sure the video cable is
connected with the system
properly.
“Connecting and
turming on your
monitor” on
page 1-3
Adjust the brightness and
contrast setting on the OSD
menu.
“Adjusting your
monitor image”
on page 2-3
The power
indicator is
green, but
there is no
image.
The video signal cable
is loose or
disconnected from the
system or monitor.
The monitor brightness
and contrast are at the
lowest setting.
One or more
of the pxels
appear
discolored.
This is a characteristic If there are than five pixels
of the LCD technology missing, contact the Lenovo
and is not an LCD
Support Center.
defect.
• Fuzzy lines • Image setup has no
in text or a
tbeen optimized
blurryimage. • Your system
• Horizontalor Display Properties
vertical
setting have not
lines
been optimized.
through the
image.
Reference
Appendix A,”Service
and Support,” on
page A-1
Adjust the resolution settings on ‘Adjusting your monitor
your system to match the native image” on page 2-3
resolution for this monitor.
1920 x 1080 at 60 Hz.
“Manual image setup”
Perform automatic image setup. “Selecting a supported
If autormatic image setup does display mode” on
not help, perform manual image page 2-5
setup.
When working in the native
resolution, you may find
additional improvements by
adjusting the Dots Per Inch
(DPI) setting on your system
See the Advanced
section of your systems
display properties.
Manual image setup
If autormatic image setup does not establish the image that you prefer, perform
manual image setup.
Note: Have your monitor powered on for about 15 minutes, until the monitor
warma up.
at the bottom of the monitor to open the OSD menu.
1. Press
2. Use or
to select
and press
to access.
3-4
Flat Panel Monitor User’s Guide
3. Use or to select Clock and Phase adjustment.
• Clock(pixel frequency) adjusts the number of pixels scanned by one horizontal
sweep. If the frequency is not correct, the screen shows vertical stripes and the
picture does not have the correct width.
• Phase adjusts the phase of thr pixel clock signal. With a wrong phase adjustment,
the picture has horizontal disturbances in light picture.
4. When the image no longer looks distored, save the Clock and Phase adjustments.
5. Press
to leave the OSD menu.
Installing the monitor driver in Windows Vista
To install the monitor driver in Microsoft® Windows Vista, do the following:
1.
Turn off the computer and all attached devices.
2.
Ensure that the monitor is connected correctly.
3.
Turn on the monitor and then the system unit. Allow the system to boot into
Windows Vista operating system.
4.
Find the driver of the corresponding monitor model from Lenovo’s website:
http://support.lenovo.com/LT2423wC, and download it to the host connected to
this monitor for temporary storage (as shown in the figure on the desktop).
Click Start Control Panel, and then click the Hardware and Sound icon
5.
Click the Personalization icon.
6.
Click the Display Settings icon.
7.
Click the Advanced Settings button.
8.
9.
Click the Monitor tab.
10. Click the Properties button.
11. If the "Windows needs your permission to continue" window appears, click
on Continue button. Then click the Driver tab.
12. Open the “Update Driver Software-Generic PnP Monitor” window by
clicking on Update Driver. and then click the “Browse my computer for
driver software” button.
13. Select “Let me pick from a list of device drivers on my computer”.
14. Click the “Install from the disk” button, click on the “Browse” button, and then
navigate to the following directory: X \ Monitor Drivers \ Windows Vista
(Here, X stands for “the folder in which the downloaded driver locates” (such as
desktop)
15. Select the "LT2423wC.inf " file and click the Open button. Click the OK button.
16. Select “Lenovo LT2423wC” in the new window and then click “Next”.
17. After the installation is complete, delete the downloaded program files, and close all
the windows.
18. Restart the system.
Note: On LCD monitors, unlike CRTs, a faster refresh rate does not improve display
quality. Lenovo recommends using either 1920 x 1080 at a refresh rate of 60
Hz, or 640 x 480 at a refresh rate of 60 Hz.
Chapter 3. Reference information 3-5
Installing the monitor driver in Windows 7
To install the device driver in Microsoft® Windows 7, do the following:
1.
2.
3.
4.
5.
6.
7.
8.
9.
10.
11.
12.
13.
14.
15.
16.
17.
18.
Turn off the computer and all attached devices.
Ensure that the monitor is connected correctly.
Turn on the monitor and then the system unit. Allow the system to boot into
Windows 7 operating system.
Find the driver of the corresponding monitor model from Lenovo’s website:
http://support.lenovo.com/LT2423wC, and download it to the host connected to
this monitor for temporary storage (as shown in the figure on the desktop).
Click Start Control Panel, and then click the Hardware and Sound icon
Click the Personalization icon.
Click the Display Settings icon.
Click the Advanced Settings button.
Click the Monitor tab.
Click the Properties button.
If the "Windows needs your permission to continue" window appears, click
on Continue button. Then click the Driver tab.
Open the “Update Driver Software-Generic PnP Monitor” window by
clicking on Update Driver. and then click the “Browse my computer for
driver software” button.
Select “Let me pick from a list of device drivers on my computer”.
Click the “Install from the disk” button, click on the “Browse” button, and then
navigate to the following directory: X \ Monitor Drivers \ Windows 7
(Here, X stands for “the folder in which the downloaded driver locates” (such as
desktop)
Select the "LT2423wC.inf " file and click the Open button. Click the OK button.
Select “Lenovo LT2423wC” in the new window and then click “Next”.
After the installation is complete, delete the downloaded program files, and close all
the windows.
Restart the system.
The system will automatically select the maximum refresh rate and corresponding
color Matching profiles. Note: On LCD monitors, unlike CRTs, a faster refresh rate
does not improve display quality. Lenovo recommends using either 1920 x 1080 at
a refresh rate of 60 Hz, or 640 x 480 at a refresh rate of 60 Hz
3-6 Flat Panel Monitor User’s Guide
Installing the monitor driver in Windows 8/Windows 8.1
To use the Plug and Play feature in Microsoft Windows 8/Windows 8.1, do the following:
1. Turn off the computer and all attached devices.
2. Ensure that the monitor is connected correctly.
3. Turn on the monitor and then the system unit. Allow your computer to start the
Windows 8/Windows 8.1 operating system.
4. Find the driver of the corresponding monitor model from Lenovo’s website:
http://support.lenovo.com/LT2423wC, and download it to the host connected to this
monitor for temporary storage (as shown in the figure on the desktop).
5. Open the Display Properties window by clicking Start , right-click, choose All
Application, inter Control Panel and Hardware and Sound icon. and then clicking t
he Display icon.
6. Click the Change the display settings tab.
7. Click the Advanced settings icon.
8. Click the Monitor tab.
9. Click the Properties button.
10. Click the Drivers tab.
11. Click Upgrade Device, then click Browse the computer to find the driver program.
12. Select “Pick from the list of device driver program on the computer.
13. Click the “Install from the disk” button, click on the “Browse” button, and then
navigate to the following directory: X \ Monitor Drivers \ Windows 8
(Note: The win 8.1 system here should be Windows 8.1)
(Here, X stands for “the folder in which the downloaded driver locates” (such as
desktop)
14. Select the "LT2423wC.inf" file and click the Open button. Click on the OK button.
15. Select “Lenovo LT2423wC” in the new window and then click “Next”.
16. After the installation is complete, delete the downloaded program files, and close all
the windows.
17. Restart the system. The system will automatically select the maximum refresh rate
and corresponding color matching profiles.
Note: On LCD monitors, unlike CRTs, a faster refresh rate does not improve display quality.
Lenovo recommends using either 1920 x 1080 at a refresh rate of 60 Hz, or 640 x 480
at a refresh rate of 60 Hz.
Chapter 3. Reference information
3-7
Getting further help
If you still can’t solve your problem, please contact the Lenovo Support Center. For
more information on contacting the Customer Support Center, please see Appendix
A, “Service and Support,” on page A-1.
Service information
Product numbers
The product number for your monitor is located on the back of the display bezel as
shown below.
Customer responsibilities
The warranty does not apply to a product which has been damaged due to accident,
misuse, abuse, improper installation, usage not in accordance with product
specifications and instructions, natural or personal disaster, or unauthorized
alterations, repairs or modifications.
The following are examples of misuse or abuse and not covered by warranty:
· Images burned onto the screen of a CRT monitor. Burned image is preventable by
utilizing a moving screen saver or power management.
· Physical damage to covers, bezel, base and cables.
· Scratches or punctures on monitor screens.
Service parts
The following parts are for use by Lenovo service, or Lenovo authorized dealers, to
support the customer warranty. Parts are for service use only. The table below shows
information for model 60A8-KAR2-WW.
Table 3-3. List of service parts
FRU (Field
Replaceable Unit)
Part number
Description
03T8466
03T8449
Monitor_LT2423wC Raven Black
Analog cable
Raven Black
60A8-KAR2-WW
60A8-KAR2-WW
03T8468
03T8467
Audio cable
Stand & Base
60A8-KAR2-WW
60A8-KAR2-WW
3-8
Flat Panel Monitor User’s Guide
Color
Raven Black
Raven Black
Machine Type
Model(MTM)
Appendix A. Service and Support
The following information describes the technical support that is available for
your product, during the warranty period or throughout the life of your product.
Refer to the Lenovo Limited Warranty for a full explanation of Lenovo warranty terms.
Registering your option
Register to receive product service and support updates, as well as free and
discounted computer accessories and content. Go to:
http://www.lenovo.com/register
Online technical support
Online technical support is available during the lifetime of a product at:
http://www.lenovo.com/support
Product replacement assistance or exchange of defective components also is available
during the warranty period. In addition, if your option is installed in a Lenovo
computer, you might be entitled to service at your location. A Lenovo technical
support representative can help you determine the best alternative.
Telephone technical support
Installation and configuration support through the Customer Support Center will be
available until 90 days after the option has been withdrawn from marketing. After that
time, the support is cancelled, or made available for a fee, at Lenovo’s discretion.
Additional support is also available for a nominal fee.
Before contacting a Lenovo technical support representative, please have the
following information available: option name and number, proof of purchase, computer
manufacturer, model, serial number and manual, the exact wording of any error
message, description of the problem, and the hardware and software configuration
information for your system.
Your technical support representative might want to walk you through the problem
while you are at your computer during the call.
Telephone numbers are subject to change without notice. The most up-to-date
telephone list for Lenovo Support is always available at:
http://www.lenovo.com/support/phone
© Copyright Lenovo 2013.
A-1
Date and time Update to be
Visible on the Website
Country or
Regions
17-May-2012 1000 GMT +4:00 RUSSIA
30-Jul-2012 0900 GMT +9:00 JAPAN
Language Old Telephone Number(s)
New Telephone Number(s)
Hours of Operation
Russian,
8 800 100 7888
8-800-555-0317
10 am - 7 pm Monday - Saturday
Japanese,
English
0120-20-5550, 0570-064-600
For International: +81-46-266- 0120-000-817
4716
Korean,
English
1588-6782
080-513-0880 (Toll Free)
0234834817 (Standard
Charges Apply)
9AM - 6PM Monday - Friday
9AM - 1PM Saturday
9AM - 6PM
Monday - Sunday (Exception : Third
Sunday of the month
(due to maintenance activities) and
December 30th and 31st and January
1st, 2nd, and 3rd)
12-Sep-12 0900 GMT +9:00
SOUTH
KOREA
30-Nov-12 0700 GMT -6:00
Costa Rica
0-800-011-1029
Dial 0-800-011-4114, then
dial 877-404-9661
7 am - 9 pm Monday - Sunday
30-Nov-12 0900 GMT -4:00
Dominican
Republic
1-866-434-2080
877-396-6150
9 am - 11 pm Monday - Sunday
30-Nov-12 0700 GMT -6:00
30-Nov-12 0700 GMT -6:00
El Salvador
Guatemala
800-6264
1800-624-0051
800-6037
Dial 999-9190, then dial
7 am - 9 pm Monday - Sunday
7 am - 9 pm Monday - Sunday
30-Nov-12 0700 GMT -6:00
Honduras
Tegucigalpa: 232-4222 San
Pedro Sula: 552-2234
Dial 800-0123, then dial 8777 am - 9 pm Monday - Sunday
404-9661
30-Nov-12 0800 GMT -5:00
Spanish,
English
Panama
206-6047
001-866-434-2080 (Lenovo
001-800-507-2694
Customer Support Center- toll
free)
3-Dec-12 0800 GMT -5:00
ECUADOR
1-800-426911 OPCION 4
3-Dec-12 0800 GMT -6:00
MEXICO
001-866-434-2080
A-2
Flat Panel Monitor User’s Guide
(Andinatel) Dial 1-999-119;
then dial 877-404-9661
(Pacifictel) 1-800-225-528;
then dial 877-404-9661
(Pacifictel Spanish) 1-800999-119; then dial 877-4049661
01800 0834916
Applicab
le to IWS
8 AM - 10 PM Monday - Sunday
8 AM - 10 PM Monday - Sunday
8 AM - 10 PM Monday - Sunday
Yes
Date and time Update to be
Visible on the Website
Country or
Regions
3-Dec-12 0900 GMT -3:00
3-Dec-12 1000 GMT -2:00
PARAGUAY Spanish,
URUGUAY English
5-Dec-12 0900 GMT +8:00
HONG
KONG
Language Old Telephone Number(s)
009-800-52-10026
000-411-005-6649
New Telephone Number(s)
Hours of Operation
0098004410084 or 009-800000 411 0026332
9 am - 11 pm Monday - Sunday
10 am - 12 pm Monday - Sunday
(852) 3071-3561
9 AM - 8 PM Monday - Friday
9AM - 1 PM Saturday
Applicab
le to IWS
Cantonese,
Mandarin,
English
5-Dec-12 0900 GMT +8:00
Macau
ThinkPad (Technical enquiry
hotline):
0800-839 (Macau) ThinkPad
Service Center: 2871-5399
0800 807
(Macau) ThinkCentre,
ThinkStation and ThinkServer:
0800-336 (Macau)
5-Dec-12 0800 GMT -3:00
5-Dec-12 0800 GMT -5:00
5-Dec-12 0830 GMT -4:30
10-Dec-12 0900 GMT -4:00
CHILE
PERU
VENEZUEL
BOLIVIA
800-361-213
0-800-50-866 OPCION 2
0-800-100-2011
0800-10-0189
1230 020 0173 or 800530008
0800-77-503
08001101111
800-10-0982
8 AM - 10 PM Monday - Sunday
8 AM - 10 PM Monday - Sunday
8:30 am - 10:30 pm Monday - Sunday
9 am - 11 pm Monday - Sunday
10-Dec-12 0800 GMT -5:00
COLOMBIA
1-800-912-3021
01800 5182433 (Toll Free)
3207635 (Standard Charges
Apply)
8 AM - 10 PM Monday - Sunday
12-Dec-12 1000 GMT -3:00
ARGENTIN
0800-666-0011
0800 2660570
10 am - 12 pm Monday - Sunday
Spanish,
English
Yes
9 AM - 8 PM Monday - Friday
9AM - 1 PM Saturday
Appendix A. Service and Support
A-3
Date and time Update to be Country or
Visible on the Website
Regions
01-Sep-12 0000 GMT +10:00 Australia
Language
Old Telephone Number(s)
New Telephone
Number(s)
Hours of Operation
English
131-426 Think Branded Products
1300-880-917 ThinkServer
1800041267
24 hours/day 7 days/week
0800-733-222 Think Branded
0508 770 506
24 hours/day 7 days/week
01-Sep-12 0000 GMT +10:00 New Zealand
14-Sep-12 0830 GMT +7:00 VIETNAM
Vietnamese,
English
For Northern Area and Hanoi City:
+84-4-3 7367625/+84-4-3 7367626
For Southern Area and Ho Chi
12011072
Minh City:
+84 8 3 8243504/ +84 8 3 8243503
28-Sep-12 0830 GMT +8:00 PHILIPPINES
Tagalog,
English
1800-1601-0033 (Local number
only)
+603 8315 6858 (DID)
12-Oct-12 0800 GMT +8:00 SINGAPORE
English,
Mandarin,
Bahasa
Malaysia
800 6011 343 (Local number only)
18004155529
+603 8315 6856 (DID)
26-Oct-12 0900 GMT +7:00 THAILAND
Thai, English
9-Nov-12 0900 GMT +7:00
Bahasa
Indonesia,
English
INDONESIA
Yes
1-800-060-066(Local number only)
66 2273 4088+603 8315 6857
0018004415734
(DID)
+6221 2992 5823 001-803-606282
001803442425
(Local number only) +603 8315
6859 (DID)
Bahasa
Malaysian,
English
801-1041
14-Nov-12 0900 GMT +8:00 MALAYSIA
Bahasa
Malaysia,
English
1800-88-1889 (Local number only)
1800880013
+603 8315 6855 (DID)
30-Nov-12 0000 GMT -4:00 Antigua
30-Nov-12 0000 GMT -4:00 Aruba
English
New
New
Flat Panel Monitor User’s Guide
8:30 AM - 5:30 PM Monday Friday
180089086454 (Domestic
8:30 AM - 5 PM Monday Toll Free) 180014410719
Friday
(International Toll Free)
14-Nov-12 0900 GMT +8:00 BRUNEI
A-4
Applic
able to
IWS
Dial 800-1111, then dial
8662735446
855-882-4402
855-882-4402
8AM - 6:30PM Monday Friday
9 AM -6 PM Monday - Friday
9 AM -6 PM Monday - Friday
9 AM -6 PM Monday - Friday
9 AM -6 PM Monday - Friday
24 hours a day 7 days a week
24 hours a day 7 days a week
Date and time Update to be Country or
Visible on the Website
Regions
30-Nov-12 0000 GMT -5:00 Bahamas
30-Nov-12 0000 GMT -4:00 Barbados
30-Nov-12 0000 GMT -4:00 Bermuda
British Virgin
30-Nov-12 0000 GMT -4:00
Islands
30-Nov-12 0000 GMT -5:00 Cayman
30-Nov-12 0000 GMT -4:00 Curacao
30-Nov-12 0000 GMT -4:00 Grenada
30-Nov-12 0000 GMT -4:00 Guyana
30-Nov-12 0000 GMT -5:00 Jamaica
30-Nov-12 0000 GMT -4:00 Montserrat
30-Nov-12 0700 GMT -6:00 Nicaragua
30-Nov-12 0000 GMT -4:00 Puerto Rico
30-Nov-12 0000 GMT -4:00 St Kitts
30-Nov-12 0000 GMT -4:00 St Lucia
30-Nov-12 0000 GMT -4:00 ST
30-Nov-12 0000 GMT -4:00 St Vincent
30-Nov-12 0000 GMT -3:00 Suriname
30-Nov-12 0000 GMT -4:00 Trinidad and
30-Nov-12 0000 GMT -4:00 US Virgin
30-Nov-12 0000 GMT -5:00 CANADA
30-Nov-12 0000 GMT -5:00 UNITED
17-Dec-12 0800 GMT -2:00 BRAZIL
Language
English
Old Telephone Number(s)
New Telephone
Number(s)
Hours of Operation
New
New
1-800 426 7378
855-882-4402
855-882-4402
855-882-4402
24 hours a day 7 days a week
24 hours a day 7 days a week
24 hours a day 7 days a week
New
855-882-4402
24 hours a day 7 days a week
855-882-4402
855-882-4402
855-882-4402
855-882-4402
855-882-4402
855-882-4402
001-800226-0334
855-882-4402
855-882-4402
855-882-4402
855-882-4402
855-882-4402
855-882-4402
1-8666269587
855-882-4402
8882523099
855-882-4402
24 hours a day 7 days a week
24 hours a day 7 days a week
24 hours a day 7 days a week
24 hours a day 7 days a week
24 hours a day 7 days a week
24 hours a day 7 days a week
7 am - 9 pm Monday - Sunday
24 hours a day 7 days a week
24 hours a day 7 days a week
24 hours a day 7 days a week
24 hours a day 7 days a week
24 hours a day 7 days a week
24 hours a day 7 days a week
24 hours a day 7 days a week
24 hours a day 7 days a week
24 hours a day 7 days a week
24 hours a day 7 days a week
0800 885 0500 (Toll
Free) (11) 3140-0500
(Standard Charges
Apply)
8 AM - 8 PM Monday - Friday
8 AM - 5 PM Saturday
New
New
New
New
1-800 426 7378
New
Spanish,
001-800-220-1830
New
New
New
New
English
New
New
New
New
English, French 1-800-565-3344
English
1-800-426-7378
Portuguese
Calls made from within the Sao
Paulo region
(11) 3889-8986
Calls made from outside the Sao
Paulo region
0800-701-4815
Appendix A. Service and Support
Applic
able to
IWS
Yes
A-5
Appendix B. Notices
Lenovo may not offer the products, services, or features discussed in this document in
all countries. Consult your local Lenovo representative for information on the
products and services currently available in your area. Any reference to a Lenovo
product, program, or service is not intended to state or imply that only that Lenovo
product, program, or service may be used. Any functionally equivalent product,
program, or service that does not infringe any Lenovo intellectual property right may
be used instead. However, it is the user’s responsibility to evaluate and verify the
operation of any other product, program, or service.
Lenovo may have patents or pending patent applications covering subject matter
described in this document. The furnishing of this document does not give you any
license to these patents. You can send license inquiries, in writing, to:
Lenovo (United States), Inc.
1009 Think Place - Building One
Morrisville, NC 27560
U.S.A.
Attention: Lenovo Director of Licensing
LENOVO PROVIDES THIS PUBLICATION “AS IS” WITHOUT WARRANTY OF ANY
KIND, EITHER EXPRESS OR IMPLIED, INCLUDING, BUT NOT LIMITED TO, THE
IMPLIED WARRANTIES OF NON-INFRINGEMENT, MERCHANTABILITY OR
FITNESS FOR A PARTICULAR PURPOSE. Some jurisdictions do not allow disclaimer
of express or implied warranties in certain transactions, therefore, this statement may
not apply to you.
This information could include technical inaccuracies or typographical errors. Changes
are periodically made to the information herein; these changes will be incorporated in
new editions of the publication. Lenovo may make improvements and/or changes in
the product(s) and/or the program(s) described in this publication at any time without
notice.
The products described in this document are not intended for use in implantation or
other life support applications where malfunction may result in injury or death to
persons. The information contained in this document does not affect or change
Lenovo product specifications or warranties. Nothing in this document shall operate
as an express or implied license or indemnity under the intellectual property rights of
Lenovo or third parties. All information contained in this document was obtained in
specific environments and is presented as an illustration. The result obtained in other
operating environments may vary.
Lenovo may use or distribute any of the information you supply in any way it believes
appropriate without incurring any obligation to you.
© Copyright Lenovo 2013.
B-1
Any references in this publication to non-Lenovo Web sites are provided for
convenience only and do not in any manner serve as an endorsement of those Web
sites. The materials at those Web sites are not part of the materials for this Lenovo
product, and use of those Web sites is at your own risk.
Any performance data contained herein was determined in a controlled environment.
Therefore, the result obtained in other operating environments may vary
significantly. Some measurements may have been made on development-level
systems and there is no guarantee that these measurements will be the same on
generally available systems. Furthermore, some measurements may have been
estimated through extrapolation. Actual results may vary. Users of this document
should verify the applicable data for their specific environment.
Recycling information
Lenovo encourages owners of information technology (IT) equipment to responsibly
recycle their equipment when it is no longer needed. Lenovo offers a variety of
programs and services to assist equipment owners in recycling their IT products. For
information on recycling Lenovo products, go to:
http://www.lenovo.com/lenovo/environment/recycling
B-2
Flat Panel Monitor User’s Guide
Collecting and recycling a disused Lenovo computer or monitor
If you are a company employee and need to dispose of a Lenovo computer or monitor
that is the property of the company, you must do so in accordance with the Law for
Promotion of Effective Utilization of Resources. Computers and monitors are
categorized as industrial waste and should be properly disposed of by an industrial
waste disposal contractor certified by a local government. In accordance with the Law
for Promotion of Effective Utilization of Resources, Lenovo Japan provides, through
its PC Collecting and Recycling Services, for the collecting, reuse, and recycling of
disused computers and monitors. For details, visit the Lenovo Web site at
www.ibm.com/jp/pc/service/recycle/pcrecycle/. Pursuant to the Law for Promotion of
Effective Utilization of Resources, the collecting and recycling of home-used
computers and monitors by the manufacturer was begun on October 1, 2003. This
service is provided free of charge for home-used computers sold after October 1, 2003.
For details, visit the Lenovo Web site at www.ibm.com/jp/pc/service/recycle/personal/.
Disposing of Lenovo computer components
Some Lenovo computer products sold in Japan may have components that contain
heavy metals or other environmental sensitive substances. To properly dispose of
disused components, such as a printed circuit board or drive, use the methods
described above for collecting and recycling a disused computer or monitor.
Trademarks
The following terms are trademarks of Lenovo in the United States, other countries, or
both:
Lenovo
The Lenovo logo
ThinkCentre
ThinkPad
ThinkVision
Microsoft, Windows, and Windows NT are trademarks of the Microsoft group of
companies.
Other company, product, or service names may be trademarks or service marks of
others.
Appendix B. Notices
B-3
Turkish statement of compliance
The Lenovo product meets the requirements of the Republic of Turkey
Directive on the Restriction of the Use of Certain Hazardous Substances in
Electrical and Electronic Equipment (EEE).
Türkiye EEE Yönetmeliğine Uygunluk Beyanı
Bu Lenovo ürünü, T.C. Çevre ve Orman Bakanlığı'nın “Elektrik ve Elektronik
Eşyalarda Bazı Zararlı Maddelerin Kullanımının Sınırlandırılmasına Dair Yönetmelik
(EEE)” direktiflerine uygundur.
EEE Yönetmeliğine Uygundur.
Lenovo and the Lenovo logo are trademarks of Lenovo in the United States, other
countries, or both.
Ukraine RoHS
Цим підтверджуємо, що продукція Леново відповідає вимогам
нормативних актів України, які обмежують вміст небезпечних
речовин
© Copyright Lenovo 2013.
C-1