1
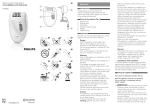
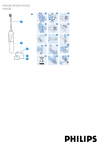
Register your product and get support at
1
www.philips.com/welcome
English
HP6516
--
Introduction
Congratulations on your purchase and welcome to
Philips! To fully benefit from the support that Philips
offers, register your product at www.philips.com/
welcome.
--
General description (Fig. 1)
1
2
3
---4
Epilating discs
Epilating head
On/off button
press once for speed II
press twice for speed I
press three times to switch off
Charging light (white) with battery-low indication
(red)
5 Socket for small plug
6Adapter
7 Cleaning brush
8 Storage pouch
-----
Important
Read this user manual carefully before you use the
appliance and save it for future reference.
--
2
3
4
---
5
6
7
---
8
9
10
--
--
11
12
13
---
4203.000.7290.1
--
Danger
Keep the adapter dry.
Warning
If the adapter is damaged, always have it replaced
with one of the original type in order to avoid a
hazard.
This appliance is not intended for use by persons
(including children) with reduced physical, sensory
or mental capabilities, or lack of experience and
knowledge, unless they have been given supervision
or instruction concerning use of the appliance by a
person responsible for their safety.
Children should be supervised to ensure that they
do not play with the appliance.
The adapter contains a transformer. Do not cut
off the adapter to replace it with another plug, as
this causes a hazardous situation.
Do not insert metal-containing material into the
socket for the appliance plug to avoid short circuiting.
Caution
This appliance is only intended for removing
women’s body hair on areas below the neck:
underarms, bikini line and legs. Do not use it for any
other purpose.
Fully charge the appliance every 3 to 4 months, even
if you do not use the appliance for a longer time.
To prevent damage and injuries, keep the operating
appliance away from scalp hair, eyebrows, eyelashes,
clothes, threads, cords, brushes etc.
Do not use the appliance on irritated skin or skin
with varicose veins, rashes, spots, moles (with hairs)
or wounds without consulting your doctor first.
People with a reduced immune response or people
who suffer from diabetes mellitus, haemophilia or
immunodeficiency should also consult their doctor first.
Your skin may become a little red and irritated
the first few times you use the epilator. This
phenomenon is absolutely normal and quickly
disappears. As you use the appliance more
often, your skin gets used to epilation, skin
irritation decreases and regrowth becomes thinner
and softer. If the irritation has not disappeared within
three days, we advise you to consult a doctor.
Do not use the epilating head if it is damaged or
broken, as this may cause injury.
Do not clean the appliance with water that is hotter
than shower temperature (max. 40°C).
Charge, use and store the appliance at a temperature
between 10°C and 30°C.
Make sure the socket is live when you charge the
appliance. The electricity supply to sockets in mirror
cabinets over washbasins or shaver sockets in
bathrooms may be cut off when the light is turned off.
Do not use bath or shower oils when you epilate
under wet conditions, as this may cause serious skin
irritations.
Compliance with standards
This Philips appliance complies with all standards
regarding electromagnetic fields (EMF).
General
---
This symbol means that this appliance is suitable for
use in a bath or shower and for cleaning under a
running tap (Fig. 2).
For safety reasons, this appliance can only be
operated cordlessly.
Preparing for use
Charging
Charging the epilator takes approximately 1 hour. When
the epilator is fully charged, it has a cordless operating
time of up to 30 minutes.
1Switch off the appliance before you charge it. Then
connect it to a wall socket.  (Fig. 3)
,, The charging light flashes white to indicate that the
appliance is charging.  (Fig. 4)
,, When the battery is fully charged, the charging light
lights up white continuously for 20 minutes and
then goes out (Fig. 5).
Battery low or empty
--
--
When the battery is almost empty, the charging light
starts to flash red. When this happens, the battery
still contains enough energy for a few minutes of
epilating.
When the battery is completely empty, the charging
light lights up red continuously. To charge the epilator,
see section ‘Charging’ above.
Using the appliance
Clean the epilating head and charge the appliance fully
before you use the appliance for the first time.
Note:You cannot use the appliance while it is connected to
the mains.
Epilating tips
--
Wet: If you are new to epilation, we advise you to
start epilating on wet skin, as water relaxes the skin
and makes epilation less painful and more gentle. The
appliance is waterproof and can be safely used in the
bath or shower.
Tip: If you want you can use your common shower gel or
foam.
-- Dry: If you epilate dry, epilation is easier just after
taking a bath or shower. Make sure your skin is
completely dry when you start epilating.
-- General: Make sure your skin is clean and free from
grease. Do not apply any cream to your skin before
you start to epilate.
-- General: We advise you to epilate before you go
to bed at night, as skin irritation usually disappears
overnight.
-- General: Epilation is easier and more comfortable
when the hairs have a length of 3-4 mm. If the hairs
are longer, we recommend that you shave first and
epilate the shorter regrowing hairs after 1 or 2 weeks.
Epilating
1Press the on/off button once to switch on the
appliance.
,, The appliance starts to operate at speed II, which is
the most efficient speed for epilating.
Note: If you want to use speed I, press the on/off button
a second time. Speed I is suitable for areas with little hair
growth, for hard-to-reach areas and for areas where bones are
located directly beneath the skin, such as knees and ankles.
2Stretch the skin with your free hand to make the
hairs stand upright. Place the epilating head at an
angle of 90° onto the skin with the on/off button
pointing in the direction in which you are going to
move the appliance (Fig. 6).
3Move the appliance slowly over the skin against the
direction of the hair growth while pressing it lightly.
4Press the on/off button a third time to switch off
the appliance.
Tip:To relax the skin, we advise you to apply a moisturising
cream immediately or a few hours after epilation.
Overheat protection
This function helps to prevent overheating of the
appliance.
Note:To avoid overheating of the epilator, do not press the
appliance too hard onto your skin.The epilator works best
when you move it over your skin without exerting excessive
pressure.
If the overheat protection is activated, the appliance
switches off automatically and the charging light flashes
red for 30 seconds.
To reset the overheat protection, let the appliance cool
down and then switch it on again.
Note: If the charging light starts to flash red again, the
appliance has not yet cooled down completely.
Overload protection
If you press the epilating head too hard onto your skin or
when the epilating discs of the epilating head get blocked
(e.g. by clothes etc.), the appliance switches off and the
charging light flashes red for 5 seconds.
Turn the epilating discs with your thumb until you can
remove whatever is blocking the epilating discs.
Cleaning and maintenance
Never use scouring pads, abrasive cleaning agents or
aggressive liquids such as petrol or acetone to clean the
appliance.
Always keep the adapter dry. Never rinse it under the
tap or immerse it in water.
---
If necessary, clean the adapter with the cleaning
brush or a dry cloth.
After each wet use, clean the appliance thoroughly
with water to ensure optimum performance.
Cleaning the appliance
1Switch off the appliance.
2Push the epilating head to the right (1) and remove
it from the appliance (2).  (Fig. 7)
Note: Never try to detach the epilating discs from the
epilating head.
3Remove loose hairs with the cleaning brush (Fig. 8).
4Rinse all parts under the tap and shake off excess
water.
Note: Make sure all parts are completely dry before you
reassemble the appliance.
Ordering accessories
To purchase accessories for this appliance, please visit
our online shop at www.shop.philips.com/service.
If the online shop is not available in your country, go to
your Philips dealer or a Philips service centre. If you have
any difficulties obtaining accessories for your appliance,
please contact the Philips Consumer Care Centre in
your country. You find its contact details in the worldwide
guarantee leaflet.
Environment
--
--
Do not throw away the appliance with the normal
household waste at the end of its life, but hand it in
at an official collection point for recycling. By doing
this, you help to preserve the environment.  (Fig. 9)
The built-in rechargeable battery contains substances
that may pollute the environment. Always remove
the battery before you discard and hand in the
appliance at an official collection point. Dispose of
the battery at an official collection point for batteries.
If you have trouble removing the battery, you can
also take the appliance to a Philips service centre.
The staff of this centre will remove the battery for
you and will dispose of them in an environmentally
safe way (Fig. 10).
Removing the rechargeable battery
1Disconnect the appliance from the adapter. Let the
appliance operate until the battery is completely
empty.
2Remove the epilating head and open the appliance
with a screwdriver.  (Fig. 11)
3Insert the screwdriver into the small slot in the
printed circuit board (1). Twist the screwdriver until
the connection between the printed circuit board
and battery breaks off (2) (Fig. 12).
Deutsch
Einführung
Herzlichen Glückwunsch zu Ihrem Kauf und willkommen
bei Philips! Um das Kundendienstangebot von Philips
vollständig nutzen zu können, sollten Sie Ihr Produkt unter
www.philips.com/welcome registrieren.
Allgemeine Beschreibung (Abb. 1)
1Epilierpinzetten
2Epilierkopf
3Ein-/Ausschalter
-- Einmal drücken für Geschwindigkeit II
-- Zweimal drücken für Geschwindigkeit I
-- Dreimal drücken zum Ausschalten
4 Ladeanzeige (weiß) mit Warnanzeige bei geringem
Ladestand (rot)
5 Buchse für kleinen Stecker
6Adapter
7Reinigungsbürste
8Aufbewahrungstasche
Wichtig
Lesen Sie diese Bedienungsanleitung vor dem Gebrauch
des Geräts aufmerksam durch, und bewahren Sie sie für
eine spätere Verwendung auf.
----
4Pry the rechargeable battery out of the appliance
with the screwdriver.  (Fig. 13)
Caution: Be careful, the battery strips are sharp.
Do not attempt to replace the rechargeable battery.
Do not connect the appliance to the mains again after
you have removed the rechargeable battery.
----
Guarantee and service
If you have a problem, need information or replacement
parts or if you want to purchase additional parts, please
visit the Philips website at www.philips.com/support
or contact the Philips Consumer Care Centre in your
country. You find its phone number in the worldwide
guarantee leaflet. If there is no Consumer Care Centre in
your country, go to your local Philips dealer.
--
--
Gefahr
Halten Sie den Adapter trocken.
Warnhinweis
Wenn der Adapter defekt oder beschädigt ist, darf
er nur durch ein Original-Ersatzteil ausgetauscht
werden, um Gefährdungen zu vermeiden.
Dieses Gerät ist für Benutzer (einschl. Kinder)
mit eingeschränkten physischen, sensorischen
oder psychischen Fähigkeiten bzw. ohne jegliche
Erfahrung oder Vorwissen nur dann geeignet, wenn
eine angemessene Aufsicht oder ausführliche
Anleitung zur Benutzung des Geräts durch eine
verantwortliche Person sichergestellt ist.
Achten Sie darauf, dass Kinder nicht mit dem Gerät
spielen.
Der Adapter enthält einen Transformator. Ersetzen
Sie den Adapter keinesfalls durch einen anderen
Stecker, da dies eine Gefährdungssituation darstellt.
Zur Vermeidung eines Kurzschlusses stecken Sie
kein metallhaltiges Material in die Buchse für den
Gerätestecker.
Achtung
Dieses Gerät ist nur für die Entfernung von
weiblichem Körperhaar an Hautpartien unterhalb
des Halses vorgesehen: Achselhöhlen, Bikinizone und
Beine. Verwenden Sie es nicht für andere Zwecke.
Laden Sie das Gerät alle 3 bis 4 Monate vollständig
auf, auch wenn Sie es längere Zeit nicht verwenden.
--
--
--
-----
--
Halten Sie das eingeschaltete Gerät fern von
Kopfhaar, Wimpern und Augenbrauen sowie
von Kleidung, Fäden, Kabeln, Bürsten usw., um
Verletzungen und Beschädigungen zu vermeiden.
Benutzen Sie das Gerät nicht bei Hautreizungen,
Krampfadern, Ausschlag, Pickeln, (behaarten)
Muttermalen oder Wunden, ohne vorher einen
Arzt zu konsultieren. Gleiches gilt für Patienten mit
geschwächter Immunabwehr, Diabetes, Hämophilie
und Immuninsuffizienz.
Nach den ersten Anwendungen kann Ihre Haut
möglicherweise mit Rötungen oder Reizungen
reagieren. Dies ist völlig normal und sollte sich bald
legen, sobald Sie sich an das Epilieren gewöhnt haben
und die nachwachsenden Haare feiner und weicher
werden. Sollte die Hautirritation nicht innerhalb von
3 Tagen wieder abklingen, konsultieren Sie Ihren Arzt.
Ein beschädigter Epilierkopf darf nicht verwendet
werden, um Verletzungen zu vermeiden.
Bei der Reinigung des Geräts darf das Wasser nicht
wärmer als normales Duschwasser (max. 40 °C) sein.
Laden, benutzen und verwahren Sie das Gerät bei
Temperaturen zwischen 10 °C und 30 °C.
Prüfen Sie vor dem Aufladen des Geräts, ob die
Steckdose kontinuierlich Strom führt. Steckdosen
in Badezimmerschränken über Waschbecken sowie
Rasierer-Steckdosen werden häufig zusammen mit
der Raumbeleuchtung ausgeschaltet.
Verwenden Sie keine Bade- oder Duschöle, wenn
Sie nass epilieren, da dies zu starken Hautreizungen
führen kann.
Normerfüllung
Dieses Philips Gerät erfüllt sämtliche Normen bezüglich
elektromagnetischer Felder.
Allgemeines
--
--
Dieses Symbol bedeutet, dass dieses Gerät für den
Gebrauch in einer Badewanne oder Dusche und
für die Reinigung unter fließendem Wasser geeignet
ist (Abb. 2).
Aus Sicherheitsgründen kann dieses Gerät nur
kabellos bedient werden.
Für den Gebrauch vorbereiten
Laden
Das Aufladen des Epilierers dauert ca. 1 Stunde. Wenn
der Epilierer vollständig aufgeladen ist, kann er bis zu
30 Minuten kabellos betrieben werden.
1Schalten Sie das Gerät aus, bevor Sie es
aufladen.Verbinden Sie es dann mit einer
Steckdose.  (Abb. 3)
,, Die Ladeanzeige blinkt weiß und zeigt an, dass das
Gerät aufgeladen wird.  (Abb. 4)
,,
Wenn die Akkus vollständig aufgeladen sind,
leuchtet die Ladeanzeige konstant weiß und erlischt
nach 20 Minuten (Abb. 5).
Akku fast leer oder leer
---
Wenn der Akku fast leer ist, beginnt die Ladeanzeige rot
zu blinken. In diesem Fall steht noch genügend Energie
für ein paar Minuten Akkubetrieb zur Verfügung.
Wenn der Akku vollständig leer ist, leuchtet
die Ladeanzeige konstant rot. Um den Epilierer
aufzuladen, lesen Sie den Abschnitt “Aufladen” weiter
oben.
Das Gerät benutzen
Reinigen Sie den Epilierkopf, und laden Sie das Gerät
vollständig auf, bevor Sie das Gerät zum ersten Mal
verwenden.
Hinweis: Solange das Gerät an das Stromnetz angeschlossen
ist, kann es nicht verwendet werden.
Tipps zum Epilieren
--
Nass: Wenn Sie noch nie epiliert haben, empfehlen
wir Ihnen, mit dem Epilieren auf nasser Haut zu
beginnen, da Wasser die Haut entspannt und für eine
sanftere und weniger schmerzhafte Epilation sorgt.
Das Gerät ist wasserdicht und kann sicher in der
Badewanne oder Dusche verwendet werden.
Tipp:Wenn Sie möchten, können Sie Ihr übliches Duschgel
oder Ihren üblichen Rasierschaum verwenden.
-- Trocken: Wenn Sie trocken epilieren, ist das
Epilieren nach einem Dusch- oder Vollbad am
leichtesten. Achten Sie darauf, dass Ihre Haut vor der
Anwendung vollständig trocken ist.
-- Allgemein: Ihre Haut sollte sauber und fettfrei sein,
wenn Sie das Gerät benutzen. Tragen Sie vor dem
Epilieren keine Creme oder Lotion auf.
-- Allgemein: Wir empfehlen das Epilieren vor dem
Schlafengehen, da Hautreizungen in der Regel über
Nacht abklingen.
-- Allgemein: Am angenehmsten und gründlichsten wird
die Epilation, wenn die Haare 3 – 4 mm lang sind. Wenn
die Haare länger sind, empfehlen wir, dass Sie zunächst
rasieren und anschließend nach 1 bis 2 Wochen die
nachgewachsenen kürzeren Haare epilieren.
Epilieren
1Drücken Sie den Ein-/Ausschalter einmal, um das
Gerät einzuschalten.
,, Das Gerät fängt an, mit Geschwindigkeitsstufe II zu
arbeiten, die am effektivsten für die Epilation ist.
Hinweis:Wenn Sie die Geschwindigkeitsstufe I verwenden
möchten, drücken Sie den Ein-/Ausschalter ein zweites Mal.
Die Geschwindigkeitsstufe I eignet sich für Hautpartien mit
geringer Behaarung, für schwer erreichbare Zonen und für
Hautpartien direkt über Knochen, z. B. Knie und Knöchel.
2Straffen Sie die Haut mit der freien Hand, damit
sich die Haare aufrichten. Setzen Sie den Epilierkopf
im 90° Winkel auf die Haut auf, sodass der Ein-/
Ausschalter in die Richtung zeigt, in der Sie das
Gerät bewegen (Abb. 6).
3Führen Sie das Gerät langsam und mit leichtem
Druck gegen die Haarwuchsrichtung über die Haut.
4Drücken Sie den Ein-/Ausschalter ein drittes Mal,
um das Gerät auszuschalten.
Tipp: Damit sich die Haut beruhigt, sollten Sie sofort
oder ein paar Stunden nach dem Epilieren eine
Feuchtigkeitscreme auftragen.
Überhitzungsschutz
Diese Funktion hilft dabei, eine Überhitzung des Geräts
zu vermeiden.
Hinweis: Um eine Überhitzung des Epilierers zu vermeiden,
drücken Sie das Gerät nicht zu stark auf die Haut. Der
Epilierer funktioniert am besten, wenn Sie ihn nur mit
leichtem Druck über Ihre Haut gleiten lassen.
Bei aktiviertem Überhitzungsschutz schaltet sich das
Gerät automatisch ab, und die Ladeanzeige blinkt
30 Sekunden lang rot.
Um den Überhitzungsschutz zurückzusetzen, lassen Sie
das Gerät abkühlen, und schalten Sie es dann wieder ein.
Hinweis:Wenn die Ladeanzeige erneut rot blinkt, ist das
Gerät noch nicht vollständig abgekühlt.
Das Gerät reinigen
1Schalten Sie das Gerät aus.
2Drücken Sie den Epilierkopf nach rechts (1), und
entfernen Sie ihn vom Gerät (2).  (Abb. 7)
Hinweis:Versuchen Sie nicht, die Epilierpinzetten vom
Epilierkopf abzunehmen.
3Entfernen Sie lose Haare mit der mitgelieferten
Reinigungsbürste (Abb. 8).
4Spülen Sie alle Teile unter fließendem Wasser ab,
und entfernen Sie überschüssiges Wasser durch
Schütteln der Teile.
Hinweis:Vergewissern Sie sich, dass alle Teile vollständig
trocken sind, bevor Sie das Gerät wieder zusammenbauen.
Zubehör bestellen
Um Zubehör für dieses Gerät zu kaufen, besuchen Sie
unseren Online-Shop unter www.shop.philips.com/
service. Wenn der Online-Shop in Ihrem Land nicht
verfügbar ist, wenden Sie sich an Ihren Philips Händler oder
ein Philips Service-Center. Sollten Sie Schwierigkeiten bei
der Beschaffung von Zubehör für Ihr Gerät haben, wenden
Sie sich bitte an ein Philips Service-Center in Ihrem Land.
Die entsprechenden Kontaktinformationen finden Sie in
der beiliegenden Garantieschrift.
Umwelt
--
Überlastungsschutz
Wenn Sie den Epilierkopf zu fest auf Ihre Haut drücken
oder die Epilierpinzetten des Epilierkopfs blockiert
werden (z. B. durch Kleidung usw.), schaltet sich das Gerät
aus, und die Ladeanzeige blinkt 5 Sekunden lang rot.
Drehen Sie die Epilierpinzetten mit Ihrem Daumen, bis
Sie die Ursache für die Blockierung entfernen können.
Reinigung und Pflege
Benutzen Sie zum Reinigen des Geräts keine
Scheuerschwämme und -mittel oder aggressive
Flüssigkeiten wie Benzin oder Azeton.
Achten Sie darauf, dass der Adapter immer trocken ist.
Spülen Sie ihn niemals unter fließendem Wasser ab, und
tauchen Sie ihn auch nicht in Wasser.
---
Bei Bedarf reinigen Sie den Adapter mit der
Reinigungsbürste oder einem trockenen Tuch.
Reinigen Sie nach jedem Nassgebrauch das Gerät
gründlich mit Wasser, um eine optimale Funktion zu
gewährleisten.
--
Werfen Sie das Gerät am Ende der Lebensdauer
nicht in den normalen Hausmüll. Bringen Sie es zum
Recycling zu einer offiziellen Sammelstelle. Auf diese
Weise helfen Sie, die Umwelt zu schonen.  (Abb. 9)
Der integrierte Akku enthält Substanzen, die die
Umwelt gefährden können. Entfernen Sie den
Akku, bevor Sie das Gerät an einer offiziellen
Recyclingstelle abgeben. Geben Sie den gebrauchten
Akku bei einer Batteriesammelstelle ab. Falls
Sie beim Entfernen des Akkus Probleme haben,
können Sie das Gerät auch an ein Philips ServiceCenter geben. Dort wird der Akku umweltgerecht
entsorgt (Abb. 10).
Den Akku entfernen
1Trennen Sie das Gerät vom Adapter. Lassen Sie das
Gerät laufen, bis der Akku ganz leer ist.
2Nehmen Sie den Epilierkopf ab, und öffnen Sie das
Gerät mit einem Schraubendreher.  (Abb. 11)
3Stecken Sie den Schraubendreher in den kleinen
Schlitz auf der Platine (1). Drehen Sie den
Schraubendreher, bis die Verbindung zwischen der
Platine und dem Akku getrennt wird (2) (Abb. 12).
4Lösen Sie den Akku mit dem Schraubendreher aus
dem Gerät.  (Abb. 13)
Achtung:Vorsicht: Die Schienen am Akku sind scharf!
Versuchen Sie nicht, den Akku zu ersetzen.
Verbinden Sie das Gerät nicht mehr mit dem Stromnetz,
nachdem Sie den Akku entnommen haben.
Garantie und Kundendienst
Wenn ein Problem auftritt, Sie weitere Informationen
oder Ersatzteile benötigen oder zusätzliche Teile kaufen
möchten, besuchen Sie die Philips Website unter
www.philips.com/support, oder setzen Sie sich mit
einem Philips Service-Center in Ihrem Land in Verbindung.
Sie finden die Telefonnummer in der Garantieschrift.
Sollte es in Ihrem Land kein Service-Center geben,
wenden Sie sich bitte an Ihren Philips Händler vor Ort.