1
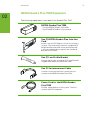
Quadro® PLEX 7000
User guide
NVIDIA Quadro plex 7000 USER Guide
NVIDIA Quadro Plex 7000
®
NVIDIA Quadro plex 7000 USER Guide
table of contents
Introduction to the NVIDIA Quadro Plex 7000
About This Guide
Features
Minimum System Requirements
1
1
2
3
Unpacking the NVIDIA Quadro Plex 7000
Unpacking
NVIDIA Quadro Plex 7000 Equipment
NVIDIA Quadro Plex Rack-mount Kit (Optional)
NVIDIA Quadro Plex 7000
4
4
5
7
9
Hardware Installation and Connections
Safety Instructions
Before You Begin
Optional Low Profile Bracket
Installation Instructions
Connecting to the Host System
Removing Old Drivers
Installing the NVIDIA Quadro Plex Interface Card
Installing and Connecting the NVIDIA Quadro Plex 7000
Connecting the Power Cord
Installing NVIDIA Quadro Plex Rack-mount Kit (Optional)
10
10
10
11
12
13
13
13
14
16
17
Driver Installation
Windows Installation
Verifying Windows Installation
Linux Installation
Verifying Linux Installation
23
23
26
27
29
Enabling Mosaic Technologies
30
Troubleshooting31
Safety Information 32
Compliance and Certifications38
Table of Contents
NVIDIA Quadro plex 7000 USER Guide
01
Introduction
The NVIDIA Quadro® Plex represents a quantum
leap in visual computing, enabling breakthrough
levels of capability and productivity from an
industry-standard architecture. Achieving
unprecedented visual computing density, the
NVIDIA Quadro Plex is easily deployed in a wide
range of environments. Featuring NVIDIA® SLI™
multi-GPU technology, this dedicated system
scales graphics computing to meet the most
demanding professional application requirements.
Multiple NVIDIA Quadro Plex’s can be combined
using the NVIDIA Quadro G-Sync to further scale
performance, quality, and channels. Based on
proven, industry-standard architectures,
NVIDIA Quadro Plex can be deployed with
any NVIDIA-certified PCI Express platform.
About This Guide
This Installation Guide provides instructions
to connect the NVIDIA Quadro Plex 7000 to a
certified host system1 in a desktop or rack-mount
environment. For information on using the system
with applications, refer to the NVIDIA web site at:
www.nvidia.com/quadroplex
1
For a list of certified host systems visit www.nvidia.com/quadroplex
1
Introduction
00
01
Features
>> 6 GB ECC Capable Frame Buffer per GPU (12 GB system total)
•
Delivers high throughput for interactive visualization of large
models and high performance for real time processing of
large textures and frames and enables the highest quality and
resolution full-scene anti-aliasing (FSAA).
>> Premium Mosaic Technology
•
Enables transparent use of multi GPUs on multiple displays to
simplify 4K and other large scale projection systems.
>> Desktop or Rack Mount
•
Compact design can be easily deployed in a desktop
workspace or can be converted to fit any standard 19” 3U rack
environment.
>> Frame Synchronization
•
Allows the display channels from multiple workstations to
be synchronized from an internal or external synchronization
source, thus creating one large “virtual display” that can be
driven by a multisystem cluster for performance scalability.
>> Full-Scene Anti-aliasing (FSAA)
•
Up to 128× SLI FSAA dramatically reduces visual aliasing
artifacts or jaggies resulting in highly realistic scenes.
>> Four Dual-Link Digital Display Connectors
•
Full dual-link TMDS transmitters support ultra-highresolution panels, which result in amazing image quality
producing detailed photorealistic images.
>> Ultra Quiet Design
•
Sub 40 dB delivers acoustics lower than most desktop
workstations to maintain a quiet and productive environment.
>> Unified Driver Architecture (UDA)
•
The NVIDIA UDA guarantees forward and backward
compatibility with software drivers.
2
introduction
01
Minimum System Requirements
The NVIDIA Quadro Plex 7000 is designed to connect to an NVIDIA
certified PCI Express host system. The specific motherboard and
SBIOS of your system may affect the functionality of the NVIDIA Quadro
Plex 7000. Refer to the NVIDIA web site (www.nvidia.com/quadroplex)
for a list of certified host systems.
The NVIDIA Quadro Plex 7000 minimum
system requirements include:
>> System/Platform
•
NVIDIA Quadro Plex officially certified system or platform
>> Operating System
•
Microsoft Window XP or Professional ×64 Edition
•
Microsoft Windows Vista or 7 32 or 64-bit
•
Linux 32-bit or 64-bit
•
Solaris ×86
>> Processor
•
Intel Pentium 4 or Xeon processor or higher AMD Opteron
processor or higher
>> RAM
•
Minimum 12 GB recommended
>> System Interface
•
PCI Express Gen2 ×16
3
NVIDIA Quadro plex 7000 USER Guide
02
Unpacking
The NVIDIA Quadro Plex 7000 is shipped
as a standard deskside configuration for
connection to a host system. An optional
rack-mount kit is available if you are going
to install the NVIDIA Quadro Plex 7000
into a cabinet. You will need one kit for
each Quadro Plex to be rack-mounted.
Be sure to inspect each piece of equipment
shipped in the packing box. If anything is
missing or damaged, contact your reseller.
4
5
UNPACKING
00
02
NVIDIA Quadro Plex 7000 Equipment
The following equipment is included in the Quadro Plex 7000.
NVIDIA Quadro Plex 7000
- Two (2) NVIDIA Quadro 7000 GPUs
- One (1) NVIDIA Quadro G-Sync board
One (1) NVIDIA Quadro Plex Interface
Card
Installs into the PCI Express x16 slot in the host
system. The card comes with the standard ATX
height bracket attached. A low-profile bracket
is also provided and can replace the standard
bracket on the card.1
One (1) Low Profile Bracket
Used to replace the standard ATX (long) bracket
shipped attached to the interface card.
One (1) 2m Interconnect Cable
Connects from the interface card in the host
system to the NVIDIA Quadro Plex 7000.
Power Cord for the NVIDIA Quadro
Plex 7000
Used to supply power to the system. The host
system controls the power
6
Unpacking
02
Four (4) DVI-to-VGA Adapters
Used to connect a VGA monitor to the NVIDIA
Quadro Plex 7000 graphics cards (which are all
dual-link DVI connectors).
One (1) NVIDIA Quadro Plex 7000
Installation CD
Contains all the necessary drivers. To keep your
drivers current, visit www.nvidia.com/drivers
and download the latest drivers. Make sure to
select the Quadro Plex as the Product Series
to show the drivers tested and approved for the
Quadro Plex
One (1) Quick Install Guide
The Quick Start Guide (a summary of the
Installation Guide) provides the basic
procedures necessary to install and bring-up
the Quadro Plex
UNPACKING
02
NVIDIA Quadro Plex Rack-Mount Kit (Optional)
The rack-mount kit is an optional kit ordered
separately from the NVIDIA Quadro Plex 7000.
One (1) kit has all the hardware necessary to
rack-mount one (1) NVIDIA Quadro Plex 7000 in a
standard 19-inch Electronics Industries Alliance
(EIA) cabinet. The NVIDIA Quadro Plex 7000
takes up half the width space in a rack which
allows two (2) Quadro Plex’s to be rack-mounted
side-by-side.
Note: To connect two Quadro Plex’s to the same system NVIDIA
provides the Dual Host Interface card, NVIDIA part #: 930-508940501-000. The use of the dual host interface card is required for using
two Quadro Plex’s in Mosaic.
Note: This kit is an optional item, NVIDIA part #
930-50375-2207-000.
The rack-mount kit for the Quadro Plex 7000 is different from
the rack-mount kit for the Quadro Plex 2200 D2
7
8
unpacking
02
The following equipment is included in the rack-mount kit box.
One (1) Side Rail, Eight (8) Screws
Used to mount the NVIDIA Quadro Plex 7000 in
a standard 19” EIA rack.
x8
One (1) Rear Alignment Bracket,
Four (4) Screws
x4
Used when mounting two (2) NVIDIA Quadro Plex
7000 in a rack side-by-side to provide alignment
and finish.
Two (2) Thumb Screws
Used to secure the NVIDIA Quadro Plex 7000 to
the rack and side rail.
9
UNPACKING
02
NVIDIA Quadro Plex 7000
The NVIDIA Quadro Plex 7000 contains two (2)
NVIDIA Quadro GPUs driving one (1) to four (4)
channels and one (1) NVIDIA Quadro G-Sync II
board. The four (4) dual-link DVI-I connectors
are standard connections for high-speed, highresolution digital displays. The DVI-I connectors
support both digital and analog signals. The
3-pin mini-DIN is a standard VESA connector
used for stereo connections.
Two (2) 3-pin
mini-DIN connectors
Four (4) dual-link DVI
connectors
One (1) interconnect
cable connector
One (1) NVIDIA Quadro One (1) BNC house
G-Sync II board
sync connector
NVIDIA Quadro plex 7000 USER Guide
03
02
Hardware
17 PT CHAPTER TITLE
Installation
2-LINES
and
ALL
connections
CAPS
8 pt optional 1-line subhead u&lc
Installing and connecting the NVIDIA
Quadro Plex 7000 requires opening the
host system. Follow all of the safety
instructions provided here to ensure that
there is no damage to you, your host
system, or the NVIDIA Quadro Plex 7000.
Safety Instructions
To reduce the risk of fire, electric shock, and injury always follow basic
safety precautions.
Remember to remove power from your host system by disconnecting
the AC main source before installing any equipment into the host
system chassis.
Note: All hardware must be installed prior to installation of
the drivers
Before you Begin
The NVIDIA Quadro Plex 7000 can be connected to a host system in
a desktop or rack mount environment (an optional rack-mount kit is
required for installation into an equipment rack). In either situation,
the host system accessing the NVIDIA Quadro Plex 7000 must have the
proper graphics drivers installed and have an open ×16 PCI Express
slot. To avoid conflicts, any current graphics drivers must be uninstalled prior to installing the hardware and software associated with
the NVIDIA Quadro Plex 7000.
10
11
Hardware install ation and connections
00
03
Optional Low Profile Bracket
Before beginning the installation, determine if you are going to
need the NVIDIA Quadro Plex interface card with the standard (long)
bracket or the shorter low profile bracket. If you require the low
profile bracket, use the following instructions to replace the standard
bracket. Replacing the bracket requires a Philips #2 screw driver.
1 Remove one (1) screw attaching the standard bracket to the NVIDIA
Quadro Plex interface card.
2 Remove the two (2) jack screws from the connector.
3 Install one (1) screw to attach the low profile bracket to the NVIDIA
Quadro Plex interface card.
4 Install the two (2) jack screws removed in step 2 to secure the card to
the bracket
Standard bracket
Low profile bracket
Hardware install ation and connections
00
03
Installation Instructions
For connection to a host system, be sure to review the minimum
system requirements given on page 3. Then start your installation with
“Connecting to the Host System” on page 14.
For the rack-mount instructions, start with “Installing
NVIDIA Quadro Plex Rack-Mount Kit” on page 19.
The installation procedure will take you through the following steps:
>> Removing old drivers.
>> Installing the NVIDIA Quadro Plex interface card
>> Installing and connecting the NVIDIA Quadro Plex 7000
>> Rack-mount instructions
12
Hardware Install ation and Connections
00
03
Connecting to the Host System
Use the following procedure to connect the NVIDIA Quadro Plex 7000
to a host system.
Note: Any previous NVIDIA graphics card drivers must be
completely removed to avoid conflicts. NVIDIA recommends that
you uninstall these drivers prior to removing the old hardware
and installing the NVIDIA Quadro Plex interface card.
1 Turn off the host system, monitor, and any peripheral equipment.
2 Disconnect the power cord to the host system
Installing the NVIDIA Quadro Plex
Interface Card
3 Open the host system. Refer to your host system documentation from
the original manufacturer for assistance..
4 Locate your graphics card (usually the monitor is connected to the
graphics card) or open the ×16 PCI Express slo
5 Remove the graphics card (if there is one) from the host system. Save
any hardware (such as screws and brackets) to use when installing the
NVIDIA Quadro Plex interface card
6 Install the NVIDIA Quadro Plex interface card into the PCI Express ×16
graphics card slot. To replace the standard bracket with a low profile
bracket, see the instructions given on page 14.
7 Secure the NVIDIA Quadro Plex interface card using any applicable
hardware removed in step 6.
8 Reinstall the cover on your host system.
Some computer systems are shipped with graphics integrated into
the motherboard. If this is the case, you may need to enter the SBIOS
and disable the integrated graphics. Depending on the motherboard
and the SBIOS you have, the NVIDIA Quadro Plex 7000 may or may not
function with the on-board graphics enabled.
For a list of compatible host systems visit
www.nvidia.com/quadroplex
13
Hardware Install ation and Connections
00
03
Installing and Connecting the
NVIDIA Quadro Plex 7000
9 Connect one end of the Quadro Plex
interconnect cable supplied in the box
to the exposed connector of the NVIDIA
Quadro Plex interface card in the host
system.
Interconnect cable connects to the
back of the host system
10 Connect the other end of the
cable to the back of the NVIDIA
Quadro Plex .
Interconnect cable connects to
the back of the NVIDIA Quadro
Plex 7000
Note: There is no specific order when connecting the
interconnect cables between the host system and the NVIDIA
Quadro Plex 7000.
14
15
Hardware install ation and connections
00
03
11 Connect the DVI cable from the monitor to one of the DVI connectors
on the NVIDIA Quadro Plex 7000. If your monitor has a VGA connector,
use the DVI-to-VGA adapter shipped in the box.
The primary GPU is specified by your motherboard and SBIOS. To
help identify the primary GPU there is an orange LED between
the two DVI connectors which illuminates on the primary GPU.
When connecting one (1) monitor the active display is the DVI port to
the right of the orange LED.
LED Indicating Primary
GPU
Hardware Install ation and Connections
00
03
Connecting the Power Cord
1 Connect the power cord to the NVIDIA Quadro Plex 7000 by opening
the rear louvered cover to expose the power plug.
2 Close the louvered cover.
3 Plug the power cord from the NVIDIA Quadro Plex 7000 to an
AC outlet (it is recommended to use a power-surge protected
outlet). The Quadro Plex 7000 requires the input power within
the following ranges:
110-127 Vac, 50/60Hz, 11A
200-240 Vax, 50/60Hz, 5.5A
4 Reconnect the power cord to your host system.
5 Power on the host system.
At this time, power is also applied to the NVIDIA Quadro Plex 7000.
6 Click Cancel when the Found New Hardware Wizard window displays.
You are now ready to install the graphic drivers. Go to Driver
Installation Section and begin the driver installation.
.
16
17
Hardware install ation and connections
03
Installing NVIDIA Quadro Plex
Rack-Mount Kit (Optional)
The NVIDIA Quadro Plex 7000 can be installed in a standard 19-inch
EIA equipment cabinet. To perform this installation, the optional
NVIDIA Quadro Plex rack-mount installation kit is necessary. The
installation kit is not included in the NVIDIA Quadro Plex 7000 shipping
box. The kit is a separate order item and one kit will be required for
each Quadro Plex installed in the cabinet.
Use the following procedure to install the NVIDIA Quadro Plex 7000
into an equipment cabinet.
Note: The hardware in the rack-mount kit is intended for a
standard 19” EIA rack only.
1 Slide the bracket assembly out of the rack side panel.
.
Hardware Install ation and Connections
03
2 Adjust the rack side panel to fit the rack. Loosen eight (8) screws to
adjust the length of the side-panel.
3 Install the side panel into the cabinet
4 Remove the two (2) screws holding the aluminum shells to the Quadro
Plex 7000 chassis.
18
Hardware install ation and connections
03
5 Remove screw from the bottom of the Quadro Plex 7000 Chassis
6 Place the Quadro Plex 7000 silver side down.
7 Push the black aluminum shell towards the display connectors until it
stops. Slide up and remove the black shell. You may need to slide the
black shell forward slightly to release the retaining clips before you
can lift up.
19
Hardware Install ation and Connections
03
8 Rotate the Quadro Plex 7000 over so the silver side is up
9 Push the silver aluminum shell towards the display connectors until
it stops. Slide up and remove the silver aluminum shell. You may need
to slide the silver shell forward slightly to release the retaining clips
before you can lift up
10 Reinstall the two screws removed in Step 4.
11 Place the front handle bracket on top of the Quadro Plex 7000 and
attach with the eight (8) screws provided in the box
20
Hardware install ation and connections
03
12 Slide the Quadro Plex 7000 into the side bracket installed in the
cabinet in Step 3. Be sure to line up the alignment bracket on the
Quadro Plex 7000 to the alignment pins on the side panel.
13 Secure the Quadro Plex 7000 to the rack and side panel using the two
(2) thumb screws provided in the kit.
14 If needed, remove and rotate the NVIDIA logo on the front Quadro Plex
7000 bezel.
Note: If you are installing one Quadro Plex 7000 into the rack,
go to Step 19. If you are installing a second Quadro Plex 7000
into the rack next to the first Quadro Plex 7000, you need to
continue with Step 5.
15 Prepare the second Quadro Plex 7000 following Steps 1 through 14.
16 On each Quadro Plex 7000, remove the two screws that you removed in
Step 4.
21
Hardware Install ation and connections
03
17 Install the Alignment bracket and attach with the four (4) screws
included in the box.
18 Connect the power cord to the Quadro Plex 7000.
19 Connect the Interconnect Cable to the Quadro Plex 7000 and the
Workstation.
20 If using the Dual Host Interface Card in the workstation, connect the
G-Sync board in each Quadro Plex 7000 with a standard CAT-5 or
better Ethernet cable.
21 Connect DVI cables from the display(s) to the Quadro Plex 7000 DVI
connectors.
22
NVIDIA Quadro plex 7000 USER Guide
04
Driver installation
This section contains the instruction to install
the NVIDIA Quadro Plex 7000 software drivers
within a Windows environment or within a Linux
environment on page 34.
Windows Installation
1 Download the current display drivers for the Quadro Plex 7000 from
www.nvidia.com/drivers (make sure to select Quadro as the product
type and Quadro Plex as the Product Series) or insert the NVIDIA
Quadro Plex installation CD.
2 Run setup.exe.
Depending on your system setup, the install disk may automatically
run the install setup.exe. If it does not run, go to My Computer and
click on the CD to open.
23
Driver install ation
00
04
3 Click Agree and Install when the NVIDIA Install window displays.
4 Click Continue Anyway (on Windows XP) or Install this driver software
anyway (Windows Vista/7) if the Hardware Installation warning is
displayed
Note: This warning tells you that the drivers you are about to
install have not passed the Windows logo testing (WHQL). WHQL
is a Microsoft testing procedure that is required before Microsoft
approves the software. Clicking Continue Anyway will not harm
your computer. These drivers are currently under WHQL testing.
If you do not see this warning, the drivers have passed the
testing requirements. This warning displays multiple times for
each GPU in the system.
24
Driver Install ation
04
5 Restart the computer if the user interface prompts you to.
Note: The in-the-box drivers provide all the functionality
necessary for the system. However, it is highly recommended
that you periodically visit www.nvidia.com/drivers to update to
the latest driver versions.
25
Driver Install ation
00
04
Verifying Windows Installation
It is recommended that you verify your installation by going to the
NVIDIA Control Panel and verifying that the graphic cards have been
installed correctly and are recognized by the drivers.
Use the following procedure to verify the installation of the graphic
cards:
1 Go to Start > Control Panel.
2 Select NVIDIA Control Panel.
3 Go to Help > System Info in the menu bar.
4 Select Display tab.
5 Highlight the Quadro Plex 7000 in the list of components.
26
Driver Install ation
00
04
Linux Installation
1 Download the current display drivers for the Quadro Plex 7000
from www.nvidia.com/drivers (make sure to select Quadro as
the product type and Quadro Plex as the Product Series) or
insert the NVIDIA Quadro Plex installation CD. Using drivers
included with Linux distributions is not recommended
2 Run the .run file from the root prompt.
3 Select Accept to accept the License Agreement.
4 Select Yes if a warning window displays indicating that there are
drivers already installed. Selecting Yes tells the installation process
to overwrite the previously installed drivers.
27
driver install ation
00
04
5 Select Yes when the Kernel Interface window displays.
6 Select OK to compile a Kernel interface.
7 Run nvidia-xconfig utility.
8 Install is complete.
28
Driver Install ation
00
04
Verifying Linux Installation
1 Insert the 4-pin cRun nvidia-settings to displays the Server Settings
window.
2 Verify here that the installation is correct and working.
29
NVIDIA Quadro plex 7000 USER Guide
05
Enabling Mosaic Technologies
In order to configure the Quadro Plex 7000
to automatically scale across multiple
display screens you will need to enable
Mosaic. Mosaic can be configured for either
Windows or Linux operating systems.
The user interface and features for Mosaic
Technologies can change with display driver
updates so reference the User Guide that
is posted on nvidia.com and/or the driver
release notes for the most up to date guide:
http://www.nvidia.com/docs/IO/40049/
NVSLIMosaicMode_UG_v20.pdf
30
NVIDIA Quadro plex 7000 USER Guide
06
Troubleshooting
Use the following guidelines to troubleshoot
your unit. If you require further assistance,
go to www.nvidia.com/support.
>> symptom
No lights on the front
of the NVIDIA Quadro
Plex 7000
>> FIX
>> Check power cord.
>> Check the interconnect cables.
>> Check www.nvidia.com/quadroplex to make
sure your system/motherboard are certified.
>> If all connections check out and your system is
certified, you may have a faulty power cord or
a faulty interconnect cable.
No display on any
monitor
>> Check the monitor connection to the NVIDIA
Quadro Plex 7000.
>> Some motherboards choose different default
connectors so try a different connector. Be
sure to reset your systems each time you
change the connections.
>> If there is still no display, go to
www.nvidia.com/quadroplex and make
sure your host system contains a certified
motherboard and/or is a certified system.
If Mosaic menu is not
shown in the nvidia
control panel
>> Verify that both Quadro 7000 boards are
shown in the Device Manager
>> If both boards are not present re-install
the driver
31
NVIDIA Quadro plex 7000 USER Guide
07
safety information
NVIDIA products are designed to operate safely when installed
and used according to the product instructions and general
safety practices. The guidelines included in this document
explain the potential risks associated with computer operation
and provide important safety practices designed to minimize
these risks. By carefully following the information contained in
this document and the specific instructions provided with your
product, you can protect yourself from hazards and create a
safer computer work environment.
The product is designed and tested to meet IEC-60950-1,
the Standard for the Safety of Information Technology
Equipment. This also covers the national implementation of
IEC-60950-1 based safety standards around the world e.g.
UL-60950-1. These standards reduce the risk of injury from
the following hazards:
>> Fire: Overload, temperature, material flammability
>> Mechanical: Sharp edges, moving parts, instability
>> Energy: Circuits with high energy levels (240 volt amperes) or
potential as burn hazards
>> Heat: Accessible parts of the product at high temperatures
>> Chemical: Chemical fumes and vapors
>> Radiation: Noise, ionizing, laser, ultrasonic waves
Retain and follow all product safety and operating instructions. Always
refer to the documentation supplied with your equipment. Observe
all warnings on the product and in the operating instructions.
32
Safety Information
00
07
To reduce the risk of bodily injury, electric shock, fire and damage
to the equipment, observe all precautions included in this guide.
General Precautions
To reduce the risk of personal injury or damage to the equipment:
>> Shut down the product and disconnect all AC power cords and cables
before installation.
>> Do not connect or disconnect any cables when performing installation, maintenance, or reconfiguration of this product during an
electrical storm.
>> Never turn on any equipment when there is evidence of fire, water, or
structural damage.
>> Place the product away from radiators, heat registers, stoves,
amplifiers, or other products that produce heat.
>> Never use the product in a wet location.
>> Use only with a rack, cart, stand, or bracket recommended by NVIDIA,
or sold with the product. Or it will cause serious bodily injury and
serious damage to the product.
>> Avoid inserting foreign objects through openings in the product.
>> Do not use conductive tools that could bridge live parts.
>> Do not make mechanical or electrical modifications to the equipment.
>> Use the product only with approved equipment.
>> Follow all cautions and instructions marked on the equipment. Do not
attempt to defeat safety interlocks (where provided).
>> If the product sustains damage requiring service, disconnect the product
from the AC electrical outlet and refer servicing to an NVIDIA authorized
service provider.
Examples of damage requiring service include:
•
The power cord, extension cord or plug has been damaged.
•
Liquid has been spilled on the product or an object has fallen into
the product.
33
Safety Information
00
07
•
The product has been exposed to rain or water.
•
The product has been dropped or damaged.
•
There are noticeable signs of overheating.
•
The product does not operate normally when you follow the
operating instructions.
Precautions for Installation,
Maintaining and Servicing
To reduce the risk of electric shock or damage to the
equipment when installing maintaining, or servicing
products, observe the following precautions:
Installation:
>> Follow the Pre/Post-installation procedures in other part of the
manual.
>> Follow the Installing and Configure Instruction in the manual.
>> Follow the precaution for installation product to racks.
>> In some geographical areas it may by advisable to install lightning
protection for product.
>> Ensure reliable earthing of rack mounted equipment have been
maintained.
Maintaining and Servicing:
>> Product contains power supplies that are capable of producing
hazardous energy levels. The installation of internal options
and routine maintenance and service of this product should
be performed by individuals who are knowledgeable about the
procedures, precautions, and hazards associated with equipment
containing hazardous energy levels.
>> Do not exceed the level of repair specified in the procedures in the
product documentation. All troubleshooting and repair procedures
are detailed to allow only subassembly or module-level repair.
Because of the complexity of the individual boards and subassemblies,
34
safety information
00
07
do not attempt to make repairs at the component level or to make
modifications to any printed wiring board. Improper repairs can create
a safety hazard.
>> Verify that the AC power supply branch circuit that provides power
to the rack is not overloaded. This will reduce the risk of personal
injury, fire, or damage to the equipment. The total rack load should not
exceed 80 percent of the branch circuit rating. Consult the electrical
authority having jurisdiction over your facility wiring and installation
requirements.
>> The covers should remain locked during normal operation.
>> The server should be installed in a controlled access location where
only qualified personnel have access to the server.
>> Upon completion of any service or repairs to the product, have your
authorized service provider perform any safety checks required by the
repair procedure or by local codes to determine that the product is in
proper operating condition.
>> Power down the equipment and disconnect all AC power cords and
cable before removing any access covers.
>> Do not replace components while power is applied to the product.
First, shut down the product and disconnect all AC power cords.
>> Allow the product to cool before removing covers and touching internal
components.
>> Move products with casters carefully. Avoid quick stops and uneven
surfaces.
>> Do not block the opening used for ventilation, since these ensure
reliable operation of product and protect it from overheating. And
opening should be kept free of dust and debris.
>> Do not insert or pour anything into the opening used for ventilation.
>> Allow sufficient air circulation around and Prevent direct exposure to
radiant heat sources.
>> Before cleaning, ensure unplug the product from the wall outlet.
>> Do not use liquid cleaners or aerosol cleaner, use a damp cloth for
cleaning.
35
Safety Information
00
07
Precautions for Power Connection
Power Cords
To reduce the risk of electric shock or damage to the equipment:
>> Use power cables provided with this product.
>> If you have to change the power cords for any reason, use an
approved power cord. .
>> Not all power cords have the same current ratings. If you have
questions about the type of power cord to use, contact an authorized
service provider.
>> You must use a power cord rated for your product and for the voltage
and current marked on the electrical ratings label of the product.
The voltage and current rating of the cord must be greater than the
voltage and current rating marked on the product. .
>> Make sure that the total ampere rating of all products plugged into
an extension cord or power strip does not exceed 80 percent of the
ampere ratings limit for the extension cord or power strip.
>> The product is equipped with a three-wire electrical groundingtype plug which has a third pin for ground. This plug only fits into a
grounded electrical power outlet.
>> Plug the power cord into a grounded (earthed) electrical outlet that
is easily accessible at all times.
>> Do not disable the power cord grounding plug. The grounding plug is
an important safety feature.
>> Do not place objects on AC power cords or cables. Arrange them so
that no one may accidentally step on or trip over them.
>> Do not pull on a cord or cable. When unplugging from the electrical
outlet, grasp the cord by the plug.
>> When possible, use one hand only to connect or disconnect cables.
>> Do not modify power cables or plugs. Consult a licensed electrician
or your power company for site modifications.
36
Safety Information
00
07
Power Supply
>> Ensure that the voltage and frequency of your power source match
the voltage and frequency required. The Quadro Plex 7000 requires:
•
110-127 Vac, 50/60Hz, 11A
•
200-240 Vax, 50/60Hz, 5.5A
>> Connect to a properly wired and grounded electrical outlet, always
follow your local/national wiring rules.
>> The socket-outlet shall be installed near the equipment and shall be
easily accessible.
>> If want to help protect your system from sudden, transient increases
and decreases in electrical power, a surge suppressor, line
conditioner and so on could be used.
Precaution for Communication Cable
To reduce the risk of exposure to shock hazard from
communication cable.
>> Do not connect communication cable during a lightning storm. There
may be a remote risk of electric shock from lightning.
>> Do not connect or use communication cable in a wet location.
>> Disconnect the communication cable before opening a product
enclosure, touching or installing internal components.
37
NVIDIA Quadro plex 7000 USER Guide
08
Compliance and
Certifications
The following regulatory compliance statements
apply to the products documented by this manual.
US Federal Communications
Commission Compliance
FCC– Federal Communications Commission
Title 47 of Code of Federal Regulation (CFR) part 15
CAUTION: Changes or modifications to this unit not expressly
approved by the party responsible for compliance could
void the user’s authority to operate the equipment.
NOTE: This equipment has been tested and found to comply with
the limits for a Class B digital device, pursuant to Part 15 of the FCC
Rules. These limits are designed to provide reasonable protection
against harmful interference in a residential installation. This
equipment generates, uses and can radiate radio frequency energy
and, if not installed and used in accordance with the instructions,
may cause harmful interference to radio communications. However,
there is no guarantee that interference will not occur in a particular
installation. If this equipment does cause harmful interference to
radio or television reception, which can be determined by turning
the equipment off and on, the user is encouraged to try to correct
the interference by one or more of the following measures:
38
Compliance and Certifications
08
>> Reorient or relocate the receiving antenna.
>> Increase the separation between the equipment and receiver.
>> Connect the equipment into an outlet on a circuit different from that
to which the receiver is connected.
>> Consult the dealer or an experienced radio/TV technician
for help.
Canada Compliance
Industry Canada
ICES-003:2004 - Digital Apparatus: Spectrum Management and
Telecommunications Policy; Interference-Causing Equipment Standard
This Class B digital apparatus complies with Canadian ICES-003.
Cet appareil numérique de la classe B est conforme
à la norme NMB-003 du Canada.
Australia and New Zealand Compliance
C-Tick - The Australian Communications
Authority (ACA) and the Radio Spectrum
Management Group (RSM) of New Zealand
AS/NZS CISPR 22:2009 standard – Information technology equipmentRadio disturbance characteristics-limit and methods of measurement
CAUTION: Changes or modifications to this unit not expressly
approved by the party responsible for compliance could
void the user’s authority to operate the equipment.
39
Compliance and Certifications
08
Japan Compliance
VCCI - Voluntary Control Council for Interference
by Information Technology Equipment
>> V-1/09.04: Agreement of Voluntary Control Council for Interference by
Information Technology Equipment
>> V-2/09.04: Rules for Voluntary Control Measures
>> V-3/09.04: Normative Annex 1 Technical Requirements
>> V-4/09.04: Normative Annex 1-1 Supplementary Test Conditions for
Equipment under Test
40
Compliance and Certifications
08
Korea Compliance
KC – Korea Certification
>> KN 22 (CISPR 22: Information technology equipment-Radio disturbance
characteristics - limit and methods of measurement)
>> KN 24 (CISPR 24: Information technology equipment - immunity
characteristics-limit and methods of measurement)
B급 기기(가정용 방송통신기기)
이 기기는 가정용(B급)으로 전자파적합등록을 한
기기로서 주로 가정에서 사용하는 것을 목적으로
하며, 모든 지역에서 사용할 수 있습니다.
Taiwan Compliance
BSMI - Bureau of Standards, Metrology and Inspection
>> CNS 13438:2006 (CISPR 22: Information technology equipmentRadio disturbance characteristics-limit and methods of
measurement)
41
Compliance and Certifications
08
European Union Compliance
CE – European Conformity (Conformité Européenne)
Product comply with both the EMC Directive (2004/108/
EC) and the Low Voltage Directive (2006/95/EC) issued
by the Commission of the European Community.
Compliance with these directives implies conformity
to the following European Norms
(The equivalent international standards are in parenthesis)
>> EN 55022:2006 +A1:2007 (CISPR 22): Information technology
equipment-Radio disturbance characteristics -limit and methods of
measurement
>> EN 55024:1998+A1:2001+A2:2003 (IEC 61000-4-2, 3, 4, 5, 6, 8, 11):
Information technology equipment - immunity characteristics-limit
and methods of measurement
>> EN 61000-3-2:2006 (IEC 61000-3-2): Electromagnetic compatibility
(EMC)-Part 3-2: Limits-Limits for harmonic current emissions
(equipment input current ≤16 A per phase)
>> EN 61000-3-3:2008 (IEC 61000-3-3): Electromagnetic compatibility
(EMC)-Part 3-3: Limits-Limitation of voltage changes, voltage
fluctuations and flicker in public low-voltage supply systems, for
equipment with rated current ≤16 A per phase and not subject to
conditional connection)
42
Compliance and Certifications
08
Russia Federal Compliance
GOST-R –Russian System GOST R
>> GOST R IEC 60950-1-2005 2nd edition: Information technology
equipment – Safety –Part 1: General Requirement
>> GOST R 51318.22-99: Information technology equipment – Radio
disturbance characteristics - limit and methods of measurement
>> GOST R 51318.24-99(IEC 61000-4-2, 3, 4, 5, 6, 8, 11): Information
technology equipment – immunity characteristics - limit and
methods of measurement
>> GOST R 51317.3.2-2006(passage 6 and 7) (IEC 61000-3-2):
Electromagnetic compatibility (EMC) – Part 3-2: Limits - Limits for
harmonic current emissions (equipment input current ≤ 16A per
phase)
>> GOST R 51317.3.3-99(IEC 61000-3-3): Electromagnetic
compatibility(EMC)- Part 3-3: Limits-Limitation of voltage changes,
voltage fluctuations and flicker in public low-voltage supply systems,
for equipment with rated current ≤ 16A per phase and not subject to
conditional connection)
43
Compliance and Certifications
08
UL, cUL Compliance
>> UL60950-1, 2nd edition, 2007-03-27: Information technology
equipment - Safety - Part 1: General requirement
>> CSA C22.2 No. 60950-1-07, 2 nd edition, 2007-03: Information
Technology equipment - Safety - Part1: General requirement
CB Scheme
>> IEC 60950-1:2005 2
nd
edition: Information technology
equipment – Safety – Part 1: General requirement
44
Compliance and Certifications
45
46
Notice
ALL NVIDIA DESIGN SPECIFICATIONS, REFERENCE BOARDS, FILES,
DRAWINGS, DIAGNOSTICS, LISTS, AND OTHER DOCUMENTS (TOGETHER
AND SEPARATELY, “MATERIALS”) ARE BEING PROVIDED “AS IS.”
NVIDIA MAKES NO WARRANTIES, EXPRESSED, IMPLIED, STATUTORY,
OR OTHERWISE WITH RESPECT TO THE MATERIALS, AND EXPRESSLY
DISCLAIMS ALL IMPLIED WARRANTIES OF NONINFRINGEMENT,
MERCHANTABILITY, AND FITNESS FOR A PARTICULAR PURPOSE.
Information furnished is believed to be accurate and reliable. However,
NVIDIA Corporation assumes no responsibility for the consequences of use
of such information or for any infringement of patents or other rights of third
parties that may result from its use. No license is granted by implication
or otherwise under any patent or patent rights of NVIDIA Corporation.
Specifications mentioned in this publication are subject to change without
notice. This publication supersedes and replaces all information previously
supplied. NVIDIA Corporation products are not authorized for use as critical
components in life support devices or systems without express written
approval of NVIDIA Corporation.
Trademarks
NVIDIA, the NVIDIA logo, Quadro, and SLI are trademarks or registered
trademarks of NVIDIA Corporation. Other company and product names may
be trademarks of the respective companies with which they are associated.
Copyright
© 2011 NVIDIA Corporation. All rights reserved.
www.nvidia.com