1
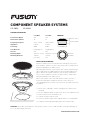
COMPONENT SPEAKER SYSTEMS
CS-CM50
CS-CM60
SPEAKER PARAMETERS
CS-CM50
CS-CM60
Peak Power (Watts)
220
240
Rated Power (Watts)
35
40
Frequency Response
41Hz - 26kHz
35Hz -26kHz
Impedance
4 Ohms
4 Ohms
Sensitivity
85dB
86dB
Cone Material
Polypropylene
Polypropylene
Tweeter
PEI
PEI
Mounting Depth
43mm (1-11/16”) 45.5mm (1-13/16”)
Mounting Diameter
118mm (4-21/32”)
TWEETER
9mm (11/32”)
20mm (25/32”)
47mm (1-27/32”)
Ø 53mm (2-1/16”)
126mm
(5”)
INSTALLATION GUIDELINES
Ensure the audio system is turned off before making any connections
to the amplifier, speakers or source unit. Failure to do so could result in
permanent damage to the audio system.
When wiring the speakers ensure that the wire is protected from sharp
objects and always use rubber grommets when wiring through metal
panels. Ensure all terminals and connections are protected from the
vehicle chassis and from each other as failure to do so could result in
permanent damage to the audio system.
When connecting the source unit and speakers ensure you connect
the positive and negative output wire from the source unit to the
corresponding speaker terminals. This will ensure the audio system will
be in phase.
1) Ensure there is adequate clearance & depth for the speaker to be mounted
2) Use the supplied template to mark out & cut the correct diameter hole
3) Drill four holes for the mounting screws
4) Seperate the grille from the frame
5) Insert the speaker & grille frame and affix with the screws provided
6) Complete installion by replacing the grille into the grille frame
WARNING: Do not drill mounting holes with speaker in place as this could allow drill shavings to damage the
voice coil and void your warranty.
www.fusionelectronics.com
TWEETER (Surface/Angle mount)
To obtain the best performance from the tweeter it should be located on axis to approximately 4” below the rear
view mirror. Select the mount you require and use this as a template to drill the holes to mount or alternatively
if using an adhesive pad ensure the mounting surface is cleaned with a residue free cleaner and stick the
tweeter down. Attach the wires to the speaker terminals.
TWEETER (Flush mount)
Ensure you have adequate depth to mount the tweeter and cut a 47mm hole. Assemble the rear mount with the
spring clamp and press through from the rear of the hole, then attach the front plate to the rear plate as shown
in the illustration. Attach the wires to the speaker terminals.
RECORD YOUR PURCHASE DETAILS HERE:
SERIAL NUMBER
DATE OF PURCHASE
AFFIX RECEIPT HERE
For further product and installation information, please visit www.fusionelectronics.com
Pour plus d’informations sur les produits et l’installation, rendez-vous sur www.fusionelectronics.com
Para obtener más información acerca de los productos y de su instalación, visite el sitio web www.fusionelectronics.com
Bezoek www.fusionelectronics.com voor meer product- en installatie-informatie.
Weitere Produkt- und Installationsinformationen finden Sie unter www.fusionelectronics.com
Per ulteriori informazioni sui prodotti e la loro installazione, potete visitare www.fusionelectronics.com
Для получения дополнительной информации о продуктах и установке зайдите, пожалуйста, на: www.fusionelectronics.com
WARNING: Audio Systems can produce sound levels over 135dB. Continuous exposure to sound pressure levels over 100dB may cause permanent
hearing loss! Please watch for emergency vehicles as warning signals may not be heard. USE COMMON SENSE!
PUBLISHED BY FUSION ELECTRONICS LIMITED: © Copyright 2010 by FUSION Electronics Limited. All rights reserved. Specifications and design are subject to change without notice.
YOU CAN HELP PROTECT THE ENVIRONMENT! Please remember to respect the local regulations: Hand in the non-working electrical equipment to an appropriate waste disposal center.