1
Vielen Dank, dass Sie sich für ein Radio der Marke
GROUND ZERO entschieden haben.
Viel Spaß mit diesem Hochleistungsmodell.
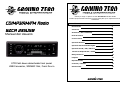
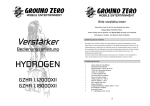
CD/MP3/AM/FM Radio
GZCR 235USB
Bedienungsanleitung
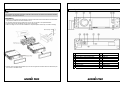
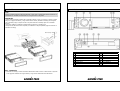
Klappbare und abnehmbare ETR-Frontblende
USB-Anschluss, Front Aux-In
und SD/MMC-Karteneinschub
Inhalt
Vorsichtsmaßnahmen
2
Zubehör
3
Installation / Deinstallation
4
Bedienelemente
5
Fernbedienung
6
Bedienung
7
Radiomodus
9
CD / USB / SD Karten Bedienung
11
Titel / Ordner Suchfunktion
12
Behandlung von CDs
13
Reinigung von CDs
13
Technische Daten
14
Anschlüsse
15
Problembehandlung
16
1
GROUND ZERO
Vorsichtsmaßnahmen
Zubehör
Dieses Gerät wurde unter Beachtung der Benutzerfreundlichkeit designed und hergestellt.
Unsachgemäße Behandlung des Geräts kann zu Verletzungen des Nutzers oder Schäden am Gerät
führen. Um dies zu vermeiden, empfehlen wir Ihnen, sich diese Bedienungsanleitung genau
durchzulesen.
Folgendes Zubehör ist im Lieferumfang des Geräts enthalten
Sicherheitsvorkehrungen
• Öffnen Sie das Gehäuse des Geräts nicht – dies könnte zu Stromschlägen führen.
• Wenn das Gerät einen Fehler aufweist, wenden Sie sich an Ihren Fachhändler.
• Setzen Sie das Gerät keiner Feuchtigkeit oder starken Verschmutzungen aus, platzieren Sie es nicht an
Orten mit hoher Luftfeuchtigkeit und nutzen Sie es nicht mit feuchten Händen. All dies könnte einen
Kurzschluss im Gerät verursachen.
• Hören Sie Musik nur mit angemessenem Lautstärkepegel, bei dem Sie während der Fahrt den Verkehr
und Warnsignale außerhalb des Fahrzeugs hören könnten.
• Reinigen Sie das Gerät nicht mit Alkohol. Nutzen Sie zur Reinigung ein weiches, trockenes Tuch.
• Falls das Gerät bei hohen Temperaturen oder hoher Luftfeuchtigkeit gelagert wurde, lassen Sie Ihr
Fahrzeuginneres abkühlen, bevor Sie das Gerät starten.
• Nutzen Sie das Gerät nicht für längere Zeit ohne laufenden Motor. Dies könnte die Fahrzeugbatterie
leeren.
• Vergewissern Sie sich vor dem endgültigen Einbau in das Armaturenbrett, dass alle Kabel korrekt
verlegt und angeschlossen sind. Testen Sie zuerst, ob das Gerät ordnungsgemäß funktioniert und
beenden Sie dann den Einbau.
• Nutzen Sie für einen korrekten Einbau nur die mitgelieferten Zubehörteile.
• Verlegen Sie die Kabel nur in trockenen und kühlen Bereichen des Fahrzeugs. Beim Kontakt zu heissen
oder feuchten Stellen im Fahrzeug könnten die Kabel rosten oder schmelzen.
• Wenn es nötig ist, eine Gerätesicherung zu erneuern, verwenden Sie nur eine gleichwertige neue
Sicherung.
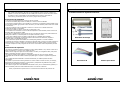
Installationsmaterial
Fernbedienung
Vorsichtsmaßnahmen
• Spielen Sie keine verkratzten, verbogenen oder gebrochenen CDs mit dem Gerät ab, wenn das Gerät
eine CD nicht laden kann, führen Sie sie nicht mit Gewalt in das Gerät ein.
• Führen Sie niemals ungeeignete Gegenstände wie Münzen in den CD- Einschubschlitz ein. Dies würde
den Lademechanismus zerstören oder zu einem Kurzschluss im Gehät führen.
• Nutzen Sie nur handelsübliche 12 cm, runde CDs.
• Entsorgen Sie leere Batterien der Fernbedienung ordnungsgemäß.
• Wenn das Gerät vom Strom getrennt wird, gehen gespeicherte Daten verloren.
• Es ist grundsätzlich möglich, mit einem PC gebrannte CDs abzuspielen, jedoch kann es abhängig von
der Brennsoftware, Dateiformaten und weiteren Formaten zu Fehlern bei der Wiedergabe kommen.
• Wenn die Klangqualität auf dem Wiedergabemedium schlecht ist, das Medium verschmutzt oder defekt
ist, kann es zu Problemen bei der Wiedergabe kommen, möglicherweise kann das Medium nicht
wiedergegeben werden.
ISO Kabel A+B
Schutzetui für Bedienteil
Design sowie technische Daten können je nach Produkt von denen in der Bedienungsanleitung
abweichen.
2
3
GROUND ZERO
GROUND ZERO
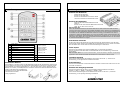
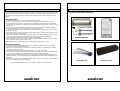
Installation
Bedienteil
Bitte beachten Sie!
Vergewissern Sie sich, dass alle Anschlüsse sachgemäß durchgeführt sind, bevor Sie das Gerät zum
ersten Mal einschalten. Das Gerät sollte horizontal in einem Winkel von weniger als 30° eingebaut
werden.
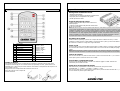
Installation
• Stecken Sie den Metallrahmen in die Radiohalterung Ihres Fahrzeugs und biegen Sie die Metall
Laschen nach außen, um den Rahmen zu fixieren.
• Wenn nötig platzieren Sie den Haltestreifen hinter dem Gerät und fixieren Sie ihn mit den
mitgelieferten Unterlegscheiben und Muttern.
• Drücken Sie das Gerät in den Metallrahmen bis Sie ein klicken hören (Das Gerät rastet mit diesem
Geräusch ein).
• Stecken Sie den Abdeckrahmen an die Frontseite des Geräts (Nicht bei allen Fahrzeugtypen nötig).
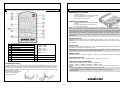
1
2
3
4
5
6
7
8
9
Un-Installation
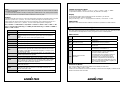
Power / Mute Taste
Lautstärke Knopf
T-Up / Nächste / Schnell Vorwärts Taste
T-Dn / Vorhergehende / Schnell Zurück
Taste
Speicher Taste
OK / PTY Taste
Mode Taste
Select Taste
Band / TA Taste
10
11
12
Infrarot Sensor
Aux In Eingang
USB Anschluss
13
Öffnen Taste
14
15
16
17
18
SD Eingang
Eject Taste
Anzeigelampe
Reset Taste
CD Einschubschlitz
Um das Gerät zu deinstallieren, entfernen Sie den Abdeckrahmen von der Frontseite des Geräts und
stecken Sie die mitgelieferten Schlüssel links und rechts mittig zwischen Metallrahmen und Gerät, ziehen
Sie das Gerät dann an den Schlüsseln heraus.
4
5
GROUND ZERO
GROUND ZERO
Fernbedienung
Bedienung
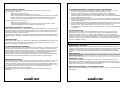
Entfernen des Bedienteils
-
Schalten Sie das Gerät aus.
Drücken Sie die OPEN Taste.
Drücken Sie das Bedienteil in einem 45° Winkel
nach links und ziehen Sie das Bedienteil heraus.
Einsetzen des Bedienteils
-
Setzen Sie die linke Seite des Bedienteils in das
Gerät ein.
Drücken Sie die rechte Seite des Bedienteiles sanft in das
Gerät, bis ein “Klick” Ton zu hören ist.
Bitte beachten Sie!
Setzen Sie das Bedienteil nicht von der rechten Seite aus ein. Dies könnte die Kontakte am Gerät
zerstören. Diese können leicht durch Stromschläge beschädigt werden. Bewahren Sie das Bedienteil nach
dem Entfernen in dem mitgelieferten Schutzetui auf und setzen Sie es keinen starken Stromstößen aus.
Die Kontakte auf der Rückseite des Bedienteils sind extrem wichtig, um die Befehle zum Gerät zu
transportieren. Achten Sie deshalb darauf, sie nicht mit Fingernägeln, Stiften, Schraubenziehern oder
Ähnlichem zu beschädigen. Wenn das Bedienteil verschmutzt ist, reinigen Sie es nur mit einem trockenen
und weichen Tuch. Nutzen Sie ein mit Isopropyl Alkohol befeuchtetes Baumwolltuch um die Kontakte auf
der Rückseite des Bedienteils zu reinigen.
Zurücksetzen des Geräts
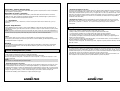
1
Power Taste
2
TA/TP Taste
3
PTY Taste
4
AF/REG Taste
5
AS/PS Taste
6
Vorwärts Taste
7
SELECT Taste
8
DIS Taste
12
BAND Taste
9
Mode Taste
13
Backward Taste
10
Mute Taste
14
Lautstärke +/- Tasten
11
Preset
Preset
Preset
Preset
Preset
Preset
1
2
3
4
5
6
/
/
/
/
/
/
Pause
Repeat
Intro
Random
- 10
+ 10
Wechseln der Batterie
Bei der Ersten Nutzung des Geräts oder nach dem Austausch der Fahrzeugbatterie muss das Gerät
zurück gesetzt werden. Drücken Sie die OPEN taste auf dem Bedienteil, um es zu öffnen und drücken Sie
dann die RESET Taste um das Gerät auf die Werkseinstellungen zurückzusetzen.
Power An/Aus
Drücken Sie eine beliebige Taste (außer die OPEN Taste), um das Gerät einzuschalten.
Drücken und Halten Sie die PWR Taste auf dem Bedienteil oder der Fernbedienung, um das Gerät
auszuschalten.
Bitte beachten Sie! Wenn Sie das Gerät ausschalten, werden die aktuelle Lautstärke und Einstellungen
gespeichert. Beim nächsten Anschalten des Geräts kehrt es automatisch zu diesen zurück.
Lautstärke Regelung
Drehen Sie den VOL Regler auf dem Bedienteil oder drücken Sie die VOL +/- Tasten auf der
Fernbedienung, um die gewünschte Lautstärke einzustellen.
Stummschaltung
Um die Batterie zu wechseln, ziehen Sie das Batteriefach gerade aus der Fernbedienung. Entfernen Sie
die leere Batterie und legen Sie eine gleichwertige CR2025 Batterie in das Fach ein. Achten Sie hierbei
auf die Polarität und richtige Lage der Batterie („+ Pol“ zeigt nach oben zu Ihnen). Berühren Sie die
Batterie nur am Rand, um Kontaktprobleme zu vermeiden. Schieben Sie dann das Batteriefach wieder
gerade in das Gehäuse der Fernbedienung.
Vergewissern Sie sich, dass das Batteriefach
nach dem Wechsel wieder
richtig eingesetzt ist.
Drücken Sie die MUTE Taste um das Gerät Stumm zu schalten. Drücken Sie die Taste erneut um den
Ton wieder zu aktivieren.
Einstellen der Klangeingenschaften
Drücken Sie wiederholt die SEL Taste, um die folgenden Klangeigenschaften auszuwählen:
VOLUME => BASS => TREBLE => BALANCE => FADER=> EXIT.
Drehen Sie den Lautstärkeregler auf dem Bedienteil oder drücken sie die VOL +/- Tasten der
Fernbedienung, um die jeweilige Einstellung auszuwählen.
6
7
GROUND ZERO
GROUND ZERO
Bitte beachten Sie!
- Wenn das Gerät ausgeschalten wird, werden alle Einstellungen automatisch gespeichert.
- Beim Zurücksetzen des Geräts oder einer Trennung des Geräts vom Strom kehrt es zu den
Werkseinstellungen zurück.
Einstellungen
Drücken Sie die SEL Taste lange, um in das Hauptmenü zu gelangen.
Drehen Sie den Lautstärkeregler auf dem Bedienteil oder drücken Sie die VOL +/- Tasten auf der
Fernbedienung um die Lautstärke in einem Bereich von 0 bis 45 einzustellen.
Drücken Sie die SEL Taste wiederholt, um zwischen den Untermenüs zu wechseln,
Drehen Sie den Lautstärkeregler auf dem Bedienteil oder drücken sie die VOL +/- Tasten der
Fernbedienung, um die jeweilige Einstellung auszuwählen.
AF => IN VOL. => ADJ CLOCK => 24/12hour =>TA VOL => EON => PTY => REG =>
MONO (Nur im Radio Modus) => LOUD => SUBW => BEEP => DSP => EXIT
AF
IN VOL
ADJ
24 / 12 hour
TA VOL
EON
PTY
REG
LOC
MONO
LOUD
SUBW
BEEP
DSP
AF (Alternative Frequenz) AN/AUS.
Einstellen der Standard Lautstärke von 0-45.
Drehen Sie den Lautstärkeregler im Uhrzeigersinn oder drücken Sie VOL + auf der
Fernbedienung, um die Minutenzahl einzustellen, drehen Sie den Lautstärkeregler gegen
den Uhrzeigersinn oder drücken Sie VOL – auf der Fernbedienung, um die Stundenzahl
einzustellen.
Drehen Sie den Knopf um zwischen dem 12 und 24 Stunden Zeitformat zu wechseln.
Drehen Sie den Knopf um die Lautstärke für Verkehrsdurchsagen einzustellen.
Drehen Sie den Knopf um EON AN/AUS zu schalten.
Programm Typ AN/AUS.
Wählen Sie zwischen REG AN/AUS.
Bei angeschalteter REG Funktion wechselt das Gerät zu einem anderen Sender des
gleichen Netzes, der dieselbe Sendung ausstrahlt, wenn die empfangenen Signale des
gegenwärtigen Senders schwächer werden. Das REG Symbol wird im Display angezeigt.
Wählen Sie zwischen LOC AN/AUS.
Es ist empfehlenswert, in einem Gebiet mit starkem Signal den lokalen Modus zu
verwenden, um einen besseren Radioempfang zu erzielen.
Drehen Sie den Knopf um MONO AN/AUS zu schalten.
Wählen Sie zwischen Loudness AN/AUS. (Werkseinstellung = AUS)
Die “LOUD” Funktion ermöglicht die Anhebung tiefer und hoher Frequenzen. Dadurch wird
die Wahrnehmung dieser Frequenzen bei geringen bis mittleren Lautstärken verstärkt.
Wählen Sie zwischen SUBWOOFER AN/AUS.
Diese Funktion erlaubt es Ihnen, den RCA Subwoofer Ausgang An und Auszuschalten.
Wählen Sie zwischen Beep AN/AUS.
Bei aktivierter Beep Option ertönt ein Ton nach jedem Tastendruck. (Werkeinstellung =
AUS)
Wählen Sie zwischen POP => ROCK => CLASS => FLAT => NONE.
Auswahl des Wiedergabemodus
Display
Drücken Sie die DIS (Display) Taste der Fernbedienung um die aktuellen Wiedergabe Informationen
und die Uhrzeit zu sehen.
Im Radiomodus werden die folgenden Informationen nacheinander angezeigt:
Uhrzeit => PTY (Programmtyp) => PS (Radiosender) => Frequenz => EXIT
AUX Anschluss
Hier können Sie portable Musikwiedergabegeräte anschließen.
Radiomodus
Bitte beachten Sie: Die Verfügbarkeit des RDS (Radio Data System) Service variiert je nach Region. Falls
in Ihrer Region kein RDS zur Verfügung steht, können auch die folgenden Funktionen nicht ausgeführt
werden.
RDS Übersicht
PI
Programmkennung
Ein Code zur Identifizierung von Programmen
PS
Sendername
Der Sendername in alphanumerischen Zeichen
AF
Alternative Frequenz
Frequenzliste von Sendern, mit gleichem Programm.
TP
Verkehrsdurchsagenprogramm
Identifizierungscode für einen Verkehrsfunksender.
TA
Verkehrsdurchsage
Identifizierungscode, der anzeigt, ob gerade eine
Verkehrsdurchsage gesendet wird oder nicht.
EON
Enhanced Other Networks
Information
Sendeinformationen zu PI, AF, TP, TA, etc., die in
Verbindung mit anderen Sendernetzen als dem des gerade
empfangenen Senders in Verbindung stehen.
Band Auswahl
Drücken Sie die MODE Taste um zum Radiomodus zu gelangen.Drücken Sie im Radiomodus die BAND
Taste, um zwischen den folgenden Funktionen zu wechseln: FM1 => FM2 => FM3 => AM1 => AM2.
Wenn eine Funktion ausgewählt wird, wird die zuletzt auf dieser Funktion abgespielte Radiostation
abgespielt.
Manuelle / Automatische Sendersuche
Manuelle Sendersuche: Um einen Sender zu finden, wählen Sie zuerst FM1, FM2, FM3 etc. aus. Drücken
und halten Sie dann die T-DN/T-UP Taste auf der Fernbedienung bis MANUAL auf dem Display erscheint.
Drücken Sie diese Tasten dann wiederholt, um auf- oder abwärts nach einem Sender zu suchen.
Automatische Sendersuche: Um einen Sender zu finden, wählen Sie zuerst FM1, FM2, FM3 etc. aus.
Drücken uns halten Sie dann die T-DN/T-UP Tasten auf dem Bedienteil oder drücken sie kurz die T-UP/TDN Tasten der Fernbedienung. Die automatische Sendersuche auf- / abwärts beginnt. Sobald ein Sender
gefunden wird, wird dieser automatisch abgespielt.
Drücken Sie die MODE Taste, um zwischen den folgenden Wiedergabeoptionen zu wähleN:
RADIO => (* CD) => (* SD) => (*USB) => AUX => RADIO
(*Nur verfügbar wenn ein entsprechendes Medium eingelegt ist.)
8
9
GROUND ZERO
GROUND ZERO
Gescannte Sender speichern
Sie können manuell oder automatisch 30 Radiosender im Gerät speichern (18 FM, 12 AM).
Um einen Sender zu speichern:
Wählen Sie FM1, FM2, FM3 etc. aus
Suchen Sie manuell oder automatisch nach einem Sender
Halten Sie die gewünschte Zifferntaste (1-6) auf der Fernbedienung für länger als 2 Sekunden
gedrückt, oder drücken Sie OK auf dem Bedienteil und wählen Sie dann durch drehen des
Lautstärkereglers den gewünschten Speicherplatz aus. Drücken Sie zur Bestätigung OK.
Um einen gespeicherten Sender aufzurufen:
Wählen Sie FM1, FM2, FM3 etc. aus
Drücken Sie eine Nummerntaste auf der Fernbedienung oder drücken Sie die T-UP/T-DN
Tasten auf dem Bedienteil um den gespeicherten Sender aufzurufen.
Automatisches speichern von Sendern
Wählen Sie FM1, FM2, FM3 etc. aus, drücken Sie die MEM Taste auf dem Bedienteil oder die AS/PS Taste
auf der Fernbedienung und halten Sie die Taste für mehr als 2 Sekunden gedrückt. Das Gerät speichert
automatisch 6 Sender auf dem aktuell gewählten Band (z.B. FM1). Um das automatische Speichern zu
unterbrechen, drücken Sie erneut diese Taste.
Bitte beachten Sie: Während dem automatischen speichern wählt das Gerät zuerst die Sender mit dem
stärksten Signal aus. Sender mit schwächerem Signal werden gespeichert, bis alle Speicherplätze belegt
sind.
Senderdurchlauf
Wählen Sie FM1, FM2, FM3 etc. aus, drücken Sie die MEM Taste auf dem Bedienteil oder die AS/PS Taste
auf der Fernbedienung um alle gespeicherten Sender für jeweils 5 Sekunden abzuspielen. Um die
Wiedergabe zu stoppen, drücken Sie diese Taste erneut.
TA (Verkehrsdurchsagen) / TP (Travel Program Identification)
1) Aktivieren/Deaktivieren Sie den TA Modus durch drücken und halten der BAND Taste auf dem
Bedienteil oder TA/TP Taste auf der Fernbedienung (Werkseinstellung = AUS)
2) Wenn die TA Funktion aktiviert ist, sucht das Gerät automatisch nach einer Station, die
Verkehrsdurchsagen ausstrahlt. Wenn kein Sender gefunden wird, wird eine Station mit TP
Information gesucht. Wird kein Sender mit TP Information gefunden, kehrt das Gerät automatisch
zur vorher abgespielten Station zurück.
3) Wenn ein Sender mit TP Information, jedoch ohne TA Information gefunden wird, erscheint das TP
Symbol auf dem Display, das TA Symbol blinkt. Wenn TA und TP Informationen empfangen werden,
erscheinen beide Symbole.
4) Während der Wiedergabe eines Mediums wechselt das Gerät automatisch zum Radio Modus, wenn
eine TA Information empfangen wird. Nachdem die Verkehrsdurchsage beendet ist, wechselt das
Gerät wieder zum vorhergehenden Modus zurück. Drücken Sie die TA Taste, um die
Verkehrsdurchsagen zu ignorieren, drücken Sie die Taste zwei Mal, um wieder Verkehrsdurchsagen
zu empfangen.
PTY (Programm Typ)
Drücken und halten Sie die OK Taste auf dem Bedienteil oder drücken Sie die PTY Taste auf der
Fernbedienung um die Programm Typ Liste aufzurufen, drehen Sie den Lautstärkeregler auf dem
Bedienteil oder drücken Sie die VOL +/- Tasten auf der Fernbedienung um einen Programm Typ
auszuwählen. Drücken Sie die OK Taste auf dem Bedienteil oder die PTY Taste auf der Fernbedienung,
um nach der Auswahl eines Typs einen passenden Sender zu suchen. Drücken Sie die Taste erneut, um
die Suche zu stoppen. Wenn kein Sender mit dem passenden Programm Typ gefunden werden kann,
erscheint „PTY NONE“ im Display.
CD / USB/ SD Karten Bedienung
Disk einlegen / auswerfen
AF (Alternative Frequenz) Funktion
Drücken Sie die AF/REG Taste auf der Fernbedienung um die AF Funktion an-/auszuschalten. Sie können
außerdem die SEL Taste drücken und halten, um zur AF Funktion zur gelangen. Drehen Sie dann den
Lautstärkeregler auf dem Bedienteil oder drücken Sie die V+/- Tasten auf der Fernbedienung um die AF
Funktion an-/auszuschalten. Ist die AF Funktion aktiviert, erscheint das AF Symbol auf dem Display.
Wenn bei aktivierter AF Funktion kein RDS Signal empfangen wird, blinkt das AF Symbol.
Das RDS Programm wird automatisch gesucht und empfangen. Bei einem schwachen RDS Signal nach
der Aktivierung sucht das Gerät automatisch nach einer anderen Station mit RDS Programm.
Schalten Sie das Gerät an. Um eine einzulegen, schieben Sie es mit der bedruckten Seite nach oben
zeigend in den Einschubschlitz, das Gerät spielt das eingelegte Medium automatisch ab. Um das Medium
auszuwerfen, drücken Sie die EJECT Taste und entnehmen Sie den Datenträger. Wenn Sie einen
Datenträger an den SD/USB Anschluss anschließen, wechselt das Gerät automatisch zum jeweiligen
Modus.
Bitte beachten Sie!
Wenn eine SD Karte sowie ein USB Stick angeschlossen ist, wechselt das Gerät in den Modus des zuletzt
angeschlossenen Mediums.
Wiedergabe / Pause
REG (Regional) Funktion
Drücken und halten Sie die AF/REG Taste auf der Fernbedienung für länger als 2 Sekunden, um die REG
Funktion an-/auszuschalten. Sie können außerdem die SEL Taste wiederholt drücken, um zur REG
Funktion zur gelangen. Drehen Sie dann den Lautstärkeregler auf dem Bedienteil oder drücken Sie die
V+/- Tasten auf der Fernbedienung um die REG Funktion an-/auszuschalten (Werkseinstellung = AUS).
Bei aktivierter REG Funktion akzeptiert das Gerät regional unterschiedliche Sendungen einer
Radiostation, das REG Symbol erscheint im Display.
Bei deaktivierter REG Funktion ignoriert das Gerät regional unterschiedliche Sendungen einer
Radiostation.
Das Gerät fängt die Wiedergabe automatisch beim ersten Titel des eingelegten Mediums an. Um
Fehlfunktionen zu vermeiden, warten Sie bis das Gerät das Medium gelesen hat, bevor Sie weitere
Befehle geben. Drücken Sie die 1/PAUSE Taste auf der Fernbedienung um die Wiedergabe anzuhalten,
drücken Sie die Taste erneut um mit der Wiedergabe fortzufahren.
Wiedergabe des nächsten / vorhergehenden Titels
Drücken Sie während der Wiedergabe die T-UP / T-DN Taste, um den nächsten / vorhergehenden Titel
wiederzugeben.
10
11
GROUND ZERO
GROUND ZERO
Schneller Vorlauf / Rücklauf
Drücken und halten Sie während der Wiedergabe die T-UP / T-DN Taste, um den Titel schnell vor- und
zurück zu spulen.
Bitte beachten Sie: Wenn beim schnellen vor- und zurück spulen das Ende eines Titels erreicht wird, gibt
das Gerät automatisch den vorhergehenden / nächsten Titel im Normalmodus wieder.
- Suche nach Ordner
Drücken Sie 3 x die MEM Taste auf dem Bedienteil oder die AS/PS Taste auf der Fernbedienung. Der
entsprechende Ordnername wird auf dem Display angezeigt. Drehen Sie den Lautstärkeregler am
Bedienteil oder drücken Sie die VOL +/- Tasten auf der Fernbedienung, um zwischen den Ordnern und
Unterordnern zu wechseln.
- / + 10 Titel
Behandlung von CDs
Wiederholte Wiedergabe
-
Drücken Sie die 5/ 10-, 6/ 10 + Tasten auf der Fernbedienung um 10 Titel vor- oder zurück zu springen.
Drücken Sie die 2 / REPEAT Taste auf der Fernbedienung oder die BAND Taste auf dem Bedienteil
wiederholt, um die Repeat Funktion auszuwählen, drücken Sie OK um zu bestätigen. Drücken Sie die 2 /
REPEAT bzw. BAND Taste erneut um die wiederholte Wiedergabe abzubrechen.
Bitte beachten Sie! Wenn das Gerät alle Titel auf einem Medium wiedergegeben hat, fängt es
automatisch wieder beim ersten Titel an.
Intro
-
Verschmutzte, verkratzte oder verbogene CDs können Störgeräusche verursachen.
Berühren Sie die CD nur an den Rändern. Berühren Sie nicht die Oberfläche der CD, um sie sauber
zu halten.
Bewahren Sie CDs nur in den dafür vorgesehenen Hüllen auf, um Kratzer zu vermeiden.
Setzen Sie CDs keinem direkten Sonnenlicht, hoher Luftfeuchtigkeit, hohen Temperaturen oder
Staub aus.
Anhaltendes Aussetzen der CDs von hohen Temperaturen kann die sie beschädigen (lassen Sie Ihre
CDs also nicht einen ganzen Sommer über in Ihrem Auto).
Schreiben oder Ritzen Sie nichts in die Oberfläche der CD. Scharfe Schreibinstrumente oder
bestimmte Arten von Tinte können die Oberfläche der CD beschädigen.
Berühren Sie niemals die unbedruckte Seite der CD. Kleben Sie keine Aufkleber auf die Seiten der
CD.
Drücken Sie die 3 / INT Taste auf der Fernbedienung oder die BAND Taste auf dem Bedienteil
wiederholt, um die INTRO Funktion auszuwählen, drücken Sie OK um zu bestätigen. Diese Funktion
spielt alle Titel auf dem Medium 10 Sekunden lang ab.
-
Zufallswiedergabe
Reinigung von CDs
Titel / Ordner Suchfunktion
Fingerabdrücke sollten vorsichtig mit einem trockenen, weichen Tuch von der CD gewischt werden.
Durch die glatte Oberfläche der CDs kann Staub und Schmutz leicht abgewischt werden. Wischen Sie
immer von der Mitte der CD nach außen, nutzen Sie niemals Benzin, Schallplattenreiniger oder
antistatische Sprays zur Reinigung. Diese Chemikalien können die Oberfläche beschädigen.
Drücken Sie im CD Modus die Taste 4 auf der Fernbedienung oder BAND auf dem Bedienteil wiederholt,
um RDM Wiedergabe auszuwählen, drücken Sie OK um zu bestätigen. Drücken Sie die 4 / BAND Taste
erneut, um zur normalen Wiedergabe zurückzukehren.
Drücken Sie die MEM Taste auf dem Bedienteil oder die AS/PS Taste auf der Fernbedienung, um bei der
Wiedergabe von MP3/WMA Dateien in den Suchmodus zu gelangen.
Folgende Eigenschaften können durchsucht werden:
Suche nach Nummer => Suche nach Name => Suche nach Ordner => Suchmodus verlassen
Bitte beachten Sie!
Diese Funktion ist nicht für CDDA Discs verfügbar..
- Suche nach Nummer
Drücken Sie 1 x die MEM Taste auf dem Bedienteil oder die AS/PS Taste auf der Fernbedienung, um zum
Suchmodus nach Titelnummern zu gelangen. Die letzte Nummernstelle „0“ blinkt, nun können Sie die
gesuchte Titel Nummer eingeben. Drehen Sie den Lautstärkeregler am Bedienteil oder drücken Sie die
VOL +/- Tasten auf der Fernbedienung, um eine Nummer einzustellen, drücken Sie die SEL Taste um zur
nächsten Stelle zu springen. Drücken Sie die OK Taste auf dem Front Panel, um die eingegebene
Nummer zu bestätigen und den gefundenen Titel abzuspielen.
- Suche nach Name
Drücken Sie 2 x die MEM Taste auf dem Bedienteil oder die AS/PS Taste auf der Fernbedienung, bis der
erste Buchstabe „A“ blinkt. Drehen Sie den Lautstärkeregler am Bedienteil oder drücken Sie die VOL +/Tasten auf der Fernbedienung, um einen Buchstaben oder eine Zahl einzustellen, drücken Sie die SEL
Taste um zur nächsten Stelle zu springen. Drücken Sie die OK Taste auf dem Front Panel, um den
eingegebenen Titel zu bestätigen und den gefundenen Titel abzuspielen. Wird kein Titel gefunden, kehrt
das Gerät automatisch zum vorhergehenden Wiedergabe Modus zurück.
12
13
GROUND ZERO
GROUND ZERO
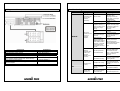
Technische Daten
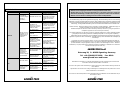
Anschlüsse
FM Radio
Frequenzbereich
Suchlevel
Stereo Trennung
87,5 ~ 108 Mhz
9 dBuV
28 dB
AM (MW) Radio
Frequenzbereich
Suchlevel
522 ~ 1620 Khz
30 dBuV
CD Player
Störung THD
Signal to Noise Ratio
Frequenzbereich
< 0,5%
60 dB
20 Hz ~ 20 Khz
Allgemein
Spannungsversorgung
Stromaufnahme
Impedanz
Abmessungen
Ausgangsleistung
Ausgangslevel
DC 11 ~ 16 Volt
< 10 Ampere
4 ~ 8 Ohm
178 mm x 165 mm x 50 mm /
7.01” x 6.50” x 1.97”
4 x 40 W Max
2 V (CD 1K 0 dB Vol Max)
Kompatibilität
SD
USB
CD
SD-HC >8 GB
USB 2.0 >8 GB
CD, CD-R, CD-RW, 12 cm CDs
MP3, WMA, ID 3 Tag
Bedienteil
Abnehmbares anti- Diebstahl Display mit LED Leuchten,
Klappbares Bedienteil, ISO Einbau
LCD Display
Wiedergabe
Lesbare Formate: MP3, WMA Wiedergabe mit ID3 Tag Display, Titel und
Ordnersuche
CD Mechanismus:
Elektronische Anti- Schock Funktion
(Audio CD 8 Sekunden, MP3 40 seconds)
ISO Connector A
A1 Nicht verbunden
A2 Zum Telefon Terminal
A3 Nicht verbunden
A4 Direkt zur Batterie
A5 Remote / Auto Antenne (max. 100mA 12V DC)
A6 Dimmer
(Gedimmte Beleuchtung bei angeschaltenem Licht)
A7 Schaltplus (Zündung 12V DC)
A8 Masse (Metallteil des Fahrzeugs)
ISO Connector B
1. Hinterer Rechter Lautsprecher (+)
2. Hinterer Rechter Lautsprecher (-)
3. Vorderer Rechter Lautsprecher (+)
4. Vorderer Rechter Lautsprecher (-)
5. Vorderer Linker Lautsprecher (+)
6. Vorderer Linker Lautsprecher (-)
7. Hinterer Linker Lautsprecher (+)
8. Hinterer Linker Lautsprecher (-)
Radio
AM/FM Radio mit 30 (FM18, AM 12) Speicherplätzen,
Automatische / Manuelle Senderspeicherung, Senderdurchlauf,
Automatischer / Manueller Suchlauf
Audio
DSP Klangeffekte (Keiner, Klassic, Rock, Pop, Flat)
4 x 40 W (max) Verstärker, 2 CH Stereo RCA Lineout
14
15
GROUND ZERO
GROUND ZERO
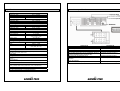
Problembehandlung
Symptom
Gerät schaltet
nicht an.
Kein Ton ist zu
hören.
Grund
Sicherung ist
durchgebrannt.
Verkabelung fehlerhaft.
Allgemein
Vom Gerät und
dem externen
Verstärker wird
kein Ton
wiedergegeben.
Beim drücken
der Tasten
reagiert das
Gerät nicht,
Display arbeitet
nicht genau.
Tonwiedergabe
ist verzerrt oder
stockt
Verkabelung am
Verstärker Ausgang ist
fehlerhaft oder ein
Kurzschluss liegt am
Verstärker Ausgang
vor.
Der MUTE / STUMM
Modus ist aktiviert.
Verkabelung am RCA
Ausgang ist fehlerhaft.
Bedienungsanleitung in weiteren Sprachen auf www.ground-zero-audio.com verfügbar !
Manual in more languages available on www.ground-zero-audio.com !
Mode d'emploi en vers ces langues disponible sur le site www.ground-zero-audio.com !
Gebruikers Handleiding in andere talen op www.ground-zero-audio.com beschikbaar !
Manual en otros idiomas en www.ground-cero-audio.com disponibles !
Bitten Sie einen Fachmann
um Hilfe.
Die Gewährleistung entspricht der gesetzlichen Regelung. Eine Rücksendung kann nur nach vorheriger
Absprache und in der Originalverpackung erfolgen. Bitte unbedingt einen maschinell erstellten Kaufbeleg
und eine Fehlerbeschreibung beilegen. Von der Gewährleistung ausgeschlossen sind Defekte, die durch
Überlastung, unsachgemäße Behandlung oder bei Teilnahme an Wettbewerben entstanden sind.
Überprüfen Sie die
Verkabelung anhand des
Anschlussdiagramms.
Limited warranty - defective products must be returned in original packaging - please add a copy of the
original purchasing invoice showing the purchasing date and a
detailed description of the failure. Failure caused by overload, misuse or by using the product for
competition purpose are not covered by the warranty.
Schalten Sie den MUTE /
STUMM Modus ab.
Überprüfen und erneuern
Sie die RCA Verbindungen.
Verkabelung zwischen
REM Terminal des
externen Verstärker
und der Antenne dieses
Geräts ist fehlerhaft,
Antennenkabel
verursacht Masse –
Kurzschluss.
De garantie bepalingen van alle door ground zero geleverde producten is volgens wettelijke bepalingen
geregeld, Een retourzending kan alleen na duidelijke afspraak en in de originele verpakking
plaatsvinden.SVP een aankoopbon en een duidelijke storingsomschrijving bijvoegen.Van garantie
uitgesloten zijn defecten door overbelasting, onkundig gebruik, of door deelname aan wedstrijden (SPL)
ontstaan zijn
Verbinden Sie die Kabel
am REM Terminal und der
Antenne korrekt.
La garantie est conforme aux droits legaux. Un retour du produit défectueux doit être dans son
emballage d'origine sur presentation du reçu ou de la facture indiquant la description du defaut.La
presente Garantie n'est pas applicable lorsque le produit a été endommagé en raison : Mauvaise
alimentation, Trop de puissance (HP, Subwoofer) Accident, Installation ou Utilisation non conforme aux
normes Technique (Concours SPL etc.).
Bedienteil ist
schmutzig.
Reinigen Sie das Gerät mit
einem weichen,
fusselfreien Tuch.
CD ist schmutzig.
Reinigen Sie die CD mit
einem weichen,
fusselfreien Tuch um
Kratzer auf der Oberfläche
zu vermeiden.
CD ist stark verkratzt
oder verzerrt.
Tauschen Sie die CD gegen
eine unbeschädigte aus.
Lassen Sie das Gerät ca.
eine Stunde angeschaltet
trocknen.
CD
Klangqualität
direkt nach dem
Einschalten ist
schlecht.
Lösung
Erneuern Sie die Sicherung
mit einer neuen
gleichwertigen. Wenn die
Sicherung erneut
durchbrennt, kontaktieren
Sie einen Fachhändler.
Wasser oder
Fremdkörper haben die
eingebaute Linse
beschädigt.
Erneuern Sie die Sicherung
mit einer neuen
gleichwertigen. Wenn die
Sicherung erneut
durchbrennt, kontaktieren
Sie einen Fachhändler.
GROUND ZERO GmbH
Erlenweg 25; D - 85658 Egmating, Germany
Tel. +49 (0)8095/873 830
Fax -8310
www.ground-zero-audio.com
Wir behalten uns das Recht vor, zukünftig nötige Änderungen oder Verbesserungen an dem Produkt
vorzunehmen ohne den Kunden darüber zu informieren.
We reserve the right to make needed change or improvement to the product without informing customer about
this in advance.
Wij behouden ons het recht om de nodige veranderingen of verbeteringen aan het product door te voeren
zonder de klant hierover te informeren.
Nous réserve le droit d'entreprendre à l'avenir nécessairement des modifications ou des améliorations au produit
sans informer le client.
16
17
GROUND ZERO
GROUND ZERO
Thank you for selecting a Ground Zero high quality radio.
We are providing a helpful hints list which should keep you from Experiencing unnecessary
CD/MP3/AM/FM Radio
GZCR 235USB
Owner’s manual
ETR Fold down detachable front panel
USB Connector, SD/MMC Slot, Front Aux in
shut down.
Contents
Precautions
2
Accessories
3
Installation / Un- Installation
4
Control panel
5
Remote control
6
General operations
7
Digital tuner operations
9
CD / USB / SD Card operations
11
File / Folder search function
12
Handling discs
12
Cleaning
12
Specifications and features
13
Wiring connection
14
Troubleshooting guide
15
1
GROUND ZERO
Precautions
Accessories
This unit is designed and manufactured with user’s safety in mind. Any improper use or operation of this
unit may result in injury to the user or damage to the product. It is highly recommended that you read
this manual thoroughly and follow all instructions and precautions for the proper and safe use of this
product.
The unit contains below accessories
Safety Precaution
• To prevent an electrical shock, do not open the housing of the unit.
• In case of malfunctioning, have the unit serviced by an approved and qualified service centre.
• Do not expose the unit to water or heavy moisture, do not place it in high humidity environment or
operate when your hands are wet. Exposure to these elements and environment can cause the unit to
short circuit.
• For safety driving, keep the volume at a level where you can still hear traffic conditions around you.
• Do not clean the unit with alcohol, only clean with a soft and dry cloth.
• If the unit has been kept in high temperature or high humidity area, cool down the car interior before
powering on the unit.
• Do not use the unit for a long time without running vehicle’s engine, it may drain the battery and the
vehicle may not be able to start engine.
• Before final installation into dashboard, ensure that wiring is connected correctly, then power up the
unit. If all is functioning properly, complete the final installation into your car’s dashboard.
• Use only the parts provided with the unit to ensure proper installation.
• Ensure that all wiring is routed in dry and cool areas. If wiring routed in hot areas or comes in touch
with hot surfaces, the wiring may corrode or melt.
• When replacing fuse, be sure to use only the same rated fuse prescribed on this unit
Mounting Materials
Remote control
ISO cable A+B
Panel carry case
Operation Precaution
• Do not operate the player with scratched, bended or broken discs and when a disc is not loading
properly, do not force it into the disc loader.
• Never insert any other object such as coin or pin, into the disc loader, this will damage the loading
mechanism or cause short circuit.
• Do not use different disc size and disc shape other than 12 cm with round shape.
• Please dispose of empty batteries in the proper manner as required by your local government agency.
• If the unit is disconnected from its power source, the unit will lose memorized data.
• Playback of discs recorded with a PC using the correct format is possible, however depending on the
application software, environmental settings, CD recording device and other factors playback may not
be possible.
• If source disc has poor sound quality due to scratch, dirty or improper recording, the encoded file may
have poor sound quality or may not work at all.
Design and specification may vary in the operation manual from the actual product.
2
3
GROUND ZERO
GROUND ZERO
Installation
Control panel
Note!
First complete the electrical connections, and then check them for correctness. Unit should be installed
horizontally in an angle less than 30°
Installation
• Bend the 2 locking tabs of the Half Sleeve a little bit inside and insert the Half Sleeve into dash-board
hole, and then bend mount tabs outwards to fix it.
• If necessary, place the mount strap at the rear of the unit and fix it with provided washer.
• Push the unit into the Half Sleeve until you hear a click sound.
• Place Trim Ring over the unit and installation is completed (Some vehicle may not need Trim Ring).
Un-Installation
• Remove Trim Ring and insert Release Keys into left and right side-end holes as shown below and pull
the unit out of the dash-board.
1
2
3
4
5
6
7
8
9
Power / Mute button
Volume knob
T-Up / Next / Fast forward button
T-Dn / Previous / Fast backward button
Memory button
OK / PTY button
Mode button
Select button
Band / TA button
10
11
12
13
14
15
16
17
18
4
5
GROUND ZERO
GROUND ZERO
IR Sensor
Aux in Jack
USB jack
Open button
SD Slot
Eject button
Light indicator
Reset button
Disc slot
Remote control
General operation
Detaching the control panel
-
Turn the power off
Press the open button to release the front panel
Push the panel to the left in 45 degrees
and pull the panel towards you.
Attaching the control panel
-
Insert the left side of the control panel into the
main unit.
Press the right side of the control panel until
the “click” sound is heard.
Note! Do not insert DO NOT insert the control panel from the right side. It can damage the control
panel. The control panel can easily be damaged by shocks. After removing it, place it in a protective case
and be careful not to drop it or subject it to strong shocks. The rear connector that connects the main
unit and the control panel is an extremely important part. Be careful not to damage it by pressing on it
with fingernails, pens, screwdrivers, etc. Note: If the control panel is dirty, wipe off the dirt with soft, dry
cloth only. And use a cotton swab soaked in isopropyl alcohol to clean the socket on the back of the
control panel.
Resetting the unit
Operating the unit for the first time or after replacing the car battery, you must reset the unit. Press
OPEN button on the panel to open the panel and press RESET button to restore the unit to its original
factory settings.
1
2
3
4
5
6
7
8
9
10
Power button
TA/TP button
PTY button
AF/REG button
AS/PS button
Forward button
SELECT button
DIS button
Mode button
Mute button
11
12
13
14
Preset 1 / Pause
Preset 2 / Repeat
Preset 3 / Intro
Preset 4 / Random
Preset 5 / - 10
Preset 6 / + 10
BAND button
Backward button
Volume up/down buttons
Power on/off
Press any button (except OPEN) to turn on the unit. Press and hold PWR button on front panel or press
PWR button on remote control to switch the unit off.
Note! After the unit is off, the volume level and radio current settings will be memorized, and when you
turn the unit on it will resume the stored status you previously set.
Volume control
Rotate VOL knob on front panel or press VOL +/- buttons on remote control to adjust the volume level.
Turning the sound off
Press the MUTE button to turn the sound off. Press it again to turn the sound on.
Setting the sound characteristics
Changing the battery
To change the battery, the battery compartment can be pulled out towards the front. Now replace the
old battery with a new one of the same type (CR 2025). Please pay attention to the polarity ("+ pole" to
the top) when you insert the battery. Please only touch the battery on the edge, since there might be
contact problems otherwise. Now slide the battery compartment with the new battery back into the case.
Make sure that the battery
compartment is positioned flush
inside the case again after
changing the battery.
Short press and repeat SEL button to select the audio settings:
VOLUME => BASS => TREBLE => BALANCE => FADER=> EXIT.
Rotate VOL knob on front panel or press VOL +/- button on remote control to adjust each setting.
Note!
- If the unit is turned off, all the settings of each mode will be saved.
- If cutting off battery power or resetting the unit, all the settings will return to factory
default settings.
6
7
GROUND ZERO
GROUND ZERO
Setting
Long press SEL button to enter into main settings menu,
Rotate Vol knob on front panel or press Vol+/- buttons on remote control to choose the volume level 045.
Press SEL button repeatedly to choose between sub-settings: Rotate Vol knob on front panel or press
Vol+/- buttons on remote control to adjust the settings.
AF => IN VOL. => ADJ CLOCK => 24/12hour =>TA VOL => EON => PTY => REG =>
MONO (In radio mode only) => LOUD => SUBW => BEEP => DSP => EXIT
AF
Set AF (Alternative Frequency) on/off.
IN VOL
Adjust the initial volume level 0-45.
ADJ
Rotate the Vol knob clockwise or press VOL+ button on remote control to
adjust minute and rotate the Vol knob anti-clockwise or press
VOL- button on remote control to adjust hour.
24 / 12 hour
Turn the knob to choose 24 or 12 hour
TA VOL
Turn the knob to adjust TA volume.
EON
Turn the knob to adjust EON ON/OFF.
PTY
Set (Program Type) on /off.
REG
Choose REG on/off. When REG is enabled (on), the receiver accepts regional
variants of the tuned station with REG icon turned on. When REG is disabled
(off), the receiver ignores regional variants.
LOC
Adjust LOC ON/OFF, when LOC is enabled, the receiver accepts regional
variants.
MONO
Turn the knob to choose MONO ON/OFF.
LOUD
Set Loudness ON/OFF. Default setting is OFF. The “LOUD” function makes it
possible to emphasize low and high frequencies through the push of a
button in order to increase sound perception in an adjustment to the
respective volume.
SUBW
Set SUBW ON/OFF. This function allows you to turn the RCA subwoofer
output ON and OFF.
BEEP
Set BEEP ON/OFF. When BEEP is on, press any key will make a beep sound.
Default setting is OFF.
DSP
Choose between POP => ROCK => CLASS => FLAT => NONE.
Mode Setting
Press MODE button TUNER => (* CD) => (* SD) => (*USB) => AUX => TUNER
(* available only if there is media device in disc, SD, USB slot)
AUX jack
Intended to receive audio signals by connecting to external media player.
Digital Tuner Operations
Note: RDS (Radio Data System) service availability varies with areas. Please understand if RDS service is
not available in you area, the following service is not available, either.
RDS overview
PI
Program Identification code
PS
Program services name
AF
Alternative Frequency
TP
Traffic program identification
Identification data for traffic information
broadcasting station.
TA
Traffic announcement identification
Identification data showing traffic information is
being transmitted or not.
Enhanced other networks
information
The “EON” function is an additional RDS service. If
the current program doesn’t offer any traffic
announcements, EON automatically switches to the
traffic announcements on another program. After
the end of the announcement, the device switches
back to the previously heard station. The readiness
for traffic announcements “TA” has to be activated
for this. To turn the EON function on or off, please
switch to the RDS menu.
EON
Code for identifying programs
Broadcast station name data expressed in
alphanumerically characters.
Frequency list of broadcasting stations transmitting
the same program.
Band selection
Press MODE button to select TUNER. Press BAND to select:
FM1 => FM2 => FM3 => AM1 => AM2.
When a new frequency band is selected, the last chosen frequency / station of that frequency band will
be heard.
Manual / automatic tuning
Manual tuning: To find a station, select a band first, then press and hold T-DN/T-UP buttons on remote
control until MANUAL appears on the display, then press these buttons repeatedly to search a station
upward or downward.
Automatic tuning: To find a station, select a band first, then press and hold T-DN/T-UP buttons on front
panel or short press T-UP/DN buttons on remote control, the automatic downward/upward search will
start. It will play when a station is found.
Display
Press DIS button on remote control to see current tuning information and time.
In Radio mode, display menu:
Clock (clock time) => PTY => PS (program station) => Frequency => EXIT
8
9
GROUND ZERO
GROUND ZERO
Programming preset stations
You can store up to a total of 30 radio stations in the memory (18 FM, 12 AM), manually or
automatically.
To store a station:
Select a band (if needed)
Search a station by manual/automatic tuning
Hold a Preset button (1-6) on remote control, where you want to store the station for at least
2 seconds. Or on front panel you can press OK button first and rotate VOL knob to choose (16), and finally press OK button to confirm.
To recall a station:
Select a band (if needed)
Press a Preset button (1-6) on remote control to recall the stored station., or on front panel,
you can press T-UP/DN buttons to recall the stored station
4) When playing in other mode and TA information is received, it will change to the radio mode
automatically. After playing over, it will return to the previous mode. Press TA button once to ignore
the received TA information, press TA button twice to turn off the function.
PTY (Program Type)
Press and hold OK button on front panel or press PTY button on remote control to open PTY program
type list, and turn the VOL knob on front panel or press VOL+/- buttons on remote control to select a
PTY type. After selecting the program type you want, press OK button on front panel or press PTY
button on remote control to search. Press them again to stop the PTY search. If PTY code is different or
not available, LCD blinks with “PTY NONE”.
CD / USB/ SD Card Operations
Loading/Ejecting a disc
Auto memory store
Select a band, press MEM button on front panel or AS/PS button on Remote control and hold for 2
seconds to enter auto store mode. The radio will automatically store 6 stations to the 6 preset memories
of the current band. To stop auto store, press this button again.
Note: During auto station preset, the unit will search and store stations with the strong signal first, and
then weaker signal stations until the memories are full.
Preset scan
Select a band, press MEM button on front panel or AS/PS button on Remote control to scan all preset
stations in the memories of the current band, each preset scan for 5 seconds. To stop preset scan, press
the button again.
AF (Alternative Frequencies) function
Press AF/REG button on remote control to turn on or turn off the AF function. You can also press and
hold SEL button and press it repeatedly to see AF, then rotate VOL knob on front panel or press V-/+
button on remote control to set this function on/off. If the AF function is on the display will show “AF”.
When AF switching mode is selected, but RDS information is not received yet the “AF” will be flashing.
The RDS program will be automatically searched and received. After turning on, if the RDS signal is weak
or even no signal, the unit will search another frequency with this RDS program.
REG (Regional) function
Press and hold AF/REG button on remote control for 2 seconds to enable or disable REG mode. You can
also press and hold SEL button and press it repeatedly to see REG, then rotate VOL knob on front panel
or press V-/+ button on remote control to set this function on/off. (Default is off for REG).
When REG is enabled (on), the receiver accepts regional variants of the tuned station with REG icon
turned on.
When REG is disabled (off), the receiver ignores regional variants.
TA (Travel Announcement) / TP (Travel Program Identification)
1) Enable or disable TA mode by pressing and hold BAND button on front panel or pressing TA/TP
button on remote control: (Default is OFF)
2) When TA function is activated, it will search the station with TA information automatically. If there is
no TA information, it will search the station with TP information automatically, if there is no TP
information either, it will return to the previous station after searching.
3) When receiving the station with TP information but without TA information, TP icon is on and TA
icon keeps blinking; when receiving the station with TP and TA information, both TP and TA icons
are on.
Turn the power on. And insert the disc to disc slot with the printed side facing up. Press EJECT button to
eject the disc. Inserting the SD card/USB device Insert the SD card or USB device into SD slot or USB
socket. Then the playing mode will be changed into SD or USB mode automatically.
Note!
When SD card and USB device are both inserted, the playing mode will be changed into the mode of the
device inserted later.
Playing/pausing
The unit will automatically play from the first sound track recorded on a disc/SD /USB device. To ensure
good system performance, wait until the unit finishes reading the disc /device information before
proceeding. Press 1/PAUSE button on remote control to pause playback, press it again to resume
playback.
Playing the previous/next track
During playback press PREVIOUS button to play the previous track. Press NEXT button to play the next
track.
Scanning forward and backward
Press and hold Fast forward/backward buttons to select fast forward/backward playing. Note: When fast
backward/forward playback reaches the previous or next track, the unit will resume normal playback.
- / + 10 files
Press 5/ 10-, 6/ 10 + buttons on remote control to jump to previous/next 10 files.
Repeat playback
Press 2/REPEAT on remote control or press BAND button on the panel repeatedly to choose repeat Play,
then press OK to confirm to play track repeatedly, press again to cancel.
Note!
After finishing playing all tracks or all folders of CD/MP3/SD, the unit restarts playing all tracks or all
folders automatically.
Intro
Press 3/INT button on remote control or press BAND on the panel to choose INT Play, then press OK to
confirm to activate INTRO function which will play the beginning of every track for 10 seconds.
10
11
GROUND ZERO
GROUND ZERO
Random
In disc mode press 4 or press BAND on the panel to choose RDM Play, then press OK to confirm to
activate random playing mode, press one more time to return to normal playing.
File / Folder Search Function
In MP3/WMA file CD, USB, SD mode, press MEM button on front panel or AS/PS button on remote
control to enter search mode. Below is toggle sequence of search mode:
File Number Search => File Name Search => Folder Search => Exit search mode
Note! This function is not available for CDDA discs.
- File Number Search
Press MEM button on front panel or AS/PS button on remote control first time, it enters file number
search and the last digit 0 blinks, that means the unit is ready to accept file number for search. Rotate
the VOL knob on front panel or press VOL +/- buttons on remote control to input a digit, press SEL
button to move the digit to next position, and now you can continue to input numbers. After completing
inputs, press OK button on front panel to play.
- File Name Search
Press MEM button on front panel or AS/PS button on remote control repeatedly until the first letter A
blinks. Rotate the VOL knob on front panel or press VOL +/- buttons on remote control to input alphabet
(from A to Z) or a digit (from 0 to 9) of which you want to listen to. Press SEL button to move to next
position. After completing input, press OK button on front panel to play. If there is no file found, the
unit will return to initial input ready mode automatically.
Specifications and features
FM Tuner
Frequency range
Usable sensitivity
Stereo separation
AM (MW) Tuner
Frequency range
Usable sensitivity
Distortion THD
Signal to Noise Ratio
Frequency range
Power supply
Current consumption
Load impedance
Dimensions
Power output
Line output
Panel system
-
Cleaning discs
DC 11 ~ 16 Volt
< 10 Ampere
4 ~ 8 Ohm
178 mm x 165 mm x 50 mm /
7.01” x 6.50” x 1.97”
4 x 40 W Max
2 V (CD 1K 0 dB Vol Max)
Compatibility
Handling discs
-
< 0,5%
60 dB
20 Hz ~ 20 Khz
Electric
SD
USB
Dirty, scratched or warped discs may cause skip ping or noise.
Handle the disc only by the edges. Do not touch its surface to keep it clean.
Discs should be stored in their cases after use to avoid scratches.
Do not expose discs to direct sunlight, high humidity, high temperature or dust.
Prolonged exposure to extreme temperature can wrap the disc (such as leaving the discs in your car
during summer time).
Do not stick or write anything on either side of disc. Sharp writing instruments, or the ink used in
some felt-tip pens, may damage its surface.
Do not touch the unlabeled side. Do not attach any seal, label or data protection sheet to either side
of a disc.
522 ~ 1620 Khz
30 dBuV
CD Player
- Folder Search
Press MEM button on front panel or AS/PS button on remote control for 3 times, the folder name will be
displayed on LCD. Rotate the VOL knob on front panel or press VOL +/- buttons on remote control to
choose between folders and Sub-folders.
-
87,5 ~ 108 Mhz
9 dBuV
28 dB
CD
SD-HC >8 GB
USB 2.0 >8 GB
CD, CD-R, CD-RW, 12 cm discs
MP3, WMA, ID 3 Tag
Anti- theft full detachable with flashing LED,
flip down front panel, ISO mount
LCD Display
Playback
Decoding: MP3, WMA playback with ID3 Tag display, file and folder
search
CD mechanism:
Electronic anti- shock (Audio CD 8 seconds, MP3 40 seconds)
Tuner
AM/FM receiver with 30 (FM18, AM 12) station memory,
auto / manual station store, preset scan, auto / manual tuning
Audio
Fingerprints should be carefully wiped from the surface of disc with a soft cloth. Unlike conventional
records, compact discs have no grooves to collect dust and macroscopic dirt, so gently wiping them with
a soft cloth should remove most dust or stains. Wipe in a straight motion from the center to the edge.
Caution: Never use a thinner benzine, record cleaner or anti static spray on a compact disc. Such
chemicals can damage its plastic surface.
DSP sound effect (None, classic, rock, pop, flat)
4 x 40 W (max) amplifier, 2 CH stereo RCA lineout
12
13
GROUND ZERO
GROUND ZERO
Wiring connections
Trouble shooting
Symptom
Power does not
turn on (No
sound is
produced).
Cause
Fuse is blown.
Incorrect wiring.
Wiring for amplifier
output is incorrect, or
there is a short circuit
among the output
wiring.
The unit is in MUTE
mode.
General
Connector A
A1 Not connected
A2 To telephone control terminal
A3 Not connected
A4 To terminal always supplied with power
A5 To system control terminal of the power amp or
Auto- Antenna control terminal (max. 100mA 12V DC)
A6 To dimmer control terminal
A7 To electric terminal controlled by ignition switch
(12V DC) ON/OFF
A8 To vehicle (metal) body
Connector B
1. Rear right speaker (+)
2. Rear right speaker (-)
3. Front right speaker (+)
4. Front right speaker (-)
5. Front left speaker (+)
No sound
comes from the
unit or its
external
amplifier
Nothing
happens when
buttons are
pressed.
Display is not
accurate.
6. Front left speaker (-)
7. Rear left speaker (+)
RCA output wiring is
incorrect
Wiring between
external amplifier’s
REM terminal and the
unit’s antenna lead is
incorrect, or antenna
output lead of the
unit is short circuit to
ground.
The microprocessor
has malfunctioned.
Panel or main unit
connectors are dirty.
Compact disc is dirty
8. Rear left speaker (-)
CD
Sound skips or
is noisy
Sound is poor
directly after
power is on.
Compact disc is
heavily scratched or
warped.
Water or moisture
may have formed on
the internal lens.
14
15
GROUND ZERO
GROUND ZERO
Remedy
Replace with a fuse of
the same rating
amperage. If the fuse
blows again, consult your
local distributor.
Consult your local
retailer.
Refer to the unit wiring
diagram to check proper
connections, make sure
the wiring is done
correctly.
Turn off the MUTE
function.
Check and properly
connect the RCA output
with the external
amplifier.
Properly connect the
REM terminal of the
external amplifier and the
unit’s antenna output
lead.
Turn off the power, Then
press the OPEN button
and remove the front
panel. Press the RESET
button for about 2
seconds.
Wipe the dirt off with a
soft cloth moistened with
cleaning alcohol.
Clean the compact disc
with a soft cloth, avoid
scratching the surface of
the disc.
Replace with a compact
disc without scratches.
Let it dry for about 1
hour with the power on.
Bedienungsanleitung in weiteren Sprachen auf www.ground-zero-audio.com verfügbar !
Manual in more languages available on www.ground-zero-audio.com !
Mode d'emploi en vers ces langues disponible sur le site www.ground-zero-audio.com !
Gebruikers Handleiding in andere talen op www.ground-zero-audio.com beschikbaar !
Manual en otros idiomas en www.ground-cero-audio.com disponibles !
Die Gewährleistung entspricht der gesetzlichen Regelung. Eine Rücksendung kann nur nach vorheriger
Absprache und in der Originalverpackung erfolgen. Bitte unbedingt einen maschinell erstellten Kaufbeleg
und eine Fehlerbeschreibung beilegen. Von der Gewährleistung ausgeschlossen sind Defekte, die durch
Überlastung, unsachgemäße Behandlung oder bei Teilnahme an Wettbewerben entstanden sind.
Limited warranty - defective products must be returned in original packaging - please add a copy of the
original purchasing invoice showing the purchasing date and a
detailed description of the failure. Failure caused by overload, misuse or by using the product for
competition purpose are not covered by the warranty.
De garantie bepalingen van alle door ground zero geleverde producten is volgens wettelijke bepalingen
geregeld, Een retourzending kan alleen na duidelijke afspraak en in de originele verpakking
plaatsvinden.SVP een aankoopbon en een duidelijke storingsomschrijving bijvoegen.Van garantie
uitgesloten zijn defecten door overbelasting, onkundig gebruik, of door deelname aan wedstrijden (SPL)
ontstaan zijn
La garantie est conforme aux droits legaux. Un retour du produit défectueux doit être dans son
emballage d'origine sur presentation du reçu ou de la facture indiquant la description du defaut.La
presente Garantie n'est pas applicable lorsque le produit a été endommagé en raison : Mauvaise
alimentation, Trop de puissance (HP, Subwoofer) Accident, Installation ou Utilisation non conforme aux
normes Technique (Concours SPL etc.).
GROUND ZERO GmbH
Erlenweg 25; D - 85658 Egmating, Germany
Tel. +49 (0)8095/873 830
Fax -8310
www.ground-zero-audio.com
Wir behalten uns das Recht vor, zukünftig nötige Änderungen oder Verbesserungen an dem Produkt
vorzunehmen ohne den Kunden darüber zu informieren.
We reserve the right to make needed change or improvement to the product without informing customer about
this in advance.
Wij behouden ons het recht om de nodige veranderingen of verbeteringen aan het product door te voeren
zonder de klant hierover te informeren.
Nous réserve le droit d'entreprendre à l'avenir nécessairement des modifications ou des améliorations au produit
sans informer le client.
16
GROUND ZERO
Gracias por elegir un aparato de radio Ground Zero de alta calidad.
Estamos proporcionando una lista de consejos útiles para que su experiencia sea muy
satisfactoria.
CD/MP3/AM/FM Radio
GZCR 235USB
Manual del Usuario
ETR Fold down detachable front panel
USB Connector, SD/MMC Slot, Front Aux in
Contenido
Precauciones
2
Accesorios
3
Instalación / Des- Instalación
4
Panel de Control
5
Control remoto
6
Operación General
7
Operación del Sintonizador Digital
9
Operación de CD / USB / SD Card
11
Función de búsqueda File / Folder
12
Manejo de discos
13
Limpieza
13
Especificaciones
14
Conexión y cableado
15
Guía de Fallas
16
1
GROUND ZERO
Precauciones
Accesorios
Esta unidad ha sido diseñada y fabricado con la seguridad del usuario en mente. Cualquier uso
indebido o una incorrecta instalación de esta unidad puede resultar en lesiones al usuario o daños
al producto. Es muy recomendable que lea detenidamente este manual y siga todas las
instrucciones y precauciones para el uso correcto y seguro de este producto.
La unidad contiene los siguientes accesorios
Precauciones de Seguridad
• Para evitar una descarga eléctrica, no abra la caja de la unidad.
• En caso de anomalías, haga revisar la unidad por un centro de servicio calificado.
• No exponga la unidad al agua o a la humedad, no lo coloque en un ambiente de alta humedad u opere
con las manos mojadas. La exposición a estos elementos y el medio ambiente puede causar en la unidad
un cortocircuito.
• Para una conducción segura, mantenga el volumen a un nivel que no le impida escuchar las
condiciones del tráfico a su alrededor.
• No limpie la unidad con alcohol, utilice sólo un paño suave y seco.
• Si la unidad se ha mantenido en una zona de alta temperatura o alta humedad, enfriar el interior del
Automóvil antes de encender la unidad.
• No utilice la unidad durante un largo tiempo sin correr el motor del vehículo, esto puede ocasionar la
descarga de la batería y el vehículo puede no ser capaz de arrancar el motor.
• Antes de la instalación final en el tablero, asegúrese de que el cableado está conectado
correctamente, a continuación, encienda la unidad. Si todo funciona correctamente, complete la
instalación final en el salpicadero del coche.
• Use solamente las piezas suministradas con la unidad para garantizar su correcta instalación.
• Asegúrese de que todo el cableado se encamina en las áreas secas y frescas. Si los cables enviados en
lugares calurosos o entra en contacto con superficies calientes, los cables pueden corroerse o derretir.
• Cuando reemplace el fusible, asegúrese de usar sólo el mismo fusible nominal especificado para esta
unidad.
Materiales de Montaje
Control remoto
Precauciones de Operación
• No utilice el reproductor de discos compactos con disco rayado, doblado o roto, cuando un disco no se
carga correctamente, no lo fuerce en el cargador de disco.
• Nunca inserte ningún otro objeto como una moneda o un alfiler, en el cargador de disco, esto puede
dañar el mecanismo de carga o causar un cortocircuito.
• No utilice el tamaño de disco diferente y la forma de otro disco de 12 cm con forma redonda.
• Deshágase de las baterías usadas de manera apropiada según lo requiera el organismo de gobierno
local.
• Si la unidad está desconectada de su fuente de alimentación, la unidad se pierden los datos
memorizados.
• Es posible la reproducción de discos grabados con una PC usando el formato correcto, sin embargo,
dependiendo del software de aplicación, la configuración y el dispositivo de grabación de CD, puede
ocasionar que la reproducción no sea posible.
• Si el disco de origen tiene mala calidad de sonido debido a cero, sucio o inadecuadas de grabación, el
archivo codificado puede tener mala calidad de sonido o no funcionar en absoluto.
ISO cable A+B
Estuche porta Panel
Diseño y especificaciones pueden variar en el manual de funcionamiento del producto real.
2
3
GROUND ZERO
GROUND ZERO
Instalación
Panel de Control
Nota!
Primero complete todas las conexiones eléctricas, y luego revise y marque todo para su corrección. La
unidad debe ser instalada horizontalmente en un ángulo inferior a 30 grados.
Instalación
• Doble las dos lengüetas de fijación de la mitad de la manga un poco en el interior e insertar la media
manga en el agujero de tablero, y luego doblar hacia el exterior pestañas de montaje para arreglarlo.
• Si es necesario, apoye el soporte correa en la parte trasera de la unidad y fijarlo con la arandela
siempre.
• Colocar la unidad en la mitad de la manga hasta que escuche un sonido de clic.
• Coloque Anillo decorativo sobre el aparato y la instalación se haya completado (Algunos vehículos no
necesitan Trim Ring).
1
2
3
4
5
6
7
8
9
Botón de encendido / Mute
Control de Volumen
T-Up / Next / Fast forward botón
T-Dn / Previous / Fast backward botón
Botón de Memoria
OK / PTY botón
Mode botón
Botón de Selección
Band / TA botón
10
11
12
13
14
15
16
17
18
Des - Instalación
• Remueva el Trim Ring e inserte las llaves de desconexión hasta el final en el lado derecho e izquierdo
en los agujeros mostrados en la figura anterior, luego hale la unidad hacia fuera del tablero.
4
5
GROUND ZERO
GROUND ZERO
Sensor Infrared Remote
Puerto Aux
Puerto USB
Botone de Apertura
Ranura de SD
Botón de expulsión
Luz indicadora
Botón Reset
Ranura de Disco
Control Remoto
Operación General
Desenganche del Panel de control
- Apague la alimentación
- Pulse el botón de apertura para liberar el panel frontal
- Empuje el panel a la izquierda en 45 grados
y tire del panel hacia usted.
Enganche del Panel de control
- Inserte el lado izquierdo del panel de control en la
unidad principal.
- Presione el lado derecho del panel de control hasta
el "clic" se oye sonido.
Nota! NO inserte el panel de control desde el lado derecho. Puede dañar el panel de control. El panel de
control puede resultar dañado por golpes. Después de retirar, coloque en un caso de protección y tener
cuidado de no dejarlo caer, ni lo someta a fuertes impactos. El conector trasero que conecta la unidad
principal y el panel de control es una parte extremadamente importante. Tenga cuidado de no dañarlo
presionándolo con sus uñas, bolígrafos, destornilladores, etc Nota: Si el panel de control está sucio,
limpie la suciedad con un paño suave y seco. Y utilizar un hisopo de algodón empapado en alcohol
isopropílico para limpiar el conector situado en la parte posterior del panel de control
Re-Setting de la Unidad
Cuando se utilice el aparato por primera vez o después de sustituir la batería del coche, se debe
restablecer la unidad. Presione el botón OPEN en el panel para abrir el panel y pulse el botón RESET
para restaurar la unidad a su configuración original de fábrica.
1
Power botón
2
TA/TP botón
3
PTY botón
4
AF/REG botón
5
AS/PS botón
6
Adelanto botón
7
SELECT botón
8
DIS botón
12
BAND botón
9
Mode botón
13
Atraso botón
10
Mute botón
14
VOL +/- botón
11
Preset
Preset
Preset
Preset
Preset
Preset
Cambio de Batería
1
2
3
4
5
6
/
/
/
/
/
/
Pause
Repeat
Intro
Random
- 10
+ 10
Para cambiar la batería, ubique el compartimento de la batería y proceda a sacar la pieza. Ahora
reemplace la batería vieja por una nueva del mismo tipo (CR 2025). Por favor, preste atención a la
polaridad (polo + hacia arriba) al insertar la batería. Ahora deslice el compartimento de las pilas con la
nueva batería en la caja.
Asegúrese de que el compartimiento de la batería se cierre al ras
dentro de la caja de nuevo después de
cambiar la bacteria.
Power on/off
Presione cualquier botón (excepto OPEN) para encender la unidad. Presione y mantenga el botón PWR
en el Panel frontal de control o presione el botón PWR en el control remoto de la unidad para apagar la
unidad.
Nota! Después de apagar la unidad, el nivel de volumen y los setting del radio serán memorizados, y
cuando se encienda nuevamente la unidad la unidad volverá a los setting previamente memorizados.
Control de Volumen
Rote el control de VOL en el panel frontal de control o presione los botones de VOL +/- en el control
remoto para ajustar los niveles de volumen en la unidad.
Función Mute o apagado del sonido
Presione el botón MUTE para apagar el sonido en la unidad sin apagar la unidad. Presione este
nuevamente para encender el sonido.
Ajuste de la Características de Sonido
Pulse brevemente y repetidamente el botón SEL para seleccionar los ajustes de audio:
VOLUMEN BAJO => = TREBLE> = resultado> = FADER> => EXIT.
Rote el control de El VOL en el panel frontal de control de El o presione certamen El Botón VOL + / - en
el control Remoto El párrafo ajustar CADA ajuste.
6
7
GROUND ZERO
GROUND ZERO
Nota!
- Si la unidad es apagada los ajustes serán memorizados y mantendrán los cambios cuando la unidad se
encendida nuevamente.
- Si la corriente de la batería es cortada, los setting de la unidad volverán a los niveles predeterminados
desde fabrica cuando sea conectada la unidad nuevamente a fuente de poder.
Setting
pulsado el botón SEL para entrar en el menú de configuración principal, Gire la perilla de VOL en el panel
delantero o presione Vol + / botones - en el control remoto para elegir el nivel de volumen 0-45.
Pulse el botón SEL varias veces para elegir entre los sub-opciones: girar la perilla del volumen en el
panel delantero o presione Vol + / botones - el control remoto para ajustar la configuración.
AF => IN VOL. => ADJ CLOCK => 24/12hour =>TA VOL => EON => PTY => REG => TEL
VOL => LOC (In radio mode only) => MONO (In radio mode only) => LOUD => SUBW =>
BEEP => DSP => EXIT
Cambio de la función Mode
Presione el botón MODE , TUNER => (* CD) => (* SD) => (*USB) => AUX => TUNER
(* disponibles solamente si se encuentra un disc, SD, USB slot en la unidad)
Display
Presione El Botón DIS En El Control Remoto Para Ver La Estación y La Hora real.
En la Función de Radio, menú de la pantalla:
Reloj (hora del reloj) = PTY> => PS (programa de la estación) = Frecuencia> => EXIT
AUX entrada
Destinado a recibir señales de audio mediante la conexión a reproductor de medios externos.
Operación del Sintonizador Digital
Nota: RDS (Radio Data System) la disponibilidad del servicio varía según las zonas. Entienda por favor si
el servicio RDS no está disponible en su área, el siguiente servicio no está disponible.
AF
Fija la función AF (Alternative Frequency) on/off.
IN VOL
Ajustar el nivel inicial de volumen 0-45.
Gire a la derecha el botón VOL o pulse VOL + botón del mando a
distancia para ajustar los minutos y gire el botón VOL a la izquierda o
pulse
Botón VOL-en el control remoto para ajustar la hora.
RDS overview
ADJ
PI
Program Identification code
24 / 12 hour
Gire la perilla para fijar 24 o 12 horas
PS
Program services name
TA VOL
Gire la perilla para ajustar el nivel de volumen TA.
AF
Alternative Frequency
EON
Gire la perilla para ajustar EON ON/OFF.
PTY
Fije (Program Type) on /off.
TP
Traffic program identification
Identificara la data para la información de trafico por
las estaciones.
TA
Traffic announcement identification
REG
Seleccione REG ON / OFF. Cuando REG está habilitado (on), el receptor
acepta variantes regionales de la emisora sintonizada con el icono REG
encendido. Cuando REG está desactivado (apagado), el receptor ignora
las variantes regionales.
Identificara la data para la información de trafico
será mostrada si es transmitida o no.
LOC
Fijar LOC ON/OFF, cuando LOC modo esta activado, La el sintonizador de la
unidad aceptará variaciones regionales.
MONO
Gire la perilla para escoger en el MONO ON/OFF.
LOUD
Ajuste de sonoridad ON / OFF. El valor por defecto es OFF. El "LOUD"
función permite hacer hincapié en las frecuencias bajas y altas a través
de la pulsación de un botón con el fin de aumentar la percepción del
sonido en un ajuste del volumen respectivo.
Enhanced other networks
information
El EON "función" es un servicio RDS adicional. Si
el programa actual no ofrece ningún tipo de
anuncios de tráfico, EON cambia
automáticamente a los mensajes de tráfico de
otro programa. Tras el final del anuncio, el
dispositivo vuelve a la emisora previamente
escuchado. La preparación para mensajes de
tráfico "TA" debe estar activado para esto. Para
activar la función EON encendido o apagado, por
favor, cambiar al menú RDS.
SUBW
Fije SUBW ON/OFF. Esta función permite escoger encender o apagar las
salida RCA subwoofer
BEEP
Fija BEEP ON/OFF. Cuando la función BEEP está encendida, al presionar
cualquier tecla o botón se generara un sonido BEEP. Por defecto esta
función viene fijada en OFF.
DSP
Permite escoger entre POP => ROCK => CLASS => FLAT => NONE.
EON
Código para identificar programas.
El nombre de la estación será expresada en carácter
alfanuméricos.
Lista las frecuencias de las Estaciones que están
transmitiendo la misma programación.
Selección de Banda
Pulse el botón MODE para seleccionar TUNER. Presione BAND para seleccionar:
FM1 => FM2 => FM3 => AM1 => AM2.
Cuando una nueva banda de frecuencia está activada, la última frecuencia elegida y la estación de dicha
banda de frecuencias será escuchado.
8
9
GROUND ZERO
GROUND ZERO
Sintonización Manual / Automática
Ajuste manual: Para buscar una emisora, seleccione una primera banda, a continuación, presione y
mantenga presionado T-DN/T-UP botones del mando a distancia hasta que aparece el mensaje MANUAL
en la pantalla, a continuación, pulse estos botones repetidamente hasta que aparezca una estación hacia
arriba o hacia abajo.
Sintonización automática: Para buscar una emisora, seleccione una primera banda, a continuación,
presione y mantenga presionado T-DN/T-UP botones del panel frontal o presión corta T-UP/DN botones
del mando a distancia, para activar el modo de búsqueda automática / búsqueda hacia arriba se iniciará.
Automáticamente se podrá ver cuándo se encuentre un canal.
REG (Regional) función
Presione y sostenga el botón AF / REG botón del mando a distancia durante 2 segundos para activar o
desactivar el modo REG. También puede mantener pulsado el botón SEL y pulse repetidamente para ver
REG, a continuación, gire la perilla VOL en el panel frontal o presione V-/ + tecla del mando a distancia
para ajustar esta función de encendido / apagado. (Por defecto está desactivado por REG).
Cuando REG está habilitado (on), el receptor acepta variantes regionales de la emisora sintonizada con
el icono REG encendido.
Cuando REG está desactivado (apagado), el receptor ignora las variantes regionales.
TA (Travel Announcement) / TP (Travel Program Identification)
Programación de estaciones
Puede almacenar hasta un total de 30 estaciones de radio en la memoria (18 FM, 12 AM), de forma
manual o automática.
Para almacenar una emisora:
- Seleccione una banda (si es necesario)
- Busque una emisora manual / sintonización automática
- Mantenga un botón de memoria (1-6) en el control remoto, en la que desea almacenar la emisora
durante al menos 2 segundos. O en el panel frontal se puede pulsar el botón OK primera y gire la perilla
de VOLUMEN para elegir (1-6), y finalmente pulse el botón OK para confirmar.
Para invocar una emisora:
- Seleccione una banda (si es necesario)
- Pulse el botón de preselección (1-6) en el control remoto para la emisora almacenada., O en el panel
frontal, puede pulsar los botones T-UP/DN recordar la emisora almacenada
1) El modo TA se activa o desactiva pulsando y manteniendo presionado el botón BAND en el panel
frontal o pulsando el botón TA / TP en el control remoto: (Por defecto está desactivada)
2) Cuando la función TA está activado, se buscará la estación con la información TA de forma
automática. Si no hay información de TA, buscará la emisora con información TP automáticamente, si no
hay información TP , volverá a la emisora anterior después de la búsqueda.
3) Cuando se recibe la emisora con información TP, pero sin información de TA, el icono de TP se
encenderá y parpadea el icono TA, cuando recibe la emisora TP con información TA, tanto TP y TA
permanecerán en pantalla.
4) Cuando la unidad este en reproducción de CD/SD o USB y información TA se reciba, se cambiará al
modo de la radio automáticamente. Después de reproducir el mensaje de TA, la unidad volverá al modo
anterior. Pulse el botón TA una vez para ignorar la información recibida de TA, pulse el botón TA dos
veces para apagar la función.
PTY (Tipo de Programa)
Guardado en Auto memoria
Seleccione una banda, pulse el botón MEM en el panel frontal o botón AS / PS en el control remoto y
manténgalo durante 2 segundos para entrar en modo guardado de auto. La radio automáticamente
guardar hasta 6 estaciones de las 6 memorias programadas de la banda actual. Para detener la
memorización automática, pulse este botón otra vez.
Nota: Durante la estación de pre ajuste automático, la unidad de buscará y almacenara las emisoras con
la señal más fuertes primero, y luego la más débil estaciones de señal hasta que los espacio de memoria
estén llenos.
Pulse el botón y sostenga el botón OK en el panel delantero o presione PTY en el control remoto para
abrir la lista PTY tipo de programa, y gire el botón VOL en el panel frontal o pulse VOL + / botones - en
el control remoto para seleccionar un tipo de PTY. Después de seleccionar el tipo de programa que
desea, pulse el botón OK en el panel delantero o presione el botón PTY en el control remoto a un
registro. Presione de nuevo para detener la búsqueda PTY. Si el código PTY es diferente o no disponible,
parpadea LCD con "PTY NONE".
Operaciones de CD / USB/ SD Card
Escaneo
Seleccione una banda, pulse el botón MEM en el panel frontal o botón AS / PS en el control remoto para
explorar todas las emisoras memorizadas en la memoria de la banda actual, cada estación guardad en la
memoria será explorada y mostrada durante 5 segundos. Para detener la exploración programada,
presione el botón MEM de nuevo.
AF (Alternative Frequencies) función
Presione botón AF / REG en el control remoto para activar o desactivar la función AF. También puede
mantener pulsado el botón SEL y pulse repetidamente para ver AF, a continuación, gire la perilla VOL en
el panel frontal o presione V-/ + tecla del mando a distancia para ajustar esta función de encendido /
apagado. Si la función AF está activada, la pantalla mostrará "AF". Cuando cambia el modo AF está
activada, pero la información RDS no sea recibida, el display mostrara "AF" parpadeando.
La programación RDS será buscada automáticamente y recibidas. Después de encender la unidad, si la
señal RDS es débil o incluso no hay señal, la unidad buscará otra frecuencia con esta programación RDS.
Carga (loading)/Descarga (eject) de un disco
Encienda la unidad. E inserte el disco en la ranura del disco con la cara impresa hacia arriba. Pulse el
botón EJECT para expulsar el disco. Para insertar la tarjeta SD / dispositivo USB Inserte la tarjeta SD o
un dispositivo USB en la ranura SD o puerto USB. A continuación, el modo de reproducción se
transformó en el modo SD o USB de forma automática.
Nota!
Cuando una tarjeta de memoria SD y un dispositivo USB son insertados al mismo tiempo, el modo de
reproducción será cambiado al modo de reproducción del último dispositivo insertado.
Reproducir/Pausar
La unidad se reproduce automáticamente desde la primera pista de sonido grabada en un disco / SD /
dispositivo USB. Para asegurar buen rendimiento del sistema, espere hasta que la unidad termine de leer
el disco / información del dispositivo antes de proceder. Presione el botón del mando a distancia
1/PAUSE para pausar la reproducción, púlselo otra vez para reanudar la reproducción.
10
11
GROUND ZERO
GROUND ZERO
Reproducir anterior/próximo track
Durante la reproducción pulse el botón ANTERIOR para reproducir la pista anterior. Pulse el botón NEXT
para reproducir la pista siguiente.
Búsqueda en avance y retroceso
Rápido Pulse y mantenga pulsado hacia adelante y hacia atrás para seleccionar avance o retroceso
rápido de juego. Nota: Cuando la reproducción rápida hacia atrás / adelante llega a la pista anterior o
siguiente, la unidad reanudará la reproducción normal.
- / + 10 archivos
Presionando 5/ 10-, 6/ 10 + Botones en el control remoto para saltar entre los anteriores y prox. 10
archivos.
- Búsqueda de Nombre de Archivo
Presione el botón MEM en el panel frontal o botón AS / PS del mando a distancia varias veces hasta que
la primera letra A parpadea. Gire el botón VOL en el panel frontal o pulse VOL + / botones - en el control
remoto para introducir alfabeto (de la A a la Z) o un dígito (de 0 a 9) de la que desea escuchar. Pulse el
botón SEL para pasar al próxima posición. Después de completar, presione el botón OK en el panel de
control para reproducir el archivo. Si el archivo no es encontrado, la unidad volverá a la pantalla de
entrada de modo automático.
- Búsqueda de Carpeta Presione el botón MEM en el panel frontal o botón AS / PS en el control
remoto de 3 veces, el nombre de la carpeta se mostrará en la pantalla LCD. Gire el botón VOL en el
panel frontal o pulse VOL + / botones - en el control remoto para elegir entre las carpetas y
subcarpetas.
Repetir Reproducción
Pulse 2/REPEAT el control remoto o pulse el botón BAND en el panel varias veces para seleccionar la
reproducción repetida, pulse OK para confirmar a reproducir la pista en varias ocasiones, vuelva a pulsar
para cancelar.
Nota! Después de finalizado la reproducción de todas las pistas o todos los archivos del CD/MP3/SD, La
unidad reiniciara la reproducción de todas las pistas o todos los archivos automáticamente.
Intro
Pulse el botón 3/INT el control remoto o presione BAND en el panel para elegir Escuchar INT, a
continuación, pulse Aceptar para confirmar para activar la función INTRO, que desempeñará el principio
de cada pista durante 10 segundos
Random
En el modo disco presione BAND en el panel para elegir Escuchar RDM, a continuación, pulse Aceptar
para confirmar para activar el modo de reproducción aleatoria, pulse una vez más para volver a la
reproducción normal.
Función de búsqueda File / Folder
En un CD de archivos MP3 y WMA, USB, SD modo, pulse el botón MEM en el panel frontal o botón AS /
PS del mando a distancia para entrar en el modo de búsqueda.
A continuación se muestra la secuencia de la palanca del modo de búsqueda:
Número de expediente búsqueda => Nombre del archivo búsqueda => Carpeta de búsqueda => Salir
modo de búsqueda
Manejo de Disco
- Discos sucios, rayados o doblados pueden causar saltar ping o ruido.
- Maneje el disco por los bordes. No toque la superficie para mantenerla limpia.
- Los discos deben guardarse en sus cajas después de usarlos para evitar arañazos.
- No exponga los discos a la luz directa del sol, alta humedad, altas temperaturas y el polvo.
- La exposición prolongada a temperaturas extremas puede envolver el disco (por ejemplo dejar los
discos en su coche en verano).
- No pegue ni escriba nada sobre cada lado del disco. Los instrumentos filosos, o la tinta utilizada en
algunos rotuladores, pueden dañar su superficie.
- No toque la cara sin etiqueta. No instale ningún sello, etiqueta u hoja de protección de datos a ambos
lados de un disco.
Limpieza de discos
Las huellas dactilares deben ser cuidadosamente limpiadas de la superficie del disco con un paño suave.
A diferencia de los discos tradicionales, los discos compactos no tienen ranuras para recoger el polvo y la
suciedad macroscópica, por lo que suavemente con un paño suave debería eliminar la mayoría de polvo
y las manchas. Limpie con movimientos rectos desde el centro hacia el borde.
Precaución: No utilice nunca bencina un disolvente, limpiador de discos o anti aerosol estático en un
disco compacto. Esos productos químicos pueden dañar la superficie de plástico.
Nota!
Esta función no está disponible para discos CDDA.
- Búsqueda de Numero de Archivo
Presione el botón MEM en el panel frontal o botón AS / PS del mando a distancia por primera vez, entra
en la búsqueda de número de archivo y el último dígito parpadea 0, que significa que la unidad está
preparada para aceptar el número de expediente para la búsqueda. Gire el botón VOL en el panel frontal
o pulse VOL + / botones - en el control remoto para introducir un botón del dígito, pulse SEL para mover
el dígito a la siguiente posición, y ahora usted puede seguir para inscribir números. Después de
completar las entradas, pulse la tecla OK en el panel frontal para jugar
12
13
GROUND ZERO
GROUND ZERO
Especificaciones
Conexiones y cableado
FM Tuner
Frequency range
Usable sensitivity
Stereo separation
87,5 ~ 108 Mhz
9 dBuV
28 dB
AM (MW) Tuner
Frequency range
Usable sensitivity
522 ~ 1620 Khz
30 dBuV
CD Player
Distortion THD
Signal to Noise Ratio
Frequency range
< 0,5%
60 dB
20 Hz ~ 20 Khz
Electric
Power supply
Current consumption
Load impedance
Dimensions
Power output
Line output
DC 11 ~ 16 Volt
< 10 Ampere
4 ~ 8 Ohm
178 mm x 165 mm x 50 mm /
7.01” x 6.50” x 1.97”
4 x 40 W Max
2 V (CD 1K 0 dB Vol Max)
Compatibility
SD
USB
CD
SD-HC >8 GB
USB 2.0 >8 GB
CD, CD-R, CD-RW, 12 cm discs
MP3, WMA, ID 3 Tag
Panel system
Sistema antirobo desmontable con display LED,
flip down front panel, ISO mount
LCD Display
Playback
Decoding: MP3, WMA playback with ID3 Tag display, file and folder
search
CD mechanism:
Electronic anti- shock (Audio CD 8 seconds, MP3 40 seconds)
Tuner
Connector A
A1 No conectado
A2 To telephone control terminal
A3 No conectado
A4 Al terminal con funte de potencia continua “+”
A5 Al cable remoto para uso con amplificador externo o
antenna automatica (max. 100mA 12V DC).
A6 Al terminar del atenuador de luz
A7 terminal controlado por el switch de encendido del
vehiculo
(12V DC) ON/OFF
A8 Tierra del vehiculo (metal)
Connector B
1. Altavoz derecho trasero (+)
2. Altavoz derecho trasero (-)
3. Altavoz derecho frontal (+)
4. Altavoz derecho frontal (-)
5. Altavoz izquierdo frontal (+)
6. Altavoz izquierdo frontal (-)
7. Altavoz izquierdo trasero (+)
8. Altavoz izquierdo trasero (-)
AM/FM receiver with 30 (FM18, AM 12) station memory,
auto / manual station store, preset scan, auto / manual tuning
Audio
DSP sound effect (None, classic, rock, pop, flat)
4 x 40 W (max) amplifier, 2 CH stereo RCA lineout
14
15
GROUND ZERO
GROUND ZERO
Tabla de Problemas
Síntoma
La unidad no
enciende (Ningún
sonido es
producido).
Causa
El Fusible esta en corto.
Cableado Incorrecto.
Cableado de salida del
amplificador es
incorrecto, o si hay un
cortocircuito entre los
cables de salida.
General
Ningún sonido es
producido por la
unidad o por los
amplificadores
externos
Nada ocurre
cuando son
presionado los
botones de
función el display
presenta fallas.
El sonido “salta”
CD
La calidad del
sonido es pobre
después de
encendido.
Remedio
Remplace el fusible con
uno del misma capacidad
de amperaje. Si el fusible
entra en corto de nuevo,
consulte con su tienda
local.
Consulte a su tienda local.
Consulte el diagrama de
cableado de la unidad para
comprobar las conexiones
correctas, asegúrese de
que el cableado se realiza
correctamente.
Bedienungsanleitung in weiteren Sprachen auf www.ground-zero-audio.com verfügbar !
Manual in more languages available on www.ground-zero-audio.com !
Mode d'emploi en vers ces langues disponible sur le site www.ground-zero-audio.com !
Gebruikers Handleiding in andere talen op www.ground-zero-audio.com beschikbaar !
Manual en otros idiomas en www.ground-cero-audio.com disponibles !
Die Gewährleistung entspricht der gesetzlichen Regelung. Eine Rücksendung kann nur nach vorheriger
Absprache und in der Originalverpackung erfolgen. Bitte unbedingt einen maschinell erstellten Kaufbeleg
und eine Fehlerbeschreibung beilegen. Von der Gewährleistung ausgeschlossen sind Defekte, die durch
Überlastung, unsachgemäße Behandlung oder bei Teilnahme an Wettbewerben entstanden sind.
Limited warranty - defective products must be returned in original packaging - please add a copy of the
original purchasing invoice showing the purchasing date and a
detailed description of the failure. Failure caused by overload, misuse or by using the product for
competition purpose are not covered by the warranty.
La unidad esta en
modo MUTE .
Apague la función MUTE.
La salida RCA esta
cableada
incorrectamente.
Chequee e instale
propiamente la conexión
de salida RCA al
amplificador externa.
El cableado entre el
terminal REM del
amplificador externo y
el plomo de la unidad
de la antena es
incorrecta, o conductor
de la antena de salida
de la unidad es
cortocircuito a tierra.
De garantie bepalingen van alle door ground zero geleverde producten is volgens wettelijke bepalingen
geregeld, Een retourzending kan alleen na duidelijke afspraak en in de originele verpakking
plaatsvinden.SVP een aankoopbon en een duidelijke storingsomschrijving bijvoegen.Van garantie
uitgesloten zijn defecten door overbelasting, onkundig gebruik, of door deelname aan wedstrijden (SPL)
ontstaan zijn
Conecte adecuadamente el
REM terminal del
amplificador externo y el
de la salida de la antena.
La garantie est conforme aux droits legaux. Un retour du produit défectueux doit être dans son
emballage d'origine sur presentation du reçu ou de la facture indiquant la description du defaut.La
presente Garantie n'est pas applicable lorsque le produit a été endommagé en raison : Mauvaise
alimentation, Trop de puissance (HP, Subwoofer) Accident, Installation ou Utilisation non conforme aux
normes Technique (Concours SPL etc.).
El microprocessor está
mal funcionando.
El conector ubicado
detrás del panel de
control está sucio.
El disco compacto está
sucio
El disco compacto está
fuertemente rayado.
Gotas de Agua o
humedad puede
haberse formado en el
interno del lente.
Apague la unidad, Presione
el botón OPEN y remueva
el Panel de control. Luego
presione el botón RESET
durante 2 segundos.
Limpie la suciedad con un
paño suave humedecido
con alcohol.
Limpie el disco compacto
con un paño suave,
evitando ralladuras en la
superficie.
Remplace con un disco
nuevo sin ralladuras.
Déjelo secar con la unidad
encendida por cerca de
una hora.
GROUND ZERO GmbH
Erlenweg 25; D - 85658 Egmating, Germany
Tel. +49 (0)8095/873 830
Fax -8310
www.ground-zero-audio.com
Wir behalten uns das Recht vor, zukünftig nötige Änderungen oder Verbesserungen an dem Produkt
vorzunehmen ohne den Kunden darüber zu informieren.
We reserve the right to make needed change or improvement to the product without informing customer about
this in advance.
Wij behouden ons het recht om de nodige veranderingen of verbeteringen aan het product door te voeren
zonder de klant hierover te informeren.
Nous réserve le droit d'entreprendre à l'avenir nécessairement des modifications ou des améliorations au produit
sans informer le client.
16
17
GROUND ZERO
GROUND ZERO