1
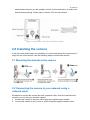
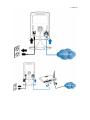
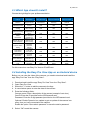
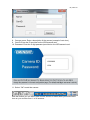
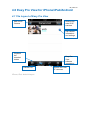
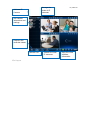
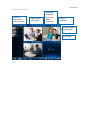
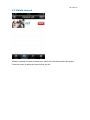
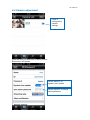
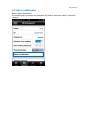
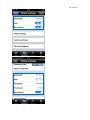
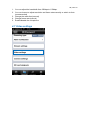
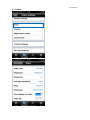
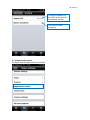
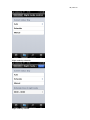
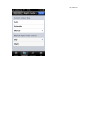
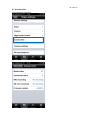
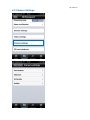
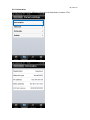
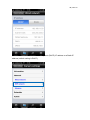
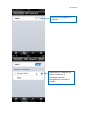
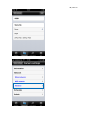
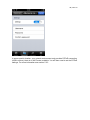
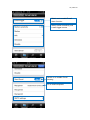
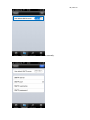
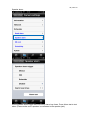
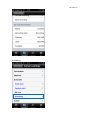
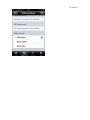
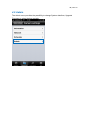
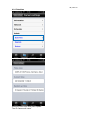
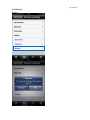
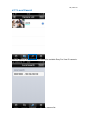
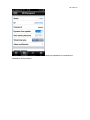
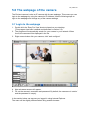
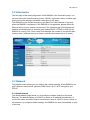
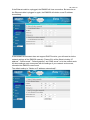
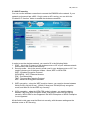
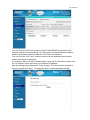
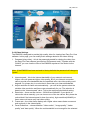
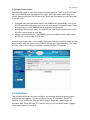
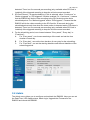
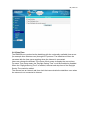
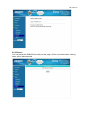
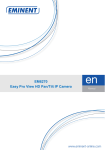
EM6250
Easy Pro View IP Camera
2 | ENGLISH
EM6250 – Easy pro view IP camera
Table of contents
1.0 Introduction ........................................................................................................... 4
1.1 Packaging contents ........................................................................................... 4
1.2 Requirements to access the camera. ................................................................. 4
1.3 Major hardware components. ............................................................................ 4
2.0 Installing the camera ............................................................................................. 6
2.1 Mounting the bracket to the camera................................................................... 6
2.2 Connecting the camera to your network using a network cable .......................... 6
2.3 Which App should I install? ................................................................................ 8
2.4 Installing the Easy Pro View App on an Android device ..................................... 8
2.5 Installing the Easy Pro View App on an Apple device ........................................ 9
2.6 Installing the software and camera on a PC or notebook (Windows). ............... 11
2.7 Adding the camera to a wireless network ......................................................... 13
2.7.1 Connecting to Wi-Fi using the WPS button. ...............................................13
2.7.2 Connecting to Wi-Fi using the PC (windows). ............................................13
2.7.3 Connecting to Wi-Fi using the App. ............................................................13
2.8 Mounting the camera on the wall or ceiling ...................................................... 14
3.0 Viewing images ................................................................................................... 14
3.1 On your smartphone/tablet (Android, iPhone, iPad) ......................................... 14
3.2 On your PC (Windows) in a remote location. ................................................... 14
3.3 Alarm-notification recording (micro SD-Card) ................................................... 15
3.4 Via the Internet using the web portal ................................................................ 15
4.0 Easy Pro View for iPhone/iPad/Android ............................................................... 16
4.1 The Layout of Easy Pro View........................................................................... 16
4.2 See the live video ............................................................................................ 18
4.3 Delete camera ................................................................................................. 20
4.4 Camera adjustment ......................................................................................... 21
4.5 Alarm notification ............................................................................................. 22
4.6 Stream settings................................................................................................ 24
4.7 Video settings .................................................................................................. 26
4.7.1 Video .........................................................................................................27
4.7.2 Control.......................................................................................................28
4.7.3 Night mode control ....................................................................................29
4.7.4 Camera info ...............................................................................................32
4.8 Camera Settings .............................................................................................. 33
4.8.1 Information ................................................................................................34
4.8.2 Network .....................................................................................................35
4.8.3 Schedule ...................................................................................................40
4.9 Admin .............................................................................................................. 48
4.9.1 Date/time ...................................................................................................49
4.9.2 Upgrade ....................................................................................................50
4.9.3 Reboot.......................................................................................................51
3 | ENGLISH
4.10 SD-Card Playback ......................................................................................... 52
4.11 Local Search ................................................................................................. 54
4.12 Information .................................................................................................... 56
5.0 The webpage of the camera ................................................................................ 57
5.1 Login to the webpage ...................................................................................... 57
5.2 Information ...................................................................................................... 58
5.3 Network ........................................................................................................... 58
5.3.1 Wired Network ...........................................................................................58
5.3.2 Wi-Fi security.............................................................................................60
5.3.3 Advanced ..................................................................................................62
5.4 Video ............................................................................................................... 63
5.4.1 Video Display ............................................................................................63
5.4.2 Video Settings ...........................................................................................64
5.4.3 Mobile Video settings.................................................................................66
5.4.4 Night mode Control ....................................................................................67
5.5 Schedule ......................................................................................................... 67
5.5.1 E-mail/FTP alarm.......................................................................................68
5.5.2 Speaker Alarm ...........................................................................................70
5.5.3 NAS settings..............................................................................................71
5.5.4 SD-Card settings .......................................................................................74
5.5.5 Scheduling.................................................................................................75
5.6 Admin .............................................................................................................. 76
5.6.1 Admin login................................................................................................77
5.6.2 LED Display Control ..................................................................................77
5.6.3 Date/Time ..................................................................................................78
5.6.4 Upgrade ....................................................................................................79
5.6.5 Reboot.......................................................................................................80
5.6.6 Set to factory default ..................................................................................81
6.0 Frequently Asked Questions and other related information .................................. 82
7.0 Service and support............................................................................................. 82
8.0 Warning and points of attention ........................................................................... 83
9.0 Warranty conditions ............................................................................................. 83
10.0 Declaration of Conformity .................................................................................. 84
4 | ENGLISH
1.0 Introduction
Congratulations with the purchase of this high-quality Eminent product! This product
has undergone extensive testing by Eminent’s technical experts. Should you
experience any problems with this product, you are covered by a five-year Eminent
warranty. Please keep this manual and the receipt in a safe place.
Register your product now on www.eminent-online.com and receive product updates!
1.1 Packaging contents
The following parts need to be present in the packing:
•
EM6250
•
Power supply
•
Quick install guide
•
Network cable
•
Mounting bracket with screws and plugs
•
Screwdriver
•
CD-ROM with software and wizard
•
ID/Password card
1.2 Requirements to access the camera.
It is very easy to access the video images of the EM6250 on your smartphone, tablet
or PC. You only need the ID and password that is written on your ID/Password card
and download the application for your device. You do not need to remember or setup
the configuration of your modem/router to be able to access the camera.
1.3 Major hardware components.
The major components on the front panel of the EM6250 are the built-in microphone,
lens and LEDs :
1. Microphone – for receiving the audio/voice. Effective distance is about 5 meters.
2. Lens – the lens is inside the camera body and the focus of the lens is fixed, you
do not need to spend time to adjust the focus, the effective focus range is from
30cm to infinity. There are two lens for day and night usage separately.
3. Status indication LED (red) – this LED is to indicate the Internet connection status.
When the Internet connection is connected, the LED will be constant red light. If
there is any Internet connection problem, the LED will be blinking red light.
5 | ENGLISH
4. Ethernet indication LED (blue) – this LED is to indicate if the Ethernet link is ok
and packet traffic is sending/receiving. When the Ethernet cable is connected, the
LED is on. When there is packet sending/receiving, the LED is blinking blue light.
5. SD card indication LED(yellow) – this LED is to indicate the status of the Micro-SD
card recording, it will be on when the Micro-SD card is inserted and will blink
during recording.
6. Micro-SD card slot – for inserting the Micro-SD Card. (support up to 32G bytes)
7. WPS button – this is to automatically synchronize the Wi-Fi settings with a WPS
capable Wi-Fi router.
8. Speaker jack – connect to an external speaker for two way audio and speaker
alarm usage.
9. PIR sensor – for the detection of movement.
10. IR LED – for the Infra-Red lighting of the night mode usage.
Major components in the front and side panel
The major components on the back panel of the EM6250 are the bracket screw jack,
power jack, Ethernet jack and reset button:
1. Bracket screw jack – this is the position to screw in the bracket of the EM6250.
With the bracket, you can put the EM6250 on the desk, on the wall or on the
ceiling.
2. Power jack – this is the place to plug in the power adapter. The power needed for
this EM6250 is 12V/1.0A or 5V/1A, please make sure you are using the correct
power adapter.
3. Ethernet jack – this is the place to plug in the RJ45 Ethernet cable. When the
Ethernet link is ok, the Ethernet indication LED on the front side will be blue light.
4. Reset button – this is the button to reset the EM6250 to default factory settings.
You need to use a small stick like pencil or tooth stick to press the reset button for
more than 3 seconds to enable the reset function. Usually when you forgot the
6 | ENGLISH
administrator account, you will probably need to do this reset action to reset to the
default factory settings. Please refer to section 5.6.6 for more details.
Major components in the back and bottom panel
2.0 Installing the camera
A few short and simple steps are necessary to connect and assign the camera, and to
enjoy the use of the camera. Use the following steps to connect the camera.
2.1 Mounting the bracket to the camera
2.2 Connecting the camera to your network using a
network cable
We advise to connect the camera first with a network cable. Once the camera works
correctly, you can use your wireless network.
1. Connect the camera to a power outlet using the supplied power adapter.
2. Connect the camera to your router or switch using the supplied network cable.
7 | ENGLISH
8 | ENGLISH
2.3 Which App should I install?
Choose the right App for your preferences/device
Feature
Description
Easy Pro View
Easy Pro View HD
Easy Pro View
Platform
Support device
ID/Password
Access
Remote Live
video viewing
Video record
and playback on
device
Motion/Audio
alert directly to
smartphone
Retrieve video
data from SD
card remotely
Wi-Fi Scan, test
and other
advanced
settings
Local device
scan and
auto‐search
Push notification
on motion
detection
Audio
notification on
motion detection
Retail Price at
App Store
iPhone/iPod
iPad only
Android
YES
YES
YES
YES
YES
YES
YES
YES
YES
YES
YES
YES
YES
YES
YES
YES
YES
YES
YES
YES
YES
YES
YES
YES
YES
YES
YES
FREE
FREE
FREE
CAMID/Password
Remote Live
viewing
Video Recording
& Playback
PUSH
Notification
Remote SD card
Video Playback
Advance Video
setting
Local device
Auto‐search
Motion Detection
Push Alert
Audio Detection
Push Alert
Cost
For this manual we use Easy Pro View on iPod/iPhone.
2.4 Installing the Easy Pro View App on an Android device
Before you can view the video of the camera, you need to download and install the
app “Easy Pro View” from the “Play Store”.
1.
2.
3.
4.
5.
Download and install the app “Easy Pro View” from the “Play Store”.
Open Easy Pro View.
Select the “+” button to add the camera to the App.
A new window opens to enter the data of the camera.
Enter the following fields:
Camera name: Enter a description of the camera (example: front door)
CamID: Enter the ID provided on the ID/Password card.
Password: Enter the 4 digit password provided on the ID/Password card.
Optional: Enable Dynamic icon update to get an update of the camera icon
every time you have connected to the camera.
Enable the option “Save admin password” to save the admin password.
6. Select “OK” to add the camera.
9 | ENGLISH
10000000
1234
2.5 Installing the Easy Pro View App on an Apple device
Before you can view the video of the camera, you need to download and install the
app “Easy Pro View” from the “App Store”.
1.
2.
3.
4.
5.
Download and install the app “Easy Pro View”* from the “App Store”.
Open Easy Pro View.
Select the “+” button to add the camera to the App.
A new window opens to enter the data of the camera.
Enter the following fields:
Camera name: Enter a description of the camera (example: front door)
CamID: Enter the ID provided on the ID/Password card.
Password: Enter the 4 digit password provided on the ID/Password card.
Optional: Enable Dynamic icon update to get an update of the camera icon every
time you have connected to the camera.
Enable the option “Save admin password” to save the admin password.
6. Select “DONE” to add the camera.
10 | ENGLISH
Switch ON/OFF for
dynamic icon update
Switch ON/OFF to save
admin password
Click to select trigger
source for alarm
notification (section 4.5)
*For iPad download and install Easy Pro View HD this adds the possibility to view
more IP-Cams in one screen and the screen is adjusted to use in landscape mode.
11 | ENGLISH
2.6 Installing the software and camera on a PC or
notebook (Windows).
Before you can view the video of the camera, you need to install the software” Easy
Pro View” from the CD-ROM.
1.
2.
3.
4.
5.
Insert the CD in the CD-ROM.
If auto-run is enabled the Wizard should start.
Run the wizard to install the application Easy Pro View/Play.
There are 2 applications installed on the PC: Easy Pro View and Easy Pro Play
Open Easy Pro View. (If prompted with a screen about the firewall click always
allow).
6. If the computer and the EM6250 is connected to the same network, The CAM ID
will be displayed in the “Auto Search” list. You can double click the “Auto Search”
to search all the connected IP CAMs any time. The only thing left right now for
seeing the video is to double click the CAM ID item in the “Auto Search” list. A
window asking for password input will pop up. Please enter the password
displayed on your ID/Password card into this field and click “ok”. The video will
then be displayed on the window.
7. If the EM6250 is not in the same network as the computer you can add the
EM6250 by right clicking the mouse button on “Camera List” and select “new
Camera”.
12 | ENGLISH
8. Camera name: Enter a description of the camera (example: front door)
9. CamID: Enter the ID provided on the ID/Password card.
10. Password: Enter the 4 digit password provided on the ID/Password card.
10000000
1234
11. Select “OK” to add the camera.
With the toolbar you can select how and the amount of video feeds you would like to
view on your monitor from 1 to 36 screens.
13 | ENGLISH
2.7 Adding the camera to a wireless network
There are 3 options to connect the EM6250 to your wireless network. First option is to
use the WPS button (Modem/router needs to support the WPS option). The second
option is to use the software installed on your PC (windows). Third option is to
configure the settings by using the App.
2.7.1 Connecting to Wi-Fi using the WPS button.
1. Disconnect the Ethernet cable from the camera.
2. Press the WPS button on the camera.(1 second)
3. Press the WPS button on your modem/router.(please refer to the manual of the
modem router for information about how to start WPS synchronization)
4. The blue LED will start blinking (Camera is synchronizing the wireless encryption
settings with your modem/router). The synchronization is ready when the Blue
status LED continuously lit.
2.7.2 Connecting to Wi-Fi using the PC (windows).
1. Ensure the camera is connected to the network with a Ethernet cable.
2. Install the software on the CD-ROM
3. Start “Easy Pro View”
4. Right click on “camera ID” in the auto search list and click “web configure”
5. Login with username: (default “admin”)
Password: (default “leave blank”)
6. Click Network
7. Wi-Fi security
8. A control panel will appear for your Wi-Fi settings
9. Select enable Wi-Fi function (to activate he Wi-Fi module)
10. Now you can use 2 different ways to configure the camera to connect to the Wi-Fi
network; manually or you can use the software to AutoDetect your Wi-Fi network.
11. Click “Wi-Fi scan” to search for available wireless networks.
12. Select the Wireless network you want to connect to.
13. Enter the Encryption settings and the WPA-PSK key of the wireless network and
click “Save & Apply”.
14. Disconnect the Ethernet cable to connect to the wireless network.
2.7.3 Connecting to Wi-Fi using the App.
1. Ensure the camera is connected to the network with a Ethernet cable.
2. Start the App “Easy Pro View”.
3. Select the “Camera settings” menu by pressing the arrow next to the camera you
would like to configure.
4. (if prompted Login with username: (default “admin”)
Password: (default “leave blank”)
5. Select “Network”
6. “Wi-Fi Network”
7. Enable Wi-Fi
8. A list of available wireless networks will be displayed.
14 | ENGLISH
9. Select the wireless network you want to connect to (if not displayed press
“refresh”)
10. Enter the wireless encryption key and press “ok”
11. Disconnect the Ethernet cable to connect to the wireless network.
2.8 Mounting the camera on the wall or ceiling
1. Once the camera is connected correctly with your computer, you can mount the
camera on a wall or ceiling.
2. Use the mounting stand to mark the holes at the location where you want to mount
the camera.
3. Drill the holes and fill the holes with the supplied plugs.
4. Mount the bracket stand to the wall or ceiling using the supplied screws. If the
bracket is still attached to the camera, you can twist of the bracket again, in order
to make mounting the screws easier.
5. Mount the camera on the bracket.
6. Connect the power supply into the wall socket and connect the power tip to the
camera.
3.0 Viewing images
You can view the images both on your computer and on your smartphone screen, as
we explain in the sections below.
Optionally, you can install the supplied software so you can find the camera directly
with your computer and make recordings with your computer.
3.1 On your smartphone/tablet (Android, iPhone, iPad)
Start the App Easy Pro View (HD)* press the camera-icon of the camera you wish to
view. The device will start connecting with the camera and will show live images of the
camera.
*Easy Pro View HD is for iPad only this App ads the possibility to view more IP-Cams
in one screen and the screen is adjusted to use in landscape mode.
3.2 On your PC (Windows) in a remote location.
After Easy Pro View software is installed, it’s very easy to add a camera item in the
“Camera List” folder of the Easy Pro View software, key in the CAM ID and Password
(from the ID/Password card). And then double click this camera item. You will then
see the Camera video immediately. No further NAT/router setting modifications are
needed. The camera can be controlled remotely as well.
15 | ENGLISH
3.3 Alarm-notification recording (micro SD-Card)
The EM6250 offers the possibility to record video images and store them on the micro
SD-Card when a security sensor (PIR, motion or sound) is triggered. This function
needs to be enabled in the settings of the camera. To playback these recordings you
need to start the Easy Pro View App. Press and hold the camera-icon of the camera
you would like to playback the recordings until a menu is displayed. Select the option
“SD card playback”. Now you can select the date and time of the recording you wish to
playback to start viewing the video images.
3.4 Via the Internet using the web portal
You can view live camera images on internet by logging into the online portal
http://easyproview.eminent-online.com/ enter the CAM ID and password, you do not
need to open a port in the router, the camera will be accessible automatically. This
feature is only supported by Internet Explorer.
10000000
1234
16 | ENGLISH
4.0 Easy Pro View for iPhone/iPad/Android
4.1 The Layout of Easy Pro View
Add new IP
Camera
Arrange the
order of IP
cameras
Get camera
information
and settings
Playback
the
recorded
videos
Easy Pro
View
software
information
Camera List
iPhone, iPod, Android Layout
Search for Local
IP cameras
Arrange the
order of IP
cameras
Add new IP
Camera
17 | ENGLISH
Get camera
information and
settings
Playback the
recorded videos
Camera List
iPad Layout
Search for Local
IP cameras
Easy Pro View
software
information
18 | ENGLISH
4.2 See the live video
1. Select “camera List”
2. Select the camera you wish to view.
Press to
disconnect the
live video
Live video
Start/stop
recording
(turns red
while
recording
Video stream
information
Take a
snapshot
Trigger alarm
Enable/disable
Speaker
19 | ENGLISH
iPhone, iPod, Android
Press to
disconnect
the live video
Video stream
information
Start/stop
recording
(turns red
while
recording
Take a
snapshot
Enable/disable
Microphone
Live video
iPad
20 | ENGLISH
4.3 Delete camera
Slide the camera you wish to delete from right to left, the delete button will appear.
Press the button to delete the camera from the list.
21 | ENGLISH
4.4 Camera adjustment
Press to
configure the
camera
settings
Press the blue icon as shown in above picture.
Below menu will appear.
Switch ON/OFF for
dynamic icon update
Switch ON/OFF for saving
admin password
22 | ENGLISH
4.5 Alarm notification
Select “Alarm Notification”
If prompted enter username and password (By default username “admin” password
“empty”).
23 | ENGLISH
24 | ENGLISH
Select the trigger source and click update.
If the alarm is triggered you will receive an alarm notification. As shown in below
picture, press view to view the live stream including pre-recording buffer (if SD-card is
installed).
4.6 Stream settings
This option allows you to set the bandwidth and quality of the live stream of your
mobile connection. In most cases the bandwidth of your mobile phone will be lower in
comparison to your home internet connection. In some cases we advise you to
change these values. For example your telecom provider charges you for every MB
send to your phone (roaming). If you choose a lower resolution and/or frame rate the
bandwidth and amount of MB will be lowered.
25 | ENGLISH
26 | ENGLISH
1. You can adjust the bandwidth from 32Kbps to 1.5Mbps.
2. You can choose to adjust resolution and frame rate manually or switch to Auto
(recommended)
3. Change the resolution (manual)
4. Change frame rate (manual)
5. Enable/disable the microphone.
4.7 Video settings
27 | ENGLISH
4.7.1 Video
28 | ENGLISH
Video Color: User can set the video color: colored or black and white.
Brightness: Control the brightness of the camera video from 1(dark) ~ 10(Bright) level.
Sharpness: Control the level of sharpness and clearness of the image.
Low Light Sensitivity: The level of the camera senses the low light condition.
Place: You can choose the camera installation environment in order to make camera automatically
adjust for the best image quality.
Preference: You can choose image quality, video motion, better quality or best quality as your
preference of the video quality.
Time display on video: Enabling this function will make the camera embed the time information
into the picture.
Microphone: Disable or enable the microphone. When you enable the Mic., the user who monitors
the image can hear the sounds.
Video Flip: This function is to flip the image for mounting camera upside down.
4.7.2 Control
29 | ENGLISH
Control the behavior of
the LEDs on the front of
the camera (On/Off)
The level of motion
sensitivity
4.7.3 Night mode control
Configure how the Night mode is controlled.
30 | ENGLISH
Night mode by schedule.
Night mode by manual.
31 | ENGLISH
32 | ENGLISH
4.7.4 Camera info
View camera information.
33 | ENGLISH
4.8 Camera Settings
34 | ENGLISH
4.8.1 Information
View camera information (different information as described in section 4.7.4)
35 | ENGLISH
4.8.2 Network
36 | ENGLISH
You can select if the camera will use a Dynamic (DHCP) IP address or a Static IP
address (default setting is DHCP).
37 | ENGLISH
Switch on to enable Wi-Fi
function
Select the Wi-Fi network you
wish to connect to. If
necessary enter the
encryption key of the Wi-Fi
network
38 | ENGLISH
39 | ENGLISH
In some special situation, your network environment only provides PPPoE connection
(ADSL service), there is no NAT/router available. You will then need to set the PPPoE
settings. For more information see section 5.3.3
40 | ENGLISH
4.8.3 Schedule
Email alarm
41 | ENGLISH
Switch on to enable E-mail
alarm function
Select motion sensitivity and
e-mail trigger source
Switch on to enable E-mail
sending
Fill in email recipients
42 | ENGLISH
Switch off if you want to enter a SMTP server manually.
43 | ENGLISH
Speaker alarm
Select speaker alarm trigger and how many alarm loop times. Press Alarm test to test
alarm (Please make sure a speaker is connected to the speaker jack).
44 | ENGLISH
SD-Card
Switch ON and select the
type of recording
always/scheduled
Select circular or stop
recording if disk (SD-Card)
space is full
45 | ENGLISH
Scheduling
46 | ENGLISH
Select the trigger source: Email alarm, Speaker alarm, SD-Card record
47 | ENGLISH
Select the time period
48 | ENGLISH
4.9 Admin
The Admin menu provides the possibility to change System date/time, Upgrade
Firmware or reboot device remotely.
49 | ENGLISH
4.9.1 Date/time
Select the time zone and press update.
The IP-Camera will reset.
50 | ENGLISH
4.9.2 Upgrade
Upgrade
This function is not available please view section 5.6.4
51 | ENGLISH
4.9.3 Reboot
Reboot
52 | ENGLISH
4.10 SD-Card Playback
SD-Card Playback
Press to view recorded files from SD-Card
53 | ENGLISH
Select the date and time of the recorded video you wish to play
54 | ENGLISH
4.11 Local Search
Use this option to scan your internal-network for available Easy Pro View IP camera’s.
Select the camera from the list to add it to the camera list.
55 | ENGLISH
You need to give a name to the camera and enter the password to complete the
installation of the camera.
56 | ENGLISH
4.12 Information
57 | ENGLISH
5.0 The webpage of the camera
The Eminent camera is also an IP camera with its own webpage. This means you can
login to the webpage by using the camera’s IP Address. Use the following steps to
login to the webpage and change any of the camera settings.
5.1 Login to the webpage
1. Double click the ‘Easy Pro View’ shortcut placed on your desktop.
(This program has been installed and described in section 2.5).
2. The program will automatically search for your camera in your network. When
found, the camera will be displayed in the list.
3. Right mouse button click your camera, click “web configure”
4. Now a browser screen will appear.
5. Fill out the camera’s username and password. By default, the username is ‘admin’
and the password is ‘empty’.
In the section below, we assume you logged in using Internet Explorer.
The menu will be slightly different when using another browser.
58 | ENGLISH
5.2 Information
The first page of the web configuration of the EM6250 is the information page. You
can see the model name/firmware version, CAM ID, registration status, network type
and current video settings( bandwidth, resolution) in this page.
The EM6250 can be viewed remotely by the Easy Pro View software or App only
when the EM6250 is registered. If the EM6250 is not registered, please check the
Ethernet wiring of your network environment. The “Network type” field displays the
network connection(wired or wireless) and method(DHCP, PPPoE or static ip) the
EM6250 is running. The “Video users” field displays the number of connected video
viewing users. (maximal amount of users connected simultaneously is 20 users).
5.3 Network
The Network menu allows you to configure the network settings of the EM6250 such
as IP address, subnet mask, gateway, DNS Server, Wi-Fi, Wi-Fi encryption, and
PPPoE
5.3.1 Wired Network
The Wired Network page allows you to modify the network settings of the wired
Ethernet. The default settings use DHCP to obtain an IP address automatically. In
most of the home and office network environment, there is a DHCP server running. In
this situation, by using this default settings, the EM6250 can work immediately in most
of the time.
59 | ENGLISH
If the Ethernet cable is unplugged, the EM6250 will lose connection. But as soon as
the Ethernet cable is plugged in again, the EM6250 will obtain a new IP address
immediately.
If the network environment does not support DHCP function, you will need to set the
network settings of the EM6250 manually. Please fill in all the fields including “IP
address”, “Subnet mask”, “Default gateway” and “DNS server” to let the network work.
All these settings must correspond with the settings of your network environment,
otherwise the EM6250 cannot work.
The default setting is “Obtain an IP address automatically”.
60 | ENGLISH
5.3.2 Wi-Fi security
You can use the wireless connection to connect the EM6250 to the network. If your
network environment has a 802.11 b/g/n router or AP running, you can click the
“Enable Wi-Fi function” button to enable the wireless connection.
In order to use the wireless network, you need to fill in the following fields:
1. SSID – this is the ID (name) of the wireless router or AP of your wireless network
environment, this must be set correctly.
2. Security mode – this is the security mode used in your wireless router or AP. You
need to choose one of the three modes – None, WEP or WPA-PSK.
WEP : Wireless Encryption Protocol.
WPA/WPA2 : Wi-Fi Protected Access.
PSK : Pre-Shared Key.
TKIP : Temporal Key Integrity Protocol.
AES : Advanced Encryption Standard.
3. WEP encryption – when the WEP mode is chosen, you need to choose between
64-bit(5 char), 64-bit(10 hex), 128-bit(13 char) and 128-bit(26 hex) encryption
mode, and then fill out the WEP key correctly.
4. WPA encryption - when the WPA-PSK mode is chosen, you need to choose
between TKIP and AES encryption mode, and then fill out the WPA-PSK key
correctly. WPA2-PSK is also supported. But WPA Enterprise or WPA2 Enterprise
is not supported.
All the fields in this page must be filled out correctly, with the same settings as the
wireless router or AP are using.
61 | ENGLISH
You can click the “Wi-Fi test” button to check if the EM6250 can connect to the
wireless network for these settings. You will need to unplug the Ethernet cable to
enable the wireless connection after the “Wi-Fi test” is successful.
You can click the “Wi-Fi scan” button to scan for all the available access points
nearby. See figure for reference.
If you want to define a fixed IP address when using a Wi-Fi connection, please click
the “IP address” button and enter your preferred IP address.
After the settings are updated click “Save & Apply”, The device does not need to
reboot to let the Wi-Fi work, To enable the Wi-Fi, unplug the Ethernet cable.
62 | ENGLISH
5.3.3 Advanced
In some special situation, your network environment only provides PPPoE connection
(ADSL service), there is no NAT/router available. You will then need to set the PPPoE
settings in the “Advanced Network” page. Only the PPPoE username and password
are needed to let PPPoE work. After the “Save & Apply” button is clicked, the PPPoE
function will work immediately. You can check the “Registration status” in the
“Information” page to see if the EM6250 is registered using the PPPoE connection.
Please notice that the DHCP or static IP settings in the “Network” page can work
together with the PPPoE connection. Only the PPPoE has higher priority, so, if the
PPPoE is working, the EM6250 will use PPPoE to connect to the Internet.
The default setting is “Disable PPPoE”.
63 | ENGLISH
5.4 Video
The Video menu allows you to configure the Video settings of the EM6250 such as
Resolution, Frame rate, Day & Night, Flip image, Brightness ,Sharpness, Video
Colour, Indoor or outdoor image quality, Mobile stream.
5.4.1 Video Display
This page allows you to view the video display and control the Day & Night movement
of the camera. For the first time use of this display on a computer, an ActiveX
component will be automatically downloaded into the browser (This will only work in
Microsoft Internet Explorer, run Internet explorer as administrator). This could take
some time, depending on the internet speed. The component is downloaded from a
public domain, the computer must be connected to the Internet.
If you want to modify the video display screen size, please refer to section 5.4.2 for
more details.
64 | ENGLISH
5.4.2 Video Settings
The EM6250 is designed to provide high quality video for viewing from Easy Pro View
software. In this page, you can modify some settings related to the video viewing:
1. Password (play video) – this is the password needed for viewing the video from
the Easy Pro View software (provided on ID/Password card). Together with the
CAM ID, you can view the video of the EM6250 anywhere in the world via the
Internet.
Note : If the EM6250 has been restored to factory defaults the password will change to
“ipcam”
2. Internet speed – this is the Internet bandwidth of your network environment.
Higher value will generate higher video quality. But if your Internet connection
cannot provide more bandwidth than the specified value, the video quality could
degrade. So, please key in a value that is lower than your internet bandwidth.
3. Adjust resolution & frame rate automatically – you can let the system select the
suitable video resolution and frame rate automatically for you. The selection is
based on the “Internet speed” value. This is the recommended default setting.
4. Resolution – there are two choices : 320x240 and 640x480. If you decide to
choose the value manually, you can choose one of the two values. But, please be
noticed that if the Internet speed is slow (low value), high resolution(640x480) or
frame rate could cause very bad video quality.
5. Frame rate – the video frame display rate. Higher value means faster movement
and continuity in the video display.
6. Favor/Preference – choose between “Video motion”, “Image quality”, “better
quality” and “best quality”. When the real bandwidth is not enough for the selected
65 | ENGLISH
7.
8.
9.
10.
11.
12.
13.
14.
“Internet speed”, the system will need to degrade the video motion or image
quality. This selection will decide if the user want to maintain the “video motion” or
“image quality” when the internet speed is not good enough.
Brightness – the brightness of the video, lower value means darker display.
Sharpness – the sharpness of the video, higher value means sharper video.
Low light sensitivity – The low light sensitivity could be normal, high or very high.
When the low light sensitivity is high, the system could see better video clearance
under low light situation, but the moving object will not be very clear under this low
light environment. Under very dark environment, set to “very high” will get better
video clearance. The default value of this setting is “high”.
Video color – choose between “colored” and “black & white”.
Video flip – can do “normal” or “flip” video display, this is needed if the EM6250 is
installed on the ceiling or wall.
Outdoor/Indoor video – for better video display quality, modify this setting when
taking indoor or outdoor video. The default setting is “Outdoor video”, in most
cases, this is also ok for indoor usage. Under some special cases, there could be
some lines on the video display when the EM6250 is taking indoor video. In this
situation, change the setting to “Indoor video” will solve the problem. Please also
be noticed that in “Indoor video” setting, the video display of outdoor view is very
vague. For indoor usage, if there is strong sun light into the room, please select
the “indoor+sun light” choice. (Some light sources interfere the video quality to
change the frequency of the recordings you need to select indoor video or
indoor+sunlight to change the value to 60Hz or 50Hz.
Enable/disable audio microphone – you can enable or disable the audio
microphone on the EM6250. If disable, there will be no voice on the Easy Pro
View video viewing.
Enable/disable time display on video – if enabled, the date/time of the system will
be displayed on the left-upper corner of the video.
When this modification is saved, it works immediately, but all the connected video
viewing users will be disconnected.
66 | ENGLISH
5.4.3 Mobile Video settings
The EM6250 is able to be viewed from a 3G mobile phone, please download “Easy
Pro View”/”Easy Pro View HD” software from App Store for iPhone/iPad and “Easy
Pro View” from Android Market for Android Mobiles and pads..
The audio, video frame rate, resolution and bandwidth for 3G mobile access could be
set independently from the video settings for LAN access. The maximum allowed
resolution is 640x480 and maximum allowed bandwidth is 768 kbps.
67 | ENGLISH
5.4.4 Night mode Control
The EM6250 is able to work both in day time and night time. There is an IR LED that
can let the EM6250 see the objects in the night. This night mode control page is to
control when the time the IR LED will be on. There are three ways to control the night
mode (IR LED) :
1. Automatic day and night mode switch : the EM6250 will automatically turn on the
IR LED when the night time is arrived or the environment is becoming dark. There
is a light sensor on the EM6250 that is doing this light detection.
2. Scheduled time of night mode : the EM6250 can also be scheduled to turn on the
IR LED in a time range of each day.
3. Manual night mode control : the EM6250 can be manually forced to night mode(
IR LED on ) or day mode( IR LED off ).
In order to get better video colour display during day time and night time, there are two
video sensors and two lenses on the EM6250 for day and night separately. This make
sure the video colour quality is excellent compared to other IP camera’s.
5.5 Schedule
The Schedule menu allows you to configure and manage when and how the alarm
notifications are triggered. You can configure the way of notification: Email/FTP,
Speaker, Push notification. You can also configure where the video images are
recorded: NAS, Micro SD-card, FTP server. Also you can set which sensor triggers
what type of alarm or recording.
68 | ENGLISH
5.5.1 E-mail/FTP alarm
The EM6250 provides the Email/ftp function, you can enable or schedule the Email/ftp
ability in this page, the EM6250 will then send out an email with a jpeg picture
attached in the email and/or send out the jpeg picture file to a ftp server. The related
settings are explained below:
1. Email/FTP trigger – choose between “motion”, “PIR”, “schedule” and “disable”
A. If “motion” is selected, it means that when there is a motion detected, the
system will send out the email and/or ftp with the captured video snapshot.
B. If “PIR” is selected, it means that when there is a PIR alarm detected, the
system will send out the email and/or ftp with the captured video snapshot. If
the PIR alarm is constantly on, the EM6250 will keep sending out email/ftp
message every second for up to 30 seconds.
C. If “schedule” is selected, it means that the email/ftp alarm detection and
triggering will be scheduled by the “scheduling” in section 5.5.5.
D. “disable” will disable the email/ftp alarm.
2. Motion sensitivity – there are 10 possible choices in this field.
3. “High” means high sensitivity, i.e., the motion detection is triggered by a very small
movement in the video image. If “High” is selected and the size of the moving
object is larger than about 1% of the whole video area, it is detected. Please be
noticed that the real size of the object could be large or small, anyway, the
detection is only based on the relative size of the object. Probably a small pencil
moving near the EM6250 could be detected, but a moving car far away from the
EM6250 could not be detected.
4. “Low” means low sensitivity, i.e., the motion detection is triggered by a very large
movement. If the size of the moving object is larger than about 10% of the whole
video area, it is detected. “Median” means 3% to trigger the detection.
5. Send email message – if this item is enabled, the EM6250 will send out an email
message with the jpeg picture attached to the specified email account.
6. Email recipient#1~#3 – this is the email address to receive the detection notice
message. An email message with the jpeg picture file named by the date/time of
the triggered moment will reach this address.
7. Send FTP message – if this item is enabled, the EM6250 will send out a jpeg
picture file to the specified ftp account.
8. FTP server – this is the FTP server address to receive the jpeg file.
9. FTP username/password – this is the username/password to login into the FTP
server, so, this triggered jpeg file will be allowed to reach this FTP server.
10. Remote folder – the jpeg file will be put under this folder of the FTP server.
When this modification is Saved, it works immediately, but all the connected video
viewing users will be disconnected.
The default setting is “Disable”.
69 | ENGLISH
For the email message to work, a SMTP server is required. Click the “advanced”
button will display the SMTP server settings page. A default SMTP server is provided,
so that the user does not need to use a specific SMTP server. But, anyway, the user
could also specify his own SMTP server.
1. SMTP server – this is the SMTP server that will help to transfer the email
message. This server is irrelevant to the “Email recipient” address.
2. SMTP username/password – this is the account to use the SMTP server to
transfer the email message. The SMTP server and username/password account
are only for transfer the email message to the “Email recipient”, the “Email
recipient” could be on another email server or any reachable email address. The
username and password fields could be left empty if no authentication is needed
for the SMTP server.
3. SMTP server test – after the settings are filled, you could press “SMTP server
test” to check if all the settings are correct. If the default SMTP server is chosen, it
will test the default SMTP server.
70 | ENGLISH
Note: Sound sensor is only available in the App.
5.5.2 Speaker Alarm
The EM6250 provides speaker alarm function, a PIR or video motion detection could
trigger the speaker alarm. The duration of the alarm could also be set. The related
settings are explained below:
1. Speaker alarm trigger– select the trigger mode of the speaker alarm
A. Motion trigger – if this is selected, the speaker alarm signal will be active when
video motion is detected. The detection sensitivity is set In the “motion
detection” page.
B. PIR trigger – if this is selected, the speaker alarm will work when the PIR
sensor is detected..
C. Schedule – if this is selected, the speaker alarm is scheduled according to the
settings of scheduling in section 5.5.5.
D. Disable–disable the speaker alarm.
2. Alarm loop times – this is the number of the loop times of the speaker alarm.
71 | ENGLISH
Note: This feature requires a speaker to be connected to the speaker jack.
5.5.3 NAS settings
The EM6250 provides the recording of the video files into a standard NAS ( Network
Access Storage ) device. The EM6250 connects to the NAS device using the standard
LMX_NS/CIFS/SSN protocols that are the same as the Microsoft Windows network
neighbourhood protocols. This makes the EM6250 easily record the video files to all
the standard NAS devices in the market. Since there are a lot of different choices,
including prices and scales, users can decide by themselves which is best for their
needs. By using this function, the standard NAS device is becoming a NVR (Network
Video Recorder) device.
Note : when the EM6250 is doing NAS recording, this is counted as one video user.
(max. 20 users can be connected at the same time)
1. If the “Always Recording” is selected, the system will start to record to the NAS
storage device immediately and keep recording always. If the “Schedule
Recording” is selected, the system will do the NAS recording according to the
“scheduling” in section 5.5.5. “Disable Recording” will disable this NAS recording.
2. When doing the NAS recording, the system will check the free disk space of the
NAS device. If the free disk space is less than the specified number, the system
will do “Circular recording” (overwrite the oldest recorded files of this EM6250 in
the NAS device) or “Stop recording” as selected. If the “keep recorded video for xx
days” is selected, the system will do circular recording and over write the recorded
video files older than xx days ago.
3. The EM6250 can connect to the NAS device by using the “NAS name” or “NAS IP
address”. If the NAS device and the EM6250 are in the same local area network,
the EM6250 can automatically locate and connect to the NAS device by the “NAS
72 | ENGLISH
4.
5.
6.
7.
8.
9.
name”. If the NAS device uses a fixed IP address( either in the local area network
or in the public internet), the EM6250 can connect to it by the “NAS IP address”.
The “Shared folder name” is the folder in the NAS device that will record the video
files of the EM6250.
The “NAS access account” and “NAS access password” are the username and
password to login into the specified “Shared folder name” of the NAS device.
NAS Scan – use this to scan for some specific NAS devices in the same network.
Not all the NAS devices are supported for this scan function.
NAS Info – display the NAS storage capacity and available disk space.
Configure NAS (web) – click this to connect to the web configuration page of the
NAS device. Need to key in the login username/password of the NAS device.
Access NAS files – on the Microsoft Windows platform, click this to access the
files on the NAS devices.
In the Microsoft Windows environment, you can access to the NAS device by keying
the URL address \\”NAS name”\”shared folder name” or \\”NAS IP address”\”shared
folder name” in the windows Internet Explorer, and then key in the “NAS access
account” and “NAS access password” to the prompted login window. The video files
are recorded under the subfolder IPCamRecordFiles/Recording/ID-ID, where ID is the
ID of the EM6250. All the recorded files are with the name of hhmmss.crf format,
where hh is the hour, mm is the minute, ss is the second of the starting time of the
recording video. The files are segmented every five minutes. Users can use the free
bundled Easy Pro Play software to play back the video files.
73 | ENGLISH
74 | ENGLISH
5.5.4 SD-Card settings
The EM6250 provides the recording of the video files into a standard Micro SD-Card.
Since this recording is directly to the SD-Card, there is no network packets loss
problem when recording to remote device through internet.
Note : when the EM6250 is doing SD-Card recording, this is counted as one video
user. Please refer to appendix B about allowed maximum video users.
1. If the “Always Recording” is selected, the system will start to record to the SDCard immediately and keep recording always. If the “Schedule Recording” is
selected, the system will do the SD-Card recording according to the “scheduling”
in section 5.5.5. “Disable Recording” will disable this SD-Card recording.
2. When doing the SD-Card recording, the system will check the free disk space of
the SD-Card. If the disk space is full (no free disk space), the system will do
“Circular recording”( overwrite the oldest recorded files in the SD-Card ) or “Stop
recording” as selected.
3. SD-Card status – the SD-Card inserted or removed status is displayed here.
4. SD-Card files – a list of recorded video files will be displayed that are stored on
the micro SD-Card with information including file name and recorded time under
the directory of each date. The recorded file could be separately downloaded or
deleted on this page.
75 | ENGLISH
5.5.5 Scheduling
The EM6250 provides the scheduling function for the motion detection triggered
email/ftp sending and/or the NAS recording with the individual parameters set in the .
“Email/ftp alarm” settings and the “NAS settings” page. Totally 12 schedule list items
are allowed. There is no conflict check for the scheduling, it means that the scheduling
time could be overlapped, and the EM6250 will do all the scheduled events during the
overlapped time period. For the scheduling of the Email/ftp sending and/or NAS
recording, the “Schedule” option must enabled in the “Email/ftp alarm” settings and/or
the “NAS settings”.
1. Schedule list – all the scheduling are listed in this area. Each listed item can be
modified or deleted by pressing the “Edit” or “Delete” button.
2. Email/ftp Alarm – for each scheduling, if this is selected and the “Motion triggered”
and/or “PIR triggered” is enabled, the EM6250 will trigger the email/ftp sending in
the scheduled time period when the video motion is detected and/or PIR alarm is
detected.
3. Speaker Alarm – for each scheduling, if this is selected and the “Motion triggered”
and/or “PIR triggered” is enabled, the EM6250 will trigger the speaker alarm in the
scheduled time period when the video motion is detected and/or PIR alarm is
detected.
4. NAS Record – for each scheduling, if this is selected, either “Continuous” or
“Motion triggered” or “PIR triggered” could be enabled. For “Continuous”, it means
that EM6250 will do the video recording to the NAS device during the whole
scheduled period. For “Motion triggered” and/or “PIR triggered”, it means that the
EM6250 will do the video recording to the NAS device for 30 seconds during the
scheduled period each time when the video motion is detected and/or PIR alarm is
76 | ENGLISH
detected. There is a five seconds pre-recording (only available when SD-Card is
installed) of the triggered recording to keep the critical moment recorded.
5. SD-Card Record – for each scheduling, if this is selected, either “Continuous” or
“Motion triggered” or “PIR triggered” could be enabled. For “Continuous”, it means
that the EM6250 will do the video recording to the SD-Card during the whole
scheduled period. For “Motion triggered” and/or “PIR triggered”, it means that the
EM6250 will do the video recording to the SD-Card for 30 seconds during the
scheduled period each time when the video motion is detected and/or PIR alarm is
detected. There is a five seconds pre-recording (only available when SD-Card is
installed) of the triggered recording to keep the critical moment recorded.
6. For the scheduling period, can choose between “Every week”, “Every day” or
“Fixed time” :
A.
For “Every week”, can choose week days of the week and set the time
duration of each day.
B.
For “Every day”, can set the time duration of every day for the scheduling.
C.
For “Fixed time”, can set the starting date/time and the end date/time of the
scheduling period.
5.6 Admin
The Admin menu allows you to configure and maintain the EM6250. Here you can set
the Date/Time, LED display status, Admin login, Upgrade the Firmware for the
EM6250 and reboot the EM6250.
77 | ENGLISH
5.6.1 Admin login
In this page, you can modify the web login account. With this account, you can login to
the EM6250 and do any modifications. The default account is “admin” without
password. If the login account is forgotten, you can reset the EM6250 to the factory
default settings by following the steps in section 5.6.6 and login with the “admin”
account.
Please be noticed that this account is different from the video play password in the
“Video settings” page.
5.6.2 LED Display Control
The EM6250 provides the Led Display Control function, you can enable or disable the
led display/indication on the front panel of the EM6250. The related settings are
explained below:
1. Normal led display – select this to enable the status led and Ethernet led display.
2. Turn off led display always – select this to disable the status led and Ethernet led
display.
3. Turn off led display after network connected – select this then the led will display
when the Internet connection has some problem, the led display will be off when
the Internet connection is successful.
78 | ENGLISH
5.6.3 Date/Time
The EM6250 can synchronize the date/time with the universally available time server
(for example time.windows.com) through NTP protocol. The date/time will then be
corrected with the time server anytime when the Internet is connected.
Users can choose the different Time Zone of their areas to display the correct time.
For some Time Zone areas, the “Daylight Saving Time” could be enabled or disabled.
When the “Daylight Saving Time” is enabled, the start and stop time of the Daylight
Saving Time could be edited.
The camera has an internal real time clock that can maintain the date/time even when
the camera is not connected to internet.
79 | ENGLISH
5.6.4 Upgrade
If there is a new firmware available for the EM6250, you can upgrade the firmware on
this page. A status message about the percentage done in the upgrade procedure is
displayed. Please note: do not power off the EM6250 during the upgrade procedure.
After the upgrade procedure is finished, the system will restart automatically.
For more information about firmware upgrade please see the manual enclosed with
the firmware.
80 | ENGLISH
5.6.5 Reboot
You can restart the EM6250 manually on this page. All the connected video viewing
users will be disconnected.
81 | ENGLISH
5.6.6 Set to factory default
For some reason, for example you forgot the web login password, you may want to set
the EM6250 to the factory default settings. The only thing you need to do is using a
stick to press the “reset” button on the back of the EM6250 body for more than 4
seconds and release it, do this when the EM6250 is powered on. The EM6250 will
reset to the factory default settings and restart automatically.
Note: The web login account will be “admin” (no password), the play-video password
will be “ipcam” after reset to factory default.
82 | ENGLISH
6.0 Frequently Asked Questions and other
related information
The latest Frequently asked questions for your product can be found on the support
page of your product. Eminent will update these pages frequently to assure you have
the most recent information. Visit www.eminent-online.com for more information about
your product.
7.0 Service and support
This user’s manual has been carefully written by Eminent’s technical experts. If you
have problems installing or using the product, please fill out the support form at the
website www.eminent-online.com/support.
You can also contact us by phone. Below you will find a list with phone numbers for
each supported country.
Country
Belgium (Dutch)
Belgium (French)
Denmark
Finland
Germany
Italy
Norway
Spain
Sweden
The Netherlands
UK
Hungary
Phone number
Rate per minute*
070 277 286
€0.30
070 277 286
€0.30
+45 69918565
Local Costs
+35 8942415826
Local Costs
+49 (0)30 887 89 298
Local Costs
+39 0240042016
Local Costs
+47 21075033
Local Costs
807 080 042
€0.41
+46 840 309985
Local Costs
0900-3646368
€0.45
+44 (0)203 318 9998
Local Costs
1-4088902 (From
Local Costs
Budapest)
Hungary
06-1-4088902 (From the
Local Costs
rest of Hungary)
Hungary
+36 1-4088902
Local Costs
(International)
* Rates mentioned in this table do not include cell phone charges.
83 | ENGLISH
8.0 Warning and points of attention
Due to laws, directives and regulations set out by the European parliament, some
(wireless) devices could be subject to limitations concerning its use in certain
European member states. In certain European member states the use of such devices
could be prohibited. Contact your (local) government for more information about this
limitations.
Always follow up the instructions in the manual*, especially where it concerns devices
which need to be assembled.
Warning: In most cases this concerns an electronic device. Wrong/improper use may
lead to (severe) injuries!
Repairing of the device should be done by qualified Eminent staff. The warranty
immediately voids when products have undergone self-repair and/or by misuse. For
extended warranty conditions, please visit our website at www.eminentonline.com/warranty.
*Tip: Eminent manuals are written with great care. However, due to new technological
developments it can happen that a printed manual does not longer contain the most
recent information.
If you are experiencing any problems with the printed manual or you cannot find what
you are looking for, please always check our website www.eminent-online.com first for
the newest updated manual.
Also, you will find frequently asked questions in the FAQ section. It is highly
recommended to consult the FAQ section. Very often the answer to your questions will
be found here.
9.0 Warranty conditions
The five-year Eminent warranty applies to all Eminent products unless mentioned
otherwise before or during the moment of purchase. When having bought a secondhand Eminent product the remaining period of warranty is measured from the moment
of purchase by the product’s first owner. The Eminent warranty applies to all Eminent
products and parts inextricably connected to and/or mounted on the main product.
Power supply adapters, batteries, antennas and all other products not integrated in or
directly connected to the main product and/or products of which, without reasonable
doubt, can be assumed that wear and tear show a different pattern than the main
product are not covered by the Eminent warranty. Products are not covered by the
Eminent warranty when subjected to incorrect/improper use, external influences
and/or when opened by parties other than Eminent.
84 | ENGLISH
10.0 Declaration of Conformity
To ensure your safety and compliance of the product with the directives and laws
created by the European Commission you can obtain a copy of the Declaration of
Conformity concerning your product by sending an e-mail message to: [email protected]. You can also send a letter to:
Eminent Europe BV
PO Box 276
6160 AG Geleen
The Netherlands
Clearly state ‘Declaration of Conformity’ and the article code of the product of which
you would like to obtain a copy of the Declaration of Conformity.
EM6250-FULL | 03-2013