1
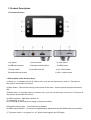
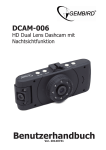
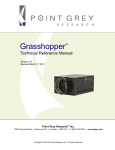
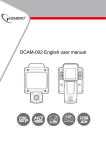
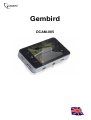
Gembird
DCAM-005
English
1: Product Description
1.1 Product structure
1) up button
2) menu button
4) USB data interface
5) bracket mounting holes
7) Power switch
8) microSD card slot
10) Mode selection button
3) down button
6) HDMI output
9) the LOCK button
11) OK / confirm button
1.2 Description of the function keys:
1) Button up - In standby mode or in video m o d e you can use this button to zoom in. The button is
also used to scroll within the menu’s.
2) Menu button - Short-Press to bring up the fist tab of the menu. A second press will open the second
tab.
3) Button down - In standby mode or in video m o d e you can use this button to zoom out. The button is
also used to scroll within the menu’s.
4) USB connection - USB data interface for:
(1) connecting t o a PC
(2) connecting an external power supply to charge the battery
5) Bracket mounting hole – To connect the car bracket
6) HDMI output interface - To connect to high-definition display devices with HDMI cable (not included)
7) The power switch - Long press on / off - Short press toggles front LED lights.
8) MicroSD card slot – Input your memory card here
9) The “LOCK” button – Pressing this button, saves the currently recording video fragment, so it can
no longer be deleted automatically by the camera.
10) The mode select button – a short press to switch between each of the camera modes: video/ photo /
playback.
11) OK button – When in video mode this button acts as the “REC & stop” button. When in photo mode
–short press – to take a picture. When in a Menu – use this button to confirm selection.
1.3 Special Function Description:
The G-sensor function
When there is an abrupt acceleration (e.g. accident) up to 6g (1g = 9.80 m / sec2), the camera will
automatically save the current video, so it can no longer be deleted automatically by the camera.
LOCK function
Pressing this button, saves the currently recording video fragment, so it can no longer be deleted
automatically by the camera.
2: Basic instructions for camera use:
Switching the camera On and Off
Press and hold the power button
to power on the camera - the blue indicator light w i l l b e
lit.
Again press & hold the power button
is turned off,
, the blue light goes out and the device
Note: If the battery runs low, the camera will automatically shutdown – in this case please attach a
power source.
Video mode
Short press (if needed) of the
key, switches to video camera mode, the upper left corner of
the screen displays a camera icon;
Short press of the
button to start the camera, the camera icon will flash and a red dot
indicates the recording is active.
Photo mode
Short press (if needed) of the
key, switches to photo mode, in the upper-left corner of the
screen the photo camera icon is displayed
Short press of the
button to take pictures
Video / photo playback mode
Short press (if needed) of the
key to switch to playback mode, in the upper-left corner
of the screen the playback icon appears.
Use the up & down arrow keys to select the desired photo or video file and press OK to play (video
only)
Menu setting
Short press the Menu button
press of the Menu button
to enter the first tab of the menu “video settings”. A 2nd
switches to the 2nd tab of the menu "camera settings". Use the
arrow keys to navigate through both these menu’s and press OK to open menu items and confirm
changes. When finished, just press the
key again to exit the settings menu.
Time & date
As above - Short press the Menu button
twice to enter the 2nd tab of the menu, the
to
“camera settings”. Use the arrow buttons to select the “date /time” option and press
confirm. Use the arrow keys to modify the various parts of the date (dd/mm/yy) and press OK to
confirm changes. When done, press the Menu button
to close the menu screen.
USB mode
When you connect the camera via USB to the computer, you will see a popup menu in the
camera LCD display. There are three modes to choose from:
1: USB-Disk - In this mode, video files or photo files on the SD-Card can be accessed from the
PC (Camera is used as mass storage device)
2: PC-Camera (optional) – Selecting this mode to enable web cam function
3: PictBridge – used only for PictBridge compatible printers etc.
Battery charging instructions
There are three ways to charge the battery, (see below) d u r i n g t h i s p r o c e s s i n a l l
c a s e s the red charging indicator light will be lit. The total charging time is about 180 minutes.
The red charging indicator light will automatically switch off after the charging is finished.
1: Use a 5V USB power adapter – (not included)
2: Use the PC-USB charging cable - included
3: Use the vehicle power charger - included
Note: If the camera stops operating (e.g. because of a software crash), please use a pointed implement
to press and hold the reset button to restart the camera.
3: Menu options
Video settings
Photo settings
Camera setup
Resolution – setup video resolution
(max 1920x1080)
Timer – Customizing the self timer
option
Set date/time – setup date, time and
notation.
Loop recording – The camera will
automatically overwrite the oldest video
Resolution – setup photo resolution
fragments when this function is enabled.
(max 1920x1080)
Select the preferred video fragment
length here.
Auto power off – setup automatic power
off feature and timer.
EV – denotes all combinations of a
camera's shutter speed and relative
aperture that yield the same exposure for
Sequence - Possibility to take sequence
a given scene luminance. EV refers to
Language - setup menu language
the difference between the indicated and of 5 photos.
set exposures. For example, an
exposure compensation of +1 EV means
to increase exposure.
Motion detection – If enabled, the
camera will start recording automatically
Quality – Setup picture quality to
when movement is detected in front of
fine/normal/economy
the camera lens. The camera must be in
standby mode for this function to work.
Light frequency – Select frequency of
power mains: 50Hz (EU) or 60Hz
(US/Asia)
Audio – Toggle the microphone
Sharpness – Setup picture sharpness to Screen saver – Setup after how many
minute the LCD screen goes black.
sharp/normal/soft
Date stamp – Toggle the visibility of the
date/time on the videos
White Balance – Selection of standard
options: Automatic, daylight, cloudy, etc
Image rotation – Rotate image 180
degrees, depending on mounting
direction of the camera.
Buttons sound – Toggle the beep
sound of the buttons.
Color – setup color scheme (normal,
black/white, sepia)
Format – Format the SD-card. NOTE:
this will delete ALL files, photos and
videos that are stored on the card.
ISO – automatic up to 400 ISO
Default settings – Puts the camera
back to its default settings.
EV – see also video settings
Firmware version - Check firmware
version.
Anti-shaking – Toggle image
stabilisation feature.
Quick review – Setup the quick review
that can be shown after taking a Photo.
Date stamp – Toggle the visibility of the
date/time on the photos
4: Product specifications
Product Name
DCAM-005
Features
High-definition camera, high-definition video.
Color
Black + silver
G-sensor
Built-in (car accident case of emergency save, will
d l d)
2.7 b
LTPS
LCD screen size
Camera
Language
140 A + grade high-resolution ultra-wide-angle
L
Russia,
Japan, France, Italy, Germany, Western, English,
Chinese (simplified), Chinese (Traditional), Korean, Etc.
File Format
AVI
Video resolution
Maximum 1080P
Video video formats
M-JPEG, Audio: AAC
Color effects
Standard
Continuous loop video
Seamless looping video supported
Truck switch machine
Support auto ignition boot, turn off shutdown
Motion Detection Function
Support
Date of hours
Support
Carrier media
Built-in Memory (total: 64MB)
The camera mode
5 MP
Photo format
JPEG
Memory card
microSD/TF (up to 32GB)
Microphone
Support
Built-in stereo
Support
Infrared night vision
Support
Video output
HDMI
Video Format
PAL / NTSC
Current frequency
50HZ/60HZ
USB function
Power input
1 : USB-Disk
5V, 800ma
Battery
600 mAh
2: the PC-Camera