1
Technical specifications and operating instructions
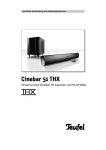
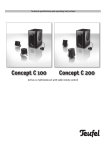
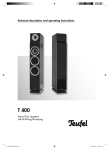
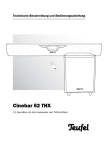
Cinebar 51 THX
Virtual surround soundbar with subwoofer
Original packaging
We recommend keeping the
packaging if you want to take
advantage of the eight-week
right of return, because we can
only accept the speakers IN
THEIR ORIGINAL PACKAGING.
We are unable to supply empty
boxes!
Technical data
Technical data can be found in
the product description on our
website at www.teufelaudio.com.
For your information
The information in this document may be changed without advance notification and does not
represent any obligation on the part of Lautsprecher Teufel GmbH.
No part of these operating instructions may be
copied in any way, whether electronically, mechanically, using photocopies or recordings, or transferred without the prior written agreement of
Lautsprecher Teufel GmbH.
© Lautsprecher Teufel GmbH
Version 1.1
Oktober 2011
Trademark
® All trademarks are the property of their respective owners.
Dolby
Manufactured under licence from Dolby Laboratories. » Dolby«, »Pro Logic« and the DD symbol are
trademarks of Dolby Laboratories.
DTS
Manufactured under licence under U.S. Patent
Nos: 5,956,674; 5,974,380; 6,487,535 & other U.S.
and worldwide patents issued & pending. DTS, the
Symbol, & DTS and the Symbol together are registered trademarks & DTS Digital Surround and
the DTS logos are trademarks of DTS, Inc. Product
includes software. © DTS, Inc. All Rights Reserved.
Complaints
If you have a complaint, it is essential that you
provide the following information so that we can
respond:
1. Invoice number
Found on the sales receipt (enclosed with the product) or the order confirmation that you received
as a PDF file, e.g. 4322543.
2. Serial number
Can be found at the rear of the device,
e.g. serial #: CB 04007480121A
You can find information on the subject of returns on the returns form that accompanies the
delivery or online in the support area of our website www.teufelaudio.com.
If you need to return an item, do not act without
the prior agreement of Lautsprecher Teufel.
We can only process and accept returns if you
have informed us first by phone and discussed
the procedure with us!
Thank you for your support.
Contact
Please contact our service department if you
have any questions, suggestions or if there is
anything you think we could do better.
Lautsprecher Teufel GmbH
Gewerbehof Bülowbogen
Bülowstraße 66
10783 Berlin (Germany)
Phone: 00800 200 300 40
Fax: +49 (30) - 300 930 930
www.teufelaudio.com
2
· Cinebar 51 THX
Contents
Table of contents . . . . . . . . . . . . . . . . . . . . . . . . . . . . . . . . . . . . . . . . . . . . . . . . . . . . . . . . . . . . . . . . . . . 3
Safety and care instructions . . . . . . . . . . . . . . . . . . . . . . . . . . . . . . . . . . . . . . . . . . . . . . . . . . . . . . . . . 4
Introducing Cinebar 51 THX · General functions . . . . . . . . . . . . . . . . . . . . . . . . . . . . . . . . . . . . . . . . . 5
Unpacking · Contents . . . . . . . . . . . . . . . . . . . . . . . . . . . . . . . . . . . . . . . . . . . . . . . . . . . . . . . . . . . . . . . . 6
Set-up · Assembly . . . . . . . . . . . . . . . . . . . . . . . . . . . . . . . . . . . . . . . . . . . . . . . . . . . . . . . . . . . . . . . . . . . 7
Cinebar 51 THX front . . . . . . . . . . . . . . . . . . . . . . . . . . . . . . . . . . . . . . . . . . . . . . . . . . . . . . . . . . . . . . . . 8
Cinebar 51 THX back · CB 51 SW connection . . . . . . . . . . . . . . . . . . . . . . . . . . . . . . . . . . . . . . . . . . . . 9
Blu-ray- or DVD player and TV set connection . . . . . . . . . . . . . . . . . . . . . . . . . . . . . . . . . . . . . . . . . . . 10
CB 51 RC remote control . . . . . . . . . . . . . . . . . . . . . . . . . . . . . . . . . . . . . . . . . . . . . . . . . . . . . . . . . . . . . 11
Volume adjustment · Sound source selection . . . . . . . . . . . . . . . . . . . . . . . . . . . . . . . . . . . . . . . . . . . 12
Volume control · Mode setting . . . . . . . . . . . . . . . . . . . . . . . . . . . . . . . . . . . . . . . . . . . . . . . . . . . . . . . . 13
USB playback · Repeat function . . . . . . . . . . . . . . . . . . . . . . . . . . . . . . . . . . . . . . . . . . . . . . . . . . . . . . . 14
Troubleshooting . . . . . . . . . . . . . . . . . . . . . . . . . . . . . . . . . . . . . . . . . . . . . . . . . . . . . . . . . . . . . . . . . . . . 15
Glossary
Dolby Digital (ATSC A/52) is
the digital multichannel audio
format created by Dolby Laboratories. It was developed for
efficiently storing film sound with up to 5.1 sound
channels. The data is compressed using psychoacoustic processes and transferred in a single data
flow. The format supports various data rates. The
format also has options for automatic adjustment
of volume differences (dynamic compression) and
also the possibility of allowing playback via a twochannel speaker system using stereo downmix.
Dolby Virtual Speaker simulates the surround
sound playback provided by five speakers and an
LFE effect channel in systems using a two-channel
speaker combination. In contrast to stereo downmix by Dolby Digital, which only places the missing
channel information of 5.1 audio material in the
existing speakers, the Dolby Virtual Speaker procedure uses psychoacoustic room modelling to
create pseudo-sound sources that suggest the
existence of speakers in the appropriate room positions.
MP3 (MPEG-1 Layer 3) is a widely used digital data format for
saving audio data (mono/twochannel stereo) in a compressed
form using psychoacoustic processes. MP3 files
may exist in various – and sometimes variable – bit
rates, which can have a direct influence on playback quality.
USB (Universal Serial Bus) is
a widely used serial, digital interface protocol. A USB host appliance can request data from terminals and also
transmit data to them.
Operating instructions Version 1.1
· Cinebar 51 THX
3
Safety and care instructions
Safety information
Please note
Packaging materials
(e.g. plastic bags) should be
kept out of the reach and sight
of children to avoid the risk of
suffocation.
Set-up
Please refer to the label on the back of the Cinebar 51 Unit. This provides information on the
required mains voltage.
In order to make sure that heat dissipates, please
set up your Cinebar 51 Unit either freestanding
or leave a ventilation gap of at least 7–10cm. Do
not block any of the ventilation openings on the
appliance itself. You can find more information on
the best way to set up your appliance on page 7.
Ě Do not stack this appliance on top of other
appliances.
Ě Switch off attached devices and the Cinebar 51
Unit before moving them.
Ě Switch off all components and the Cinebar 51
unit before connecting or changing the cables.
Ě Please switch the Cinebar 51 Unit to standby
or disconnect it completely from the power
supply, especially if you are not using the
appliance for a long time.
Ě Avoid high temperatures caused by direct
sunlight or radiators/heaters and protect
your speakers from humidity.
Ě Place the subwoofer on a level surface, because
the appliance emits sound downwards.
Please do not place items containing liquids on
the appliance or the subwoofer.
In case of emergency
If any of the following occur, disconnect the appliance from the mains and consult our technicians:
Ě If the plug or cable are damaged
Ě If foreign bodies or liquid have got into the
appliance
Ě If an appliance has been in direct contact with
rain or other water
Ě If an appliance does not play, even though you
have followed the instructions for use
Ě If one of the appliances has been dropped or
damaged in some other way.
Ě If foreign objects have entered one of the
appliances.
We cannot accept any responsibility for incidents
that occur because safety information has not
been adhered to.
Information on protecting the environment
The batteries used in this product contain environmentally damaging chemicals. Please dispose
of used batteries in line with the currently applicable laws and directives.
For your safety
Never open the appliances or try to make any
repairs. None of the parts inside the appliances
require maintenance. As a result of the internal
operating voltage, opening the appliance may
result in death. Always contact qualified service
staff.
Please note
Risk of electrocution – do not
leave children unsupervised with
electrical devices!
Note
This product and its operating
instructions include third-party
licences. These licenses are restricted to private and non-commercial use. The usage licence is
also exclusively restricted to this
product. The licence only covers
the appliance’s ability to encrypt
and decipher audio files in line
with ISO/IEC 11172-3 or ISO/IEC
13818-3. No usage rights are
issued for functions that do not
match these specifications.
4
· Cinebar 51 THX
Caution
Ě The Cinebar 51 THX System is not designed for
industrial use, only for domestic/personal use.
Ě Please do not place items containing liquids on
the appliance or the subwoofer.
Ě External influences such as storms and static
discharges can affect the functioning of the
appliance. If this occurs, please switch off the
Cinebar 51 Unit and the subwoofer and then
switch them on again. Alternatively, please remove
the mains plug from the socket and then
insert it again.
Ě Significant temperature fluctuations can cause
condensation to form in the Cinebar 51 THX System
which may impair its functions. If this happens,
please leave the appliances switched off at
room temperature for several hours and then
check whether the appliances work properly.
Ě Under no circumstances should you bridge or
splice the earth wire of the electricity supply.
Care instructions and cleaning
To make sure you are able to enjoy your Lautsprecher Teufel product for a long time, please
note the following tips:
Ě Please only use a lightly dampened or dry
cloth to clean the Cinebar 51 THX System.
Ě Abrasive products and cleaners (benzine,
thinners) that contain alcohol should be
avoided.
Introducing Cinebar 51 THX · General functions
Dear Lautsprecher Teufel customer,
Thank you for choosing the Cinebar 51 THX System from Lautsprecher Teufel. Cinebar 51 THX
is a complete system for playing sound and film
tracks. The Cinebar 51 THX combined receiver
speaker unit combines a two-channel amplifier
with two high-quality speakers (Cinebar 51 Unit).
This unit is completed by a matching CB 51 SW
subwoofer that has its own integrated highperformance amplifier. You can connect various
sound sources directly to the Cinebar 51 Unit via
analogue and digital inputs. Thanks to the integrated USB interface, the Cinebar 51 THX System
even allows you to connect mobile MP3 media players and USB data storage devices.
The integrated Dolby Digital Downmix Matrix and
additional support from “bass redirection logic”
ensure that media encoded for surround sound,
such as 5.1 sound, are reproduced accurately on
your 2.1 speaker system. Thanks to Dolby Virtual Speakers, the unit can also be used to create
surround sound in 2.1 speaker configuration. In
terms of sound quality, the system lives up to all
the expectations you could have of a Lautsprecher Teufel home cinema system.
Please read these instructions carefully before
operating the unit and store the manual in a safe
place for future reference. If you have any further
questions, please contact our engineers on Phone
00800 200 300 40 – or use the e-mail contact
form on our website: www.teufelaudio.com. Please
have your invoice number ready, so we can immediately locate your product and provide the best
possible support.
Before contacting us with a question, please read
the »Problems and solutions« section on page
15 of these operating instructions and visit our
website (www.teufelaudio.com) where you will find
answers to many questions in the »FAQ/Support«
section.
Please refer to our safety information on page 4
of these operating instructions and only use the
system once you have read the safety information.
General functions
Outstanding sound playback
You can enjoy music in crystal-clear sound with
the Teufel Cinebar 51 THX System. The Dolby Digital technology developed by Dolby Laboratories
enables the playback of 5.1 surround sound sources via a 2.1 amplifier/speaker system.
Dolby Virtual Speaker technology
The Cinebar 51 THX System supports the Dolby
Virtual Speaker, developed by Dolby Laboratories.
This simulates surround sound playback from five
speakers and the LFE effect channel in systems
using a two-channel speaker combination with a
subwoofer. Psychoacoustic room modelling procedures are used to create pseudo-sound sources that suggest the existence of speakers in the
corresponding room positions. Please see set-up
information on page 7.
Playback from USB storage media
You can use the Cinebar 51 THX to play back audio
files in MP3 and WMA format from USB storage
media. USB sticks with up to 8 GB capacity are
supported.
External audio inputs
Analogue and digital signal sources can be connected to the Cinebar 51 Unit. There are two
analogue stereo inputs and two digital inputs in
optical and coaxial format on the back, where you
can connect Blu-ray- or DVD players, CD players or
satellite receivers.
Repeat
You can repeat one or all tracks on a connected
USB medium, just by pressing the repeat button.
Please make a note of the invoice and serial
numbers for your device on the last page, so that
you have the available information to hand in the
event that you require service.
· Cinebar 51 THX
5
Unpacking · Contents
Please note
Please keep the boxes for the
eight-week return period at
least, as we can ONLY repay
the full purchase price if the
products are returned in the
ORIGINAL PACKAGING in which
they were supplied!
Unpacking
Fold back the flaps on the top of
the box, remove the polystyrene
pieces and lift each item out of
the box carefully. We recommend
keeping the boxes and packaging
that came with the Cinebar
51 Unit in order to ensure safe
transport for any later servicing.
Note
The remote control battery is
protected by plastic film. Pull the
flap sticking out of the back of
the remote control before use.
Before start-up
The Teufel Cinebar 51 THX System is supplied as a
complete system. Check that all of the contents
are there before installation.
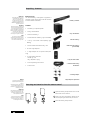
3Cinebar 51 soundbar
Contents
Ě 1 x Cinebar 51 amplifier/speaker
Ě 1 x CB 51 SW subwoofer
3CB 51 SW subwoofer
Ě 1 x base for Cinebar 51
Ě 1 x wall bracket for Cinebar 51 (pre-assembled)
3Base for Cinebar 51
Ě 1 x CB 51 RC remote control (battery type
CR2025)
Ě 1 x audio connection cable for CB 51 SW
3Wall bracket for Cinebar 51
(pre-assembled)
Ě 6 x cinch angle adapters
Ě 1 x angle adapter for the optical cable (rotating)
Ě 2 x mains power cables for:
- Cinebar 51 Unit
- CB 51 SW (cable + plug)
3CB 51 RC remote control
Ě 1 x set of operating instructions
3Connection cable for CB 51
Ě 1 x return form
SW subwoofer
3Cinch angle adapter
Warning
Explosion hazard with inappropriate replacement of the
battery.
Replacement only by the same or
an equivalent type. Not expose
batteries to excessively warms as
sunshine, fire or like.
3Angle adapter for optical cable
Inserting new batteries into the remote control
Please note
If the batteries have leaked, wipe
up the liquid in the battery compartment carefully with a cloth
and replace the batteries.
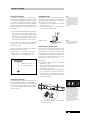
Q Open the battery compartment cover on the
back of the remote control.
+
CR2025
3V
Note
Remove the batteries from the
appliance if you do not intend to
use it for a long time. Never try
to recharge the batteries.
+
CR2025
3V
W Insert a CR 2025 coin battery. Please ensure
that the poles (plus and minus) are correct.
E Close the battery compartment.
Q
6
· Cinebar 51 THX
W
E
Set-up · Assembly
Setting up the speakers
The Cinebar 51 THX System is a high-quality stereo and surround playback set suitable for reproducing film and music sound in rooms up to 30m2.
The sound is automatically in perfect symmetry
with the picture thanks to the satellite speakers
that form an integral part of the Cinebar 51 Unit,
which is attached or set up below or above your
flatscreen TV.
Ě Set-up height should be between 40 centimetres
and 2.0 metres, ideally at ear height to the
sitting position. Your listening position should
be central and in front of the Cinebar 51 Unit.
It also helps to position the Cinebar 51 Unit in
a central position between the two side walls.
When set up correctly, the Cinebar 51 THX System
simulates surround sound realistically, using a
front speaker alone.
You can achieve optimum effects at the following
listening distances, for example:
Ě Room size 10 m2 Listening distance: 1.5 m
Ě Room size 16 m2 Listening distance: 2.1 m
Ě Room size 20 m2 Listening distance: 2.7 m
Optimum distance to
the listening position
Setting up the subwoofer
You can locate the subwoofer anywhere: this will
not affect the other speakers. It is usually beneficial to position the subwoofer near the Cinebar 51
Unit. To adjust the levels between the Cinebar 51
Unit and the subwoofer, please read the relevant
section on page 12.
Assembling the base
The Cinebar 51 Unit can be positioned as a standing appliance on the base supplied. For optimum
sound, please place the Cinebar 51 Unit right in
the centre, above or below the TV.
Ě Do not place or lean any objects on or against
the Cinebar 51 Unit.
Ě Avoid placing the Cinebar 51 Unit in front of
the TV’s remote control receiver.
Note
If colour changes occur in the
TV picture (e.g. on tube sets),
increase the distance between
the Cinebar 51 Unit and the
TV set until the colour changes
completely disappear. For wall
mounting, please check for
any changes in colour before
assembly.
Cinebar 51 Base
Note
The positioning illustrated may
not be possible, depending on
the TV set construction.
TV base
Wall mounting the Cinebar 51 THX
The Cinebar 51 Unit can be fixed directly to a wall
using the rear bracket. Before doing so, ensure
that the wall is sturdily constructed and capable
of supporting the load! Please use strong screws
in combination with the wall plugs supplied to guarantee a secure hold. For perfect sound, set up
the Cinebar 51 Unit below the TV set.
Please note:
Ě Do not place or lean any objects on or against
the Cinebar 51 Unit.
Ě Attach the connecting cables to the wall to
avoid any possible trip hazards that could cause
the Cinebar 51 Unit to fall.
Ě After assembly, please check that the Cinebar 51
Unit is mounted securely and recheck at
regular intervals. Lautsprecher Teufel accepts
no responsibility for damage caused because
of incorrect assembly.
548 mm
Each side of the bracket is attached to the
wall using a screw.
Using the angle adapter
When wall-mounting the Cinebar
51 Unit, please use the angle
adapters supplied. These ensure
that the cables lie correctly.
Connect the cinch adapter to
the corresponding colour-coded
jacks on the back. The jacks
should always point downwards
(with the exception of any
connections to the TV set).
The optical angle adapter can
be swivelled. This adapter should
also point downwards.
· Cinebar 51 THX
7
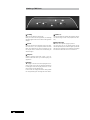
Cinebar 51 THX front
R
Q
W
E
Q Standby
Switches the appliance on and off.
When you switch off the appliance, the Standby
message appears for a short while in the appliance
display.
W Source
Switches through the available inputs, one after
the other. Aux 1, Aux 2, Optical, Coaxial and USB.
When the appliance has been switched on, the
last signal source selected will automatically be
selected again.
E USB port
Supports storage media with a USB 1.1/2.0 interface. USB sticks with up to 8 GB capacity are
supported.
R Display
The display is used as a clear text display for the selected sound source and the activated operations.
In USB player mode, the display shows the current
track number and the playing time.
In this mode, the display also shows small symbols
for recognised MP3 files and Play and Pause modes.
8
· Cinebar 51 THX
Y
T
T Volume -/+
Use these buttons to control the amplifier volume.
The control range is from 0 to 40 (maximum volume).
Y LED power light
Indicates that a power supply is present.
This LED lights up red in standby mode. During
normal operation, the LED doesn’t light up. Instead
the last active signal source is shown on the display
and selected when the device is switched on.
Cinebar 51 THX back · CD 51 SW connection
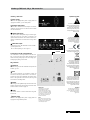
Cinebar 51 Unit back
Q Power supply
Connect the appropriate power supply cable to
supply the Cinebar 51 Unit with power.
Explanation of symbols
Q
The arrow-headed lightning
symbol in an equilateral triangle
indicates the presence of a
dangerous non-insulated electrical voltage within the system
housing and therefore a risk of
electrical shock.
W Analogue audio inputs
Use the Aux 1 and Aux 2 stereo inputs to connect
analogue signal sources. Use normal cinch cables
for the connection.
E Digital audio inputs
You can connect compatible digital audio appliances here. You can use either a coaxial or an
optical cable connection. You can also feed in encoded, multichannel surround data using these
inputs.
W
E
The exclamation mark in an
equilateral triangle, as affixed
to the appliance, is to make
the user aware of important
operating and maintenance
instructions.
R
R Subwoofer output
Connect the CB 51 SW subwoofer to the Cinebar
51 THX System here.
The cut-off frequency is set at 150 Hz.
Connection to the CB 51 SW subwoofer
The subwoofer is directly connected to the Cinebar 51 Unit using the cinch cable supplied. If the
cable isn’t long enough you can use a longer, preferably high-quality cinch cable.
This product complies with
European Community guidelines
2004/108/EC and 2006/95/EC
Audio cable
Audiokabel
T
T
Y
Y
U
The dustbin symbol printed
on our products’ type plates
and amplifiers states that
Lautsprecher Teufel guarantees
proper disposal of these speakers
and subwoofers in line with the
Electrical and Electronic
Appliance Act.
CB 51 SW back
T Cinebar In
Connect this jack to the subwoofer output of the
Cinebar 51 unit.
Y Auto
This switch activates the automatic switch-on
function of the CB 51 SW. If there is an audio signal at the input, the subwoofer will switch on. If
there is no signal for a few minutes, the CB 51 SW
will switch to standby mode.
I
I
O
U Volume
You can adjust the global output volume of the subwoofer using the level control. Please read the “Subwoofer volume” section on page 12.
I Power
This rocker switch is used to switch the CB 51 SW
on and off.
O Power supply
Connect the appropriate power supply cable to
supply the CB 51 SW with power.
O
Please note
The Cinebar 51 THX System
independently recognises
whether the subwoofer output
is being used. If the jack is being
used, the sound will be adjusted
accordingly. If you are using the
CB 51 SW, this should always
also be switched on.
This product is a safety class II
product in accordance with DIN
standard EN 61140 (VDE 0140-1)
and IEC 60417 and does not require a safety plug, only the plug
supplied (2-pole). The casing has
reinforced or double insulation
against electric shock.
Attention
The separating equipment of
this equipment is the mains
plug, this separating equipment
must be usable without
difficulties.
Note
If you want more powerful bass
effects, you can connect a larger
or second active subwoofer to
the subwoofer output.
· Cinebar 51 THX
9
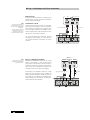
Blu-ray- or DVD player and TV set connection
Before start-up
Always switch off the Cinebar 51 THX System, the
television and all other connected components
before changing the cabling.
Note
If you are playing TV sound via
the Cinebar 51 THX System, you
can control the volume from the
TV appliance.
This also applies to peripheral
appliances such as Blu-ray- or
DVD players whose sound is
reproduced through the TV set.
Connection to a TV set
Connect the sound output of your TV to the analogue input of the Cinebar 51 Unit. Use a standard
high-quality cinch cable for this purpose. You can
also use a digital connection, if available. If your
television sound comes from an external receiver,
connect it as a sound source instead.
For more information on connecting external
components to the Cinebar 51 Unit, please see
the relevant operating instructions for these
products.
Note
Remove the cover from the
socket and the jacks before you
use the optical cable.
TV
Stereo audio cable
R
L
AUX 1 In
· Cinebar 51 THX
or
Coaxial
Out
or
digital audio
cable
R
L
AUX 2 In
Optical In
Coaxial In
SUB Out
Bluy-ray- /
DVD-Player
Audio
Audio
Out
R L
Stereo audio cable
Optical
Out
or
5
Coaxial
Out
or
digital audio
cable
Coaxial In
SUB Out
Or
R
L
AUX 1 In
10 Optical
Out
Or
Blu-ray- or DVD player connection
Connect the sound output of your Blu-ray- or DVD
player to the Cinebar 51 Unit.
We recommend
NOTE
using digital audio interfaces, because they are
capable of transferring encoded surround formats. The Blu-ray- or DVD player also needs to be
connected to the TV set for picture playback.
Alternatively or in addition to a Blu-ray- or DVD
player, you can also connect games consoles, CD
players and other appliances to the free jacks on
the Cinebar 51 Unit. However, record players cannot be connected to the Cinebar 51 THX System
without an external preamplifier.
Audio
Audio
Out
L
R
R
L
AUX 2 In
Optical In
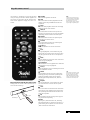
CB 51 RC remote control
The Cinebar 51 THX System is primarily operated
using the CB 51 RC remote control supplied. You
can clearly see the status of the selected functions on the appliance display, even from a distance.
Q
W
E
R
T
Y
U
O
P
{
I
}
q
w
}
e
r
t
Range of functions of the CB 51 RC remote control
Always point the remote control towards the receiver on the Cinebar 51.
+/-30°
be
rn
Fe
Around 7m
ng
nu
die
Q Standby
Switches the appliance on and off.
W USB
Press this button to select playback from USB
storage media. MP3 and WMA file formats are
supported.
E Mute
Switches sound playback on and off. The display
shows the active mute function.
R AUX 1/2
Press this button to select audio inputs Aux 1
and Aux 2 as sound sources. Pressing the button
repeatedly switches between the two inputs.
T Optical
Press this button to select the optical digital
audio input as a sound source.
Y Coaxial
Press this button to select the coaxial digital
audio input as a sound source.
U I VOL+/These two buttons are used to control the
volume.
O Prev
During USB playback, use this button to jump
back to the start of the track. Pressing it again
will take you back to the start of the previous
track.
P Next
Use this button to jump to the start of the next
track during USB playback.
{ Play/Pause
Use this button to start playback of a connected
USB medium or to pause playback.
} Sub +/These two buttons are for controlling the volume
of the subwoofer channel.
q Mode*
Switch between the various stereo operating
modes by pressing this button repeatedly. The
modes are available either with or without
Goundary Gain Compensation, See „BGC“ for
reference.
w Repeat
During USB playback, use this button to repeat
one or all tracks or to switch off the repeat
function.
e Tone
Press this button to control the bass and treble
sound during music playback. Pressing this button repeatedly switches between the bass and
treble menu options.
r EQ
Switch between the various EQ presets by pressing this button repeatedly.
t BGC
By using the „BGC“ button the the „Boundary
Gain Compensation“ is switched on or off. It is a
global setting for the „Mode“ menu to have the
„BGC“ activated or deactivated.
Note
Under some circumstances, the
remote operability of the Cinebar
51 THX System may be impaired.
Possible causes for this are
direct sunlight, strong sources of
artificial light or infrared lights.
*Tip
If the system is placed on a shelf
or on the wall, press the “Mode”
button and choose the mode:
“BGC” (Boundary Gain Compensation). This mode ensures clean
sound in basic and deep tones.
· Cinebar 51 THX
11
Adjusting the volume · Selecting the sound source
Note
Use the mute button on the CB
51 RC to completely stop sound
playback at any time.
Adjusting the volume
+
–
Press the (+) button to increase the volume. Use
the (-) button to reduce the volume. Alternatively,
you can also use the appropriate operating controls
on the Cinebar 51 Unit (Vol -/+).
Please refer to the information below about setting
the volume on the subwoofer.
Setting up the subwoofer
Sub+
Sub-
Use the Sub +/Sub - buttons to adjust the subwoofer volume within the working range of +/12dB. The display shows the corresponding value.
Use this button to adjust the subwoofer to the
current sound program.
Note
The closer you place the subwoofer to a wall or corner, the louder
you can hear the bass playback.
Setting the sound levels on the subwoofer
As the subwoofer has its own sound level control,
this should be in the maximum position. If you use
this position as a starting point, you can make
fine adjustments later using the remote control,
depending on the current sound programme.
Note
We recommend that you buy a
Teufel sound level meter (from
our online shop) to measure the
level precisely. You can determine
the exact output level from both
sound sources using this appliance and the usual test signals.
This is done as follows:
First set the subwoofer level to position “0” using
the remote control (see above).
Now play a high-quality CD on the Cinebar 51 THX
System. Adjust the volume control on the CB 51
SW until you achieve a harmonious sound.
12 · Cinebar 51 THX
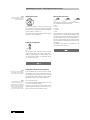
Selecting the sound source
Aux 1/2
Optical
Coaxial
The Cinebar 51 THX System can choose between
five possible sound sources (inputs).
Ě Aux 1
Ě Aux 2
Ě Coaxial
Ě Optical
Ě USB
The sound source is selected either by repeatedly
pressing the source button on the Cinebar 51 Unit
or on the CB 51 RC remote control. The coaxial, optical and USB inputs have their own buttons. Aux 1
and Aux 2 share a button. You can switch between
the two inputs by repeatedly pressing on the Aux
1/2 button.
The display on the Cinebar 51 Unit shows you the
input that has been selected.
Volume control · Mode setting
Sound settings
Tone
Pressing the sound button branches the sound
control. By pressing the button once you can access the bass control, whose working area can be
controlled by +/- 6 dB using the “+/-” buttons. By
pressing the button again you can access the treble control of the treble component. You can also
adjust the value up to +/- 6dB using the “+/-” buttons. The display shows the value that has been set.
EQ set-up
EQ
Note
There may be a slight pause in
playback when changing the
operating mode (Mode) and
sound settings (EQ).
Pressing the EQ button repeatedly switches between the sound presets “Flat”, “Rock”, “Pop”, “Classic” and “Jazz”. The selected mode is shown on the
screen.
Mode setting
Mode
Press the mode button during playback to select
the required stereo mode. Pressing the button
repeatedly will switch between “BGC”, “Reference”,
“Stereo” and “Wide” modes (presets). The selected
mode will be shown on the display. Choose “BGC”
for a clean sound in basic and deep tones (when
the placement of the system is on the wall or on
shelves). Select “Stereo” for conventional twochannel playback. “Reference” and “Wide” are alternative operating modes with virtual surround
playback.
· Cinebar 51 THX
13
USB playback · Repeat function
Playback from USB storage media
Repeat function
USB
You can select a USB medium as a sound source
by pressing the USB button. USB sticks with a capacity of up to 8 GB. The storage device must be
formatted in FAT 16/32 format. MP3 and WM3 files
can be read, but not WAV format. Subfolders on
the USB device are also recognised. The tracks are
played or selected according to the file hierarchy,
and in alphabetical order within a level of the file
structure. Depending on the USB device and the
quantity of MP3/WMA files it contains, the reading
process may take a while. The reading process is indicated on the display with the message “Loading”.
Note
When you insert a USB device
into the selected USB port, the
“Loading” message will be shown
in the display. The first track will
then start to play automatically.
The same applies if you switch on
the Cinebar 51 THX System with
a USB device inserted and if the
USB port was the last selected
source.
Ě ||
Start playback by pressing the play button, which
also functions as a pause button. The display
shows the track number currently selected and
the play time. The display also shows a small symbol for the playback and pause functions as well
as an MP3 symbol.
Track selection
Use the “Prev” and “Next” buttons to select
tracks.
ĚĚ|
Press the “Next” button to skip to the beginning
of the next track.
ĚĚ|
Press “Prev” to select the beginning of the current track and press it again to jump back to the
beginning of the previous track.
14 · Cinebar 51 THX
Press the repeat button to switch the repeat
function on or off. You can choose between no
repeats, repeating the current track or repeating all tracks. The display shows you the selected
mode:
Ě Re Off No repeats
Ě Re 1 The current track will be repeated.
Ě Re All All tracks will be repeated
Troubleshooting
If a problem should occur, please check through
the following advice before contacting our service staff.
No power
Ě Please check whether the plug is properly
inserted in the mains socket.
Ě Check whether the corresponding electric
circuit is live.
No sound or poor sound output
Ě You may have inserted an incompatible disc.
To test this, insert an audio CD into your playback
appliance and use the remote control to select
the correct input.
Ě Check whether the television and Cinebar 51 THX
are switched on and ensure the correct
programme source is selected.
Ě Check the cable connection between the TV,
player and Cinebar 51 THX.
Ě Check whether the mute function has been
activated.
Ě Check whether the subwoofer is switched on.
Ě The USB device is not recognised or does not
contain any readable data. First try to play
other tracks or another medium.
Ě Condensation may have formed in the appliance.
Remove the USB device and leave the appliance
switched on for one to two hours.
Malfunctions
Ě If the Cinebar 51 THX System malfunctions,
disconnect the device from the power supply
for at least 30 minutes. Then connect the
Cinebar 51 unit again. The internal restore
function should reset the appliance.
No surround sound playback
Ě The transfer of surround-encoded data requires
a digital connection to the Cinebar 51 Unit.
Ě Check whether the operating mode has been
set to “Reference” or “Wide” (mode button).
Ě Not every DVD has surround sound. Try inserting
another DVD to test this.
The remote control does not work
Ě First check whether the batteries are still
charged and if necessary replace them.
Ě Point the remote control at the sensor on the
Cinebar 51 Unit.
Ě Make sure that there are no obstacles between
the remote control and Cinebar 51 Unit. Remove
these, if necessary.
Ě Check whether the batteries in the remote
control have been inserted with the correct
polarity.
Ě Check whether the batteries have leaked.
Ě Check whether there are fluorescent lamps
close by.
The appliance does not react to input commands
Switch the appliance to standby and switch it on
again. If this doesn’t help, switch the system off
completely and then on again. To do this, switch
the Cinebar 51 Unit to standby. Now switch the
subwoofer off and disconnect the power supply
to the Cinebar 51 Unit. Follow this procedure in
reverse to switch the system on again.
The USB stick is not recognised
Due to the wide variety of USB sticks on the market, it is not possible to guarantee 100% compatibility with all sticks. We have had the best test
results with the latest USB memory sticks (using
the USB 2 standard).
No MP3 playback/noisy MP3 playback
Ě If data files and MP3 files are mixed together
on the same data storage device, playback
may be noisy or even blocked altogether.
Ě Check to see whether all of the files on the
storage medium are MP3 files. If necessary
skip files and try to play other MP3s.
· Cinebar 51 THX
15
Technical description and operating instructions for the Cinebar 51 THX
Please note the serial number displayed on the
sticker on the box (e.g. SY05007200216A) and
this invoice number:
My INVOICE NUMBER is:
....................................................................................
My SERIAL NUMBER is:
....................................................................................
This serial number and the invoice number make
it easier for us to process your request quickly if
you require service.
Please contact our service department if you have any questions, suggestions or if there is anything
you think we could do better.
Lautsprecher Teufel GmbH
Gewerbehof Bülowbogen · Bülowstraße 66
10783 Berlin · Germany
Phone: 00800 200 300 40
Fax: +49(30) 300 930 930
www.teufelaudio.com
All information is provided without guarantee of correctness. Subject to technical
changes, typing errors and mistakes. The
information provided regarding weight
and dimensions is approximate and subject to change.