1
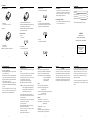
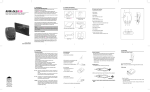
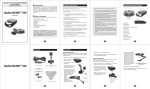
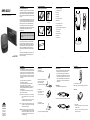
RMR-D210
1. Introduction
2. Control and Features
Dear Rocky Mountain Radar Owner,
1) Included with your Radar Detector
2) Controls and Functions
Advanced Micro Technology Design
360 Degree / Safety / Radar Detector
This model provides distinct visual and audible alerts to warn you of the
presence of X, K, and all kinds of Ka Band radar guns in the front and
rear of you. This model also provides the benefit of ‘undetectability’ by
alerting you to the presence of VG-2 (‘The Radar Detector detector’).
b. Dim Button
c. Mute Button
d. City Button
e
e. DC 12V Power Input Jack
RMR-D210
Windshield Bracket with
Suction Cups
h
f. Radar Antenna
g. Front Laser Detection Lens
a
h. Rear Laser Detection Lens
It also incorporates a new safety feature - Safety Alert(SA) and Safety
Warning System(SWS). This safety feature warns you of the presence of
potential road hazards by detecting signals from safety radar
transmitting devices.
Note :
Important : The RMR-D210 is not designed to help you disobey the
law. A defensive driver always obeys the posted speed limit and legal
driving methods.
f
g
a. On/Off Volume Control
Congratulations on your purchase of one of the world’s most sophisticated
radar/laser detectors. The RMR-D210 is a completely integrated radar/laser
detector which responds not only to all the radar guns in use today, including
“Stalker”, but also to the other latest development in speed monitoring devicesthe laser gun.
Receives incoming laser signals from rear
i. Power-On Indicator
b
j. X Band Indicator
c
d
k. K/Ka Band Indicator
Hook and Loop Fastener Tape
Power Cord
l. City Indicator
m. Laser and VG2
Federal and Local Regulations
The FCC passed the Communications Act in 1934 to give all citizens
the right to receive all types of radio transmissions. The same radio
frequencies used by police radar are also used by other devices, such
as automatic door openers, burglar alarms, and some amateur radio
equipment. Since the RMR-D210 is just a radio receiver tuned to a
specific portion of the public radio spectrum, it is protected under this
act.
Owner’s Manual
ROCKY MOUNTAIN RADAR
Spare Fuse
Some local, state, and federal regulations may prohibit the use of this
detection device. Please check with authorities regarding the use of
this device before operating it.
1
2
3
3. Installation
4
4. Operation
1) Mounting Guidelines
For the best performance, select the proper location for the unit
where it has a direct view of the road. The radar antenna is located
behind the rear panel of the unit and the laser detection lenses are
located behind the rear panel of the unit and the front window. The
antenna and sensors should not be obstructed by metal or metallic
surfaces and should be pointed at the horizon for accurate long
range detection.
2) Mounting Types
a. Attach bracket to windshield.
b. Bend bracket for correct detection angle.
·Choose a location that does not block the driver’s vision.
·Mount the detector in a level position.
·Do not mount the detector behind metal surfaces, windshield
antenna, wiper blades, ornaments, or mirrored glass.
·Heated windshields, currently available as an option on some Ford
(Instaclear) or GM(electriclear) vehicles act as an impenetrable
barrier to radar signals.
·Do not mount the detector where the driver or passenger might
collide in the case of an abrupt halt.
c. Plug Power cord into detector.
N o t e : Whichever mounting method you choose, remember to
place the radar detector out of view when you leave your
vehicle.
This keeps the detector out of sight from thieves and
prevents exposure to extremely high temperatures.
b. Tape on detector’s bottom.
1) Power and Volume Control
3) Power Connection
A. On Windshield
The coiled power cord provided with the unit has a cigarette lighter
socket plug at one end and a small connector on the other.
1. Insert the small connector into the jack on the side of the unit.
2. Insert the other end into the cigarette lighter socket of your vehicle.
If the detector does not operate when you turn it on, remove the
adapter from the cigarette lighter socket and carefully check the
socket for debris. Also, check the fuse in the adapter and your
vehicle fuse box.
d. Attach bracket to detector.
e. Plug power cord into cigarette lighter.
4) Replacing Fuse
a. To replace the fuse, unscrew the top of the plug.
Turn on and adjust volume.
Note : Turning on the detector will trigger the Self-Test mode.
2) Dim Mode
B. On Dashboard
a. Peel protective paper off one
side of hook-loop.
b. Remove and check the fuse to see if it has blown, If it has, replace it.
c. Peel top paper off.
ROCKY
MOUNTAIN
R ▲D▲ R
EI Paso, TX.
6469 Doniphan
El Paso, TX 79932
(915)587.0307
fax(915)587.6408
N o t e : If necessary, you may adjust the bracket to the proper angle
by bending it. To remove your detector, pull up the detector
from the front pulling it towards you.
Caution : On some newer model cars, a plastic safety coating has
been applied to the windshield. The suction cups may leave
permanent marks on the windshield once they are removed.
Check your vehicle owner’s manual to see if your car has
the plastic safety coating.
5
d. Place detector on dashboard.
· Press Dim Button.
→ An audible warning sound will alert you that Dim mode
has been activated.
Each time you press Dim button, display intensity will
change dim, dark, bright.
e. Plug power cord into detector and cigarette lighter.
6
7
8
4. Operation
ACCESSORIES
3) City / Highway Mode
c. K/Ka Band Detection
5) VG-2 Select
Accessories are available as follows:
7) Feature Memory
“K/Ka” LED turns on with audible tone.
The RMR-D210 will automatically “Remember” your
settings when the unit is turned off or removed from the
power. All features selected are retained in memoryDim/Dark, City/Highway, VG2 and mute.
8) Feature Engage Confirmation
d. Laser Alarm
·Hold down the Mute button for three seconds.
·Press the Button.
→“City” LED turns on for “City” Mode.
Each time a button is pressed two beeps confirm feature
“L/V” LED and “X, K/Ka” LEDs flash with audible tone.
The RMR-D210 will disengage VG2 feature with beep sound.
If the unit detects the laser signal when the City mode is
Press Mute button again for three seconds.
engaged, ALL LEDs will flash with audible tone.
“On”, one beep confirms feature “Off”.
Windshield mount
$5.00
Power Cord
$5.00
Suction cups(set of two)
$2.00
2amp fuses(two ea.)
$2.00
Replacement owner’
s manual
$3.50
Add $10.00 shipping and handling per shipment
The RMR-D210 will engage VG2 feature with three beeps.
4) Mute Mode
The factory default is “VG2 On”.
CAUTION
6) Indicator and Visual
Tampering with unit
a. Power On
“P” LED turns on.
will result in a $75.00 repair fee!
e. VG2 Alarm
WE DO NOT ACCEPT COD SHIPMENT
“L/V” LED flashes with audible tone.
·Press Mute Button.
ROCKY MOUNTAIN RADAR
6469 DONIPHAN DRIVE
EL PASO, TX 79932
915.587.0307
915.587.6408(FAX)
b. X Band Detection
→Silences the Audio.
Note : Press button again to restore audio alarm.
“X” LED turns on with audible tone.
9
5. Care and Maintenance
Your Rocky Mountain radar detector is an example of
superior design and craftsmanship.
The following suggestions will help you care for your detector
so you can enjoy it for years.
·Never leave your detector on the windshield or dashboard
when your vehicle is left parked. The temperature in the
vehicle durning the summer can reach levels above what is
considered to be safe for this detector.
·To make you less susceptible to break-in and theft, remove
the detector from your windshield or dashboard when leaving
your vehicle.
·Do not expose the detector to moisture, rain, dew, road
splash, or other liquids that can damage the internal
components and reduce the sensitivity of the detector.
10
6. Troubleshooting
11
If the detector does not turn on:
installed.
·Check the fuse that controls the power to the cigarette lighter
socket.(See your vehicle’s owner’s manual for reference.)
WARRANTY
This product has been designed and certified to comply
with Part 15 of the FCC Rules. Operation is subject to the
Antenna Type : Linear polarized, Self-Contained Antenna
materials for one year. Should you experience any difficulty
following two conditions: (1) this device may not cause
Detector Type : Scanning Frequency Discriminator
with the RMR-D210 during this time, the unit will be repaired or
harmful interference, and (2) this device must accept any
Frequency of Operation : 10.525GHz/± 50MHz(X-Band)
replaced at no charge. Should you desire to have your unit
interference received, including interference that may
24.150GHz/±100MHz(K-Band)
checked, there will be no additional charge other than postage
cause undesired operation.
34.700GHz/±1,300MHz
and handling. After the warranty period expires, the unit may
(Ka Super Wideband)
be returned for service and it will be reconditioned for $25.00
emery cloth to ensure a good, clean connection.
·There might be a problem with the vehicle’s electricity.
Caution : Do not place any metal objects other than the cigarette
lighter or a cigarette lighter plug in the cigarette lighter
Any changes or modifications not expressly approved by
Rocky Mountain Radar may void your authority to use this
LASER
product.
Receiver Type : Pulsed Laser Signal Receiver
Detector Type : Digital Signal Processor Pulse
socket. Doing so could blows a fuse in your vehicle or
cause the metal object to become very hot.
FCC Information
This unit guaranteed against defects in workmanship and
·The cigarette lighter socket might be dirty. Clean it with a fine
·Make sure that the volume control is in the ON position.
13
Receiver Type : Dual conversion Superheterodyne
RADAR
Width Discriminator
Opto Sensor : Dual Convex Condenser Lens and High Speed
Photo Diode Detector
If the detector gives a false alert when the vehicle hits bumps:
·Check the vehicle’s electrical system, including main battery cable
and alternator connections.
Spectral Response : 800 ~ 1,100nm
GENERAL
·Install a filter capacitor (470㎌, 35volts) on the back of the cigarette
lighter socket, across the power connection.
Temperature Range : -4 to 158℉ (-20 to 70℃)
Power Requirements : 12 ~ 15V DC, 80㎃ nominal
If the receiving signal is weak:
(Negative Ground)
·Check the angle of the detector. (Place it on the point of horizon.)
·Radar antenna/laser sensor is obstructed.
(Relocate the detector clear of any obstruction outside the
windshield, such as a wiper blade.)
·Relocate the detector clear of the window tint.
14
Warranty
7.Specification
·Check the power cord. Be sure all power connectors are properly
12
15
Dimensions(HWD) 1.1” x 2.5” x 3.6”
Weight : 2.2oz
Specifications are typical : individual units might vary.
Specifications are subject to change without notice.
16
17
18