1
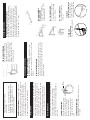
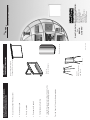
For the finest in film and video projection
• Ideal for houses of worship, schools, family
centers and industrial training rooms.
• Completely self-storing
• Economically priced
• Easily installed
• Attractively styled
®
• Exclusive Camlok Roller System
QUALITY FEATURES FOR BETTER PICTURES,
EASIER OPERATION, LONGER LIFE
Da-Lite
Project-O-Stands
and Easels
Da-Lite
Monitor Mounts
Da-Lite Tripod, Wall and
Ceiling and Electric Screens
DA-LITE IS MORE
THAN PROJECTION SCREENS
46420 Rev. 5/08
Da-Lite Lecterns
Assembly Instructions
for
MODEL B®
CLASS-RITE®
3100 North Detroit Street
Post Office Box 137
Warsaw, Indiana 46581-0137
Phone: 574-267-8101
800-622-3737
Fax: 574-267-7804
Toll Free Fax: 877-325-4832
www.da-lite.com
e-mail: [email protected]
DA-LITE SCREEN COMPANY, INC.
The
POWER In
PRESENTATION PRODUCTS
FOR
WALL
FOR MAP RAIL MOUNTING –
Use keyhole slots in flat brackets. Do not use
“D” rings.
FOR WALL MOUNTING –
Use the keyhole slot at the
back of the hanging bracket
for flush wall suspension.
Position screws or other
fasteners into the wall and
hang screen by using the
slots.
FOR
CEILING
Da-Lite wall/ceiling screens may be mounted on a
wall, map rail, suspended from ceiling or
extension brackets. Wall screens must be
mounted level and with the case-back parallel to
the wall.
BUILT-IN HANGERS
Care in mounting and care in correct operation will
mean a long and satisfactory life for your Da-Lite
wall/ceiling screen. Locate the screen where the
audience can best see it and where other
furnishings in the room permit. Mount the screen
so that bottom of picture surface, when fully
extended, will be above the heads of viewers.
INSTALLATION
PROTECT YOUR SCREEN by keeping it rolled in its
protective case when not in use. Always examine
both front and back of surface before re-rolling
into case to make certain screen is free of dust,
dirt or other foreign matter. Use a very soft duster
to gently remove any foreign particles.
in choosing a Da-Lite projection screen
designed and engineered to produce the
sharpest, most pleasing pictures with
maximum convenience.
YOU HAVE MADE A WISE
SELECTION…
TO RAISE PICTURE SURFACE
Pull down on the pull bail, then raise quickly, as a
window shade. Keep control of the picture surface.
Do not allow it to roll uncontrolled into the case or
damage will result.
TO LOWER PICTURE SURFACE
Pull screen down all the way. HESITATE – then
allow screen to retract VERY SLOWLY until it locks
in place.
OPERATING INSTRUCTIONS
FOR CEILING SUSPENSION
If the screen is to be ceiling
mounted, two screw hooks
should be placed in a beam or
other solid surface. For drop
ceilings, Da-Lite’s T-Bar Clips
may be purchased.
T-BAR CLIP
For Drop Ceilings
50 lb. max. load capacity.
TILT LOCK
For Keystone Elimination
Holds back bottom of
screen in tilted position
to eliminate keystoning.
No. 6 WALL BRACKETS
Screen can be extended 6"
from wall.
No. 11 WALL BRACKETS
Screen can be extended 10"
or 14" from wall by changing
position of bracket.
No. 23 ADJUSTABLE
WALL BRACKETS
Screen can be extended
10"-24" from wall by wing nut
and bolt adjustment.
WALL BRACKETS (75# per pair maximum)
Da-Lite No. 6 and No. 11 Non-adjustable wall
brackets and No. 23 adjustable extension wall
brackets are ideal for keystone elimination,
clearance, or corner mounting. The screen
brackets should be fastened to the studding or
other solid surface and not in the plaster only.
Suspend screen from “D” rings.
SCREEN ACCESSORIES