1
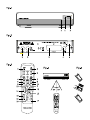
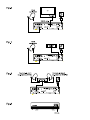
Digital Satellite Receiver TCT 1500 User Manual SAT 4000 kanäle Digital audio Update via USB OTA 1.00W stand-by PART 2 • English 1.0 Introduction 1.1 Safety Instructions 1.2 Storage 1.3 Equipment Set-up 1.4 Accessories 1.5 Usage of external USB devices 2 2 2 2 2 3 2.0 Your Receiver 2.1 Front Panel 2.2 Rear Panel 2.3 Remote Control Unit 2.4 Default PIN code: 0000 2.5 Installing the Batteries 2.6 Using the Remote Control 3 3 3 3 4 4 4 3.0 Connections 3.1 Basic connection with SCART cable 3.2 Connecting to Satellite Dish 3.3 Connecting to a Digital Audio Amplifier 3.4 Connecting to USB device 4 4 4 4 4 4.0 First time installation 4.1 OSD Settings 4.2 My Dish 4 4 5 5.0 Main Menu 5.1 TV 5.2 Radio 5.3 Accessory 5.4 Configuration 6 6 7 7 7 6.0 Changing channel list mode 9 7.0 Audio Language Selection English Table of Contents 9 8.0 Teletext 10 9.0 Subtitles 10 10.0 Trouble Shooting 11 11.0 Specifications 12 TekComm declares that this item complies with the basic requirements and other relevant regulations of directives CE 2004/108/EEC and 73/23EEC RoHS 2002/95EEC Subject to alterations. In consequence of continuous research and development technical specifications, design and appearance of products may change. All product names are trademarks or registered trademarks of their respective owners. © TekComm 2011. All rights reserved. 07/2011 1 PART 2 • English 1.0 Introduction 1.1 Safety Instructions DO NOT INSTALL YOUR RECEIVER: In a closed or poorly ventilated cabinet; directly on top of or under any other equipment; on a surface which might obstruct the ventilation slots. DO NOT EXPOSE THE RECEIVER OR ITS ACCESSORIES: To direct sunlight or near any other equipment that generates heat; to rain or intense moisture; to intense vibration and to any shock which may cause permanent damage to your receiver or to any magnetic objects, such as loudspeakers, transformers, etc. Do not use a damaged power cord. It may cause a fire or an electrical shock. Do not touch a power cord with wet hands. It may cause an electric shock. When the receiver is not used for a long period of time, you should unplug the power cord from the wall socket. Do not use alcohol or ammonia based liquids to clean the receiver. If you wish, you may clean your receiver with a soft lint-free cloth slightly made damp with a mild soap solution, only after disconnecting from the mains voltage supply. Make sure no foreign objects fall through the ventilation slots because this could cause fire or an electric shock. Do not place any objects on top of the receiver because this might prevent proper cooling of the components inside. Safety Precautions Never open the receiver cover. It is dangerous to touch the inside of the receiver due to high voltage currents and possible electrical hazards and your warranty will be void. Refer all maintenance or servicing to suitably qualified personnel. When you are connecting cables, be sure that the receiver is disconnected from the mains supply voltage. Wait a few seconds after switching off the receiver before you move the receiver or disconnect any equipment. It is a necessity that you only use an approved extension and compatible wiring that is suitable for 2 the electrical power consumption of the installed equipment. Please ensure that the electrical power supply corresponds with the voltage on the electrical identification plate at the back of the receiver. If the receiver does not operate normally even after strictly following the instructions in this user manual, it is recommended to consult your dealer. 1.2 Storage Your receiver and its accessories are stored and delivered in a packaging designed to protect against electric shocks and moisture. When unpacking it, make sure that all the parts are included and keep the packaging away from children. For transporting the receiver from one place to another or if you are returning it under warranty conditions, make sure to repack the receiver in its original packaging with its accessories. Failing to comply with such packaging procedures could void your warranty. 1.3 Equipment Set-up We recommend you consult a professional installer to set up your equipment. Otherwise, please follow the instructions below: Refer to the user manual of your TV and your antenna. Make sure that the SCART cable and outdoor components are in a good condition and the SCART connection is well shielded This manual provides complete instructions for installing and using this receiver. The following symbols will serve as follow. WarningIndicates warning information. TipsIndicates any other additional important or helpful information. MENURepresents a button on the remote control or the receiver (Bold Character) Move toRepresents a menu item within a window. (Italic Character) 1.4 Accessories 1. TCT 1500 1x 2. User’s Manual 1x 3. Remote control unit 1x PART 2 • English WARNING:The batteries should not be recharged, disassembled, electrically shortcircuited, be mixed or used with other types of batteries. If rechargeable accumulators instead of batteries are going to be used, we recommend using (e.g. NiMH) types with low self-discharge to ensure long time operation of remote control. 1.5 Usage of external USB devices It is recommended to use USB 2.0 storage devices. TekComm cannot guarantee compatibility to all types of USB storage devices. It is advised not to store important information on USB storage devices used with the receiver. Always make backups of data on USB storage device before usage with receiver. TekComm will not take responsibility for any loss of information or circumstances caused by loss of information. 2.0 Your Receiver 2.1 Front Panel 1. INDICATION LED: Green LED during operation, red LED in standby mode. 2. REMOTE SENSOR: Reception of remote control signals. 3. USB CONNECTION: Connection to USB storage device. Fig. 1 2.2 Rear Panel Fig. 2 1. SAT OUTA Loop through to connect an extra receiver to the satellite signal from dish 2. SAT INTo connect to the LNB for satellite signal from dish 3. TV SCARTTo connect to your TV set using a SCART cable. 4. S/PDIF coaxTo connect to the input of your digital audio amplifier. 5. Power CordYour receiver requires a mains voltage of 100~240 V AC (Auto-selectable), 50/60Hz ±5%. Make sure to check the power specification before connecting your receiver to the wall outlet. 2.3 Remote Control Unit Fig. 3 1. qTurns the receiver On/Standby 2. !Mutes audio output of the receiver 3. 0~9Changes channel and controls numeric functions 4. FAVOpens the available favourite list if previously configured 5. RECALLToggles between the two the last watched channels 6. AUDIOOpens the audio language(s) and mode selection. 7. SUBTITLEOpens the subtitle language(s) selection 8. INFOShows the information banner 9. MENUDisplays the main menu and returns to the previous level of menu 10.EPGOpens the EPG (Electronic Programme Guide) in TV mode. 11.EXITExits from any menu and sub-menu or cancels the progressing function 12.pqSwitches to the previous/ next programme in TV mode. Moves the cursor upwards/ downwards in menu mode 13.OKIn TV mode it displays the channel list according to the chosen mode. In menu mode activates the highlighted menu item. 14.tuIncreases/decreases the volume level in TV mode. Changes settings for specific menu items in menu mode 15.TEXTOpens the Teletext language(s) selection 16.PAUSEFreezes your live audio and video, press again to cancel 3 English 4. Batteries (AAA type) 2 x PART 2 • English 17.COLOURED BUTTONS For Teletext and further menu functions 18.TV/RADIOIn viewing mode toggles between TV and radio mode 2.4 Default PIN code: 0000 Connecting multiple fixed dishes to your receiver using a DiSEqC 1.0 switch Fig. 8 3.3 Connecting to a Digital Audio Amplifier Connect your Digital Audio Amplifier with the S/PDIF connector on the back of the receiver Fig.7 2.5 Installing the Batteries Fig. 5 Remove the battery cover from the remote control and put 2xAAA size batteries inside the compartment. The diagram inside the battery compartment shows the correct way to install the batteries. 1. Open the cover 2. Install batteries 3. Close the cover 2.6 Using the Remote Control Fig. 4 3.4 Connecting to USB device Fig. 9 4.0 First time installation Ensure your satellite signal is of good quality. It is recommended that you perform the first time installation by following the Installation as described step by step. It will help you to easily achieve system configuration and installation setup. 4.1 OSD Settings To use the remote control, point it towards the front of the digital receiver. The remote control has a range of up to 7 metres from the receiver at an angle of up to 60 degrees. Press OK pq and tu to change settings for OSD Language, Audio Language, Subtitle Language, AUTO Standby, Auto Time Zone and Time Zone. The remote control will not operate if its path is blocked. Use this option to change the language of the OSD. Use tu to select OSD language to German, French or English. NOTE:Sunlight or very bright light will decrease the sensitivity of the remote control. 4.1.2 Audio Language Use this option to change the language of the Audio. Use tu to select Audio language to German, French or English. 3.0 Connections 4.1.3 Subtitle Language Use this option to change the language of Subtitles. Use tu to select Subtitle language to German, French, English or OFF. 3.1 Basic connection with SCART cable Fig. 6 3.2 Connecting to Satellite Dish Connecting a fixed satellite dish to your receiver Fig. 7 4 4.1.1 OSD Language 4.1.4 Auto Standby This option allows you to enable Auto Standby or to disable Auto Standby. Auto Standby will switch the receiver to standby automatically when it doesn’t receive commands from the remote control for a period of 3 hours. To avoid the automatic switch off, use tu to set Auto Standby to OFF. PART 2 • English This option allows you to enable Auto Time Zone or to disable Auto Time Zone. If switched ON, it will follow the time zone automatically where you are. Use tu to set Auto Time Zone to OFF/ON. 4.1.6 Time Zone try to get a high as possible signal for Strength and Quality.) 4.2.1.2 DiSEqC 1.2/USALS DiSEqC 1.2/USALS need to be selected if your dish is mounted on DiSEqC 1.2 motor. a) First you need to set the LNB type you are using (YELOW button). Use this option to set the time zone manual. (Only possible if Auto Time Zone is OFF.) b) Then you have to select your Location (GREEN button). You can make a selection from -12:00 till +12:00. (Steps of 30 minutes). c) To set your Limit positions, the RED button will bring you in a new Set Limit menu. Move continue or in steps to your end position East end West. Select the RED button to Set West Limit position you have reached. Select the GREEN button to Set East Limit position you have reached. 4.2 My Dish Press OK pq and tu to change settings for Switch Type, Toneburst and DiSEqC. 4.2.1 Switch Type Use tu to select the the Switch Type of your dish. You can select DiSEqC 1.0/1.1, DiSEqC 1.2/USALS or NONE. 4.2.1.1 DiSEqC 1.0/1.1 For DiSEqC 1.0/1.1, you can select the satellite you want to use for LNB 1, 2, 3 and 4. Press pq for the LNB you want to use and press OK to edit. (Press the red button to add a satellite from the list.) Default: LNB1 is set to Astra 19,2E. You can press OK on, for example, LNB1 Astra 19,2E to see the signal level for Strength and Quality. Now you can turn your dish to get the highest Strength and Quality level. d) Satellite positions Press pq to select the Position you like to use and press OK. Press the RED button to Add SAT you like to install. Select a transponder receivable at your location (choose Transponder field and select the transponder with tu.) Then choose GOTO X” and press OK. The dish will turn fast, close to the right position. Use the Move Step field for Fine Tuning and adjust the position of the dish with the tu buttons. Once the dish is adjusted to the desired position, select the OK field and press OK to save. Press the BLUE button to scan the position you have set. (For Astra 19,2E after a scan, the list starts with a pre-installed list, followed with new found channels.) If you have aligned your dish to maximum signal, press EXIT. You can save 32 satellite positions. Use the colour buttons mentioned on the bottom screen. NOTE:If your pre-installed list, Astra 19,2E is NOT giving any signal, you are probably on the wrong satellite. (Press INFO button 3 x in viewing mode and try to get a high as possible signal for Strength and Quality). RED = Scan All, GREEN = Delete, YELLOW = Delete All, BLUE = Scan. After a scan, the list starts with a pre-installed list, followed with new found channels. NOTE:If your pre-installed list, Astra 19,2E, is NOT giving any signal, you are probably on the wrong satellite. (Press INFO button 3 x in viewing mode and English 4.1.5 Auto Time Zone 4.2.1.3 NONE / Toneburst If you have no DiSEqC 1.0/1.1 or DiSEqC 1.2/USALS you can select NONE. Press pq to select Toneburst and use tu buttons to switch it OFF/ON. 5 PART 2 • English For Toneburst OFF, you can edit 1 dish. For Toneburst ON, you can edit 2 dishes. Press pq to select Receiver and press OK. Here you can edit the dish settings. (Press the RED button to Add SAT you like to install.) Select a transponder receivable at your location (choose the Transponder field and select the transponder with tu). Now you can turn your dish to get the highest Strength and Quality level. If you have aligned your dish to maximum signal, press OK to save. Press the BLUE button to scan the position you have set. (For Astra 19,2E after a scan, the list starts with a pre-installed list, followed with new found channels.) NOTE:If your pre-installed list, Astra 19,2E, is NOT giving any signal, you are probably on the wrong satellite. (Press INFO button 3 x in viewing mode and try to get a high as possible signal for Strength and Quality.) 5.0 Main Menu All important settings and features of your receiver can be operated in Main Menu. It consists of the submenus: TV, Radio, Accessory and Configuration. To open the Main Menu press MENU. 5.1 TV Press tu to move to Main Menu. In Main Menu press tu to move to TV and press OK to enter the TV menu. 5.1.1 TV Channels Use tu to reach the following sub-menus Fav, Lock, Edit, Move, Sort, Skip, Delete and Search. With the BLUE button you can change the available group you would like to use. (All Satellite, Satellite1, Satellite2, Fav1, Fav2 etc.) 5.1.1.1 Favourites Press tu to select v if you wish to make favourite lists. Press pq to select the desired channel and press 1-9 to add the selected channel to 6 that favourite group you like to save. Repeat this operation to remove the channel from the favourite list. (Press YELLOW button to save.) 5.1.1.2 Lock Press tu to select . Then press pq to select the desired channel and press OK to lock this channel. (Press YELLOW button to save.) NOTE:This only works if Channel Lock is switched ON in the Pin Code menu from the Configuration menu! Default Pin Code is “0000”. 5.1.1.3 Edit Press tu to select , then press pq to select the desired channel and OK to edit this channel. (Press YELLOW button to save.) 5.1.1.4 Move Press tu to select , then press pq to select the desired channel and OK to move this channel. Use pq to move the channel to its new location and press OK to confirm. Repeat this for every channel you want to move. (Press YELLOW button to save all your changes.) 5.1.1.5 Sort Press tu to select . You can sort channels by Name A~Z, Name Z~A with the RED button or PayFree or Free- Pay with the GREEN button. Press MENU or EXIT to return the menu. The list is now sorted by the specified order. Note:Please take care once desired order is executed this order stays. 5.1.1.6 Skip Press tu to select , then press pq to select the desired channel and OK to skip this channel. During zapping in viewing mode, it will pass the skipped channel. (Press YELLOW button to save.) 5.1.1.7 Delete Press tu to select , then press pq to select the desired channel and OK to delete this channel. Press the YELLOW button to save and confirm or exit the pop up screen. With the GREEN button you can select the whole list to delete. PART 2 • English 5.1.2 EPG (Electronic Programme Guide) The EPG shows the programme schedule for all services broadcasting EPG information. Note:Not all broadcasters provide programme information. Press pq to select the desired channel and the right screen will show you the available EPG. Press u to step in to the EPG schedule for the current channel and use pq for EPG± and tu to change Date. 5.3 Accessory In Main Menu press tu to move to Accessory and press OK to enter the menu. Press pq to select the following sub-menus Gomoku, Calendar and Calculator. 5.3.1 Gomoku Press pq to select Gomoku and press OK. Play the game Gomoku on your receiver. Use the on screen help tips to set and play the game. 5.3.2 Calendar Press pq to select Calendar and press OK. Use OK for more details on the selected EPG. Press EXIT to leave. Use the on screen help tips to search in your Calendar. 5.1.3 Programming Timer from EPG 5.3.3 Calculator Book the selected programme in EPG screen with the RED button. A Timer Settings menu will pop up and you can edit this menu with pq tu and the numeric buttons to set the timer details. Press OK to save. The receiver will switch on to the right programme at the right time. Press pq to select Calculator and press OK. Use the on screen help tips to use your Calculator. 5.4 Configuration In Main Menu press tu to move to Configuration and press OK to enter the menu. 5.2 Radio Use pq to move to the following sub-menus Installation, TV Setup, PIN Code, Set Timer, Set Default and SW Update. Press MENU to move to Main Menu, then press tu to move to Radio and press OK to enter the Radio Channels menu. 5.4.1 Installation 5.2.1 Radio Channels Press pq or OK to move to Radio Channels. Use tu to move to the following sub-menus Fav, Lock, Edit, Move, Sort, Skip, Delete and Search. Press EXIT to leave. Note:For each function, refer to chapters 5.1.1.1 to 5.1.1.8 as the functions are identical. 5.2.2 Radio EPG Note:The functions in the Radio EPG are identical to the TV EPG, please read the chapters 5.1.2 for your reference. English 5.1.1.8 Search Press tu to select , then press OK and use the On Screen Display menu to search for a programme. Press pq to select Installation and press OK. This menu includes the following submenus: OSD settings, switch type and TP Manager. 5.4.1.1 OSD settings Note:For each function, refer to chapters 4.1, as the functions are identical. 5.4.1.2 Switch type Note:For each function, refer to chapters 4.2.1, as the functions are identical. 5.4.1.3 TP Manager Press pq to select a transponder you would like to Delete or to Scan. To make a new transponder in your list, you can use Add. 7 PART 2 • English You can use Delete All to delete all channels from the list. RED = Add, GREEN = Del, YELLOW = Delete All, BLUE = Scan. (See bottom line.) 5.4.2 TV Setup Press pq to select TV Setup and press OK. Use pq to move to the following sub-menus TV Format, TV System, OSD Transparency, Banner Display Time and Video Output. 5.4.2.1 TV Format Press tu to change settings for TV Format (4:3 LB, 4:3 PS, 16:9 PB,16:9 AUTO). 5.4.2.2 TV System Press tu to change settings for TV System (PAL, NTSC, AUTO). 5.4.2.3 OSD Transparency Press tu to change settings for OSD Transparency (1~ 8 ). 5.4.3.2 Channel Lock Press tu to change settings for Channel Lock (Yes or No). This option will ask you for a pin code if you try to enter a locked Channel. (Default pin code: 0 000)) 5.4.3.3 Parental Control Press tu to change settings for Parental Control. (No Restriction, All Programmes, 02 ~ 18.) This option will ask you for a pin code if you try to enter a channel with your restrictions. (Default pin code: 0000) 5.4.3.4 Change PIN Press tu to change settings for Change PIN (Yes or No). If you select Yes, this option will ask you to Enter Old PIN code first and then you will be asked to Enter New PIN for 2 times. 5.4.4 Set Timer Press pq to select Set Timer and press OK. 5.4.2.4 Banner Display Time Press tu to change settings for Banner Display Time (1sec, 3sec, 5sec, 10sec, 30sec, Always). This option will bring you to a timer screen. 5.4.2.5 Video Output Press tu to change settings for Video Output (RGB or CVBS). Your receiver will switch to the right channel at the right time, even from standby. RGB will give you the best performance. If you would like to change a timer setting, use pq to highlight the timer number and use the RED button for Edit or the GREEN button to Delete. 5.4.3 PIN Code Press pq to select PIN Code and press OK. Use pq to move to the following sub-menus Menu Lock, Channel Lock, Parental Control and Change PIN. 5.4.3.1 Menu Lock Press tu to change settings for Menu Lock (Yes or No). This option will ask you for a pin code if you like to enter the menu. (Default pin code:0000) Note:With active menu lock some functions in the channel editing are not available. 8 To Add a timer, push the RED button and use pq tu to change settings. You are able to set 10 timers at most. 5.4.5 Set Default Press pq to select Set Default and press OK. A pop-up screen will ask you: “Set factory default?”. Press OK or Exit. Please be careful when using this function, as it will erase all the data and parameters you may have set earlier. Once you have set to Default you will have to re-install your preferences and re-scan channels. The receiver will return to its factory default state and all user data will be deleted. NOTE:Before you set to Default, make a backup on a USB Device! (Chapter 5.4.6.3 Backup to USB.) PART 2 • English NOTE:Your PIN code will change back to the factory setting “0000”. Press OK and confirm the new request “System Update?” and press OK for Yes or Exit for exit. 5.4.6 SW Update Warning!NEVER disconnect the USB device from the receiver, the receiver from the main or switch the power OFF during the update/backup procedure. It can damage your receiver and warranty will void! As soon as the update has been finished, the receiver restarts automatically! Use pq to move to the following sub-menus Update by OTA, Update by USB, Backup to USB, OTA, Update by USB, Backup to USB. 5.4.6.1 Update by OTA This function will search for new software on satellite. An Update by OTA menu will pop up and you can edit this menu with pq tu and the numeric buttons to change the details. Press OK to scan directly. For OTA in Standby you can set Manual, AUTO and Disabled. Default: It will scan Manual at 04:00 o’clock am, at this default setting, for new software. If you want to search for other frequencies automatically, please change OTA in Standby to AUTO. Change OTA in Standby to Disabled if you don’t want to use this function. Note:Needed parameters can be changed. Please ask your local TekComm dealer in case software update was not successful. Warning!During the Update process NEVER disconnect the receiver from the main or disconnect the receiver from the antenna cable! This can damage your receiver and warranty will be void! After the update the receiver restarts automatically! 5.4.6.2 Update by USB a) Download the required update file for your receiver model from our website www.tekcomm.tv. b) Unzip the file, copy it to your USB device and connect it to the USB port of your receiver. c) Use pq to move to Update by USB and press OK. (USB device should be connected!) An Update Files list will pop-up and you can use pq tu to highlight the software you want to load. NOTE:You can also load a backup file with your backup settings! (See chapter 5.4.6.3) English Press pq to select SW Update and press OK. 5.4.6.3 Backup to USB Use pq to move to Backup to USB and press OK. (USB device should be connected!) To backup your User Database press OK and it will save your User Database. You can use this Backup File in Update by USB. (Read chapter 5.4.6.2) Warning:NEVER disconnect the USB device from the receiver, the receiver from the main or switch the power OFF during the update/backup procedure. It can damage your receiver and warranty will void! As soon as the update has been finished, the receiver restarts automatically! 6.0 Changing channel list mode To change between TV and Radio channel lists use TV/RADIO in normal viewing mode. To change channel list to Favourite in normal viewing mode, press FAV. Use FAV again to select other favourite groups or Satlists. Now select the desired channel and press OK to switch to full screen mode. 7.0 Audio Language Selection Press AUDIO to select the audio language. Select Audio Channel or Audio mode with pq. 9 PART 2 • English tu and make your selection (Stereo, Left or Right channel). Press OK, Exit and confirm. Your selection will be memorized for the current channel. NOTE:Audio tracks containing AC3 can only be listened to if the receiver is connected to a digital audio amplifier and this amplifier is switched ON and set to the correct input. 8.0 Teletext Press TEXT in normal viewing mode and tu to increase or decrease the displayed page number. Use 1-9 buttons to input a page directly. 9.0 Subtitles Press SUB in normal viewing mode. If the current channel broadcasts subtitle information, the Subtitle Language selection menu will appear. Use pq tu to select what you want, press OK, Exit and confirm. 10 PART 2 • English 10.0 Trouble Shooting There may be various reasons for occurring abnormal operation of the receiver. Check the receiver according to the procedures shown below. If the receiver does not work properly after checking it, please contact the dealer. Don’t open the receiver cover. This may cause a dangerous situation and will void warrant Cause The display on front panel does not light up. Remedy The power cord is not plugged in. Receiver is in stand-by mode. Solution Check, that the power cord is plugged into the wall outlet. Your model is without display. Switch ON receiver. Wrong connection of the Audio/Video output of the receiver to TV. Connect the Audio/video output of the receiver to TV correctly. Audio muting. Press the Mute button. Wrong Audio channel Press AUDIO button and select other audio channel TV power off, wrong channel or input. Turn on TV, select correct channel or input. The receiver can’t receive the signal Check the antenna cable, replace the cable, or connect the cable to the receiver tightly. Incorrect values of some tuner parameters. Set the values of the tuner parameters correctly in the installation menu. Wrong direction of the dish Check the signal strength with a spectrum analyzer and adjust your dish correctly. The remote control does not work The batteries of the remote control are not inserted or exhausted Check whether the batteries are inserted correctly in your remote control. Check the batteries, and if exhausted replace the batteries in the remote control. The USB storage device is not recognized. Wrong formatted Make sure that your USB device use file system FAT32. The external USB HDD does not start. Power consumption is too high. Connect extra power supply adaptor to your USB HDD. The receiver switches off automatically. Auto Standby function enabled. Disable Auto Standby. See section 4.1.4 for details. No picture Your model is without display. English No picture or sound 11 PART 2 • English 11.0 Specifications General Data Input Voltage Range: 100-240 V AC 50/60 Hz Demodulator Modulation: QPSK Power consumption: max 18W, typ. 4.5 W Input Symbol Rate: 2~45 Ms/s Operating Temperature: +0°C ~ 40 ° C SCPC /& MCPC signals from C & KU and satellites Storage Temperature: -30°C ~ 80°C Video Decoder Profile level: MPEG-2 MP@ML Input Rate: Max. 60 Mbits/s Video Resolution: 720 x 576 pixels (PAL), 720 x 480 pixels (NTSC) Aspect Ratio: 4:3, 16:9 Audio Decoder ISO/IEC 11172 LAYER I&2 Sampling rate: 32, 44.1, 48 kHz Audio modes: Stereo, Dual mono, Mono Tuner Front-End: DVB-S Input Frequency Range: 950~2150 MHz RF Input Level: .-25~-65 dBm LNB Power: 13/18 V DC (± 5%) max. 500 mA, Overload protected DiSEqC Version: 1.0, 1.1 & 1.2, GOTO X System and Memory Flash Memory: 1 6 Mbits SDRAM: 128 Mbits Connectors SAT IN SAT OUT SCART TV (RGB, CVBS) S/PDIF: coaxial output USB port 12 Stand-by Power consumption: 1.00 W Operating Humidity Range: 10% - 85%, RH, Noncondensing Size (WxDxH): 180 x 130 x 45 mm Weight: ca. 0.457 kg English PART 2 • English 13 PART 2 • English 14