1
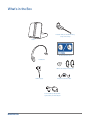
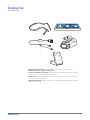
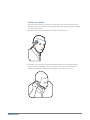
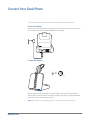
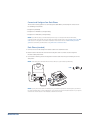
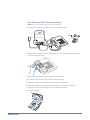
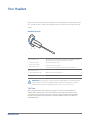
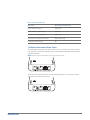
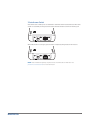
CS545-XD™
Wireless Headset System
User Guide
Contents
Welcome 3
What’s in the Box 4
Base and Headset Basics 5
Accessories 6
Customize Your Headset 7
Change Headset Configuration 7
Left Earloop Assembly 7
Headband Assembly 8
Position Your Headset 9
Connect Your Desk Phone 10
Connect the Power 10
Charge the Headset 10
Connect and Configure Your Desk Phone 11
Desk Phone (standard) 11
Check Configuration and Make a Test Call 12
Desk Phone plus HL10 Lifter (sold separately) 13
Desk Phone plus EHS Cable 15
Position Your Base 16
Your Headset 17
Headset Controls 17
Talk Time 17
Battery 18
Charge your second battery 18
Replace your headset battery 18
Muting Your Headset During a Call 19
Adjusting Your Headset Volume 19
Out of Range Warning Tones 19
Your Base 20
Base Phone Button and Switches 20
Subscription Button 20
Wideband/Narrowband Audio Switch 21
Auto Answer Switch 22
Daily Use 23
Place an Outgoing Call 23
Answer an Incoming Call 23
Conference Up to Three Additional Headsets 23
Troubleshooting 24
Headset 24
Desk Phone 24
2
Welcome
Welcome
Congratulations on purchasing your new Plantronics product. This guide contains instructions for
setting up and using your CS545-XD Wireless Headset System.
Please refer to the separate safety instructions for important product safety information prior to
installation or use of the product.
3
What’s in the Box
Headset with pre-installed battery,
eartip and earloop
Base
Fit kit instruction card
Headband
Other size eartip and earloops
Power supply
Telephone interface cable
Second battery charger with
spare battery and AC adapter
4
Base and Headset Basics
Base overview
BACK
FRONT
4
1
2
3
1 Call/mute LED
2 Power on/subscription LED
3 Charging LED
4 Subscription button
5 Narrowband/wideband audio switch
6 Power jack
7 Handset lifter/EHS cable jack
8 Telephone interface cable jack
9 Auto answer switch
10 Listening volume dial*
11 Speaking volume dial*
12 Configuration switch*
*For installation set up
4
5
6
1 Earloop
2 Eartip
3 Volume/mute button
4 Call control button
5 Battery Cover
6 Headset LED
7 Microphone
7
8
9
BOTTOM
10
11
12
Second battery charger overview
Headset overview
1 2 3
6
5
7
1
2
3
1 AC adapter
2 Battery charger
3 Battery
5
Accessories
(Sold separately)
2
1
4
3
5
1B
ehind-the-head headband Extremely light and comfortable wearing alternative.
2 Fit kit with earloops, eartips and foam sleeve
3E
lectronic hookswitch cable (EHS) Electronically takes your desk phone handset off hook.
Enables remote call answer/end with your headset.
4 HL10™ lifter Automatically lifts handset and returns it to the cradle. Enables remote call
answer/end with your headset.
5 Online indicator (OLI) A light that flashes once a call is activated. It allows others to know
when you are on a call.
6
Customize Your Headset
Your headset comes configured for your right ear with a pre-installed small
eartip and medium earloop. You can also configure your headset for your left
ear, install a different sized eartip and earloop, or install the headband.
Change Headset Configuration
1 Gently pull the eartip from the headset. Rotate the earloop down 90°.
NOTE You will feel resistance when rotating the earloop down; this is normal.
90º
2 Remove the earloop from the headset.
3 To wear the headset on the right ear but with a different size earloop or eartip, select the size you
want and reinstall in reverse order as shown. Be sure notch in the eartip faces the microphone.
90º
Left Earloop Assembly
90ºthe earloop as shown and insert it
1 Choose the size of earloop that fits most comfortably. Align
onto the headset. Be sure the earloop is flat against the headset and rotate the earloop up 90°.
90º
90º
90º
2 Choose the size of eartip that fits most comfortably. Align the eartip with the notch facing the
microphone as shown. Press on to attach.
7
Headband Assembly
The headset can be rotated for wearing on the left or right ear.
NOTE Before installing the headband, remove the eartip and earloop from the headset.
1 Hold the headband so it is aligned to receive the headset as shown and insert the headset into
the headband.
2 Rotate the headset up.
3 To optimize the position of the headset, push the headset in so the microphone is close to the
corner of your mouth.
8
Position Your Headset
When you wear the headset, the microphone should rest as close to your cheek as possible
without touching. The microphone can be adjusted inward by the pivoting earpiece to optimize
the position of the headset.
1 Slide the headset over and behind your ear and fit the eartip into your ear.
2 Holding the base of the headset, push it in and back towards your ear to allow the pivoting
earpiece to bring the microphone close to your mouth. As the base of the headset moves
backwards, you will feel soft clicks until the microphone rests close to your cheek.
9
Connect Your Desk Phone
This section describes how to connect the base to your desk phone.
Connect the Power
Plug one end of the power supply into the power jack on the back of the base and the other end
into a working power outlet. The Power On LED will be solid white.
Charge the Headset
=
20
Place the headset in the charge cradle. The charging LED on the base will flash green when
charging and turn solid green when the headset is fully charged. Charge for at least 20 minutes
prior to the first use. A full charge takes 3 hours.
NOTE This product has a replaceable battery. Use only batteries supplied by Plantronics.
10
Connect and Configure Your Desk Phone
There are three setup options for connecting the CS545-XD to your desk phone. Select one of
the following and continue.
• Desk phone (standard)
• Desk phone + HL10 lifter (sold separately)
• Desk phone + EHS cable (sold separately)
NOTE If you will be using a standard desk phone set up or a desk phone with an HL10 lifter,
continue below. If you will be using the desk phone with an EHS cable, refer to Desk phone plus EHS
cable section in this guide. For further installation information refer to the EHS Getting Started
guide that came with your EHS cable or at plantronics.com/accessories.
Desk Phone (standard)
1 Connect one end of the telephone interface cable to the back of the base.
2 Disconnect the handset coil cord from the desk phone and re-connect it to the telephone
interface cable junction box.
3 Connect the remaining end of the telephone interface cable into the open handset port on the
desk phone.
NOTE Your desk phone handset will continue to work; it’s just hooked up differently.
USE
NOTE If your phone has a built-in headset port, you should only use the headset port if you will not
be using the HL10 lifter. In this configuration, you must press both the headset button on your phone
and the call control button on the headset to answer or end calls.
11
Check Configuration and Make a Test Call
1 If your desk phone has a volume control set it to mid-range.
2 Look at the bottom panel of your base and make sure the default settings are correct.
Listening volume dial (
) = 2 and Speaking volume dial (
)=2
Configuration switch = A
Desk phone volume = mid-range
3 Remove the handset from desk phone cradle.
4 While wearing your headset, press the call control button on the headset.
5 If you do not hear a dial tone, adjust the configuration switch (A-G) until you do.
NOTE For most phones, the factory default settings will sound the best.
6 Dial a test call from the desk phone. If needed, fine tune the volume with the headset volume
controls. You can also adjust the desk phone speaking and listening volumes on the bottom of
the base.
12
Desk Phone plus HL10 Lifter (sold separately)
NOTE First follow the steps above for Desk Phone (Standard).
1 Firmly press the handset lifter power cord into the handset lifter jack.
USE
2 While wearing your headset, slide the handset lifter arm under the handset until the lifter base
touches the side of the phone.
3 Slide the lifter up to where it nearly touches the handset earpiece.
4 Press the call control button on your headset to activate the lifter.
5 If you hear a dial tone the lifter is set correctly and needs no adjustment.
6 Remove the protective strips from the 3 mounting tapes on the underside of the lifter.
7 Gently place the lifter on the desk phone in the pre-determined position.
8 Press firmly to adhere.
13
If You Do Not Hear a Dial Tone
1 If you do not hear a dial tone, raise the lifter height switch to the next highest position.
2 Repeat steps 2 through 5 above as necessary until you hear a dial tone.
3 When you hear a dial tone, secure the lifter as described in steps 6 through 8.
Additional Parts (if required)
Use extender arm when the handset lifter needs additional stability lifting and returning
handset to cradle.
Extender Arm
1 Slide extender arm onto lifter.
2 Stabilizers can be shifted left and right. Position stabilizers on outsides of handset to gently
grip the handset.
2
1
2
Ringer Microphone
Use ringer microphone only when the telephone speaker is not located directly under the
handset.
1 Remove cover from ringer microphone jack on back of lifter.
2 Connect ringer microphone plug.
3 Place ringer microphone over phone speaker. Remove adhesive tape and attach.
3
1
2
14
For Nortel Phones Only
Desk Phone plus EHS Cable
1 Connect the end of the EHS cable to the base and the other end to the desk phone as
described in the EHS Adapter Getting Started guide.
NOTE For further installation information refer to the EHS Getting Started guide that came with
your EHS cable or at plantronics.com/accessories.
USE
15
Position Your Base
The minimum recommended separation between your desk phone and the base is 6 inches.
The minimum recommended separation between the base and computer is 12 inches.
Incorrect position can cause noise and interference problems.
16
Your Headset
Now that you’ve adjusted your headset and connected your desk phone, read
this section to learn about the headset features, how to use the controls and
more.
Headset Controls
1
2
3
1 Volume/Mute button
This table describes volume controls if you wear the headset on the right.
The volume controls are opposite if you wear it on the left.
Increase the volume
Press the volume button up.
Decrease the volume
Press the volume button down.
Mute/unmute a call
To mute/unmute the headset, press the volume/mute button in.
2 Call control button
Place, answer, end a call
3 Headset LED
Briefly press the call control button.
Flashes white when in use.
IMPORTANT For your safety, do not use headset at high volumes for extended periods
of time. Doing so can cause hearing loss. Always listen at moderate levels. For more
information on headsets and hearing visit: plantronics.com/healthandsafety.
Talk Time
With a single full charge, the headset will provide up to six hours of continual talk time.
Talk time will be reduced when operating in wideband mode and/or if the headset is used
consistently at a long distance from the base. You can replace the battery mid-call, without
losing the call, as long as a charged battery is reattached within 5 minutes. This allows for
unlimited talk time.
17
Battery
This product has a replaceable battery. To ensure replacement batteries meet Plantronics high
quality standards and for optimal performance, only use replacement batteries provided by
Plantronics.
Low Battery Warning
If you are on a call and the headset battery is critically low, you will hear a repeated single
low tone every 15 seconds indicating that the battery is low. You should recharge the headset
immediately.
If you are not on a call and press the call control button, you will hear three low tones if the
battery is critically low. You should recharge the headset immediately.
Charge your second battery
1 Plug in your second battery charger to a wall outlet or USB port on your PC. (Battery comes
preinstalled in the charger.)
2 The charging LED on the battery charger will flash green when charging and will turn solid
green when the battery is fully charged.
Replace your headset battery
You can replace the battery mid-call, without losing the call, as long as a charged battery is
reattached within 5 minutes. This allows for unlimited talk time.
1 Disconnect the battery from the headset.
2 Remove the charged battery from the second battery charger and slide it onto the headset
until you hear a click.
3 Charge the used battery by inserting it in the second battery charger.
18
Muting Your Headset During a Call
To mute/unmute the call, press the volume/mute button in.
When mute is activated on the primary headset, the Call/mute LED on the base will be solid red
and you will hear three high tones (you will still be able to hear the caller).
Adjusting Your Headset Volume
Fine-tune your headset volume by pressing the volume/mute button up (increase) or down
(decrease) if you wear your headset on the right. If you wear it on the left, it’s opposite: press
down to increase the volume and up to decrease the volume.
Make set up volume adjustments for the desk phone with the volume dials on the base.
Out of Range Warning Tones
If you are on a call and go out of the operating range, you will hear three low tones. You will
hear a single mid tone when you are back in range.
If you stay out of range, an active call will be suspended. The call will be re-established when
you walk back into range. If you remain out of range for more than 5 minutes, the system will
drop the call.
If you are not on a call and go out of the operating range and then press the call control button,
you will hear a single tone for the button press and three low tones for the failure to make a
link.
19
Your Base
Base Phone Button and Switches
12
1 Subscription Button
3
The headset and base that came in the box are subscribed (connected) to each other. However,
if you wish to use a new headset or need to restore subscription to your current headset, the
units can be subscribed to each other by the following two methods.
NOTE The red CS500XD markings on the base and headset indicate an XD headset system and only
XD headsets can be subscribed to XD bases. If you try to subscribe a non-XD headset to an XD base,
the power LED on the base will turn off and will remain off until the non-XD headset is removed from
the base.
Automatic Secure Subscription
With your system idle, docking a headset will automatically subscribe it to the base, making
it the primary headset. The Power On/Subscription LED will flash white during subscription
process and become solid white when the new subscription is established.
Manual Over-the-Air Subscription
1 With your system idle and your headset undocked, press and hold the subscription button on
the base for three seconds. The Power on/subscription light will flash white.
2 Press and hold the volume up button on the headset for three seconds until the headset LED
turns solid white. When the Power on/subscription LED on the base becomes solid white, the
headset and base are subscribed to one another.
NOTE If the subscription process times out after two minutes or if the subscription process fails, the
subscription LED on the base will go dark for three seconds and then re-illuminate steadily to indicate
power is applied to the base. If this occurs, try to re-subscribe the headset again.
Ending Subscription
If the base is in subscription mode and you want to stop the base from searching for a headset,
press the subscription button again. The subscription LED on the base will go dark for three
seconds and then re-illuminate steadily to indicate power is applied to the base.
20
Power On/Subscription LED
Base Status
Power On/Subscription LED
Primary headset subscription
Flashes white
Primary headset subscribed to base
Solid white
Conference call headset subscription
Flashes white
Active conference call with guest headsets
Flashes white rapidly
Incompatible headset and base
Off
2 Wideband/Narrowband Audio Switch
The CS545-XD has wideband audio, which allows speech to sound clearer and more natural. If
your desk phone is capable of wideband audio, set the Wideband-Narrowband audio switch to
yellow for wideband.
NOTE: Talk time will be reduced when operating in wideband mode.
Set the switch to black (narrowband) for longer headset battery life or to increase the number
of systems that can work in a small area.
21
3 Auto Answer Switch
Auto answer saves a button press to establish the radio link between headset and base. When auto
answer is set to black you must press the headset call control button to answer an incoming call.
When Auto Answer is set to gray you can answer a call just by lifting headset from the base.
NOTE Auto answer/end capability requires the use of an EHS cable or HL10 lifter. Visit
plantronics.com/accessories for more information.
22
Daily Use
Place an Outgoing Call
1 Wearing your headset, press the headset call control button.
2 Remove the handset from the cradle. You will hear a dial tone.
NOTE This step will be automatic if you install a lifter or EHS cable accessory. For a complete
list of accessories, visit plantronics.com/accessories.
3 Dial the number using your desk phone.
4 To end the call, press the headset call control button and hang up the handset.
Answer an Incoming Call
1 Wearing your headset, press the headset call control button.
2 Remove the handset from the cradle and speak to your caller.
NOTE This step will be automatic if you install a lifter or EHS cable accessory. For a complete
list of accessories, visit plantronics.com/accessories.
3 To end the call, press the headset call control button and hang up the handset.
Conference Up to Three Additional Headsets
You can conference up to three additional headsets to a call in progress.
NOTE Only XD headsets will work with XD bases.
Join a Conference Call
While in an active link between the primary headset and the base (on a call), place the guest
headset into the primary user’s charge cradle (this connects the headset to the base). The base
subscription LED will begin flashing. After a few moments, the primary user will hear a triple
tone in their headset indicating the guest headset wishes to join the call. Within ten seconds of
hearing the triple tone, press the primary headset’s call button to accept the guest headset. If
the process fails or times out because the button was not pressed within ten seconds the guest
subscription is terminated and the guest will hear an error tone in their headset.
To connect a guest headset that is of different variety than the primary headset press the base
subscription button while the base has an active link. Next, press the guest headset volume
up button until the indicator light turns on. The base subscription LED will begin flashing and
the primary user will hear a triple tone in their headset indicating the guest headset wishes
to join the call. Within ten seconds of hearing the triple tone, press the primary headset’s call
button to accept the guest headset. If the process fails or times out because the button was
not pressed within ten seconds the guest subscription is terminated and the guest will hear an
error tone in their headset.
NOTE Headsets in a conference maintain independent mute controls. The base only indicates the
primary user’s mute state.
Exit a Conference Call
Guests headsets can remain as guests through multiple calls. To remove a guest headset, press
the guest headset’s call button or dock the primary user’s headset in the charge cradle. A single
tone in the master headset will be heard as each guest leaves the call.
23
Troubleshooting
Headset
My headset is unstable.
When you wear the headset, the microphone should rest as close to your cheek
as possible without touching. The microphone can be adjusted inward by pivoting
the earpiece to optimize the position of the headset. See Position your headset.
Headset has to be charged
too often.
Talk time is not as long as
stated.
Switch the Wideband-Narrowband audio switch to narrowband (black).
Talk time performance is
significantly degraded even
after a full recharge.
Battery is wearing out. Call Plantronics at (800) 544-4660 for ordering a
replacement battery or contact us at plantronics.com/support.
I can’t subscribe a headset
to the base.
Make sure both the headset and base have the red XD markings.
See Subscription button in this user guide.
Desk Phone
I can’t hear a dial tone in the
headset.
Make sure your headset is charged.
Make sure your headset is subscribed to base. See Subscription button.
Press the call control button on your headset.
If using a lifter, make sure the lifter is lifting the handset high enough to operate
the hookswitch; set to a higher setting if necessary.
Adjust the configuration switch on the base until a dial tone is heard.
Fine tune the listening volume on the headset.
If the volume is still too low, adjust the Listening volume dial on the base.
I hear static.
Make sure there is at least 12 inches between your base and your computer, and
6 inches between your base and your telephone. You may hear static as your
headset is going out of range; move closer to the base.
The sound is distorted.
Lower the Speaking volume dial or Listening volume dial on the base. For most
telephones the correct setting is position 2.
If your desk phone has a volume control, lower until the distortion disappears.
If the distortion is still present, adjust the headset volume control to lower the
headset speaker volume. If the distortion persists, lower the Listening volume dial
on the base.
Make sure there is at least 12 inches between your base and your computer, and 6
inches between your base and your telephone.
I hear echo in the headset.
Lower the Listening volume dial and Speaking volume dial on the base. For most
telephones, the correct setting is position 2.
If the audio level is too low in this position, adjust the headset volume control to
increase the headset speaker volume.
If your speaking volume is too low for your listener in this position, adjust the
position of the headset to make sure the microphone is as close as possible to
your mouth.
Adjust the Configuration switch. The most commonly used position is “A”, which is
the default position.
People I talk to can hear a
buzz in the background.
Move the base further away from your phone.
If the base power supply is plugged into a power strip, plug it into the wall
directly.
The handset lifter is
installed but does not lift
the handset.
Be sure the handset lifter power cord is firmly pushed into the handset lifter jack
on the base.
24
NEED MORE HELP?
plantronics.com/support
Plantronics, Inc.
345 Encinal Street
Santa Cruz, CA 95060
United States
© 2013 Plantronics, Inc. All rights reserved. Plantronics, the logo design, CS545-XD, EHS, and HL10 are trademarks or registered trademarks of Plantronics,
Inc. All other trademarks are the property of their respective owners.
Patents US D635,548; D635,962; D645027; BR DI70057630; DI70057796; DI71026975; CN ZL201030710901.2; ZL201030710900.8; 201130145424.4;
EM 001792276-0002; 001792276-0003; 001865510-0002; IN 33102; 236858; KR D143954; D143955; Patents Pending
200089-06 (02.13)