1
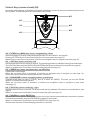
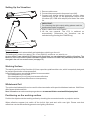
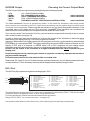
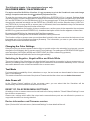
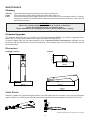
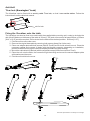
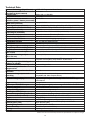
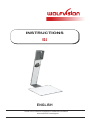
R
INSTRUCTIONS
VZ-3
ENGLISH
Check out our Internet Homepage for additional information
www.wolfvision.com/support
ENGLISH
Precautions
WARNING!
Risk of electric shock
Dangerous voltage inside
Please observe the following:
Use this Visualizer only with the correct voltage as shown on the type label !
Do not expose the Visualizer to heat or moisture !
Protect the Visualizer from excessive shocks !
Make sure that sufficient air circulation for cooling the Visualizer is possible (ventilation slots on
the back of the tube)!
If there is any abnormality (abnormal noise, smell, smoke etc.) disconnect the Visualizer from
mains immediately and contact your Visualizer dealer!
Do not use a damaged power supply / power cord. This may cause short circuits or electrical
shocks!
To prevent danger, do not modify the Visualizer or operate without the cover panel firmly in place!
Do not expose the Visualizer to water, metallic objects or any flammable material.
Avoid installing the Visualizer in locations exposed to strong magnetic fields or electrical
currents.
Avoid installing the Visualizer in environments where there is radiation. This could cause
monitor image distortion or damage to the CCD camera.
Do not pull the plug from the power socket with wet hands!
If the Visualizer is not used for a long time, disconnect it from mains!
The external power supply has to be approved by CSA or UL in accordance to CSA 22.2-60950 or
UL 1950.
Precautions for LED light according EN62471:
LED lightning system - Do not stare into beam!
Do not modify the LED lightning system!
Do not view the light beam with optical instruments!
Ne pas regarder dans l'objectif lorsque le visualiseur est en marche!
CODES - Short Keys
One Push White Balance:
Press the LIGHT key for 2 seconds to perform one push white balance.
Activating the on-screen menu:
Keep the MENU key (EXTERN) pressed for 2 seconds to activate the on-screen menu. Use the navigation
keys (FREEZE and EXTERN) or the ZOOM wheel to navigate and the ENTER key (POWER) and the
Selection keys (LIGHT and FOCUS) to enter submenus and to change values. For the help function, keep
the HELP key (FREEZE) pressed for 2 seconds.
Manual Focus:
Keep FOCUS key pressed for 2 seconds and focus with the FREEZE and EXTERN keys. Press the
FOCUS key quickly to return to normal operation mode.
Reset Resolution to AUTO:
Press FOCUS and LIGHT keys simultaneously and the Visualizer selects the best resolution for the
connected display device.
1
Approval
Marks on the unit:
C
Tested to complywith
FCC standards for
home or office use
US
L I ST E D
9902476
FCC information:
This device complies with part 15 of the FCC rules. Operation is subject to the following two conditions: (1)
this device may not cause harmful interference, and (2) this device must accept any interference received,
including interference that may cause undesired operation.
Note:
This equipment has been tested and found to comply with the limits for a class A digital device, pursuant to
part 15 of the FCC rules.
Information to user:
The user manual or instruction manual for an intentional or unintentional radiator shall caution the user that
changes or modifications not expressly approved by the party responsible for compliance could void the
user's authority to operate the equipment.
This product is built according to Directive EMC and to Directive electrical equipment.
Inspections, tests and evaluation are according to UL 60950. CSA 22.22-60950
Inspections, tests and evaluation are according to the CB-Scheme
Inspections, tests and evaluation are according to the PCT-Scheme
Copyright Information
Copyright © by WolfVision. All rights reserved.
WolfVision, Wofu Vision and
are registered trademarks of WolfVision Holding AG, Austria.
No part of this document may be copied, reproduced, or transmitted by any means, without prior written
permission from WolfVision. Except documentation kept by the purchaser for backup purposes.
In the interest of continuing product improvement, WolfVision reserves the right to change product
specifications without notice.
Information in this document may change without notice.
Disclaimer: WolfVision shall not be liable for technical or editorial errors or omissions.
The units are "MADE IN EU/AUSTRIA”
Printed in Austria, August 2012
2
Components of the Visualizer
ZOOM
#4
R
VISUA
LIZER
VZ-3
#3
#2
#1
#1
#2
#3
#4
Working surface (see page 7)
Connectors (on the back behind the cable cover - see below)
Light (maintenance-free LED)
Control keys (see next page)
Zoom wheel (see next page)
Connectors (#2)
#7
#6
EXTERN IN
USB
#8
LAN (PoE+)
#5
DVI
#5
#6
#7
#8
#9
DVI-I output (see page 8)
USB port (see page 7)
External Input for Computer RGB-signals (15pin) (see page 9)
LAN port 10/100 TBase (see page 7)
Power connection PoE+ (see page 7)
Cable Tie to fix all cables (to unfasten, pull the lug)
3
#9
Control Keys (camera head) (#4)
One of the great features of WolfVision's Portable Visualizers is that only the most necessary keys are on
the unit itself. Therefore anyone can use it without instructions:
#13
#12
#14
#11
#15
#10
#10 EXTERN key / MENU key / menu: navigation key - down
Switches between Visualizer image and external input (for more details - see page 9).
Pressing EXTERN key for 2 second activates the on-screen menu (see page 10).
When the on-screen menu is activated, it functions as navigation key to navigate down (see page 10).
#11 LIGHT key / menu: select key - left
Switches the light of the Visualizer on and off. The arrow beside the key indicates if the light is switched on.
The LIGHT key also works as ONE PUSH WHITE BALANCE key if pressed for 2 seconds (see page 6).
When on-screen menu is activated, it works as select key left (see page 10).
#12 FREEZE key / menu: navigation key - up / HELP key
Freezes the current image.
When the on-screen menu is activated, it functions as navigation key to navigate up (see page 10).
Opens the help function when keeping pressed for 2 seconds.
#13 ZOOM WHEEL / menu: navigation wheel - up and down
Turn the wheel down to zoom in (TELE), and up to zoom out (WIDE). The more you turn the ZOOM
WHEEL, the faster the zooming works.
When the on-screen menu is activated, it functions as navigation wheel to navigate up and down
(see page 10).
#14 FOCUS key / menu: select key - right
Switches the auto focus on and off. The arrow beside the key indicates if the auto focus is switched on (see
page 6).
When on-screen menu is activated, it works as select key right (see page 10).
#15 POWER key / menu: ENTER key
Switches the unit on and off. When switching the unit on the Visualizer automatically runs power-on preset.
For switching to standby, keep the POWER key pressed for 4 seconds.
When on-screen menu is activated, it works as ENTER key (see page 10).
Switches the Visualzer off when keeping pressed for 2 seconds.
4
Setting Up the Visualizer
1. Remove cable cover.
2. Connect the power pack to the power-input (#8).
3. Connect your display device (projector, monitor, video
conferencing unit etc.) to the appropriate output of the
Visualizer (#5, RGB with adapter) and fasten the cable
tie.
IMPORTANT:
For choosing the right output setting please read the
detailed description on page 8!
4. Slide-in cable cover until it rasted.
5. Lift the arm upwards. The VZ-3 is switched on
automatically. (Alternative the Visualizer can be
switched on by pressing the POWER key.)
Power-on preset:
The power-on preset is automatically activated when switching on the unit.
The settings are: zoom size: approx. 20 x 15 cm (DIN A5), autofocus: on, auto iris: on.
As soon as the Power Indication LED stays green illuminated, you can start working with the Visualizer. The
behavior of the unit once the power has been supplied or after the POWER key has been pressed can be
changed in the unit's on-screen menu (see page 10).
Working Surface
The working surface of the Visualizer (#1) has a special crystalline white color, which is especially designed
for perfect reproduction of transparencies.
In the following cases, an optional lightbox is recommended:
- If the transparency is very dark
- If the transparency is very wavy and causes reflections
- If the room light causes reflections on a transparency
Whiteboard Foil
The optional whiteboard foil can be used for direct annotation with special whiteboard markers. WolfVision
offers spare whiteboard foils.
More information on markers and sponge cleaners at www.wolfvision.com/wolf/thirdparty.html
Positioning on the working surface
Position the objects onto the working surface by checking the connected monitor or projector monitor.
When reflections appear just switch off the built-in light and work with room light. Please note that
reflections can also be caused by general room lighting conditions.
5
Focusing / Autofocus
Please note that objects with very low contrast (like blank sheet of paper) are difficult to focus. If the
autofocus does not work just move the object slightly.
For special applications the autofocus can also be switched off using the FOCUS key (#14).
To focus manually, keep the FOCUS key pressed for 2 seconds and then adjust the focus with the arrow
up/down keys (FREEZE and EXTERN). Press the FOCUS key quicklyto return to normal operation. As
long as the manual focus mode is active, the arrows up and down are flashing.
Digital Zoom
Please note that the Visualizer has an optical 12x zoom. The digital 2x zoom increases the overall zoom
range to a 24x zoom. The smallest pickup size on the working surface without digital zoom is 33mm x
25mm (1.3" x 1"). When you zoom in further the digital zoom is automatically activated and the smallest
pickup size is 17mm x 13mm (0.7" x 0.5"). However please be aware that when the digital zoom is used,
the resolution of the picture is not as good as before. The default setting displays a message on-screen
when you are in the digital zoom mode.
You can change the behavior of the Visualizer in the digital zoom mode in the on-screen menu (see page
10).
Auto Iris
WolfVision Visualizers are equipped with an auto iris. This means that the brightness of the camera image
adjusts automatically.
The standard auto iris level can be set brighter or darker in the unit's on-screen menu. When picking up
areas with bright spot, Back Light Compensation can be switched on in the unit‘s on-screen menu - see
page 10 and on-screen help.
IMPORTANT
White Balance Adjustment
Correct white balance adjustment is important for an exact color reproduction!
Each time the lighting condition changes, the Visualizer's camera must readjust its white balance, in order
to optimize the color reproduction. The lighting condition (color temperature) changes, for example, if
changing between the Visualizer's light and an external lightbox (bottom light) or if the room light is turning
on or off.
The standard setting of the Visualizer is "Auto Tracking" white balance. This means that the white balance
is continuously adjusted automatically.
For an exact white balance, at least 10% of the recorded image should be white.
For a precise fixed white balance adjustment use the "One Push" white balance. This can be done by
pressing the LIGHT key (#11) for 2 seconds. When the white balance is stored an on-screen message
appears. Setting a "One Push" white balance switches off the "Auto Tracking" mode (when the unit is
switched off and on again the "Auto Tracking" mode will be reactivated).
Normally there is no need for a manual white balance adjustment. However, if the colors on the screen still
appear to be wrong, the white balance can be adjusted manually (one-push).
Please note: False colors can also be due to wrong color settings of your projector or monitor. It is
recommended to adjust the white balance of the Visualizer at first and if the results are still not satisfactory,
the monitor or projector should be checked.
For specialists: The Visualizer can be switched between "Auto Tracking", "One Push" and "Manual"
white balance mode in the on-screen menu (see page 10). If you work with negative transparencies and a
light box, use a blank (black in the image) part of the negative film for white balance adjustment! The "one
Push" white balance will be separately adjusted and stored for top light and external light box.
6
USB Port
The USB device port (#6) can be used for direct connections between the Visualizer and a computer. This
way, a Visualizer can be controlled and can be used as a scanner for 3-dimensional objects. Images in JPG,
TIF or BMP format can be taken in a fraction of a second - much faster than with a desktop scanner.
WolfVision's Connectivity Software works under Windows XP, Vista and 7 (32 and 64-bit) as well as Apple
Macintosh. It is fully TWAIN/WIA compatible. This is important when using Visualizers in connection with
graphic programs such as Photoshop, or for connecting them to Interactive Whiteboards (Smart Boards).
The fast USB 2.0 port can also output live motion. WolfVision‘s Connectivity Software can store AVI files
and includes a video capture driver. You can view and save the live image from the Visualizer on your
computer in almost every modern video editing software.
Please download the latest version of the WolfVision Connectivity Software from:
www.wolfvision.com/support
Pictures which are stored with the WolfVision Connectivity Software includes EXIF data, if file format JPG
or TIFF is used. Included data are:
Manufacturer = WolfVision
Visualizer model (inclusive serial number) = i.e. VZ-3 (01031527)
Firmware version = i.e. V1.22b
Date and time of create = i.e. 2012-05-01 11:06:29 (yyyy-mm-dd hh:mm:ss)
Ethernet / LAN Port
10BASE-T/100Base-TX
The LAN port (#8) makes the Visualizer a part of the internal computer network and it can be used for
communication over the Internet, if it is assigned an official (WAN) IP address.
Administrators of a larger number of Visualizers can use the LAN port to control, support and update all of
their units from their local desktop PC. The list of applications for the Visualizers LAN port is constantly
increasing. It can be used for controlling, capturing images and maintenance purposes like firmware
updates.
The following protocols are supported: TCP/IP, ICMP and ARP.
By default, DHCP is activated to receive all network settings automatically.
Possible image transfer resolution up to SXGA- (1280x960).
In order to prevent unauthorized users from logging into the Visualizer over the network, it is possible to set
administrator and user passwords. The transmission of the passwords over LAN is encrypted with Md5.
For full functionality JAVA version 1.5.0 or higher is necessary.
For full functionality following ports are necessary: 50915 and 50913 (by default).
Power over Ethernet plus (PoE+)
The Ethernet/LAN-port of the VZ-3 includes Power over Ethernet plus (PoE+) functionallity.
Power over Ethernet is a popular way of saving cables and installation costs.
The VZ-3 is compatible with PoE+ power injectors or PoE+ switches (according to the
IEEE 802.3at™-2009 industry standard). The supplied Voltage (in the range between
36 and 57V) will be added to a CAT-5 (or higher) ethernet cable and the Visualizer can receive power via the
Ethernet/LAN-cable.
When selecting a PoE+ adapter for the VZ-3 it is very important that the adapter complies to the
IEEE 802.3at™-2009 industry standard. Before this standard was introduced, many incompatible PoEsystems were available on the market. Some of these units with different PoE standards are not compatible
with the VZ-3 and may have damaging effects! The "power classification" is "High power Class 4 (12.95 to
25.50W)".
More information on PoE-adapters at www.wolfvision.com/wolf/thirdparty.html
7
DVI/RGB Output
Choosing the Correct Output Mode
The DVI-I output (#5) can output analog and digital signals in following formats:
- XGA
- SXGA- WXGA*
- WXGA
- 720p
(4:3 - 1024x768 pixels) at 60Hz
(4:3 - 1280x960 pixels) at 60Hz
(16:10 - 1280x800 pixels) at 60Hz
(16:9 - 1360x768 pixels) at 60Hz
(16:9 Widescreen HD - 1280x720 pixels) at 50Hz or 60 Hz
native resolution
native resolution
native resolution
The "Auto resolution" function is activated by default. In this mode the Visualizer continuously checks
which devices are connected to the DVI-I output and automatically sets the optimal output mode for each
connected device separately. Please note that the Visualizer can not check the possible resolution, if the
connected units or the cables are not "Plug and Play" compatible. If the Visualizer can not detect the
resolution of the connected device, the output is set to the default of SXGA-/60Hz.
If you can not use the "Auto resolution" function, you can select the output mode manually in the on-screen
menu of the Visualizer (see page 10).
In order to achieve the best picture quality you must set the outputs of the Visualizer to match the native
resolution of your display unit (e.g. LCD or DLP projector or monitor).
Important: What matters is the native resolution of the projector or monitor, not the maximum resolution that
it can display (in compressed mode). The native resolution is the actual number of pixels of the built-in LCD
display or DLP chip of a projector or monitor. Most LCD or DLP projectors can also display higher
resolutions than their native resolution, but only in compressed mode and with inferior picture quality.
Do NOT set the output of the Visualizer to a higher standard than the native resolution of your
display unit!
Do not set a higher refresh rate than your monitor or projector can display, otherwise the monitor or
projector can be damaged!
Follow the instructions in the user manual of the connected units.
Please note, if 4:3 and 16:9 or 16:10 resolutions are used simultaneously, the 4:3 display shows black bars
on top and bottom. This is necessary to ensure that all displays show the same image content.
DVI-I Port
The DVI Port (#5) supplies the digital and analog signal - DVI-I.
Pin 8
Pin 1
C1
C2
Pin 9
C3
Pin 17
Pin 24
C5
C4
1
2
3
4
5
6
7
8
C1
C4
C5
-
T.M.D.S. Data2T.M.D.S. Data2+
T.M.D.S. Data2/4 Shield
T.M.D.S. Data4- (*)
T.M.D.S. Data4+(*)
DDC Clock
DDC Data
Analog Vertical Sync
Analog Red
Analog Horizontal Sync
Analog Ground
(analog R, G & B return)
9
10
11
12
13
14
15
-
T.M.D.S. Data1T.M.D.S. Data1+
T.M.D.S. Data1/3 Shield
T.M.D.S. Data3- (*)
T.M.D.S. Data3+ (*)
+5V Power
Ground (return for +5V,
HSync and Vsync)
16 - Hot Plug Detect
C2 - Analog Green
17
18
18
19
20
21
22
23
24
C3
-
T.M.D.S. Data0T.M.D.S. Data0+
T.M.D.S. Data0+
T.M.D.S. Data0/5 Shield
T.M.D.S. Data5- (*)
T.M.D.S. Data5+ (*)
T.M.D.S. Clock+
T.M.D.S. ClockAnalog Vertical Sync
Analog Blue m
*...not used
The output level on analog part of DVI-I output can be adjusted to match exactly 700mV. This can be helpful
to balance different image brightness i.e. when using external input.
For exact adjustment, please use external measurement equipment.
Range: 85% to 100% (on-screen extra menu - see page 10).
Use supplied cable without choke (ferrit core), other cables may block the hinge mechanically.
8
External Input - EXTERN
A computer can be connected to the External RGB input (#7) of the Visualizer.
By pressing the EXTERN-key (#10) you can switch between the Visualizer image and the image of the
external input to be displayed to the audience.
The settings of the Visualizer can be changed in the on-screen menu (see page 10).
Use supplied cable without choke (ferrit core), other cables may block the hinge mechanically.
The Visualizer has a built-in A/D-converter in order to digitize the analog RGB signal from the computer and
output it on the RGB and DVI outputs in the selected signal format.
Supported resolutions from VGA (640x480@60Hz) to WXGA+ (1440x900@60Hz) with several resolutions
and refresh rates in this range.
Following data are provided:
Plug & Play Monitor VESA DDC
Monitor name: "WolfVision"
Video Input Definition: Analog at 0.7Vpp and separated synchronization signals
Vertical range limits: 48Hz - 86Hz
Horizontal range limits: 30kHz - 121kHz
Maximum pixel clock: 170MHz
Gamma: 2.2
Preferred resolution: SXGA- (1280x960) @60Hz
5
1
1
2
3
4
5
15
-
Analog Red video
Analog Green video
Analog Blue video
N/C Not connected
GND Ground
6
7
8
9
10
-
Red return
Green return
Blue return
SENSE +5 V DC from Visualizer
GND Ground (VSync, DDC)
11
12
13
14
15
-
N/C Not connected
SDA I²C data
HSync Horizontal sync
VSync Vertical sync
SCL I²C clock
11
15-pin D-Sub HD
connector female
(front side, unit)
Built-in Digital Scaler for Extern-In
The Visualizer has a built-in digital image scaler which can process the signal from the external input and
output it in the same mode as the Visualizer image (For example: If the Visualizer is set to output an SXGAimage to the projector and the computer outputs an XGA signal, the scaler of the Visualizer converts the
XGA image of the computer to SXGA-. As a result the projector does not readjust the input mode when
switching between the Visualizer and computer image).
The output resolution of the Visualizer can be changed in the on-screen menu (see page 10).
9
The following chapter is for experienced users only:
ON-SCREEN MENU / ON-SCREEN HELP
For regular use of the WolfVision Visualizer, it is not necessary to go into the Visualizer's menu and change
settings. Inexperienced users should not make any adjustments here.
To enter the on-screen menu keep pressed the MENU key (EXTERN #10) for 1 second. Settings of the
Visualizer's basic functions and the built-in camera can be made here using the navigation keys (FREEZE
#12 and EXTERN #10) or the ZOOM wheel (#13) on the camera head. To enter the selected sub menu or
changing the selected value/digit use the ENTER key (POWER #15) and the Selection keys (LIGHT #11
and FOCUS #14). As long as the on-screen menu is activated, the arrows beside the keys on the camera
are flashing to indicate the second function of the keys.
To get more information of a function in the on-screen menu, set the cursor in the respective line and press
the HELP key (press and hold FREEZE #12). A detailed description of this function appears on the screen.
By pressing the MENU key for 4 seconds the Extra Menu appears.
In the Extra Menu, settings like ZOOM wheel calibration can be performed.
The functions of the on-screen menu are not described in detail in this user manual as the help menu is an
integrated part of the Visualizer's software (firmware). The information you see on your screen always
belongs to the current Visualizer firmware.
Changing the Color Settings
If the picture on your screen appear to be too light or too dark or the color saturation is not correct, you can
change the Color Mode in the on-screen menu (Color Settings). Pre-settings are PRESENTATION (higher
color saturation), NATURAL (sRGB) and VIDEO CONF (for video conferencing systems).
Alternative Gamma and Saturation can be changed manually.
Switching to Negative, Negative/Blue and Black/White
The output image of the Visualizers can be switched from positive to negative in the on-screen menu. In
addition, the background of a negative image can be switched to blue for better readability of text. You can
also switch between color or black and white in the on-screen menu.
Text Mode
For improving the readability of text, sketches or x-rays, the text mode can be activated in the on-screen
menu, Color Settings.
This mode enhances the contrast of the picture. Please note that the colors are now darker than usual.
Auto Power-off
In the "Power Control" settings of the on-screen menu you can select that the Visualizer will be
automatically switched off after a certain amount of time.
RESET OF ON-SCREEN MENU SETTINGS
All settings in the on-screen menu can be set back to the factory defaults. "Recall Default Settings" is one
item in the on-screen menu.
Please note, settings which affect the output and communications ports are not affected to prevent unsupported resolutions or loosing data link.
Device information und Firmware version
Open „Device Info” in the sub menu „Advanced Settings” to view details of the unit.
10
MAINTENANCE
Cleaning
Cabinet:
Light:
Lens:
Clean the cabinet by gently wiping it with a soft, lint free cloth.
Clean the light by gently wiping with a soft micro fiber cloth only.
Clean the lenses by gently wiping with a soft, lint free cloth (do not use a paper tissue!). Clean by
breathing on the lens to create moisture then wipe with a lint free cloth (If need be, use a special
optical cleaner only!).
WARNING:
Never use strong cleaning agents such as acetone or benzene!
Never use cleaning agents to clean the light!
These substances can damage the surface and the anti-reflex coating!
Firmware Upgrades
The software (firmware) of your Visualizer (including the on-screen HELP) can easily be upgraded to the
latest version. The firmware update can be done via USB or Ethernet (LAN).
Firmware update files can be downloaded for free at www.wolfvision.com/support. Updates can be
performed with the WolfVision Connectivity Software. This software can be found under the same link as
the firmware files.
Dimensions
working position:
128.6mm
[5.1"]
closed:
506mm
[20"]
305mm
[12"]
305mm
[12"]
488mm
[19.2"]
559mm
[22"]
Cable Shield
When the cables are guided through the table, the cable shield can be mounted. Just connect all desired
cables, fold the unit, remove the cover and mount the shield with the two supplied screws K22x10 (Torx6).
Technical Specifications are Subject to Change!
11
Anti-theft
T-bar lock (Kensington® Lock)
The Visualizer can be fixed with a security cable T-bar lock, so that it can not be stolen. Follow the
instructions from the cable lock manual.
slot for lock
Fixing the Visualizer onto the table
The Visualizer can also be fixed onto a table with the supplied table mounting set in order to minimize the
risk of theft. Maximum thickness of the table is 35mm [1.38"] and a free area of at least 620mm x 350mm
[24.4" x 18.8"] would be required. Drill a whole into the table on the desired position: Ø 42mm [1.65"].
1. Fold the unit to remove the cover.
2. Remove the original base plate by removing both screws (keep it for further use).
3. Place one adapter plate and both screws (M4x50 Torx20) and fix it with at least one nut. Place the
necessary cables and connect it (begin with the biggest connector; depending on installation,
place the cables first through the second adapter plate and the table-drilling).
4. Mount the cable shield (if desired) with the supplied screws (K22x8 countersunk Torx6).
5. Place the unit onto the table, the screws through the drilling and mount the second adapter plate
with washers and hex nuts.
6. Fold the unit to slide in the cover.
Technical Specifications are Subject to Change!
12
Technical Data
Camera / Technology (Signal format)
Pictures per second
(as picked up by the camera)
Effective Pixel
Total pixels of CCD
Pixels processed per second
(=effective pixels x frames per second)
Color reproduction
(sRGB color precision)
Native signal output (camera)
Output signals (native and scaled)
Resolution (measured)
Vertical image-frequency
(depending on resolution)
Iris / Shutter / Gain (on-screen menu)
White balance adjustment
Autofocus / Manual Focus
On-screen menu and on-screen help
Upgradeable firmware
Lens / Zoom
Max. object height on working surface
Max. pick-up area on working surface
Min. pick-up area on working surface
Depth of focus on small object
(42 x 33 mm)
Depth of focus on large object
(360 x 270 mm)
Light source
Disturbing stray light / blinding of
audience or speaker
Reflection free area on working surface
Special working surface for
transparencies
Additional working surface for direct
annotation
Software for image capture and
controlling
External computer input / Input switch
Alternative Image display
Image memory
DVI-I output / HDMI/RGB output
USB port / standard
Ethernet (LAN) port
Intelligent folding system
Bottom light / Slide pick-up
Dimensions in operation (L x W x H)
Dimensions folded (L x W x H)
Weight
Anti-theft device
Voltage input / Power consumption
(external power pack)
Operating Temperature
Relative Humidity
Warranty
Made in
1-CCD 1/3" Progressive Scan Camera
30 frames
1280 x 960 (=1,228,800)
1,315,648
36,864,000
very good colors
SXGA- (1280x960) / WXGA* (1280x800) / HD 720p (1280x720)
SXGA- / WXGA* / 720p / WXGA / XGA (switchable)
710 lines
Progressive Scan: 50 Hz and 60Hz (switchable)
automatic / manual / flickerless (Shutter)
automatic and manual
yes (continuously working high speed) / yes
yes
yes, via USB and Ethernet/LAN
24x zoom (12x optical + 2x digital), zoom wheel with multiple speed
60mm (2.4") in tele position, 320mm (12.6") in wide position
300mm x 400mm (11.81" x 15.75")
33mm x 25mm (1.3" x 1") / digital zoom: 17mm x 13mm (0.7" x 0.5")
10mm (0.4")
260mm (10.2")
Maintenance free high-brightness LED light system (high light output,
low power consumption), lamp lifetime: 30,000 hours
none
whole working surface
yes
optional
included (for 32- and 64-bit Windows and Macintosh, Twain/WIA
compatible with Video Capture Driver)
yes (15-pin D-Sub plug), can also be output through DVI
negative image / negative-blue image / black and white image /
text enhancer
1 image freeze
DVI-I (analog and digital) / when using a DVI/HDMI or DVI/RGB cable
USB 2.0, Device port
yes, IP-addressable, 10/100 Mbps
mechanical arm, 1-step set up
with optional external light box
488mm x 340mm (working surface) x 510mm (18.5" x 13.4" x 20")
408mm x 333mm x 155mm (16.1" x 13.1" x 6.1")
3.5kg (7.7lbs)
yes, T-Lock (Kensington Lock®) and table lock bolt
multi range 100 - 240 VAC at 25.5W (LPS) / 19.2W PoE+
(IEEE 802.3at 2009)
0°C - 40°C (32°F - 104°F)
40 - 60%rel (no-condensation)
5 years
Austria (European Union)
Please note: Due to technical improvements all specifications are subject to change!
13
R
CONTACTS
Manufacturer / Worldwide Distribution
WolfVision GmbH
A-6833 Klaus
Tel: +43(5523)-52250, Fax: +43(5523)-52249
AUSTRIA
E-Mail: [email protected]
International Distribution Offices
USA
WolfVision Inc.
Duluth
(Atlanta)
Burlingame
(San Francisco)
Asia
WolfVision Pte Ltd
Singapore
Tel: +1(770)931-6802, Toll free: 877-873-WOLF, Fax: +1(770)931-9606
E-Mail: [email protected] / [email protected]
Tel: +1(650)648-0002, Toll free: 800-356-WOLF, Fax: +1(650)648-0009
E-Mail: [email protected] / [email protected]
Tel: +65-6636-1268, Fax: +65-6636-1269
E-mail: [email protected]
Middle East
WolfVision Middle East
Dubai
Tel: +971 (04) 354 2233, Fax: +971 (04) 354 2244
E-Mail: [email protected]
Germany
WolfVision Germany
Tel: 0800 / 98 28 787 (Toll Free for Germany)
E-mail: [email protected]
Japan
WolfVision Co. Ltd.
Tokyo
Tel: +81(0)3-3360-3231, Fax: +81(0)3-3360-3236
E-mail: [email protected]
Canada
WolfVision Canada, Inc.
Ottawa
Tel: +1(613)741-9898, Toll free: 877-513-2002, Fax: +1(613)741-3747
E-Mail: [email protected]
United Kingdom
WolfVision UK Ltd.
Manchester
Tel: +44(161)435-6081, Fax: +44(161)-435-6100
E-Mail: [email protected]
Internet Homepage: www.wolfvision.com
E-Mail to technical support: [email protected]
Printed in Austria - August 2012