1
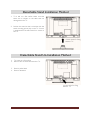
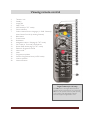
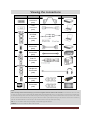
32HFL2808D/12 39HFL2808D/12 EN User Manual Studio 32/39HFL2808D/12 Page |1 For support, please check your warranty card or www.philips.com/support. Studio 32/39HFL2808D/12 Page |2 Contents 1 2 3 4 5 6 7 8 9 10 11 12 13 14 15 16 17 Important Information Notice Sustainability Help and support TV Control switch & Operation Stand Installation/Un-Installation Viewing remote control Viewing the connections Switching On/Off First Time Installation Media Playback via USB input TV Features and Functions Software Upgrade Specifications Supported File Formats and Compatibility TV Menu Professional Mode HotelTV Options Studio 32/39HFL2808D/12 4 5 6 6 7 8 9 10 11 11 12 13 17 19 21 23 26 Page |3 Important Information Important information Safety Read and understand all instructions before you use your TV. If damage is caused by failure to follow the instructions, the warranty does not apply. Risk of electric shock or fire! Never expose the TV to rain or water. Never place liquid containers, such as vases, near the TV. If liquids are spilt on or into the TV, disconnect the TV from the power outlet immediately. Contact Philips Consumer Care to have the TV checked before use. Never place the TV, remote control or batteries near naked flames or other heat sources, including direct sunlight. To prevent the spread of fire, keep candles or other flames away from the TV, remote control and batteries at all times. Never insert objects into the ventilation slots or other openings on the TV. Never expose the remote control or batteries to rain, water or excessive heat. Avoid force coming onto power plugs. Ensure that the power plug is fully inserted into the power socket. Loose power plugs can cause arcing or fire. When the TV is swiveled, ensure that no strain is exerted on the power cord. Strain on the power cord can loosen connections and cause arcing. To disconnect the TV from the mains power, the power plug of the TV must be disconnected. When disconnecting the power, always pull the power plug, never the cord. Ensure that you have full access to the power plug, power cord and outlet socket at all times. Risk of damage to the TV! Two people are required to lift and carry a TV that weighs more than 25kg or 55lbs. When stand mounting the TV, use only the supplied stand. Secure the stand to the TV tightly. Place the TV on a flat, level surface that can support the combined weight of the TV and the stand. Studio 32/39HFL2808D/12 When wall mounting the TV, use only a wall mount that can support the weight of the TV. Secure the wall mount to a wall that can support the combined weight of the TV and wall mount. TP Vision Netherlands B.V. bears no responsibility for improper wall mounting that results in accident, injury or damage. If you need to store the TV, disassemble the stand from the TV. Never lie the TV on its back with the stand installed. Before you connect the TV to the power outlet, ensure that the power voltage matches the value printed on the back of the TV. Never connect the TV to the power outlet if the voltage is different. Parts of this product can be made of glass. Handle with care to avoid injury and damage. Risk of injury to children! Follow these precautions to prevent the TV from toppling over and causing injury to children: Never place the TV on a surface covered by a cloth or other material that can be pulled away. Ensure that no part of the TV hangs over the edge of the surface. Never place the TV on tall furniture, such as a bookcase, without anchoring both the furniture and TV to the wall or a suitable support. Educate children about the dangers of climbing on furniture to reach the TV. Risk of swallowing batteries! The product/remote control may contain a coin type battery, which can be swallowed. Keep the battery out of reach of children at all times! Risk of overheating! Never install the TV in a confined space. Always leave a space of at least 4 inches or 10 cm around the TV for ventilation. Ensure that curtains or other objects never cover the ventilation slots on the TV. Risk of injury, fire or power cord damage! Never place the TV or any objects on the power cord. Disconnect the TV from the power outlet and aerial before lightning storms. During lightning storms, never touch any part of the TV, power cord or aerial cable. Page |4 Risk of hearing damage! Avoid using earphones or headphones at high volumes or for prolonged periods of time. Low temperatures If the TV is transported in temperatures below 5°C or 41°F, unpack the TV and wait until the TV temperature matches room temperature before connecting the TV to the power outlet. Terms of warranty Screen care Risk of damage to the TV screen! Never touch, push, rub or strike the screen with any object. Unplug the TV before cleaning. Clean the TV and frame with a soft damp cloth. Never use substances such as alcohol, chemicals or household cleaners on the TV. To avoid deformations and color fading, wipe off water drops as soon as possible. Avoid stationary images as much as possible. Stationary images are images that remain onscreen for extended periods of time. Stationary images include onscreen menus, black bars, time displays, etc. If you must use stationary images, reduce screen contrast and brightness to avoid screen damage. Notice 2012 © TPVision Netherlands B.V. All rights reserved. Specifications are subject to change without notice. Trademarks are the property of Koninklijke Philips Electronics N.V or their respective owners. TP Vision Netherlands B.V. reserves the right to change products at any time without being obliged to adjust earlier supplies accordingly. The material in this manual is believed adequate for the intended use of the system. If the product, or its individual modules or procedures, are used for purposes other than those specified herein, confirmation of their validity and suitability must be obtained. TP Vision Netherlands B.V. warrants that the material itself does not infringe any United States patents. No further warranty is expressed or implied. TP Vision Netherlands B.V. cannot be held responsible neither for any errors in the content of this document nor for any problems as a result of the content in this document. Errors reported to Philips will be adapted and published on the Philips support website as soon as possible. Studio 32/39HFL2808D/12 Risk of injury, damage to TV or void of warranty! Never attempt to repair the TV yourself. Use the TV and accessories only as intended by the manufacturer. The caution sign printed on the back of the TV indicates risk of electric shock. Never remove the TV cover. Always contact Philips Customer Care for service or repairs. Any operation expressly prohibited in this manual, or any adjustments and assembly procedures not recommended or authorised in this manual shall void the warranty. Pixel characteristics This LCD/LED product has a high number of color pixels. Although it has effective pixels of 99.999% or more, black dots or bright points of light (red, green or blue) may appear constantly on the screen. This is a structural property of the display (within common industry standards) and is not a malfunction. CE compliance This product is in compliance with the essential requirements and other relevant provisions of Directives 2006/95/EC (Low Voltage), 2004/108/EC (EMC). Compliance with EMF TP Vision Netherlands B.V. manufactures and sells many products targeted at consumers, which, like any electronic apparatus, in general have the ability to emit and receive electromagnetic signals. One of Philips’ leading Business Principles is to take all necessary health and safety measures for our products, to comply with all applicable legal requirements and to stay well within the Electro Magnetic Field (EMF) standards applicable at the time of producing the products. Page |5 Philips is committed to develop, produce and market products that cause no adverse health effects. TP Vision confirms that if its products are handled properly for their intended use, they are safe to use according to scientific evidence available today. Philips plays an active role in the development of international EMF and safety standards, enabling Philips to anticipate further developments in standardisation for early integration in its products. Trademarks and copyrights Windows Media is either a registered trademark or trademark of Microsoft Corporation in the United States and/or other countries. Manufactured under license from Dolby Laboratories. Dolby and the double D symbol are trademarks of Dolby Laboratories. The terms HDMI and HDMI High-Definition Multimedia Interface, and the HDMI Logo are trademarks or registered trademarks of HDMI Licensing LLC in the United States and other countries. All other registered and unregistered trademarks are the property of their respective owners. Sustainability Energy efficiency This TV is designed with energy-efficient features. To access these features, press the Green button on the remote control. Energy saving picture settings: You can apply a a combination of energy saving picture settings. While you watch TV, press the Green button and select [Energy saving]. Screen off: If you only want to listen to audio from the TV, you can switch off the TV display. Other functions continue to operate normally. End of use Your product is designed and manufactured with high quality materials and components, which can be recycled and reused. When this crossed-out wheeled bin symbol is attached to a product it means that the product is covered by the European Directive 2002/96/EC. Please inform yourself about the local separate collection system for electrical and electronic products. Studio 32/39HFL2808D/12 Please act according to your local rules and do not dispose of your old products with your normal household waste. Correct disposal of your old product helps to prevent potential negative consequences for the environment and human health. Your product contains batteries covered by the European Directive 2006/66/EC, which cannot be disposed with normal household waste. Please inform yourself about the local rules on separate collection of batteries because correct disposal helps to prevent negative consequences for the environmental and human health. EU energy label The European Energy Label informs you on the energy efficiency class of the product. The greener the energy efficiency class of this product is, the lower the energy it consumes. On the label, you can find the energy efficiency class, the average power consumption of the product in use and the average energy consumption for 1 year. You can also find the power consumption values for the product on the Philips website for your country at www.philips.com/TV. Help and support Visit Philips website Visit the Philips support website at www.philips.com/support. At the Philips support website, you can also: Find answers to Frequently Asked Questions (FAQ) Download a printable PDF version of this user manual Email us a specific question Chat online with our support personnel (available in certain countries only) Contact Philips You can contact Philips Consumer Care in your country for support. The number is available in the leaflet accompanying this product, or online at www.philips.com/support. Before you contact Philips, write down the model and serial number of your TV. You can find this information on the back of your TV or on the TV packaging. Page |6 Important information General Operation TV Control switch & Operation Installing the Batteries to the Remote 1. 2. 3. Up direction Down direction Program switch Lift the cover on the back of the remote upward gently. Install two AAA batteries. Make sure to match the + and - ends of the batteries in the battery compartment (observe the correct polarity). Replace the cover. Program switch can control: Volume/ AV / Standby-On Note: You can move the switch, upward or downward to change the volume. If you want to change channels, press the middle of the switch once (Position 3) and then move upward or downward. If you press the middle of the switch once more, source OSD will be displayed. If you press the middle of the switch and hold about a few seconds, the TV will switch to standby mode. Main menu OSD cannot be displayed via control buttons. Connect Power & Antenna/Cable IMPORTANT: The TV set is designed to operate on 220-240V AC, 50 Hz socket. After unpacking, allow the TV set to reach the ambient room temperature before you connect the set to the mains. Plug the power cable to the mains socket outlet. Operation with the Remote Control Press “MENU” button on your remote control to display main menu screen. Use Left or Right button to select a menu tab and press OK to enter. Use Left / Right / Up / Down to select or set an item. Press “MENU” or “RETURN” button to quit a menu screen. Once you have connected external systems to your TV, you can switch to different input sources. Press SOURCE button on your remote control consecutively to select the different sources. You can change the channel and adjust the volume by using the +/- and P/CH +/- buttons on the remote. Studio 32/39HFL2808D/12 Accessories included Remote Control Batteries: 2 x AAA Page |7 Detachable Stand Installation Method 1. TV is laid on a flat surface. Make sure that there are no objects on the table that can damage/harm the TV 2. Position the stand so that it coincides with the stand mounting points (4x) on the TV. Once it is positioned fix the stand with four screws to the TV. 4 screw holes for fixing stand to TV Detachable Stand Un-Installation Method 1. TV is laid on a flat surface. 2. Remove four screw that fix stand to TV. 3. Stand is pulled back. 4. Stand is detached. 4 screw holes for fixing stand to TV Studio 32/39HFL2808D/12 Page |8 Viewing remote control 1 2 3 4 5 6 7 8 9 10 11 12 13 14 15 16 17 18 19 20 Teletext / mix Standby Image Size Sleep Timer Info/ Reveal (in TXT mode) Source selection Yellow button/Current language (in DVB Channel) / Mono-Stereo Dual I-II (in Analog Channel) Blue button Green button Red button Navigation buttons / Subpage (in TXT mode) OK / Hold (in Text mod) /Channel List Return /Back /Index page (in TXT mode) Electronic Programme Guide Menu on/off Mute Programme up/down Previous Programme/ Now (in EPG mode) Volume up/down Numeric buttons Digital Teletext (for UK only) Press RED button to view digital teletext information. Operate it with the coloured buttons, cursor buttons and OK button. The operation method may differ depending on the contents of the digital teletext. Follow the instructions displayed on digital teletext screen. Studio 32/39HFL2808D/12 Page |9 Viewing the connections Connector Type Cables (Not supplied) Device Scart Connection (back) VGA Connection (back) PC/YPbPr Audio Connection (side) HDMI Connection (back) SPDIFF Connection (back) Side AV Connection (side) Headphone Connection (side) USB Connection (side) CI Connection (side) NOTE: When connecting a device via the Side AV input, you must use the supplied connection cables to enable connection. See the illustrations above. To enable PC audio, you will need to use the supplied SIDE AV CONNECTION cable’s WHITE & RED inputs. If an external device is connected via the SCART socket, the TV will automatically switch to AV mode. When receiving DTV channels (Mpeg4 H.264) or while in Media Browser mode, output will not be available via the scart socket. We recommend that you plug all your cables into the back of the TV before mounting on the wall. Insert or remove the CI module only when the TV is SWITCHED OFF. You should refer to the module instruction manual for details of the settings. Note: You can use YPbPr to VGA cable (not supplied) to enable YPbPr signal via VGA input WARNING: You cannot use VGA and YPbPr at the same time. Studio 32/39HFL2808D/12 P a g e | 10 Switching On/Off To Switch the TV On Note: Connect the power cord to the 220-240V AC, 50 Hz. Then the standby LED lights up. To switch on the TV from standby mode either: o Press the “ ” button, P/CH- or P/CH+ or a numeric button on the remote control. o Press the control switch left side of the TV. The TV will then switch on. If you switch on your TV via CH- or CH+ buttons on the remote control or on the TV set, the program that you were watching last will be reselected. By either method the TV will switch on. To Switch the TV Off Note: Press the “ ” button on the remote control or hold the control switch on the TV until shut down , so the TV will switch to standby mode. To power down the TV completely, unplug the power cord from the mains socket. When the TV is switched to standby mode, the standby LED can blink to indicate that features such as Standby Search, Over Air Download or Timer is active. First Time Installation When turned on for the first time, language selection screen is displayed in all language options listed alphabetically. Press the “▼” or “▲” button to highlight the required language, press OK button to select. “First Time Installation” appears. Use “◄” or “►” button to set the required country, and press “▼” button to select Search Type. Use “◄” or “►” to set the desired Search Type. Available search types are Digital and analog, digital only and analog only. When set, press “▼” to select Teletext Language. Use “◄” or “►” to select Teletext Language. Next, select Scan Encrypted and set as Yes if you want to scan coded stations. Press OK button on the remote control to continue and the search type screen will be displayed. You must select a search type to search and store broadcasts from the desired source. Studio 32/39HFL2808D/12 IMPORTANT: When you select Country option as France or Italy, you will be asked to set and confirm a PIN number. Selected PIN number cannot be 0000. Enter a PIN number and confirm it by entering once more. Press OK button to continue. If the two PIN numbers match, your master PIN number will be set. WARNING: When you are required to enter a PIN number for any menu operation you should use the PIN that you have previously defined during the first time installation. If you have forgotten the PIN number you have set during the first time installation, you should use the master PIN code, 4725. Aerial Installation If you select AERIAL option from the Search Type screen, the television will search for digital terrestrial TV broadcasts. NOTE: You can press “MENU” button to cancel. After all the available stations are stored, Channel List will be displayed on the screen. If you like the sort channels, according to the LCN (*), please select “Yes” and then press OK. Press “MENU” button to quit channel list and watch TV. (*) LCN is the Logical Channel Number system that organizes available broadcasts in accordance with a recognizable channel sequence (if available). Cable Installation If you select CABLE option from the Search Screen, press OK button on the remote control to continue. To continue, please select YES and press OK. To cancel operation, select NO and press OK. You can select frequency ranges from this screen. For highlighting lines you see, use “▼” or “▲” button. You can enter the frequency range manually by using the numeric buttons on the remote control. Set Start and Stop Frequency as desired by using the numeric buttons on the remote control. After this operation, you can set Search Step as 8000 KHz or 1000 KHz. If you select 1000 KHz, the TV will perform search process in a detailed way. Searching duration will thus increase accordingly. Depending on your Country selection in the first time installation, 250KHz search step option might be available on Network Channel Scan screen. Note that if you perform the search with 250KHz option, search process could take a longer time. P a g e | 11 Additionally, for some countries, Network ID option will be available. Network ID feature gets the Network Information Table. This table provides information on the selected network. It may change according to the operator and the region where that operator actively broadcasts. When finished, press OK button to start automatic search. The TV will search and store available broadcasts. Media Playback via USB input You can connect a USB hard disk drive or USB memory stick to your TV by using the USB inputs of the TV. This feature allows you to play files stored in a USB drive. 2.5” and 3.5” inch (hdd with external power supply) external hard disk drives are supported. IMPORTANT! You should back up your files before making any connections to the TV set in order to avoid any possible data loss. Manufacturer will not be responsible for any file damage or data loss. It is possible that certain types of USB devices (e.g. MP3 Players) or USB hard disk drives/memory sticks may not be compatible with this TV. The TV supports Studio 32/39HFL2808D/12 FAT32 and NTFS disk formatting. Note: While formatting a USB hard disk that has 1TB (TeraByte) or more file capacity, you can experience problems with the formatting process. Quickly plugging and unplugging USB devices, is a very hazardous operation. Do not repeatedly quickly plug and unplug the drive. This may cause physical damage to the USB player and USB device itself. Do not pull out USB module while playing a file. Media Browser Menu You can play photo, music, and movie files stored on a USB disk by connecting it to your TV and using the Media Browser screen. To do this, perform the following: Connect a USB disk to one of the USB inputs located on the side of the TV. Press “MENU” button and select Media Browser tab by using Left/ Right and OK buttons. Main media browser screen will be displayed. You can display the related content by selecting the Video, Music or Picture tab. Follow the button indications under each on screen menu for media playback features. You can set your Media Browser preferences by using the Settings dialogue P a g e | 12 TV Features and Functions Picture Menu Contents Mode Contrast Brightness Sharpness Colour Power Save Mode Backlight (optional) Noise Reduction Advanced Settings Reset For your viewing requirements, you can set the related mode option. Picture mode can be set to one of these options: Cinema, Game, Sports, Dynamic and Natural. Sets the lightness and darkness values of the screen. Sets the brightness value for the screen. Sets the sharpness value for the objects displayed on the screen. Sets the colour value, adjusting the colors. Press “◄” or “►” button to set mode as Disabled, Eco or Screen Off. This setting controls the backlight level and it can be set to Auto, Low, Medium and High Mode. Backlight function will be inactive if Power Save Mode is set to On. Backlight cannot be activated in VGA, Media Browser mode or while the picture mode is set to Game. If the broadcast signal is weak and the picture is noisy, use Noise Reduction setting to reduce the noise amount. Noise Reduction can be set to one of these options: Low, Medium, High or Off. Press “OK” to enter Advanced Settings Menu Press “OK” to resets the picture settings to factory default settings. Advanced Settings Dynamic Contrast Colour Temp Picture Zoom Film Mode Skin Tone Colour Shift RGB Gain Setting Autoposition (in PC mode) H Position (in PC mode) V Position (in PC mode) Dot Clock (in PC mode) Sets the desired contrast level. Off, Low, Medium, High. Sets the desired colour tone. Normal, Warm, Cool. Sets the picture size to Auto, 16:9, Subtitle, 14:9, 14:9 Zoom, 4:3 or Cinema. Films are recorded at a different number of frames per second to normal television programs. When this feature set to Auto when you are watching films to see the fast motion scenes clearly. Adjust the desired skin color level. Adjust the desired colour tone. Adjust the desired gain settings for Red, Green and Blue. Automatically optimizes the display. Press OK to optimize. This item shifts the image horizontally to right hand side or left hand side of the screen. This item shifts the image vertically towards the top or bottom of the screen. Dot Clock adjustments correct the interference that appear as vertical banding in dot intensive presentations like spreadsheets or paragraphs or text in smaller fonts. Depending on the resolution and scan frequency that you input to the TV set, you may Phase (in PC mode) see a hazy or noisy picture on the screen. In such a case you can use this item to get a clear picture by trial and error method. While in VGA (PC) mode, some items in Picture menu will be unavailable. Instead, VGA mode settings will be added to the Picture Settings while in PC mode. Studio 32/39HFL2808D/12 P a g e | 13 TV Menu Features and Functions Sound Menu Contents Volume Equalizer: Balance Headphone Sound Mode AVL Headphone/Lineout Dynamic Bass Surround sound Digital Out Adjusts volume level. In equalizer menu, the preset can be changed to Music, Movie, Speech, Flat, Classic and User. Press “OK” to enter the menu. Press the “MENU” button to return to the previous menu. Equalizer menu settings can be changed manually only when the Equalizer Mode is in User. This setting is used for emphasizing left or right speaker balance. Sets headphone volume. You can select Stereo, Dual I or Dual II mode, only if the selected channel supports that mode. Automatic Volume Limiting (AVL) function sets the sound to obtain fixed output level between programs (For instance, volume level of advertisements tends to be louder than programs). Select play out signal on headphone connector out. Press “◄” or “►” button to set Dynamic Bass as On or Off. Press “◄” or “►” button to set Surround sound option On or Off. Sets digital out audio type to “PCM” or “Compressed”. Using the Channel List Configuring Parental Settings The TV sorts all stored stations in the Channel List. You can edit this channel list, set favorites or set active stations to be listed by using the Channel List options. Select Channel List from the main menu. Select Edit Channel List to manage all stored channels. You can move, delete, edit name and lock channels using this screen. Select Favorites to create a list of favorite programs. Select Active Channel List to sort channel list. You can select a broadcast type option from the displayed list by using “▼” or “▲” and OK buttons. To prohibit viewing of certain programs, channels and menus can be locked by using the parental control system. Highlight Parental in the Settings menu and press OK to continue. To display parental lock menu options, the PIN number should be entered. The factory default PIN number is 0000. After coding the correct PIN number, parental settings menu will be displayed. Menu Lock: Menu lock setting enables or disables the menu access. Maturity Lock: When set, this option gets the maturity information from the broadcast and if this maturity level is disabled, disables access to the broadcast. Child Lock: When Child Lock is set, the TV can only be controlled by the remote control. In this case the control panel buttons will not work. Set PIN: Defines a new PIN number. IMPORTANT: The factory default pin number is 0000, if you change the pin number make sure you write it down and keep it safe. Note: If the Country option is set to France or Italy, you can use 4725 as the default code. Note: Broadcast type can be changed from other settings menu. Studio 32/39HFL2808D/12 P a g e | 14 TV Menu Features and Functions Settings Menu Contents Conditional Access Language Parental Timers Recording Configuration Date/Time Sources Controls conditional access modules when available. Configures language settings (-may change depending on the country selected) Preferred and current settings will be available. Current settings can be changed only if the broadcaster supports. Configures parental settings. (see page 14) Sets timers for selected programs. / Sets sleep timer to turn off the TV after a certain time. If removable device (hard disk) is connected to USB port, recording and playback features are enabled. Sets date and time. – Note: * The TV takes the time info via the broadcast. Correct time will be available on Date/Time Settings, if the time info is provided in the broadcast. If the TV is in no channel mode, Date/Time settings can be changed. However, if there is a channel preset, only “Time Settings Mode” can be changed and if this is set to Manual, Time Zone will be enabled. * If the TV is switched to standby mode and switched on later and there is no broadcast available, time information will not be updated. If there is a present broadcast; however, time information will be taken via the broadcast. In other words, time information will be available according to these priorities: The TV first looks for the time info in the broadcast, then to the user preference, and lastly to the teletext time information. Enables or disables source selection. Other Settings Contents Menu Timeout Scan Encrypted Blue Background (optional) Software Upgrade Application Version Hard of Hearing Audio Description Auto TV Off Standby Search (optional) Changes timeout duration for menu screens. (Off, 15s, 30s, 60s) When this setting is on, search process will locate the encrypted channels as well. If it is set as Off, encrypted channels will not be located in automatic search or manual search. Activates or deactivates blue background system when the signal is weak or absent. To ensure that your TV always has the most update information, you can use this setting. In order for the proper operation once Automatic scanning is set to Enabled, please ensure that the TV is set to standby mode. Select Scan for Upgrade is OK, manual search for update is initiated. Displays current application software version. If the broadcaster enables any special signal concerning the audio, you can set this setting as On to receive such signals. Audio description refers to an additional narration track for blind and visually impaired viewers of visual media, including television and movies. You can use this feature, only if the broadcaster supports that additional narration track. Timeout value Auto, 1 – 6 hour. When the timeout value is reached and the TV is not operated for selected time, the TV will go off. If you change Standby Search to Off, this function will be unavailable. When the Standby Search is set to On, and if the TV is in standby mode, available broadcasts will be searched. If the TV locates any new or missing broadcasts, a menu screen will be displayed, asking you whether or not to execute these changes. Channel list will be updated and changed after this process. Please activate Standby Search setting in order to enable your TV for automatically updating the broadcast frequency of the broadcaster, broadcast definition and similar changes. Studio 32/39HFL2808D/12 P a g e | 15 Store mode Power Up Mode If enabled will store changes to channels are made. Power up of TV will be Standby mode or Last Status at moment of power down. TV Menu Features and Functions Install and Retune Menu Contents Automatic Channel Scan (Retune) Displays automatic tuning options. Digital Aerial: Searches and stores aerial DVB stations. Digital Cable: Searches and stores cable DVB stations. Analogue: Searches and stores analogue stations. Digital Aerial & Analogue: Searches and stores aerial DVB and analogue stations. Digital Cable & Analogue: Searches and stores cable DVB and analogue stations. Manual Channel Scan This feature can be used for direct broadcast entry. Network Channel Scan Searches for the linked channels in the broadcast system. Analogue Fine Tune You can use this setting for fine tuning analogue channels. This feature is not available if no analogue channels are stored. First Time Installation Deletes all stored channels and settings, resets TV to factory settings and starts first time installation. You can follow the instructions in the Initial Installation section for more information on this process. Clear Service List (*) Visible for Denmark, Sweden, Norway or Finland. Clear Service List and then press OK. The following OSD will be displayed on the screen. Select YES and press OK to continue or select NO and press OK button to cancel. Studio 32/39HFL2808D/12 P a g e | 16 Electronic Program Guide Some, but not all channels send information about the current and next programs. Press the “EPG” button to view the EPG menu. Up/Down/Left/Right: Navigate EPG. OK: Displays program options. INFO: Displays, in detail information on program selected. GREEN: Switches to List Schedule EPG. YELLOW: Switches to Timeline Schedule EPG. BLUE: displays filtering options. Program Options IMPORTANT In EPG menu, press the OK button to enter the Event Options menu. Select Channel In EPG menu, using this option, you can switch to the selected channel. Software Upgrade Your TV is capable of finding and updating new software upgrades over broadcast channels (if available). For broadcast channels search, TV looks the available channels stored in your settings. So before software upgrade search, it is advised to auto search and update all available channels. 1. Software Update via USB Input Before starting.. Ensure that you have a USB flash disk with appropriate free space. Do not use a USB hard disk drive for the software update process. Get software updates from your dealer or www.philips.com/support. Check the current software version of your TV using the MENU> Settings> Other Settings> Software Upgrade item. If the version you have found is not newer than the current version on your TV, it is not necessary to update your product. Do not install a lower version of the software since this may cause problems. After obtaining the most recent software, copy the BIN file to the USB flash disk. Now connect the USB flash disk to the USB input of your TV. Switch off your TV using the main control switch of the TV and unplug the power cord. Studio 32/39HFL2808D/12 Hold the remote control towards the TV. Now press the OK button and keep pressing the OK button (Do not release the OK button now). Plug the TV to the mains and switch on the TV. Keep pressing the OK button five seconds more after the TV switches on and release it afterwards. Software update process should now start. The TV will switch on in First Time Installation mode after the software update finishes. Do not press any other buttons on the TV or on the remote control during the software update. Do not remove the USB flash disk from the TV during the process. To prevent accidental updates, please use your computer to delete the BIN file on your USB flash disk after the software update is successfully finished. 2. 3 AM search and upgrade mode If Automatic scanning in Upgrade Options menu is enabled, TV wakes up at 03:00 and searches broadcast channels for new software upgrade. If new software is found and downloaded successfully, with next power up TV opens with new software version. Note on reboot operation: Reboot is the last step in software upgrade operation if download of new software is finished successfully. During reboot TV makes final initialization. In reboot sequence panel power is closed and front led indicates the activity with blinking. Around 5 minutes later TV restarts with new software activated. The TV may start in first time installation mode. If your TV fails to restart in 10 minutes, unplug power for 10 minutes and re-plug again. TV should open with new software safely. If you still cannot get TV working, please kindly repeat unplug and plug sequence a few times more. If your set still cannot operate, please call the service personnel to fix the problem for you. Caution: While led is blinking during reboot do not unplug your TV’s power. Doing this may cause your TV not to re-open again and can only be fixed by service personnel. P a g e | 17 Troubleshooting & Tips Image persistence – ghosting Please note that ghosting may occur while displaying a persistent image (still or paused image). LED TV’s image persistence may disappear after a short time. Try turning off the TV for a while. To avoid this, do not leave the screen in still picture mode for extended periods. No power If your TV has no power, please check the power cord plug is connect to the mains power socket. Poor picture 1. Have you selected the correct TV system? 2. Is your TV or house aerial located too close to non-earthed audio equipment or neon lights, etc.? 3. Mountains or high buildings can cause double pictures or ghost images. Sometimes you can improve the picture quality by changing the direction of the aerial. Is the picture or teletext unrecognisable? 4. Check if you have entered the correct frequency. 5. Please retune the channels. 6. The picture quality may degrade when two devices are connected to the TV at the same time. In such a case, disconnect one of the devices. 4. Is the antenna cable damaged? 5. Are suitable plugs used to connect the antenna? 6. If you are in doubt, consult your dealer. No sound 1. Has the TV been set to mute? To cancel mute, press button, or increase the volume level. 2. Sound is coming from only one speaker. Is the balance set to one extreme? See Sound Menu section. Remote control - does not operate Your TV no longer responds to the remote control. The batteries may be exhausted, if so you can still use the control buttons on the TV. (* Is only possible if they are not blocked by parental control and if they are available with your model.) Input sources - cannot be selected 1. If you cannot select an input source, it is possible that no device is connected. 2. Check the AV cables and connections if you have tried to connect a device. No picture 1. No Picture means that your TV is not receiving a transmission. Have you selected the correct button on the remote control? Try once more. Also make sure the correct input source has been selected. 2. Is the antenna connected properly? 3. Are the plugs connected tightly to the antenna socket? Studio 32/39HFL2808D/12 P a g e | 18 Specifications TV BROADCASTING PAL/SECAM B/G D/K K’ I/I’ L/L’ DIGITAL RECEPTION DVB-T MPEG2 DVB-T MPEG4 HD DVB-T MHEG-5 Engine (for UK only) DVB-C MPEG2 DVB-C MPEG4 HD RECEIVING CHANNELS VHF (BAND I/III) UHF (BAND U) HYPERBAND NUMBER OF PRESET CHANNELS 1000 (800 DVB-T / 200 Analogue) CHANNEL INDICATOR On Screen Display RF AERIAL INPUT 75 Ohm (unbalanced) OPERATING VOLTAGE 220-240V AC, 50 Hz. AUDIO German + Nicam Stereo AUDIO OUTPUT POWER (WRMS) (10% THD) 2 x 5W 32HFL2808D/12: POWER CONSUMPTION EU energy label: 41W PANEL 16:9 display, 32” Screen Size VESA Mounting 200mm x 100mm Screw Type: M4 DIMENSIONS (mm) 39HFL2808D/12: POWER CONSUMPTION EU energy label: t.b.c. PANEL 16:9 display, 39” Screen Size VESA Mounting 200mm x 200mm Screw Type: M4 DIMENSIONS (mm) With foot: DxLxH (mm): 185 x 742 x 489 Weight (Kg): 6.9kg With foot: DxLxH (mm): 220 x 893 x 570 Weight (Kg): 9.5kg Without foot: DxLxH (mm): 89/105 x 742 x 451 Weight (Kg): 6.3kg Without foot: DxLxH (mm): 77/xxx x 893 x 530 Weight (Kg): 8.7kg Studio 32/39HFL2808D/12 P a g e | 19 Supported DVI Resolutions PC Typical Display Modes When connecting devices to your TV’s connectors by using DVI to HDMI cables (not supplied), you can refer to the following resolution information The following table is an illustration of some of the typical video display modes. Your TV may not support all resolutions. Your TV supports up to 1920x1080. Index 1 2 3 4 5 6 7 8 9 10 11 12 13 14 15 16 17 18 19 Resolution 640x400 640x480 800x600 832x624 1024x768 1152x864 1152x870 1280x768 1280x960 1280x1024 1360x768 1400x1050 1400x900 1600x1200 1680x1050 1920x1080 1920x1200 480i-480p 576i-576p Frequency 70Hz 60Hz-66Hz-72Hz-75Hz 56Hz-60Hz-70Hz-72Hz-75Hz 75Hz 60Hz-66Hz-70Hz-72Hz-75Hz 60Hz-70Hz-75Hz 75Hz 60Hz-75Hz 60Hz-75Hz 60Hz-75Hz 60Hz 60Hz-75Hz 65Hz-75Hz 60Hz 60Hz 60Hz 60Hz 60Hz 50Hz Studio 32/39HFL2808D/12 Index 1 2 3 4 5 6 7 8 9 10 11 12 13 14 15 16 17 18 Resolution 640x350p 640x400p 1024x768 1280x768 1360x768 720x400 800x600 800x600 1024x768 1024x768 1280x768 1360x768 1280x1024 1280x960 1280x1024 1400x1050 1600x1200 1920x1080 Frequency 60 Hz 60 Hz 60 Hz 60 Hz 60 Hz 60 Hz 56 Hz 60 Hz 60 Hz 66 Hz 60 Hz 60 Hz 60 Hz 60 Hz 60 Hz 60 Hz 60 Hz 60 Hz P a g e | 20 Supported File Formats for USB Mode Media Motion JPEG .asf, .wmv .fla, .flv File Extension Format Video codecs MPEG1,2 MPEG2 H.264, MPEG1,2,4 MPEG2, H.264, VC1, AVS, MVC Xvid 1.00, Xvid 1.01, Xvid 1.02, Xvid 1.03, Xvid 1.10-beta1/2 H.264 MPEG2, MPEG4 Xvid 1.00, Xvid 1.01, Xvid 1.02, Xvid 1.03, Xvid 1.10-beta1/2 H.264 JPEG VC1 H.264, Sorensen H.263 Audio Codecs .mp3 MPEG1/2 Layer 1 File Extension .mpg, .mpeg, .dat .vob .mkv .ts .avi Movie .mp4 Media Music Media AC3, EAC3 .m4a, .aac M4A/AAC .wma, .asf .wma, .asf WMA WMA Pro LPCM IMA-ADPCM / MS-ADPCM PCM, LPCM Photo formats Base-Line Progressive JPEG Non-interlaceinterlace .pcm, .wav File Extension .jpeg Photo .png .bmp Studio 32/39HFL2808D/12 Remarks (Maximum resolution/Bit rate etc.) MAX 1920x1080 @ 30P 20Mbit/sec 640 x 480 @ 30fps 1080p @ 30fps 1080p @ 25-50fps Remarks 32Kbps ~ 448Kbps(Bit rate) 8Kbps ~ 384Kbps(Bit rate) 8Kbps ~ 320Kbps(Bit rate) Embedded in video files 32KHz ~ 48KHz(Sampling rate 32Kbps ~640Kbps, 32/44.1/48KHz 32Kbps ~6Mbps, 32/44.1/48KHz Free format 8KHz ~ 48KHz(Sampling rate 128Kbps ~320Kbps, 8 ~ 48KHz <768Kbps, 96KHz 64Kbps ~ 1.5Mbps, 8 ~ 48KHz Embedded in video files 384Kbps, 8 ~ 48KHz Embedded in video files 8Kbps ~320Kbps, 16 ~ 48KHz Remarks max WxH = 15360x8640 max WxH = 1024 x 768 max WxH = 9600x6400 max WxH = 1200 x 800 max WxH = 9600x6400 P a g e | 21 AV and HDMI Signal Compatibility Source EXT (SCART) Side AV YPbPr HDMI1 Supported Signals PAL 50/60 NTSC 60 RGB 50 RGB 60 PAL 50/60 NTSC 60 480I 480P 576I 576P 720P 720P 1080I 1080I 1080P 1080P 480I 480P 576I 576P 720P 720P 1080I 1080I 1080P 1080P 1080P 1080P 1080P 60Hz 60Hz 50Hz 50Hz 50Hz 60Hz 50Hz 60Hz 50Hz 60Hz 60Hz 60Hz 50Hz 50Hz 50Hz 60Hz 50Hz 60Hz 24Hz 25Hz 30Hz 50Hz 60Hz Available O O O O O O O O O O O O O O O O O O O O O O O O O O O O O (X: Not Available, O: Available) In some cases a signal on the LED TV may not be displayed properly. The problem may be an inconsistency with standards from the source equipment. If you do experience such a problem please contact your dealer and also the manufacturer of the source equipment. Studio 32/39HFL2808D/12 P a g e | 22 TV Menu Professional Mode Features and Functions Hotel Setup RC (22AV8573) Standard RC Enter Hotel TV Menu It is only possible to enter the Hotel TV Menu for the Professional Mode using the optional HotelTV SetUp Remote Control (22AV8573). To exit the Hotel TV menu with standard RC: press Menu key To enter the Hotel TV menu: press RC5 Setup key press Home/Menu key Note: Only the Home/Menu key on the HotelTV SetUp RC (22AV8573) will control the TV. No other keys will function on this TV! To make changes use the Remote Control that is included with the TV. The RC 22AV8573 is optional and NO part of the standard accessories. This RC can be purchased at your dealer. Exit Hotel TV Menu Leaving the Hotel TV Menu after making the required settings can be done using the HotelTV SetUp Remote Control (22AV8573) and the with the TV included standard Remote Control. To exit the Hotel TV menu: press RC5 Setup key press Home/Menu key Studio 32/39HFL2808D/12 P a g e | 23 Hotel TV Menu settings Feature to enable or disable the Hotel TV Menu features. Hotel Mode • When enabled the TV will follow configured feature settings. [Off] Note: Access to the Hotel TV Menu is by the use of <Help/Menu> on the HTV Setup RC or on the standard RC using key sequence: Menu 7 9 3 5. Below settings are only active while [Hotel Mode] is On. Pin8 Last Status Panel Lock RCU Inhibit Feature to enable or disable the auto SCART feature. [Off] • This feature allows a connected SCART device to turn the TV on or off. Feature to enable or disable the last status feature [On] • This feature allows the TV to remember the last used configuration and restores when startup again. Otherwise default settings are used. Feature to enable or disable the functionality of the side control TV button. [Off] • • Select [On] to lock the side control TV button. Select [Off] unlock the side control TV button. Enable or disable the functionality Remote Control. [Off] • • Select [On] to block all RC commands (except the HotelTV SetUp RC Home/Menu key, or the standard RC Menu 7 9 3 5 key sequence). Select [Off] and all RC commands are enabled. Select startup program/source when TV is switched on via Power On key or Digit keys. Startup Position • • [TV] • Auto V wakes up in last used channel/source. TV TV wakes up with the channel specified in Startup Channel field. EXT1 / EXT1-S / Side AV / HDMI1 / HDMI2 / YPbPr / VGA_PC TV wakes up with the specified external source. Startup Channel Volume Limit [1] Feature to select the channel to be used as Startup Position. Feature to set the maximum volume level. [63] • Range values 0-63. Fixed Volume Enable [Off] Feature to set Volume to a set Fixed Volume. Fixed Volume Value [20] Feature to set the Fixed Volume level. Headphone Direct Volume [Disabled] • • Volume is fixed to the level set at Fixed Volume Value item. Range values 0-63. Control Head Phone out volume instead of TV speakers. TV speakers volume is set to Last Status before Hotel Mode is activated. Studio 32/39HFL2808D/12 P a g e | 24 Hotel TV Menu settings Feature to hide menu items when the Remote Control Menu key is pressed. • Disable All Menus OSD Disable [Disable All Menus] ○ all menu icons are hidden. • Disable Setup Menus ○ picture, sound, settings and media browser menu icons are displayed. When [Hotel Mode] is set to Off, all TV menu items will be displayed (picture, sound, settings, install and retune, channel list, media browser) Feature to hide Teletext display. Teletext [Off] Copy To USB • • On Off to enable Teletext activation. to hide Teletext. Feature to copy configuration and channel settings. <OK> • Copy From USB Select [OK] to copy settings to a USB device (connected to side-I/O). Feature to copy configuration and channel settings of a similar TV. <OK> • Select [OK] to copy settings from a USB device (connected to side-I/O). Feature to set the channel to view when the TV wakes up. Wakeup Time Channel [1] Wakeup Time Volume [40] USB option [On] • Use Digits button(s) to complete entry field. All timers and events are not possible to set once all menus are hidden. (Already set events must be cleared before hide all menus) >>> OSD Disable [Disable All Menus] Feature to set the wakeup time volume level. Range values 0-63. Feature to detect if a USB device is connected. • On to enable USB device detection. • Off to disable USB device detection. When [Off] the Media Browser icon will be displayed but cannot be activated. Fixed Pic. Mode Digital Tuner Feature to hide picture menu icon. • • • [On] • [Off] Off On Off On picture icon is displayed amongst all menu. picture icon is hidden. mixture of analog and digital channels. digital channels only. Multiple RC support [Off] Feature to select a unique RC address (1 out of 4) // a.k.a. MultiRC Welcome Screen Feature to show a welcome screen at startup. NIT Update [On] • • • • Off feature is disabled. On feature is enabled and shows what RC is set. On Off a welcome screen is shown a welcome screen is hidden Feature to retrieve channel table information: [Disable] High Security Reset to Default • • On Retrieve NIT information Disable Don’t use NIT table Feature to limit Hotel Mode menu access: [Off] • • On Off Access to Hotel Menu only by Hotel Setup Remote Access to the Hotel Menu also with standard TV RC Feature to reset all features to standard factory setting Studio 32/39HFL2808D/12 P a g e | 25 HotelTV Options Service Menu Enter Service Menu It is only possible to enter the Service Menu if the Hotel Mode is disabled, Hotel Mode set to <Off>. If enabled, open the Hotel TV Menu and set Hotel Mode to Off. To enter the Service Menu: press Menu key press key sequence: <1><2><3><6><5><4> All items are unselectable under the Service Menu. The software version number will shown as VES11E_x.y.z MultiRC setup Enter MultiRC Menu Feature to program a RC to pair to a TV To enter the MultiRC Menu: (press Menu key) press key sequence: <RETURN><1><2><3><4> On the TV a menu will guides you to select desired TV. Press relevant key and then press OK key to finish the programming. Welcome Picture Store in a welcome_image directory on a USB device a picture file with the name: hotel_wel.png. <USB>:/welcome_image/hotel_wel.png Picture characteristics: Name + extension Resolution Hotel_wel.png 960h x 540v Note: For the welcome picture, there is a color lookup table used that is limiting the number of colors available to display. This can result in certain display color artifacts and using a limited number of different color values can improve this. The picture can be loaded into the TV using the Copy from USB command in the Hotel TV Menu. In the Hotel TV Menu, set the entry: Welcome Screen <On> Once this feature is configured and set the welcome image will be displayed within 8 seconds after switch on. This page will remain until a key on the RC is pressed. Enter MultiRC Menu Feature to reset the RC/TV To enter the MultiRC Menu: (press Menu key) press key sequence: <RETURN> <4><3><2><1> On the TV you will see a dialog, “Reset OK?” Press OK key to reset the system. After resetting, the system will return to the factory default. Studio 32/39HFL2808D/12 P a g e | 26