1
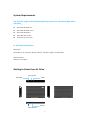
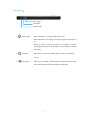
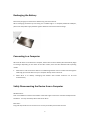
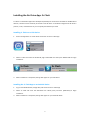
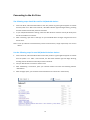
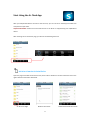
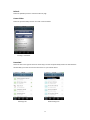
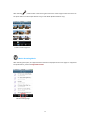
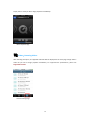
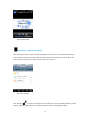
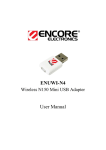
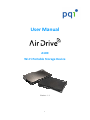
 User Manual A100 Wi‐Fi Portable Storage Device Version:1.1
1
Index Product Introduction.....................................................................................................3
What’s in the package ...................................................................................................3
Quick Start Guide ..........................................................................................................3
Product Features ...........................................................................................................4
Supported Formats........................................................................................................4
System Requirements ...................................................................................................5
Getting to Know Your Air Drive.....................................................................................5
Recharging the Battery..................................................................................................8
Connecting to a Computer ............................................................................................8
Safely Disconnecting the Device from a Computer......................................................8
Installing the Air Drive App: S+ Flash ...........................................................................9
Connecting to the Air Drive ........................................................................................10
Start Using the S+ Flash App ....................................................................................... 11
Air Drive: View the Air Drive file list ...........................................................11
Image: Browsing pictures............................................................................14
Music: Browsing Music ................................................................................15
Video:Browsing Videos ............................................................................16
My Folder:Mobile Files Menu ..................................................................17
Settings.........................................................................................................18
2
Product Introduction Congratulations on your purchase of a brand‐new Air Drive! The Air Drive is both a wireless and USB mobile storage device. Using a wireless connection, data can be transferred to your iPhone, iPad, iPod Touch, Android smartphone, tablet computer, and any other device with Wi‐Fi functionality. The Air Drive supports up to 5 simultaneously device transfers of different media files, meaning you can share your favorite digital content with friends and family anywhere, anytime. The Air Drive’s battery life provides up to 5 hours of uninterrupted video playback for a single user and features wireless transfer functionality within a 15 meter range. Reminder: 1.
Battery life may vary depending on the number of users and specifications of data being transferred. 2.
Wi‐Fi data transfer rates may vary based on user environment, distance, and number of users. What’s in the package Air Drive Quick Start Guide 3
Product Features Browse Pictures Browse Documents Audio Playback Video Playback Supports Wi‐Fi WPA2 encryption Can simultaneously support wireless transfers for 5 devices reading different files Supports iOS & Android systems Dedicated iOS App Dedicated Android App Sharing images, video, music and documents wirelessly Capacity may vary; supports SD/SDHC card (up to 32GB) Built‐in lithium battery; supports up to 5 hours of continuous video playback Built‐in USB 2.0 cable for transferring files and recharging batteries Security settings for wireless connections Light‐weight, ultrathin, and compact design Supported Formats Supported formats vary with different platforms iOS: Document: .pdf, .txt, .doc, .docx, .xls, .xlsx, .ppt, .pptx
Image: .jpg, .png
Audio: .mp3, .wav, .aif
Video: .mp4, .mov Android:: Document: .pdf, .txt, .doc, .docx, .xls, .xlsx, .ppt, pptx
Image: .jpg, .png, bmp, .gif
Audio: .mp3, .mp4, .3gp, .wav, .ogg, .imy, .aif
Video: .mp4, .3gp
4
System Requirements The Air Drive supports the following operating systems for transferring data with a USB cable: z
Microsoft Windows® XP z
Microsoft Windows Vista® z
Microsoft Windows® 7 z
Mac® OSX 10.5 or later z
Linux® Kernel 2.4 or later S+ Flash app requirements: iOS devices: iPhone 3GS, 4, 4S, iPod Touch (Gen4) and iPad (iOS 4.0 or higher recommended) Android devices: Android 2.1 and above Getting to Know Your Air Drive Wi‐Fi Switch USB Cable Reset SD Slot LED Indicators 5
Wi‐Fi Switch: When this switch is turned ON, the Wi‐Fi function will be enabled. When the switch is turned OFF, the device is turned into a standard USB storage device. Built‐in USB cable: Capable of both recharging the battery and transferring files Note: When recharging the device via USB, the Wi‐Fi function can still be enabled. However, file transfer will not be possible via USB during charging. To transfer data via USB, the Air Drive’s Wi‐Fi function must first be switched off. SD Card Slot: Insert an SD/SDHC card for wireless transfers up to 32GB. USB cable transfers can support SDXC cards (32GB or higher) Note: To access the SD slot, use a paper clip or pen tip to press down on the center of the aperture. Both the card and the slot cover will pop out together. Reset button: Press and hold for 3–5 seconds to restore the device to its original factory settings. This action will not delete any data from the Air Drive. 6
LED Indicators: Wi‐Fi Signal Low Power Power Supply 1.
Power supply: When the power is on, the green light will turn on. When the battery is recharging, the orange and green lights will turn on. When the power is off and the battery is recharging, a constant orange light will appear. It will disappear once the battery is finished recharging. 2.
Low Power: When less than 10% of the battery power remains, a red light will turn on. 3. Wi‐Fi Signal: When Wi‐Fi is enabled, a slow blinking blue light will appear. When data is being transferred, the blue light will quickly flash. 7
Recharging the Battery Please fully charge your new Air Drive before using it for the first time. When recharging the device by connecting it to a USB charger or a computer/notebook's USB port, please note the power supply indicator lights to determine the status of the recharge. Connecting to a Computer When the Air Drive is connected to a computer, the Air Drive’s internal battery will automatically begin to recharge. Depending on the status of the Wi‐Fi switch, there are two different kinds operating modes: 1.
When Wi‐Fi is off: The Air Drive will act as a USB storage device and can transfer data through the USB. Drag your favorite files from your computer directly into the Air Drive. 2.
When Wi‐Fi is on: Battery recharging and wireless data transfer functions can be used simultaneously. Safely Disconnecting the Device from a Computer Windows Users: Click on the USB icon located in the taskbar at the lower right‐hand corner and select "Safely Remove Hardware". You may now safely disconnect the Air Drive. Mac Users: Drag and drop the drive icon into the trash. You may now safely remove the Air Drive. 8
Installing the Air Drive App: S+ Flash S+ Flash is a multimedia application developed specifically for the Air Drive. Suitable for iOS & Android devices, it allows users to wirelessly access files in the Air Drive. S+ Flash will categorize the Air Drive’s pictures, music, and video files so you can quickly find the files you need. Installing S+ Flash on an iOS device 1.
Access the App Store on an iOS device and search for the S+ Flash App 2.
Select S+ Flash and enter the download page. Select FREE and then press INSTALL APP to begin installation. 3.
When installation is completed, the app will appear on your iOS device. Installing the S+ Flash App on an Android device 1.
Log on to Android Market / Google Play and search for the S+ Flash App 2.
Select S+ Flash and enter the download area. Select [Free] and then [Download] to begin installation. 3.
When installation is completed, the app will appear on your Android device. 9
Connecting to the Air Drive The following steps should be used for iOS/Android devices: 1.
On the Air Drive, switch the WiFi button to the "On" position. A green light will appear to indicate that the power is on. After a few seconds, a blue WiFi indicator light will begin blinking, showing that the wireless functionality has been activated. 2.
In your iOS/Android device's settings, select the WiFi function and then choose [Air Drive] from the list to establish a connection. 3.
After connecting, open the S+ Flash app on your handheld device to begin using files stored on the Air Drive. Note: To set up 5 devices to simultaneously connect to the Air Drive, simply repeat steps 1–3 on each device. Use the following steps for non‐iOS/Android wireless devices: 1.
On the Air Drive, switch the WiFi button to the "ON" position. A green light will appear to indicate that the power is on. After a few seconds, the blue WiFi indicator light will begin blinking, showing that the wireless functionality has been activated. 2.
Use your WiFi device to connect to the Air Drive. 3.
After establishing a connection, open your internet browser and enter the following address: "192.168.2.1". 4.
After the page opens, you will see the files and folders in the Air Drive’s root directory 10
Start Using the S+ Flash App After your iOS/Android device connects to the Air Drive, you can use the S+ Flash App to browse files and perform simple tasks. Important Reminder: Please ensure that file formats on Air Drive are supported by your iOS/Android device. After entering the S+ Flash main page, you will see the following functions: Air Drive: View the Air Drive file list Open this page to browse the Air Drive's files; select a file to browse its content. Check the box on the right‐hand side of the file to download. Air Drive List Page Browse File Content
11
Select & Download Documents
After selecting , a file operations list will appear that allows the following functions to be performed for selected files: [Delete], [Refresh], [Create Folder], [Download], and [Exit]. You can also select the [Cancel] button to return to the list page. Function List
Delete After selecting the [Delete] function, a delete button will appear to the left of the file. Pressing this button and confirming will delete this file. Delete buttons appear
Confirming deletion 12
Refresh Select the [Refresh] button to refresh the file list page. Create Folder Select the [Create Folder] function to create a new file folder. Creating a new folder
Download Check the box to the right of the file to select file(s). Choose the [Download] function to download the selected file(s) from the Air Drive and store them on your mobile device. Selecting Files
Downloading Files
13
Exiting the App Select the [Exit] function to close the [S+ Flash] app. Image: Browsing pictures Selecting this option will display all of the Air Drive’s supported image files. For supported file specifications, please see Supported Formats. Image Browsing Page
Click on a specific image icon to browse the images in slideshow mode. Slideshow Mode Page
14
After selecting
, check the box in the lower right‐hand corner of the image to select and save it to the photo album of a device (iOS devices only) or data folder (Android devices only). Check to Save Image File
Music: Browsing Music After selecting this option, all supported music files will be displayed on the same page. For supported file specifications, please see Supported Formats. Music Browsing Page
15
Simply select a track you like to begin playback immediately! Music Playback Page
Video:Browsing Videos After selecting this option, all supported video files will be displayed on the same page. Simply select a video file you like to begin playback immediately. For supported file specifications, please see Supported Formats. Video Browsing Page 16
Video Playback Page
My Folder:Mobile Files Menu After selecting this option, you can browse through the list of the files you’ve downloaded and view their contents. Check the box on the right‐side of the filename to upload them to the Air Drive. You may still use this function even when not connected to the Air Drive. My Folder List Page After selecting , file options will appear that will allow you to access: [Delete], [Refresh], [Create Folder], [Upload], and [Exit] functions. Select [Cancel] to return to the [My Folder] page. 17
File Function List
Upload Images (iOS devices only) After selecting , all album content on the device will be displayed. Select the images you want and transfer them to the Air Drive Settings Settings Page 18
Factory Reset: Restore original factory settings Reboot: After setting channel, SSID, and Wi‐Fi passwords, select the reboot function to restart the Air Drive and instantly apply the new settings. Save: After setting channel, SSID, and Wi‐Fi passwords, press the save button. The new settings will be automatically applied the next time you restart the Air Drive. Channel: Select the Wi‐Fi channel to be used by the Air Drive. Use alternate channels to prevent conflicts with other active wireless channels. Device name/SSID: Default name is [Air Drive]. You may re‐name the device to whatever you’d like. This is the name you will see when establishing a Wi‐Fi connection with the device. Wi‐Fi Password: Setting a password is optional. To protect your data from being accessed by unauthorized connections, simply create a connection password. The password must be at least 8 characters long (max of 63). You may use numbers (0 – 9) and upper/lowercase English letters (A – Z ). Important Reminder: If you forget your password and are unable to connect to your Air Drive, press and hold the reset button for 3 to 5 seconds. This will restore the Air Drive to its original factory settings. Data stored in the Air Drive will not be deleted. 19
NCC/DGT 警語 第十二條 型式認證合格之低功率射頻電機,非經許可,公司、商號或使用者均不得擅自變更頻率、加大功
率或變更原設計之特性及功能。 第十四條 低功率射頻電機之使用不得影響飛航安全及干擾合法通信;經發現有干擾現象時,應立即停用,
並改善至無干擾時方得繼續使用。 前項合法通信,指依電信法規定作業之無線電通信。 低功率射頻電機須忍受合法通信或工業、科學及醫療用電波輻射性電機設備之干擾。 FCC Compliance and Advisory Statement This device complies with Part 15 of the FCC rules. Operation is subject to the following two conditions: (1) this device may not cause harmful interference, and (2) this device must accept any interference received, including interference that may cause undesired operation. This equipment has been tested and found to comply with the limits for a Class B digital device, according to Part 15 of the FCC rules. These limits are designed to provide reasonable protection against harmful interference in a residential installation. This equipment generates, uses and can radiate radio frequency energy and if not installed and used in accordance with the instructions, may cause harmful interference to radio communications. However, there is no guarantee that interference will not occur in a particular installation. If this equipment does cause harmful interference to radio or television reception, which can be determined by turning the equipment off and on, the user is encouraged to try to correct the interference by one or more of the following measures: 1.
Reorient the receiving antenna. 2.
Increase the separation between the equipment and receiver. 3.
Connect the equipment into an outlet on a circuit different from that to which the receiver is connected. 4.
Consult the dealer or an experienced radio/TV technician for help. Any special accessories needed for compliance must be specified in the instruction manual. WARNING: A shielded‐type power cord is required in order to meet FCC emission limits and also to prevent interference to the nearby radio and television reception. It is essential that only the supplied power cord be used. Use only shielded cables to connect I/O devices to this equipment. CAUTION: Any changes or modifications not expressly approved by the party responsible for compliance could void your authority to operate the equipment. For product available in the USA/Canada market, only channel 1~11 can be operated. Selection of 20
other channels is not possible.
This device and its antenna(s) must not be co‐located or operation in conjunction with any other antenna or transmitter. FCC SAR Statement: Federal Communication Commission (FCC) Radiation Exposure Statement This EUT is compliance with SAR for general population/uncontrolled exposure limits in ANSI/IEEE C95.1‐1999 and had been tested in accordance with the measurement methods and procedures specified in OET Bulletin 65 Supplement C. This equipment should be installed and operated with minimum distance 1 cm between the radiator & your body. 21