1
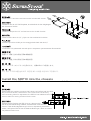
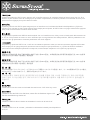
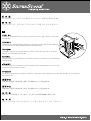
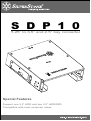
S D P 1 0
5.25” to 3.5” and 2.5” bay converter
Special Features
Support one 3.5” HDD and two 2.5” HDD/SSD
Compatible with most computer cases
Introduction
The SDP10 is a new generation of 5.25” to 3.5” drive bay bracket that is
capable of accommodating two additional 2.5” hard drives or SSDs
(9.5mm thickness) in addition to a 3.5” drive. If you are building a system
in which additional hard drive space is required and there are free 5.25”
drive bays, the SDP10 is a great choice.
Specification
Hard drive installation
Install the 3.5” hard drive and secure with included #6-32 screws
Installieren Sie die 3,5 Zoll-Festplatte, anschließend mit den beigelegten
#6-32-Schrauben fixieren.
Installez le disque dur 3.5” et fixez-le avec les vis #6-32 fournies
Instale el disco duro de 3,5” y fíjelo con los tornillos #6-32 incluidos.
Utilizzare quindi le viti #6-32 per il montaggio delle hard disk da 3,5”
Установите 3.5-дюймовый жесткий диск и закрепите прилагаемыми
болтами #6-32
安裝3.5”硬碟,以內附的#6-32螺絲鎖固。
将卡榫扳开,取下拉带,将硬盘抽出。
3.5”ハードディスクドライブを取り付け、付属の#6-32ネジで固定します。
3.5" 하드 드라이브를 설치하고 제공된 #6-32 나사를 사용하여 고정합니다.
Install the 2.5” hard drive and secure with included M3 screws
Installieren Sie die 2,5 Zoll-Festplatte, anschließend mit den beigelegten
M3-Schrauben fixieren.
Installez le disque dur 2.5” et fixez-le avec les vis M3 fournies
Instale el disco duro de 2,5” y fíjelo con los tornillos M3 incluidos.
Utilizzare quindi le viti M3 per il montaggio delle hard disk da 2,5”
Установите 2.5-дюймовый жесткий диск и закрепите прилагаемыми болтами M3
安裝2.5”硬碟,並以內附的沉頭M3螺絲鎖固。
安装2.5”硬盘,并以内附的沉头M3螺丝锁固。
2.5” ハードディスクドライブを取り付け、付属のM3ネジで固定します。
2.5" 하드 드라이브를 설치하고 제공된 M3 나사를 사용하여 고정합니다.
Install the SDP10 into the chassis
A. Internal 3.5” device installation with common 5.25” drive bay cover
1.
Adjust SDP10’s position to ensure that it does not interfere with the drive
bay cover and secure it with screws. If the case does not have any
more mounting holes for adjustment, the SDP10 has additional set of
holes to allow for moving it further into the case.
Passen Sie die Position des SDP10 so an, dass es nicht
mit der Schachtabdeckung kollidiert; anschließend mit Schrauben
fixieren. Falls die Montagebohrungen nicht zur Anpassung ausreichen
sollten, verfügt das SDP10 über zusätzliche Bohrungen, damit es nahezu
frei platziert werden kann.
Ajustez la position du SDP10 pour assurer qu'il n'interfère pas avec le cache de la baie et fixez-le avec des vis. Si le
boîtier n'a pas d'autres trous de montage pour procéder à l'ajustement, le SDP10 possède un ensemble de trous pour
permettre des réglages plus précis dans le boîtier.
Ajuste la posición del SDP10 para asegurar que no interfiere con la cubierta de labahía de dispositivos y fíjela con
tornillos. Si la carcasa no tiene más agujeros de montaje para el ajuste, el SDP10 tiene un juego adicional de agujeros
para poder moverlo hacia el interior de la carcasa.
3.Aggiustare la posizione di SDP10 assicurandosi che non interferisca con il bay cover ed assicurarlo alla struttura con
le viti. Se i fori presenti nel case non sono sufficienti per una regolazione fine della posizione, SDP10 possiede un suo
set di fori che gli permettono di essere posizionato nel modo migliore.
Подгоните устройство SDP10 так, чтобы оно не мешало крышке отсека для жестких дисков и закрепите болтами.
Если в корпусе не предусмотрены дополнительные отверстия для крепления, то устройство SDP10 снабжено
дополнительным набором крепежных отверстий, позволяющих закрепить его глубже внутри корпуса.
調整SDP10的前後位置,確定不會與機殼大檔板干涉後,將SDP10固定,如果機殼沒有多保留可供後退的孔位,SDP10在標準
的鎖固孔前方另外保留一組鎖固孔,供後退用
调整SDP10的前后位置,确定不会与机壳大档板干涉后,将SDP10固定,如果机壳没有多保留可供后退的孔位,SDP10在标准
的锁固孔前方另外保留一组锁固孔,供后退用
SDP10の位置をドライブベイカバーに干渉しないよう調整してからネジで固定します。ケースの調節穴が足りない場合、
SDP10にはケース内に収まるよう、調節穴が追加されています。
드라이브 베이 커버와 걸리지 않도록 SDP10의 위치를 조정한 다음 나사로 고정합니다. 케이스에 조정할
장착 구멍이 더 이상 없을 경우, SDP10의 추가 구멍 세트를 사용하여 이를 케이스 안으로 더 밀어넣을 수
있습니다.
2.
Install SDP10 into the case and reinstall the case’s own 5.25” drive bay cover
Installieren Sie das SDP10 im Gehäuse, setzen Sie die Gehäuse-eigene 5,25
Zoll-Schachtabdeckung wieder auf.
Installez le SDP10 dans le boîtier et réinstallez le cache de la baie 5.25”
Instale el SDP10 en la carcasa y reinstale la cubierta de la bahía para dispositivos
de 5,25”
Installare SDP10 nel case e riposizionare il bay cover da 5,25 del case.
Установите устройство SDP10 в отсек закройте его крышкой для 5.25-дюймового Отсека
將銀欣機殼的5.25”檔板安裝至SDP10。
将银欣机壳的5.25”档板安装至SDP10。
SDP10をケースに取り付けてから、ケース自体の5.25”ドライブベイカバーを元に戻します。
SDP10을 케이스에 설치하고 케이스 자체의 5.25” 드라이브 베이 커버를 다시 설치합니다.
Install the SDP10 into the chassis
B. Internal 3.5” device installation with SilverStone aluminum drive bay cover
1.
Install the SilverStone 5.25” aluminum drive bay cover onto the SDP10
Bringen Sie die 5,25 Zoll-Aluminium-Schachtabdeckung von SilverStone am
SDP10 an.
Installez le cache de la baie 5.25” de SilverStone en aluminium sur le SDP10
Instale la cubierta para bahía de dispositivos de 5,25” de aluminio de Silverstone
en el SDP10
Installare il bay cover SilverStone da 5,25 in alluminio su SDP10
Установите алюминиевую 5.25-дюймовую крышку компании SilverStone на устройство SDP10
將SDP10安裝上機殼,將機殼的5.25"擋板或是面板安裝回。
将SDP10安装上机壳,将机壳的5.25"挡板或是面板安装回。
SilverStone 5.25”アルミニウム製ドライブベイカバーをSDP10に取り付けます。
SilverStone 5.25” 알루미늄 드라이브 베이 커버를 SDP10에 설치합니다.
2.
Install the completed SDP10 into the case and secure it with screws or tool-less
mechanism.
Installieren Sie das vollständige SDP10 im Gehäuse, fixieren Sie es anschließend
mit Schrauben oder dem Gehäuse-eigenen Mechanismus.
Installez le SDP10 au complet dans le boîtier et fixez-le avec des vis ou avec
l'aide d'un mécanisme sans-outils.
Instale el SDP10 completado en la carcasa y fíjelo con tornillos o mecanismos sin
Herramientas
Installare il SDP10 completo nel case ed assicurarlo alla struttura con le viti o per
mezzo del meccanismo tool less
Установите собранное устройство SDP10 и закрепите при помощи болтов или механизма, не требующего
инструментов.
原本將SDP10連同大檔板安裝上機殼,並以螺絲或Tooless固定將改成
原本将SDP10连同大档板安装上机壳,并以螺丝或Tooless固定将改成
組み上がったSDP10をケースに収め、ネジまたは工具不要機構で固定します。
완료된 SDP10을 케이스에 설치하고 나사를 사용하여 공구 없이 고정합니다.
Warranty Information
This product has a limited 1 year warranty in North America, and Australia.
For information on warranty periods in other regions, please contact your reseller or SilverStone authorized distributor.
Warranty terms & conditions
1. Product component defects or damages resulted from defective production is covered under warranty.
Defects or damages with the following conditions will be fixed or replaced under SilverStone Technology’s jurisdiction.
a) Usage in accordance with instructions provided in this manual, with no misuse, overuse, or other inappropriate actions.
b) Damage not caused by natural disaster (thunder, fire, earthquake, flood, salt, wind, insect, animals, etc…)
c) Product is not disassembled, modified, or fixed. Components not disassembled or replaced.
d) Warranty mark/stickers are not removed or broken.
Loss or damages resulted from conditions other than ones listed above are not covered under warranty.
2. Under warranty, SilverStone Technology’s maximum liability is limited to the current market value for the product (depreciated value, excluding
shipping, handling, and other fees). SilverStone Technology is not responsible for other damages or loss associated with the use of product.
3. Under warranty, SilverStone Technology is obligated to repair or replace its defective products. Under no circumstances will SilverStone
Technology be liable for damages in connection with the sale, purchase, or use including but not limited to loss of data, loss of business, loss of
profits, loss of use of the product or incidental or consequential damage whether or not foreseeable and whether or not based on breach of warranty,
contract or negligence, even if SilverStone Technology has been advised of the possibility of such damages.
4. Warranty covers only the original purchaser through authorized SilverStone distributors and resellers and is not transferable to a second hand
purchaser.
5. You must provide sales receipt or invoice with clear indication of purchase date to determine warranty eligibility.
6. If a problem develops during the warranty period, please contact your retailer/reseller/SilverStone authorized distributors or SilverStone
http://www.silverstonetek.com.
Please note that: (i) You must provide proof of original purchase of the product by a dated itemized receipt; (ii) You shall bear the cost of shipping
(or otherwise transporting) the product to SilverStone authorized distributors. SilverStone authorized distributors will bear the cost of shipping
(or otherwise transporting) the product back to you after completing the warranty service; (iii) Before you send the product, you must be issued a
Return Merchandise Authorization (“RMA”) number from SilverStone. Updated warranty information will be posted on SilverStone’s official website.
Please visit http://www.silverstonetek.com for the latest updates.
Additional info & contacts
For North America ([email protected])
SilverStone Technology in North America may repair or replace defective product with refurbished product that is not new but has been functionally tested.
Replacement product will be warranted for remainder of the warranty period or thirty days, whichever is longer. All products should be sent
back to the place of purchase if it is within 30 days of purchase, after 30 days, customers need to initiate RMA procedure with SilverStone Technology
in USA by first downloading the “USA RMA form for end-users” form from the below link and follow its instructions.
http://silverstonetek.com/contactus.php
For Australia only ([email protected])
Our goods come with guarantees that cannot be excluded under the Australian Consumer Law.
You are entitled to a replacement or refund for a major failure and for compensation for any other reasonably foreseeable loss or damage.
You are also entitled to have the goods repaired or replaced if the goods fail to be of acceptable quality and the failure does not amount to a major failure.
Please refer to above “Warranty terms & conditions” for further warranty details.
SilverStone Technology Co., Ltd. 12F No. 168 Jiankang Rd., Zhonghe Dist., New Taipei City 235 Taiwan R.O.C. + 886-2-8228-1238
(standard international call charges apply)
For Europe ([email protected])
For all other regions ([email protected])
January, 2013
NO: G11218430