1
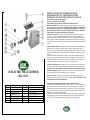
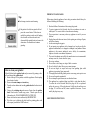
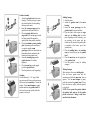
ATTENTION
If any components of this unit are broken,
or if the unit does not operate properly,
please contact LEM Products at
1-877-536-7763
#8 Electric Meat
Grinder
MODEL #1113
120V~60Hz, 575W
For more great products or a free catalog
log onto www.lemproducts.com
LEM Products
109 May Drive • Harrison, OH 45030
877-536-7763
www.lemproducts.com
IMPORTANT WARRANTY INFORMATION BELOW:
PLEASE READ, FILL OUT AND RETURN ENCLOSED
WARRANTY CARD TO ENSURE WARRANTY COVERAGE.
THIS WARRANTY COVERS LEM PRODUCTS
#8 575 WATT ELECTRIC MEAT GRINDER
THE WARRANTY IS EXTENDED TO THE ORIGINAL PURCHASER ONLY.
WARRANTY DURATION: This product is warranted to the original purchaser for a period of one (1)
year from the original purchase date. EACH UNIT COMES WITH A WARRANTY CARD, WHICH
MUST BE FILLED OUT COMPLETELY AND RETURNED IMMEDIATELY, WITH A COPY
OF THE PURCHASING RECEIPT. FAILURE TO RETURN YOUR WARRANTY CARD WILL
LIMIT WARRANTY TO 90 DAYS WITH PROOF OF PURCHASE.
WARRANTY COVERAGE: This product is warranted against defective materials or workmanship.
The warranty is void if the product has been damaged by accident, misuse, neglect, modification or
improper service or repairs by unauthorized personnel. It is also void if damaged in shipment or by other
causes not arising out of defects in the materials or workmanship. This warranty does not extend to any
units which have been in violation of written instructions furnished, or to units which have been altered or
modified.
WARRANTY DISCLAIMERS: This warranty is in lieu of all warranties expressed or implied, and no
representative or person is authorized to assume any other liability in connection with the sale of our
products. There shall be no claims for defects or failure of performance under any theory of sort, contract
or commercial law including, but not limited to negligence, gross negligence, strict liability or breach of
contract.
The manufacturer declines all responsibility for damage to persons, things or animals arising from the
failure to comply with the norms contained in this manual. The manufacturer reserves the right to make
modifications at anytime to the models while maintaining the main characteristics described herein. The
manufacturer also declines all responsibility for any errors in compiling this manual.
#8 ELECTRIC MEAT GRINDER
SKU #1113
LETTER
1
2
3
4
5
6
7
DESCRIPTION
MEAT STOMPER
MEAT PAN
GRINDER HEAD
RELEASE BUTTON
REVERSE BUTTON
ON/OFF SWITCH
MOTOR HOUSING
LETTER
8
9
10
11
12
13
14
DESCRIPTION
FINE GRINDING PLATE
WORM GEAR/AUGER
GRINDER KNIFE
COARSE GRINDING PLATE
RETAINING RING
STUFFING PLATE
STUFFING TUBE
WARRANTY PERFORMANCE: During the above one year warranty period, a product with a defect
will either be repaired or replaced after the product has been inspected by an LEM Service Technician.
NO PRODUCT WILL BE EVALUATED UNLESS THE ORIGINAL SALES RECEIPT OR THE
WARRANTY CARD IS ON FILE. The repaired product will be in warranty for the balance of the one
year warranty period. No charge will be made for such repair or replacement.
IMPORTANT NOTICE: If any parts are missing or defective, please contact our Customer Service
Department for assistance at 877-536-7763. (M-F 8:30am to 4:30pm EST) DO NOT RETURN TO THE
STORE WHERE THE ITEM WAS PURCHASED.
LEM PRODUCTS MERCHANDISE RETURN POLICY WARRANTY SERVICE:
To obtain service under terms of this warranty, please contact us at 877-536-7763 to obtain authorization
prior to returning the merchandise. No merchandise will be accepted without prior authorization. Please
return the product pre-paid in the original packaging if possible, enclose a copy of your receipt, (Keep a
copy of your proof-of purchase for your records.) and include a written explanation of the issue. Ship to
LEM Products, 107 May Drive, Harrison, OH 45030.
LEM Products is not responsible for damage incurred in shipping, make certain to pack product properly.
Return shipping charges are the responsibility of the purchaser. Packages returned to LEM should be
insured for the value of the product to cover any damages that may occur during shipping.
IMPORTANT SAFEGUARDS
Tips
◆ Cord storage is under motor housing.
◆ If the grinder is locked, turn grinder off and
press the reverse button. If this does not
unlock the grinder, turn the unit off, unplug
the electrical cord from the outlet and
disassemble the grinder head and remove the
obstruction. Reassemble and continue
grinding.
How to clean your grinder:
Meat left behind in the grinder head may be removed by passing a slice
of bread through the grinder head.
1. Before clean up of the grinder, switch the appliance off and unplug
from electrical socket.
2. Remove the meat stomper and meat tray.
3. Press the release button and turn the grinder head in the direction of
unlock.
4. Unscrew the retaining ring and remove all parts from the grinder
head. Hand wash in warm soapy water. Grinder parts are not
dishwasher safe. CLEAN IMMEDIATELY AFTER USE.
5. Rinse with clear hot water and hand-dry IMMEDIATELY.
6. We advise you to lubricate the knife and the grinding plates with
silicon spray (available at LEM Products.)
When using electrical appliances, basic safety precautions should always be
followed including the following:
1. Read and follow all instructions before using the grinder.
2. To protect against risk of electrical shock do not submerse in water or
other liquid. Use a moist cloth to clean the motor housing.
3. Close supervision is necessary when any appliance is used by or near
children.
4. Unplug from outlet when not in use, before putting on or taking off parts,
and before cleaning.
5. Avoid contacting moving parts.
6. Do not operate any appliance with a damaged cord or plug or after the
appliance malfunctions, or is dropped or damaged in any manner. Return
appliance to the nearest authorized service facility for examination,
repair or electrical or mechanical adjustment.
7. The use of attachments not sold by the manufacturer is not recommended
and may cause fire, electric shock or injury.
8. Do not use outdoors.
9. Do not allow cord to hang over edge of table or counter.
10. Never feed food by hand. Always use a meat stomper.
11. Do not use fingers to scrape food away from grinding plate while
appliance is operating. Injury may result.
12. Thoroughly hand-wash all grinder parts in warm soapy water prior to use.
13. Never run the grinder unattended.
14. Do not attempt to grind bones, nuts or other hard items.
15. This appliance has a polarized plug (one blade is wider than the other.)
To reduce the risk of electrical shock, this plug will fit in a polarized
outlet, only one way. If the plug does not fit fully into the outlet reverse
the plug. If it still does not fit, contact a qualified electrician. Do not
modify the plug in any way.
SAVE THESE INSTRUCTIONS
Grinder Assembly
1. Attach the grinder head to the motor
housing. It will be necessary to push
the release button (#4) when putting
the head on the motor.
2. Insert the worm gear/auger into the
grinder head, the geared end first.
3. Place the grinder knife onto the
auger stud. (The cutting edges should
be facing out and flat against the
grinder plate when properly installed.)
4. Place the medium or coarse grinding
plate (depending on the consistency
you prefer) onto the worm
gear/auger. (Make sure the notches on
the grinder plate are matched to the
locator pin in the grinder head.)
5. Screw the retaining ring onto the
grinder head until it is firmly
tightened.
6. Place the meat tray on the upright
part of the grinder head.
7. Now the grinder is ready for grinding.
Grinding
Cut the meat into 4” x ¾” strips. Make
sure to remove all bones, gristle and sinew.
Put the meat in the meat tray. Turn on the
grinder. Use the meat stomper to gently
push the meat into the grinder head. Do
not force the meat too quickly, allow the
grinder to do the job.
Stuffing Sausage
1. Grind the meat.
2. Attach the grinder head to the motor
housing.
3. Insert the worm gear/auger into the
grinder head, the geared end first.
4. Place the knife on the square of auger
stud, put the stuffing plate (or other
plate depending on the consistency you
are wanting) on the auger stud pin.
(Make sure the notch in the grinder plate
is matched to the locator pin in the
grinder head.)
5. Place the stuffing tube in the retaining
ring and screw the ring on the grinder
head.
6. Place the meat tray on the upright part
of the grinder head.
7. Now the grinder is ready for stuffing
sausages.
Making Sausages
Slide casing of choice onto stuffing tube.
Mix the course ground meat with the
seasonings and add to the meat tray. Turn on
grinder. Use the meat stomper to gently
push the meat into the grinder head. Do not
force the meat too quickly, allow the grinder
to do the job.
NOTE: Never operate the grinder without
the grinder knife and one of the grinder
plates in the head. Doing so may force
meat back into the motor.