1
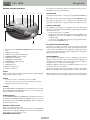
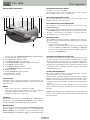
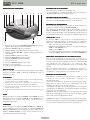
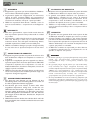
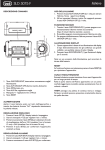
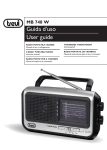
Italiano
RC 828
DESCRIZIONE COMANDI
1. 9. 2.
4.
7.
SVEGLIA CON LA SUONERIA
Se invece, desiderate essere svegliati con la suoneria, portare il selettore
(1) su BUZZ, l'indicatore (11) si illuminerà.
6.
5.
3.
8. 12.
SPEGNIMENTO DELLA SVEGLIA
Per disinserire la sveglia (suoneria o radio) premere il tasto ALARM SET/
OFF(4).
Se desiderate spegnere momentaneamente la sveglia, premere il pulsante SNOOZE (7); l’interruzione dura 9 minuti, trascorsi i quali la
sveglia si riaccende. L’operazione puo’ essere ripetuta diverse volte
entro un’ora di tempo.
11.
FUNZIONE SLEEP
Il pulsante SLEEP (3) vi permette di programmare lo spegnimento
della radio fino ad un massimo di 1 ora e 59 minuti. Questa regolazione
viene effettuata a radio accesa.
- Portare il selettore (1) su OFF.
- Regolare il tempo di spegnimento premendo contemporaneamente i tasti SLEEP (3) e MINUTE (6) oppure SLEEP (3) e HOUR
(5)
- Per disinserire anzitempo la funzione SLEEP e’ sufficiente premere
il tasto SNOOZE (7).
10.
1. Selettore funzioni: ON/OFF/AUTO/BUZZ; Accesa/Spenta/Sveglia
con radio o buzzer
2. Tasto TIME SET, regolazione orario
3. Tasto SLEEP, spegnimento programmato
4. Tasto ALARM SET/OFF, regolazione/spegnimento allarme
5. Tasto HOUR, regolazione ore
6. Tasto MINUTE, regolazione minuti
7. Tasto SNOOZE, spegnimento temporaneo
8. Controllo sintonia
9. Controllo VOLUME
10. Vano batterie
11. Indicatore allarme inserito
BATTERIA TAMPONE ANTI BLACK-OUT
Per mantenere in funzione l’orologio e la memorizzazione dell’orario di sveglia anche durante una momentanea mancanza di energia
elettrica, inserire una batteria a 9V nell’apposito vano (10) sul fondo
dell’apparecchio. Vi consigliamo di sostituire questa batteria ogni 6
mesi.
Se in caso di interruzione elettrica l’apparecchio mostri sul display
un orario sbagliato e lampeggiante sostituire la batteria 9V.
CURA E MANUTENZIONE
Non esporre l’apparecchio alla pioggia o all’umidita’ per evitare il
rischio di scosse elettriche o di cortocircuiti.
Evitare di sistemare l’apparecchio vicino a fonti di calore, in luoghi
umidi o polverosi, e di esporlo direttamente ai raggi solari.
Disinserire la spina dalla presa di corrente ed estrarre la batteria se
avete intenzione di non usare l’apparecchio per un lungo periodo di
tempo.
Pulire la parte esterna del Vostro apparecchio con un panno morbido leggermente inumidito; evitare assolutamente l’uso di solventi o
abrasivi.
INSTALLAZIONE
Inserire la spina del cavetto di alimentazione in una presa di corrente
230V - 50Hz; il display lampeggera’ fino a quando non avrete regolato l’ora.
RADIO
- Accendete la radio portando il selettore (1) su ON.
- Selezionate la gamma d’onda desiderata col controllo FM (12).
- SintonizzateVi sulla Vostra stazione preferita con il controllo (8).
- Regolate il volume con il controllo (9).
TREVI persegue una politica di continua ricerca e sviluppo. Pertanto
i prodotti possono presentare caratteristiche diverse da quelle descritte.
OROLOGIO
Premere contemporaneamente il tasto TIME SET(2) e HOUR (5) per
regolare l’ora; i pulsanti TIME SET(2) e MINUTE (6) per regolare i
minuti. Sul display viene visualizzata l’ora impostata.
SVEGLIA
Premere contemporaneamente i pulsanti ALARM SET/OFF(4) e HOUR
(5) per regolare l’ora di sveglia; I pulsanti ALARM SET/OFF(4) e
MINUTE (6) per regolare i minuti. Premendo il tasto ALARM SET/
OFF(4) viene visualizzato sul display l’orario di sveglia.
SVEGLIA CON LA RADIO
Sintonizzatevi sulla stazione desiderata.
Dopo aver regolato l’orario di sveglia, portare il selettore (1) su
AUTO, l'indicatore (11) si illuminerà. Regolare il volume al livello
desiderato. All’orario stabilito la radio si accenderà.
1
English
RC 828
DESCRIPTION OF CONTROLS
1. 9. 2.
11.
4.
7.
If you wish to set the buzzer alarm clock, switch the selector (1) on
AUTO, the indicator (11) will light up.
6.
5.
3.
8. 12.
ALARM STOP
To stop the alarm (buzzer or radio), press the ALARM SET/OFF key
(4).
If you wish to stop the alarm temporarily, press the SNOOZE key (7);
the temporary stop goes on for 9 minutes, then the alarm starts
again. This operation can be repeated several time within one hour.
SLEEP FUNCTION
The SLEEP key (3) allows you to program the radio switching off
after max 1 hour and 59 minutes.While programming this function,
the radio must be on.
- Position the selector (1) on OFF.
- Program the switching off time by pressing the SLEEP (3) and
MINUTE (6) keys or the SLEEP (3) and HOUR (5) keys
simultaneously.
- To disconnect the SLEEP function before the programmed time,
just press the SNOOZE key (7).
10.
BLACKOUT BUFFER BATTERY
To keep any set data in the alarm clock even during a temporary
black-out, fit a 9V battery in the provided compartment (10) located
at the bottom of the appliance. We suggest you replace this battery
every 6 months. If during a black-out the display shows a wrong time
blinking, replace the 9V battery.
1. Function selector: ON/OFF/AUTO/BUZZ; Radio or buzzer alarm
clock
2. TIME key, time setting
3. SLEEP key, programmed switching off
4. ALARM SET/OFFkey, alarm setting
5. HOUR key, hour setting
6. MINUTE key, minute setting
7. SNOOZE key, temporary stop
8. Tuning control
9. VOLUME control
10. Battery compartment
11. Alarm on indicator
MAINTENANCE
Do not expose the appliance to rain or humidity, to prevent the
danger of electric shock or short circuit. Position the appliance at
safe distance from heating sources and avoid keeping it in damp or
dusty places. Do not expose to direct sunlight.
Unplug the appliance and remove the batteries whenever you are
not going to use it for a long time.
Clean the external surfaces of your appliance with a soft, slightly
damp cloth; absolutely avoid using solvents or abrasive substances.
SETUP
Plug the feeder cable in a 230V - 50Hz socket; the display will blink
until you finish setting the hour.
TREVI follows a policy of ongoing research and development. The
products may therefore have features different from those described.
RADIO
- To turn the radio on, switch the selector (1) ON.
- Tune into the station you prefer by the tuning control (8).
- Adjust the volume by the control (9).
CLOCK
Press TIME SET(2) and HOUR (5) keys simultaneously to set the
hour; TIME SET(2) and MINUTE (6) keys, to set the minutes. The
display will show the set hour/min.
ALARM CLOCK
Press ALARM SET/OFF(2) and HOUR (5) keys simultaneously to set
the alarm hour; ALARM SET(2) and MINUTE (6) keys to set the
minutes. By pressing the ALARM SET/OFFkey (2), the display will
show the alarm set time.
RADIO ALARM CLOCK
Tune in to the station you prefer.
After setting the alarm time, switch the selector (1) on AUTO and
the indicator (11) will light up. Adjust the volume as you prefer. The
radio will turn on at the time you set.
BUZZER ALARM CLOCK
2
Français
RC 828
DESCRIPTION DES COMMANDES
1. 9. 2.
4.
7.
6.
5.
3.
RÉVEIL AVEC LA RADIO
Syntonisez la station de votre choix.
Après avoir réglé l’heure de réveil, amener le sélecteur (1) sur AUTO,
l’indicateur (11) s’allumera. Régler le volume au niveau voulu. La
radio s’allumera à l’heure fixée.
8. 12.
RÉVEIL AVEC LA SONNERIE
Si par contre, vous désirez être réveillés par la sonnerie, amener le
sélecteur (1) sur AUTO, l’indicateur (11) s’allumera.
ARRÊT DU RÉVEIL
Pour désactiver le réveil (sonnerie ou radio), appuyer sur la touche
ALARM SET/OFF (4).
Si vous désirez arrêter momentanément le réveil, appuyer sur la
touche SNOOZE (7); l’arrêt dure 9 minutes, passé ce délai le réveil
s’active à nouveau. L’opération peut être répétée plusieurs fois en
l’espace d’une heure.
11.
FONCTION SLEEP
La touche SLEEP (3) vous permet de programmer l’arrêt de la radio
jusqu’à un maximum d’1 heure et 59 minutes. Ce réglage s’effectue
avec la radio allumée.
- Amener le sélecteur (1) sur OFF.
- Régler le temps d’arrêt en appuyant en même temps sur les touches
SLEEP (3) et MINUTE (6) ou bien SLEEP (3) et HOUR (5).
- Pour désactiver la fonction SLEEP avant le temps configuré, il suffit
d’appuyer sur la touche SNOOZE (7).
10.
1. Sélecteur des fonctions : ON/OFF/AUTO/BUZZ ; Allumé/Éteint/
Réveil avec radio ou vibreur
2. Touche TIME SET, réglage de l’heure
3. Touche SLEEP, arrêt programmé
4. Touche ALARM SET / OFF, réglage/arrêt de la sonnerie
5. Touche HOUR, réglage des heures
6. Touche MINUTE, réglage des minutes
7. Touche SNOOZE, arrêt temporaire
8. Bouton d’accord
9. Bouton de réglage VOLUME, réglage du volume
10. Logement des piles
11. Indicateur de sonnerie activé
PILE TAMPON ANTI BLACK-OUT
Pour que l’horloge et la mémorisation de l’heure de réveil restent
en fonction même lors d’une coupure de courant électrique
momentanée, introduire une pile de 9V dans le logement spécifique
(10) sur le fond de l’appareil. Nous vous conseillons de remplacer
cette pile tous les six mois.
Si, en cas de coupure de courant, l’appareil affiche sur l’écran un
horaire incorrect et clignotant, remplacer la pile 9V.
MANIEMENT ET ENTRETIEN
Ne pas exposer l’appareil à la pluie ou à l’humidité afin d’éviter le
risque de décharges électriques ou de courts-circuits.
Éviter de placer l’appareil près de sources de chaleur, dans des
endroits humides ou poussiéreux, et de l’exposer directement aux
rayons du soleil.
Débrancher la fiche de la prise de courant et retirer la pile si vous
avez l’intention de ne pas utiliser l’appareil pendant une longue période
de temps.
Nettoyer la partie extérieure de votre appareil à l’aide d’un chiffon
doux légèrement humide; éviter absolument d’utiliser des solvants
ou des abrasifs.
INSTALLATION
Introduire la fiche du câble d’alimentation dans une prise de courant
230V - 50Hz ; l’afficheur clignotera tant que vous n’aurez pas réglé
l’heure.
RADIO
- Allumer la radio en amenant le sélecteur (1) sur ON.
- Sélectionner la gamme d'onde choisie avec le sélecteur FM (12).
- Syntoniser la station choisie au moyen du bouton d'accord (8).
- Régler le volume par le dispositif de réglage (9).
HORLOGE
Appuyer en même temps sur la touche TIME SET(2) et HOUR (5)
pour régler l’heure ; sur les boutons TIME SET(2) et MINUTE (6)
pour régler les minutes. L’écran affiche l’heure configurée.
TREVI suit une politique de recherche et de développement continus.
C’est pourquoi ses produits peuvent présenter des caractéristiques
différentes de celles décrites.
RÉVEIL
Appuyer en même temps sur les touches ALARM SET/OFF(4) et
HOUR (5) pour régler l’heure de réveil; sur les touches ALARM SET/
OFF(4) et MINUTE (6) pour régler les minutes. En appuyant sur la
touche ALARM SET/OFF (4), l’écran affiche l’heure de réveil.
3
RC 828
Deutsch
BESCHREIBUNGE DER BEDIENELEMENTE
1. 9. 2.
4.
7.
6.
5.
3.
WECKEN MIT RADIO
Den gewünschten Sender abstimmen.
Nach Einstellen der Weckzeit den Wahlschalter (1) auf AUTO stellen.
Die Anzeige (11) wird leuchten. Die gewünschte Lautstärke einstellen.
Das Radio wird sich zur eingestellten Uhrzeit einschalten.
8. 12.
WECKEN MIT DEM LÄUTWERK
Möchten Sie sich hingegen mit dem Läutwerk wecken lassen, den
Wahlschalter (1) auf AUTO stellen, die Anzeige (11) wird leuchten.
AUSSCHALTEN DES WECKERS
Um den Wecker (Läutwerk bzw. Radio) auszuschalten, die Taste
ALARM SET/OFF (4) drücken.
Für eine zeitweilige Unterbrechung des Weckers, die Taste SNOOZE
(7) drücken; eine Unterbrechung dauert 9 Minuten, dann schaltet
sich der Wecker wieder ein. Dieser Vorgang kann innerhalb von
einer Stunde mehrmals wiederholt werden.
11.
SLEEP-FUNKTION
Die Taste SLEEP (3) ermöglicht die Programmierung der Ausschaltzeit
des Radios bis max. 1 Stunde und 59 Minuten. Diese Einstellung
erfolgt bei eingeschaltetem Radio.
- Den Wahlschalter (1) auf OFF stellen.
- Um die Ausschaltzeit zu programmieren, die Tasten SLEEP (3)
und MINUTE (6) oder SLEEP (3) und HOUR (5) gleichzeitig
drücken.
- Durch Drücken der Taste SNOOZE (7) kann die Funktion SLEEP
vorzeitig ausgeschaltet werden.
10.
1. Funktionswahlschalter: ON/OFF/AUTO/BUZZ; Ein/Aus/Wecken
mit Radio oder Summerton
2. Taste TIME SET, Zeiteinstellung
3. Taste SLEEP, programmierte Ausschaltung
4. Taste ALARM SET/OFF, Alarmeinstellung/-ausschaltung
5. Taste HOUR, Stundeneinstellung
6. Taste MINUTE, Minuteneinstellung
7. Taste SNOOZE, zeitweilige Unterbrechung des Weckers
8. Abstimmung-Regler
9. Regler VOLUME, Lautstärkeregler
11. Anzeige Alarm ein
STROMAUSFALLSICHERE BATTERIE
Um die Uhrzeit bzw. die eingestellte Weckzeit bei einem eventuellen
Stromausfall gespeichert zu halten, eine Batterie mit 9V ins
entsprechende Fach (10) an der unteren Seite des Geräts einlegen.
Es wird empfohlen, diese Batterie alle 6 Monate auszuwechseln.
Blinkt nach einem Stromausfall eine falsche Uhrzeit auf dem Display,
so ist die Batterie zu ersetzen.
PFLEGE UND WARTUNG
Das Gerät nicht der Feuchtigkeit und dem Regen aussetzen. Gefahr
von elektrischen Schlägen und Kurzschlüsse.
Das Gerät nicht in der Nähe von Wärmequellen, in sehr feuchten
oder staubigen Räumen oder an Orten, die direkter
Sonnenbestrahlung ausgesetzt sind, anwenden.
Wird das Gerät über längere Zeit hinweg nicht verwendet, den
Stecker von der Steckdose abziehen und die Batterie entfernen.
Das Gerät außen mit einem weichen, leicht angefeuchteten Tuch
reinigen; keinesfalls Lösungsmittel oder scheuernde Substanzen
benutzen.
INSTALLATION
Das Speisekabel an einer Steckdose 230V - 50Hz anschließen; das
Display wird blinken, bis die Uhr eingestellt wird.
RADIO
- Radio einschalten, indem der Wahlschalter (1) auf ON gestellt
wird.
- Gewünschten Wellenbereich (FM) einstellen.
- Mit Hilfe des Schalters (8) gewünschten Sender einstellen.
- Lautstärke mit dem Schalter (9) einstellen.
Die Firma TREVI verfolgt eine Politik ständiger Forschung und
Weiterentwicklung. Die Produkte könne daher andere als die
beschriebenen Eigenschaften aufweisen.
ZEITEINSTELLUNG
Für die Stundeneinstellung die Tasten TIME SET(2) und HOUR (5)
bzw. für die Minuteneinstellung die Tasten TIME SET(2) und MINUTE
(6) gleichzeitig drücken. Die eingestellte Uhrzeit wird auf dem Display
angezeigt.
EINSTELLUNG DER WECKZEIT
Für die Stundeneinstellung des Weckers die Tasten ALARM SET(4)
und HOUR (5) bzw. für die Minuteneinstellung die Tasten ALARM
SET(4) und MINUTE (6) gleichzeitig drücken. Durch Drücken der
Taste ALARM SET(4) wird die Weckzeit auf dem Display angezeigt.
4
RC 828
Español
DESCRIPCIÓN DE MANDOS
1. 9. 2.
4.
7.
Sintonice con la emisora deseada.
Después de haber regulado el horario del despertador, ponga el
selector (1) en AUTO, el indicador (11) se iluminará. Regule el
volumen al nivel deseado. La radio se encenderá a la hora establecida.
6.
5.
3.
8. 12.
DESPERTAMIENTO CON ALARMA
Sin embargo si desea despertarse con la alarma, ponga el selector
(1) en AUTO, el indicador (11) se iluminará.
APAGADO DEL DESPERTADOR
Para desactivar el despertador (alarma o radio) presione la tecla
ALARM SET/OFF(4).
Si desea apagar momentáneamente el despertador, presione el
pulsador SNOOZE (7); la interrupción dura 9 minutos, transcurridos
los cuales el despertador se enciende de nuevo. La operación puede
repetirse varias veces dentro de una hora de tiempo.
11.
FUNCIÓN SLEEP
El pulsador SLEEP (3) le permite programar el apagado de la radio
hasta un máximo de 1 hora y 59 minutos. Esta regulación se debe
efectuar con la radio encendida.
- Ponga el selector (1) en OFF.
- Regule el tiempo de pagado presionando contemporáneamente
las teclas SLEEP (3) y MINUTE (6) o bien SLEEP (3) y HOUR (5)
- Para desactivar en su tiempo la función SLEEP es suficiente
presionar la tecla SNOOZE (7).
10.
1. Selector de funciones: ON/OFF/AUTO/BUZZ; Encendido/
Apagado/Despertador con radio o buzzer
2. Tecla TIME SET, regulación horaria
3. Tecla SLEEP, apagado programado
4. Tecla ALARM SET/OFF, regulación/apagado de alarma
5. Tecla HOUR, regulación horas
6. Tecla MINUTE, regulación minutos
7. Tecla SNOOZE, apagado temporal
8. Control de sintonía
9. Control VOLUMEN, regulación de volumen
10. Compartimento baterías
11. Indicador de alarma activado
BATERÍA TAMPÓN ANTI BLACK-OUT
Para mantener en funcionamiento el reloj y la memorización del
horario del despertador también durante una momentánea falta de
energía eléctrica, debe introducir una batería de 9V en el compartimento correspondiente (10) del fondo del aparato. Le aconsejamos
sustituir esta batería cada 6 meses.
En el caso de una interrupción eléctrica el aparato muestra en la
pantalla un horario incorrecto e intermitente, sustituya la batería
9V.
CUIDADO Y MANTENIMIENTO
No exponga el aparato a la lluvia o a la humedad para evitar el riesgo
de choques eléctricos o cortocircuitos.
Evite la ubicación del aparato cerca de las fuentes de calor, en
lugares húmedos o con polvo, y la exposición directa a los rayos
solares.
Desconecte el enchufe de la toma de corriente y extraiga la batería
si tiene la intención de no usar el aparato por un período largo de
tiempo.
Limpie la parte externa de su aparato con un paño húmedo
ligeramente humedecido; evite absolutamente el uso de disolventes
o abrasivos.
INSTALACIÓN
Enchufe el cable de alimentación en una toma de corriente 230V 50Hz; la pantalla destellará hasta cuando no habrá regulado la hora.
RADIO
- Encender la radio colocando el selector (1) en posición ON.
- Seleccionar la gama de onda mediante el control FM (12).
- Sintonizar la emisora que se desea escuchar mediante el control
(8).
- Regular el volumen mediante el control (9).
TREVI sigue una política continua de investigación y desarrollo. Por
lo tanto los productos pueden tener características que son diferentes
a las descritas.
RELOJ
Presione contemporáneamente la tecla TIME SET(2) y HOUR (5)
para regular la hora; los pulsadores TIME SET(2) y MINUTE (6) para
regular los minutos. En la pantalla se visualiza la hora introducida.
DESPERTADOR
Presione contemporáneamente los pulsadores ALARM SET/OFF(4) y
HOUR (5) para regular la hora del despertador. Los pulsadores
ALARM SET/OFF(4) y MINUTE (6) para regular los minutos.
Presionando la tecla ALARM (2) se visualiza en la pantalla el horario
del despertador.
DESPERTAMIENTO CON LA RADIO
5
RC 828
Português
DESCRIÇÃO COMANDOS
1. 9. 2.
4.
7.
DESPERTADOR COM O RÁDIO
Sintonizar-se na emissora desejada.
Após ter programado o horário do despertador, colocar o selector
(1) em AUTO, o indicador (11) irá iluminar-se.
6.
5.
3.
8. 12.
DESPERTADOR COM ALARME
Caso se deseje despertar com o alarme, colocar o selector (1) em
AUTO, o indicador (11) irá iluminar-se.
DESLIGAMENTO DO DESPERTADOR
Para desinserir o despertador (alarme ou rádio) premir a tecla
ALARM SET/OFF (4).
Caso se deseje desligar momentaneamente o despertador, premir a
tecla SNOOZE (7); a interrupção dura 9 minutos, após esse período
de tempo, o despertador se reacenderá. A operação pode ser
repetida várias vezes durante uma hora.
11.
FUNÇÃO SLEEP
A tecla SLEEP (3) permite programar o desligamento do rádio por
um máximo de 1 hora e 59 minutos. Esta regulação deve ser efectuada
com o rádio ligado.
- Colocar o selector (1) em OFF.
- Regular o tempo de desligamento premindo contemporaneamente as teclas SLEEP (3) e MINUTE (6) ou SLEEP (3) e HOUR (5)
- Para desinserir antecipadamente a função SLEEP, é suficiente
premir a tecla SNOOZE (7).
10.
BATERIA TAMPÃO ANTI BLACK-OUT
Para manter em funcionamento o relógio e a memorização do horário
do despertador mesmo durante uma momentânea falta de energia
eléctrica, introduzir uma bateria de 9V no específico compartimento (10) situado no fundo do aparelho. Recomenda-se a substituição
desta bateria a cada 6 meses. Se no caso de uma interrupção eléctrica
o aparelho mostra no display um horário errado e lampejante,
substituir a bateria de 9v.
1. Selector funções: ON/OFF/AUTO/BUZZ; Ligado/Desligado/
Despertador com rádio ou buzzer
2. Tecla TIME SET, regulação horário
3. Tecla SLEEP, desligamento programado
4. Tecla ALARM SET/OFF, regulação/desligamento alarme
5. Tecla HOUR, regulação horas
6. Tecla MINUTE, regulação minutos
7. Tecla SNOOZE, desligamento momentâneo
8. Controle sintonia
9. Controle VOLUME, regulação volume
10. Compartimento baterias
11. Indicador alarme inserido
CURA E MANUTENÇÃO
Não expor o aparelho à chuva e à humidade para evitar o risco de
choques eléctricos ou de curtos-circuitos.
Evitar de deixar o aparelho próximo a fontes de calor, em lugares
húmidos ou empoeirados, de expô-lo directamente aos raios solares.
Desligar a ficha da tomada de corrente eléctrica e extrair a bateria
se houver a intenção de não utilizar o aparelho por um longo período
de tempo.
Limpar a parte externa do vosso aparelho com um pano macio
levemente humedecido; evitar absolutamente o uso de solventes ou
abrasivos.
INSTALAÇÃO
Introduzir a ficha do cabo de alimentação em uma tomada de corrente 230V - 50Hz; o display irá lampejar até quando não terá sido
regulada a hora.
RÁDIO
- Ligue o rádio colocando o selector (1) em ON.
- Seleccionar a gama de onda desejada com o controle FM (12).
- Sintonizar a estação preferida com o controle (8).
- Regular o volume com o controle (9).
TREVI Persegue uma política de contínua pesquisa e desenvolvimento.
Portanto, os produtos podem apresentar características diferentes
daquelas descritas.
RELÓGIO
Premir contemporaneamente a tecla TIME SET (2) e HOUR (5) para
regular a hora; as teclas TIME SET (2) e MINUTE (6) para regular os
minutos. No display será visualizada a hora programada.
DESPERTADOR
Premir contemporaneamente as teclas ALARM SET/OFF(4) e HOUR
(5) para regular a hora do despertador; as teclas ALARM SET/
OFF(4) e MINUTE (6) para regular os minutos. Premendo a tecla
ALARM SET/OFF (4) é visualizado no display o horário do despertador.
6
RC 828
Ellhnika
PERIGRAFH TWN CEIRISMWN
1. 9. 2.
4.
7.
6.
5.
3.
XUPNHMA ME TO RADIOFWNO
Suntoniste…te sto staqmÒ thj prot…mhs¾j saj.
AfoÚ šcete ruqm…sei to wr£rio afÚpnhshj, fšrte ton epilogša (1)
sth qšsh AUTO: o de…kthj (11) qa fwtiste….
8. 12.
XUPNHMA ME KOUDOUNISMA
Ean, Òmwj, epiqume…te na xupn¾sete me koudoÚnisma, fšrte ton
epilogša (1) sth qšsh AUTO: o de…kthj (11) qa fwtiste…:
SBHSIMO TOU XUPNHTHRIOU
Gia na apenergopoi¾sete to xupnht¾ri (me koudoÚnisma ¾ me
radiÒfwno), pišste to pl¾ktro ALARM SET/OFF (4).
Ean epiqume…te na sb¾sete proswrin£ to xupnht¾ri, pišste to
pl¾ktro SNOOZE (7): h diakop¾ diarke… 9 lept£, met£ apÒ ta
opo…a to xupnht¾ri an£bei p£li. H diadikas…a aut¾ mpore… na
epanalhfqe… perissÒterej foršj mšsa sth di£rkeia miaj èraj.
11.
LEITOURGIA SLEEP
To pl¾ktro SLEEP (3) saj epitršpei na programmat…sete to
sb¾simo tou radiofènou mšcri to anètato Òrio thj 1 èraj kai
59 leptèn. Aut¾ h rÚqmish g…netai me to radiÒfwno anammšno.
- Fšrte ton epilogša (1) sth qšsh OFF.
- Ruqm…ste to crÒno sbhs…matoj pišzontaj tautÒcrona ta pl¾ktra
SLEEP (3) kai MINUTE (6) ¾
SLEEP (3) kai HOUR (5).
- Gia na apenergopoi¾sete prin apÒ ton prokaqorismšno crÒno th
leitourg…a SLEEP, arke… na pišsete to pl¾ktro SNOOZE (7).
10.
1. Epilogšaj leitourgièn ON/OFF/AUTO/BUZZ AnammšnosbhstÒ-Xupnht¾ri me radiÒfwno ¾ buzzer
2. Pl¾ktro TIME SET, rÚqmish tou wrar…ou
3. Pl¾ktro SLEEP, programmatismšnh apenergopo…hsh
4. Pl¾ktro ALARM SET/OFF, rÚqmish-apenergopo…hsh tou
xupnhthrioÚ
5. Pl¾ktro HOUR, rÚqmish twn wrèn
6. Pl¾ktro MINUTE, rÚqmish twn leptèn
7. Pl¾ktro SNOOZE, proswrinÒ sb¾simo
8. /Elegcoj sunton…aj
9. /Elegcoj VOLUME, rÚqmish thj šntashj
10. Cèroj gia tij mpatar…ej
11. De…kthj tou energopoihmšnou xupnhthrioÚ
MPATARIA ASFALEIAS KATA TOU MPLAKAOUT
Gia na exakolouq¾soun na leitourgoÚn to rolÒi kai to
xupnht¾ri kai se per…ptwsh proswrin¾j šlleiyhj hlektrikoÚ
reÚmatoj, eis£gete mia mpatar…a twn 9V ston eidikÒ cèro (10)
pou br…sketai sto k£tw mšroj thj suskeu¾j. Saj
sumbouleÚoume na antikataqist£te aut¾n th mpatar…a k£qe
6 m¾nej.
Ean, se per…ptwsh diakop¾j tou hlektrikoÚ reÚmatoj, h
suskeu¾ de…cnei sthn oqÒnh šna lanqasmšno wr£rio pou
anabosb¾nei, antikataste…ste th mpatar…a twn 9V.
EGKATASTASH
Eis£gete thn pr…za tou kalwd…ou trofodÒthshj se mia paroc¾
reÚmatoj twn 230V - 50Hz: h oqÒnh qa anabosb¾nei mšcri na
ruqm…sete thn èra.
FRONTIDA KAI SUNTHRHSH
Mhn ekqštete th suskeu¾ sth broc¾ ¾ sthn ugras…a, gia na
apofÚgete ton k…nduno hlektrikoÚ tin£gmatoj ¾
bracukuklwm£twn.
ApofÚgete na topoqete…te th suskeu¾ kont£ se iscuršj phgšj
qermÒthtaj, se cèrouj ugroÚj ¾ me poll¾ skÒnh kai na thn
ektšqete kat/euqe…an stij hliakšj akt…nej.
Aposundšste thn pr…za apÒ thn paroc¾ reÚmatoj kai afairšste
th mpatar…a, ean problšpete na mh crhsimopoi¾sete th suskeu¾
gia meg£lo cronikÒ di£sthma.
Kaqar…ste thn exwterik¾ epif£neia thj suskeu¾j saj me šna
malakÒ kai elafr£ bregmšno pan…: apofÚgete austhr£ th cr¾sh
dialutikèn ¾ £llwn diabrwtikèn ousièn.
RADIOFWNO
1. Ανα′βετε το ραδιο′φωνο φε′ρνοντας τον διακο′πτη επιλογη′ς
των λειτουργιω′ν (1) στην θε′ση ΟΝ.
2. Επιλε′γετε σε ποιο′ κυ′µα συχνοτη′των επιθυµει′τε να
συντονιστει′τε µε τον διακο′πτη ελε′γχου FM (12).
3. Συντονι′ζεστε στον αγαπηµε′νο σας σταθµο′ µε τον
διακο′πτη ελε′γχου (8).
4. Ρυθµι′στε την ε′νταση του η′χου µε τον διακο′πτη ελε′γχου
(9).
ROLOI
Pišste tautÒcrona ta pl¾ktra TIME SET (2) kai HOUR (5), gia na
ruqm…sete thn èra: ta pl¾ktra TIME SET (2) kai MINUTE (6), gia
na ruqm…sete ta lept£. Sthn oqÒnh optikopoie…tai h
programmatismšnh èra.
H TREVI akolouqe… mia politik¾ sunecoÚj šreunaj kai an£ptuxhj.
Gi/autÒ to lÒgo ta pro•Ònta mpore… na parousi£soun carakthristik£,
ta opo…a e…nai diaforetik£ apÒ aut£ pou perigr£fontai.
XUPNHTHRI
Pišste tautÒcrona ta pl¾ktra ALARM SET/OFF (4) kai HOUR (5),
gia na ruqm…sete thn èra afÚpnhshj: ta pl¾ktra ALARM SET/
OFF (4) kai MINUTE (6), gia na ruqm…sete ta lept£. Pišzontaj to
pl¾ktro ALARM SET/OFF (4) sthn oqÒnh optikopoie…tai to
programmatismšno wr£rio afÚpnhshj:
7
RC 828
ATTENZIONE
ATENCION
RISCHIO DI SCOSSE
ELETTRICHE
NON ESPORRE
A PIOGGIA E UMIDITÀ
PELIGRO DE CHOQUES
ELECTRICOS
NO EXPONER A LLUVIA Y
HUMEDAD
ATTENZIONE: NON APRIRE L'APPARECCHIO. ALL'INTERNO NON
VI SONO COMANDI MANIPOLABILI DALL'UTENTE NE PARTI DI RICAMBIO. PER TUTTE LE OPERAZIONI DI SERVIZIO RIVOLGERSI AD
UN CENTRO DI ASSISTENZA AUTORIZZATO TREVI
ATENCION: NO ABRIR EL APARATO, EN SU INTERIOR NO HAY
MANDOS QUE PUEDAN SER MANIPULADOS POR EL USUARIO NI
PARTES DE REPUESTO. PARA TODAS LAS OPERACIONES DE SERVICIO
DIRIGIRSE A UN CENTRO DE ASISTENCIA AUTORIZADO TREVI.
CAUTION
ATENÇÃO
DANGER OF ELECTRIC SHOCK!
DO NOT EXPOSE TO
RAIN OR HUMIDITY
PERIGO DE CHOQUES
ELÉTRICOS
NÃO EXPOR A CHUVA E
UMIDADE
CAUTION: TO REDUCE THE RISK OF ELECTRIC SHOCK, DO NOT
REMOVE COVER OR BACK. NO USER SERVICEABLE PERTS INSIDE.
REFER SERVICING TO QUALIFIED PERSONNEL ONLY.
ATENÇÃO: NÃO ABRIR O APARELHO. NO INTERIOR DO MESMO NÃO
EXISTEM COMANDOS OU PEÇAS DE SUBSTITUIÇÃO QUE POSSAM SER
MANIPULADOS PELO USUÁRIO. EM CASO DE EVENTUAL OPERAÇÃO DE
SERVIÇO, DIRIGIR-SE A UM CENTRO DE ASSISTÊNCIA AUTORIZADO TREVI
ATTENTION
ΠΡΟΣΟΧΗ
DANGER DE DECHARGES
ELECTRIQUES
NE PAS EXPOSER A LA PLUIE
NI A L’HUMIDITE
ΚΙΝ∆ΥΝΟΣ ΗΛΕΚΤΡΟΠΛΗΞΙΑΣ
ΜΗΝ ΕΚΘΕΤΕΤΕ
ΣΕ ΒΡΟΧΗ ΚΑΙ ΥΓΡΑΣΙΑ
ATTENTION: NE PAS OUVRIR L’APPAREIL. SON INTERIEUR NE
CONTIENT AUCUNE COMMANDE DESTINEE A L’UTILISATEUR NI DE
PIECES DE RECHANGE. POUR TOUTE OPERATION D’ASSISTANCE
CONTACTER UN CENTRE D’ASSISTANCE AGREE TREVI.
ΠΡΟΣΟΧΗ: ΜΗΝ ΑΝΟΙΓΕΤΕ ΤΗΝ ΣΥΣΚΕΥΗ. ∆ΕΝ ΥΠΑΡΧΟΥΝ ΣΤΟ ΕΣΩΤΕΡΙΚΟ
ΤΗΣ ΕΝΤΟΛΕΣ ΠΟΥ ΝΑ ΜΠΟΡΕΙ ΝΑ ΧΕΙΡΙΣΤΕΙ Ο ΚΑΤΑΝΑΛΩΤΗΣ ΟΥΤΕ
ΑΝΤΑΛΛΑΚΤΙΚΑ ΤΜΗΜΑΤΑ. ΓΙΑ ΟΠΟΙΑ∆ΗΠΟΤΕ ΕΡΓΑΣΙΑ ΑΠΕΥΘΥΝΘΕΙΤΕ
ΣΕ ΕΝΑ ΑΠΟ ΤΑ ΕΞΟΥΣΙΟ∆ΟΤΗΜΕΝΑ ΚΕΝΤΡΑ ΑΝΤΙΠΡΟΣΩΠΕΙΑΣ ΤΡΕςΙ.
ACHTUNG
UK PLUG ONLY
WIRES CONNECTIONS TO A THREE-PIN PLUG
GEFAHR ELEKTRISCHER
SCHLÄGE
NICHT DER FEUCHTIGKEIT
UND DEM REGEN AUSSETZEN
The wires in this mains lead are coloured in accordance with the following
wiring codes:
Blue: ...................................................... Neutral
Brown: ................................................. Live
The wires in this mains lead must be connected to the terminals in the
plug as follows:
Blue wire: ............................................ N or Black
Brown wire: ....................................... L or Red
Neither wire is to be connected to the earth (E or :) terminal of threepin plug.
Should the fuse fail in the plug remove the plug form the wall socket and
replace the fuse with a 3 Amp. ASTA approved BS 1362 fuse.
ACHTUNG: DAS GERÄT NICHT ÖFFNEN. IM INNERN BEFINDEN SICH
KEINE VOM BENUTZER SELBST INSTANDSETZBAREN TEILE UND AUCH
KEINE ERSATZTEILE. FÜR JEGLICHE SERVICEARBEITEN,WENDEN SIE SICH
BITTE AN EINE TREVI AUTORISIERTEN KUNDENDIENSTSTELLE.
8
RC 828
GARANZIA
1. L’apparecchio è garantito per 24 mesi dalla data di fabbricazione indicata sull’etichetta applicata sul prodotto.
2. La garanzia si applica solo ad apparecchi, non manomessi,
riparati da centri assistenza TREVI, essa comprende la
riparazione dei componenti per difetti di fabbricazione con
l’esclusione di etichette, manopole e parti asportabili.
3. TREVI non risponde di danni diretti o indiretti a cose o/e
persone causati dall’uso o sospensione d’uso dell’apparecchio.
CLAUSULAS DE GARANTIA
1. El aparato tiene una garantía de 24 meses a partir de la fecha
de fabricación indicada en la tarjeta sobre el producto.
2. La garantía está aplicada solamente a los productos no
desarreglados y reparados por los centros de asistencia
TREVI. Además, la garantía incluye la reparación de los
componentes a causa de defectos de fabricación, con la
exclusión de etiquetas, botones y partes removibles.
3. TREVI no es responsable por daños directos o indirectos a
cosas y/o personas causados por el uso o suspensión del uso
del aparato.
WARRANTY
1. This unit is guaranteed for a period of 24 months from the
date of production printed on the product itself or on label
on product.
2. The warranty is valid only if the unit has not been tampered
with. The warranty is valid only at authorized TREVI
assistance centres, that will repair manufacturing defects,
excluded replacement of labels and removable parts.
3. TREVI is not liable for damage to people or things caused by
the use of this unit or by the interruption in the use of this
unit.
GARANTIA
1. O aparelho tem uma garantia de 24 meses a partir da data
de fabricação indicada na etiqueta que consta no produto.
2. Somente aparelhos não violados, e que foram reparados
pelo Centro de Assistência TREVI incluem-se nesta garantia.
Esta compreende a reparação dos componentes em caso de
defeitos de fabricação com a exclusão de etiquetas, botões
e partes que podem ser extraídas.
3. A TREVI não considera-se responsável por danos directos
ou indirectos, causados pelo uso ou suspensão do uso do
aparelho, à objectos e/ou pessoas.
CONDITIONS DE GARANTIE
1. L’appareil est garanti pendant une période de 24 mois de la
date de fabrication indiquée sur l’étiquette se trouvant sur
le produit.
2. La garantie n’est appliquée que sur les appareils non altérés,
ayant été réparés chez un Service Après-Vente TREVI. Elle
comprend la réparation des composantes à la suite de
défauts de fabrication, à l’exclusion d’étiquettes, boutons de
réglage et parties amovibles.
3. TREVI ne répond pas des dommages directs ou indirects aux
choses et/ou aux personnes entraînés pendant l’usage ou la
suspension d’usage de l’appareil.
ΕΓΓΥΗΣΗ
1. Η συσκευηϖ εϖχει εγγυϖηση διαϖρκειαϕ 24 µηνωϖν
αποϖ την ηµεροµηνιϖα κατασκευηϖϕ που
αναγραϖφεται στην κολληµεϖνη επαϖνω τηϕ
ετικεϖτα.
2. Η εγγυϖηση εϖχει ισχυϖ µοϖνο για τιϕ συσκευεϖϕ,
στιϕ οποιϖεϕ δεν εϖχει επεµβειϖ κανειϖϕ, τιϕ
επισκευασµεϖνεϕ αποϖ τα κεϖντρα αντιπροσωπειϖαϕ
TREVI και περιλαµβαϖνει την επισκευηϖ των
συστατικωϖν στοιχειϖων που ειϖναι ελαττωµατικαϖ
αποϖ κατασκευηϖϕ εκτοϖϕ των ετικετωϖν,
χειρολαβωϖν και µετακινουϖµενων τµηµαϖτων.
3. Η εταιριϖα TREVI δεν ειϖναι υποϖλογη αϖµεσων ηϖ
εϖµµεσων ζηµιωϖν σε πραϖγµατα ηϖ π ρ ο ϖ σ ω π α
αποϖ κακηϖ χρηϖση ηϖ διακοπηϖ τηϕ χρηϖσηϕ τηϕ
συσκευηϖϕ.
GARANTIEBESTIMMUNGEN
1. Das Gerät hat eine Garantie von 24 Monaten ab dem
Herstellungsdatum. Das Herstellungsdatum ist auf der am
Produkt angebrachten Etikette angegeben.
2. Die Garantie gilt nur für Geräte, an denen nicht selbst
ausgeführte Reparaturen erfolgt sind, sondern die von
TREVI-Kundendienststellen durchgeführt wurden. Die
Garantie umfaßt die Reparatur von Bauteilen, wenn diese
auf Herstellungsfehler zurückzuführen sind. Die Garantie
gilt hingegen nicht für Etiketten, Drucktasten, Knöpfe und
entfernbare Teile.
3. TREVI haftet nicht für direkte oder indirekte Sach- und/oder
Personenschäden, die vom Gebrauch des Gerätes verursacht
worden sind.
9
NOTE
RC 828
10
NOTE
RC 828
11
MADE IN P.R.C.
DICHIARAZIONE DI CONFORMITÀ
SI DICHIARA CHE:
L'apparecchio Radiosveglia marca
TREVI modello RC 828
risponde alle prescrizioni dell'art. 2 comma 1
del D.M. 28 agosto 1995, n° 548
TREVI S.p.A.
Via Ausa 173
47852 Coriano (Rn) Italia
TREVI S.p.A. - Via Ausa 173 - 47852 Coriano (RN) - Italy - Tel. 0541/756420 - Fax 0541/756430 - E-mail: [email protected] - www.trevi.it
Coriano, 28/09/2006