1
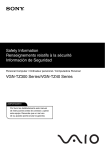
For details, refer to “Operating Instructions for advanced features”.
Digital Camera
Model No.
DMC-TZ40 / DMC-ZS30
VQC9329
Wi-Fi® connection guide
The camera cannot be used to connect to a public wireless LAN
connection.
[Remote Shooting]
By linking with the DLNA compatible TV,
you can display pictures on TV right after
taking them or display them on TV later by
playing them back on the camera.
[Playback on TV]
■About the Wi-Fi connection lamp
Wi-Fi connection lamp
Lit blue: The Wi-Fi connection is on standby
Blinking blue: Sending/receiving data
through the Wi-Fi connection
[Send Images While Recording]
1 Press [Wi-Fi] button
●We strongly recommend that you set an encryption to maintain
information security.
●When sending images on a mobile network, high packet
communication fees may be incurred depending on the details of your
contract.
●Do not remove the memory card or battery or move to an area
without any reception while sending images.
●“Wi-Fi”, “Wi-Fi Protected Setup”, “Wi-Fi Direct”, “WPA” and “WPA2” are
marks or registered marks of the Wi-Fi Alliance.
[Airplane Mode]
Every time you take a picture, the picture
can be automatically sent to a specified
location. You can play back the picture on
the smartphone/tablet, or save and edit it
on PC.
The operation to connect this unit to other devices by Wi-Fi differs by function, connection method, etc. Perform operation by following the screen display and
refer to the manual, etc. for the connecting device or WEB service.
Preparation: You may be required to configure settings on applicable devices depending on the connecting device or WEB service.
Linking with the Wi-Fi compatible equipment allows you to remotely
operate the camera, or share pictures with people in distant places even
during recording or playing back.
You can remotely operate the camera
using a smartphone/tablet. You need to
install “Image App” on your smartphone/
tablet.
Sequence of connecting operation
Electromagnetic waves from the camera can affect instruments and
meters. In airplane cabins or in other restricted areas, set [Airplane
Mode] to [ON].
Press [MENU/SET]
Press
to select [Setup] and press [MENU/SET]
Press
to select [Airplane Mode] and press [MENU/SET]
Press
to select [ON] and press [MENU/SET]
You can select and send recorded
images.
2
• You can also select it by touch
operations.
Press
to
select the item and
press [MENU/SET]
[New Connection]: Configure settings for a new Wi-Fi connection with Wi-Fi compatible devices or WEB services. ([Remote Shooting] / [Playback
on TV] / [Send Images While Recording] / [Send Images Stored in the Camera])
[History Connection]: Connect to compatible devices or WEB services using the same setting as before when connecting with Wi-Fi.
[Favorite Connection]: You can register frequently used connection settings.
[Wi-Fi Setup]: Configure various Wi-Fi settings.
3 Connect to Wi-Fi
Camera
Smartphone/
tablet
[Remote Shooting] (see below)
Wireless access
point
Camera
Compatible devices, etc.,
on network
[Via Network] (see reverse side)
Camera
Wi-Fi compatible
devices
[Direct] (see reverse side)
[Send Images Stored in the Camera]
Recording/viewing pictures with a smartphone/tablet [Remote Shooting]
This section describes how to make a Wi-Fi connection between this unit
and a smartphone/tablet to record pictures using the smartphone/tablet
and to transfer pictures to the smartphone/tablet.
1
Installing “Panasonic Image App”
The “Panasonic Image App” is an application provided by Panasonic that
allows your smartphone/tablet to perform the following operations of a
Wi-Fi-compatible LUMIX. (“Panasonic Image App” is indicated as “Image
App” in the text.)
■ Version
1.2 or above
2
Easily connect to a smartphone/tablet
Use the NFC (Near Field Communication) function to easily connect this
unit to a smartphone/tablet with Wi-Fi for remote recording and to send
pictures to the smartphone/tablet.
• This function can be used with NFC compatible devices with Android
(2.3.3 or above). (Not available in certain models)
2 Place your smartphone/tablet to the side of this
unit
Taking pictures / Playing back pictures
Press the [Wi-Fi] button
Use
to select [New Connection] and press
[MENU/SET]
Use
to select [Remote Shooting] and press [MENU/SET]
■ On your smartphone/tablet
Android 2.2 - Android 4.2
iOS 4.3 - iOS 6.0
■ Installation procedure
Connect your smartphone/tablet to the Internet, and
please install “Panasonic Image App” from the following
site.
• “Google Play™ Store” (for Android)
• “App StoreSM” (for iOS)
Place over this area
(within 5 mm (0.20 inch))
• Do not bump your smartphone/tablet strongly against this unit.
(The smartphone/tablet or this unit may get scratched)
• For information on how to use NFC compatible devices, please
contact the device manufacturer.
• If there is no immediate reaction, slightly move the position where
the smartphone/tablet was placed.
In the search field of each site, search by entering
“Panasonic Image App” to find it quickly.
type of smartphone/tablet being used. For compatible devices,
see the following support site.
http://panasonic.jp/support/global/cs/dsc/
(This site is available in English only.)
●Android and Google Play are trademarks or registered trademarks of
Google Inc.
●App Store is a service mark of Apple Inc.
3
1 Start up “Image App” on your smartphone/tablet
■ Supported OS
●The service may not be able to be used properly depending on the
When manually connecting without the NFC function
■ Operating this unit
3 Press
4
to select [Yes] and press [MENU/SET]
Place your smartphone/tablet over this area of the
unit again
• When the connection is complete, live images captured by the
camera will be displayed on your smartphone/tablet.
• Smartphone/tablet that have already been approved to connect
can connect by performing the operations in step 1 and 2 .
Select the SSID displayed on the camera, and enter the
password
• The SSID displayed differs depending on the connection
method.
• To connect [Via Network], select a wireless access point and
adjust the settings.
Start up “Image App”
• When the connection is complete, live images captured by the
camera will be displayed on the “Image App” screen.
Transferring a still picture easily to your smartphone/tablet
■Taking pictures via a smartphone/tablet
(remote recording)
Select [
] on a smartphone/tablet
■Playing back pictures in the camera
Select [
] on a smartphone/tablet
●Read the [Help] in the “Image App” menu for further details on how to
operate.
●The screen differs depending on the operating system.
When transferring just 1 still picture to your smartphone/tablet with “Image App” installed, you can use the NFC function to easily send the picture.
Start up “Image App” on your smartphone/
Display the still picture to be transferred
Place your smartphone/tablet to the side of
tablet
to your smartphone/tablet on the 1-picture
this unit
screen (full screen)
Connecting via a wireless access point / Connecting directly
Press
to select connection method, and then press [MENU/SET]
Playback on TV
You can use the Wi-Fi function [Playback on TV] to display pictures on a
television that is compatible with a DLNA certified digital media renderer
(DMR).
Preparations: Set the TV to DLNA waiting Mode.
Connection method
[Via Network]
1 Press [Wi-Fi] button
[Direct]
2 Press
to select [New Connection] and
press [MENU/SET]
• You can also select it by touch operations.
[Wi-Fi Direct]™
Set the device to Wi-Fi Direct mode
Press
to select [Wi-Fi Direct] and press [MENU/SET]
Press
to select the device to connect to, and then
press [MENU/SET]
—
[WPS (Push-Button)]
Press
to select [WPS (Push-Button)] and press [MENU/SET]
Set the device to WPS mode
[WPS (PIN code)]
Press
to select [WPS (PIN code)] and press
[MENU/SET]
Press
to select the wireless access point you are
connecting to, and press [MENU/SET]
Enter the PIN code displayed on the camera screen into the
wireless access point
Press [MENU/SET]
Press
to select [WPS (PIN code)] and press
[MENU/SET]
Enter the PIN code of the device into this unit
Press
to select the wireless access point you are
connecting to, and press [MENU/SET]
(If network authentication is encrypted)
Enter the encryption key
• If no wireless access points appear, you can directly enter
the SSID etc. to register one.
Enter the SSID and password into the device. The SSID
and password are displayed on the connection waiting
screen of this unit.
[Manual Connection]
3
Press
to select [Playback on TV] and press
[MENU/SET]
4 Press
• Create a PC user account (account name (up to 254 characters)
and password (up to 32 characters)) consisting of alphanumeric
characters. An attempt to create a receive folder may fail if the account
includes non-alphanumeric characters.
■When using “PHOTOfunSTUDIO”
1 Install “PHOTOfunSTUDIO” to the PC
• For details on hardware requirements and installation, read
“Operating Instructions for advanced features”.
2 Create a folder that receives images with
“PHOTOfunSTUDIO”
• To create the folder automatically, select [Auto-create]. To specify
a folder, create a new folder, or set a password to the folder,
select [Create manually].
• For details, refer to the operating instructions of
“PHOTOfunSTUDIO” (PDF).
■When not using “PHOTOfunSTUDIO”
1 Enable sharing of the folder used for receiving
data
• For details, refer to the operating instructions of your PC or Help
on the operating system.
Installing “LUMIX Map Tool”
■ Operating environment
Windows® XP (32-bit) SP3
Windows Vista® (32-bit) SP2
Windows® 7 (32-bit, 64-bit) and SP1
Windows® 8 (32-bit/64-bit)
Mac® OS X v10.4, v10.5, v10.6, v10.7, and v10.8
■ Windows
[Via Network]:
When you want to connect to your TV via an wireless access
point.
[Direct]:
When you want to directly connect this unit to the device you are
using as a wireless access point.
■ Mac
5 Press
to select a device you want to connect,
and then press [MENU/SET]
6 Take or play back pictures on this unit
●DLNA, the DLNA Logo and DLNA CERTIFIED are trademarks, service
Insert the disc
Click [Applications]
Click [Recommended Installation] or [LUMIX Map Tool]
Continue the installation procedure following the instructions
displayed on the screen.
Insert the disc
Double-click the recognised disc to open
Double-click the [Application] folder to open
Double-click the [MAPTOOL] folder to open
Double-click [LUMIX Map Tool.pkg]
Continue the installation procedure following the instructions
displayed on the screen.
marks, or certification marks of the Digital Living Network Alliance.
Copying detailed maps to a memory card
Since the map data size is large, be sure to check the free space
on the memory card before copying the data. (A memory card of at
least 8 GB is needed to copy the map data for all the regions.)
• When a memory card is formatted (initialised), all data, including
the map data, is deleted.
You can select and send recorded images. Prepare folders for receiving images on the PC before sending a picture to the PC.
To create a folder that receives images
You can use “LUMIX Map Tool” to copy the map data on the disc
(supplied) to a memory card. When the map data is copied to the
memory card, detailed maps can be displayed on the camera.
to select connection method, and then
press [MENU/SET]
When sending images to PC
1
Using the map data on the disc
(supplied)
2
Connecting to your PC
• Turn the computer on.
• If the standard settings are changed for the workgroup on the connected PC, you must change settings in [PC Connection] on this unit.
Press
to select the folder you want to send,
and then press [MENU/SET]
1 Press [Wi-Fi] button
7
2 Press
8 Press
to select [New Connection] and
press [MENU/SET]
• You can also select it by touch operations.
3 Press
to select [Send Images Stored in the
Camera], and press [MENU/SET]
4 Press
to select [PC] and press [MENU/SET]
5 Press
to select connection method, and then
press [MENU/SET]
[Via Network]:
When you want to connect to your PC via a wireless access point.
[Direct]:
When you want to directly connect this unit to the device you are
using as a wireless access point.
6 Press
to select the PC you want to connect
to, and then press [MENU/SET]
to select [SINGLE] or [MULTI], and then
press [MENU/SET]
9 Select and send the images
●[SINGLE] setting
Press
to select the picture
Press [MENU/SET]
• Confirmation screen is displayed. If you select [Yes], the
operation is executed.
●[MULTI] setting
Press
to select the picture, and then press the [DISP.]
button to set (repeat)
Press [MENU/SET]
• Confirmation screen is displayed. If you select [Yes], the
operation is executed.
●Folders sorted by the sent date are created in the specified folder, and
pictures are saved in those folders.
●If the screen for a user account and password entry appears, enter the
one you set on your PC.
Preparation: Insert the supplied disc in your computer drive before
starting the copying procedure.
Insert the memory card into a card reader/writer (commercially
available)
Start “LUMIX Map Tool” installed in your computer
Windows:
Click [Start] → [All Programs] → [Panasonic] → [LUMIX Map
Tool] → [LUMIX Map Tool]
Mac:
Double-click [LUMIX_Map_Tool] in [Applications] (Applications)
Select a card from the pull-down menu
Click the checkbox to select a region to be copied
Click [Execute]
Perform the rest of the steps in accordance with the instructions
displayed on the computer screen.
After copying is finished, click [Close] and remove the memory
card from the computer