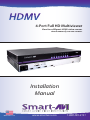
1
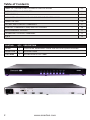
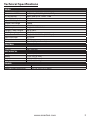
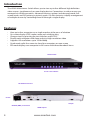
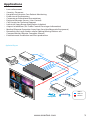
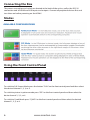
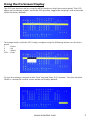
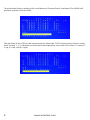
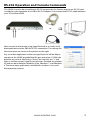
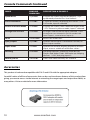
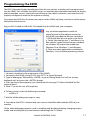
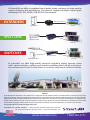
HDMV
4-Port Full HD Multiviewer
View four different HDMI video sources
simultaneously on one screen.
Installation
Manual
Made in the U.S.A.
www.smartavi.com
www.smartavi.com
1-800-AVI-21311
Table of Contents
TABLE OF CONTENTS AND TECHNICAL SPECIFICATIONS
2-3
INTRODUCTION AND FEATURES
4
APPLICATIONS
5
CONNECTING THE BOX AND USING THE FRONT CONTROL PANEL
6
USING THE OSD
7-8
HOTKEY AND CONSOLE COMMANDS
9
CONSOLE COMMANDS (cont) AND ACCESSORIES
10
PROGRAMMING THE EDID
11
UPGRADING THE VIDEO FIRMWARE
12
Q&A
What’s
in the Box?
PART NO.
QTY
13
DESCRIPTION
HDMV
1
4-Port HDMI, Multiviewer Switch with PiP/Dual/Quad/Full modes
Power Cord
1
6ft Power Cable
CBLDB906
1
6ft DB9 Serial RS-232 Cable
2
www.smartavi.com
Technical Specifications
VIDEO
Video Bandwidth
Resolution HDTV
PC Resolution
Input Video Signal
Input DDC Signal
Single Link Range
Format
DVI Compliance
Output Cable Length
HDCP Compliance
Video Bandwidth
Input Interface
Output Interface
Connector
CONTROL
Front Panel
RS-232
MECHANICAL
Height
Width
Depth
Weight
POWER
Requirements
Power Supply Approvals
Single-link 340MHz [10.2Gbps]
480i,480p,720i,720p,1080i,1080p
800 x 600 up to 1920 x 1200
1.2 volts
5 volts
1080p
HDMI 1.4
Single-link DVI-D 2.0
Up to 20 ft.
1.0/2.0
Single-link 340MHz [10.2Gbps]
(4) HDMI
HDMI
Type A [19-pin female]
Tact Switches
DB9 (female)
1.70 in. (1U)
17 in. (431.8 mm.)
10.2 in. (259 mm.)
4.05 lbs. (1.84 kg.)
Internal 100-240 VAC
UL, CE, CSA, CEC, RoHS
www.smartavi.com
3
Introduction
The HDMV Multiviewer Switch allows you to view up to four different high definition
video sources simultaneously on one display device. Connections to video sources are
managed via HDMI connectors. Advanced viewing options include quad-mode, fullscreen mode, and PiP (picture in picture) mode. Use this device to simplify management
of multiple sources by controlling them all through a single display.
Features
•
•
•
•
•
•
•
View up to four computers on a single monitor at the press of a button
On-screen display (OSD) makes setup and switching easy
Change views by pressing the tact switches and RS-232
Display each computer with clean and crisp high-resolution video
Supports HD resolutions up to 1920x1080p
Quad-mode splits the screen to show four computers on one screen
PiP-mode displays one computer in full screen with three thumbnail views
Status LEDs
Front control Panel
USB inputs
(from computers)
RS-232 Connection
USB Keyboard and Mouse
Power
Output
RS-232 (DB9) connection
HDMI inputs
4
www.smartavi.com
Applications
•
•
•
•
•
•
•
•
•
•
•
Law enforcement
Security Clearance
Hospital and Hospice Care Patient Monitoring
Professional Presentations
Corporate or Educational Presentations
Financial (Remote Servers/User Control)
Call Centers for Technical Support
Industrial (Long-Range Workstation Isolation)
Airport Installations (Air Traffic Control/Passenger Information)
Medical (Remote Operation Away from Sensitive/Magnetic Equipment)
Recording (for Large Studios where Editing/Mixing Stations are
Compact and/or Require Complete Silence)
• Entertainment Production and Post production
Application Diagram
HDM
I In
Cab
le o
r Sa
I In
ttel
HDM
lite
Cam
era
SMT
CP-2
32
I In
RS2
HDM
V
HD
HD
Mul
HDM
MVP
lus
tivie
wer
Syst
em
I In
HDM
ut
MI O
HD
DV
D
/Bl
DV
D
u-R
ay
P
laye
r
/Bl
u-R
ay
P
laye
r
www.smartavi.com
HDMI In
HDCP
HDMI Out
RS232 In
5
Connecting the Box
The power connection and switch are located at the back of the unit as well as the RS-232
connection and all HDMI and USB inputs and outputs. Connect all peripheral devices first and
turn them on before powering on the HDMV.
Modes
Using the Front Control Panel
To switch to Full Screen Mode press the button “FULL” on the front control panel and then select
the desired channel 1, 2, 3, or 4.
To switch to picture in picture mode press “PiP” on the front control panel and then select the
desire channel 1, 2, 3, or 4.
To switch to Quad-Mode press “QUAD” on the front control panel and then select the desired
channel 1, 2, 3, or 4.
6
www.smartavi.com
Using the On Screen Display
The OSD can be accessed by using the MENU button on the front control panel. The OSD
allows you to change modes, move the OSD position, toggle the hot plugs, and restore the
HDMV to factory defaults.
To change modes with the OSD simply navigate using the following buttons on the front
panel:
1
- Down
2
- Up
4
- Select
FULL - Enter
To save the settings navigate to the “Save” text and Enter (FULL button). The next time the
HDMV is started the current screen mode will load by default.
www.smartavi.com
7
To restore the factory settings click scroll down to “Factory Reset” and enter. The HDMV will
perform a power reset on itself.
The position of the OSD can be moved around. Select the “OSD Position” text and press enter.
Next use the 1, 2, 3, 4 buttons on the front control panel to move the OSD, where 1 is down, 2
is up, 3 is left, and 4 is right.
8
www.smartavi.com
RS-232 Operation and Console Commands
The HDMV may also be controlled via RS-232 commands; this feature requires an RS-232 card
installed on your computer or a USB to RS-232 adapter. First connect the RS-232 cable between
your PC and the HDMV.
RS-232 Cable
OR
USB to RS-232 Adapter Cab le
Next connect to the device using HyperTerminal or a similar serial
data application and an DB9 for RS-232 connection. The settings for
the connection are shown in the picture on the right.
Any serial data application similar to HyperTerminal will be able to
connect to the HDMV provided the Bits per second are 115200, the
data bits are set to 8, the Parity is “None,” the stop bits are “1,” and
there is no flow control. HyperTerminal comes standard on windows
XP and can be enabled on Windows Vista, Windows 7, and Windows
8. There are many applications available for windows, Linux, and
Mac operating systems.
www.smartavi.com
9
Console Commands Continued
MODE
CONSOLE
COMMAND
DESCRIPTION & EXAMPLE
Quad Mode
//Q#<CR>
4 inputs on screen, equally displayed. “//Q2”
quad mode, channel 2 as user control
Full Screen Mode
//F#<CR>
1 input on screen, displaying full screen. “//F4”
Full mode, input 4 selected
Picture in Picture Mode
//P#<CR>
4 inputs on screen, main selection largest Area.
“//P3” Picture in picture mode, input 3 selected
Change User Control
//U#<CR>
Changes USB control to input selected. “//U4”
change to user channel 4 (In PiP mode with
main input 1, control over input 4)
Reset
//reset<CR>
Resets the HDMV box
Query Inputs
//QI<CR>
Queries which input is selected as control, returns input number
Input Status
//IS<CR>
Queries the current display properties of each
input, returns a table of resolution values
Hot Plug
//H#<CR>
Hot plugs devices, useful for some Blu-ray
Players and Video Cards. Will wake up sleeping
devices. “//H2”, hot plug input 2
Memory Reset
//MR<CR>
Clears the video memory for a refresh
Accessories
This product is backward compatible with DVI-D and VGA with the appropriate adapter.
SmartAVI makes a full line of accessories that can be used to enhance features of this product from
giving you remote access via the Internet or extending the range inputs and output over 200 ft, to
many others. Visit our website for more information.
10
www.smartavi.com
Programming the EDID
The EDID (Extended Display Identification Data) of your monitor or display can be programmed
into the HDMV. This will allow the HDMV to pass essential display information between the display
and the attached sources. Information pertaining to color depth, resolution, and sound must be
properly configured in order for the optimum viewing .
To program the EDID first disconnect any inputs to the HDMV and plug a monitor in to the output.
Next power the device on.
Plug an RS-232 cable or USB to RS-232 adapter into the HDMV and your computer.
Any serial data application similar to
HyperTerminal will be able to connect to
the HDMV provided the Bits per second are
115200, the data bits are set to 8, the Parity
is “None,” the stop bits are “1,” and there is no
flow control. HyperTerminal comes standard
on windows XP and can be enabled on
Windows Vista, Windows 7, and Windows
8. There are many applications available for
Windows, Linux, and Mac operating systems.
1. Connect a monitor to the output port of the HDMV.
2. Connect to the HDMV using RS-232 (use PuTTY or HyperTerminal).
3. Type in “debuguon” followed by <ENTER> to go to Debug Mode. You will not see any
feedback until you press the <ENTER> button.
4. If this has been done properly, you should see the message “CLI Menu Enabled” on the
terminal client.
5. Enter “?” to see the rest of the options.
6. To learn screen, enter the following command:
wEDID a 3
7. Wait for all the debug messages to stop.
8. Once done, the EDID is learned and your sources should be able read the EDID of your
monitor.
*Note: other debugging options such as enabling and disabling hotplug, changing output
mode, and resetting the unit can be accessed through the CLI Menu.
www.smartavi.com
11
How to Upgrade the Video Firmware
Download the latest firmware upgrade from the SmartAVI website.
Open either Chip45Boot2 or a serial data application such as HyperTerminal. Chip45Boot2 may be
downloaded from the Chip45 website. HyperTerminal, Putty, TeraTerm are widely distributed and
free to use.
1) Connect an RS-232 cable or USB to
RS-232 adapter from your computer to
the HDMV.
Using Chip45Boot2 GUI
2) Open Chip45Boot2 GUI and select the
appropriate com port.
3) Select a baud rate of 115200 (if
connection fails select a lower
baud rate)
4) Press “Select Flash Hexfile” and locate
the firmware upgrade. (Don’t forget to
download the upgrade first.)
5) With the power to the HDMV off, press
“Connect to Bootloader” then turn the
power to the HDMV on.
6) Once connected click on “Program Flash”
7) When finished click “Disconnect from
bootloader” and power cycle the
HDMV.
Using HyperTerminal
12
Occasionally Chip45 may give an error
“Unable to connect, with a red status flag.”
Clicking “connect” just after seeing this
message will sometimes connect. Also
consider lowering the baud rate.
With a Terminal Program:
1) Set PC serial port to 19200 baud, 8N1, XON
XOFF (we suggest to start with 19200 baud,
even though higher baud rates are possible,
depending of target MCU clock.) Set the
line endings on your terminal program to
‘CR+LF’ for outgoing messages, this means
to “send line ends with line feeds.”
Emulation should be set to “VT100.”
2) Hold shift-U keys pressed while powering
on or resetting your target
3) See the welcome message “c45b2” plus
version number plus prompt on the next
line now the boot loader is ready to accept
the firmware.
4) Type “pf” to load the firmware. An echo of
“pf+” will return.
5) Send text file, go to desktop and “show all”
and select the hex file. (Send it as a text file
although it is a hex file.)
www.smartavi.com
Notes:
www.smartavi.com
13
Notes:
14
www.smartavi.com
Notes:
www.smartavi.com
15
At SmartAVI, we offer a complete line of audio/video solutions for high-quality
signal switching and distribution. Our devices support multiple signal types
including VGA, DVI, HDMI, USB, RS232, IR and more.
EXTENDERS
CAT5/5e/6 UTP/STP
FIBER OPTIC
COMPUTER
SPLITTERS
BLUERAY PLAYER
EXTENDER
DISPLAY
SPLITTER
DISPLAYS
DVR
SWITCHES
MATRIX SWITCH
GAMING CONSOLE
DISPLAYS
At SmartAVI, we offer high-quality products including digital signage, video
walls, signal extenders, splitters and switches and fiber optics. All of our products
are manufactured in the United States in our North Hollywood, California facility.
NOTICE
The information contained in this document is subject to change without notice. SmartAVI makes no warranty of any kind
with regard to this material, including but not limited to, implied warranties of merchantability and fitness for any particular
purpose. SmartAVI will not be liable for errors contained herein or for incidental or consequential damages in connection with
the furnishing, performance or use of this material. No part of this document may be photocopied, reproduced or translated
into another language without prior written consent from SmartAVI. For more information, visit www.smartavi.com.
© Copyright 2014 SmartAVI, All Rights Reserved
SmartAVI, Inc. / Twitter: smartavi - 11651 Vanowen St. North Hollywood, CA 91605
Tel: (818) 503-6200 Fax: (818) 574-5581 - http://www.SmartAVI.com
16
Made in the U.S.A.
www.smartavi.com
www.smartavi.com
S M A R T A U D I O V I D E O I N N O V AT I O N
1-800-AVI-2131