1
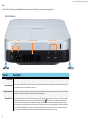
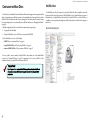
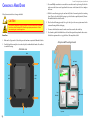
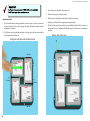
J4
USER MANUAL •
© 2012 Promise Technology, Inc.
Version: 1.00
Contents
Introduction to Pegasus J41
About this User Manual
J4 Description
15
Mac OS Disk Utility15
1
Create a striped RAID set 16
2
Client OS Support 2
Create a concatenated disk set
16
Utility OS Support 2
Create a mirrored RAID set
17
Rebuild a mirrored RAID set
17
Specifications 3
Hardware Description
Delete a RAID set 17
4
If a RAID set fails 17
Front 4
Combine RAID sets
17
Back 5
Configuration Example - Create a RAID 10 set
Bottom View
6
Top View
6
What is RAID?
Unpacking the Pegasus J4
Install Hard Disks
8
Remove housing cover
8
Insert storage drives
9
Replace housing cover
9
7
Updating Firmware
Remove Drive
23
23
Insert Replacement Drive 24
Daisy-Chaining Multiple Units
25
Support Information 26
Contacting Technical Support
Shutting down the Pegasus 12
Installing the Device Driver 13
13
Driver Installation: Macintosh
13
Installing the J4 Firmware Updater
13
13
MacBook Pro/iMac Software Update
Software Installation: Macintosh
21
Changing a Hard Drive
Power on the Pegasus12
OS Support
19
Auto Shutdown powering saving feature 21
Connecting the Power and Thunderbolt Cables 10
OS Support
14
18
Using the J4 Firmware Updater 20
Installation and Setup 7
ii
Configure the Hard Disks
13
26
Promise Technologies Pegasus J4User Manual
Introduction to Pegasus J4
This section includes the following topics:
• About this manual (below)
• Device Description
• Client OS Support
• Utility OS Support
• Specifications
• Hardware Description
About this User Manual
This Product Manual describes how to set up, use and maintain the Pegasus J4 Direct Attached Storage (DAS) system. It describes how to use software
that you install and run on a Macintosh computer used to monitor and update the device.
This manual includes a table of contents, chapter task lists, and cross-references used for navigating the document and helping the user locate
information. There are four levels of notification used to call attention to important or useful information. These notifications take the following forms:
1
✓
!
✓
!
CAUTION
A CAUTION informs you of possible equipment damage or loss of data and
how to avoid them.
Promise Technologies Pegasus J4User Manual
J4 Description
The Pegasus J4 from PROMISE Technology is a high-performance direct attached storage JBOD system
featuring Intel® Thunderbolt™ connection technology. The J4 system is perfect for use in non-linear editing
of digital media or other data storage applications where very high throughput and very low latency is
required. The compact and efficient design of the J4 means it is easy to pack up and transport, so it is wellsuited for use paired with a Thunderbolt ready computer to use as a mobile video editing station.
There are two versions of the J4 available, a plug and play version that includes installed storage drives
that are configured for immediate use; and a DIY version that requires installation of four 2.5” SATA drives
(HDD or SSD). Once the drives are installed in the DIY version, the four storage disks are configured for
RAID operation using the Disk Utility in the Macintosh OS or in Windows OS. Both versions of the J4
require a Thunderbolt cable (not included) for use with a Thunderbolt ready computer.
There is a device driver for the Thunderbolt connection required for installation plus an optional software
J4 Firmware Updater for device monitoring and firmware updates. The device driver is available for Mac OS
using the Mac OS update procedure. The disks can be arranged as a striped RAID set, a mirrored RAID set,
a JBOD set, or in a combination of these options.
The two Thunderbolt ports on the J4 mean that it can be daisy-chained with other Pegasus devices or
other Thunderbolt ready devices, including a display. The daisy-chain connection of all Thunderbolt devices
functions at full speed regardless of whether or not the other devices are powered on.
Client OS Support
The following client operating systems support the Pegasus unit:
• Mac OS 10.7 and higher
• MacBook Pro/ iMac Software Update 1.5
Utility OS Support
The following client operating systems support the Promise Utility:
• Mac OS 10.7 and higher
• MacBook Pro/ iMac Software Update 1.5
✓
!
2
CAUTION
The electronic components within the device are sensitive to damage from
Electro-Static Discharge (ESD). Observe appropriate precautions at all times when
handling this device or its subassemblies.
Promise Technologies Pegasus J4User Manual
Specifications
Feature
2.5” Storage Disks
Check online for the latest list at: www.promise.com
Capacity
Depends on the size of the storage drives installed.
Power supply
System Fan
RAID function
OS Support
HW monitoring
Temperature
Humidity
Dimensions
Weight
Safety
3
Pegasus J4
AC Input: 100-240V 47-63Hz, DC Output 12V (11.4V - 12.6V)
12V DC 60 mm x 60 mm x 15 mm blower with PWM control, operation voltage: 6V - 13.8V
The J4 does not include an embedded RAID controller. All RAID setup is done through the OS. In Macintosh, use the Disk
Utility to configure the J4 in a RAID 0 or RAID 1.
Mac OS X 10.7 & 10.8
The J4 is shipped with a software installation package to install a hardware monitoring software on the host system. The J4
Firmware Updater software monitors Voltage, Temperature, the System Fan and Physical Drive status.
Operating: 0° ~ 35° C
Operating: 10% ~ 90% non-condensing Storage: 5% - 95% non-condensing
13.1 x 10.7 x 4.33 inch
3.52lbs (not including HDD)
UL/CSA/CE/TUV
Promise Technologies Pegasus J4User Manual
Hardware Description
Front
The front of the J4 displays various LED indicators used to monitor the system. Be sure to place the device in a location where the LEDs can be seen.
System
Status
Thunderbolt Link
Disk Status & Activity
Air Flow
Air intake vent
behind bottom of face plate
Front Panel Features
LED
Description
System Status The System Status indicator uses a color-coded reference system for monitoring the general operating health of the device. Blue means the system is
awake and normal, and Amber means the system is in stand by mode. This will be dark when the device is powered off.
Thunderbolt Link Status The LED indicators in the shape of the Thunderbolt symbol are the link indicators for the Thunderbolt ports. This will light Blue when a device is
connected, otherwise it remains dark.
Disk Status and Activity Disk status LEDs are also color-coded and indicate the current health status of the physical hard drives. Blue is normal, while Amber indicates a critical
fault. Use the J4 monitoring software to get more detailed information about the disk status of the J4. The LEDs are number 1-4, read from left to right
(HD#1 is the left most, HD#4 is the right most). To see how the physical drives are numbered, refer to the illustration “J4 top view with housing removed”
on page 23.
4
Promise Technologies Pegasus J4User Manual
Back
The back of the J4 is where the power and Thunderbolt connections are made. It includes the power button, a cooling exhaust vent.
Rear Panel Features
Power
button
Power
receptacle
Cooling exhaust vent
Thunderbolt ports
Air Flow
Feature
Air Flow
Description
Power Button Press lightly to power on the J4. To shut down the device, press and hold the power button for 5 seconds to initiate a controlled system shut down power off.
Power Receptacle Use only the power cord shipped with the device to connect the J4 power. Insert one end of the power cord into the power receptacle and insert the other end
into a suitable power source such as a wall outlet or a power strip.
Cooling Exhaust Vent The cooling vent on the back should be clear and unobstructed to allow proper airflow for disk and system cooling. Note that the air intake vents should also be
unobstructed. These are located on the bottom of the device at the front and on both sides.
Thunderbolt Ports Use a Thunderbolt cable to connect the J4 to a Thunderbolt ready computer. This connection completes the physical link to the J4, it is the path through which
the SATA link is established. Make sue the connector is oriented so that the Thunderbolt logo is facing down, i.e. on the underside of the connector, then
insert the connector into the port, pushing it strait in. Make sure the connector is pushed in so that the connector housing touches the back panel of the J4.
The J4 has two ports in order to allow the other port to be connected to a Thunderbolt display device, or to be daisy-chained another Pegasus attached storage
device. See “Daisy-Chaining Multiple Units” on page 25 for illustrations and instructions to daisy-chain two or more J4 units. The connection to other devices
does not require that the J4 be powered on, it functions at full speed for the other attached devices even if the J4 is not running.
5
Promise Technologies Pegasus J4User Manual
Bottom View
Top View
Air Flow
Bottom of J4
air intake
Top of J4
bottom front
top rear
air
air
intake
intake
Air Flow
Air Flow
right
side
left
side
bottom rear
!
6
CAUTION
top front
Air intake vents located on the bottom must allow free flow of air into the housing for
hard disk and system cooling.
Promise Technologies Pegasus J4User Manual
Installation and Setup
Unpacking the Pegasus J4
This chapter contains the following topics:
• “Unpacking the Pegasus J4”
The Pegasus box contains the following items:
• Pegasus J4 unit
• Quick Start Guide
• Product CD
• Power cord (1.5 m)
• “Install Hard Disks” on page 8 (for DIY version only)
• “Connecting the Power and Thunderbolt Cables” on page 10 (for all versions of J4)
• “Power on the Pegasus” on page 12
• “Shutting down the Pegasus” on page 12
• “Installing the Device Driver” on page 13
• “Installing the J4 Firmware Updater” on page 13
CAUTION
The electronic components within the Pegasus J4 enclosure are sensitive to
damage from Electro-Static Discharge (ESD). Observe appropriate precautions at
all times when handling the J4 and storage drives
7
Promise Technologies Pegasus J4User Manual
Install Hard Disks
The DIY version of the J4 requires installation of four storage disks and configuration of the RAID array.
Follow the instruction in the section if your J4 does not already have storage disks installed. If you have the
plug and play version with drives installed, skip ahead to “Connecting the Power and Thunderbolt Cables”
on page 10. For information on what SATA storage to install, please go to the PROMISE website at:
www.promise.com click on Support then Download Center, use the pull-down menu to locate the Pegasus
J4, and click on the Compatibility link in the field below for a list of compatible drives.
✓
Remove housing cover
1. Make sure the J4 is powered off, detach the power cable and remove any attached Thunderbolt cables.
3. Use a small Phillips screwdriver to remove the five screws that secure the top housing.
2. Turn the J4 upside down and place it on a clean, dry, table, or similar flat stable surface. Be careful not
to scratch the housing.
4. Hold the loosened housing top in place and turn the J4 back to the normal position (bottom facing
down). Place it on the table a lift the housing top so that it detaches completely from the J4 chassis.
Four empty storage drive bays should be visible.
Remove screws (J4 bottom)
8
J4 top view housing top removed
Promise Technologies Pegasus J4User Manual
Insert storage drives
Replace housing cover
5. Place a new storage drive into an empty bay with the contact edge ready to receive the contacts in the
drive bay and oriented so the top side is facing up (the top has a label with specifications and other
information about the drive). With the drive in position, push with your fingers on the edge opposite
the drive contacts until the drive is firmly seated in the drive bay.
8. Replace the housing top into its proper positing.
9. Hold the unsecured housing in place and turn the J4 upside down once more.
10. Replace the screws and snug them tight. The J4 is now ready to be connected and powered on.
6. Attach the anchor screw to secure the drive in place.
7. Repeat steps 5 and 6 for each remaining hard drive.
Insert storage drive
drive anchor screw
9
Top view of J4 with housing cover
Promise Technologies Pegasus J4User Manual
Connecting the Power and Thunderbolt Cables
Follow the instructions below to connect the Thunderbolt™ cable and power cord.
To power the Pegasus unit:
1. Attach the power cord including with the J4 to the power receptacle on the rear panel. Plug the other
end into a suitable power source.
2.
Connect one end of the Thunderbolt cable to either Thunderbolt port on the back of J4. It should be
oriented so that the Thunderbolt symbol printed on the connector housing faces down, that is , so that
the symbol is on the underside of the connector when it is lined up with the port. Insert the connector
into the port so the edge of the connector housing touches the rear panel facing of the J4.
3. Connect the other end of the Thunderbolt cable to a computer equipped with a Thunderbolt port.
Note that the orientation of the Thunderbolt port on the computer might be different than that of the
J4. Make sure the connector is lined up properly before pushing it into the port on the computer.
See “Power and Thunderbolt connections” on page 11.
Connect power cable
10
✓
Promise Technologies Pegasus J4User Manual
Power and Thunderbolt connections
Computer
Power Cable
J4 Power Cable
Thunderbolt Cable
Step 2.
Step 1.
Attach the power cord to the power
receptacle on the rear panel of
the J4. Plug the other end into a
suitable power source.
✓
11
Connect one end of the Thunderbolt
cable to either Thunderbolt port
on the rear panel of the J4. Note
that the Thunderbolt connector
housing should be oriented so that
the Thunderbolt symbol is facing
down when connecting it to the J4.
Step 3.
Connect the other end of the
Thunderbolt cable to a Thunderbolt
equipped computer. Be sure the
connector is oriented properly for
the system it is being attached
to. The Thunderbolt port on the
computer might have a different
orientation than on the J4.
Promise Technologies Pegasus J4User Manual
Power on the Pegasus
1. Follow the instructions “Connecting the Power and Thunderbolt Cables” on page 10 to connect the
power cable.
2. Once the Thunderbolt connection is established it will be detected automatically and the J4 will power
on. Check the LED indicators on the front to verify that the device is functioning properly.
It takes about 30 seconds for the device to fully boot up. After booting, the LEDs should behave as follows:
• The Status LED lights blue
• The Thunderbolt link LEDs light blue for any connected port
System
Status
Thunderbolt
Link
• The Disk Status LEDs light blue
Shutting down the Pegasus
To shut down the Pegasus unit, press and hold the power button for about 5 seconds, until the System
Status LED goes dark, indicating the system is powered off.
12
Shut down the J4
Disk Status & Activity
Promise Technologies Pegasus J4User Manual
Installing the Device Driver
Follow the driver install instructions according to the operating system used on your computer.
Installing the J4 Firmware Updater
Follow the installation instructions for the Updater software according to the operating system used on
your computer.
OS Support
OS Support
The following operating systems support the Pegasus J4 device driver for the Thunderbolt connection:
• Mac OS 10.7.x
The following operating systems are supported:
• Mac OS 10.7.x
• MacBook Pro/ iMac Software Update 1.5
• MacBook Pro/ iMac Software Update 1.5
Driver Installation: Macintosh
MacBook Pro/iMac Software Update
To install the driver software onto your computer:
1. Insert the Product CD into the DVD drive, or download the driver from the PROMISE website.
2. The Welcome menu appears.
3. Click the Driver button. The Install dialog box appears.
4. Click the Install button. The password dialog box appears.
5. Type your password in the field provided and click the OK button.
6. The Confirmation dialog box appears to inform you that you must restart your computer when
installation is done.
7. Click the Continue Installation button to begin installation. In a few moments the Install Succeed
dialog box appears.
8. Click the Restart button to restart your computer.
When the computer has restarted, it is ready to work with the Pegasus unit.
✓
To check your software version:
1. On the MacBook Pro or iMac desktop, click the
Apple icon and choose
Software Update... from the dropdown menu.
The Software Update dialog box opens.
2. Look for MacBook Pro / iMac Software Update 1.5
• If MacBook Pro / iMac Software Update 1.5 appears
in the list, click the Install Items button and wait
for the installation to finish.
• If MacBook Pro / iMac Software Update 1.5 does
NOT appear in the list, the update has already
been installed on your computer. Go to “Driver
Installation: Macintosh” on page 11.
13
Software Update dialog box
Promise Technologies Pegasus J4User Manual
Software Installation: Macintosh
To install the Updater software onto your computer:
1. Insert the Product CD into the DVD drive.
2. The Welcome menu appears.
3. Click the Firmware Updater button. The Install dialog box appears.
4. Click the Install file button. The password dialog box appears.
5. Type your password in the field provided and click the OK button. In a few moments the Install
Succeeded menu appears.
6. Click the Close button to quit the installer.
The installer adds an icon labeled “Pegasus J4 FW Updater” to the Applications folder. See “Using the
J4 Firmware Updater” on page 20 for instructions to use the Updater and a description of the software
interface.
To launch the Pegasus J4 Firmware Updater, open the Applications folder and double-click on the
Pegaus J4 FW Updater icon.
✓
14
https://support.promise.com/userRegistration.aspx
Launch J4 Firmware Updater application in Applications folder
Promise Technologies Pegasus J4User Manual
Configure the Hard Disks
Once the device drive is installed, the four hard disks installed in each unit appear as four separate individual
drives to the operating system. The disks are ready to be formatted and used as four separate disks or used in
a RAID set. Follow the instructions here if you are setting up the J4 for the first time, if you want to change
the current configuration, or if you are installing new or different hard drives (see “Changing a Hard Drive”
on page 23).
Hard disk configuration on the J4 on a Macintosh is summed up in two general steps:
1. Opening the Mac Disk Utility.
2. Using the Disk Utility to create a RAID set or concatenated disks (JBOD).
Use the Disk Utility to create one of the following:
• A JBOD “Create a concatenated disk set” on page 16
• A striped RAID (RAID 0) set “Create a striped RAID set” on page 16
• A mirrored RAID (RAID 1) set “Create a mirrored RAID set” on page 17
It is also possible to create a combined or hybrid RAID set that combines two of the available RAID
set options. See “Combine RAID sets” on page 17 for an example of how to set up a RAID 10 set that
combines the benefits of a striped RAID and a mirrored RAID set.
✓
15
Mac OS Disk Utility
The Disk Utility on a Mac OS computer is located in the Utility folder. This is normally located in the
Applications folder, unless it has been moved. The Disk Utility is used to format hard drives, to mount or
unmount drives, to configure RAID sets (discussed below) to rebuild a RAID set, to delete a RAID set, or
to troubleshoot various problems that might arise with hard drives that are installed on the computer or
attached to it.
Mac OS Disk Utility path
Promise Technologies Pegasus J4User Manual
Create a striped RAID set
Disk Utility
A striped RAID set (also called “RAID 0”) is used when high performance is required for the application used to access the data on the disks.
For example, if the data contained on the J4 will be used primarily for video editing, a striped RAID is preferable because non-linear media
editing requires access to data at a speed that cannot normally be achieved with a mirrored RAID set. Note that if any disk on a RAID 0 set fails
or is removed from the set, ALL DATA on the RAID will be lost. Be sure to back up important data contained on a RAID 0 set.
To create a striped RAID set:
1. Open Disk Utility, in the Utilities folder.
2. Select one of the disks that you want in the set, and then click RAID.
3. Click Add (+), and type a name for the RAID set.
4. Choose a format from the Format pop-up menu, and then choose Striped RAID Set from the RAID Type pop-up menu.
5. Drag the disks you want to add to the set to the list on the right.
6. Click the Options button to specify an optimal storage block size for the data stored.
Set the block size to match the size of data stored on the set. For example, a video processing application require fast throughput of large
amount of data, so a larger block size might be best.
7. Click Create.
✓
Create a concatenated disk set
A concatenated RAID set (also called “Just a Bunch of Disks” or JBOD).
1. Open Disk Utility, in the Utilities folder.
2. Select one of the disks that you want in the set, and then click RAID.
3. Click Add (+), and type a name for the RAID set.
4. Choose a format from the Format pop-up menu. Usually you’ll choose the Mac OS Extended (Journaled) format.
5. Choose Concatenated Disk Set from the RAID Type pop-up menu.
6. Drag the disks you want to add to the set to the list on the right.
7. Click Create.
16
RAID configuration
Promise Technologies Pegasus J4User Manual
Create a mirrored RAID set
Protect your data against hardware failure with a mirrored RAID set (also called “RAID 1”). It writes your
data to two or more disks so that each disk in the set contains the same data as every other disk.
You can’t create RAID set that contains partitions on your startup disk. To create a RAID disk that contains
partitions on that disk, you must first start up your computer from another disk or the Mac OS X installation
disc.
1. Open Disk Utility, in the Utilities folder.
2. Select one of the disks that you want in the set, and then click RAID.
3. Click Add (+), and type a name for the RAID set.
4. Choose a format from the Format pop-up menu, and then choose Mirrored RAID Set from the RAID
Type pop-up menu.
Delete a RAID set
You can delete a RAID set if you want to use it for another task.
To remove a disk from a striped RAID set or concatenated disk set, you must delete the set first. You can
remove disks from a mirrored RAID set without deleting it.
Always back up any important files before you delete the set. Deleting a striped RAID set or concatenated
disk set erases all the disks in it. Deleting a version 2.0 mirrored RAID set leaves a copy of the set’s files one
each disk, but you should back up important files as a precaution.
1. Back up any important files.
2. Open Disk Utility, in the Utilities folder.
3. Select a disk in the set you want to delete, and click RAID.
5. Drag the disks you want to add to the set to the list on the right.
4. Select the RAID set.
6. For each disk, select it, and then choose its type from the RAID Type pop-up menu.
5. If you’re deleting a mirrored set and you see a Convert button, click it to convert the RAID set from a
version 1.0 to a version 2.0.
• To use the disk as a mirror at all times, choose RAID Slice.
• To use the disk as a mirror only when another disk fails, choose Spare. A disk can be a spare in only
one RAID set.
If a disk in the set fails and you have no spares, you must add a new disk to the RAID set in Disk Utility
to return to the original number of disks.
7. To rebuild disks automatically when they’re disconnected then reconnected, click the Options button,
select RAID Mirror AutoRebuild, and then click OK.
If you don;t choose to rebuild disks automatically, you must rebuild them yourself in Disk Utility.
8. Click Create.
Rebuild a mirrored RAID set
If the AutoRebuild option is not used, it will be necessary to rebuild a mirrored RAID set when the J4 is
restarted or reconnected. Follow these instructions to initiate a rebuild of a mirrored RAID set.
1. Open Disk Utility, in the Utilities folder.
2. Select the RAID set and click RAID.
3. Click Rebuild.
17
6. Click Delete.
If a RAID set fails
Disk Utility monitors the status of the disks in a RAID set. If you see a message that a disk is missing or
has failed, there are several things you can try to solve the problem.
• If a disk is missing, make sure it’s connected to power, turned on, and connected to your computer.
You might need to disconnect and reconnect it.
• Use the First Aid pane to repair the RAID set.
• In some cases, you might need to quit and reopen Disk Utility or restart your computer, and then
check the RAID set.
• If yo are using a striped RAID set, delete the damaged RAID set. Your data will be lost. Be sure to back
up the disks in your RAID set and other data regularly.
• If you have a persistent problem with a disk in a mirrored RAID set, you may need to replace it. After
you the damaged disk, click Rebuild to rebuild the RAID set.
Combine RAID sets
Combine different RAID sets to combine their benefits. For example, create two equal sized striped RAID
(RAID 0) disks, then use these two RAID 0 disks to create a mirrored RAID (RAID 1) set. This type of
combined RAID configuration is known as RAID 10 because it combines the speed of RAID 0 with the
redundancy of RAID 1.
First create the smaller RAID 0 sets, then create a RAID 1 set from the two RAID 0 sets. Note that before
the RAID 0 sets can be used to create the RAID 1 set, they each must first be unmounted.
See the example below for instructions to set up a RAID 10 configuration using 4 identical hard disks.
Promise Technologies Pegasus J4User Manual
Configuration Example - Create a RAID 10 set
Create striped RAID sets
1. Open Disk Utility, in the Utilities folder.
2. Select one of the disks that you want in the set, and then click RAID.
3. Click Add (+), and type a name for the RAID set.
4. Choose a format from the Format pop-up menu, and then choose Striped RAID Set from the RAID Type pop-up menu.
5. Drag two disks to the list on the right.
6. Click the Options button to specify an optimal storage block size for the data stored.
Set the block size to match the size of data stored on the set. For example, a video processing application require fast throughput of large amount
of data, so a larger block size might be best.
7. Click Create.
8. Repeat steps 1-7 for the remaining two disks.
There should now be two striped RAID sets visible. In order to create a striped RAID with these RAID 0 sets, it is necessary to unmount the RAID
sets.
9. Select one of the striped RAID sets and click on the Unmount button. Repeat this for the other striped RAID set.
Unmount striped RAID sets
10. Select one of the unmounted striped RAID sets, and click RAID.
11. Click Add (+), and type a name for the combined RAID set.
12. Choose a format from the Format pop-up menu, and then choose Mirrored RAID Set from the RAID Type pop-up menu.
13. Drag each of the striped RAID sets to the list on the right to add them to the combined RAID set.
14. For each disk, select it, and then choose RAID Slice from the RAID Type pop-up menu.
15. To rebuild disks automatically when they’re disconnected then reconnected, click the Options button, select RAID Mirror AutoRebuild, and
then click OK.
16. Click Create.
18
Combined RAID set (RAID 10)
Promise Technologies Pegasus J4User Manual
What is RAID?
RAID 0 or Striped RAID using all four disks on the J4
The Mac disk utility is used to create a file system for the physical drives in the J4. The section “Configure the
Hard Disks” on page 15 provides a description of the procedures to create different RAID configurations.
Alternatively, you can simply create a file system for the disks and continue the default JBOD (Just a Bunch
of Disks) disk arrangement where each installed physical drive appears as a separate physical drive in Finder.
RAID Type
RAID 0
Stripe
Description
Data is split evenly across multiple disks, striping with no parity, no mirroring, no
error checking and no redundancy. A disk failure will destroy the array and the
probability of failure increases with the number of disk added to the array. Data
blocks are written to their respective disks simultaneously on the same sector.
This allows smaller sections of the entire chunk of data to be read off the drive in
parallel, increasing bandwidth. More disks in the array provides higher data transfer
rates, but with a greater risk of data loss. Data stored on a RAID 0 device must be
backed up on another system or the data will be lost permanently in the event of
any disk failing in the RAID 0 array.
Storage space added to the array by each disk is limited to the size of the smallest
disk, so the installed disks should be the same size. Stripe size is normally a
multiple of the hard disk sector size.
A RAID 0 array is useful for non-critical data that changes infrequently and is
frequently backed up where redundancy is unnecessary or irrelevant and when
excellent read/write performance is desirable such as audio or video streaming or
editing applications.
RAID 1
Mirror
Creates an exact copy (mirroring without parity or striping) of a set of data on two
or more disks. Used when reliability is more important than storage capacity. Can
only be as big as the smallest member disk and can only use an even number
of disks. One disk can remain inactive, as a backup and be used to rebuild the
mirrored disk.
RAID 10
Mirror / Stripe
Mirror + Stripe combines both of the RAID 1 and RAID 0 logical drive types. RAID
10 can increase performance by reading and writing data in parallel or striping,
while protecting data by duplicating it or mirroring.
A RAID 10 configuration can be created in a single J4 unit where two RAID 0
arrays — each consisting of two individual physical drives — are mirrored to
each other in a RAID 1 configuration. Alternatively, two separate J4 units — each
configured initially as a RAID 0 array — can be configured in a mirrored RAID 1 set
thus creating a RAID 10 with two J4 units.
19
RAID 1 or Mirrored RAID creates an exact copy
Promise Technologies Pegasus J4User Manual
Using the J4 Firmware Updater
The J4 includes software used to monitor the hardware and system status, change settings and upgrade
firmware. If you have not yet installed the software, it is recommended to do so. See “Installing the J4
Firmware Updater” on page 13 for instructions on how to install the monitoring software.
Launch the software by clicking on the Promise Utility icon in your Applications folder.
Use the Updater to troubleshoot the J4 and to monitor hardware status in the following categories:
• Voltage
• Temperature
• Cooling Unit (system fan)
• Physical Drive
A green check mark indicates normal function. A yellow check mark indicates a problem. A red check
mark indicates a critical failure.
Additional information you can find listed in the J4 Updater are Version Information (including firmware
version), the Physical Drive List displays basic information about the installed drives, and the Enclosure
Information field displays hardware information including internal Temperature, Voltage and Fan rpm.
In addition, there are icons at the top of the menu to view a virtual Front View and Back View of the J4.
For instructions on using the Auto Shutdown feature for power saving, see “Auto Shutdown powering
saving feature” on page 21. For instructions on how to update system firmware, see “Updating Firmware”
on page 21.
To launch the Pegasus J4 Firmware Updater, open the Applications folder and double-click on the
Pegaus J4 FW Updater icon.
20
Promise Utility screen
Promise Technologies Pegasus J4User Manual
Auto Shutdown powering saving feature
The J4 Auto Shutdown feature is used to shut off the device after it sits idle for 15 minutes.
To enable this feature, do the following:
1. Launch the Pegasus J4 Firmware Updater application.
Utility Settings menu
2. Click on the Settings icon at the top of the J4 Updater interface
3. Click to place a check mark in the Auto Shutdown option box.
4.
Click on the Submit button.
Updating Firmware
Use the Promise J4 Firmware Updater application to update system firmware. If you have not yet installed
the application, see “Installing the J4 Firmware Updater” on page 13.
You will need the latest firmware file. Please go to the PROMISE website at: www.promise.com click
on Support then Download Center, use the pull-down menu to locate the Pegasus J4, and click on the
Firmware link in the field below to see what version is available. You can check your installed version listed
under Version Information in the J4 Updater main menu.
To update firmware on the J4, follow these steps:
1. Launch the Pegasus J4 Firmware Updater (open the Applications folder and double-click on the
Pegaus J4 FW Updater icon).
2. Click on the Firmware Update icon.
3. In the Firmware Update menu, click on the Choose File button, in the pop-up menu, locate the
downloaded firmware file on your system and click the Submit button. The chosen file appears listed
in the update menu.
21
Firmware Update menu
Promise Technologies Pegasus J4User Manual
4. Click the Next button. A pop-up menu appears for confirmation of the update. If you want to continue
to install the firmware, type the word “confirm” in the space provided and click on the Confirm
button. Note that the update will take a few minutes, during which time the J4 must not be turned off
and cannot be used.
5. When the firmware update process is completed, a dialog box appears informing you that the Flashing
completed, click on the OK button. The J4 is now updated.
22
Confirm update
Firmware update complete
Promise Technologies Pegasus J4User Manual
Changing a Hard Drive
3. Use a small Phillips screwdriver to remove the five screws that secure the top housing. Note that the
single screw at the bottom rear is longer than the four screws on the bottom sides. Do not misplace
the screws.
4. Hold the loosened housing top in place and turn the J4 back to the normal position (bottom facing
down). Place it on the table a lift the housing top so that it detaches completely from the J4 chassis.
The installed hard disks should be visible.
Follow the instructions below to change a hard disk.
CAUTION
The electronic components within the Pegasus J4 enclosure are sensitive to damage
from Electro-Static Discharge (ESD). Observe appropriate precautions at all times
when handling the J4 and storage drives.
5. Place the detached housing top nearby. It is a good idea to place the screws you just removed in the
overturned housing shell for safe keeping.
6. To remove a hard drive, first remove the anchor screw that secures the drive in the bay.
7. Use a thumb to push the black flexible lever so the hard drive is pushed away from the drive contacts.
It should not require much force to pop the disk out. Take away the freed disk.
Remove Drive
1. Make sure the J4 is powered off, detach the power cable and remove any attached Thunderbolt cables.
2. Turn the J4 upside down and place it on a clean, dry, table, or similar flat stable surface. Be careful not
to scratch the housing.
J4 top view with housing removed
J4 bottom view
front
top front
left
right
side
side
HD#1
top
top
HD#2
left side
HD#3
rear
top rear
23
HD#4
right side
Promise Technologies Pegasus J4User Manual
✓
3. Secure the drive in the bay with the drive anchor screw.
4. Replace the housing top into its proper positing.
5. Hold the unsecured housing in place and turn the J4 upside down once more.
Insert Replacement Drive
1. Place the new hard drive into the empty bay with the contact edge ready to receive the contacts in the
drive bay and oriented so the top side is facing up (the top has a label with specifications and other
information about the drive).
2. With the drive in position, push with your fingers on the edge opposite the drive contacts until the
drive is firmly seated in the drive bay.
Gently push in HD place and anchor with screw
top front
HD#1
HD#4
top
left side
top
HD#2
right side
HD#3
top rear
24
6. Replace the screws that hold the housing in place and snug them tight.
7. Place the J4 where you need it and attach the power and Thunderbolt cables. The J4 is ready for use
with the new drive. Go to “Configure the Hard Disks” on page 15 for instructions on formatting the
new drives.
Replace drive anchor screw
Promise Technologies Pegasus J4User Manual
Daisy-Chaining Multiple Units
Up to six Pegasus J4s can be connected or “daisy-chained” together. The number of devices in the daisy-chain does not affect performance. In addition, not all devices need to be powered on for the Thunderbolt
connection to operate. So if the stack is connected to a display, only the Mac and display need to be powered on to use the computer and display. There is no need to unplug the existing Thunderbolt connections when the
Pegasus J4 stack is not being used.
The daisy-chained stack
can connect to
Thunderbolt-ready
display monitor
✓
25
Promise Technologies Pegasus J4User Manual
Support Information
• Contacting Technical Support (below)
• Limited Warranty
• Returning Product For Repair
To view FAQ and information useful for trouble shooting, please visit the Promise Knowledge Base website
at http://kb.promise.com/ and locate the product line or use the keyword search function.
Contacting Technical Support
PROMISE Technical Support provides several support options for PROMISE users to access information
and updates. We encourage you to use one of our electronic services, which provide product information
updates for the most efficient service and support.
PROMISE E-Support: https://support.promise.com
When you contact us, please have the following information available:
• Product model and serial number
• BIOS, firmware, and driver version numbers
• A description of the problem/situation
• System configuration information, including: motherboard and CPU type, hard drive models, SAS/
SATA/ATA/ATAPI drives & devices, and other controllers.
26
✓
✓
https://support.promise.com/userRegistration.aspx
Promise Technologies Pegasus J4User Manual
Limited Warranty
PROMISE Technology, Inc. (“PROMISE”) warrants that this product, from the time of the
delivery of the product to the original end user:
a. all components for a period of two (2) years;
b. will conform to PROMISE’s specifications;
c. will be free from defects in material and workmanship under normal use and service.
This warranty:
a. applies only to products which are new and in cartons on the date of purchase;
b. is not transferable;
c. is valid only when accompanied by a copy of the original purchase invoice;
d. Is not valid on spare parts.
This warranty shall not apply to defects resulting from:
a. improper or inadequate maintenance, or unauthorized modification(s), performed
by the end user;
b. operation outside the environmental specifications for the product;
c. accident, misuse, negligence, misapplication, abuse, natural or personal disaster,
or maintenance by anyone other than a PROMISE or a PROMISE-authorized
service center.
Disclaimer of other warranties
This warranty covers only parts and labor, and excludes coverage on software items as
expressly set above.
Except as expressly set forth above, PROMISE DISCLAIMS any warranties, expressed
or implied, by statute or otherwise, regarding the product, including, without limitation,
any warranties for fitness for any purpose, quality, merchantability, non-infringement,
or otherwise. PROMISE makes no warranty or representation concerning the suitability
of any product for use with any other item. You assume full responsibility for selecting
products and for ensuring that the products selected are compatible and appropriate for
use with other goods with which they will be used.
PROMISE DOES NOT WARRANT that any product is free from errors or that it will
interface without problems with your computer system. It is your responsibility to back up
or otherwise save important data before installing any product and continue to back up
your important data regularly.
No other document, statement or representation may be relied on to vary the terms of this
limited warranty.
27
PROMISE’s sole responsibility with respect to any product is to do one of the following:
a. replace the product with a conforming unit of the same or superior product;
b. repair the product.
PROMISE shall not be liable for the cost of procuring substitute goods, services, lost
profits, unrealized savings, equipment damage, costs of recovering, reprogramming, or
reproducing of programs or data stored in or used with the products, or for any other
general, special, consequential, indirect, incidental, or punitive damages, whether in
contract, tort, or otherwise, notwithstanding the failure of the essential purpose of the
foregoing remedy and regardless of whether PROMISE has been advised of the possibility
of such damages.
PROMISE is not an insurer. If you desire insurance against such damage, you must obtain
insurance from another party.
Some states do not allow the exclusion or limitation of incidental or consequential damages
for consumer products, so the above limitation may not apply to you.
This warranty gives specific legal rights, and you may also have other rights that vary from
state to state. This limited warranty is governed by the State of California.
Your Responsibilities
You are responsible for determining whether the product is appropriate for your use and
will interface with your equipment without malfunction or damage. You are also responsible
for backing up your data before installing any product and for regularly backing up your
data after installing the product. PROMISE is not liable for any damage to equipment or
data loss resulting from the use of any product.
Promise Technologies Pegasus J4User Manual
Returning Product For Repair
If you suspect a product is not working properly, or if you have any questions about
your product, contact our Technical Support Staff through one of our Technical Services,
making sure to provide the following information:
• Product model and serial number (required)
• Return shipping address
• Daytime phone number
• Description of the problem
• Copy of the original purchase invoice
The technician will assist you in determining whether the product requires repair.
If the product needs repair, the Technical Support Department will issue an RMA (Return
Merchandise Authorization) number.
✓
Return ONLY the specific product covered by the warranty (do not ship cables, manuals,
diskettes, etc.), with a copy of your proof of purchase to:
USA and Canada: PROMISE Technology, Inc.
Customer Service Dept.
Attn.: RMA # ______
47654 Kato Road
Fremont, CA 94538
Other Countries: Check PROMISE E-Support at https://support.promise.com or the store where the user purchased the product:
Contact the office or repair depot for full instructions before shipping the product.
28
You must follow the packaging guidelines for returning products:
• Use the original shipping carton and packaging
• Include a summary of the product’s problem(s)
• Write an attention line on the box with the RMA number
• Include a copy of proof of purchase
You are responsible for the cost of insurance and shipment of the product to PROMISE.
Note that damage incurred due to improper transport or packaging is not covered under
the Limited Warranty.
When repairing returned product(s), PROMISE may replace defective parts with new or
reconditioned parts, or replace the entire unit with a new or reconditioned unit. In the event
of a replacement, the replacement unit will be under warranty for the remainder of the
original warranty term from purchase date, or 30 days, whichever is longer.
PROMISE will pay for standard return shipping charges only. You will be required to pay
for any additional shipping options (such as express shipping).
©2012 Promise Technology, Inc.
29