1
SOUND CARD MANUAL
Quick Start Guide
©2009 Diamond Multimedia. All rights reserved. p/n: 40042
version 7.0
BLANK
Safety Notices
Please read through the following safety tips to ensure for a safe
and proper installation of this product.
Please make sure to read all the instructions
thoroughly before attempting the installation
of this sound card.
• Do not attempt to install this product during an
electrical storm.
• Make sure your computer system is connected
to a properly grounded power outlet.
• Touching the exposed metal part of your
computer case (on the rear side) will discharge static electricity from your body.
We recommend you perform this step before
touching this product or any part inside
your computer and periodically while working
inside your PC.
• Internal Boards may contain “Lead” which may
cause cancer, birth defects and other
reproductive harm. Please wash your hands
thoroughly after handling these products.
This notice is required under California ” proposition 65 “ and
Health & Safety code.
Package Contents
Please verify your package contains the following items.
1.
2.
3.
4.
Xtreme Sound PCI Card
Installation CD
Quick Start Guide
Warranty Card
Before You Begin
Please have the following items available prior to the installation
1. System / Motherboard manual (or working knowledge)
2. A philips head screwdriver
3. Can of compressed air (optional, recommended for upgraders)
PAGE 1
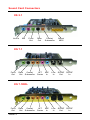
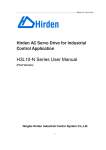
Sound Card Connectors
XS 5.1
Line In
Mic
Front
Out
Rear
Out
Center/
Subwoofer
Game/
MIDI
XS 7.1
Front
Out
Rear
Center/
Out Subwoofer
ALT
MIC
Center In
Line
In
S/PDIF S/PDIF
Out
In
ALT
MIC
Center In
Line
In
S/PDIF S/PDIF
Out
In
XS 7.1DDL
Front
Out
PAGE 2
Rear
Center/
Out Subwoofer
Hardware Installation
Please consult your systems user guide for exact instructions
regarding opening the computer case and installing new cards.
1. With the computer power turned OFF disconnect the power
cable from the computer.
2. Open the computer case following the instructions from your
system manufacturer.
3. Locate an available PCI slot on the motherboard.
4. Insert the Xtreme Sound PCI card into the slot that you
located in step 3.
5. Screw the metal bracket into place.
6. Close the computer case.
7. Reconnect any loose cables (Power, mouse, keyboard, etc.)
8. Connect your speakers to the sound card.
Refer to the diagram on the previous page.
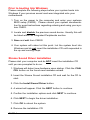
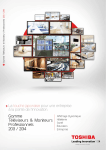
Selecting the placement of your speakers
Use the following diagram for a basic guideline to help assist in
arranging the placement of your speakers.
PAGE 3
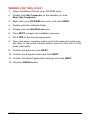
Prior to booting Into Windows
Please complete the following steps before your system boots into
Windows if your previous sound card was integrated onto your
motherboard.
1. Turn on the power to the computer and enter your systems
BIOS setup (CMOS). Please consult your system documentation for exact instructions regarding entering and using your system CMOS.
2. Locate and disable the previous sound device. Usually this will
be listed within an Integrated Peripherals section.
3. Save and exit from CMOS.
4. Your system will reboot at this point. Let the system boot into
Windows and do not insert the installation CD until requested in
the up and coming steps.
Xtreme Sound Driver Installation
Please start your computer and do NOT insert the installation CD
until you are prompted to do so.
1. Windows will detect new hardware upon startup. Click the CANCEL button on the found new hardware wizard.
2. Insert the Xtreme Sound installation CD and wait for the CD to
start.
3. Click the Install Sound Driver button.
4. A wizard will appear. Click the NEXT button to continue.
5. Confirm the installation options and click NEXT to continue.
6. Click NEXT to begin the driver installation.
7. Click OK to reboot the system.
8. Remove the installation CD.
PAGE 4
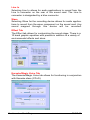
Application Installation
The following steps are optional and not required for the general
use of the Xtreme Sound card.
Audacity
Audacity is a sound editing tool that can edit MP3, WAV and other
popular sound types. You can use it to cut parts from songs, mix
songs together, fade in/out, increase / decrease
volume and more!
1.
Insert the installation CD and wait for the menu to appear.
2.
Click the Bonus Software button.
3.
Click the Audacity button.
4.
Click NEXT to continue.
5.
Click I Accept the Agreement and click NEXT.
6.
Click NEXT to continue.
7.
Confirm the installation path and click NEXT.
8.
Confirm additional tasks and click NEXT to continue.
9.
Click the INSTALL button.
10. Click the FINISH button.
11. Click HELP / ONLINE HELP for more information.
12. Remove the installation CD.
Acrobat Reader
Use Acrobat Reader to view the documentation on the install CD.
1.
Insert the installation CD and wait for the menu to appear.
2.
Click the Bonus Software button.
3.
Click the Acrobat Reader button.
4.
Click NEXT to continue.
5.
Confirm the path and click NEXT.
6.
Click OK to complete the installation.
PAGE 5
WINDVD (XS71DDL ONLY)
1. Insert installation CD into your CD-ROM drive.
2. Double click My Computer on the desktop (or click
Start, My Computer).
3. Right click your CD-ROM drive icon. Left click OPEN.
4. Double click the software folder.
5. Double click the WinDVD.exe icon.
6. Click NEXT to begin the installation process.
7. Click YES to the license agreement.
8. Type your name, company name, and in the space for serial number refer to the serial number sticker found on the front of this
quick start guide.
9. Confirm the path and click NEXT.
10. Confirm the program folder and click NEXT.
11. Confirm the default application settings and click NEXT.
12. Click the FINISH button.
PAGE 6
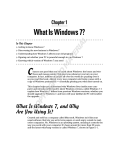
Xtreme Sound Control Panel
Double click the Diamond icon either in the system tray or in the
control panel. The following screen appears.
Main Setting Tab
Output Device
Analog Output
You can select between headphones & 2, 4, 6, or 8 channel modes.
Note: The XS51 sound card can select between 2, 4,or 6 channel
modes.
Continued on Next Page.
PAGE 7
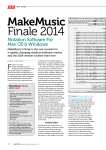
Click the hammer icon and the following screen appears.
Center/Bass Output Swap
Swap the center channel with the bass channel
Side/Back Surround Output Swap
Swap the side surround channel with the back surround
channel
Bass Enhancement
Increase the bass response by 15% by selecting this box.
S/PDIF Output
Click the – symbol to activate this option. This is used when you
have a coaxial cable connected between the S/PDIF out on the
sound card to a S/PDIF on a home receiver.
Sound Tests
The follow sound tests are included and built into the sound card
driver.
Vocal sound test for each speaker that is attached
and selected
Helicopter sound demonstrating surround sound
capabilities
Musical surround sound test.
Stops playback of any of the 3 sound tests.
PAGE 8
Continued on Next Page.
Mixer Tab
The mixer tab is where you control the component volumes on the
sound card for both recording and playback.
Playback Mixer
The playback mixer is used to control all sound components that
are playing back through your system speaker system.
Balance
With this slider set to the middle position an equal volume of
sound will be present out the left and right channels. Moving
the slider left or right of the middle position will cause the left
or right channel o be more prominent.
Notice: Each component on the sound card also has an individual balance slider. Moving the balance on an individual
component only affects that particular component.
Volume
Use this knob to raise or lower the overall system volume
level.
Mute
The mute button located just under the volume knob will mute
the entire sound system when lit. Click once to toggle this
control on/off. Notice: Each component on the sound card
also has an individual mute button. Clicking the mute on an
individual component only affects that particular component.
Wave
The Wave slider controls the volume of any program using
the Wave playback portion of the sound card. This usually
includes and is not limited to files with the following
extensions: .WAV, .MP3, .RM, etc). Most games will use the
Wave channel for sound effects and voice playback.
Continued on Next Page.
PAGE 9
SW Synth
The SW Synth slider controls the volume of any program
using the MIDI playback portion of the sound card.
This usually will be any file utilizing the .MID file extension or
games using MIDI playback for their back ground musical
score.
Microphone
The Microphone slider controls the volume of the microphone
component. If the volume is not loud enough please see the
advanced setting. The microphone connector is located on
the rear of the sound card and is designated by a pink colored
connector.
• Advanced Setting
The Advanced setting allows for mute and boost controls.
Check the Mute Microphone box if you do not want to hear
the Microphone through your sound system speakers. Check
the Boost +20dB box if the microphone volume is too low.
CD Player
The CD Player slider controls the volume of the CD player
component. This is only used if you have a CD audio cable
connected between a CD-ROM drive and the sound card.
Most systems no longer utilize this connection and instead the
Wave volume should be used to control the playback of an
audio CD.
Aux
The Aux slider controls the volume of the auxiliary input. This
input is a connector located on the top of the sound card circuit board. Most applications typically do not make use of this
connector.
PAGE 10
Continued on Next Page.
Line In
The line in slider controls the volume of the Line In connector which
is located of the rear side of the sound card and is designated by
a blue colored connector.
Recording Mixer
The playback mixer is used to control all sound components that
are playing back through your system speaker system.
SPDIF In
Advanced Setting
Reverse S/PDIF Format
Check this box to reverse the order of the S/PDIF format.
Validity Check
Check this box to perform a constant validity check.
Continued on Next Page.
PAGE 11
Monitor S/PDIF-In to Analog Output
Checking this box causes all digital input coming in through
the S/PDIF input connector on the rear of the sound card to
be converted and played back through the analog channels of
the sound card.
Stereo Mix
Selecting Stereo Mix allows audio applications to record sound
being played back through the Wave component on the sound
card.
Microphone
Selecting Microphone allows audio applications to record sound
from a microphone connected to the MIC connector on the rear of
the sound card. The MIC connector is designated by a pink colored
connector.
Advanced Setting:
CD Player
Selecting the CD player allows for audio applications to record
from the analog CD input connector on the sound card.
NOTE: This connection is not normally used since most CD player
applications use the bus to transfer the CD audio digitally.
Aux
Selecting Aux allows for audio applications to record from the Aux
input connector on the sound card.
NOTE: This connector is not normally used by most applications.
PAGE 12
Continued on Next Page.
Line In
Selecting Line In allows for audio applications to record from the
Line In connector on the rear of the sound card. The Line In
connector is designated by a blue connector.
Wave
Selecting Wave for the recording device allows for audio applications to record from the wave component on the sound card. Any
sound mapped through this device will be recorded.
Effect Tab
The Effect tab allows for customizing the sound stage. There is a
10 band graphic equalizer with presets in addition to a variety of
environmental effects and sizes.
Karaoke/Magic Voice Tab
The Karaoke/Magic Voice tab allows for functioning in conjunction
with Karaoke discs (CD+G).
Continued on Next Page.
PAGE 13
Select the On button to enable these features.
Microphone Echo allows for an adjustable range of echo applied
to the incoming sound from the microphone.
Key Shifting allows to slow down and speed up Karaoke CD
music.
Voice Cancellation attempts to remove vocal portions from the
current audio CD being played.
Information Tab
The information tab displays the driver version and various
trademarks.
Check the option to Show the audio configuration icon in the
system tray if you would like to be able to access the PCI 3D
Audio Configuration from a Diamond icon in the system tray.
PAGE 14
Technical Support
Diamond Technical Support staff is here to help resolve any issues
that you may be experiencing with the installation of the Diamond
sound card. Prior to contacting technical support please make sure
you have the following information available.
1.
Model #: (Printed on the bar code, located on the box)
2.
Installation CD Version: (printed on the CD label)
3.
The version of Windows that your system is running.
4.
The manufacturer and model # of your computer.
5.
CPU type and speed (example: Intel Pentium4 2.4GHZ)
6.
A complete description of the problem that you are
experiencing including any steps that you have taken to try
to resolve the issue.
Technical Support Options
Free Telephone Support
818-357-5165
(long distance rates may apply)
Mon - Fri, 8 - 4:30 PST
http://www.diamondmm.com
PAGE 15
One Year Limited Warranty
The warranty described below is extended only to the original buyer and is not transferable.
PLEASE NOTE THAT THE PRODUCT YOU HAVE PURCHASED IS DISTRIBUTED AND WARRANTED BY DIAMOND
MULTIMEDIA ("DIAMOND") AS DESCRIBED BELOW. QUESTIONS REGARDING THIS WARRANTY AND WARRANTY CLAIMS SHOULD BE MADE TO DIAMOND.
Diamond warrants to the original purchaser of the hardware product, that the product is free from defects in materials or
workmanship under normal use and service for a period of one (1) year from the date of purchase at retail. All cables and
accessories provided with a Diamond product are warranted to be free from defects in materials or workmanship under
normal use and service for a period of for (90) ninety days from date of purchase at retail.
Diamond ’s sole obligation under this warranty shall be, at Diamond ’s option, to: (i) repair the defective product or part;
(ii) deliver to customer an equivalent product or part to replace the defective product. When a product or part is replaced
or exchanged, the item becomes customer’s property and the replaced or exchanged item becomes Diamond ’s property. When a refund or replacement product is given, the defective product becomes Diamond’s property.
Replacement parts or products may be new or include serviceable used parts with at least the same functional equivalence to the original product. If, at the time of repair, a product is "out of warranty" or within the last ninety (90) days of the
warranty period, Diamond warrants any repair for ninety (90) days. All software provided is subject to the terms of the associated software end-user license agreement.
WARRANTY EXCLUSIONS AND LIMITATIONS
THIS WARRANTY IS ONLY APPLICABLE TO PRODUCTS SOLD BY DIAMOND AFTER MAY 1, 2007.
THIS WARRANTY IS ONLY APPLICABLE IF PRODUCT REGISTRATION IS RECEIVED WITHIN 30 DAYS OF THE
DATE THE PRODUCT IS PURCHASED. TO BE ELIGIBLE FOR THIS WARRANTY, YOU MUST REGISTER AT
diamondmm.com. THE ORIGINAL SALES RECEIPT SHOWING THE DATE OF PURCHASE OF THE PRODUCT IS
PROOF OF THE DATE OF PURCHASE. DIAMOND MAY REQUEST THE ORIGINAL SALES RECEIPT OR A COPY AS
PROOF OF DATE OF PURCHASE.
Diamond does not warrant third party products which Diamond distributes "AS IS" unless otherwise specified. Third party
products may be warranted by the third party.
Diamond makes no warranty or representation that: (i) the operation of the product will be uninterrupted or error free; (ii)
defects in the product will be corrected; or (iii) that the product will meet Customer’s requirements or work in combination
with any hardware or software provided by third parties.
TO THE FULLEST EXTENT ALLOWED BY LAW, THE WARRANTIES, REMEDIES AND LIMITATIONS CONTAINED
HEREIN ARE EXCLUSIVE AND ARE IN LIEU OF ALL OTHER WARRANTIES, TERMS OR CONDITIONS, EXPRESS OR
IMPLIED, EITHER IN FACT OR BY OPERATION OF LAW, STATUTORY OR OTHERWISE, INCLUDING WITHOUT LIMITATION, WARRANTIES, TERMS OR CONDITIONS OF MERCHANTABILITY, FITNESS FOR A PARTICULAR PURPOSE, QUALITY, CORRESPONDENCE WITH DESCRIPTION AND NON-INFRINGEMENT, ALL OF WHICH ARE
EXPRESSLY DISCLAIMED.
DIAMOND WILL NOT BE LIABLE UNDER THIS WARRANTY IF ITS TESTING AND EXAMINATION DISCLOSE THAT
THE ALLEGED DEFECT OR MALFUNCTION IN THE PRODUCT OR SOFTWARE DOES NOT EXIST OR WAS CAUSED
BY CUSTOMER’S OR ANY THIRD PARTY’S MISUSE, NEGLECT, IMPROPER INSTALLATION OR TESTING, UNAUTHORIZED ATTEMPTS TO OPEN, REPAIR OR MODIFY THE PRODUCT OR SOFTWARE, OR ANY OTHER CAUSE
BEYOND THE RANGE OF THE INTENDED USE, OR BY ACCIDENT, FIRE, LIGHTNING, OTHER HAZARDS, OR ACTS
OF GOD. THIS WARRANTY WILL NOT APPLY TO PRODUCTS USED FOR NUCLEAR RELATED, WEAPONS RELATED, MEDICAL OR LIFE SAVING PURPOSES.
TO THE FULLEST EXTENT ALLOWED BY LAW, DIAMOND ALSO EXCLUDES FOR ITSELF AND ITS SUPPLIERS ANY
LIABILITY, WHETHER BASED IN CONTRACT OR TORT (INCLUDING NEGLIGENCE), FOR INCIDENTAL, CONSEQUENTIAL, INDIRECT, SPECIAL OR PUNITIVE DAMAGES OF ANY KIND, OR FOR LOSS OF REVENUE OR PROFITS, LOSS OF BUSINESS, LOSS OF INFORMATION OR DATA, OR OTHER FINANCIAL LOSS ARISING OUT OF OR
IN CONNECTION WITH THE SALE, INSTALLATION, MAINTENANCE, USE, PERFORMANCE, FAILURE, OR INTERRUPTION OF ITS PRODUCTS, EVEN IF DIAMOND, ITS SUPPLIERS OR ITS RESELLER HAS BEEN ADVISED OF THE
POSSIBLITY OF SUCH DAMAGES. DIAMOND ’S SOLE LIABILITY WITH RESPECT TO ITS PRODUCT IS LIMITED TO
REPAIR OR REPLACEMENT OF THE PRODUCT, AT DIAMOND ’S OPTION. THIS DISCLAIMER OF LIABILITY FOR
DAMAGES WILL NOT BE AFFECTED IF ANY REMEDY PROVIDED HEREIN SHALL FAIL FOR ESSENTIAL PURPOSE.
DISCLAIMER: Some jurisdictions may not allow the exclusion or limitation of incidental or consequential damages for
products supplied to consumers, or the limitation of liability for personal injury, so the foregoing limitations and exclusions
may not apply or may be limited in their application to you. When implied warranties are not allowed to be excluded in their
entirety, they will be limited to the duration of the applicable written warranty. This warranty gives you specific legal rights
that may vary depending on the law of the applicable jurisdiction.
OBTAINING WARRANTY SERVICE: Please review the online "help" resources referred to in the accompanying documentation before seeking warranty service. If the product is still not functioning properly after making use of these
resources, please access the online help website at diamondmm.com for warranty instructions or to obtain warranty services. Some additional charges may apply for phone support.
BLANK
Diamond Multimedia
9650 DeSoto Ave.
Chatsworth, CA. 91311
www.diamondmm.com