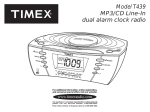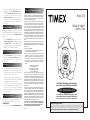
1
2. To turn off the alarm without setting it for the
following day, switch the Mode Switch to Alarm
OFF. The Alarm ON Indicator Icon will disappear.
3. To operate the snooze feature, press the
Snooze/Light Button. The alarm will shut off
approx. nine minutes before sounding again. You
may repeat this several times during the one-hour
snooze cycle.
Demo Operation
The Alarm Clock feature funny sound effects that can
be set as alarm wake sounds or played as a demo.
The alarm instructions are in the Operating the Alarm
section.
1 . Set the Mode Switch to Demo then press the
Snooze/Light Button. Depending the setting
of Volume Switch, if it sets at HI both special
sound and shaking effects will activate; if it sets
at LO, only sound effects will activate.
Back Light Operation
1 . Set the Mode Switch to Alarm ON or Alarm OFF
then press the Snooze/Light Button then the
display back light will turn on for approx. 30
seconds.
Maintenance
• Protect your furniture when placing the clock on
natural wood or a lacquered wood finish. A cloth
or other protective material should be placed
between the unit and the furniture.
• Clean the casing with a soft cloth moistened only
with mild soap and water. Stronger cleaning agents
may damage the surface of the case.
• If the clock is not to be used for a prolonged
period, remove the batteries to prevent possible
corrosion. Should the battery compartment
become corroded or dirty, clean it thoroughly and
replace the batteries.
Questions or Comments
For questions or comments regarding this or other
SDI products, please call our toll-free number:
1-800-888-4491.
Please also visit our website: www.timexaudio.com.
90-Day Limited Warranty Information
Timex Audio Products, a division of SDI Technologies Inc.
(hereafter referred to as SDI Technologies), warrants this
product to be free from defects in workmanship and materials,
under normal use and conditions, for a period of 90 days
from the date of original purchase.
Should this product fail to function in a satisfactory manner,
it is best to first return it to the store where it was originally
purchased. Should this fail to resolve the matter and service
still be required by reason of any defect or malfunction during
the warranty period, SDI Technologies will repair or, at its
discretion, replace this product without charge (except for a
$3.00 charge for handling, packing, return UPS/postage, and
insurance). This decision is subject to verification of the defect
or malfunction upon delivery of this product to the Factory
Service Center listed below. The product must include proof
of purchase, including date of purchase. The fee for service
after the warranty period or without proof of purchase is
$6.00.
Before returning this product for service, please first replace
the batteries (if applicable) with fresh ones, as exhausted or
defective batteries are the most common cause of problems
encountered.
If service is still required:
1. Remove batteries (if applicable) and pack the unit in a
well-padded, heavy corrugated box.
2. Enclose a photocopy of your sales receipt, credit card
statement, or other proof of the date of purchase.
3. Enclose a check or money order payable to the order of
Soundesign, for the sum of $3.00 (or $6.00 if after the
warranty period or without proof of purchase).
4. Send the unit prepaid to the Factory Service Center listed
below:
Consumer Repair Department
SDI Technologies Inc.
Timex Audio Products Division
1401 Pullman Drive, Suite A
El Paso, TX 79936-7726
NOTE: This warranty is valid only if the product is used for
the purpose for which it was designed. It does not cover (i)
products which have been damaged by negligence, misuse,
or accident, or which have been modified or repaired by
unauthorized persons; (ii) cracked or broken cabinets, or units
damaged by excessive heat; (iii) damage to tape cassettes
or compact discs (if applicable); (iv) the cost of shipping this
product to the Consumer Repair Department and its return
to the owner.
This warranty is valid only in the United States of America
and does not extend to owners of the product subsequent
to the original purchaser. Any applicable implied warranties
are also limited to 90 days, and SDI Technologies will not be
liable for consequential damages. (Some states do not allow
limitations on implied warranties or exclusion of consequential
damages, so these restrictions may not apply to you.) This
warranty gives you specific legal rights; you may also have
other rights which vary from state to state.
For questions or comments regarding this or other products,
p l e a s e c a l l o u r t o l l - f re e n u m b e r : 1 - 8 0 0 - 8 8 8 - 4 4 9 1 .
TIMEX and TIMEX Kids are registered trademarks of Timex
Corporation the United States and other countries.
T156-041119-0
Printed in China
Model T156
“Shake N’ Wake”
Alarm Clock
ALARM ON
TIM
E
SE
T
REV
ET
MS
SET
/ RE
R
FWD
ALA
For additional information, online registration,
and exclusive special offers visit our website:
www.timexaudio.com
For questions or comments regarding this or other
products, please call our toll-free number 1-800-888-4491.
Para instruccionese en Espanol, llame al 1-800-888-4491.
Important Message to Parents
Thank you for purchasing one of the TIMEX brand’s many top-quality products. We would appreciate it if you would
take a few moments to read through these instructions. This will help you explain the safe and proper way to use
this product, and to help give it the long-lasting life that TIMEX branded products have been designed for.
Please keep these instructions for future reference as they contain important information.
Note: While pressing either FWD or
REV Button the minutes will begin at a
moderate pace, then get faster. This will
assist you in setting the time both fast and
exact.
3. Press either the FWD or REV Button
repeatedly until the correct time is displayed.
Installing the Batteries
The Alarm Clock operates on 3 “AA” (R6) batteries,
which are included is for demo purpose only. To replace
or install the batteries, follow these instructions:
Install The Battery:
1. The battery compartment is located on the back
of the cabinet. Open the battery compartment
door by screw driver then take out the battery
box.
2. Install 3 “AA” (R6) batteries, making sure that the
positive and negative polarities match up with
the diagram inside the battery box.
3. Put back the battery box into battery
compartment gently and in correct direction.
4. . Close the battery compartment door by screw
driver. Do not over-tighten.
For the Best Possible Performance:
• We recommend using alkaline batteries.
• Non-rechargeable batteries are not to be
recharged.
• Rechargeable batteries are to be removed from
the clock before being charged (if removable).
• Different types of batteries or new and used
batteries are not to be mixed.
• Only batteries of the same or equivalent type as
recommended are to be used.
• Remove exhausted batteries from the clock.
• The supply terminals are not to be short-circuited.
• Rechargeable batteries are only to be recharged
under adult supervision. (if removable)
• Batteries are to be inserted with correct polarity.
Battery Installation
Snooze/Light Button
Volume Switch
Operating the Alarm
Mode Switch
Setting Clock Time and Alarm Time
All of the clock and alarm functions are controlled
using the buttons in the front of cabinet (see graphic)
Setting Clock Time
1. Press and hold the Time Button for several
seconds until the display flashes. If no timeset buttons are pressed within approx. ten
seconds, the display will stop flashing and
return to normal mode.
2. Press and hold the FWD Button to rapidly
advance the time forward, or the REV Button
to rapidly change the time backward. Release
button when the approximate correct time is
displayed. PM Indicator is on the lower right
of the display.
Setting Alarm Time
1. Press and hold the Alarm Set/Reset
Button for several seconds until the display
flashes. If no alarm-set buttons are pressed
within approx. ten seconds, the display will
stop flashing and return to normal mode.
2. Press and hold the FWD Button to rapidly
advance the alarm time forward, or the
REV Button to rapidly change the alarm
time backward. Release button when the
approximate alarm time is displayed. PM
Indicator is on the lower right of the
display. Again, be sure to set the proper
AM or PM wake time as shown by PM
Indicator.
3. Press either the FWD or REV Button
repeatedly until the desired alarm time is
displayed.
4. When the alarm time has been set, press
the Alarm Set/Reset Button again to
return to the default clock display.
Time Button
ALARM ON
TIM
E
SE
T
REV
REV Button
ET
MS
SET
/ RE
R
FWD
ALA
FWD Button
Front of Clock
Alarm Set/
Reset Button
Turning On the Alarm
1. After setting the alarm time, set the Mode
Switch to Alarm ON to turn on the alarm.
The Alarm ON Indicator Icon will appear
on the display, showing that the alarm is
turning on.
2. Set the Volume Switch to Hi for louder
alarm sound and shaking effect during
alarm sounding. Set to Low for lower alarm
sound and no shaking effect.
Turning Off the Alarm
1. After the alarm sounds, press the Alarm
Set/Reset Button to turn it off and
automatically reset it for the same time the
following day.