1
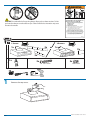
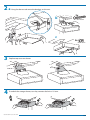
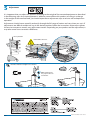
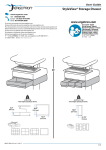
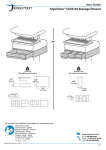
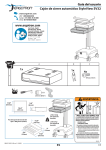
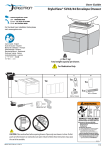
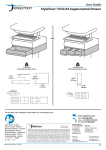
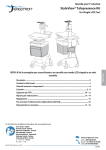
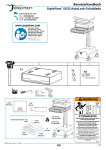
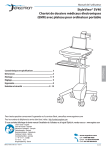
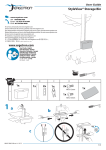
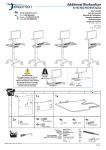
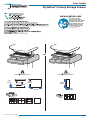
User Guide
StyleView® Primary Storage Drawer
www.ergotron.com
User's Guide - English
Guía del usuario - Español
Manuel de l’utilisateur - Français
Gebruikersgids - Nederlands
Benutzerhandbuch - Deutsch
Guida per l’utente - Italiano
Användarhandbok - svenska
ユーザーガイド : 日本語
用户指南 : 汉语
or
< 2 lbs (1 kg)
Total weight capacity per drawer.
2.5"
(64 mm)
<0.25 lbs (0.1 kg)
Total weight capacity per drawer.
10.5"
10.5"
(267 mm)
(267 mm)
12.5"
(315 mm)
3.75"
(96 mm)
888-97-306-G-00 rev. B • 04/13
1/4
WARNING
14mm (9/16”)
IMPACT HAZARD!
CAUTION: Close worksurface before opening drawers. Open only one drawer at a time. Do Not
push cart when drawers or worksurface are open. Failure to follow these instructions may cause
the cart to be unstable.
MOVING PARTS CAN CRUSH AND CUT.
Minimize Lift Tension BEFORE:
· Removing Mounted Equipment.
· Shipping Cart
· Storing Cart
To Minimize Lift Tension
1. Lower worksurface to lowest position.
2. Turn adjustment nut at top of riser
counterclockwise until it stops
(Adjustment may require 40-60 revolutions).
Failure to heed this warning may result in
serious personal injury or property damage!
For More information and instructions refer to product
guide at http://4support.ergotron.com or contact
Ergotron Customer Care at 1-800-888-8458.
822-052
A
1 Drawer
3 Drawers
3x
1x
or
1x
9x
1
3x
1x
2
2x
2x
M6 x 43mm
M6 x 10mm
14mm (9/16")
1
Remove the top cover.
888-97-306-G-00 rev. B • 04/13
2/4
2a
Hang the drawer tabs onto the brackets on the cart.
2x
b
M6 x 43mm
c
2x
M6 x 10mm
3
Replace top cover on drawer.
4
To unlock the storage drawer, turn key counter clockwise 1/4 turn.
888-97-306-G-00 rev. B • 04/13
3/4
5
Adjustment
It is important that you adjust this product according to the weight of the mounted equipment as described
in the following steps. Any time equipment is added or removed from this product, resulting in a change
in the weight of the mounted load, you should repeat these adjustment steps to ensure safe and optimum
operation.
Adjustments should move smoothly and easily through the full range of motion and stay where you set it. If
adjustments are difficult and do not stay in the desired position, follow the instructions to loosen or tighten
the tension to create a smooth, easy adjustment motion. Depending on your product and the adjustment, it
may take several turns to notice a difference.
Lift – Up and down
Release Brake to move riser.
Follow these instructions to tighten or loosen tension.
14mm (9/16")
NOTE: Adjustment
may require 40 - 60
revolutions.
888-97-306-G-00 rev. B • 04/13
4/4