1
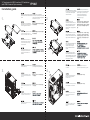
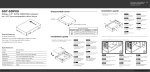
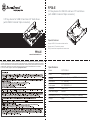
FP36-E
3.5” bay device for USB 3.0 and two 2.5” hard drives
(with USB3.0 internal 19pin connector)
3.5” bay device for USB 3.0 and two 2.5” hard drives
(with USB3.0 internal 19pin connector)
Special features:
Support USB 3.0 for maximum data transfer
Support two 2.5” hard drive mounts
Easy to install and compatible with most cases
FP36-E
www.silverstonetek.com
During warranty period, assistance for replacement or exchange of defective components is available at the place of purchase with receipt or valid proof
of purchase. The warranty does not cover repair or exchange of product resulting from misuse, accident, modification, unsuitable physical or operating
environment, improper maintenance, or failure caused by non-SilverStone product. The warranty is voided by removal or alteration of product or parts
identification labels. Warranty period is region specific, please contact your reseller or SilverStone authorized distributor for more information.
If you have any comments or suggestions, please e-mail to [email protected]
Specifications:
Model
SST-FP36-E
Color
Black or Silver
Material
Aluminum front panel, SPCC with nickel plating
Form factor
3.5” front bay
Drive space
2.5” SSD/HDD x 2
Connector
USB 3.0 x 2
USB cable length
600mm
Dimension(W x H x D) 101.6mm(W) x 25.4mm(H) x 149mm(D)
Weight
Issue date: May, 2013
296g
3.5” bay device for USB 3.0 and two 2.5” hard drives
(with USB3.0 internal 19pin connector)
FP36-E
Installation guide
1.
Install your 2.5” hard drive into the extension Установите ваш 2,5-дюймовый
bracket and secure with included screws as жесткий диск в переходной кронштейн
и закрепите прилагаемыми шурупами
shown.
как показано на рисунке
Setzen Sie die 2,5 Zoll-Festplatte in
das Slotblech ein und fixieren Sie sie
mit den mitgelieferten Schrauben
При использовании разъемов SATA под
углом 90 градусов оба диска SSD/HDD 2,5
дюйма не удастся установить в одном
направлении; устанавливайте их в
противоположных направлениях по
отношению друг к другу.
Bei der Verwendung von 90
Grad-SATA-Anschlüssen können nicht
beide 2,5 Zoll-SSD/-HDD in derselben
Ausrichtung installiert werden; bitte
installieren Sie sie in entgegengesetzter
Ausrichtung.
當您使用90度SATA線時,若兩顆2.5吋硬碟
以同方向安裝,則兩條SATA線材將互相干
擾導致無法連接至硬碟。請將其中一顆硬碟
以反方向安裝,即可順利使用90度SATA線
連接。
Les disques SSD/HDD 2.5” ne peuvent
pas être installé dans le même sens si
vous utilisez des connecteurs SATA à 90
degrés, veuillez les installer tête bêche.
当您使用90度SATA线时,若两颗2.5吋硬盘
以同方向安装,则两条SATA线材将互相干
扰导致无法连接至硬盘。请将其中一颗硬
盘以反方向安装,即可顺利使用90度SATA
线连接。
2.
將您的2.5吋硬碟裝入轉換架中並依圖示
以內附螺絲鎖固。
Installez votre disque dur 2.5” dans 将您的2.5吋硬盘装入转换架中并依图示
le casier d’extension et fixez-le
以内附螺丝锁固。
avec les vis incluses comme montré.
Instale su disco duro de 2,5” en el
bracket de expansión y asegúrelo
con los tornillos que se incluyen
como se muestra.
No se pueden instalar SSD/HDD de 2,5”
en la misma dirección si se usan
conectores SATA de 90 grados.
Por favor, instálelos en direcciones
opuestas.
Installare l’hard disk da 2,5” nella
sede preposta, ed assicurarlo al
supporto per mezzo delle viti in
dotazione.
Insert the extension bracket into an empty
3.5” internal drive bay.
Both 2.5” SSD/HDD cannot be installed in
the same direction if using 90 degree SATA
connectors, please install in opposite
direction of each other.
Sia gli HD che gli SSD non possono
essere installati nello stesso verso se si
usano connettori SATA a 90°, procedere
quindi con il montaggio dei due drive in
senso opposto l’uno all’altro.
Вставьте переходной кронштейн в
пустой внутренний 3,5-дюймовый отсек.
3.
Use the included screws to secure
the bracket.
При необходимости закрепите
кронштейн прилагаемыми шурупами.
Schrauben Sie das Slotblech bei
Bedarf mit den mitgelieferten
Schrauben fest.
用內附的螺絲將FP36-E鎖固。
Utilisez les vis incluses pour fixer le
casier adaptateur si nécessaire
用内附的螺丝将FP36-E锁固。
4.
Setzen Sie das Slotblech in einen
leeren internen Laufwerksschacht
(3,5 Zoll) .
依箭頭方向,將FP36-E裝回機殼內空的
3.5吋擴充槽。
Insérez le casier d’extension dans
une baie interne pour lecteur 3.5”
vide.
依箭头方向,将FP36-E装回机壳内空的
3.5吋扩充槽。
Inserte el bracket de expansión en
un espacio interno vacío de 3,5”.
Use los tornillos que se incluyen
para asegurar el bracket si es
necesario.
Inserire quindi quanto ottenuto in un
bay interno da 3,5”.
Se necessario, utilizzare le viti in
dotazione per assicurarlo allo
chassis.