1
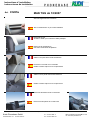
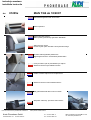
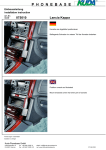
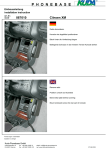
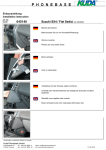
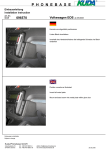
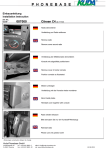
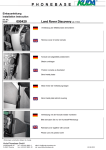
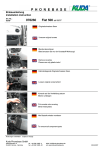
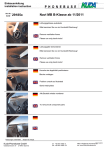
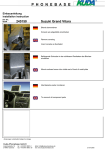
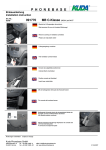
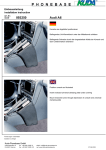
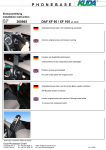
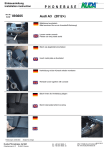
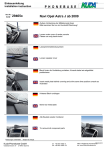
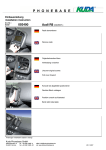
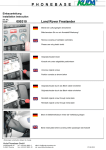
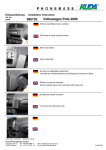
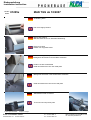
Einbauanleitung
installation instruction
Art.-Nr.:
item#
01205x
MAN TGS ab 10/2007
Verkleidung lösen
Pull cover slightly forward
Blende demontieren
Bitte benutzen Sie nur ein Kunststoff-Werkzeug!
Remove covering
Please use only plastic tools!
Konsole wie abgebildet positionieren
Beiliegende Schraube ins hintere Blech eindrehen
Position console as illustrated
Install enclosed screw into rear metal plate
Beiliegende Schraube in das untere Blech eindrehen
Install enclosed screw into lower metal plate
Alle Bauteile wieder montieren
To remount all component parts
Änderungen vorbehalten
Subject to change
Kuda-Phonebase GmbH
Osterdammerstr. 67
D-49401 Damme
tel: +49 5491 9695 -0
fax: +49 5491 9695 -30
20.11.2012
eMail: [email protected]
net: www.kuda-phonebase.de
Instructions d´ installation
instrucciones de instalación
Art.
01205x
MAN TGS ab 10/2007
Avancez légèrement la couverture
Tire el revestimiento un poco hacia adelante
Demontér l’écran
Veuillez n’utiliser qu’un outil de matière plastique
Desmonte el revestimiento
Use sólo herramientas de plástico!
Positionnez la console comme illustré
Vissez la vis jointe dans la tôle de derrière
Posicione la consola como mostrado
Instale el tornillo adjunto en la chapa trasera
Vissez la vis ci-jointe dans la tôle inférieure
Instale el tornillo adjunto en la chapa inferior
Remontez les éléments de construction
Remonte todos partes de construcción
.
Nous nous réservons la possibilité de modification
Kuda-Phonebase GmbH
Osterdammerstr. 67
D-49401 Damme
Salvo posibles modificaciones
tel: +49 5491 9695 -0
fax: +49 5491 9695 -30
20.11.2012
eMail: [email protected]
net: www.kuda-phonebase.de
instrukcja montazu
installatie instructie
Art.
01205x
MAN TGS ab 10/2007
Raamwerk langzaam naar voren halen
Odsun tapicerke
Afdekschild demonteren
Alleen plastic gereedschap gebruiken alstublieft!
Zdemontowac oslone
Prosze uzywac tylko narzedzi z tworzywa sztucznego.
Konsole zoals afgebeeld positioneren
Bijgevoegde schroef in de achterste plaat draaien
Uchwyt umiescic jak na przedstawionym zdjeciu.
Zalaczona srube w tylna blaszke wkrecic
Instale el tornillo adjunto en la chapa inferior
Zalaczona srube w dolna blaszke wkrecic
Alle gedemonteerde delen weer monteren
Wszystkie elementy ponownie zamontowac
Nous nous réservons la possibilité de modification
Kuda-Phonebase GmbH
Osterdammerstr. 67
D-49401 Damme
Salvo posibles modificaciones
tel: +49 5491 9695 -0
fax: +49 5491 9695 -30
20.11.2012
eMail: [email protected]
net: www.kuda-phonebase.de