1
NEXT BASE Click? Lite
Click7 Life Duo
Click7 Life Duo Deluxe
/" Portable DVD Player
Instruction Manual
Click &!
one step further
22 dEl ME Ср
VIDEO"
PRECAUTIONS = ENG
Thank you for purchasing this tablet DVD player. Please read this manual carefully
before operation and reserve it for future reference. It will be helpful to you when you
encounter any operational problem.
CAUTION: These servicing instructions are for use by qualified service
personnel only. To reduce the risk of electric shock, do not perform
any servicing other than that contained in the instruction manual
unless you are qualified to do so.
WARNING: To reduce the risk of fire or electric shock, do not expose this device
to rain, moisture, dripping or splashing. No object filled with liquids
(such as vase) shall be placed on the device. High voltages are
present inside the unit. Under no circumstances should you try to
repair the unit yourself. Refer servicing to qualified personnel.
LASER: This unit employs a laser. Due to possible eye injury, only qualified
service personnel should remove the cover or attempt to service this
device.
Use of controls or adjustments or performance of procedures
other than those specified herein may result in hazardous radiation
exposure.
Visible and invisible laser radiation will be exposed when open and
interlocks defeated.
DO NOT STARE INTO BEAM!
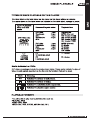
LASER
Type Semiconductor laser GaAlAs DO NOT VIEN DIRES WITH
Wave length 650 nm/780nm CLASS {MLASER PRODUCT
Output Power 5mW
Beam divergence 60degree
Hl REAR SEAT ENTERTAINMENT IH
ENGm PRECAUTIONS
MACROVISION: This product incorporates copyright protection technology that is
protected by U.S. patents and other intellectual property rights.
Use of this copyright protection technology must be authorized
by Macrovision. If not, the use of this technology is only permitted
for domestic use and other limited playback uses. Reverse
engineering or disassembly is prohibited.
DOLBY: Manufactured under license from Dolby Laboratories. "Dolby"
and the double-D symbol are trademarks of Dolby Laboratories.
DivX: This device incorporates copyright protection technology that is
protected by DivX, Inc.
DivX, DivX certified and associated logos are trademarks of
DivX, Inc., and can only be used under license.
WEEE: Please do not throw electronic devices into household
= Waste. Separate them for correct recycling.
PIXEL FAILURE STATEMENT
The LCD screen contains 336, 960 pixels, pixels can fail during normal product life. 1 pixel
0.0003% failure rate. One pixel failure per year or operation is considered normal and not
a cause for concern.
The mains plug is used as the disconnect device, the
disconnect device shall remain readily operable.
HE REAR SEAT ENTERTAINMENT IH
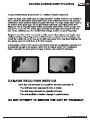
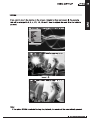
BROKEN SCREEN IDENTIFICATION =ENG
A Liquid Crystal Display (LCD) screen is a multilayer complex component.
Under the tough outer plastic layer, the glass sandwich beneath holds the LCD crystals in
place, which are themselves suspended in fluid. In the unfortunate event of an accident,
particularly a sharp localized impact, the glass will break. The tough plastic outer sheet on
the surface of the glass keeps all the glass intact underneath, preventing shards from
falling out. This is a specific safety feature, particularly implemented for the younger user
and also for in-car use. The broken glass normally shows signs of the impact mark and
also cracks radiating away. The resultant fluid leakage renders the panel inoperable.
Symptoms are often a dark round mark, a white screen without picture and maybe some
multicolored lines. Depending on the individual break, an element of the TV picture may
remain for a while, but not for long, as the fluid leaks away. Some inky black staining may
also appear upon the crack lines, as the fluid escapes.
Unfortunately a break of this nature is not covered under the manufactures warranty, as it
is accidental damage to the product, rather than an original defect from manufacture.
Please see below for some sample images of broken LCD panels for reference.
DAMAGE REQUIRING SERVICE
Have the unit serviced by a qualified service technician if:
The unit has been exposed to rain or water.
The unit does not seem to operate normally.
The unit exhibits a marked change in performance.
DO NOT ATTEMPT TO SERVICE THE UNIT BY YOURSELF!
Hl REAR SEAT ENTERTAINMENT IH
ZEENGm TABLE OF CONTENTS
PRECAUTIONS
TABLE OF CONTENTS
CAUTIONS ON USING
THIS PLAYER
DISCS PLAYABLE
PACKAGE CONTENTS
PARTS AND REMOTE
CONTROL
CONNECTIONS
BASIC OPERATIONS
SYSTEM SETUP
HE REAR SEAT ENTERTAINMENT IH
PRECAUTIONS... en nnnnenennnnnan ener neenn ene. 1
TABLE OF CONTENTS... eee een. 4
CAUTIONS ON USING THIS PLAYER......................———.—.. 6
TYPES OF DISCS PLAYABLE ON THIS PLAYER........... 7
PLAYABLE FORMATS ..................eeeeeenenennenenenenen eee. 7
PACKAGE CONTENTS... eee 8
MAIN UNIT
FRONT. cee e eee 9
EL ©) PTE 9
RIGHT... reer eee eer eee ener eee 10
LEFT/BACK....c ieee eee eee seen 11
DISC COVER... eee eee 11
REMOTE CONTROL............... em... ..eeneennnnnnneneeeeneneenn ene. 12
NOTES ON USING THE REMOTE CONTROL .............. 14
REPLACING THE BATTERY....................—.. eee 14
MONITOR
Li ©) 1 ner 15
BOTTOM... Ts 15
1-70 rennen REERKRRRKEKRKREREKKRRREEEKKKEREEG 16
CONNECTING THE ADAPTER TO A SOCKET............... 17
USING AN EARPHONE / AN AMPLIFIER................... 17
CONNECTING ACCESSORIES........................eeeeeeeeenen. 18
INSERTING A USB DISK INTO THE PLAYER................. 18
TURNING ON THE PLAYER... 19
SELECTING ALANGUAGE........cccco ie 19
TURNING OFF THE PLAYER.....................e..eeeenennne 20
LOADING... cee eee emer eases 20
PLAYBACK... eee 21
STOPPING PLAYBACK... ieee eee 21
PAUSING PLAYBACK... coor eee eee eens 21
OPTION... recesses ener eee 22
ZN nnn ene. 22
DES] eterna eee eee. 23
TV SYSTEM... nene 24
SCREEN SAVER... rere eee 24
TABLE OF CONTENTS = ENG
VA = EN 25
PASSWORD..................r. ns 25
RATING..............enen res 26
DEFAULT................ienn nr 26
LANGUAGE SETUP N10 EEE 27
SUBTITLE................e...erenm ns 27
DIGITAL SETUP SOUND EFFECT...................e...rnn 28
DYNAMIC RANGE....................n ns 28
DIVXIR] VOD...........—..... ies 29
DISC SETUP DISC MENU.................ee.n ns 30
INFORMATION..................ennn es 30
TEN 31
070 TEN 32
SUBTITLE................e.eern es 33
AT TEN 34
ZOOM... eernrernree rer 35
MODE MODE...............rennn nes 36
SETUP DUO DELUXE..................r..ermmenen 36
FUNCTIONS ON THE PLAYING AT FAST SPEED...................eeerinenienn 37
REMOTE CONTROL А-В PLAYBACK..................e.eenimn nn 37
ANGLE................rmemnrn eee eee 37
PROGRAM.................m.eeim rennes 38
PLAYING A DISC IN MP3 OR JPEG FORMAT.............. 40
OTHER DIMENSION AND PARAMETERS.....................e.ees 44
TROUBLE SHOOTING.......................r.errs 45
Hl REAR SEAT ENTERTAINMENT IH
ENGm CAUTIONS ON USING THIS PLAYER
CAUTIONS ON USING THIS PLAYER
1. DO NOT MOVE THE PLAYER DURING PLAYBACK
During playback, the disc spins at high speed. So do not lift or move the player. Doing so may damage
the disc.
2. TRANSPORT THE PLAYER
Before transporting the player, please remove the disc, turn off the power, and unplug the power cord .
3. PLACE OF INSTALLATION
Select a stable place near TV or stereo system to which you are going to connect the player.
Do not place the player on top of a TV or color monitor.
Install the player away from cassette decks or other devices which are easily affected by magnetic forces.
4. TURN OFF THE POWER WHEN NOT USING THE PLAYER
If the player is connected to your TV but not in use, switch the power off. It can avoid interference with
your normal TV picture.
Noise problems may also be experienced if the player is used near a radio.
5. STORAGE TEMPERATURE OF THE PLAYER
Do not leave the player in places where the temperature is extremely low (about -10° C or lower) or
extremely high (about 60°C or higher), such as inside the passenger cabin or trunk in midsummer. Doing
so may warp the outer case or reduce the performance or quality of the battery pack.
6. WHEN USING WITH CAR POWER CABLE (OPTIONAL) IN CARS
Please turn the engine on and then connect the car power cable for using.
7. CLEANING THE PLAYER
Normally clean the player with a soft dry cloth. For tough dirt, apply some neutral detergent diluted in 5 to
6 parts water to a soft cloth, and wring out thoroughly. Wipe off the dirt, then clean the player with a dry
cloth. Note that alcohol, thinner, benzene, insecticides, etc., may cause the paint or coating to peel off.
Also avoid leaving rubber or plastic products in contact with the player for long periods of time, as this may
damage the cabinet. When using chemically treated cloths, read the cloth's instructions carefully. Always
unplug the power cord from the power outlet before cleaning the player.
8. NEVER TOUCH THE LASER PICKUP LENS
Do not touch the laser pickup lens. Doing so may cause damages to the player. Refer servicing to
qualified personnel.
9. COPYRIGHTS
Unauthorized duplication, broadcast, public performance or rental of discs is prohibited by law.
10. MODEL NUMBER
To see the model no. of the player, you can unlock the stand and see it printed on the
backplate. (Details on how to unlock the stand, please refer to page 10.)
HE REAR SEAT ENTERTAINMENT IH
DISCS PLAYABLE = ENG
TYPES OF DISCS PLAYABLE ON THIS PLAYER
The discs listed on the table below can be played on this player without an adapter.
The marks shown on the table below are indicated on the disc's label, package or jacket.
Types of playable
discs and their Diameter/Playable sides Playback time
marks
DVD video 1 layer Playback time
12cm/single- 2 layer (MPEG 2 format)
sided 1 layer 133 minutes (4.7 GB)
DVD-Video disc 12cm/double- 2 layer 242 minutes (8.5GB)
sided 266 minutes (9.4GB)
484 minutes (17GB)
ты DVD video 1 layer (MPEG 2 format)
VIDEO 8 cm/single- 2 layer 41 minutes
sided 1 layer 75 minutes
8 cm/double- 2 layer 82 minutes
sided 150 minutes
CD CD 74 minutes
COMPACT 12 cm/single-sided
CD 20 minutes
Marks indicated on DVDs
DVD discs or packages include the marks shown below. These marks indicate the type of
video or audio signals recorded on the disc and the functions that can be used.
Mark Meaning
OD Indicates the number of audio tracks.
Kae Indicates the number of angles.
16: 9[ 1B | Indicates the selectable picture aspect ratio.
Indicates the playable region number.
PLAYABLE FORMATS
The unit is able to play most audio/video files such as:
PICTURE: JPEG
AUDIO: MP3, WMA
VIDEO: DAT, VOB, MPEG2, MPEG4 (AVI, DIV)
Hl REAR SEAT ENTERTAINMENT IH
ENGm PACKAGE CONTENTS
PACKAGE CONTENTS
Check the contents of Click Lite series DVD player.
Unit Monitor AC/DC Adapter
(X 2 for Click Lite Duo Deluxe) (for Click Lite Duo only) (X2 for Click Lite Duo Deluxe)
Earphone ï
Remote Control (X2 for Click IP Duo/Duo Deluxe) Quick Start
i Click&Go Headrest Mount
Carrying Bag (X2 for Click Lite Duo/Duo Deluxe)
AV Cable DC YO YO Cable Car Power Cable
(for Click Lite Duo/Duo Deluxe) (for Uno version only)
External Battery (optional)
|
Note:
The actual products might appear slightly different from the pictures shown above.
HE REAR SEAT ENTERTAINMENT IH
PARTS AND REMOTE CONTROL = ENGEW
MAIN UNIT
FRONT
NN
7 N
N 7
>
NEXT BASE /
TOP
\ /
O O
5 Emer) ©
] I
] |
10 9 8 7 6 5 4 3 2 1
1. LED indicator
2. ON / bl
Press it for about 2 seconds to turn the player on.
Press it to start / pause the playback.
Press it to confirm the selection.
3. OFF /M
Press it for about 2 seconds to turn the player off.
Press it to stop the playback.
Press it to exit the current operation.
Hl REAR SEAT ENTERTAINMENT IH
ENGu PARTS AND REMOTE CONTROL
4, PEI /+
Press it to skip to the next track / chapter when playing DVD.
Press it to move downwards.
5, + / 14
Press it to skip to the previous track / chapter when playing DVD.
Press it to move upwards.
6. ®
Press it to open the cover.
7.» /+
Press it to fast backward playback.
Press it to move to the right.
8. € / <<
Press it to fast forward playback.
Press it to move to the left.
9. MODE
Press it to pop up the MODE menu, which includes DVD, USB, Click&Go AV in, and AV
Input.
The default mode is DVD.
10. OPTION
Press it to pop up the OPTION menu.
RIGHT
1. DC IN 12V 5. USB Port
Connect the included AC/DC adapter here. Insert a USB disk here.
2. Earphone Jack 6. Volume wheel
Connect an earphone or an amplifier here. Adjust volume up and down.
3. Audio in/out
Connect an audio cable for audio in/out here.
4. Video in/out
Connect a video cable for video in/out here.
HE REAR SEAT ENTERTAINMENT IH
PARTS AND REMOTE CONTROL =ENG
LEFT/BACK
1. Lock
Lock/unlock the Click&Go Headrest Mount or Stanchion Mount
0000000000000000000000
000000000 0000000000000
I Y В E ]
2. Slot
Connect to the backplate ridge of Click&Go Headrest Mount / Stanchion Mount
Va NN
T1 1
o cr 2
mu — 4 ||
Ne À
DISC COVER
Open the disc cover
Hl REAR SEAT ENTERTAINMENT IH
ENGm PARTS AND REMOTE CONTROL
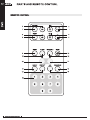
REMOTE CONTROL
/, a
(— )
5 OPTION | << 3
OOOO
MODE >> | 4
©)
N J
MENU AUDIO SUBTITLE MUTE
9 — —10
11 12
<< >>
13 14
ANGLE REPEAT A-B PROGRAM
15 — — —18
16 17
19 1 2 3 4
5 6 7 8
9 0
N J
HE REAR SEAT ENTERTAINMENT IH
©
~J
PARTS AND REMOTE CONTROL
Il
Press it to start / pause the playback.
Press it to confirm the selection.
N
Press it to stop the playback.
Press it to exit the current operation.
. 1/144
Press it to skip to the previous track /
chapter when playing DVD.
Press it to move upwards.
D>I/S
Press it to skip to the next track /chapter
when playing DVD.
Press it to move downwards.
€
Press it to move to the left.
>
Press it to move to the right.
. OPTION
Press it to pop up the OPTION menu.
. MODE
Press it to pop up the MODE menu,
which includes DVD, USB, Memory
Card, and AV Input.
The default mode is DVD.
10.
11.
12.
13.
14.
15.
16.
17.
18.
19.
m ENG
MENU
Press it to display DVD menu.
MUTE
Press it to turn on/off the audio mute.
AUDIO
Press it to change the audio language.
SUBTITLE
Press it to change the subtitle.
<
Press it to fast backward a movie/music
clip.
>>
Press it to fast forward a movie/music
clip.
ANGLE
Press it to switch angle.
REPEAT
Press it to repeat the playback.
A-B
During the playback, press it to set two
points, and repeatedly play the section
between them.
PROGRAM
Press it to arrange the playing order of
tracks.
NUMBER KEY 0-9
Hl REAR SEAT ENTERTAINMENT IH
ENGm PARTS AND REMOTE CONTROL
NOTES ON USING THE REMOTE CONTROL
1. Do not drop or step on the remote control or subject it to shocks.
2. Note that the remote control may not work if there is any obstacle between the remote
control sensor and itself.
3. Do not expose the remote sensor to strong light. Doing so may make operation impossible.
4. Use the remote control within the specified operating range.
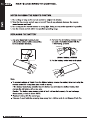
REPLACING THE BATTERY
1. Use your fingernail to press A and 2. Remove the old battery, and put a new
pull out the battery holder B according one onto the battery holder with the
to the indicated direction. + side facing upwards.
Lithium Battery (CR2025)
3. Put the battery holder back to its place.
3
má
Note:
mM To prevent leakage of liquid from the lithium battery, remove the battery when not using the
remote control for a long time (one month or more).
If the battery leaks fluid, carefully take the battery out and wipe the battery holder, then
replace the old battery with a new one.
Caution: The battery may present a risk of fire if not handled properly. Do not recharge,
disassemble, or heat it above 100°C.
m Replace battery with the same type.
m Dispose of used batteries properly, keep away from children and do not dispose it into fire.
HE REAR SEAT ENTERTAINMENT IH
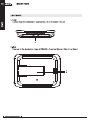
(for Click Lite Duo only, play the same movie with the main unit)
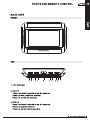
MONITOR w= ENG
FRONT
~~ ON
/_ в
7 ND
Ni J
u >»
\ NEXT BASE
NC
BOTTOM
1. LED indicator
2. ON/OFF Switch
Turn on/turn off the unit.
3. Brightness Adjust
Adjust screen brightness higher or lower.
4. Volume Adjust
Adjust volume up and down.
5. Earphone Jack
Coment earphones or amplifier here.
Hl REAR SEAT ENTERTAINMENT IH
ENGu MONITOR
LEFT/BACK
1. Lock
Lock/unlock the Click&Go Headrest Mount or Stanchion Mount
2. Slot
Connect to the backplate ridge of Click&Go Headrest Mount / Stanchion Mount
N
)
HE REAR SEAT ENTERTAINMENT IH
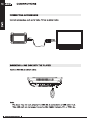
CONNECTIONS nm ENG
CONNECTING THE ADAPTER TO A SOCKET
USING AN EARPHONE /AN AMPLIFIER
1. Set the volume to its minimum sound level.
2. Connect an earphone or an amplifier to the earphone jack.
3. Adjust the volume to a sound level you prefer.
Hl REAR SEAT ENTERTAINMENT IH
ENGm CONNECTIONS
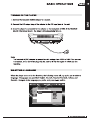
CONNECTING ACCESSORIES
Connect accessories, such as AV cable, TV box as shown below.
EXT > Video(Yellow)
D 00000
INSERTING A USB DISK INTO THE PLAYER
Insert a USB disk as shown below.
Note:
The player may not work properly if a USB disk is connected to a USB cable / hub.
This USB port can not support a device like Digital Camera, PC, or PSP, etc.
HE REAR SEAT ENTERTAINMENT IH
BASIC OPERATIONS = ENG
TURNING ON THE PLAYER
1. Connect the included AC/DC adapter to a socket.
2. Connect the DC output plug of the adapter to the DC input jack of the unit.
3. Once the player is connected to the adapter or the backplate of Click & Go Headrest
Mount / Stanchion Mount , the player will automatically turn on.
Note:
The included AC/DC adapter is compatible with voltage from 100V to 240V. You can use
it overseas, and a converter plug may be used to fit into the region in which you are
traveling.
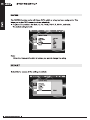
SELECTING A LANGUAGE
When the player turns on for the first time, the following menu will pop up for you to select a
language. 6 languages are provided: English, Deutsch, Espanol, FranCais, Italiano, and
Swedish. Navigate to the language you prefer, and press pl to confirm.
OPT | MODE CI) с Ie OFF/M|ON/»I
Language Setup
Subtitle Deutsch
С
a Espafiol
. , A) FranGais
Italiano
Swedish
Hl REAR SEAT ENTERTAINMENT IH
ENGu BASIC OPERATIONS
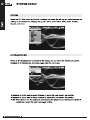
TURNING OFF THE PLAYER
1. Press OFF / IN on the unit for about 2 seconds.
2. Unplug the adapter from a socket.
3. Disconnect the DC output plug from the DC input jack.
OF
F
\ 7
O] O
& Evo (>) 7
] [
| [
Note:
When there is not any operation in 5 minutes for either the main unit or the monitor,
the main unit or the monitor will turn off automatically.
LOADING
1. Press the OPEN button on the unit to open the display panel.
2. Open the disc cover.
3. Insert a disc, and press it down with your fingers near the center hole.
You can hear a click sound.
4. Close the disc cover.
1. Make sure the disc is inserted properly. Failure to insert it properly may result in
damages.
2. Do not use warped or cracked discs.
3. For single-sided discs, place them with the label side up.
4. For double-sided discs, since they have a recording layer on both sides of the disc,
check each other carefully and make sure not to scratch them when removing them from
the player.
HE REAR SEAT ENTERTAINMENT IH
BASIC OPERATIONS
PLAYBACK
1. Turn the power on.
2. Open the disc door, and insert a disc correctly.
3. Close the disc door.
4. The player will load the disc, and start the playback
automatically. If not, press II
STOPPING PLAYBACK
1. Press IN during the playback, and the player
remembers the stopping point.
2. To resume playback from its stopping point,
press II.
3. To cancel the stopping point, press IN again in the
STOP status. The player will not resume
playback from the stopping point next time you
press pil.
PAUSING PLAYBACK
1. Press Pll during the playback.
2. To resume playback, press Pll again.
OE!
MENU AUDIO SUBTITLE MUTE
MENU AUDIO SUBTITLE MUTE
MENU AUDIO SUBTITLE MUTE
rm Il
m ENG
Hl REAR SEAT ENTERTAINMENT IH
ENGu SYSTEMSETUP
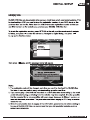
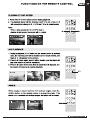
OPTION
When the OPTION button on the unit is pressed, an option list will pop up, which includes the
settings of IR Headphone, Display, Setup, Disc Menu, Information, Mute, Audio, Subtitle,
Repeat, and Zoom.
OS COD a END CONT
IR Headphone
Display
Setup
Disc Menu
Information
E a
io =
№ <
IRHEADPHONE
When an IR Headphone is connected to the player, you can select the channel you prefer.
Navigate to IR Headphone, and press pl to enter the sub-menu.
ES COD a END CONT
Channel A
Channel B
® Channel A: If you want to select Channel A, select this, and press Pll to confirm.
m Channel B: If you want to select Channel B, select this, and press II to confirm.
m Off: When there is no IR headphone connected to the player or you want to turn off the IR
headphone, select this, and press Pll to confirm.
HE REAR SEAT ENTERTAINMENT IH
SYSTEM SETUP = ENG
DISPLAY
Navigate to Display, and press Pll to enter the sub-menu.
1. Brightness: Navigate to Brightness Xt, press pl, and then use + and 4 to adjust the
brightness. Press PI to confirm.
2. Color: Navigate to Color > , press PII, and then use 4 and + to adjust the color.
Press Pl to confirm.
3. Screen ratio: Navigate to Screen ratio [+] , press Pll, and then use 4 and + to select
between 16:9 and 4:3. Press PII to confirm.
OPT | MODE aD ELIT COLIN
нс
5 4
=
Hl REAR SEAT ENTERTAINMENT IH
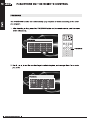
ENGm SYSTEM SETUP
TV SYSTEM
Some DVDs have set up TV Systems, and their TV Systems may be varied. Before playing a
DVD, you need to check its TV System first, and select the proper system. Navigate to Setup,
press Pll to pop up the menu of TV System, and press DII again to enter the menu.
u NTSC: Select this if the player is connected to a NTSC TV.
Em PAL: Select this if the player is connected to a PAL TV.
E Auto: Select this if the player is connected to a multi-system TV.
The default setting is Auto.
System Setup
TV System NTSC
Screen Saver PAL
TV Type Auto
Password
Rating
Default
Note:
If an incorrect TV system is selected, the picture will be displayed in black and white.
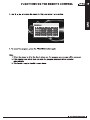
SCREEN SAVER
Navigate to Screen Saver, and press Pll to enter the sub-menu.
m On: Select this to activate the screen saver. When the player is in STOP or NO DISC
status, or there is no motion for a long time, the screen will be displayed to protect the
screen from damages.
m Off: Select this to cancel the screen saver.
The default setting is On.
OPT | MODE es ОСН БОЕ
System Setup
TV System
on
TV Type
Password
| Rating
Default
HE REAR SEAT ENTERTAINMENT IH
SYSTEM SETUP = ENG
TV TYPE
Navigate to TV Type, and press Pll enter the sub-menu.
m 4:3PS : Select this to adjust DVD aspect ratio to 4:3 pan & scan.
m 4:3LB : Select this to adjust DVD aspect ratio to 4:3 letterbox.
E 16:9 : Select this to adjust DVD aspect ratio to 16:9.
es «ЕР Comp GON
System Setup
TV System
Screen Saver
TV Type 4:3PL YI
Password 4:3LB7Y
Rating 16:37
Default
PASSWORD
The Password function is provided for parents to give DVD access to their kids selectively.
m For the first time use, enter 0000 or the assigned password to unlock the parental control.
m Once the parental control is unlocked, go to the Rating menu and set the rating for a
program.
E Assign a new password (4 digits) to lock the rating.
Mm |f you forget the password you assign, enter 0000 to unlock the rating again.
ex ce Ce CO
System Setup
TV System
Screen Saver
TV Type
1} Rating = = = = ©
Default
Hl REAR SEAT ENTERTAINMENT IH
ENGm SYSTEMSETUP
RATING
The RATING function works with those DVDs which a rating has been assigned to. This
helps you to give DVD access to others selectively.
m 8 options are provided: Kid Safe, G, PG, PG13, PG-R, R, NC-17, and Adult.
The default rating is Adult.
ee comp con
System Setup
TV System 1 Kid Safe
Screen Saver 2G
TV Type 3PG
Password 4 PG13
Default
Note:
When the Password function is locked, you cannot change the rating.
DEFAULT
Select this to resume all the settings to default.
a» CCCI COE
System Setup
TV System
Screen Saver
TV Type
Password
ri | Rating
E Restore
HE REAR SEAT ENTERTAINMENT IH
LANGUAGE SETUP um ENG
LANGUAGE
Navigate to Language Setup, press II to enter the DISPLAY menu, and press bIIagain
to enter the LANGUAGE menu.
m 6 optional languages are provided: English,Deutsch,Espanol,FranÇais,ltaliano,and
Swedish.
m Select the language you prefer, and press Pll to confirm.
mM The default language is English.
Language Setup
Subtitle Deutsch
Español
FranGais
Italiano
Swedish
SUBTITLE
Navigate to Subtitle, and press pl to enter the sub-menu.
E |f you want to play a DVD with subtitle, select On, and press wll to confirm.
m If you want to play a DVD without subtitle, navigate to Off, and press Pll to confirm.
«ЕВ camp com
Language Setup
Display
Hl REAR SEAT ENTERTAINMENT IH
MEENGm= DIGITAL SETUP
HE REAR SEAT ENTERTAINMENT IH
SOUND EFFECT
Navigate to Digital Setup, pressPll to enter the Sound Effect menu, and press pli
again to enter the sub-menu. 2 sound output effects are provided: Normal and Surround.
Choose the effect you prefer, and press DII to confirm.
CID COED Ea END CCD
Digital Setup
Normal
Dynamic Range Surround
DivX[R] VOD
DYNAMIC RANGE
Navigate to Dynamic Range, and press Pll to enter the sub-menu. This setting is to adjust
the line out compressing ratio and get different effects. Use and to adjust it, and press DII to
confirm.
If Off is selected, the audio signal peak value will be compressed to its minimum;
If Full is selected, to its maximum.
GIES CIEL) G&D EU CET
Digital Setup
Sound Effect
Dynamic Range
DivX[R] VOD
DIGITALSETUP в Е№С
DIVX[R] VOD
DivX(R) VOD files are downloaded after paying a rental from certain commercial websites. Prior
to downloading a VOD you need to input the registration number of your DVD player on the
purchase form on the site. Write down the VOD 8-character registration number so that you
can fill in the form on the website you purchase your DivX(R) VOD files from
To check the registration number, press OPTION on the unit or on the remote control, navigate
to Setup, and press PII to enter the sub-menu. Navigate to Digital Setup, and press »II
to pop up the interface below.
OPT | MODE E EMILIE OFF/MJON/DiI
Digital Setup
Sound Effect
Dynamic Range
DivX[R] VOD
Then press b»II again, and the message below will appear.
CAE EB Coms
-DIVX [R] VIDEO ON DEMAND-
YOUR REGISTRATION CODE IS:FAG6G365
- Aw Ra OLU/VOD
Note:
. The registration code will be changed each time you use it to download the DivX(R) files.
You have to use new code to carry out downloading operation next time.
2. If you cannot play a DivX VOD file recorded on a CD-R disc after downloading it, the rental
period allocated during purchasing from the website may have expired. It is also possible
that the recorded file is not compatible with your player because of different versions or
incorrect download parameters. The parameters used when copying to CD-R may be another
reason for this.
3. Since it is not possible here to supply all the information, parameters and advice relating to
the use of DivX(R) VOD files, we recommend that you visit speciallist websites such as
WWW.DIVX.COM/VOD.
—
Hl REAR SEAT ENTERTAINMENT IH
ENGm DISC SETUP
DISC MENU
If a disc is provided with a menu, you can display the menu by navigating to Disc Menu and
pressing pl, or by pressing the MENU button on the remote control.
В em CD gs XQ
OPTION 1
IR Headphone © © © ©
ODO
MENU AUDIO SUBTITLE MUTE
MENU—O OO ®@
E CH NO 0/13 O 00:00:01
Menu Play
INFORMATION
Navigate to Information, and press PIl. The disc and playback information will be shown
on the top of the screen.
IR Headphone
aa aa TR OFF/M|ON/PII
E
HE REAR SEAT ENTERTAINMENT IH
DIGITALSETUP = ENG
MUTE
To mute the sound, you can either navigate to MUTE and press Pll, or press the MUTE
button on the remote control. Repeating the above step will recover the sound.
IR Headphone
MENU AUDIO SUBTITLE MUTE
OOO G— MUTE
ANGLE REPEAT AB PROGRAM
OOOO
Hl REAR SEAT ENTERTAINMENT IH
ENGu DISC SETUP
AUDIO
If a DVD is provided with different audio languages, you can choose the audio language you
prefer by navigating to Audio and pressing pI, or by pressing the AUDIO button on the
remote control.
CI CD >
E EVE OFF/M|ON/II
IR Headphone
Display
Setup
Disc Menu
Information
MENU AUDIO SUBTITLE MUTE
auDio | OPO @
Audio
ANGLE REPEAT AB
OOO
Note:
For VCD or CD, you can choose different channels to play.
HE REAR SEAT ENTERTAINMENT IH
DISC SETUP m ENG
SUBTITLE
Select the subtitle you prefer on DVDs by navigating to Subtitle and pressing PII , or
pressing the SUBTITLE button on the remote control during playback.
ess CI EH CCCI» COED
>
IR Headphone
Display
Setup
Disc Menu
Information
A a
SL
io |
Subtitle
MENU AUDIO SUI BTITLE M
О O VOL SUBTITLE
OOOO
0/3 NO 0/13 00:00:03
[ 1 English ]
Hl REAR SEAT ENTERTAINMENT IH
ENGu DISC SETUP
REPEAT
repeatediy.
ОРТ | МОРЕ a» DIE CLINT]
IR Headphone
Display
Setup
Disc Menu
Information
Mute
Audio
Subtitle
Repeat
NO 0/13 ®00:00:03
[ chapter ]
22 CH
Repeat:
0/3
Note:
During a playback, if the option Repeat is selected, or the Repeat button on the remote
control is pressed, the title/chapter of a DVD or the track/entire disc of a CD will be played
| REPEAT
The REPEAT mode will be changed each time the REPEAT button is pressed.
HE REAR SEAT ENTERTAINMENT IH
DISC SETUP = ENG
ZOOM
If you want to zoom the picture on the screen, navigate to Zoom and press II . The zooming
rate will be changed to 2, 3, 4, 1/2, 1/3, 1/4 and 1 time its original size each time the button is
pressed.
ee comp com
Ir Headphone
Display
Setup +
Note:
If the option ZOOM is selected during the playback, the movie will be automatically paused.
Hl REAR SEAT ENTERTAINMENT IH
ENGm MODE
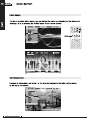
MODE
When the MODE button on the unit is pressed, an option list will pop up, which includes DVD,
USB, Click&Go AV in and AV Input.
«= a» EE]
VIDEO
VIDEO
Pl to start the playback.
m USB: Select this if you want to watch the video clips, listen to music, or view pictures in a
USB disk. Navigate to SES , press II to load the USB disk, and the menu below will
О
Pop tp a»
® [BABY BIRTH] BABY01.JPG
Je 77 a CA)
É] 02.8IRTHDAY a 002.BABY02
= [С] 03.CEREMONY a. 003.BABYOS
(С о4.РАВТУ a. 004.BABYO4
Г
eee
e
H Click&Go AV IN (applicable to Duo Deluxe only)
Select this if you want to play the same movie on 2 screens
m AV INPUT: Select this if you want to play the files in other device (or ATV box)
connected through AV in/out.
HE REAR SEAT ENTERTAINMENT IH
FUNCTIONS ON THE REMOTE CONTROL w= ENG
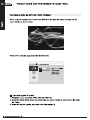
PLAYING AT FAST SPEED
1. Press << or»» on the remote control during playback.
2. The playback speed will be changed each time you press or. It
will respectively change to 2, 4, 8, 20 and 1 time its normal speed.
Note:
When a disc (except for CD or MP3 disc) is
playing at fast speed, the sound will be muted. « >
A-B PLAYBACK
1. During a playback, if A-B button on the remote control is pressed
once, the current point will be located by the remote control, and
Repeat A- will appear on the screen. © © © ©
2. Press A-B button again, point B will be located, and the player will Ó © © ©
play from point A to point B repeatedly.
3. Press A-B button for the third time to cancel the A-B playback, and 6 amo 5
the player will resume its normal playback. “>
VO | AB
|
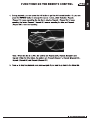
ANGLE
While playing a scene recorded with multiple angles, press the O © © ©
ANGLE button on the remote control to change the angle. If the O © © ©
scene is not recorded with multiple angles, the button will be invalid.
O00
ANGLE—-C) Ó
Hl REAR SEAT ENTERTAINMENT IH
SEEENGE FUNCTIONS ON THE REMOTE CONTROL
PROGRAM
The PROGRAM function can automatically play chapters or tracks according to the order
you program.
1. After inserting a disc, press the PROGRAM button on the remote control, and the menu
below will pop up.
MENU AUDIO SUBTITLE MUTE
© © Ô G-—PROGRAM
2. Use t, 4, €,» and the number keys to select chapters, and arrange them in an order
you prefer.
HE REAR SEAT ENTERTAINMENT IH
FUNCTIONS ON THE REMOTE CONTROL = ENG
3. Use T,+,€ ,> to move the cursor to Play, and press Pll to confirm.
E: RE
4. To cancel the program, press the PROGRAM button again.
Note:
1. When the player is off or the disc is taken out, the program you arrange will be removed.
2. If the chapter you select does not exist, the program playback will be canceled
automatically.
3. This function may be invalid in some discs.
Hl REAR SEAT ENTERTAINMENT IH
ENGm FUNCTIONS ON THE REMOTE CONTROL
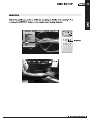
PLAYING A DISC IN MP3 OR JPEG FORMAT
When a disc is inserted and if there is an MP3 file in the disc, the player will play the file
automatically as shown below.
Press OFF to exit the page and enter the folder list.
8 [BLUES] BLUES01.MP3 1
ше
y
e © A =} 001.BLUES01
(C] o2ROCKANDROLL 5) 002.BLUES02
Ji 003.BLUES03
Fi 004.BLUESO4
№ If you want to listen to music:
1. Navigate to (J, and press Pll to enter the folder list.
2. Select the folder which stores the music clips you want to listen to, and press Pll to enter
the folder.
3. Select the clip you prefer, and press Pll to start playing it.
HE REAR SEAT ENTERTAINMENT IH
FUNCTIONS ON THE REMOTE CONTROL = ENG
4. During playback, you can press the A-B button to get the A-B repeat function. Or, you can
press the REPEAT button to change the repeat modes, which includes Repeat:
[ Repeat 1 ] means repeating the clip that is playing; Repeat: [ Repeat Dir ] means
repeating the folder; Repeat: [ Repeat All ] means repeating the disc; and Repeat:
[ Repeat Off ] means no repeating.
Repeat: Repeat 1
Note: When the disc is a DVD, the options are Repeat: [Off], Repeat: [Chapter] and
Repeat: [Title]; for other discs, the options are Repeat: [Repeat 1], Repeat: [Repeat Dir] ,
Repeat: [Repeat All] and Repeat: [Repeat Off].
5. Press IN to stop the playback, and press IN again if you want to go back to the folder list.
Hl REAR SEAT ENTERTAINMENT IH
ENGm FUNCTIONS ON THE REMOTE CONTROL
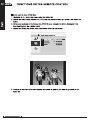
E |f you want to view JPEG files:
1. Navigate to © , and press Pll to enter the folder list.
2. Select the folder which stores the JPEG files you want to view, and press Pll to enter the
folder.
3. When you navigate in the folder, the JPEG file you navigate to will be displayed in its
thumbnail form in the middle blank.
4. Select the JPEG you prefer, and press Pll to view it in full screen.
В [BEST FRIENDS] FRIENDS01.JPG у
A lam/01-BEST FRIENDS 14€ 001.FRIENDS01
I 02.BIRTHDAY a 002.FRIENDSOT
= (] 03.CEREMONY aa. 003.FRIENDS01
C] 04.PARTY saa 004.FRIENDSO!
5. Press to stop the full-screen display, and press IN again if you want to go back to the
folder list.
HE REAR SEAT ENTERTAINMENT IH
FUNCTIONS ON THE REMOTE CONTROL m ENG
H |f you want to watch video clips:
1. Navigate to @,, and pressbIIto enter the folder list.
2. Select the folder which stores the clips you want to watch, and press Pll to enter the folder.
3. Select the clip you prefer, and pressbIIto start playing it.
4. During playback, you can press the A-B button to get the A-B repeat function. Or, you can
press the REPEAT button to change the repeat modes, which includes Repeat: [ Repeat 1 ],
Repeat: [ Repeat Dir ], Repeat: [ Repeat All ], and REP Off. REP1 means repeating the clip]
that is playing; REP DIR means repeating the folder; REP ALL means repeating the disc;
and REP Off means no repeating.
Lu ® [DAD] DADSWIMSO1.AVI i
Je ET) ii] 91.DADSWIMSO1
(CI oz 6RADUATION (| 02.DADSWIMSO2
© (CI os.sWEET HOME {| 03.DADSWIMSO3
[С] 04.200 MIME 04.DADSWIMSO4
Cie,
5. Press to stop the playback, and press IN again if you want to go back to the folder list.
Hl REAR SEAT ENTERTAINMENT IH
ZHFNGm OTHER
DIMENSION AND PARAMETERS
Product name:
Click 7 Lite
Click 7 Lite Duo
Click 7 Lite Duo Deluxe
Power: 12V / 1.5A
Audio out: Line L/R
Video out: CVBS
Main unit size:
Monitor size:
222 X 160 X 44mm
222 X 160 X 31mm
Main unit weight:
Monitor weight:
728 9
381 g
HE REAR SEAT ENTERTAINMENT IH
OTHER m ENG
TROUBLE SHOOTING
Symptoms Possible causes Remedies
Load the disc with the label side
The disc Disc is not loaded correctly. up, and firmly press it into the
center hole.
does not
Make sure there is no scratch or
play Disc is scratched or not clean. fingerprint on it.
Wrong regional disc. Use the right regional disc.
AV cable is disconnected. Connect the cable firmly.
No display ho pa vr or connection for Ve correctly
Wrong mode setting. Set the right mode.
AV cable is disconnected. Connect the cable firmly.
No sound
Wrong setting or connection for | Setting or connecting correctly
the player. with your player.
Maintenance and clean the unit only as recommended in the instruction manual.
Hl REAR SEAT ENTERTAINMENT IH
NEXT BASE
one step further
www.next-base.com
CLICK 7 LITE SERIES-ENG-MANUAL-AQ
|