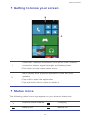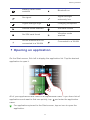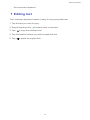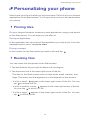
1
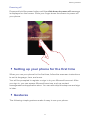
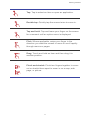
HUAWEI
W1
User Guide
Welcome to HUAWEI
1 Contents
Safety Precautions ............................................................................ 1
Foreword ......................................................................................... 3
Getting started................................................................................. 4
Getting to know your phone .................................................................................. 4
Installation ............................................................................................................. 5
Charging the battery .............................................................................................. 6
Battery saving tips .................................................................................................. 6
Powering your phone on and off............................................................................ 7
Setting up your phone for the first time.................................................................. 8
Gestures................................................................................................................. 8
Getting to know your screen ................................................................................ 10
Status icons.......................................................................................................... 10
Opening an application ........................................................................................ 11
Locking the screen ............................................................................................... 12
Unlocking the screen............................................................................................ 12
Texting................................................................................................................. 12
Editing text........................................................................................................... 14
Personalizing your phone ............................................................... 15
Pinning tiles.......................................................................................................... 15
Resizing tiles......................................................................................................... 15
Moving tiles ......................................................................................................... 16
Unpinning tiles ..................................................................................................... 17
Changing the theme ............................................................................................ 18
Changing the lock screen background.................................................................. 18
Setting a ringtone ................................................................................................ 18
Adjusting the screen brightness............................................................................ 18
Setting a screen timeout period............................................................................ 19
Screen lock........................................................................................................... 19
Calls............................................................................................... 20
Making a call........................................................................................................ 20
Making emergency calls ....................................................................................... 20
Viewing missed calls and returning them.............................................................. 20
Answering or rejecting a call ................................................................................ 21
Making a conference call...................................................................................... 21
Inviting more people to a conference call ............................................................. 21
Having a private conservation............................................................................... 21
Call forwarding .................................................................................................... 21
Setting up your voicemail ..................................................................................... 22
Using voice dialing to call a contact ...................................................................... 22
People............................................................................................ 23
ii
Adding an account............................................................................................... 23
Creating a contact................................................................................................ 23
Importing contacts using Bluetooth ...................................................................... 24
Importing contacts from a SIM card...................................................................... 24
Editing a contact .................................................................................................. 24
Searching for a contact ........................................................................................ 24
Deleting a contact ................................................................................................ 25
Sharing a contact ................................................................................................. 25
Linking contacts ................................................................................................... 25
Unlinking a contact .............................................................................................. 26
Filtering your contact list ...................................................................................... 26
Creating a room................................................................................................... 26
Editing a room ..................................................................................................... 27
Creating a contact group ..................................................................................... 27
Editing a contact group ........................................................................................ 28
Deleting a contact group...................................................................................... 28
Internet connection ........................................................................ 29
Turning on mobile data connection ...................................................................... 29
Adding an APN .................................................................................................... 29
Turning on data roaming...................................................................................... 29
Connecting to a WLAN ........................................................................................ 30
Connecting to a hidden WLAN............................................................................. 30
Turning off mobile data connection...................................................................... 30
Turning WLAN off ................................................................................................ 31
Surfing the web ............................................................................. 32
Browser................................................................................................................ 32
Adding a website to your favorites ....................................................................... 33
Accessing your favorites ....................................................................................... 33
Deleting your favorites ......................................................................................... 33
Editing your favorites............................................................................................ 33
Clearing your browser history............................................................................... 33
Sharing .......................................................................................... 35
Turning on Bluetooth ........................................................................................... 35
Sharing files using Bluetooth ................................................................................ 35
Copying files to and from your computer ............................................................. 35
Messaging...................................................................................... 37
Sending a text message........................................................................................ 37
Sending a multimedia message ............................................................................ 37
Chatting online .................................................................................................... 38
Viewing a thread.................................................................................................. 38
Sending a text message to a contact group .......................................................... 38
Deleting a message .............................................................................................. 39
Email.............................................................................................. 40
Adding an email account...................................................................................... 40
iii
Checking emails ................................................................................................... 40
Sending an email.................................................................................................. 40
Deleting an email ................................................................................................. 41
Modifying email account settings ......................................................................... 41
Linking mailboxes into one ................................................................................... 41
Unlinking mailboxes ............................................................................................. 42
Camera .......................................................................................... 43
Taking a photo..................................................................................................... 44
Shooting a video .................................................................................................. 44
Photos hub..................................................................................... 45
Viewing photos .................................................................................................... 45
Marking a photo as your favorite.......................................................................... 46
Sharing photos and videos ................................................................................... 46
Changing the Photos hub background ................................................................. 46
Entertainment ................................................................................ 47
Listening to music ................................................................................................ 47
Watching videos................................................................................................... 48
Navigation...................................................................................... 49
Turning on GPS .................................................................................................... 49
Browsing the map ................................................................................................ 49
Calendar ........................................................................................ 50
Viewing the calendar............................................................................................ 50
Viewing your agenda ........................................................................................... 50
Adding an appointment ....................................................................................... 50
Adding a to-do task ............................................................................................. 51
Alarms ........................................................................................... 52
Adding an alarm .................................................................................................. 52
Turning on and off an alarm................................................................................. 52
Deleting an alarm................................................................................................. 52
Office............................................................................................. 53
Creating and editing a Word document ............................................................... 53
Creating and editing an Excel workbook .............................................................. 53
Viewing and editing a PowerPoint presentation.................................................... 54
Saving a file to Windows Live SkyDrive ................................................................. 54
Applications ................................................................................... 55
Downloading applications .................................................................................... 55
Installing applications from the Store.................................................................... 55
Uninstalling applications....................................................................................... 55
Phone settings................................................................................ 56
Traffic manager.................................................................................................... 56
iv
Setting the time zone and language ..................................................................... 56
Checking your phone storage............................................................................... 56
Backup................................................................................................................. 56
Phone finder ........................................................................................................ 57
FAQs .............................................................................................. 58
For more help................................................................................. 60
Personal information and data security ........................................... 61
Legal Notice ................................................................................... 62
Safety Precautions
• Safety Precautions
Please read the safety precautions carefully to ensure the correct use of
your mobile phone.
Do not crash, throw, or puncture your mobile phone. Avoid the
falling, squeezing, and bending of your mobile phone.
Do not use your mobile phone in a moist environment, such
as the bathroom. Prevent your mobile phone from being
soaked or washed in liquid.
Do not switch on your mobile phone when it is prohibited to
use phones or when the phone may cause interference or
danger.
Do not use your mobile phone while driving.
Follow any rules or regulations in hospitals and health care
facilities. Switch off your mobile phone near medical
apparatus.
Switch off your mobile phone in aircraft. The phone may
cause interference to control equipment of the aircraft.
Switch off your mobile phone near high-precision electronic
devices. The phone may affect the performance of these
devices.
Do not attempt to disassemble your mobile phone or its
accessories. Only qualified personnel are allowed to service
or repair the phone.
Do not place your mobile phone or its accessories in
containers with a strong electromagnetic field.
Do not place magnetic storage media near your mobile
phone. Radiation from the phone may erase the information
stored on them.
Do not put your mobile phone in a high-temperature place or
use it in a place with flammable gas such as a gas station.
Keep your mobile phone and its accessories away from
children. Do not allow children to use your mobile phone
without guidance.
1
Safety Precautions
Use only approved batteries and chargers to avoid the risk of
explosions.
Observe any laws or regulations on the use of wireless
devices. Respect others' privacy and legal rights when using
your wireless device.
Strictly follow the relevant instructions of this manual while
using the USB cable. Otherwise your mobile phone or PC
may be damaged.
2
Foreword
• Foreword
Thank you for choosing the HUAWEI W1 smartphone.
With HUAWEI W1, you can:
• Enjoy new Windows features right in the palm of your hand.
• Surf the Internet at lightening-fast speeds.
• Immerse yourself in an extraordinary audio experience.
• Take photos and record videos anytime, anywhere.
• A lot more
Now start exploring the amazing new world of HUAWEI W1!
All pictures and illustrations in this document are for your reference only.
The actual product may vary.
3
Getting started
• Getting started
- Getting to know your phone
1
2
14
3
4
13
5
12
15
6
7
11 10 9
8
16
1
Earpiece
2
Power button
3
Front camera
4
Status indicator
5
Proximity sensor
6
Camera button
7
Search button
8
Micro USB port
9
Start screen button
10
Microphone
11
Back button
12
Flashlight
13
Rear camera
14
Headset jack
15
Volume button
16
Speaker
Button functions
• Tap
Back button
to return to the previous screen.
• Tap and hold
applications.
4
to display recently used
Getting started
• Tap
Start screen button
Search button
to display the Start screen.
• Tap and hold to open the voice controller. You
can then give voice commands to your phone. For
example, to call a number, simply tell the phone
which digits to dial.
Tap
to open Bing search.
- Installation
1
2
3
4
a
b
5
1. Open the battery cover.
2. Install the SIM card.
Insert the SIM card into the SIM card slot with its metal contacts facing
down.
3. Install the microSD card.
Insert the microSD card into the microSD card slot with its metal contacts
facing down.
5
Getting started
4. Install the battery.
Align the battery's metal contacts with those at the top of the battery
compartment (refer to position a in the preceding figure). Then press the
other end of the battery (position b in the preceding figure) to fix it to the
battery compartment.
5. Close the battery cover.
- Charging the battery
Before you charge the battery, ensure that it is correctly installed in your
phone.
1. Connect your charger to the provided USB cable.
2. Connect the charger to a power outlet.
3. Connect your phone to the USB cable to start charging the battery.
The status indicator shows your phone's battery level:
• Blinking red: The battery level is low, and the phone needs to be charged
immediately.
• Steady red: Your phone is charging.
• Steady green: Your phone is charging, and the battery level is high or full.
- Battery saving tips
• Enable power saver.
Tap
> battery saver. Switch Battery Saver to on
.
• Set the screen timeout period to a small value.
Tap
> lock screen. Set the screen timeout period to a small value.
6
Getting started
• Set the screen brightness to a low value.
Tap
> brightness. Switch automatic adjustment to off
.
• Set the phone volume to a low value.
Press the volume button to lower the volume.
Tap
> ringtones + sounds. Follow the onscreen instructions to
disable unwanted sounds, such as keytones and touch sounds.
To conserve battery power, use a headset to make calls or listen to music.
• Turn off Bluetooth.
Tap
> Bluetooth. Switch Bluetooth to off
.
• Turn off WLAN.
Tap
> WLAN. Switch WLAN to off
.
• Turn off GPS.
Tap
> location. Switch GPS to off
.
- Powering your phone on and off
Powering on
Press and hold the power button until your phone vibrates.
When you use your phone for the first time or you have not used it in a
long time, it may not power on because the battery level is too low.
Charge your phone for a while before you attempt to power it on.
7
Getting started
Powering off
Press and hold the power button until the slide down to power off message
is displayed on the screen. Slide your finger down the screen to power off
your phone.
- Setting up your phone for the first time
When you use your phone for the first time, follow the onscreen instructions
to set its language, time, and more.
You will be prompted to register or sign in to your Microsoft account. After
you sign in, you can access Microsoft services, such as contact
management and application store. You can also skip this step now and sign
in later.
- Gestures
The following simple gestures make it easy to use your phone.
8
Getting started
Tap: Tap to select an item or open an application.
Double-tap: Quickly tap the screen twice to zoom in.
Tap and hold: Tap and leave your finger on the screen
for a moment until an option menu is displayed.
Flick: Where applicable, swipe your finger in the
direction you want the screen to move to scroll rapidly
through menus or pages.
Drag: Touch and hold an item and then drag it to
another position.
Pinch and stretch: Pinch two fingers together to zoom
out or stretch them apart to zoom in on a map, web
page, or picture.
9
Getting started
- Getting to know your screen
1
2
1
Status bar: displays information such as the time, network
connection status, signal strength, and battery level.
• Flick down to view more status icons.
2
Main display area: displays application icons and their
updates.
• Tap a tile to open the application.
• Tap and hold a tile to resize or delete it.
- Status icons
The following status icons may appear on your phone's status bar.
Airplane mode enabled
Charging
Battery low
Battery full
10
Getting started
Battery saver mode
enabled
Bluetooth on
No signal
Signal strength
extremely low
Signal strength high
Charging completed
Silence mode enabled
SIM card locked
No SIM card found
Vibration mode
enabled
WLAN enabled but not
connected to a WLAN
Connected to a WLAN
- Opening an application
On the Start screen, flick left to display the application list. Tap the desired
application to open it.
All of your applications are listed in an alphabetical order. If you have lots of
applications and want to find one quickly, tap and enter the application
name.
For applications pinned to the Start screen, tap an icon to open the
application.
11
Getting started
- Locking the screen
When you are not using your phone, press the power button to lock the
screen.
You can also set a screen timeout period and have your phone automatically
lock its screen after being idle for the set period.
In the application list, tap
> lock screen > Screen times out after.
Set the desired screen timeout period.
- Unlocking the screen
Press the power button to wake the screen. Then flick up to unlock it.
- Texting
Your phone features the Microsoft QWERTY keyboard, which lets you enter
text quickly.
The keyboard layout varies depending on the scenario. The following
figure is provided for your reference only.
12
Getting started
6
1
2
3
4
5
1
Switch between uppercase and lowercase.
2
Switch to the number and symbol keyboard.
3
Tap and hold to select an input language.
4
Enter a space.
5
Start a new line.
6
Delete the character to the left of the cursor.
1
2
3
1
4
• Enter a character.
• Tap and hold to display more characters like this.
2
Switch to the next number and symbol screen.
3
Switch to letter input mode.
4
Enter an emoticon.
If the onscreen keyboard blocks any operation buttons, tap
13
to hide
Getting started
the onscreen keyboard.
- Editing text
Your onscreen keyboard makes it easy to copy and paste text.
1. Tap the text you wish to copy.
2. Drag the grab points
3. Tap
to select more or less text.
to copy the selected text.
4. Tap the location where you wish to paste the text.
5. Tap
to paste the copied text.
14
Personalizing your phone
• Personalizing your phone
Want to see your favorite photo on the lock screen? Want to pin your favorite
applications to the Start screen? You'll enjoy how much you can personalize
your phone.
- Pinning tiles
Pin your frequent contacts, commonly used applications, songs, and emails
to the Start screen. You are what you pin after all.
Pinning an application
In the application list, tap and hold the application you wish to pin. From the
displayed option menu, tap pin to start.
Pinning a contact
In the contact list, tap the contact you wish to pin and tap
.
- Resizing tiles
You can resize the tiles pinned to the Start screen.
1. Tap and hold the tile you wish to resize until it enlargers.
2. Tap the arrow icon in the lower right corner of the tile.
The tiles on the Start screen come in three sizes: small, medium, and
large. The arrow icon that appears on a tile depends on the tile size.
• If a tile is small, appears in the lower right corner of the tile. You can
tap to enlarge the tile.
• If a tile is medium in size, appears in the lower right corner of the tile.
You can tap to shrink the tile.
• If a tile is large, appears in the lower right corner of the tile. You can
tap to shrink the tile.
15
Personalizing your phone
- Moving tiles
You can move tiles to customize the Start screen.
1. Tap and hold the tile you wish to move until it enlargers.
2. Drag the tile to the desired position and tap
16
.
Personalizing your phone
- Unpinning tiles
1. Tap and hold the tile you wish to unpin until it enlargers.
2. Tap
in the upper right corner of the tile.
17
Personalizing your phone
- Changing the theme
You can change your phone's background and accent colors.
In the application list, tap
> theme.
• Tap the Background box to choose a background color.
• Tap the Accent color box to choose an accent color.
- Changing the lock screen background
1. In the application list, tap
> lock screen.
2. Tap the Background box then photo or Bing.
• If you tapped photo, tap change photo to choose a photo from your photo
albums.
• If you tapped Bing, your phone shuffles through photos from Bing on your
lock screen.
Using Bing background photos requires Internet access and generates
data traffic.
- Setting a ringtone
In the application list, tap
> ringtones + sounds. Follow the onscreen
instructions to set a ringtone for your phone.
- Adjusting the screen brightness
In the application list, tap
> brightness.
• You can switch automatic adjustment to on
automatically adjust its screen brightness.
to have your phone
• Alternatively, you can switch automatic adjustment to off
adjust the screen brightness.
18
and manually
Personalizing your phone
- Setting a screen timeout period
1. In the application list, tap
> lock screen.
2. Tap the Screen times out after box and select the desired screen timeout
period.
- Screen lock
To protect your phone from unauthorized access, set a screen lock.
Remember your screen unlock code, which is the only code that can
unlock your screen. If you forget your screen unlock code, please
contact Huawei customer service personnel.
1. In the application list, tap
> lock screen.
2. Switch Password to on
.
3. Follow the onscreen instructions to enter the screen unlock code. Then
tap done.
To change the unlock code, tap change password.
19
Calls
• Calls
- Making a call
In the application list, tap
make a call:
• Tap
. You can use any of the following methods to
, enter a phone number, and tap call.
• Tap , select the contact you wish to call, and tap the desired menu item
such as call mobile.
• Tap a number from the call history and then tap call number.
- Making emergency calls
In the event of an emergency, you will still be able to make emergency calls
without the use of a SIM card. However, you must still be in a coverage area.
1. From the application list, tap
2. Tap
.
.
If your phone does not have a SIM card inserted, tap emergency call on
the displayed dialog box.
3. Enter an emergency number for your country or region.
4. Tap call.
Emergency calls are subject to your cellular network quality, use
environment, service provider policies, and local laws and regulations.
Never rely solely on your phone for critical communications when
emergencies occur.
- Viewing missed calls and returning them
All your recent calls are displayed in your call history.
In the application list, tap
to display your recent calls.
Find a missed call and tap it. Then tap call number to return the missed call.
20
Calls
- Answering or rejecting a call
When a call comes in, you can:
• Tap answer to answer it.
• Tap ignore to reject it.
- Making a conference call
With your phone, making conference calls with your friends, family, and coworkers can be done in just a few easy steps.
Before you make conference calls, make sure that you have subscribed
to this service. For details, contact your service provider.
1. Call the first participant.
2. When the call is connected, tap
to call the second participant.
3. When the second call is connected, tap
to start a conference call.
- Inviting more people to a conference call
1. During a conference call, tap
to add a participant.
2. When the call is answered, tap
call.
to add the participant to the conference
- Having a private conservation
During a conference call, tap
and then the desired phone number.
Your phone then places the conference call on hold while you have a private
conversation. The other participants remain on the conference call. To return
to the conference call, tap .
- Call forwarding
Too busy to answer all your calls with one phone? Forward them to another
number and never miss an important call again!
21
Calls
1. In the application list, tap
forwarding.
> Additional phone settings > call
2. Switch Always forward, Forward when busy, Forward when
.
unanswered, or Forward when unreachable to on
3. Enter the phone number to which you wish to forward calls and tap OK.
The phone number you set appears under the call forwarding switch
(Always forward, Forward when busy, Forward when unanswered,
or Forward when unreachable). You can tap the phone number to
change it.
- Setting up your voicemail
In addition to forwarding calls to another phone number, you can forward
calls to your voicemail and listen to them at anytime.
Before you use voicemail, make sure that you have subscribed to this
service. For details, contact your service provider.
1. In the application list, tap
2. Drag
.
up. On the displayed screen, tap settings.
3. In the voicemail number box, enter your voicemail number.
- Using voice dialing to call a contact
Your phone supports voice dialing, which enables you to call a contact by
speaking their name or number into your phone.
1. In the application list, tap
2. Tap and hold
.
.
3. Hold the phone's microphone near your face and say a contact's name or
phone number. For example, Tom or 1234567.
Voice dialing may occasionally be inaccurate. If your phone calls the wrong
person, tap to cancel the call.
22
People
• People
The People hub displays the contacts saved in your phone's memory, SIM
card, and social networking service (SNS) accounts. You can also view your
friends' updates and post your own status.
In the application list, tap
to enter the People hub.
- Adding an account
By adding an account to your phone, you can conveniently view this
account's contacts and contact updates. You can also save contacts to
existing accounts.
1. Open the People hub. Flick left or right to go to what's new.
2. Tap set up account.
3. Select an account type, such as Hotmail.
4. Enter your email address and password. Tap sign in.
- Creating a contact
When you create a contact, you must specify the account to which you
wish to save the contact. Therefore, before you create a contact, add at
least one account to your phone. Account types you can add include
Hotmail, Google, and Exchange.
1. Open the People hub. Flick left or right to go to all.
2. Tap
.
3. If you have signed in to multiple accounts, tap the account to which you
wish to save the contact.
4. Follow the onscreen instructions to enter the contact information. Then tap
.
5. When done, tap
.
23
People
- Importing contacts using Bluetooth
If the desired contacts are saved in a device that supports Bluetooth, you can
import the contacts to your phone using Bluetooth.
Before you import contacts, connect your phone and the desired device
using Bluetooth.
1. From the application list, tap
2. Tap the desired device name. If the desired device doesn't appear on the
list, tap choose device to search for and connect to it.
3. Tap start.
- Importing contacts from a SIM card
You can copy contacts from your SIM card to your phone.
1. Open the People hub. Flick left or right to go to all.
2. Drag up. On the displayed screen, tap settings > import SIM
contacts.
3. Select the contacts you wish to import and tap import.
- Editing a contact
1. Open the People hub. Flick left or right to go to all.
2. Tap the contact you wish to edit.
3. Tap
.
4. If the contact is linked to multiple accounts, select the account in which
you wish to edit the contact.
5. Follow the onscreen instructions to edit the contact information. Then tap
.
- Searching for a contact
1. Open the People hub. Flick left or right to go to all.
24
People
2. Tap
.
3. Enter the contact's name.
Search results appear as you type.
- Deleting a contact
1. Open the People hub. Flick left or right to go to all.
2. Tap the contact you wish to delete.
3. Drag
up. On the displayed screen, tap delete.
4. If the contact is linked to multiple accounts, select the account from which
you wish to delete the contact.
5. Tap delete.
- Sharing a contact
You can easily share contacts with other devices.
1. Open the People hub. Flick left or right to go to all.
2. Tap the contact you wish to share to display the profile screen.
3. Drag
4. Tap
up. On the displayed screen, tap share contact.
.
5. Select a sharing method.
6. Follow the onscreen instructions to share the contact.
The onscreen instructions vary depending on the sharing method you
select.
- Linking contacts
Do you have multiple entries for the same contact from different SNS or
email accounts? You can link these entries to better manage your contacts.
1. Open the People hub. Flick left or right to go to all.
2. Tap the main contact you wish to link to.
25
People
3. Tap
> choose a contact. Select the contacts to be linked.
After you link the contacts, they are all saved to the main contact and are not
displayed individually in the People hub.
- Unlinking a contact
Unlinking a linked contact does not delete its information. When a linked
contact is unlinked, it is displayed as an individual contact in its original
account.
1. Open the People hub. Flick left or right to go to all.
2. Tap the main contact.
3. Tap
.
4. Tap the contact you wish to unlink.
5. Tap unlink.
- Filtering your contact list
If multiple accounts are available in your People hub, you can filter your
contact list to display contacts only from specified accounts.
Filtering your contact list does not delete your contacts.
1. Open the People hub. Flick left or right to go to all.
2. Drag
list.
up. On the displayed screen, tap settings > filter my contact
3. Select the check boxes of the accounts that contain the contacts you wish
to display. Then tap .
- Creating a room
You can create rooms to have group chats, share calendar events and
photos, and more. Create a room and gather with your family and friends.
Using a room to have group chats or sharing files generates data traffic. If
you are using a mobile network, contact your service provider to choose an
appropriate data plan.
26
People
1. Open the People hub. Flick left or right to go to together.
2. Tap
> Room.
3. Name the room and tap
4. Tap
.
.
5. Tap a friend you wish to invite. Then tap Send to send an invitation
message.
6. Tap
to invite more people to the room.
7. When done, tap
.
- Editing a room
You can rename a room or set its background.
1. Open the People hub. Flick left or right to go to together.
2. Tap the room you wish to edit.
3. Drag
up. On the displayed screen:
• To add group members, tap
instructions.
>
and follow the onscreen
• To set a background for the room, tap choose background.
• To rename the room, tap rename.
- Creating a contact group
You can create a contact group and send a message to all group members
simultaneously.
1. Open the People hub. Flick left or right to go to together.
2. Tap
> Group.
3. Name the group and tap
.
4. Tap
to choose a contact you wish to add to the group.
5. Tap
to add more contacts to the group.
6. When done, tap
.
27
People
- Editing a contact group
You can rename a contact group and manage its members.
1. Open the People hub. Flick left or right to go to together.
2. Tap the group you wish to edit.
3. Drag
up. On the displayed screen:
• To add group members, tap
instructions.
>
and follow the onscreen
• To rename the group, tap rename.
- Deleting a contact group
1. Open the People hub. Flick left or right to go to together.
2. Tap the group you wish to delete.
3. Drag
up. On the displayed screen, tap delete.
4. Tap delete.
28
Internet connection
• Internet connection
Your phone brings you into the new age of wireless Internet surfing. Let's
take a look at how this works.
You can access the Internet through a mobile network or wireless local area
network (WLAN).
- Turning on mobile data connection
1. In the application list, tap
> cellular.
2. Switch Data connection to on.
When you are not using mobile data connection, turn it off to avoid
generating additional data traffic.
- Adding an APN
1. In the application list, tap
> cellular > add internet apn.
2. Configure the required settings.
3. When done, tap
.
- Turning on data roaming
When you are roaming outside your service provider's coverage area, turn
on data roaming to continue accessing the Internet with your mobile data
connection.
1. In the application list, tap
> cellular.
2. Switch Data connection to on.
3. Switch Data roaming options to roam.
Using your mobile data connection while roaming may result in hefty
data fees. For more information, contact your service provider.
29
Internet connection
- Connecting to a WLAN
You can connect your phone to a WLAN to access the Internet.
If both WLAN and mobile data connection are available, your phone
preferentially accesses the Internet through the WLAN.
1. In the application list, tap
2. Switch WLAN to on
> WLAN.
.
Your phone then searches for WLANs within range.
3. Tap a WLAN to connect to it.
• You can connect to open WLANs directly.
• To connect to an encrypted Wi-Fi network, enter the password when
prompted.
- Connecting to a hidden WLAN
Though your phone can't automatically find WLANs whose service set
identifiers (SSIDs) are hidden, you can follow these steps to connect to
hidden WLANs.
1. In the application list, tap
> WLAN.
2. Tap WLAN and switch WLAN to on
3. Tap advanced >
.
.
4. Enter an SSID and tap add.
• You can connect to open WLANs directly.
• To connect to an encrypted Wi-Fi network, enter the password when
prompted.
Connecting to a hidden WLAN increases power consumption. Turn off
WLAN when you don't need it to save battery power.
- Turning off mobile data connection
When you are not using mobile data connection, turn it off to reduce your
phone's data traffic and battery consumption.
30
Internet connection
1. In the application list, tap
> cellular.
2. Switch Data connection to off.
- Turning WLAN off
Turn off WLAN when you don't need it to save battery power.
1. In the application list, tap
2. Switch WLAN to off
> WLAN.
.
31
Surfing the web
• Surfing the web
You can start surfing the web right away using your phone's browser and
stay on the ball with up-to-date news and information. Staying connected
has never been easier.
- Browser
In the application list, tap
to open the browser.
Configure the browser settings before using it for the first time.
1
3
2
1
Enter keywords or the website address you wish to visit.
2
Refresh the web page.
3
Display more options.
32
Surfing the web
- Adding a website to your favorites
To conveniently access regularly visited websites, save them to your
favorites.
1. Launch the browser and go to the desired website.
2. Drag
up. On the displayed screen, tap add to favorites.
3. Choose whether to name the website and tap
.
- Accessing your favorites
1. Launch the browser and drag
up. On the displayed screen, tap
favorites.
2. Tap the website you wish to visit.
- Deleting your favorites
1. Launch the browser and drag
up. On the displayed screen, tap
favorites.
2. Tap and hold the website you wish to delete from your favorites. Then tap
delete on the displayed option menu.
- Editing your favorites
1. Launch the browser and drag
up. On the displayed screen, tap
favorites.
2. Tap and hold the website you wish to edit. Then tap edit on the displayed
option menu.
3. When done, tap
.
- Clearing your browser history
To better protect your privacy, clear your browsing history from time to time.
33
Surfing the web
1. Launch the browser and drag
up. On the displayed screen, tap
settings.
2. Tap delete history.
34
Sharing
• Sharing
You can share the latest news, hottest songs, stunning photos, and much
more with your family and friends.
- Turning on Bluetooth
Your phone can use Bluetooth to connect to a device within 10 meters.
Obstacles, such as walls and electrical appliances, may affect your
Bluetooth connection.
1. In the application list, tap
2. Switch Bluetooth to On
> Bluetooth.
.
- Sharing files using Bluetooth
You can use Bluetooth to share photos, videos, and songs with your family
and friends.
To share files using Bluetooth, enable Bluetooth on your phone and the
receiving device.
1. Tap and hold the file you wish to send.
2. Tap share... > Bluetooth on the displayed option menu.
3. Tap the receiving device to start sending the file.
When another device is trying to send a file to your phone using Bluetooth,
tap accept in the displayed dialog box to start receiving the file.
- Copying files to and from your computer
1. Connect your phone to your computer using a USB cable.
2. Open the new drive that appears on your computer to view files stored in
your phone.
3. Copy the desired files to and from your computer.
35
Sharing
36
Messaging
• Messaging
Messaging makes it easy to stay in contact with your friends using text
messages or online chat.
- Sending a text message
1. In the application list, tap
.
2. Flick left or right to go to threads.
3. Tap
.
4. Enter the recipient's phone number, or tap
your contact list.
to select a recipient from
5. Tap type a message and write your text message.
6. When done, tap
to send the message.
- Sending a multimedia message
Want to share your favorite photos and videos with friends and family?
Attach them to your messages and spread the smiles all around.
Sending multimedia messages may cost more than sending text
messages. For details, contact your service provider.
1. In the application list, tap
.
2. Flick left or right to go to threads.
3. Tap
.
4. Enter the recipient's phone number, or tap
your contact list.
to select a recipient from
5. Tap type a message and write your message.
6. Tap
to attach a photo or video.
7. When done, tap
to send the multimedia message.
37
Messaging
- Chatting online
Chat with your friends online with Windows Live.
Before using Windows Live, make sure you've signed in to your Microsoft
account.
1. In the application list, tap
.
2. Flick left or right to go to online.
3. Tap
and set your status.
4. Start chatting away.
- Viewing a thread
1. In the application list, tap
.
2. Flick left or right to go to threads.
Conversations with the same contact are displayed in a thread.
3. Tap the thread you wish to view.
• Tap type a message to reply to the contact.
• Tap and hold any message. To delete it, tap delete. To forward it, tap
forward. To copy it, tap copy.
- Sending a text message to a contact
group
Want to send a text message to several contacts? Why waste time sending
it to them one at a time when you can create a group and send it to all of
them at once!
1. In the application list, tap
to enter the People hub.
2. Flick left or right to go to together.
3. In the Groups list, tap the desired group.
4. Tap text and write your text message.
5. When done, tap
.
38
Messaging
- Deleting a message
You can delete a thread from the message list or open a thread to delete
individual messages.
1. In the application list, tap
.
2. Flick left or right to go to threads.
3. In the message list, find the thread or message you wish to delete.
4. Tap and hold the thread or message. Then tap delete on the displayed
option menu.
You can also tap from the message list, select multiple threads, and
tap to delete them simultaneously.
39
Email
• Email
Your phone lets you send and receive emails to keep you connected even
when you are on the go.
- Adding an email account
To send and receive emails using multiple mailboxes, add multiple email
accounts to your phone.
1. In the application list, tap
2. Tap
> email + accounts.
to select an email account type.
3. Follow the onscreen instructions to enter your email address, password,
and required information.
4. Tap sign in.
After you add an email account, it appears in your application list.
- Checking emails
1. In the application list, tap the mailbox you wish to check.
2. In the inbox, flick left or right to find the email you wish to view.
• To reply to the sender, tap
> reply.
• To reply to the sender and all recipients, tap
• To forward the email, tap
> reply all.
> forward.
Retrieving your emails may be slightly delayed, depending on the
network condition. Tap to refresh your mailbox.
- Sending an email
1. In the application list, tap the mailbox you wish to use.
2. Tap
.
3. Enter the recipients and subject and compose your email.
4. When done, tap
.
40
Email
- Deleting an email
1. In the application list, tap the mailbox you wish to use.
2. In the email list, tap and hold the email you wish to delete.
3. Tap delete on the displayed option menu.
You can also select several emails and tap
simultaneously.
to delete them
- Modifying email account settings
You can name mailboxes, set how often they refresh, and more.
1. In the application list, tap
> email + accounts.
2. In the mailbox list, tap the email account you wish to configure.
3. Follow the onscreen instructions to modify the email account settings.
Do not change the default email account server address; otherwise you
may not be able to send or receive emails.
- Linking mailboxes into one
Busy switching between multiple email accounts and worried about missing
emails? You can link your mailboxes into one unified inbox to see all your
emails at a glance.
Add all necessary email accounts to your phone.
1. In the application list, tap any of the mailboxes you need.
2. Drag
up. On the displayed screen, tap link inboxes.
3. In the other inboxes list, tap the mailboxes you wish to link to the mailbox
you tapped in step 1.
4. Tap rename linked inbox and enter a new name.
The new unified mailbox then appears in the application list.
41
Email
- Unlinking mailboxes
1. In the application list, tap
2. Drag
.
up. On the displayed screen, tap linked inboxes.
3. In the this inbox list, tap the mailbox you wish to unlink.
4. Tap unlink.
42
Camera
• Camera
Your phone helps you capture the memories you want to keep forever.
Press the camera button to turn on the camera.
1
2
3
4
5
Select a lens.
1
Before using this function, download the desired lenses from
Store.
2
Turn the flash on or off.
3
Toggle between the front and rear cameras.
4
Toggle between photo and video capture modes.
5
Display more options.
43
Camera
- Taking a photo
1. Press the camera button to turn on the camera.
2. Frame the image you wish to capture. Press the camera button halfway to
focus.
3. Press the camera button all the way to take a photo.
- Shooting a video
1. Open the camera and tap
to switch to video capture mode.
2. Tap the screen to start recording.
3. Tap the screen again to stop recording.
44
Photos hub
• Photos hub
The Photos hub lets you view all images saved in your phone's memory,
microSD card, and SNS accounts.
In the application list, tap
to enter the Photos hub.
- Viewing photos
Your phone automatically categorizes your photos to let you find them
quickly.
Viewing photos from the web will generate data traffic. If you are going
to use a mobile network, contact your service provider to choose an
appropriate data plan.
In the Photos hub, tap the desired photos to view them.
Pinch two fingers together to zoom out or stretch them apart to zoom in.
45
Photos hub
- Marking a photo as your favorite
Would you like to quickly and easily find photos of your family and friends?
Mark them as your favorites.
1. In the Photos hub, select the desired photo.
2. Drag
up. On the displayed screen, tap add to favorites.
To view your favorite photos, open the Photos hub and flick left or right to go
to favorites.
- Sharing photos and videos
Some photos and videos are so exciting that you just can't wait to share
them! Use your phone to send them to your friends and family via MMS or
email, or even post them to SNSs.
1. Open the Photos hub and tap the photo you wish to share.
2. Drag
up. On the displayed screen, tap share....
3. Select a sharing method.
4. Follow the onscreen instructions to share the photo.
The onscreen instructions vary depending on the sharing method you
select.
- Changing the Photos hub background
You can set any photo as the Photos hub background or let your phone
shuffle through photos.
Open the Photos hub and drag
up. On the displayed screen, you can:
• Tap choose background, select the desired photo, and tap
.
• Tap shuffle background to have your phoneshuffle through photos in
your albums.
46
Entertainment
• Entertainment
- Listening to music
In the mood for music? Your phone makes listening to music a walk in the
park.
1. In the application list, tap
.
2. Tap music.
3. Find the song you wish to listen to and tap
1
2
.
3
4
5
6
1
Tap to replay or switch to the previous song. Tap and hold
to rewind.
2
Tap
3
Tap to switch to the next song. Tap and hold
forward.
4
Tap
to rate a song.
5
Tap
to shuffle.
to pause the playback.
47
to fast-
Entertainment
6
Tap
to replay the current song.
On the playback screen, you can simply flick left to switch to the
previous song or flick right to switch to the next song.
- Watching videos
Your phone can work as a portable video player so you can watch
downloaded or streaming videos wherever you want.
1. In the application list, tap
.
2. Tap videos.
3. Find the video you want and tap
1
.
2
3
4
1
Tap
to rewind.
2
Tap
to pause the playback.
3
Tap
to fast-forward.
4
Tap
to play the video in full-screen mode.
48
Navigation
• Navigation
Who needs a guide when your phone can navigate for you?
- Turning on GPS
When GPS is turned on, your current location is available on other
applications, such as Maps.
The accuracy of your position is influenced by factors such as the weather
and environment.
1. In the application list, tap
2. Switch GPS to On
> location.
.
- Browsing the map
Maps help you find the address you are looking for, show you how to get to
a destination, and display real-time traffic. You can also switch to an aerial
view.
In the application list, tap
to open Maps. You can:
• Pinch two fingers together to zoom out or stretch them apart to zoom in.
• Drag
up. On the displayed screen, tap search, aerial view off, or
favorite places. Then follow the onscreen instructions to complete the
operation.
49
Calendar
• Calendar
Always forgetting birthdays and other important events? Problem solved!
Your phone's calendar is a personal assistant that helps you keep track of
all your important dates. You will never miss another anniversary, meeting,
or appointment again.
- Viewing the calendar
In the application list, tap
appointments for the day.
. Flick left or right to go to day to view your
Flick up and down to view more.
Tap to view your appointments for the entire month. Flick up to view your
appointments in the previous month and flick down to view the appointments
for the next month.
- Viewing your agenda
In the application list, tap
. Flick left or right to go to agenda.
Flick up and down to browse your appointments.
- Adding an appointment
Add appointments to your phone and set reminders for them. You don't need
to worry about forgetting important appointments any more.
1. In the application list, tap
>
.
2. Configure the required settings.
3. If you have signed in to multiple accounts, select the account to which you
wish to save this appointment.
4. Tap more details to set a reminder and add attendees.
5. When done, tap
.
50
Calendar
- Adding a to-do task
Adding to-do tasks to your phone and setting their priorities help you better
manage your day.
1. In the application list, tap
. Then flick left or right to go to to-do.
2. Configure the required settings.
3. If you have signed in to multiple accounts, select the account to which you
wish to save this to-do task.
4. When done, tap
.
• To sort the to-do tasks by priority, drag
the displayed screen.
up. Then tap sort by priority on
• To mark a task as completed, tap the task and
disappears from the to-do list.
51
. The task then
Alarms
• Alarms
- Adding an alarm
Set alarms on your phone, and you'll never have to worry about being late
again.
1. In the application list, tap
2. Tap
.
.
3. Follow the onscreen instructions to set the alarm time, sound, how often it
repeats, and more.
4. When done, tap
.
- Turning on and off an alarm
On the alarm screen, flick the switch next to an alarm left to turn it on or right
to turn it off.
- Deleting an alarm
Tap the alarm and then
.
52
Office
• Office
Your phone is equipped with Microsoft Office, which lets you work even
when you are away from the office. Create and edit Excel workbooks, Word
documents, PowerPoint presentations, OneNote notes, and more.
- Creating and editing a Word document
1. In the application list, tap
.
2. Flick left or right to go to recent.
3. Tap
> Word to create a blank Word document.
4. Write your text.
• Tap
to view the document outline.
• Tap
to add a comment.
• Tap
to search the document.
• Tap
to change the text format and color.
5. When done, drag
up. On the displayed screen, tap save.
6. Follow the onscreen instructions to enter the name and save path of the
document. Then tap save.
- Creating and editing an Excel workbook
1. In the application list, tap
.
2. Flick left or right to go to recent.
3. Tap
> Excel to create a blank Excel workbook.
4. Edit the file.
• Tap
to move on to another worksheet.
• Tap
to use a function.
• Tap
to search the workbook.
• Tap
to sort the cells.
53
Office
5. When done, drag
up. On the displayed screen, tap save.
6. Follow the onscreen instructions to enter the name and save path of the
workbook. Then tap save.
- Viewing and editing a PowerPoint
presentation
1. In the application list, tap
.
2. Flick left or right to go to recent and tap the desired PowerPoint file.
3. Rotate your phone to view the PowerPoint file in landscape view. Flick left
and right to switch between slides.
4. Tap
to edit the file.
5. When done, drag
up. On the displayed screen, tap save.
- Saving a file to Windows Live SkyDrive
You can save files on your phone to Windows Live SkyDrive and then share
them. You can also access files on Windows Live SkyDrive from your
computer.
To use Window Live SkyDrive, sign in to your Microsoft account on your
phone.
1. In the application list, tap
.
2. Flick left or right to go to places.
3. Tap phone.
4. Tap and hold a file and tap save to... > SkyDrive.
54
Applications
• Applications
Want to discover a rich collection of applications and try out the hottest
games? Well then go ahead to see how to enrich your phone!
- Downloading applications
You can download applications to your phone in either of the following ways:
• Download applications from the Store.
• Connect your phone to a computer and copy downloaded applications
from the computer.
- Installing applications from the Store
Your phone is preinstalled with the Store, which offers a wide variety of
applications for you to download and install. Some applications are free of
charge while others are not.
Using your phone to download applications over your mobile data
connection may result in high data traffic. We suggest you use a WLAN
instead.
1. In the application list, tap
.
2. Flick left and right to switch between application categories.
3. Tap the desired application to view its details. Flick left and right to view
user comments and other information.
4. Tap install to install the application.
- Uninstalling applications
You can only uninstall third-party applications.
1. In the application list, tap and hold the application you wish to uninstall.
2. From the displayed option menu, tap uninstall.
3. Follow the onscreen instructions to complete the operation.
55
Phone settings
• Phone settings
- Traffic manager
Set a limit for your phone's data traffic to keep your data fees under control.
1. In the application list, tap
2. Tap
.
> set limit.
3. Set a data limit and other details and tap
.
Flick left or right to go to usage to view the data traffic of each application.
- Setting the time zone and language
Are you on an international business trip? Adjust your phone's time zone
settings to keep track of time. You can also change your phone's language.
1. In the application list, tap
> language + region.
2. Follow the onscreen instructions to set the time zone, language, region,
and more.
3. When done, tap restart phone.
The language and time zone changes take effect when your phone
restarts.
- Checking your phone storage
In the application list, tap
> phone storage to view details about your
phone memory and microSD card storage.
If your phone is configured with a microSD card, you can change the save
location of photos, music, and videos.
- Backup
Back up your applications, messages, photos, and videos in your phone to
a cloud server so they'll always be handy.
56
Phone settings
Your data will be backed up to the Microsoft cloud server. To use this
function, sign in to your Microsoft account on your phone.
1. In the application list, tap
> backup.
2. Select the data you wish to back up, for example, text messages, app list
+ settings, and photos.
3. Follow the onscreen instructions to back up the selected data.
- Phone finder
If your phone gets lost or stolen, you can use the phone finder function to
find the phone, lock it, or erase data from it.
To use this function, you must sign in to your Microsoft account on your
phone before your phone is lost. Then, follow these steps: In the
application list, tap
> find my phone. Read the onscreen
instructions and perform the required settings.
1. From a computer or other Internet-capable devices, log in to http://
www.windowsphone.com with your Microsoft account.
2. On the displayed web page, send a message to your phone, lock it, or
erase your data from it.
57
FAQs
• FAQs
How can I forward a text message?
1. In the application list, tap
.
2. Flick left or right to go to threads.
3. Tap the thread that contains the text message you wish to forward.
4. Tap and hold the text message you wish to forward.
5. Tap forward on the displayed option menu.
Can I disable the auto-rotate screen function?
Unfortunately, no.
Will my alarms still sound if I power off my phone?
No.
How can I hide the onscreen keyboard?
Tap
.
How can I reduce my mobile data traffic?
• When you are not accessing the Internet, turn off your mobile data
connection as follows:
Tap
> cellular. Then set data connection to off.
• When a WLAN is available, connect to the WLAN to access the Internet.
• Set your email accounts to refresh less often.
On the mailbox screen, drag up. On the displayed screen, tap settings
> sync settings and set the refresh frequency to a smaller value.
How can I format a microSD card?
1. In the application list, tap
> phone storage.
2. Tap SD card > format SD card.
How can I adjust the date and time?
1. In the application list, tap
> date + time.
2. Switch automatic adjustment to off
.
3. Tap the Date box to set the date and the Time box to set the time.
58
FAQs
How can I save my photos and videos to a different location?
1. In the application list, tap
> phone storage.
2. Follow the onscreen instructions to specify whether your photos, videos,
and songs are saved to your phone memory or microSD card.
What can I do if I forget the screen unlock pattern or password?
Please contact Huawei customer service personnel for help.
59
For more help
• For more help
Please visit www.huaweidevice.com/worldwide/support/hotline for recently
updated hotlines and email address for your country or region.
60
Personal information and data security
• Personal information and
data security
The use of some functions or third-party applications on your device could
result in your personal information and data being lost or becoming
accessible to others. Several measures are recommended to help you
protect personal and confidential information.
• Place your device in a safe area to prevent it from unauthorized use.
• Set your device screen to lock and create a password or unlock pattern to
open it.
• Periodically back up personal information kept on your SIM/UIM card,
memory card, or stored in your device memory. If you change to a different
device, be sure to move or delete any personal information on your old
device.
• If you are worried about viruses when you receive messages or emails
from a stranger, you can delete them without opening them.
• If you use your device to browse the Internet, avoid websites that might
pose a security risk to avoid theft of your personal information.
• Install or upgrade device security software and regularly scan for viruses.
• Be sure to obtain third-party applications from a legitimate source.
Downloaded third-party applications should be scanned for viruses.
• Install security software or patches released by Huawei or third-party
application providers.
• Some applications require and transmit location information. As a result, a
third-party may be able to share your location information.
• Your device may provide detection and diagnostic information to thirdparty application providers. Third party vendors use this information to
improve their products and services.
• If you have concerns about the security of your personal information and
data, please contact [email protected].
61
Legal Notice
• Legal Notice
Copyright © Huawei Technologies Co., Ltd. 2013. All rights reserved.
No part of this manual may be reproduced or transmitted in any form or by
any means without prior written consent of Huawei Technologies Co., Ltd.
and its affiliates ("Huawei").
The product described in this manual may include copyrighted software of
Huawei and possible licensors. Customers shall not in any manner
reproduce, distribute, modify, decompile, disassemble, decrypt, extract,
reverse engineer, lease, assign, or sublicense the said software, unless
such restrictions are prohibited by applicable laws or such actions are
approved by respective copyright holders.
Trademarks and Permissions
,
, and
are trademarks or registered
trademarks of Huawei Technologies Co., Ltd.
The Bluetooth® word mark and logos are registered trademarks owned by
Bluetooth SIG, Inc. and any use of such marks by Huawei Technologies Co.,
Ltd. is under license.
Microsoft, Windows, and
group of companies.
are trademarks of the Microsoft
Other trademarks, product, service and company names mentioned may be
the property of their respective owners.
Notice
Some features of the product and its accessories described herein rely on
the software installed, capacities and settings of local network, and therefore
may not be activated or may be limited by local network operators or network
service providers.
Thus, the descriptions herein may not exactly match the product or its
accessories which you purchase.
Huawei reserves the right to change or modify any information or
specifications contained in this manual without prior notice and without any
liability.
62
Legal Notice
Third-Party Software Statement
Huawei does not own the intellectual property of the third-party software and
applications that are delivered with this product. Therefore, Huawei will not
provide any warranty of any kind for third party software and applications.
Neither will Huawei provide support to customers who use third-party
software and applications, nor be responsible or liable for the functions or
performance of third-party software and applications.
Third-party software and applications services may be interrupted or
terminated at any time, and Huawei does not guarantee the availability of
any content or service. Third-party service providers provide content and
services through network or transmission tools outside of the control of
Huawei. To the greatest extent permitted by applicable law, it is explicitly
stated that Huawei shall not compensate or be liable for services provided by
third-party service providers, or the interruption or termination of third-party
contents or services.
Huawei shall not be responsible for the legality, quality, or any other aspects
of any software installed on this product, or for any uploaded or downloaded
third-party works in any form, including but not limited to texts, images,
videos, or software etc. Customers shall bear the risk for any and all effects,
including incompatibility between the software and this product, which result
from installing software or uploading or downloading the third-party works.
DISCLAIMER
ALL CONTENTS OF THIS MANUAL ARE PROVIDED “AS IS”. EXCEPT AS
REQUIRED BY APPLICABLE LAWS, NO WARRANTIES OF ANY KIND,
EITHER EXPRESS OR IMPLIED, INCLUDING BUT NOT LIMITED TO,
THE IMPLIED WARRANTIES OF MERCHANTABILITY AND FITNESS
FOR A PARTICULAR PURPOSE, ARE MADE IN RELATION TO THE
ACCURACY, RELIABILITY OR CONTENTS OF THIS MANUAL.
TO THE MAXIMUM EXTENT PERMITTED BY APPLICABLE LAW, IN NO
EVENT SHALL HUAWEI BE LIABLE FOR ANY SPECIAL, INCIDENTAL,
INDIRECT, OR CONSEQUENTIAL DAMAGES, OR LOSS OF PROFITS,
BUSINESS, REVENUE, DATA, GOODWILL SAVINGS OR ANTICIPATED
SAVINGS REGARDLESS OF WHETHER SUCH LOSSES ARE
FORSEEABLE OR NOT.
THE MAXIMUM LIABILITY (THIS LIMITATION SHALL NOT APPLY TO
LIABILITY FOR PERSONAL INJURY TO THE EXTENT APPLICABLE LAW
PROHIBITS SUCH A LIMITATION) OF HUAWEI ARISING FROM THE USE
63
Legal Notice
OF THE PRODUCT DESCRIBED IN THIS MANUAL SHALL BE LIMITED
TO THE AMOUNT PAID BY CUSTOMERS FOR THE PURCHASE OF THIS
PRODUCT.
Import and Export Regulations
Customers shall comply with all applicable export or import laws and
regulations and be responsible to obtain all necessary governmental permits
and licenses in order to export, re-export or import the product mentioned in
this manual including the software and technical data therein.
Privacy Policy
Please refer to our privacy policy on our websites for the information about
how we protect your personal information.
64
803004_01