1
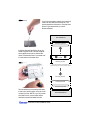
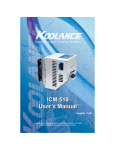
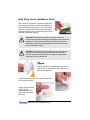
Hard Drive Cooler Installation Guide
Once mixed, the dual-pack of thermal encapsulate
material will serve as the heat transfer pad between
your drive and the cooling plate. It is not electrically
conductive, and the material can be peeled-off after it
has dried (after 60 hours). Hard drives may be used
while the encapsulate is drying.
!
!
CAUTION: Because the encapsulate can only be used once,
Koolance recommends formatting and installing software onto a new
hard drive to verify a drive defect before installing the liquid cooler.
Additional thermal packs are available with “second hard drive kits”
from your Koolance reseller.
CAUTION: The original hard drive manufacturer may not honor the
warranty if residue from the encapsulate material remains after
removal. If you have any questions on warranty coverage, please
contact your drive’s manufacturer.
Fold the dual-pack of encapsulate in half, and cut
a corner across, so that both compounds can be
squeezed-out together.
Compress the entire pack over a sheet of paper until
the contents are empty.
Using a spoon or mixing
utensil, stir the
encapsulate like paint
until it is one complete
solid color.
Hard Drive Cooler Installation Guide
v 2.00
!
CAUTION: Some hard drives have open spindle motors or other
connections which encapsulate may interfere with. Tape should be
placed over these areas before applying the thermal encapsulate.
Using the mixing utensil, apply the encapsulate to the largest heat-producing components:
the spindle motor and primary circuit chips
on the bottom side of the drive.
Use the included screws to mount the
cooler over the encapsulate on the bottom side of the hard drive. The drive may
be mounted into your case via the cooler
or the drive.
Hard Drive Cooler Installation Guide
v 2.00
If you have a Koolance chassis, the hard drive
cooler can be used with 2 hard drives. The
second hard drive will require a “Second Hard
Drive Kit” (purchased from your local
Koolance dealer).
First Hard Drive
Thermal Encapsulate
Install the Second Hard Drive Kit as you
would a regular Cooler. Thermal encapsulate is applied to the drive, and the thin
metal “Containment Plate” is screwed over
it to the bottom of the hard drive.
Liquid
Cooler
Mounting Screws
Rear view of Hard Drive Cooler Assembly for
first hard drive (above), and second hard drive (below)
Mounting Screws
Containment Plate
Thermal Encapsulate
The second drive is mounted upside-down
to the cooler, held in place via its own sidemounting screws. NOTE: If you do not own
a Koolance case, custom holes will be
needed to use the 2nd Hard Drive Kit.
Hard Drive Cooler Installation Guide
Second Hard Drive
v 2.00