1
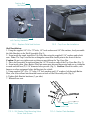
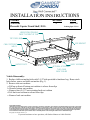
INSTALLATION INSTRUCTIONS
Product
7160-0380
Chevorlet Caprice Trunk Shelf, 2011+
Revision
A
Form
INST-546
Printing Spec: PS-001
ORIENTATION TRIANGLE
POINT TO FRONT OF CAR
TOP CROSS BAR
SIDE BRACKET
CABLE RETRAINT
HOLES
SHELF ASSEMBLY
BACKER PLATE
OPTIONAL ACCESSORY:
7160-0386
SHELF RAILING
Vehicle Disassembly:
1. Replace child seat anchor bolts with 2-1/4" bolts provided in hardware bag. Reuse stock
lock washer, spacer and child seat anchor (Fig. 1).
2. Remove rear seat cushions
a. Pull up on front of bottom seat cushion to release from clips
b. Remove bottom seat cushion
c. Remove four (4) 1/2" nuts retaining back rest cushion
d. Lift back seat cushion to release from clips
e. Remove back seat cushion.
Product Mounting Disclaimer
Gamber-Johnson is not liable under any theory of contract or tort law for any loss, damage, personal injury, special, incidental or consequential damages for personal injury or other damage
of any nature arising directly or indirectly as a result of the improper installation or use of its products in vehicle or any other application. In order to safely install and use Gamber-Johnson
products full consideration of vehicle occupants, vehicle systems (i.e., the location of fuel lines, brakes lines, electrical, drive train or other systems), air-bags and other safety equipment is
required. Gamber-Johnson specifically disclaims any responsibility for the improper use or installation of its products not consistent with the original vehicle manufactures specifications
and recommendations, Gamber-Johnson product instruction sheets, or workmanship standards as endorsed through the Gamber-Johnson Certified Installer Program.
© copyright 2011 Gamber-Johnson, LLC
If you need assistance or have questions, call Gamber-Johnson at 1-800-456-6868
Factory Bolt
Not Used
Provided Bolt
with Factory Hardware
FIG. 1 - Replace Child Seat Anchors
FIG. 2 - Top Cross Bar Installation
Shelf Installation:
1. Using the supplied 1/4"-20 x.75" bolts, 1/4" lock washers and 1/4" flat washers, loosly assemble
the Side Brackets to the Shelf Assembly (Fig 5).
2. From inside the trunk, install the Top Cross Bar using the supplied 5/16" washers and nylock
nuts. Note: The Top Cross Bar has a traingular cutout that should point to the front of the car.
Caution: Do not over tighten nuts as doing so may deform the Top Cross Bar.
3. Place shelf assembly in truck and hang on 1/4"-20 studs on ends of the Top Cross Bar (Fig. 2).
4. From inside cabin, place Backer Plate into outer most obround depression and use as a template
to mark and drill two (2) 5/16" diameter holes per side (Fig 3). Caution: Check for cables, wire
harness or other equipment before drilling into the vehicle
5. Using supplied 1/4"-20 x .75" bolts, 1/4" lock washers and 1/4" washers, bolt through Backer
Plate, rear seat wall and into threaded inserts on back of Shelf Assembly rails (Fig 4).
6. Tighten Side Bracket hardware (3 per side).
7. Reinstall rear seat.
Inside Trunk
Inside Cab
FIG. 3 - Drill Backer Plate Mounting Holes
Driver Side Shown
FIG. 4 - Backer Plate Hardware
5/16-2.25" BOLT
INSTALL THROUGH
CHILD SEAT ANCHORS
BODY HARDWARE NOT SHOWN:
CHILD SEAT ANCHOR
LOCK WASHER
BUSHING
NOTE TRIANGLE
DIRECTION
FIG. 5 - Mounting Hardware
Operation:
1. To open the shelf, press the lock button on the front of the shelf and pull shelf towards rear
of vehicle.
2. Once the shelf is fully extended, magnets will help keep the shelf out when on a slight
incline.
3. To close shelf, press shelf back to retracted position. Caution: Avoid getting fingers under
front lip during closing. The shelf will latch automatically when fully retracted.
4. For additional security, the latch can be locked with the supplied keys.
Caution: To avoid damage to the shelf or items on the shelf, always ensure the shelf is
retracted and latched before driving the vehicle.
Additonal Accessories:
To protect equipment on the shelf and retain any loose items, purchase and install the Shelf
Rail (7160-0386). The Shelf Rail is installed into threaded inserts in the front of the shelf
using hardware supplied with the Shelf Rail.