1
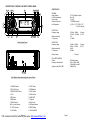
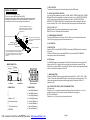
User’s Manual
622UA
IN-DASH SINGLE-DIN MP3-COMPATIBLE
DIGITAL MEDIA AM/FM RECEIVER
WITH USB AND SD MEMORY CARD PORTS
AND FRONT PANEL AUX INPUT
622UA
IN-DASH SINGLE-DIN MP3-COMPATIBLE
DIGITAL MEDIA AM/FM RECEIVER
WITH USB AND SD MEMORY CARD PORTS
AND FRONT PANEL AUX INPUT
0113
BOSS Audio Systems
3451 Lunar Court • Oxnard, CA 93030
iPod® is a trademark of Apple, Inc.
registered in the U.S. and other countries.
tech support: www.bossaudio.com/support
www.bossaudio.com
800.999.1236
Boss Audio Systems is not affiliated with Apple, Inc.
DESCRIPTION OF CONTROLS ON FRONT CONTROL PANEL
3
8
MP3 PLAYBACK
1
SPECIFICATION
10 11 12 17
4
9 2
GENERAL
Supply Voltage
Current Consumption
Power Output
Number of channels
Unit Dimensions
622UA
RPT
U SB
6
DC 12V. Negative Ground
Max.10A
4 x 50 W
2 STEREO channels.
(L X W X H): 7” X 3.85” X 1.97”
178 X 98 X 50 (mm)
13
FM SECTION
Frequency range
7
5
18
19 14 15
16
Effective sensitivity
I.F Frequency
AM SECTION
Frequency range
Front Control Panel
Effective sensitivity
I.F Frequency
Preamp Output
21
Front Cabinet after removing Front Control Panel
Page 1
12. 3/RPT button
13. 4/RDM button
14. 5 DIR- button
15. 6 DIR+ button
16. USB PORT
17. Card slot
18. AUX IN jack
19. IR Remote Sensor
20. RESET button
21. FLASHING LED
PDF created with FinePrint pdfFactory trial version http://www.pdffactory.com
522Khz - 1620Khz
530khz - 1710Khz
40dB.
450KHz
(Europe)
(U.S.A.)
MP3 audio system.
20Hz -100Hz <=5dB
10KHz-20KHz <=5dB.
50dB [1KHz] .
Signal to noise (SD & USB)
1. RELEASE button
2. SEL & VOL knob
3. POWER & MUTE button
4. LCD
5. SRC button
6. DISP button
7. BND/AP button
8&9. |<< And>>| buttons
10. 1/TOP/>|| button
11. 2/INT button
(Europe)
(U.S.A.)
1 V Output
SD or USB PLAYBACK
System
Frequency characteristics
20
87.5Mhz - 108Mhz
87.5 Mhz - 107.9Mhz
3uV.
10.7MHz.
Page 6
1.- REL BUTTON
To remove the front panel from the main body, press the REL button.
INSTALLATION METHOD
This is an anti-theft installation method.
The main unit wears a METAL MOUNTING SLEEVE.
Please connect the wiring, eg, the Power Supply, the Speakers and the Antenna
according to the requirements of this Instruction Manual, then install the metal
mounting sleeve into the car as per the diagram illustrated below.
To boost up the capability of anti-jamming,
please make sure fix tightly the metal support
strap into the metal joint that connect to the
chassis of the car.
UN IT CHASSIS
METAL SU PPORT STRAP
DASHBOARD
METAL MOUNTING SLEEVE
Bend the tabs on the metal mounting
Sleeve against the DASHBOARD with
a screwdriver
FRONT PANEL
FIXED FACEPLATE
PLASTIC TRIM RING
To remove the unit out of the metal mounting sleeve,
insert the two supplied KEYS into the left and right side
slots of the chassis at the same time. Then pull the chassis
out of the metal mounting sleeve as shown in the right
illustration.
RED
BEEP ON/BEEP OFF
BEEP ON mode: The beep is generated when any key is pressed.
BEEP OFF mode: The beep sound is disabled.
3. -POWER ON/OFF AND MUTE
Press the POWER to turn on this unit. To turn off the unit, press and hold this button
unit it off. During playing, press this to mute the sound.
4.LCD DISPLAY
5.SRC BUTTON
Press the SRC to select RADIO/CARD(SD card inserted)/USB(flash driver inserted)/
AUX mode.
IN SD, and USB mode, press and hold SRC button to activate TRACK SEARCH
and play the select track automatically.
6 . DISP button
In USB/CARD mode, during playback, the ID3 tag information of the current track will
display on the LCD. As long as the current playing music contains relevant ID3 tag
information. Press the DISP to cancel the ID3 function, then the corresponding number
of the current track will display on the LCD.
WIRES CONNECTION
WHITE
2. - SEL & VOL CONTROL BUTTON
A) Press the SEL repeatedly to select VOLUME - BASS - TREBLE - BALANCE - FADER.
B)Press SEL button and hold for more than 2 seconds to turn on EQ OFF(POP/ROCK/
CLAS), then long press SEL button repeatedly to select , LOUD OFF/LOUD ON,
BEEP OFF/ON, AREA(USA/EUR) in radio mode) mode. After selecting the desired
mode, rotate the VOL- or VOL+ button to select one setup item of the desired mode.
RCA OUTPUT
RCA OUTPUT
ISO SOCKET
CONNECTOR A
1.
2.
3.
4. Memory +12V
5. Auto Antenna Output
6.
7. 12V (To Ignition Key)
8. GROUND
ANTENNA JACK
ISO SOCKET SKETCH
CONNECTOR B
1. Rear Right Speaker (+)
2. Rear Right Speaker (-)
3. Front Right Speaker (+)
4. Front Right Speaker (-)
5. Front Left Speaker (+)
6. Front Left Speaker (-)
7. Rear Left Speaker (+)
8. Rear Left Speaker (-)
Page 5
PDF created with FinePrint pdfFactory
trial version http://www.pdffactory.com
7. - BND/AP BUTTON
A)Press the BND / AP button to select radio band as follow:FM1 -> FM2 -> FM3 -> AM1
-> AM 2. Press and hold the BND / AP button to activate the auto storage function. The
unit scans and preset the stations with strongest signal.(18stations in FM or 12
stations in AM )
8&9. -TUNE, SEEK, TRACK, SKIP UP/DOWN BUTTONS
A) Radio mode
Press the>>I or I<< to perform manual seek tuning. Press and hold the >>I or I<< to
perform auto tuning. The unit will tune to the station with strong signal.
B) SD, and USB mode
Press the >>I or I<< to play the next or previous track.
Page 2
10-15. - PRESET STATIONS MEMORY AND >II, INT, RPT, RDM BUTTONS
A)Radio mode
Press the 1-6 buttons to select the preset stations. Press and hold the 1-6 buttons to
store the station that currently listening.
B) SD, and USB mode
Press the >II to pause or resume playing. Press the INT to play the first 10 seconds of
the tracks. Press again to off this function and the current track will keep playing.
Press the RPT once to repeat plays the current track. Press the RPT twice to repeat
plays the current folder. Press the RPT thrice to repeat plays all tracks.
Press the RDM to turn random play on or off. Press the 5/6 to play the next or previous
folder.
16. - USB PORT
When USB storage devi ce is connected, the unit is automatically switched to USB mode.
17. - SD CARD SLOT
When SD card is inserted, the unit is automatically switched to SD mode.
(Note: if both USB storage device and SD card inserted, the system will switch to
the mode of USB.)
18. - AUX INPUT JACK (3.5MM STEREO JACK)
Press the SRC to select auxiliary input playing mode when connecting with external
audio device.
OPERATION OF REMOTE CONTROL
12
5
1. Power On/Off
1
2. Mute Button
2
3. Loudness Button
This function enhances the bass sound effect
given the low volume level. Press the LOUD to
turn on/off the loudness function.
4
MUTE
8
9
4. SEL/MENU Button
14
10
11
SELECT
6
D SP
A.P.
-
ST
7
MODE
BAND
LOC
LOUD
3
INT
RP T
2
3
5
6
15
17
5&6. VOL UP/DOWN Button
7. MO/ST Button
Press t he MO/ST to select stereo or mono sound
mode under FM radio reception.
16
19
TOP /
1
RD M
4
SCN
13
18
21
20
8. A.P Button
Press t he A.P button to preview the current preset
stations.(18stations in FM ) Press and hold the A.P
button to activate the auto storage function. The unit
scans and preset the stations with strongest signal. (18st ations in FM )
9. Band Button
19.- IR Remote Sensor
20.- RESET BUTTON
The unit must be reset under the following conditions:
A) Prior to using this unit for the first time after installation.
B) If the unit fails to operate properly, press the RESET with a pen tip or other pointed
instrument.
21.- FLASHING LED
10. Mode But ton
11. Tune/Seek Up And Track Skip Up/FF Butt on
12. Tune/Seek Down And Track Skip D own/REW Button
13. SCAN BUTTON
Press t he SCN button to scan the radio frequency. If a val id signal has detected, the current frequency will be
hold and blinking for 5 sec onds, then press SCN again to stop scan and remain the current frequency; other
wise, the radio will go on t o scan the other radio frequency 5 sec onds later.
14. DSP button
In USB/CARD mode, during playback, the ID3 tag information of the current track will
display on the LCD. As long as the current playing music contains relevant ID3 tag
information. Press the DSP to cancel t he ID3 function, then the corresponding number
of the current track will dis play on the LCD.
15. LOC/DX Button
Local seeking tuning lets you tune in only those radio station with sufficiently strong signals for good receptions.
Press LOC to select the local (LO) or distance (DX) mode on radio reception. (Note: this function only works on
FM reception)
16. Track TOP/>||/Radio Preset 1
17. Track INT/Radio Preset 2
18. Track RPT/Radio Pres et 3
19. Track RDM/Radio Preset 4
20. Radio Preset 5 and USB/CARD DIR21. Radio Preset 6 and USB/CARD DIR+
Page 3
PDF created with FinePrint pdfFactory
trial version http://www.pdffactory.com
Page 4